
Use the Sundiag diagnostic program to exercise your system and verify the
functionality of the DSBE/S SBus card. Sundiag is a system exerciser that runs
diagnostic tests on Sun hardware. Sundiag verifies the configuration,
functionality and reliability of most Sun hardware controllers and devices.
The Sundiag TTY interface makes it possible to run Sundiag from a terminal
that is attached to a serial port, or from a modem. For detailed instructions on
using Sundiag, see the Sundiag User's Guide that was shipped with your
operating system documentation.
The DSBE/S SBus card can be tested with Sundiag on any system that is
running Solaris 1.1 Rev. A or later, or other compatible operating system. The
operating system kernel must be configured to support all of the peripherals
that are to be tested.
The amount of swap space required varies with the type and amount of
hardware being tested. Sundiag requires a minimum of 8 MBytes of swap
space. Frame buffer tests require additional swap space and the virtual
memory test requires special swap space considerations. See the Sundiag
User's Guide for the swap requirements.
To fully exercise the DSBE/S SBus card, run all four of these tests. See the
section that follows for detailed instructions on starting and stopping the tests.
(This assumes that the devices are configured. See Appendix B.)
Note -
The device ID number [(sr#), (sd#), (st#)] can be checked to determine
whether devices are connected to the on-board SCSI or to the DSBE/S card.
The kernel configuration file contains the assignment of which devices are on
which SCSI bus. (Refer to the operating system documentation for your
system. For example: Installing System Software, Solaris 1.1 SMCC Version A,
Solaris 1.1 SMCC Version A Release Manual, or Solaris 2.0 System Configuration
and Installation manuals. Also refer to Appendix F for device addressing in
Solaris 2.x.).
Note -
Kernel boot messages, which also display device ID information that
can be used to determine if a device is connected to the on-board SCSI or to the
DSBE/S card, are located in the administration directory message file on the
system (for example: in the var/adm directory). A user can refer to this file to
determine whether the device being tested is on the intended bus.
Note -
Appendix E of this manual contains Table E-1. Table E-1 lists the ID
numbers assigned (by default) to devices connected to the on-board SCSI, first
DSBE/S card, second DSBE/S card, etc. Keep in mind the ID numbers
contained in Table E-1 are the default numbers, and can be changed.
1.
nettest. Use this test to check the Ethernet hardware on the system and the
Ethernet controllers.
-
To start the nettest, click on CPU DEVICES. Then, click on ETHERNET to
display the pop-up option menu. Make sure that you select ETHERNET
only. If other items on the menu are selected, point the mouse on the check
mark in the box to deselect the item. After you make a selection from the
control panel, click on Option to display the pop-up option menu. Select the
test options from the option menu.
2.
tapetest. Install a scratch tape before you start this test. When you select this
test it rewinds the tape, erases it, writes a pattern to a specified number of
blocks, and writes to the end of the tape. Then, it rewinds the tape and reads
and compares the information that it has just written.
-
To start the tapetest, click on TAPE DEVICES. Then, click on the OPTION
button for the tape device that is connected to the DSBE/S SBus card. A
pop-up option menu is displayed. Select the test options that you want to
use from the option menu.
3.
rawtest and fstest. Use the rawtest to perform read-only and write-only tests
on local disks. Use the fstest to exercise the DSBE/S DMA disk drive.
-
To start these tests, click on DISK DEVICES. Then, click on the Option
button and make your test selections. Now, click on the name of the disk
drive that is attached to the DSBE/S SBus card. Click on Option. When the
pop-up option menu is displayed, select your test option.
4.
cdtest. Use the Sun CD-Demo disk that is shipped with the CD-ROM to run
this test.The cdtest checks the CD table of contents and when the proper CD
is specified, it verifies that the table of contents matches it own TOC table.
cdtest classifies each track as Mode 1 or Mode 2. Mode 1 uses error detection
and correction code (288 bytes) and mode 2 uses the space for auxiliary data
or as an audio track.
-
To start the cdtest, click on DISK DEVICES. Then, select CD-ROM. Click on
the OPTION button to display the pop-up option menu and select your test
options.
To run Sundiag, refer to the Sundiag manual that was shipped with your
operating system documentation.
Note -
The examples in this section show Sundiag running in the OPEN LOOK
environment. Sundiag run in the Sunview environment will look different.
After you enter the sundiag command, the Sundiag window is displayed on
your screen. This window is the primary interface for running Sundiag. Refer
to Figure 3-1.
The Sundiag window is divided into four small windows:
-
The system status window at the upper-left of the screen displays the status
of the tests.
-
The performance monitor panel in the upper-middle of the screen displays
the performance statistics for the system that is under test.
-
The control panel is located at the right. The panel includes buttons, cycle
items, and pop-up menus that allow you to select test parameters and
options.
-
The console window at the bottom-left displays operating system messages
and test messages, and allows you, as a superuser, to use operating system
commands.
.

Figure 3-1
Sundiag Window
1. Review the information shown in the control panel window. The
information in the control panel identifies the devices that are available
for testing. Refer to Figure 3-2.
2. Click on the device that you want to test, for example DISK DEVICES.
Your selection is confirmed with the display of a check mark in the box
next to the device name.
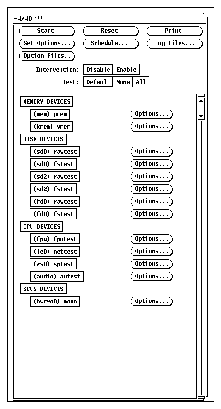
Figure 3-2
Sundiag Control Panel
3. Click on the OPTION button, opposite the device name, to display a
pop-up option menu. Refer to Figure 3-3.
4. Use the mouse to select your test options. A check mark identifies that the
item is selected.

Figure 3-3
Pop-Up Option Menu
5. If you want to use the settings that are displayed on the pop-up menu,
click the mouse on the Default button. Then, click on the Start button on
the control panel to start the test.
6. If you want to change the settings that are displayed, point the mouse at
the setting. Then, press the left mouse button and cycle the settings until
the setting you require is displayed. Click on the Done button. Then, click
on the Start button on the control panel.
7. Watch the console window for messages.
8. To interrupt a test, or to stop after a test is completed, click the mouse on
the Stop button.
If no problems are identified during the testing, the DSBE/S SBus card is ready
for operation in your system. Click the mouse on the Quit button to exit
Sundiag.
