
This chapter gives the procedures for connecting the power cord to the SCSI Expansion Pedestal and connecting the pedestal to a SPARCserver 630MP.
Follow these steps to prepare the system for cabling:
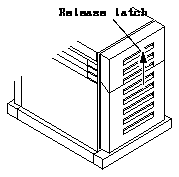
Figure 5-1 Release Latch Location

The DC power switch is located behind the front panel (see Figure 5-2).

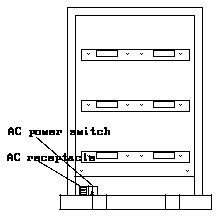
The AC power switch is located at the rear of the pedestal next to the power receptacle (see Figure 5-3).
Note - Systems shipped inside the US and Canada have an AC power cord with a three-slot female plug at one end and a three-pronged male plug at the other end. Systems shipped outside of the continental US may have different power cords shipped in a separate kit. See the instructions provided with the kit for details.
The power cord provides a ground path which will keep the drives and boards installed in your unit from being damaged from static electricity.


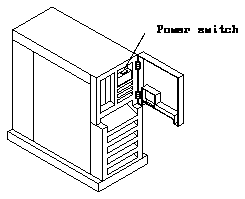
The SPARCserver 630MP power switch is located inside the front door of the pedestal (see Figure 5-4).
If the SPARCserver 630MP is on, use the SPARCsystem 630MP Installation Manual (P/N 800-5937-xx) to power down the unit before proceeding with this section.
If the power cord for your SPARCserver 630MP is not plugged into a grounded wall outlet, plug the female end of the power cord into the AC power receptacle at the rear of the pedestal.
Plug the other end of the power cord into a grounded wall outlet. The power cord provides a ground path which will keep the drives and boards installed in your unit from being damaged due to static electricity.
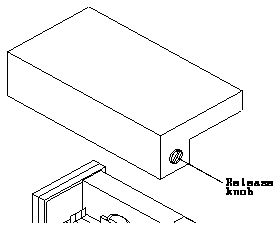
Figure 5-5 Top Cover Release Knob

Before you can connect your SCSI Expansion Pedestal to your SPARCserver 630MP, you must first determine which trays inside your SCSI Expansion Pedestal contain SCSI devices, since these are the only trays you will have to connect to your SPARCserver 630MP. You can determine which trays contain SCSI devices by the pedestal configuration you ordered from Sun Microsystems (see Table 5-1).
For example, if you ordered the marketing numbers X762AR6 and X763AR6, the bottom and middle SCSI trays contain SCSI devices for your configuration.
--------------------------------------------------------------------------------------------------------------------------------------------------------------------------------------------------------------------------------------------------


Option                                             Part Number                                                                                                                                                 Top Tray  Middle Tray      Bottom Tray
--------------------------------------------------------------------------------------------------------------------------------------------------------------------------------------------------------------------------------------------------
SunCD                                              X559LR6                                                                                                                                                     3

Single 1.3 Gbyte SCSI Disk                         X572AR6                                                                                                                                                               3            or  3

Single 2.1 Gbyte Differential SCSI Disk            X575AR6                                                                                                                                                               3            or  3

Pedestal w/Two 1.3 Gbyte SCSI Disks                X750A or X750AR6                                                                                                                                                                       3

Two 1.3 Gbyte SCSI Disks w/Tray                    X756AR6                                                                                                                                                               3

Pedestal w/5.0 Gbyte Tape, Four 1.3 Gbyte SCSI     X758A                                                                                                                                                       3         3                3
Disks w/Two Trays

Pedestal w/Two 2.1 Gbyte Differential SCSI Disks   X762A or X762AR6                                                                                                                                                                       3

Two 2.1 Gbyte Differential SCSI Disks w/Tray       X763AR6                                                                                                                                                               3

Pedestal w/5.0 Gbyte Tape, Four 2.1 Gbyte Differ   X764A                                                                                                                                                       3         3                3
ential SCSI Disks w/Two Trays

5.0 Gbyte Tape                                     X812LR6                                                                                                                                                     3

Any pedestal with five or more disk drives          -                                                                                                                                                                    3                3

--------------------------------------------------------------------------------------------------------------------------------------------------------------------------------------------------------------------------------------------------
Once you have determined which trays contain SCSI devices in your pedestal, you must verify that you have the proper number of SCSI host adaptor cards installed in the SBus slots in your SPARCserver 630MP. Examples of SCSI host adaptor cards would be FSBE/S cards for the SunCD, tape drives or 1.3 Gbyte disk drives, and DSBE/S cards for the 2.1 Gbyte disk drive.
The following list shows the total number of SCSI host adaptor cards you must have installed in the SPARCserver 630MP for each tray in your pedestal:
Note - The top tray of the pedestal will be connected to the bottom tray of the pedestal, so a SCSI host adaptor card is not needed for the top tray.
In other words, if you have SCSI devices in the bottom and middle trays of the first SCSI Expansion Pedestal, you should have two SCSI host adaptor cards installed in your SPARCserver 630MP - the first SCSI host adaptor card for the bottom tray, and the second SCSI host adaptor card for the middle tray.
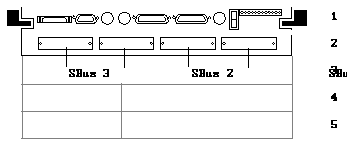
The SCSI host adaptor cards should be installed beginning at SBus slot 0 in your system, so if the SBus 0 slot is free, you would install the first SCSI host adaptor card in SBus slot 0, the second SCSI host adaptor card in SBus slot 1, and so on (likewise, if the SBus slot 1 is the first available SBus slot, you would install the first SCSI host adaptor card in SBus slot 1, the second SCSI host adaptor card in SBus slot 2, and so on). Figure 5-6 shows the location of the SBus slots on the SPARCserver 630MP.
If you do not have the proper number of SCSI host adaptor cards installed in your SPARCserver 630MP, you can order cards through Sun Microsystems. Refer to the manual you receive with the card for installation instructions.
You are now ready to connect the tray(s) to your SPARCserver 630MP. Turn to the appropriate section for the cabling instructions for each tray:
Follow these instructions to connect the bottom tray of your SCSI Expansion Pedestal to a SCSI host adaptor card installed in your SPARCserver 630MP:
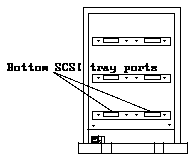
Figure 5-7 shows the location of the ports on the bottom tray in the SCSI Expansion Pedestal. Either port can be used as the "SCSI IN" port, so plug the cable into the port that is most convenient for you.
If the bottom tray contains differential SCSI disk drives (such as the 2.1 Gbyte disk drive), turn the jackscrews on both sides of the connector clockwise to secure the cable to the tray.
If the bottom tray contains differential SCSI disk drives (such as the 2.1 Gbyte disk drive), turn the jackscrews on both sides of the terminator clockwise to secure the terminator to the tray.
Figure 5-8 shows the proper connection if the first SCSI host adaptor card is installed in the SBus 0 slot and the third SCSI host adaptor card is installed in the SBus 2 slot.

Figure 5-8 Connection for the Bottom SCSI Tray
The procedure for connecting the bottom tray of your SCSI Expansion Pedestal to your SPARCserver 630MP is now complete.
Note - Do not connect a separate SCSI device between your pedestal and your SPARCserver 630MP, since this could result in a conflict in SCSI addressing.
If you have SCSI devices in another tray in your SCSI Expansion Pedestal, refer to the appropriate section for the instructions on connecting that tray:
If you have no other trays to connect, refer to Section 5.3, "What's Next."
Follow these instructions to connect the middle tray of your SCSI Expansion Pedestal to a SCSI host adaptor card installed in your SPARCserver 630MP:
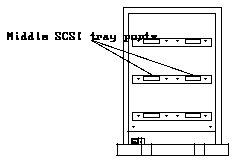
Figure 5-9 shows the location of the ports on the middle tray in the SCSI Expansion Pedestal. Either port can be used as the "SCSI IN" port, so plug the cable into the port that is most convenient for you.
If the middle tray contains differential SCSI disk drives (such as the 2.1 Gbyte disk drive), turn the jackscrews on both sides of the connector clockwise to secure the cable to the tray.
If the middle tray contains differential SCSI disk drives (such as the 2.1 Gbyte disk drive), turn the jackscrews on both sides of the terminator clockwise to secure the terminator to the tray.
Figure 5-10 shows the proper connection if the second SCSI host adaptor card is installed in the SBus 1 slot and the fourth SCSI host adaptor card is installed in the SBus 3 slot.
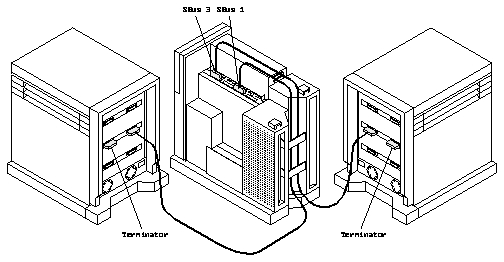
Figure 5-10 Connection for the Middle SCSI Tray
The procedure for connecting the middle tray of your SCSI Expansion Pedestal to your SPARCserver 630MP is now complete.
Note - Do not connect a separate SCSI device between your SCSI Expansion Pedestal and your SPARCserver 630MP, since this could result in a conflict in SCSI addressing.
If you have SCSI devices in another tray in your SCSI Expansion Pedestal, refer to the appropriate section for the instructions on connecting that tray:
If you have no other trays to connect, refer to Section 5.3, "What's Next."
The procedure for connecting the top tray to a SPARCserver 630MP will vary depending on the type of disk drives you have installed in the middle or bottom trays in the SCSI Expansion Pedestal.
Follow these instructions to connect the top tray of your SCSI Expansion Pedestal to your SPARCserver 630MP if you have single-ended SCSI disk drives installed in the middle or bottom trays of the SCSI Expansion Pedestal:
Refer to Table 5-1 for help in determining which disk tray is single-ended SCSI.
Figure 5-11 shows the location of the ports on the top tray in the pedestal.

For the top tray, use the single-ended SCSI terminator (P/N 150-1785).
Figure 5-12 shows the proper connection if the bottom tray is a single-ended SCSI drive tray.
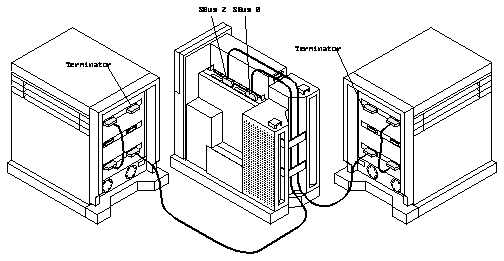
Figure 5-12 Connection for the Top SCSI Tray
The procedure for connecting the top tray of your SCSI Expansion Pedestal to your SPARCserver 630MP is now complete.
Note - Do not connect a separate SCSI device between your SCSI Expansion Pedestal and your SPARCserver 630MP, since this could result in a conflict in SCSI addressing.
If you have SCSI devices in another tray in your SCSI Expansion Pedestal, refer to the appropriate section for the instructions on connecting that tray:
If you have no other trays to connect, refer to Section 5.3, "What's Next."
If you have differential SCSI disk drives installed in both the middle and bottom trays of the SCSI Expansion Pedestal or you have differential SCSI disk drives installed in the bottom tray and no middle tray installed, you can connect the top tray to the SPARCserver 630MP using one of two methods:
--------------------------------------------


SCSI Device                    SCSI Address
--------------------------------------------
First SunCD                    6

Second SunCD                   1

150 Mbyte 1/4-Inch Tape Drive  1

1.3 Gbyte Disk Drive           3

--------------------------------------------
Table 5-3 SCSI Addresses for Devices inside the Top Tray of the SCSI Expansion Pedestal
-----------------------------------------------


SCSI Device                       SCSI Address
-----------------------------------------------
SunCD                             6

First 5.0 Gbyte 8 mm Tape Drive   4

Second 5.0 Gbyte 8 mm Tape Drive  5

-----------------------------------------------
If you find that you have two devices with the same SCSI address, you must plug the top tray of the SCSI Expansion Pedestal into a separate SCSI bus.
Follow these instructions to connect the top tray of your SCSI Expansion Pedestal to your SPARCserver 630MP:
Figure 5-13 shows the location of the ports on the top tray in the SCSI Expansion Pedestal. Either port can be used as the "SCSI IN" port, so plug the cable into the port that is most convenient for you.

For the top tray, use the single-ended SCSI terminator (P/N 150-1785).
Figure 5-14 shows the location of the SBus slots and the on-board SCSI port on the SPARCserver 630MP.

The procedure for connecting the top tray of your SCSI Expansion Pedestal to your SPARCserver 630MP is now complete.
Note - Do not connect a separate SCSI device between your SCSI Expansion Pedestal and your SPARCserver 630MP, since this could result in a conflict in SCSI addressing.
If you have SCSI devices in another tray in your SCSI Expansion Pedestal, refer to the appropriate section for the instructions on connecting that tray:
If you have no other trays to connect, refer to Section 5.3, "What's Next."
You have connected all the trays that contain SCSI devices in your SCSI Expansion Pedestal to your SPARCserver 630MP. Figure 5-15 shows how a typical system may look with all the SCSI trays in two SCSI Expansion Pedestals connected to a SPARCserver 630MP.
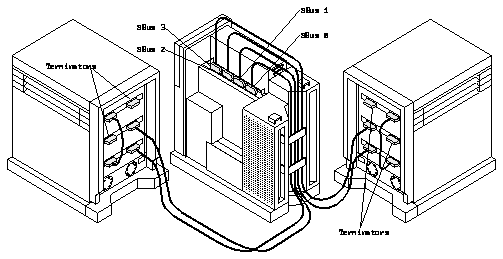
Figure 5-15 Connection for All the SCSI Trays
You should now route the cables through the cable retainers on the SPARCserver 630MP and through the cable clamps located along both sides of the inside rear bezel of the SCSI Expansion Pedestal. These cable retainers and cable clamps are used to restrain the cables.
Follow these steps to route the cables through your SPARCserver 630MP:
You can remove the cable retainers completely by swinging the cable retainer out as far as possible and pulling up, though this is not normally necessary if you are simply routing the cables through the retainers.
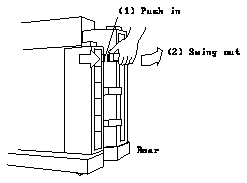
Figure 5-16 Opening the Cable Retainers
The cables can be routed either down the V - shaped groove in the system rear or they can be routed straight out the top/back of the system.
If you removed the retainers completely, replace them by sliding the right side of the retainer (the side without the finger grooves) down on the pivot at the right side of the V - shaped groove while in the "open" position and pushing the left side of the retainer to the clip at the left side of the V - shaped groove until the retainer clicks into place.

Follow these steps to route the cables through the cable clamps in the SCSI Expansion Pedestal:
The cable clamps should be installed along both sides of the inside rear bezel of your SCSI Expansion Pedestal. The cable clamp you will use varies depending on which tray the cable is connected to.
If you are securing a cable coming out from the bottom tray, use the middle cable clamp located along the inner bezel that is closest to the cable. Figure 5-17 shows how you would secure a cable that is connected to the bottom right SCSI port - securing a cable on the opposite side of the pedestal would be the same.
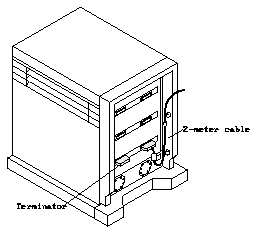
Figure 5-17 Securing a Cable from the Bottom Tray
If you are securing a cable coming out from the middle tray, use the bottom cable clamp located along the inner bezel that is closest to the cable. Figure 5-18 shows how you would secure a cable that is connected to the middle right SCSI port - securing a cable on the opposite side of the pedestal would be the same.

Figure 5-18 Securing a Cable from the Middle Tray
If you are securing a cable coming out from the top tray, use the top and bottom cable clamps located along the inner bezel that is closest to the cable. Figure 5-19 shows how you would secure a cable that is connected to the top left and bottom left SCSI ports - securing a cable on the opposite side of the pedestal would be the same.
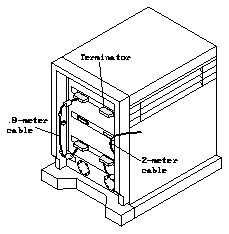
Figure 5-19 Securing a Cable from the Top Tray
Note - Make sure the connector is level with the floor when routing the cable through the clamp. If the connector is bent too far up or down, release the cable from the clamp and take up or let out the slack in the cable until the connector is level, then clamp the cable again.
Follow these steps to replace the top cover on your SPARCserver 630MP:
You should stop turning the knob once you hear a faint click.
Note - The first 1/4-turn rotates the latch to hold the cover in place. Continuing to rotate the latch tightens the top cover against the back of the front panel. To prevent possible damage by overtightening the latch, do not turn it more than 2 or 3 turns. If the latch still doesn't secure, you may have to turn the latch counter-clockwise a 1/4-turn first, then turn it clockwise a 1/4- turn again.
Refer to Chapter 7 next, "Powering the System On and Off," for instructions on powering on the system.
