
This chapter describes procedures used to remove and replace the disk card.
The disk card is installed in card cage slots 0, 1, 2 and 3.
7.1.1
Removal
Before removing a disk card, halt the system. Turn off the power using
instructions found in Chapter 4, "Powering Off and On."
1. Remove two screws that secure the card to the card cage.
See Figure 7-1.
2. Disconnect the SCSI-2 data cable from the IN port on the disk card.
3. Disconnect the terminator or (if daisy-chained) SCSI-2 data cable from the
OUT port on the disk card.
See Figure 7-2.
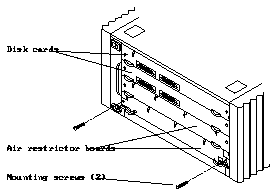
Figure 7-1
Removing or Installing Disk Card Screws
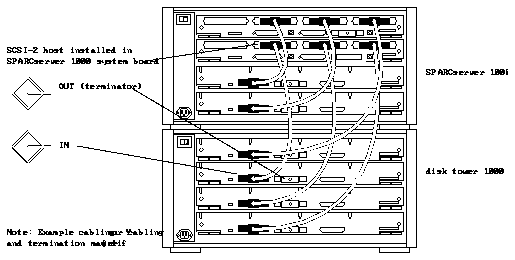
Figure 7-2
Disconnecting or Connecting the SCSI-2 Data Cable and Terminator
4. Pull the curved ends of both injector/ejector levers out simultaneously to
unseat the card from the backplane.
See Figure 7-3.
5. Carefully slide the card out of the card cage.
Caution -

The card is cut out on the right side, therefore, the right side of the
card will clear the card guides before the left. Ensure you grip the edges of the
card firmly or the card may fall and damage components. See Figure 7-3.
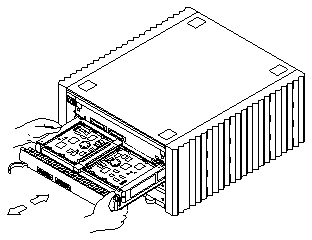
Figure 7-3
Removing or Installing the Disk Card
1. Carefully insert the card in the proper slot in the card cage, ensuring the
board does not slip out of the left and right card guides.
The component side of the board must face up.
2. Ensure the ejector/injector levers are in the outward position while
sliding the card toward the backplane.
See Figure 7-3. The card will not seat fully unless the levers are fully out.
Caution -

DO NOT FORCE A CARD into a slot, this can damage the board
and system. The card should insert and seat smoothly. If it binds, remove it,
and inspect the card cage for sign of obstruction. Also inspect the card and
backplane for bent pins or other damage.
3. Use the ejector/injector levers to seat the board.
Simultaneously swing both levers into the locked position ensuring the card
remains aligned to the card guides (does not become cocked). See Figure 7-4.
Caution -

Do not press on the board rear panel to seat it - doing so will
damage the connector pins.
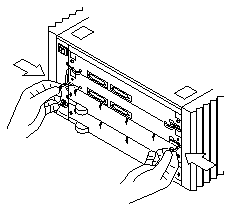
Figure 7-4
Closing the Injector/Ejector Levers
4. Install two screws to secure the card to the card cage.
See Figure 7-1.
5. Connect the SCSI-2 data cable from the IN port on the disk card to the
host directly or indirectly as per below:
-
single disk card per host adapter or the first wide SCSI disk card in a
daisy-chain: directly to the port of the SCSI-2 host adapter in the
SPARCserver 1000 (see example cabling in Figure 7-2)
-
multiple disk cards per host adapter (SWIS SBus card only): to the OUT
port of the next upstream disk card in the daisy-chain (see example
cabling in Figure 7-5)
6. Install the appropriate item on the OUT port:
-
single disk card per host adapter or the last wide SCSI disk card in a
daisy-chain: install a terminator; see example cabling in Figure 7-2
-
any upstream disk card in a daisy-chain: connect the cable feeding the
next disk card downstream in a daisy-chain; see example cabling in
Figure 7-5
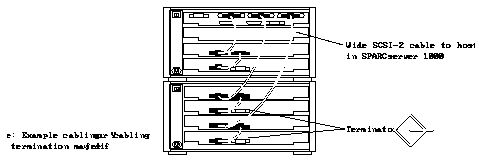
Figure 7-5
Cabling Multiple disk cards to the Wide SCSI Host Adapter
With the disk card on the bench, replace a disk drive as follows:
1. Position the antistatic mat on the work surface. Place the card on the mat.
Caution -

Observe all safety precautions detailed in Chapter 3 with regard to
ESD and antistatic mat use. Failure to do this may result to disk drive damage.
1. Remove the old disk drive:
a. Press the latch on the ejector drive retainer to release it.
b. Carefully open the ejector drive retainer. The drive should slide out
from the connector. See Figure 7-6.
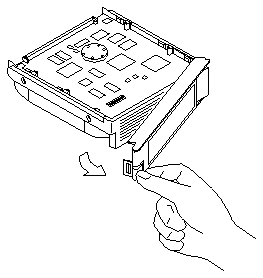
Figure 7-6
Opening the Ejector/Retainer to Remove a Disk Drive
2. Slide the old drive out and place it on the antistatic mat.
3. Unpack the new disk drive:
a. Inspect the shipping container for evidence of damage.
i. If the carrier`s agent is not present when the container is opened,
and the contents are found to be damaged, keep all contents and
packing materials for the agent`s inspection.
ii. If there is no evidence of damage, carefully remove the drive from
the shipping container.
Save the carton and packing material for possible later reuse.
4. Place the drive on the antistatic mat.
5. Hold the ejector drive retainer in the open position (not locked) and
gently slide the new drive in. Close the ejector drive retainer.
As the ejector closes, you will hear the latch snap closed. See Figure 7-6.
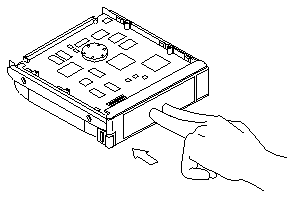
Figure 7-7
Closing the Ejector/Retainer to Install a Disk Drive

