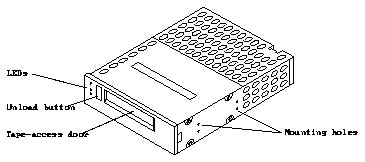

The 10 Gbyte 8 mm tape drive is packaged in the industry-standard 5.25-inch, half-height form factor. It is an enhanced 8 mm digital helical-scan cartridge tape subsystem. See Figure 1-1.
Figure 1-1 10 Gbyte 8 mm Tape Drive
The installation or replacement of the tape drive consists of the procedures shown in Figure 1-2. These procedures are explained in greater detail in each system-specific chapter.
Exposure to a sudden temperature or humidity change can cause condensation within the drive and can damage it. At the installation site, allow the drive to remain in its packing container until its temperature matches that of the surrounding air (see Table 1-1 for acclimation times).
Table 1-1 Acclimation Times for a Drive
-----------------------------------------------------------------------


Temperature Differential from Internal                 Acclimation Time
and External Temperatures
-----------------------------------------------------------------------
Degrees (F)                               Degrees (C)  Hours

+/-15                                     +/-8.3       1

+/-20                                     +/-11.1      2

+/-30                                     +/-16.6      4

+/-40                                     +/-22.2      6

+/-50                                     +/-27.7      7

+/-60                                     +/-33.3      8

-----------------------------------------------------------------------
Caution -
A tape drive is an electromechanical device that can be damaged by excessive physical shock. Store or transport the drives in the right-side up position only. Do not shake, bump, or drop the drives when moving them.Caution -
Circuit board components are vulnerable to damage by electrostatic discharge (ESD). Before handling any board or magnetic storage device, dissipate the electrostatic charge that might have built up in your body by following the instructions in this section carefully.
Figure 1-3 Attaching the Wrist Strap
This prevents static discharge from accumulating in the device.
If the drive is damaged, keep all contents and packing materials for the carrier's agent to inspect, and do not proceed with the installation. If the drive is not damaged, save the packing material for future use.
Figure 1-4 shows the rear view of the drive.
Figure 1-4 10 Gbyte 8 mm Tape Drive (Rear View)
On the rear of the tape drive, make sure the jumpers on the SCSI ID connector are set as follows:
Figure 1-6 Attaching the Mounting Brackets to the Drive
Notice that the brackets are twice the height of the 10 Gbyte 8 mm tape drive. When attaching the mounting brackets to the tape drive, make sure:
