Chapter 12 Performing Basic SCCS Functions with Versioning
This chapter shows you how to perform basic SCCS functions using Versioning. It is organized into the following sections:
Introduction to Versioning
Coordinating write access to source files is important when changes will be made by several people. Maintaining a record of file updates allows you to determine when and why changes were made.
The source code control system (SCCS) allows you to control write access to source files and monitor changes made to those files. SCCS allows only one user at a time to update a file, and it records all changes in a history file.
TeamWare Versioning is a GUI to SCCS. Versioning allows you to manipulate files and perform SCCS functions without having to know SCCS commands. It provides an intuitive method for checking files in and out, as well as displaying and moving through the history branches.
With Versioning, you can:
-
Check in files under SCCS
-
Check out and lock a version of the file for editing
-
Retrieve copies of any version of the file from SCCS history
-
Visually peruse the branches of an SCCS history file
-
Back out changes to a checked-out copy
-
Inquire about the availability of a file for editing
-
Inquire about differences between selected versions using Merging
-
Display the version log summarizing executed commands
Versioning helps you perform these tasks and expedites the progress of concurrent development projects.
Branches
You can picture the deltas applied to an SCCS file as nodes of a tree with the initial version of the file as the root. The root delta is numbered 1.1 by default. These two parts of the SCCS delta ID (SID) are the release and level numbers. Successive deltas (nodes) are named 1.2, 1.3, and so forth. This structure is called the trunk of the SCCS delta tree. It represents the normal sequential development of an SCCS file.
Situations can arise, however, when it is necessary to create an alternative branch on the tree. Branches can be used, for instance, to keep track of alternate versions developed in parallel, such as for bug fixes.
The SID for a branch delta consists of four parts: the release and level numbers and the branch and sequence numbers, or release.level.branch.sequence. The branch number is assigned to each branch that is a descendant of a particular trunk delta; the first branch is 1, the next 2, and so on. The sequence number is assigned, in order, to each delta on a particular branch.
Thus, 1.3.1.1 identifies the first delta of the first branch derived from delta 1.3. A second branch to this delta would be numbered 1.3.2.1 and so on.
The concepts of branching can be extended to any delta in the tree. The branch component is assigned in the order of creation on the branch, independent of its location relative to the trunk. Thus, a branch delta can always be identified from its name. While the trunk delta can be identified from the branch delta's name, it is not possible to determine the entire path leading from the trunk delta to the branch delta.
For example, if delta 1.3 has one branch, all deltas on that branch will be named 1.3.n. If a delta on this branch has another branch emanating from it, all deltas on the new branch will be named 1.3.2.n. The only information that can be derived from the name of delta 1.3.2.2 is that it is the second chronological delta on the second chronological branch whose trunk ancestor is delta 1.3. In particular, it is not possible to determine from the name of delta 1.3.2.2 all of the deltas between it and its trunk ancestor (1.3).
Deltas and Versions
When you check in a file, SCCS records only the line-by-line differences between the text you check in and the previous version of the file. This set of differences is known as a delta. The file version that you initially checked out was constructed from a set of accumulated deltas. The terms delta and version are often used synonymously; however, their meanings are not the same. It is possible to retrieve a version that omits selected deltas.
History Files
When you initially put a file under SCCS control, a history file is created for the new SCCS file. The initial version of the history file uses the complete text of the source file. The initial history file is the file that further deltas are compared to. Owing to its prefix (s.), the history file is often referred to as the s.file (s-dot-file).
SCCS Delta ID (SID)
An SCCS delta ID (SID) is the number used to represent a specific delta. This is a two-part number, with the parts separated by a dot (.). The SID of the initial delta is 1.1 by default. The first part of the SID is referred to as the release number, and the second, the level number. When you check in a delta, the level number is incremented automatically.
Versioning Window
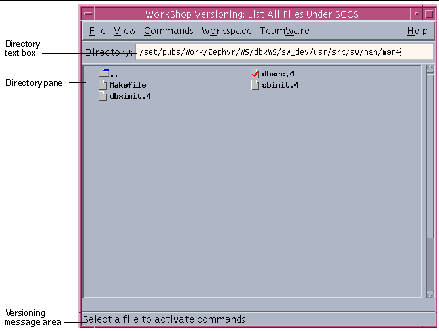
The Versioning main window (see Figure 12-1) displays the directories and SCCS files of the loaded directory.
Figure 12-1 Versioning Window

|
File menu |
Provides commands for managing files |
|
View menu |
Provides commands to control and update the icons shown in the directory pane |
|
Commands menu |
Provides commands for checking files in and out |
|
Workspace menu |
Provides commands for finding, deleting, and moving files under SCCS control |
|
TeamWare menu |
Provides commands for starting other TeamWare tools |
|
Directory text box |
Specifies the directory to view |
|
Directory pane |
Displays icons for all loaded directories and files under SCCS control |
|
Versioning message area |
Displays messages about operations in the Versioning window |
A file checked out from SCCS is marked with a check mark.
Directories are shown whether they contain files which are under SCCS control or not. A directory is a container for files and directories and can possibly contain SCCS files and directories further down the hierarchy. Files are only shown in the Versioning window if they are under SCCS control. To look at the non-SCCS files in a directory, use the Check in New window.
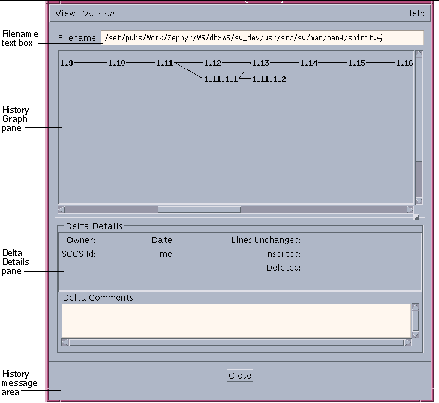
History Dialog Box
The History dialog box (see Figure 12-2) displays an illustration of SCCS delta branches for a selected file. This history graph allows you to peruse the delta structure of a file and assess associations between versions. Dashed lines are shown by default and indicate that the delta to the right of the dashed line was created by including the changes from the delta on the left. Following the dashed line provides you with a time-ordering sequence.
Using the History dialog box, you can:
-
Select a delta from the history graph that will display information about the delta in the Delta Details pane.
-
Select a delta from the history graph to check it in or out, depending on its current SCCS state.
-
View the contents of a selected delta by choosing View > Show File Contents. This opens an editor window with the contents of the selected delta displayed.
-
Select two deltas and choose View > Diff in Merging Window. This displays a Merging window in which the two selected deltas are displayed side by side for comparison.
-
Select two deltas and choose View > Diff in Text Window. An editor window opens up displaying the textual differences from the SCCS diffs command.
Figure 12-2 History Dialog Box

|
View menu |
Provides commands for managing files |
|
Version menu |
Provides commands for managing icons in the History Graph pane |
|
Filename text box |
Show the file path name |
|
History Graph pane |
Shows icons for file deltas |
|
Delta Details pane |
Contains delta history information |
|
History message area |
Displays messages about operations in the History dialog box |
Typical Sessions
This section gives an overview of the most common SCCS sessions using Versioning. It assumes that you are familiar with SCCS. The following scenarios are covered:
-
An initial session where files are not yet under SCCS control
-
A session where the project is already under SCCS control
Putting a Project Under SCCS Control
There may be instances where a project is under development before a source code control system is put in place. This scenario assumes a project is already under way and the hierarchy of the project is established. It is assumed that the project is ready to be put under SCCS control.
To put a project under SCCS control:
-
Start Versioning in one of the following three ways:
-
Type twversion at a shell command prompt, with or without a path name, followed by the ampersand symbol (&). For example:
demo% twversion & demo% twversion dirname &
-
Choose TeamWare > Versioning in the Configuring window.
-
Double-click on a workspace icon in the Configuring window.
-
-
Double click the project directory in the Versioning main window.
Versioning automatically changes to the selected directory. As there are no files yet under SCCS control, the display shows only directories.
-
Choose Commands > Check In New.
The Check In New Files window displays a list of files not under SCCS control.
-
Select the files you want to put under SCCS control and add necessary comments in the Initial Comment pane.
-
Click OK button to check in the selected files.
Once the files are under SCCS control, they will be transferred to the display in the main window.
Repeat this scenario in as many project directories as necessary. Then proceed to the scenario in "Working with a Project Under SCCS Control"" for working with files under SCCS control.
Working with a Project Under SCCS Control
Once a project is under SCCS control, you can use Versioning to perform SCCS functions. This section provides a scenario of basic SCCS tasks and how they might be applied on a project. These steps are simplified to give an overview of the process. The remaining sections of this chapter cover in-depth instructions on performing tasks.
Note -
This is representative of a hypothetical session. The steps will vary according to project needs and the tasks required to fulfill them.
-
Start Versioning and select the working directory.
-
Choose Commands > Check Out or Commands > Check Out and Edit to check out a file.
-
Choose File > File History to display the history graph of the file.
-
Select two deltas from the graph in the History window and choose View > Diff in Merging Window or View > Diff in Text Window to inspect the differences.
-
Make changes to the file.
-
Add necessary comments.
-
Choose Commands > Check in to check the file in.
These steps can be repeated and varied as required by the needs of your project. The following sections of this chapter provide in-depth information on how to perform these, and other, SCCS functions with Versioning.
Using Commands to Manipulate Files
You can perform SCCS operations within the file list on a per-file basis or on a multiple-file basis. You can select a single file, or multiple files, on which to perform a function.
The Commands menu allows you to do the following:
-
Check out a file
-
Check in a file
-
Edit a checked out file
-
Check a new file under SCCS control
-
Uncheckout a file
Checking Out and Checking In Files
This section covers the process of checking out and checking in files that are already under SCCS control.
Checking Out Files
You can use two methods for checking out files:
-
Select the file(s) you want to check out from the main window display. Then, choose Commands > Check Out.
A check mark is displayed in the file icon(s) of the selected file(s). This method is valuable when you want to check out several files at once.
-
Double click a file icon in the main window.
A check mark is displayed in the file icon and the file is checked out with you as the owner. This is not the default behavior. To enable this double-click action, you must change the default behavior by Choosing View > Options, selecting the Toggle SCCS State radio button in the Double Click Action section of the Options dialog box, and then selecting the Confirm Double Click Check Out checkbox (see "Changing Versioning Properties").
Checking In Files
You can use two methods for checking in files:
-
Select the file(s) you want to check in from the main window display and choose Commands > Check In. Enter the appropriate comments in the Check In dialog box and click OK.
The check mark(s) continue to be displayed on the file icon(s) until you choose Check In from the pop-up window. This method is valuable when you want to check in several files at once and the same comment can apply to each.
-
Double click on a checked-out file icon in the main window and add the appropriate comments in the Check In dialog box and click OK.
The check mark continues to be displayed on the file icon until you click OK in the dialog box. This is not the default behavior. To enable this double-click action, you must change the default behavior by Choosing View > Options, selecting the Toggle SCCS State radio button in the Double Click Action section of the Options dialog box, and then selecting the Confirm Double Click Check Out checkbox.
Editing a Checked-Out File
This section covers the process of checking out a file that is under SCCS control and displaying it in an editor window. The Edit menu item allows you to do this in either of the following ways:
-
To edit a file after checking it out, select the checked-out file in the Versioning window and choose File > Edit.
-
To check out a file and display it in an editor window, choose Commands > Check Out and Edit.
The default is for the file to be brought up in a cmdtool window running vi. For instructions on selecting an editor, see "Changing Versioning Properties".
Checking in a New File
Files that are not under SCCS control are not displayed in the Versioning window. To check in a new file:
-
Double click on the directory in the Versioning window, or type the directory path in the Directory text box.
-
Choose Commands > Check In New.
The Check In New window opens displaying a list of files not yet under SCCS control.
-
Select the file from the Check In New window display.
-
Enter the appropriate initial comments in the Initial Comments pane and choose Commands > Check In.
The checked-in files are removed from the Check In New display and are displayed in the Versioning window Directory pane.
Unchecking Out a File
When you have mistakenly checked out a file and want to return the file to an unchecked out state, there is a simple way to do so without having to check in the file and add comments.
To uncheck out a file, select the checked out file and choose Commands > Uncheckout.
Changing Versioning Properties
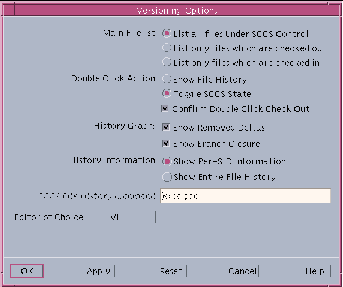
You can use the Options dialog box (see Figure 12-3) to set the Versioning properties for the remainder of the session. To open the Options dialog box, choose View > Options.
Figure 12-3 Versioning Options Dialog Box

|
Mail File List |
Lets you specify the type of SCCS files displayed in the Versioning window. |
|
Double Click Action |
Lets you specify what happens when you double click in Versioning.When you select Toggle SCCS State, you can also select Confirm Double Click Check Out if you want the check mark to be displayed on the file icon until you click OK in the dialog box. |
|
History Graph |
Lets you define items for display on the history graph. |
|
History Information |
Lets you specify the extensiveness of the information displayed when you select a delta on the history graph. If you select Show Entire File History, you can also specify a command to gather the history. |
|
Editor of Choice |
Lets you specify an editor that automatically starts up when you view the contents of a delta, or open a delta to edit. If you select Other, you must type in the text box a command that will start up your editor in a separate window. The file name is appended to the supplied command. |
- © 2010, Oracle Corporation and/or its affiliates
