Using the DN Editor
A distinguished name (DN) is a sequence of relative distinguished names (RDNs), separated by a comma, for example o=XYZ, c=US. When you have to specify a DN in the Admin Console, you can type it directly into the field supplied, or you can construct it using the Distinguished Name Editor.
Regular Expressions in Distinguished Names
You can specify a DN that contains a regular expression to indicate a set of entries. This is useful when configuring access control, for example, but not when specifying a naming context. The Admin Console does not prevent you from entering a regular expression in any DN, but you should use wildcards only where it is appropriate. See the regex(1F) man page for information about regular expressions.
You can specify a regular expression for the distinguished name of an entry. For example, the regular expression dn="cn=Joe Smith, ou=.*, o=XYZ, c=US" specifies the set of entries for people called Joe Smith in the whole of the XYZ Corporation.
You can also use a DN-based regular expression to specify a set of values for an attribute whose values are DNs. For example, you can grant write access to a distribution list entry to any person whose DN is a value of the member attribute, using the regular expression member="dn=.*".
To Create a Distinguished Name with the DN Editor
-
Start the DN Editor by clicking the Set Button to the right of the field where you must enter a DN.
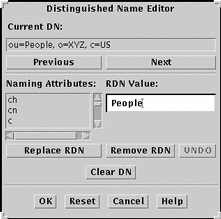
The DN Editor dialog box is displayed.
Figure 4-5 Distinguished Name Editor

-
Use the Previous and Next buttons to position the cursor where you want to add an RDN, or to highlight an RDN that you want to replace.
If you position the cursor between two RDNs, the dialog box has an Add RDN button. If you highlight an RDN, this button is replaced by a Replace RDN button.
-
Select the Naming Attribute for the RDN, and type the value in the RDN value field.
-
Click the Add RDN button or Replace RDN button.
-
Click Apply to save the new DN, and click Cancel to dismiss the DN Editor dialog box.
To Modify a Distinguished Name with the DN Editor
-
Start the DN Editor by clicking the Set Button to the right of the field containing the DN to modify.
The DN Editor dialog box is displayed.
-
Use the Previous and Next buttons to position the cursor where you want to insert an RDN, or select the existing RDN that you want to replace.
-
Select the Attribute Type for the RDN, and type the value in the RDN value field.
-
Click the Modify RDN button.
-
Click Apply to save the new DN, and click Cancel to dismiss the DN Editor dialog box.
- © 2010, Oracle Corporation and/or its affiliates
