Using the Filter Editor
An LDAP filter is a way of specifying a set of entries, based on the presence of a particular attribute or attribute value. You can use an LDAP filter in an access control rule. For example, the default access control rules include a filter specifying that users can add their own DNs to the member attribute of any entry that contains the attribute joinable with a value of TRUE. This allows users to add or remove their names from distribution lists.
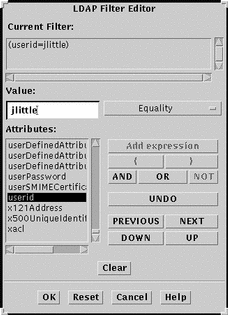
The Current Filter field shows the filter you are modifying, or the current state of the filter you are creating.
To Create an LDAP Filter
-
Click the Set button to the right of the field where you need to specify a filter.
The Filter Editor is displayed.
Figure 4-6 Filter Editor Dialog Box

-
Select an attribute from the list displayed.
-
Type a value in the Value field.
-
Select a match type from the pull-down menu.
-
Click AND, OR, or NOT, to indicate how this expression is used in the filter.
-
Click Add Expression to add the expression to the filter.
The Current Filter field shows the modified filter.
-
Repeat from Step 3 to Step 6 until the Current Filter field shows the filter as you want it.
-
Click Apply to save the filter, and click Cancel to dismiss the Filter Editor dialog box.
To Modify an LDAP Filter
-
Click the Set button to the right of the field where you need to specify a filter.
The Filter Editor is displayed, as shown in Figure 4-6.
The Current Filter field shows the filter to be modified.
-
Position the cursor where you want to add an expression, or select the expression that you want to modify.
-
Select an attribute from the list displayed.
-
Type a value in the Value field.
-
Select a match type from the pull-down menu.
-
Click AND, OR, or NOT, to indicate how this expression is used in the filter.
-
Click Add Expression to add the expression to the filter.
The Current Filter field shows the modified filter.
-
Repeat from Step 3 to Step 7 until the Current Filter field shows the filter as you want it.
-
Click Apply to save the filter, and click Cancel to dismiss the Filter Editor dialog box.
- © 2010, Oracle Corporation and/or its affiliates
