Modifying the Schema
You can modify the schema in the following ways:
-
By creating new object classes or attributes
-
By modifying object classes and attributes
It is safer to always create a new object class rather than modify an existing one. If you want to extend an existing object class, you can create an object class that inherits from the object class that you want to extend.
Deleting object classes or attributes is not advisable since there might be directory entries that use the existing definitions.
There is no automatic check that schema modifications do not invalidate entries. Therefore, to minimize the risk of entries becoming invalid, restrict your changes to the addition of object classes or attributes. You can, however, enable schema checking. For this, refer to "Schema Checking".
The schema definition contains object classes that are used internally by the Sun Directory Services directory server or by the Sun Internet Mail Server (SIMS). The Admin Console does not permit you to modify these object classes. They are marked with the keyword frozen in the configuration files. You must not remove this keyword from any standard schema item.
Note -
If you use the web gateway to allow users to browse the directory, all modification made to the schema must also be made to the dswebtmpl.conf file. See the dswebtmpl.conf(4) man page for details.
Schema Checking
Sun Directory Services provides a schema checking feature. When directory information is added or modified, the directory server checks that all mandatory attributes of the object class or inherited by the object class are present.
The schema checking options are:
-
Off: no checking is performed
-
Weak: a check is performed when entries are created or modified
-
Strong: in addition to the previous level, a check is performed on search operations
Select the appropriate level of checking from the Schema check menu button in the Schema section of the Admin Console. The default level of checking is weak.
Note -
Schema checking cannot be performed on the compatibility of object classes. For example, you could create an entry with the device object class and the person object class. The IETF standards do not enforce rules on object classes.
To Create a New Object Class
-
From the Admin Console main window, choose Class/Attribute from the Create menu.
The Create Object Class window is displayed.
-
Specify:
-
The name of the new object class
-
The object identifier for the object class (optional)
-
The superior object class, from which this object class will inherit attributes
-
-
Specify the mandatory and optional attributes you want to include in this class:
-
Click OK to save the modified object class definition.
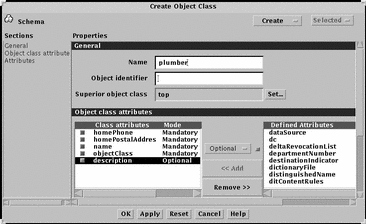
This change will take effect when you restart the dsservd daemon. Figure 8-1 shows a new object class plumber, with the atttributes you would need to contact a plumber.
Figure 8-1 Create Object Class Window

To Create a New Attribute
-
From the Admin Console main window, choose Class/Attribute from the Create menu.
-
In the Create Object Class window, choose Attribute from the Create menu.
The Add Attribute window is displayed.
-
Specify:
-
The name of the attribute
-
The unique OID for this attribute (optional)
-
Any alternate names in the Aliases field (optional)
-
Whether the attribute is multi-valued
-
Whether the attribute can be used as a naming attribute
-
-
Click OK to save the new attribute definition.
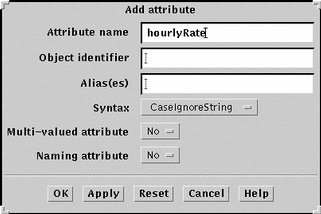
This change will take effect when you restart the dsservd daemon. Figure 8-2 shows a new attribute hourlyRate has been created to be added to the plumber object class.
Figure 8-2 Create Attribute Window

To Add an Attribute to an Object Class
-
In the object class list, highlight the object class to which you want to add an attribute, and choose Modify Class/Attribute from the Selected menu.
The Modify Object Class window is displayed. The name of the object class you are modifying is displayed in the General section of this window. The mandatory and optional attributes for that object class are listed in the Object class attributes section.
-
In the Defined Attributes list, highlight the attribute that you want to add.
-
Select the mode of the attribute (Mandatory or Optional) from the pop-up menu.
-
Click Add to add the attribute to the object class definition.
-
Click OK to save the modified object class definition.
This change will take effect when you restart the dsservd daemon.
To change the mode of an attribute that is already included in the object class definition, select the attribute in the Class attributes list and change the mode using the Mode pop-up menu.
- © 2010, Oracle Corporation and/or its affiliates
