| Sun WorkShop 6 Installation Guide |
Installing Your Licenses
This chapter gives you step-by-step instructions for installing your licenses.
Before you can install your licenses, you must have:
- Requested and received license information from the Sun License Center (see Chapter 2)
- Installed FLEXlm 7.0b license manager software on each license server (see Chapter 3 for installation instructions)
Note – For information about domain-based licenses, which support products licensed through the GoldPass and ScholarPASS programs, see Domain-Based Licenses.
This chapter describes how to install your licenses in the following ways:
- Through the License Installation Tool (
lit) graphical user interface- Through the
lit_ttycommand-line interface if you do not have graphical user interface capabilitiesAnswers to Sun WorkShop licensing frequently asked questions (FAQ) are available through the World Wide Web at the following location:
Special Cases
The following cases require special handling:
- When you completed your License Request Form, if you requested to have your floating and node-locked (Personal Edition or Desktop Edition) licenses on the same license server, you should have received separate license information from the Sun License Center for floating licenses and for node-locked licenses that you requested. To install your licenses on the same license server, run
lit(see Using lit License Installer) orlit_tty(see Using the lit_tty Command-Line Executable) on your license server for floating licenses you received from the Sun License Center and run it again for node-locked licenses you received from the Sun License Center.- If you are upgrading from Sun WorkShop Try and Buy (trial software) to purchased Sun WorkShop software, see From Try and Buy Software to Purchase.
Note – Single independent (including node-locked) and redundant server licenses cannot be mixed in the same license file (thelicenses_combinedfile). A license server and its license file is for either a single independent server or a three redundant server set. A license server cannot handle both. A Personal Edition and Desktop Edition (node-locked) license can be installed on a three redundant server set only if it was requested to run on a redundant server configuration. The Personal Edition or Desktop Edition hostid on theINCREMENTline in the license file can be the hostid of one of the redundant servers, if that is where the licensed application will be run, or it can be the hostid of an entirely different machine.
Using
litLicense InstallerThis section describes how to start
litfrom the command line. Invokinglitwill start the GUI interface for license installation.
Note – License software must be installed before proceeding withlitinstructions. See Software Installation Steps to install license software.
Email License File Installation
You must run
liton your license server.
- If you will be using redundant server configuration, you must install FLEXlm 7.0b license manager software and run
liton all three redundant servers.1. Enable client access by typing the following at a command line on your license server:
%/usr/openwin/bin/xhost +hostname- Replace hostname with the output of the
/usr/bin/hostnamecommand run on your license server.2. Become a superuser (root) by typing:
%suPassword:root-password3. Set your display.
- If you use a C shell, type:
#setenv DISPLAYhostname:0- If you use a Bourne shell, type:
#DISPLAY=hostname:0#export DISPLAY- If you use a Korn shell, type:
#export DISPLAY=hostname:0- Replace hostname with the output of the
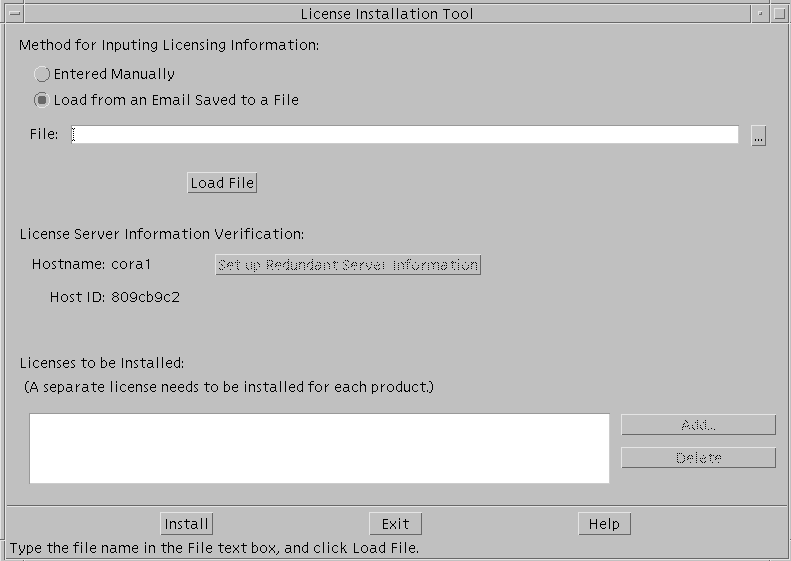
/usr/bin/hostnamecommand.4. Start the License Installation Tool by typing:FIGURE 4-1 License Installation Tool window
#/etc/opt/licenses/lit &- The License Installation Tool window opens (FIGURE 4-1).
- For Fax license installation, go to Fax License Installation.
5. Verify the radio button for Load from an Email Saved to a File is active.6. In the File text box in the License Installation Tool window, type the pathname to the file where you saved the license information that Sun emailed to you, or click the browse button (...) to use a file chooser to find the saved file.
- If you used the file chooser, continue to Step 8.
7. Click Load File.
- Your licenses listed in the email you received from Sun appear in the Licenses to be Installed pane.
8. Click Install.
litinstalls your licenses. When the installation is complete, the message License installation was successful appears in the lower left corner of the window. If you receive an error message, see Contacting Technical Support for technical support information.9. When the installation is complete, click OK in the pop-up window.10. Click Exit to dismiss the License Installation Tool.11. If your application server is different from your license server, copy and run the/etc/opt/licenses/LIC_CONFIG_SCRIPTscript on each of the application servers that will access the software products.
- Running the
LIC_CONFIG_SCRIPTscript creates a license router file for WorkShop 6 or elementary license file for previous WorkShop releases on your application server. For information on elementary license files or router files, see Chapter 2 in the Sun WorkShop 6 Installation and Licensing Reference.12. Exit from superuser privileges by typing:
#exitFax License Installation
Note – Refer to the license information you received from the Sun License Center to complete this section.
1. Click Entered Manually in the License Installation Tool window.
- The Add License window opens.
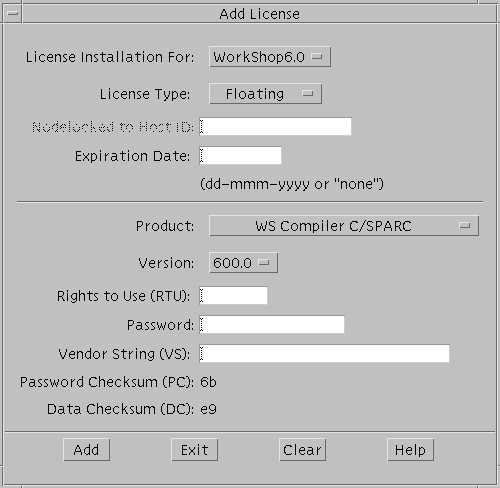
FIGURE 4-2 Add License Window2. Use the pulldown menu in License Installation For to selectWorkShop6.0if it is not already selected.3. In License Type, select the license type you are installing.
- If License Type is node-locked, enter the hostid.
4. Type the expiration date indd-mmm-yyyyformat (for example,22-may-2000) that the Sun License Center provided.5. Use the Product pulldown menu to select the software for which you want to install a license.
- The license information you received from the Sun License Center provides the feature names you need.
6. For Version, verify the software version.7. For RTU, enter the number of users.8. For Password, type the password the Sun License Center provided.9. For Vendor String (VS), type the number the Sun License Center provided.10. For Password Checksum (PC), verify the number.
- The PC includes the license expiration date, vendor string, RTU, and password. If there is a discrepancy, recheck the number to verify the components listed are correct. If you need further assistance, contact the Sun License Center.
11. For Data Checksum (DC), verify the number.
- The DC includes the license feature name, feature version, license server node name, license server hostid, and node-locked hostid. If there is a discrepancy, recheck the number to verify the components listed are correct. If you need further assistance, contact the Sun License Center.
12. Click Add.13. This license is added to the Licenses to be Installed pane in the License Installation Tool window.14. Repeat Step 5 through Step 12 as needed to install more licenses.15. Click Exit in the Add License window.16. Click Install in the License Installation Tool window.17. When the installation is complete, click OK in the pop-up window.18. Click Exit to dismiss the License Installation Tool.19. If your application server is different from your license server, copy and run the/etc/opt/licenses/LIC_CONFIG_SCRIPTscript on each of the application servers that will access the software products.
- Running the
LIC_CONFIG_SCRIPTscript creates an elementary license file or router file on your application server. For information on elementary license files and router files, see Chapter 2 in the Sun WorkShop 6 Installation and Licensing Reference.20. Exit from superuser privileges by typing:
#exitUsing the
lit_ttyCommand-Line ExecutableThis section describes how to use the
lit_ttycommand-line executable to install your licenses on your license server. See Chapter 2 for information on obtaining your license.
- If you will be using redundant server configuration, you must install FLEXlm 7.0b license manager software and run
lit_ttyon all three redundant servers.- Running the
LIC_CONFIG_SCRIPTscript creates a license router file for WorkShop 6 or elementary license file for previous WorkShop releases on your application server. For information on elementary license files or router files, see Chapter 2 in the Sun WorkShop 6 Installation and Licensing Reference.
Note – License software must be installed before you can proceed withlit_ttyinstructions. See Software Installation Steps to install license software.
Email License File Installation
1. Become a superuser (root) on your license server by typing the following at the command line:
%suPassword:root-password2. Startlit_ttyby typing:
#/etc/opt/licenses/lit_tty -flicense-file- Replace license-file with the path to the file where you saved the license information that Sun emailed to you (see Saving an Email License to File). Refer to the
lit_ttyman page for more information.3. Decide if you want the displayed licenses installed.
- If you want the displayed licenses installed, type
y.lit_ttyinstalls your licenses.- If the licenses that are displayed are not the licenses you want to install, type
n. See Contacting Technical Support for technical support.4. Exit from superuser privileges by typing:
#exitFax License Installation
If you received your license information from the Sun License Center through a fax, follow these instructions to install your licenses.
Note – If you have not filled out a License Request Form, see Chapter 2 for instructions.
1. Become a superuser (root) by typing the following at the command line:
%suPassword:root-password2. Startlit_ttyby typing:
#/etc/opt/licenses/lit_tty3. In the Select Product to License screen, type anxnext toWorkShop6.0.
- If instead of the Select Product to License screen you see the Select Product screen, skip to Step 4.
- Press Return to navigate down the product list to
WorkShop6.0.4. In the Select Product screen, type anxnext to the product for which you want to install a license.
- Your Proof of License Certificate provides information about the product(s) you purchased. If you do not want to install a license for the product where the cursor is, press Return to navigate to the next product on the list.
Note – Only one product can be selected at a time. The process is iterative and will prompt you at the end of each cycle to install a license for the remaining products on the list.
5. Select the license type by pressing Enter until the cursor is in the appropriate box for Floating, Node-locked, Demo, or Domain license.6. Type an x, then press Enter until the cursor is at Servers.7. Type anxto select the number of servers you will use.
- Press Tab to select a different number of servers.
8. Verify the license server name and hostid.
- The license server name and hostid default to the machine where you are installing the license. Your hostid is the output of the
/usr/bin/hostidcommand; your server name is the output of the/usr/bin/hostnamecommand.9. Press Return to navigate past Phone Number List.
- For Sun License Center telephone and fax numbers, see your Proof of License Certificate.
10. For Nodelocked to Host ID, type one of the following:
- For a floating license, type
none.- For a Personal Edition (node-locked) or Desktop Edition (node-locked) license, type the same hostid you typed on your License Request Form.
11. For the expiration date, typenone.12. For Rights to Use, type the number of rights to use that you received from the Sun License Center.13. For Password, type the password that you received from the Sun License Center.14. For Vendor String (VS), type the number from the VS column in the license information that the Sun License Center provided.15. Verify the Data Checksum (DC).
- The DC includes the license feature name, feature version, license server node name, license server hostid, and node-locked hostid. If there is a discrepancy, recheck the number to verify the components listed are correct. If you need further assistance, contact the Sun License Center.
16. Verify the Password Checksum (PC).
- The PC includes the license expiration date, vendor string, RTU, and password. If there is a discrepancy, recheck the number to verify the components listed are correct. If you need further assistance, contact the Sun License Center.
17. Type anxnext to Done Setting Up This License.18. Press any key to return to selecting products for which you want to install a license, and repeat Step 4 through Step 17.
- If you are done selecting products for which you want to install a license, press Return to navigate to the bottom of the screen.
Note – A server name and hostid are identified for each license. Make sure you use the license that is unique to the license server's server name and hostid.
19. Decide whether you want to install the licenses.
- To install the licenses, type an
xnext to Exit - Save Licenses.- To quit without installing the license, type an
xnext to Exit - Don't Save Licenses.20. If your application server and your license server are different machines, copy the/etc/opt/licenses/LIC_CONFIG_SCRIPTscript and run it on each of the application servers that will access the software.Demo License Installation
You install the demo license the same as you would install other Sun licenses. See Using lit License Installer or Using the lit_tty Command-Line Executable for license installation. In order for you to use Sun WorkShop, the demo license file must be installed on your application server, because the demo license does not use the license manager and will not communicate with the license server. If you choose to install your demo license on your license server, you will need to copy the license file
sunpro.lic,nodeto your application server.
Note – The demo license file must be namedsunpro.lic,node(be sure to include the comma and the period in the name of the demo license file).
1. On the license server, type:
- %
cd/etc/opt/licenses2. From the license server install directory, copy thesunpro.lic,nodefile to the product directory/install-directory/SUNWspro/license_diron your application server.
- For more information about demo licenses, see Sun WorkShop 6 Try and Buy Quick Install or Sun WorkShop 6 Try and Buy Quick Install After Download.
(Optional) Changing the Owner of the License Server Daemon
The license server daemon is automatically configured to be owned by
nobody, which is a predefined account on SolarisTM. Theadjust_flexlm_ownerscript is provided to allow you to change the user name to a functional name, such asgsi_admin.
Note – This is only required if you want to use the license admin utilities as something other thanroot.
The user name you select starts the license server daemon and has access to the license manager software utilities. Permissions are updated to allow group read and execute privileges for the user name you selected.
Note – If you decide to use a user name that does not exist, create the user account before running theadjust_flexlm_ownerscript.
- Run the
adjust_flexlm_ownerscript by typing the following at a command line:#/etc/opt/licenses/adjust_flexlm_owner
Caution – To avoid security risks, do not change ownership toroot.
For your changes to take effect, you must stop the license daemon (if it is running) and restart it. To do so, follow the instructions at the end of the script. You can run the
adjust_flexlm_ownerscript at any time to change the ownership and execute privileges of the daemon and utilities.
|
Sun Microsystems, Inc. Copyright information. All rights reserved. Feedback |
Library | Contents | Previous | Next | Index |