| Sun WorkShop 6 Installation Guide |
Installing Software
This chapter gives you step-by-step instructions for installing your FLEXlm 7.0b license manager software and your Sun WorkShopTM 6 development tools.
Special Cases
If you are upgrading from Sun WorkShop Try and Buy (trial software) to purchased Sun WorkShop software, see From Try and Buy Software to Purchase.
If you installed an Early Access version of Sun WorkShop 6, see Early Access Versions of Sun WorkShop 6 for special instructions.
If you plan to support this new Sun WorkShop release and previous Sun WorkShop releases on the same machine, see Supporting Previous Software Releases.
Otherwise, proceed to Software Installation Steps.
From Try and Buy Software to Purchase
If you installed Sun WorkShop 6 development tools on a trial basis (known as Try and Buy software) and then purchased Sun WorkShop 6, you do not need to reinstall your purchased Sun WorkShop 6 development tools. You do need to install FLEXlm 7.0b license manager software if you did not install FLEXlm on your license server when you installed your Sun WorkShop Try and Buy development tools.
To determine if you have FLEXlm 7.0b license manager software on your system, follow these steps:
1. Become a superuser (root) by typing:
%suPassword:root-password2. Search for the installed license configuration data package by typing:
#pkginfo | grep SUNWwslic3. Runlmverby typing the following:
#cd /etc/opt/licenses/#./lmver ./sunwlicd
- If there is output from the command showing
v7.0b, you have FLEXlm 7.0b license manager software already installed. Install your licenses by following the instructions in Chapter 4. Once your licenses are installed, you will be ready to use your Sun WorkShop development tools.- If there is no output about the
SUNWwslicpackage, follow these steps:
- Install FLEXlm 7.0b license manager software on your license server.
- The section Using Web Start describes how to install FLEXlm license manager software.
Note – You do not need to reinstall any of your Sun WorkShop development tools, and you do not need to reset yourPATHandMANPATHvariables.
- Install your licenses on your license server.
- See Chapter 4 for instructions.
- When your licenses are installed, you are ready to use your Sun WorkShop development tools.
Early Access Versions of Sun WorkShop 6
You must remove all versions of Sun WorkShop 6 before installing the purchased product. See Chapter 6 for complete instructions on using Web Start to remove Sun WorkShop software.
If you installed a trial version of Sun WorkShop 6 that you downloaded from
http://access1.sun.com/workshop6.0eaprior to purchasing Sun WorkShop 6, you must manually remove the following packages:
- SPROpl
- SPROpls
- SPROplsx
- SPROplx
You must uninstall these packages before installing your purchased Sun WorkShop 6 product. Use the
pkgrmcommand to uninstall the packages by following these steps:1. Become a superuser by typing:
- %
suPassword:root-password2. Remove a package by typing:
- #
pkgrmpackage-nameRepeat Steps 1 and 2 until you have removed all four packages. See the
pkgrmman page for more information about thepkgrmcommand.
Note – Use thepkgrmcommand to uninstall only those packages that you installed manually.
Supporting Previous Software Releases
To support previous Sun WorkShop releases as well as this Sun WorkShop release on the same machine, select an installation directory for the new release that is different from the directory where the previous Sun WorkShop release resides. For example, if you previously installed development tools in
/opt, install the new development tools in a new directory that you created on a file system with sufficient disk space. For example:
/opt/SUNWspro
/opt/new/SUNWsproAfter installation, modify your
PATHandMANPATHenvironment variables to include the new directory. See Changing PATH and MANPATH Variables about setting the variables to access the new release.Local or Remote Installation
In the section Software Installation Steps, you will be asked to pick a local or remote installation method.
In a remote installation, the software is downloaded on one machine (the source computer) and installed on another machine (the target computer). In a local installation, the source computer and the target computer are the same machine.
FIGURE 3-1 Local and Remote InstallationsSoftware Installation Steps
There are two ways to install Sun WorkShop development tools and FLEXlm 7.0b license manager software:
- SolarisTM Web Start (Web Start) graphical user interface (see Using Web Start for instructions)
installercommand-line installation executable if you do not have graphical user interface capabilities (see Using the Command-Line Installation for instructions)Using Web Start
These instructions describe how to use Web Start to install the Sun WorkShop development tools and the FLEXlm 7.0b license manager software.
Note – Throughout these instructions, replace platform withsparcif you use the SolarisTM SPARC Platform Edition or withintelif you use the SolarisTM Intel Platform Edition.
1. Pick a local or remote installation method.
- To help you decide, see Local or Remote Installation. Then follow the instructions in this step.
2. Check that your Sun WorkShop CD is in your CD-ROM drive.3. On the source machine, enable client access by typing the following at a command line:
%/usr/openwin/bin/xhost +target-machine-name- Replace target-machine-name with the output of the
/usr/bin/hostnamecommand entered on the target machine.4. Become a superuser (root) by typing:
%suPassword:root-password5. Check that Volume Manager is running on your machine by typing the following at a command line:
#ps -ef | grep vold- If you see an entry that contains
/usr/sbin/vold, Volume Manager is running on your machine.
- If Volume Manager is running on your machine, skip to Step 6.
- If Volume Manager is not running on your machine, type:
#mkdir -p /cdrom/devpro_v7n1_platform#mount -F hsfs -rcdrom-device/cdrom/devpro_v7n1_platform- An example of cdrom-device is
/dev/dsk/c0t6d0s2.6. Follow the instructions for local or remote installation.Local Installation
For a local installation, follow these steps:
- Set your display.
- If you use a C shell, type:
#setenv DISPLAYhostname:0
- If you use a Bourne shell, type:
#DISPLAY=hostname:0
#export DISPLAY
- If you use a Korn shell, type:
#export DISPLAY=hostname:0
- Replace hostname with the output of the
/usr/bin/hostnamecommand.
- If you have not already done so, go to the CD image by typing:
#cd /cdrom/devpro_v7n1_platform
- Skip to Step 7.
Remote Installation
For a remote installation, follow these steps:
- Add the following line to your
/etc/dfs/dfstabfile:
share -F nfs -o ro /cdrom/devpro_v7n1_platform
- Verify whether if your source machine is an NFS server by typing:
#ps -ef | grep nfsd
- If screen output that resembles the following example appears, then
nfsdis running:
root 237 1 17 Jun 04 ? 0:00 /usr/lib/nfs/nfsd -a 16
- If
nfsdis running, type:#/usr/sbin/shareall
- If you do not get screen output like the preceding example, start
nfsdby typing:#/etc/init.d/nfs.server start
#ps -ef | grep nfsd
- You should see screen output similar to the previous example. If not, contact your system administrator or your Sun authorized service provider.
- Make sure your source machine is exporting your product directory by typing:
#/usr/sbin/dfshares
- Screen output that resembles the following example appears:
RESOURCE SERVER ACCESS TRANSPORTserver-name:product-location server-name - -
- Log in to the target machine by typing:
#rlogintarget-machine-name-luser
Password:user-password
%su
Password:root-password
- Replace user with your user login name (not
root).
- Go to the source machine by typing:
#cd /net/source-machine/cdrom/devpro_v7n1_platform- If you cannot change to that directory and you do not have an automounter on your network, create a mount point on the target machine and mount the product directory by typing the following commands:
Note – Do not type the backslash (\). The backslash indicates that the command must be typed as one line.
#mkdir /remote_products
#/usr/sbin/mount -F nfs -rsource-machine:/cdrom/\devpro_v7n1_platform/remote_products
#cd /remote_products
- Redirect the target machine display.
7. Start the Web Start Installer by typing:
8. Typeyto install theSUNWwsr2package. This package allows theproductregistryfile to log properly.9. Press Return.
- The Welcome window appears.
10. In the Welcome window, click next.
- The 64-Bit Selection window opens. The default selection is 64-bit, which installs 32- and 64-bit packages. If you will be developing on Solaris 7 and 8 SPARC Platform Edition, decide if you want to install only 32-bit packages or both 32-bit and 64-bit packages.
Note – The 64-bit selection window does not appear for an x86 platform installation.
11. Click Next to proceed to the Product Selection window (FIGURE 3-2).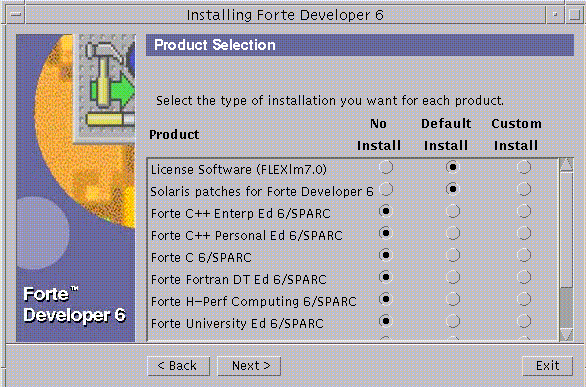
FIGURE 3-2 Product Selection Window
- The default selection License Software (FLEXlm 7.0) installs FLEXlm 7.0b and the License Installation Tools.
Caution – You cannot install your license without installing the License Software, and you cannot execute your installed product software without installing your software license.
Note – The default selection Solaris patches for Forte Developer 6 installs the patches. If you have previously installed patches, installing the default patches does not downgrade your system. For more information on patches, see theREADMEfiles in the Patch directory.
12. Select the software that you want to install by clicking the radio buttons in the Default Install column or Custom Install column.
Note – If you are upgrading to FLEXlm 7.0b license manager software from an earlier FLEXlm version, your license manager is automatically brought down during the upgrade. After you install your new licenses, the license installation tool starts your license manager again. During the upgrade, your licensed software will be unavailable.
- A default installation installs all components and all online documentation that is associated with the components.
- A custom installation allows you to select which components you want to install.
Note – If you select Custom Install, the Component Selection window appears after you complete Step 13.
13. Click Next to continue to the Select Install Directory. Decide if you want to change the software installation directory from/opt.
- See Supporting Previous Software Releases if you want to install this new Sun WorkShop release on a machine that contains previous Sun WorkShop releases.
Note – Web Start allows you to install multiple products in one location only and it must be on the same system from which Web Start is started.
- The installation directory that you choose is your default installation directory for this Web Start session:
- If you want to install in
/opt, click Next.- If you want to install the software in a directory other than
/opt, type the new location in the text box.- If you want to browse for another location, do the following:
- Click Browse and select the location where you want the software installed.
- Click OK from the Browse window.
- You return to the Select Install Directory.
14. Click Next to continue with the installation.
- If you selected Default Install in Step 12, the installer checks the diskspace, and the Ready to Install windows opens to show a list of items to be installed.
Note – If you do not have sufficient disk space, Web Start warns you.
- If you selected Custom Install in Step 12, click Next.
- The Component Selection window opens. By default, all components are selected.
- Deselect any components that you do not want to install.
- Click Next.
- A new Component Selection window opens for each product that you select for custom installation.
- Continue through the Component Selection windows for each product.
- Click Next in the last Component Selection window.
- The installer checks the disk space, and the Ready to Install window opens with a list of items to be installed.
15. In the Ready to Install window, verify the items that you want to install.
- If you want to install more products, click Back to return to the Product Selection window, make your selections, and click Next to return to the Ready to Install window.
- When you complete your selection, click Install Now to start the installation.
- The Installing ... window appears with progress bars to indicate the installation status. When the installation is complete, the Install License window opens (FIGURE 3-3).
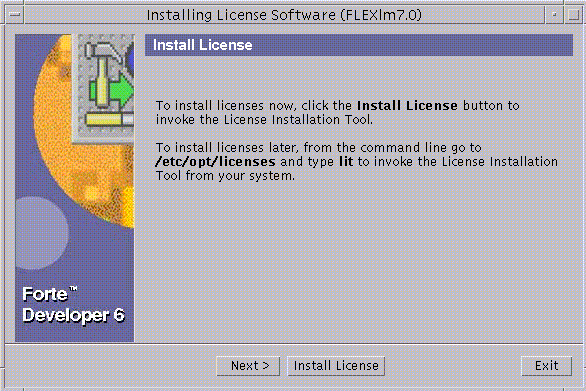
FIGURE 3-3 Install License Window16. Determine if you want to install your licenses now.
- If you choose to not install licenses now, click Next.
- The Installation Summary window opens. If you do not use Web Start to install your licenses, you must use
litandlit_ttyto install your licenses. See Chapter 4 for license installation.
- If you choose to install licenses now, click Install License.
- Go to Chapter for complete instructions on installing licenses.
17. Review the messages in the Installation Summary window, then click Exit to quit the Web Start installation.18. If you mounted the product directory in Step 6 during a remote installation, unmount by typing:
#cd /#/usr/sbin/umount/remote_products19. Exit from superuser privileges by typing:
#exit20. If you performed a remote installation, follow these steps (if you did not perform a remote installation, skip to Step 21):
- Exit from the remote machine by typing:
%exit
- Do the following regarding the NFS server:
- If
nfsdwas already running in Step 6, type the following:#/usr/sbin/unshare /cdrom/devpro_v7n1_platform
- If you manually started
nfsdin Step 6, stop it by typing:#/etc/init.d/nfs.server stop- Exit from superuser privileges by typing:
21. Disable client access by typing the following:
%/usr/openwin/bin/xhost -target-machine-name22. Review theREADMEfiles located in the top directory of the software you installed.23. Set yourPATHandMANPATHvariables by following the steps in Changing PATH and MANPATH Variables.
Note –If you use more than one license server, follow the software installation steps to install the license manager software and the license file on each license server.
Using the Command-Line Installation
These instructions describe how to install the FLEXlm 7.0b license manager software and the Sun WorkShop development tools using the command-line interface.
1. On your source computer, become a superuser (root) by typing:
%suPassword:root-password2. Check that the Sun WorkShop CD is in your CD-ROM drive.3. Pick a local or remote installation method.
- To help you decide, see Local or Remote Installation. Then follow the instructions in this step.
Note – Throughout these instructions, replace platform withsparcif you use the SolarisTM SPARC Platform Edition or withintelif you use the SolarisTM Intel Platform Edition.
Local Installation
For a local installation, follow these steps:
- If you have not already done so, go to the CD by typing:
#cd /cdrom/devpro_v7n1_platform
- Skip to Step 4.
Remote Installation
For a remote installation, follow these steps:
- Add the following line to the
/etc/dfs/dfstabfile:
share -F nfs -o ro /cdrom/devpro_v7n1_platform
- Find out if your source machine is an NFS server by typing:
#ps -ef | grep nfsd
- If screen output like the following appears, then
nfsdis running:
root 237 1 17 Jun 04 ? 0:00 /usr/lib/nfs/nfsd -a 16
- If
nfsdis running, type:#/usr/sbin/shareall
- If you do not get screen output like the above, start
nfsdby typing:#/etc/init.d/nfs.server start
#ps -ef | grep nfsd
- You should then get screen output like the above. If not, contact your system administrator or your Sun authorized service provider.
- Make sure your source machine is exporting your product directory by typing:
#/usr/sbin/dfshares
- Screen output like the following appears:
RESOURCE SERVER ACCESS TRANSPORTserver-name:product-location server-name - -
- Log in to the target machine by typing:
#rlogintarget-machine-name-luser
Password:user-password
%su
Password:root-password
- Replace user with your user login name (not
root).
- Go to the source machine by typing:
#cd /net/source-machine/cdrom/devpro_v7n1_platform
- If you cannot change to that directory and you do not have an automounter on your network, create a mount point on the target machine and mount the product directory by typing the following commands:
Note – Do not type the backslash (\). The backslash indicates that the command must be typed as one line.
#mkdir /remote_products
#/usr/sbin/mount -F nfs -rsource-machine:/cdrom/\devpro_v7n1_platform/remote_products
#cd /remote_products
4. Start the command-line installation by typing:
5. Typeyto install theSUNWwsr2package. This package allows theproductregistryfile to log properly.6. When the welcome message appears, press Return.7. Decide whether you want 64-bit support.
- Type
yto select 64-bit support ornto select 32-bit support. If no character is entered, the choice will default to 64-bit support.
Note – The 64-bit selection does not appear for an x86 platform installation.
8. The following product selection text appears: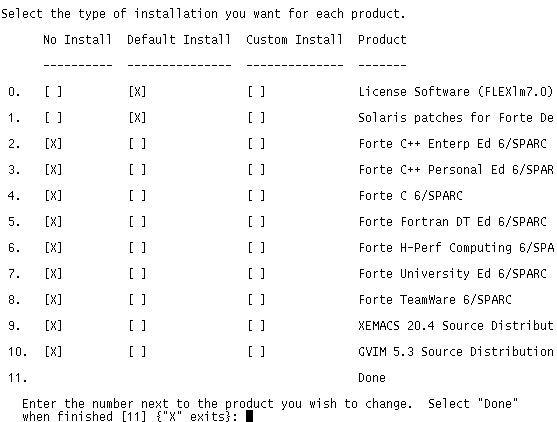
- The default selection License Software (FLEXlm 7.0) installs FLEXlm 7.0b and the License Installation Tools.
Caution – You cannot install your license without installing the License Software, and you cannot execute your installed product software without installing your software license.
Note – The default selection Solaris patches for Forte Developer 6 installs the patches. If you have previously installed patches, installing the default patches does not downgrade your system. For more information on patches, see theREADMEfiles in the Patch directory.
9. To select or deselect a product for installation, type the number (0-9) corresponding to the product you are considering.
Note – If you are upgrading to FLEXlm 7.0b license manager software from an earlier FLEXlm version, your license manager is automatically brought down during the upgrade. After you install your new licenses, the license installation tool starts your license manager again. During the upgrade, your licensed software will be unavailable.
10. Select the type of installation you want for that product.
- For no installation, type 1. No installation deselects a product and the product is not installed.
- For default installation, type 2. Default installation installs all components and online documentation associated with that product.
- For custom installation, type 3. Custom installation allows you to select the components of that product you want to install. (You will be taken through custom installation in Step 13.)
11. To select or deselect another product for installation, return to Step 9. Select Done if you are finished.12. Before you can proceed, you must specify a location for installation.
Note – Web Start allows you to install multiple products in one location only and it must be on the same system from which Web Start is started.
- If the default directory,
/opt, is your desired installation directory, press Return.- If not, enter the name of the new directory.
13. If you selected custom installation for a product in Step 10, you will now be taken through the custom installation steps for that product.
- Select or deselect a component for installation by entering the number corresponding to the component, and press Return.
- When finished, type 0 and press Return.
14. A list of products and its components will be listed for verification.
- Type 1 if you want to proceed with installation.
- Type 2 if you want to start over from Step 6.
- Type 3 if you want to exit installation.
15. If you typed 1 to proceed with installation, a progress indicator will appear.
- When installation is 100% complete, you can view a product's log file by typing the number corresponding to that product.
- When finished viewing the log files, type the number corresponding to done.
16. If you mounted the product directory in Step 3 during a remote installation, unmount by typing:
#cd /#/usr/sbin/umount/remote_products17. Exit from superuser privileges by typing:
#exit18. If you performed a remote installation, follow these steps (if not, skip to Step 19):
- Exit from the remote machine by typing:
%exit
- Do the following regarding the NFS server:
- If
nfsdwas already running in Step 3, type the following:#/usr/sbin/unshare /cdrom/devpro_v7n1_platform
- If you manually started
nfsdin Step 3, stop it by typing:#/etc/init.d/nfs.server stop- Exit from superuser privileges by typing:
19. Review theREADMEfiles located in the top directory of the software you installed.20. Set yourPATHandMANPATHvariables. See Changing PATH and MANPATH Variables.Changing
PATHandMANPATHVariablesBecause the Sun WorkShop product components and man pages do not install into the system
/usr/bin/and/usr/share/mandirectories, you must change yourPATHandMANPATHenvironment variables to enable access to Sun WorkShop.
Note – The paths shown in this section assume that Sun WorkShop packages have been installed in the standard/optdirectory. If you have indicated another installation directory when you started Web Start, replace/optin the examples with the installation path you have selected.
The
PATHandMANPATHvariables should be set in your home.cshrcfile if you are using the C shell, or your home.profilefile if you are using the Bourne or Korn shells.
- To invoke the Sun WorkShop commands, you need to add
/opt/SUNWspro/binto yourPATHenvironment variable.- To access Sun WorkShop man pages with the
mancommand, you need to add/opt/SUNWspro/manto yourMANPATHenvironment variable.- To access the man pages for the Sun WorkShop license management tools, add
/opt/SUNWste/license_tools/manto yourMANPATHvariable.SunOSTM man pages
csh(1),sh(1), andksh(1) describe thePATHvariable for the C, Bourne, and Korn shells. Theman(1) man page describes theMANPATHvariable.You can display the current value of
PATHto determine if you need to set yourPATHvariable to locate Sun WorkShop commands. If the command
%echo $PATHdisplays a string of paths containing
/opt/SUNWspro/bin/you do not need to set your
PATHvariable because it is already set. (/optmay be replaced by an alternative install path.)You can determine if you need to set your
MANPATHvariable by requesting theworkshop(1) man page. If theman workshopcommand is not able to find theworkshop(1) man page, or if the page displayed is not for the version of the software just installed, you do not have theMANPATHvariable set correctly.The discussion that follows shows how to permanently add these paths to the appropriate environment variables so that all Sun WorkShop components are always available. These commands can also be entered at a shell prompt to temporarily enable only that shell.
Note – Do not type the backslash (\). The backslash indicates that the command must be typed as one line.
1. Add Sun WorkShop to yourPATHandMANPATHvariables.
- If you are using the C shell (
csh), first determine if yourMANPATHvariable is already set. At a shell prompt, type the command:
%echo $MANPATH
- If the response is "Undefined variable" (C shell) or an empty line (Bourne/Korn shell), the
MANPATHvariable is not set. If paths to one or more man directories are displayed, the variable is set.
- Now edit the
.cshrcfile in your home directory and add the following line at the end of the file:
set path=(/opt/SUNWspro/bin $path)
- If the
MANPATHvariable is not already set, add the following line:
setenv MANPATH\/opt/SUNWspro/man:/opt/SUNWste/license_tools/man:/usr/share/man
- If the
MANPATHvariable is already set, add the following line instead:
setenv MANPATH\/opt/SUNWspro/man:/opt/SUNWste/license_tools/man:$MANPATH
- If you are using the Bourne or Korn shells (
shorksh), edit the.profilefile in your home directory and add the following lines:
PATH=/opt/SUNWspro/bin${PATH:+:}${PATH}
MANPATH=\/opt/SUNWspro/man:/opt/SUNWste/license_tools/man:\${MANPATH:=/usr/share/man}
- There should not be any blanks in these two lines.
2. Save the.cshrcor.profilefile that you modified in step 1.3. Reinitialize your shell by executing the following command:
- For the C shell, type:
source ~/.cshrc
- For the Bourne or Korn shell, type:
. ~/.profile
Note – ThePATHandMANPATHvariables must be set to include Sun WorkShop in each user's environment for users to access the installed software.
Continue to Chapter 4 if you have not installed your licenses. If you have installed your licenses, you are now ready to use your Sun WorkShop products.
|
Sun Microsystems, Inc. Copyright information. All rights reserved. Feedback |
Library | Contents | Previous | Next | Index |
