Starting SunVTS on a Remote System
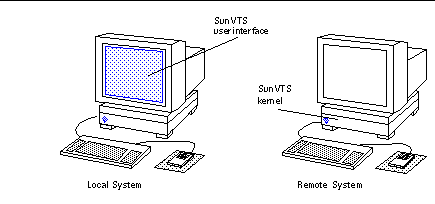
You can start, view, and control SunVTS testing sessions over a network. There are several ways to do it, but the desired effect is to have SunVTS display the SunVTS user interface on the local system (the system that you are on), while the SunVTS kernel is running and testing a remote system (connected via Ethernet, modem lines, and the like).
The following procedures are described in this section:
Requirements
In addition to the normal SunVTS requirements (refer to "Requirements for Starting SunVTS"), the following requirements must be met to run SunVTS on a remote system:
-
The user or host making the remote connection must be an authorized SunVTS user, either through the .sunvts_sec file (basic security), or through the SEAM security scheme. See "SunVTS Security".
-
The same version of SunVTS must be installed on both the local and remote systems.
To Connect the User Interface to a Remote System
-
Type the following command:
# /opt/SUNWvts/bin/sunvts -h remote_hostname
Replace remote_hostname with the hostname or IP address of the remote system.
The sunvts command starts the SunVTS kernel (vtsk) on the remote system, and starts the SunVTS user interface on the local system. The user interface connects to the kernel and the displays the test session of the remote system. Refer to Figure 3-1 below.
The term system under test (SUT) refers to the system running the SunVTS kernel, which is the remote system in this example.
Figure 3-1 Running sunvts With the -h Option

Note -If the user interface is already running on your local system, you can use the "Connect to" button to connect to a remote machine SunVTS kernel, provided that the SunVTS security is set up properly.
-
Configure SunVTS for the test session and start the tests as described in the following sections:
To Run SunVTS Through a Remote Login
-
Use the xhost command to allow the remote system to display on your local system.
% /usr/openwin/bin/xhost + remote_hostname
Replace remote_hostname with the name of the remote system.
-
Log in to the remote system as superuser.
Use a command such as rlogin.
-
Start SunVTS:
# /opt/SUNWvts/bin/sunvts -display local_hostname:0
Replace local_hostname with the name of the local system.
The SunVTS kernel starts on the remote system and the user interface displays on your system.
-
Configure SunVTS for the test session and start the tests.
To Run SunVTS Through telnet or tip (TTY Interface)
You can run SunVTS on a remote system with the TTY interface through a telnet or tip session.
You need to set the correct terminal type and number of columns and rows before starting the interface. The steps below describe this process.
-
Use the echo command to display the value of the TERM variable:
In this example, the TERM variable is a Korn or Bourne shell variable and the value is sun-cmd. Your display device may be something else like a Wyse, TeleVideo, or other kind of terminal. In that case your TERM value will be something different.
$ echo $TERM
sun-cmd
-
Use the stty command to display the settings of your terminal:
$ stty
speed 9600 baud; -parity hupcl
rows = 60; columns = 80; ypixels = 780; xpixels = 568;
swtch = <undef>;
brkint -inpck -istrip icrnl -ixany imaxbel onlcr
echo echoe echok echoctl echoke iexten
Note -You must have a minimum of 80 columns and 24 rows to run the SunVTS TTY interface.
-
Write down the values of your TERM variable and rows and columns settings.
You will need these values later.
-
Connect to the remote system using either the telnet or tip commands.
Refer to the telnet(1) and tip(1) man pages for more information about these commands.
-
Become superuser on the remote system.
-
Identify your terminal type and settings in the telnet (or tip) session window:
# TERM=sun-cmd
# stty rows 60
# stty columns 80
-
Start SunVTS with the TTY interface:
# /opt/SUNWvts/bin/sunvts -t
-
Configure SunVTS for the test session and start the tests.
- © 2010, Oracle Corporation and/or its affiliates
