| Overview ~ Tool Model ~ UI Components ~ Access Resources ~ Packaging ~ Scope ~ Registration ~ Localization |
This section provides detailed information about the SMC client tool model, and describes the core SMC client classes you must use in your tool implementations.
The SMC tool model defines the basic components of a tool implementation, and how these components are used to manage the presentation of data. A tool consists of five major components, as described below.
The Tool class is the main interface client tools must implement, and is the top-level client class instantiated by the console.
You are not limited to one instance of the Tool class. For example, you can create one instance each for all your navigation nodes, or create one master instance with which all nodes are associated, or create one for each of the non-leaf nodes, among other possibilities.
The design you choose depends on how you want to structure your application, and how much may be in common among your navigation nodes. Navigational nodes are associated with specific Tool instances by means of VScopeNode.setTool(Tool).
While you must implement all methods in the Tool interface, six are of particular interest, and called in the order as presented here:
Method Description Tool.setToolContext()Provides a handle to the ToolContext object, used for retrieving information (such as it's management scope) about the environment the tool is run in. Tool.setProperties()Provides a handle to the shared properties object that all components in the SMC system can use for property storage Tool.addConsoleActionListener()Allows other system components to register to receive your events; you simply need to maintain a list of these listeners Tool.init()Called after the Tool is instantiated, it is the time when a Tool should connect to server-side services. Tool.start()Called whenever any node associated with the Toolinstance is clicked; for a oneToolinstance application, it is a signal that your application has focusTool.stop()Called whenever any node not associated with the Toolinstance is clicked; for a oneToolinstance application, it is a signal that your application has lost focus
It is important to know when your application does or does not have focus because it will receive all events on the event bus, even those related to other applications.
Every tool must have a deployment descriptor before it can be registered and maintained by SMC. A descriptor includes static information about the tool component that is used by the SMC console to form a representation of the tool without actually instantiating it, and to manage the lifecycle of its instances.
There are several attributes common to all tools, such as:
Tool package path (provider-class tag) -- SMC needs the provider-class in order to instantiate your Tool.
Resource bundle location -- Defines the base location and name of the Tool's ResourceBundle (resource-bundle tag). The resource-bundle is used to lookup special localized properties that are needed in order to present the Tool in the console without instantiating it. These special properties are: LARGEICON, SMALLICON, BEANNAME, DESCRIPTION, and VENDOR, and are discussed TBD.
Help file location (Optional) -- Defines the base location and name of the JavaHelp help set for this component. See TBD for details on the policy established by SMC for packaging of JavaHelp bundles.
SMC SDK API version (Required) -- Defines the String version number of the SMC SDK API this component builds against. This must be in the form of : major[.minor]
Supported tool display contexts -- Application GUI, applet, CLI.
Supported Management Scopes (Optional) -- Defines the management scopes this service supports. Supported management scopes specifies which one or more of the following name services contents will be accessed and/or changed by this service:
file | nis | nisplus | ldap | dns
If not specified, file scope is assumed.
Runtime parameters (optional) -- Defines runtime attributes that effect service behavior. Unlike global registry properties, these runtime parameters can be different for each tool.
An SMC tool descriptor is defined as an XML-based file. Please refer to the "Deployment Descriptor DTD" at /usr/sadm/lib/smc/lib/dtds/viperbean_1_0.dtd for detailed syntax information.
Sample Code Tool Descriptor
VConsoleProperties represents a shared Properties object that all components in an SMC system can use for property storage.
The setProperties() method in your Tool instance is called once after instantiation to provide a handle to the Properties object. You may want to cache the setProperties() reference because you will eventually need it to access console properties.
Sample Code Tool.setProperties()
Additionally, you can register a PropertyChangeListener with the Properties object so you can be notified when properties change. The easiest way to do this is to have your main Tool class also implement PropertyChangeListener. |
Sample Code PropertyChangeListener
In addition to the various console properties as defined in VConsoleProperties, you can create your own properties for storage of tool preferences, so that they can be restored in subsequent sessions. To avoid namespace collisions with similarly named preferences in other tools, or even within the same tool, it is recommended that preference names be based on the full class name of the class in which the preference is used.
Sample Code
Any class that implements Tool should also implement the VConsoleActionListener interface, which enables the Tool to be notified of various events on the ![]() event bus. All events are
event bus. All events are VConsoleEvent with String-type event IDs.
There are numerous console-specific events which your application can listen for, all of which are listed under VConsoleActions. Additionally, you can define your own event IDs and send them to other components in your own application or to other applications that have knowledge of your event IDs. You just need to ensure your event ID's are globally unique, similar to system properties -- for example, com.mycompany.myproduct.mytool.formatDiskNow.
If your application is registered on the event bus, it will receive all console events, even those related to other applications. You therefore need to make sure your application does not execute, say, a refresh operation while another application has focus. You can use the Tool.start() and Tool.stop() methods to track whether or not your application has focus, and then react appropriately when listening for events.
Sample Code VConsoleActionListener
One of the most significant benefits of the event bus architecture is that it makes it possible to develop dynamically configured display models with no API-specific dependencies. For example, when the user selects "large icon view" from the toolbar, the toolbar will modify the ICONSTYLE property to be LARGE. As soon as this property is modified, all components in the system which have registered for property changes are notified of the property changed and of the new value. The result pane for instance, will update its view to correspond to the new ICONSTYLE property setting.
By comparison, if SMC used an API driven model, the toolbar would have to have a reference to the results pane and know the method to call to update its display, as well as any other component in the system which needed to know the value of the ICONSTYLE change.
An example of a console event would be the user selecting a node in the navigation tree. The tree view component will create a SCOPESELECTED event and send it on the event bus. Components which are interested in SCOPESELECTED events will process the event and react accordingly. For instance, the result pane will display the children of this newly selected node. The InfoBar component will count the number of children the newly selected node has and set its textfield display to reflect that, such as 6 Item(s).
Eliminating API dependencies thus creates a very flexible display model. Components no longer need any references to other components in the system, nor do they need to know the methods to invoke, they simply modify a known property or generate a known event. The other components in the system that are interested in the event or property will update themselves accordingly. Display components can easily be added and removed without fear of breaking API dependencies or passing around references to necessary components. Only one reference needs to be set to the properties object, and components added as event listeners to create the event bus.
As mentioned previously, Tool.addConsoleActionListener() lets other system components register to receive your application's events, and you simply need to maintain a list of these listeners. You use the standard "fire" method to notify all registered listeners of a particular event.
Sample Code
Perhaps the most widely used class is VScopeNode. This is the class in which you provide information (like icons, column headers, and so forth) about your data model to the console, whether that information is rendered in the navigation pane or results pane.
| Use the payload field to associate your application-specific object with the node, so that you can easily get a handle to your data object when events are received for a specified node. |
You create an instance of VScopeNode for every object you want to appear in the navigation pane. All navigation pane nodes that are children of a given parent node will automatically be rendered in the results pane when the parent node is selected.
You denote non-leaf nodes by setting the internal root of the node to null (node.setInternalRoot(null)). Perhaps a better term for these non-leaf nodes in the SMC context is exposed nodes, because you are exposing the model completely to the SMC engine for it to render and manage.
Additionally, SMC manages the opening of the corresponding results pane representation of the exposed node when it is double-clicked by automatically navigating to its node representation in the navigation pane. You do not need to do anything special to manage the results pane in a model that does not have an internal root.
You denote leaf nodes by setting the internal root of the node to a VScopeNode instance. Leaf nodes refer to models that your application will manage -- the model is not completely exposed to the SMC engine. In the SMC context, this is referred to as an extended or internal root data model.
In an extended model, your application is responsible for creating VScopeNode instances for each object you want to render in the right-side results pane. Each of these nodes must be added as siblings to the same parent node -- that is, to the internal root node. Whenever you change this model -- for example, by adding deleting or modifying -- you must post an UPDATESCOPE event.
Sample Code UPDATESCOPE
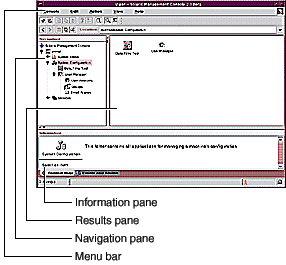
The illustration below shows the default SMC look and feel, and the location of each of its components. Note that tools do not have direct access to any of the components in the console. Instead, specific interfaces are provided for accessing the underlying data model and for accessing and customizing the console.
Default SMC Console Window
The Navigation pane works like a frame in a web page: clicking an item determines what appears in the View pane. Before proceeding, it is probably best to have an understanding of the VScopeNode class, and how it can be used to manage nodes in the Navigation pane.
While SMC knows how to create a the node representation of your tool in the Navigation pane without actually instantiating it (via the Tool Descriptor), a tool can re-create or replace this representation during it's instantiation. It is important that this top-level node for your tool be returned by your Tool.getScopeNode() method:
Sample Code
To add a node as a child for a specified parent node:
Sample Code
To remove a node that is a child of a specified parent:
Sample Code
The View pane (usually the "right-side" pane, and sometimes called the results pane) displays the contents of the node selected in the Navigation pane, where the contents could consist of folders or tools. If the node selected in the Navigation pane is a folder, the contents of that folder are displayed in the View pane. If the node selected is a Tool, the top-level contents for the tool is displayed, whether that be folders or simply the implementation of that Tool.
SMC supports 4 display styles in the View pane, accessible via the VConsoleProperties.ICONSTYLE property:
Style VConsoleProperties Name Rows and columns of small icons SMALL Rows and columns of large icons LARGE A single column of small icons, one per row LIST Tabular view of detailed data arranged in columns DETAILS
A tool does not need to do anything to support all these styles. The SMC automatically ensures that when the user changes display style for the current tool which has focus, changing focus to another tool will preserve that display style.
A tool can restrict the available styles available for the user to choose from. However, since the ICONSTYLE property is a shared property amongst all the tools, then a Tool must restore the previous style when it loses focus.
Sample Code
Tools are not limitted to restricting the presentation to a single style. A tool can restrict more than one style and still allow the remaining styles to be selected by the user.
Sample Code
The Information at the bottom of the console displays either context help for the object selected in the Navigation pane, or a list of alarm types, depending on whether the Context Help or Console Events tab is selected.
Context help must be in HTML format. Typically, the help is simply included in the Tool's jar file and retrieved via ResourceManager.getLocalizedTextFile().
Sample Code
The Console Events log provides a view of events that occur between the console and its tools, for example authentication events and tool loading problems. There are 3 types of events defined in the VLogEvent class: INFORMATION, WARNING, and ERROR. Note that console events are not persistent, and are lost when the console is exitted.
Sample Code
The Menu bar includes a series of menus which are common for all tools. Tools can implement the own menu bars by extending JMenuBar and creating their own menus in the usual manner. These menus can be added to the console's menus via the JMenu.setActionCommand() method and the constants defined in the VMenuID class.
Sample Code
The Status bar at the very bottom of the Console has 3 distinct panes for displaying certain kinds of information.
The left pane indicates the number of items (nodes) in the View Pane for the currently selected node in the Navigation pane. Send an VConsoleActions.UPDATESELINFO event to the console to display your text in the left-side info pane. By default, SMC provides a message of "# Items":
Sample Code
The center pane indicates console activity -- for example, a progress meter, or back and forth "shade" movement. If your tool is not able to determine progress status for a long operation, then enabling the back and forth "shade" movement can be done by simply sending a VConsoleActions.UPDATEPROGRESS event to the console. Re-send the same event to disable the movement.
If your tool is able to track progress, then you can specify a JProgressBar instance to be displayed in this center pane, and simply update the JProgressBar as needed to show progress:
Sample Code
The right pane provides progress information in the form of text messages. Send an VConsoleActions.UPDATESTATUS event to the console to display your text, similar to the left-side pane as shown above.
All resources should be loaded using the ResourceManager and ConsoleUtility classes, and should be located on the same root path as your main Tool class. For example, if the provider-class name for your main Tool specified in the Tool Descriptor file is com.mycompany.myproduct.mytool.client.VMytoolMgr, then all resources should be rooted at com.mycompany.myproduct.mytool.client, ideally in subdirectories of this path.
Although the ResourceManager.getLocalized*() methods are convenient for downloading files, these methods do not cache files on the client. Therefore, successive attempts to access the same resource come at the expense of another download. With this in mind, you should implement some sort of caching scheme to minimize the number of downloads, while at the same time taking into account the memory costs of caching. It is anticipated that caching will be a feature of SMC in a future release. |
Use ResourceManager.getBundle() to load resource bundles.
Sample Code ResourceManager.getBundle()
Online help can be provided in 2 forms: "Spot" or context-sensitive help provides short-and-simple information for dialog components in the form of HTML files. "Extended" help provides more extensive information and search capabilities in the form of JavaHelp helpsets. For more information, see the sections that discuss these two formats further under Localization.
Use ResourceManager.getLocalizedTextFile() to load basic (non-JavaHelp) HTML help files. Note the special heuristic used with respect to the current locale and the "C" default locale. Default English HTML files might best be located in the C/html of your main Tool; for example, com.mycompany.myproduct.foomgr.client.C.html.
Sample Code ResourceManager.getLocalizedTextFile()
Note that SMC does not at this time provide support for hyperlinking between HTML files, nor to helpsets. You must implement your own hyperlink listening code on the JEditorPane component of a VOptionPane and render the target of the link using VOptionPane.setHelpHTML(). This will be provided in a future release. In the meantime, you must implement your own link listener.
If you do implement your own link listener, it is possible to hyperlink to a specific helpset target under the following conditions:
Due to a Java limitation, linking to helpsets is only useful from non-modal dialogs or main frames, as modal dialogs will block input and prevent you from using the helpset viewer.
Hyperlinks from within a context-sensitive html file to a helpset target must be of the form helpset://<helpset filename>/<target>, where <helpset filename> may or may not include the .hs extension. For example: helpset://my_helpset.hs/my_target or helpset://my_helpset/my_target.
Then your non-modal dialog or frame must implement a VConsoleActionListener to rout the link event onto the event bus so the console can act on it and launch the help viewer for the specified target. Note that you need to also check the link event to make sure it is indeed a link to an external target, and NOT rout the event if it isn't. The best way to do this is check that the URL's protocol specification is helpset:// and that the URL does NOT end in .html.
Sample Code
VException is the class used for managing exceptions. It is not necessary to invoke the ResourceManager directly, as this is done automatically when you attempt to retrieve the exception's localized message via VException.getLocalizedMessage().
You should override two methods in your VException subclass.
Sample Code
Use ConsoleUtility.loadImageIcon() to load image icons.
Sample Code ConsoleUtility.loadImageIcon()
All tools must include a manifest file in its jar file. The manifest must include the full package path of the main Tool class, and the full package file of the Tool Descriptor file:
Sample Code
It's required that all tools provide a resource bundle that contains information like name, description, icons, vendor, version under predefined message keys:
BEANNAME -- Localized tool nameDESCRIPTION -- Localized description of the toolVENDOR -- Localized vendor nameVERSION -- Localized version numberLARGEICON -- Path of large icon relative to this bundleSMALLICON -- Path of small icon relative to this bundle<property_name>.DESCRIPTION -- Optional description of a property this component defines<parameter_name>.DESCRIPTION -- Optional description of a parameter this component definesThe icon paths specified as LARGEICON and SMALLICON should be relative to this resource bundle's location.
ResourceBundles can be implemented as compilable subclasses of ListResourceBundle, or as .properties files.
Sample Code
The AdminMgmtScope class represents a management scope or domain; that is, a name service domain or a single system. Use the ToolContext instance (obtained via your Tool.setContext() method) to retrieve context-specific information about the environment the Tool is running in.
Sample Code
If a tool uses classes or resources from some other library jars, you need to register them first, for example:
# smcconf repository add library ALL <path>/mylibrary.jar
Here we are using the pseudo bean name 'ALL' to represent all tools and services.
Next, you register a tool jar to the server repository:
# smcconf repository add bean <path>/mytool.jar
You can check the repository to see the tool is successfully imported by doing repository listing:
# smcconf repository list
See the Registration section for more details regarding the smcconf command.
Localized ResourceBundles are implemented using the standard Java heuristics (baseclass_language_country_variant). Consult the JDK docs for detailed information.
As mentioned ealier, ResourceBundles can be implemented as compilable subclasses of ListResourceBundle, or as .properties files. If you use .properties files, they will not load properly at runtime if the translations are in a non Latin-1 based character set (multi-byte environments) because there is no way to specify a character set encoding. Therefore, they must be converted to Latin-1 or Unicode-encoded characters using the native2ascii command.
Sample Code native2ascii
Localized HTML files are implemented using a similar heuristic as ResourceBundles, although each localization must reside in a unique directory based on locale, with identical filenames across locales. For example:
com/mycompany/myproduct/C/html/foobar.htmlEnglish locale; system default, referred to as the "C" locale com/mycompany/myproduct/fr/html/foobar.htmlFrench locale com/mycompany/myproduct/de/html/foobar.htmlGerman locale
When translating HTML files, you must specify the proper character set via the CONTENT field. Note that this information must be in a line that is NOT embedded withint a <HEAD></HEAD> block.
Sample Code
Localized JavaHelp helpsets must be structured by locale, as discussed in the JavaHelp User's Guide. Specifically:
The .hs file must be named following the baseclass_language_country_variant scheme as for Java ResourceBundles (foo_locale.hs).
All other files belonging to the helpset must live in a subdirectory named for the locale. The illustration below shows a sample layout of the filesystem hierarchy of localized helpsets.
JavaHelp Localization Hierarchy
All references to those files in the .hs file must reflect this subdirectory name.
Sample Code
URLs must reflect the location of the html files relative to the helpset, regardless of locale. For example, if some html files were located in the topics/topicA subdirectory, as shown in the illustration above, then URLs for those files referenced in Map.jhm would begin with topics/topicA/ in front of each file referenced.
Sample Code
To translate a JavaHelp helpset, edit the specified files as follows:
.hsSpecify proper character set encoding; translate all <label>tag values*.htmlTranslate and also specify the proper character set via the CONTENT field, as shown here index.xml, map.jhmSpecify proper character set encoding toc.xmlSpecify proper character set encoding; translate all tocitem "text" fields only (do NOT translate "target" fields)
The final step in constructing a helpset is to build the search index. This requires that you have JavaHelp 1.1 installed on your machine.
Sample Code