| Previous Contents Index DocHome Next |
| iPlanet Application Server 6.0 Administration and Deployment Guide |
Appendix B Deploying the Bank Application with the Deployment Tool
This appendix provides an example of using the iAS Deployment Tool to manage and prepare application components for deployment. The steps included in this appendix should assist you when preparing your organization's application components for deployment and deploying the application to your iAS environment.The tasks included in this appendix use the Bank sample application that was copied to your file system during iAS installation as the basis for this appendix.
The Bank application provides a web-based interface to a basic online banking service. A collection of servlets interact with two stateless session beans to provide customers with balance inquiry and account transfer services. Bank customer service representatives are able to add new customers and remove existing customers from the bank's database as well as from the Directory Server.
This appendix contains the following sections:
Importing and Deploying a Third-Party J2EE Application
All of the steps included in this appendix are completed with the iAS Deployment Tool. For further information about the iAS Deployment Tool, see Chapter 2 "Deploying and Upgrading Applications."
Packaging Application Components to Create and Deploy the Bank.ear File
- This section includes the steps required to modify a pre-existing J2EE application to suit your iAS environment and then deploy the application to your iAS machine using the iAS Deployment Tool.
- This section includes the steps required to package application components into modules and then assemble them into an application .ear file. The final steps direct you to deploy the .ear file to your iAS machine.
Importing and Deploying a Third-Party J2EE Application
If your organization purchased a J2EE application through a third-party application provider, you will be required to modify the deployment descriptor XML files to conform to your iAS environment before deployment.In this section you will open the Bank application Enterprise ARchive (.ear) file with the iAS Deployment Tool, modify the deployment settings to match your environment and then deploy the .ear file to your iAS machine.
Opening the .ear File in the Deployment Tool
You can open the Bank application .ear file in the iAS Deployment Tool to modify the deployment descriptor files using the descriptor editor GUI. The bank application .ear file contains the application components that have been packaged into modules and an application-level deployment descriptor file.
Launch the iAS Deployment Tool as follows:
On a Windows NT system: from the Start menu, choose Programs, then choose iPlanet Application Server 6.0. Finally, choose iAS Deployment Tool.
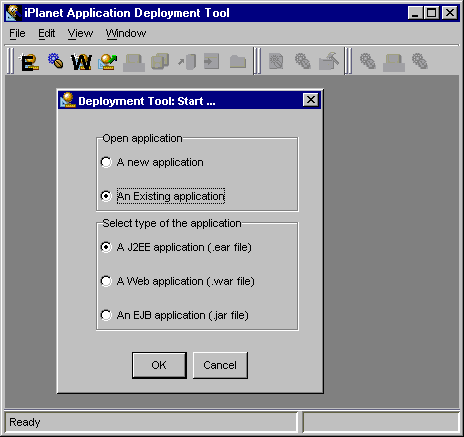
In the Deployment Tool: Start... dialog, choose to open an existing application and then a J2EE application (.ear file).On a UNIX system enter the following at the command line:
<iAS installation directory>/ias/bin/deployGUI
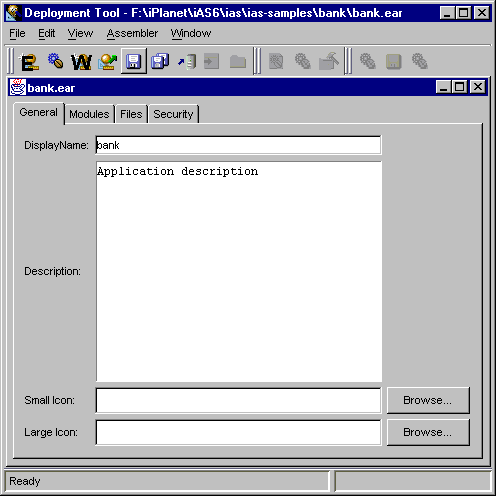
In the Open dialog, navigate to <ias installation directory> ias/ias-samples/bank, select bank.ear and click OK.
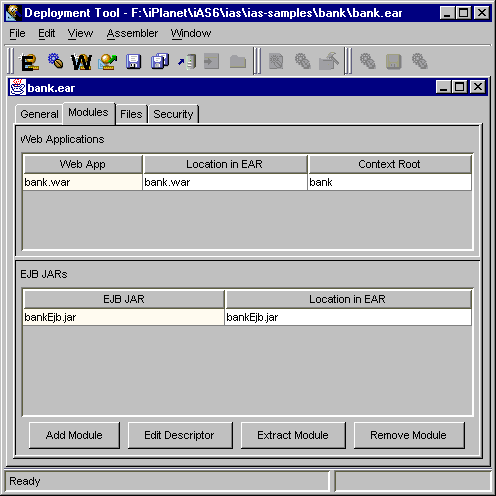
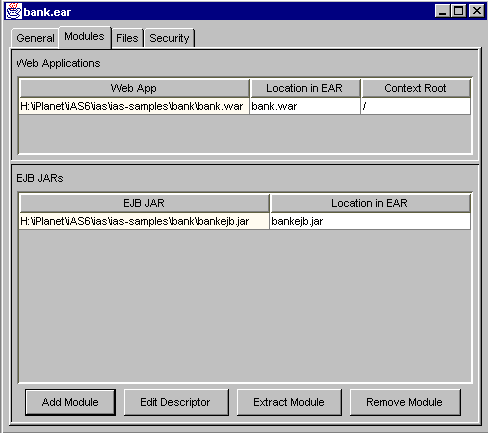
Select the Modules tab to see that this application is comprised of a Web Application module, bank.war and a EJB-JAR module, bankEJB.jar.
Modifying Environment Settings
You must modify the environment settings of the BankService EJB which is packaged inside the bankEjb.jar archive. This is necessary so that the EJB can communicate with the Directory Server (ldap) in your environment. The environment in which the EJB runs is defined in the deployment descriptor XML files for the module. You can edit the deployment descriptor XML files for a module with the iAS Deployment Tool using the descriptor editor.
With the bankEJB.ear archive opened in the iAS Deployment Tool, click the Modules tab.
You are now finished editing the deployment descriptor files for the bank application. Continue with Deploying the J2EE Bank Application."Select the bankEJB.jar file in the EJB JARs box and click the Edit Descriptor button.
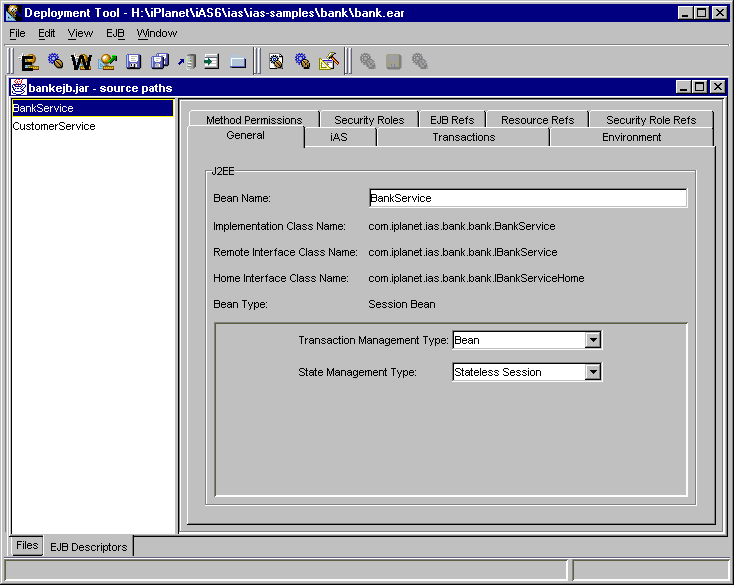
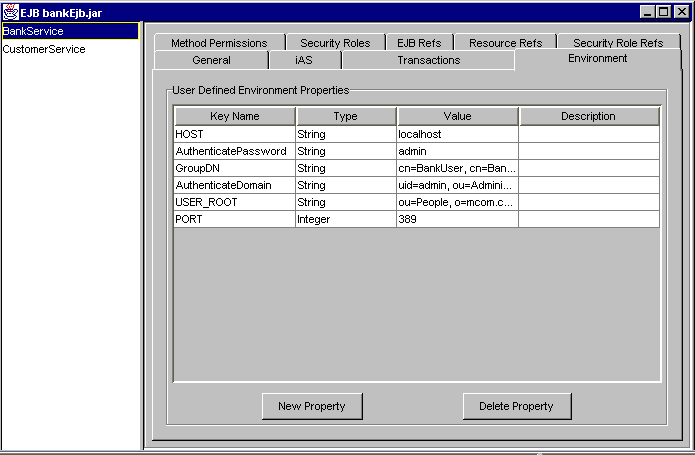
Highlight the BankService (EJB) on the left and select the Environment tab.
- The descriptor editor for this EJB-Jar module opens. The EJBs that are packaged in this module display to the left: BankService and CustomerService.
Modify the environment entries as required for your targeted deployment environment.
Click the titlebar of the bank.ear archive window and choose File, then Save to update the bankEJB.jar deployment descriptor data.
- The following table lists the environment settings required by the BankService EJB to connect and make changes to the directory server. The directory server connection settings (host name, port number, etc.) and authentication properties must be provided to the EJB. The values shown in bold are values that you might need to modify for your targeted deployment environment and network domain name.
Close the EJB bankEJB.jar window.
- You have modified a deployment descriptor XML file for the BankEJB.jar archive. When you modify a module's deployment descriptor file at the application level, new deployment descriptor files are created; the original deployment descriptors remain intact. The alternate deployment descriptor file, bankejb.jar.altdd.xml, will be used for deployment. To see how these files are packaged, see Figure 2-1.
Packaging Application Components to Create and Deploy the Bank.ear File
If your organization has developed an application from scratch, you will use the iAS Deployment Tool to package the application components into modules and then assemble the modules into an Enterprise ARchive (.ear) file. Finally, you will deploy the .ear file to your iAS machine(s).You must create a set of Java class files prior to using the Deployment Tool to assemble and deploy the Bank application. See Compiling the Application for details on how to compile the application.
Creating the EJB-JAR Module
An EJB-JAR module contains one or more EJBs. When you create a EJB-JAR module, you first specify the application components to copy into the .jar archive file and then the classes to create an EJB. Next you create the deployment descriptor XML files with the iAS Deployment Tool descriptor editor. The descriptor files, ejb-jar.xml and ias-ejb-jar.xml are stored in the /META-INF directory of the archive, with no module name prepended. These XML files represent the component-level deployment descriptor for the module and can contain declarative data for each EJB.
Specifying Source Files for the EJB-JAR Module
The bank application contains one EJB-JAR module, bankEJB.jar that contains two EJBs, BankService and CustomerService.To specify application components for the EJB-JAR module and create the EJBs, complete the following steps:
On your file system, create a new folder:
Launch the iAS Deployment Tool as follows:
- <iAS installation directory> \ias\Apps\bank.
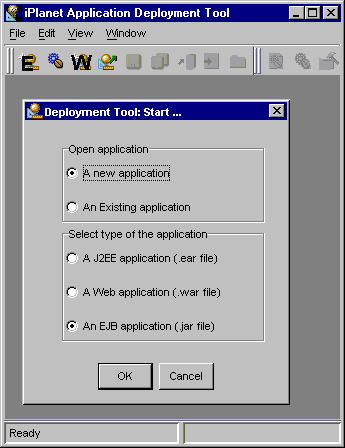
Choose to create a new application and, specifically, an EJB application.
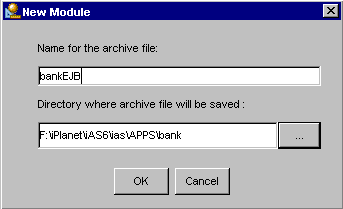
Enter bankEJB for the archive file name and choose directory <iAS installation directory\ias\APPS\bank to store the archive.
- The New Module dialog box opens.
Click OK.
- The archive file name is used to identify the module.
Choose Edit, then Insert and finally, Contents of Subtree.
- The archive window opens for you to specify the application components.
Specify the path as <iAS installation directory>\ias\ias-samples\bank\build\lib\classes.
In the resulting file list, highlight all classes in the servlets\ subdirectory.
- The application components are added to the Files tab of the archive window.
Choose Edit, then Remove Files to delete them.
On the Files tab, select the following classes:
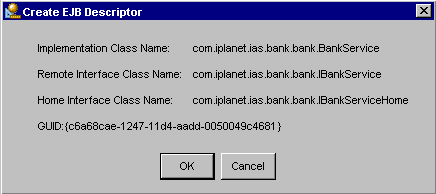
Choose EJB, then Create Descriptor.
Click OK and define this EJB as a stateless session bean.
Declaring the EJB-JAR Deployment Descriptor Parameters
Once you have specified the EJBs for the bankEJB.jar module, you are now ready to define the deployment descriptor parameters for this module. The deployment descriptor parameters contains all the declarative data (J2EE and iAS-specific) required to deploy and run the application.For the bank application, you must declare the environment settings of the BankService EJB. This is necessary so that the EJB can communicate with the Directory Server (ldap) in your environment. The environment in which EJBs run is defined in the deployment descriptor XML files for the module.
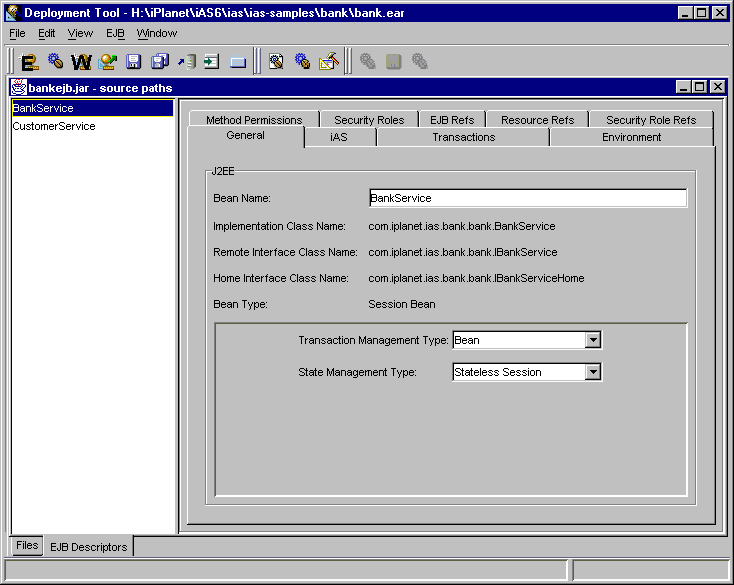
With the bankEJB.jar archive open in the Deployment Tool, select the EJB Descriptors tab at the bottom of the archive window.
The bankEJB module is now complete.
Highlight the IBankService EJB on the left of the descriptor editor window.
- The descriptor editor opens for you to declare deployment parameters for the EJBs shown on the left of the descriptor editor window.
Select the Environment tab and enter the values in the following table.
Select the Resource Refs tab.
- The table lists the environment settings required by the BankService EJB to connect and make changes to the directory server. The directory server connection settings (host name, port number, etc.) and authentication properties must be provided to the EJB.
- For each row you need to add, click the New Property button. Enter all the values in the following table and be careful to modify the values in bold as required to match your target deployment environment.
cn=BankUser, cn=BankApp, ou=Groups, o=mcom.com
admin
uid=admin, ou=Administrators, ou=TopologyManagement, o=NetscapeRoot
localhost
389
ou=People, o=mcom.com
Click the New Reference button to add a new row.
LocalDS
javax.sql. DataSource
Container
jdbc/LocalDS
Highlight IBankService EJB on the left of the descriptor editor window and then choose EJB, then Build Stubs.
Choose File and then Save.
- A message window pops open for you to view the process. Depending upon your hardware, it might take awhile to build the stubs. When the process is complete, the message window displays "9 stub files generated for IBankService."
- Stubs and skeletons are required by the EJB container and must be deployed with the application files. These stubs and skeletons enable remote communication and allow the container to intercept all bean requests. When you create stubs and skeletons, the Deployment Tool automatically adds them to the list of application files in the archive.
Highlight the ICustomerService EJB on the left of the editor window and then select the Resource Refs tab.
- This command updates the archive by copying any unsaved files into the archive and creating/updating the deployment descriptor XML files. At this time ignore any messages that indicate that more work might be necessary.
Click the New Reference button to add a new row.
LocalDS
javax.sql. DataSource
Container
jdbc/LocalDS
Highlight ICustomerService EJB on the left of the descriptor editor window and then choose EJB, then Build Stubs.
Choose File and then Save.
- A message window pops open for you to view the process. Depending upon your hardware, it might take awhile to build the stubs. When the process is complete, the message window displays "9 stub files generated for ICustomerService."
- This command updates the archive by copying any unsaved files into the archive and creating/updating the deployment descriptor XML files. At this time ignore any messages that indicate that more work might be necessary.
Creating the Web Application Module
A Web Application module contains application components such as:When you create a Web Application module, you first specify the application components to pack into the .war archive file. Then you create the deployment descriptor XML files with the iAS Deployment Tool descriptor editor. The descriptor files, web.xml and ias-web.xml are stored in the /WEB-INF directory of the archive, with no module name prepended. These XML files represent the component-level and module-level deployment descriptor data.
Specifying Source Files for the Web Application Module
The bank application contains one Web Application module, bank.war that contains several servlets and JSP files.
From the Deployment Tool's File menu, choose New J2EE Module and then Web Application.
Enter bank for the archive file name and choose directory <iAS installation directory\ias\Apps\bank to store the archive.
- The new module dialog opens.
Choose Edit, then Insert and Contents of Subtree.
- This name is used to identify your module. The Deployment Tool will create a subdirectory under the directory specified, with the same name as the module name to contain your module.
- A blank bank.war archive window opens for you to specify the application components.
Navigate to <iAS installation directory>\ias\ias-samples\bank\src and then select the docroot\ sub-directory.
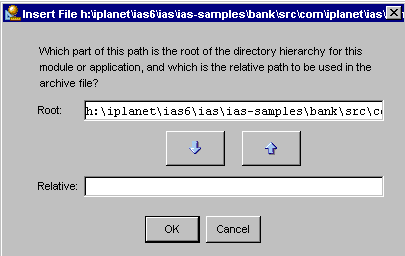
Click the up and down arrow buttons to make the relative path box empty and click OK.
- The Insert Contents of Directory dialog opens.
- The iAS Deployment Tool tries to construct a single directory hierarchy for the archive file that contains your module, even when the component files come from different places in your file system. For example, you might have class files in directories under \usr\joe\classes and HTML files under \usr\fred\pages. Once the Deployment Tool is aware that these are the roots of the directory hierarchies where you keep different kinds of files, it can project the locations where files should be put within your archive. For example, the file \usr\fred\pages\yellow\start.html would be put in the archive at \yellow\start.html. This dialog box displays when a file being inserted is not under any of the roots known for the current module and prompts you to declare the root of the hierarchy in which this file resides. Use the arrow buttons to partition the file's absolute path into a root and a path relative to that root.
Note <iAS installation directory>\ias\Apps is pre-loaded as a root directory. If you insert files into your module that are in a subdirectory of this directory, the previous dialog will not appear.
Since no deployment descriptors are required for JSPs in this particular Web Application, select all .jsp files on the Files tab of the archive window and choose Servlet, then No JSP Descriptor.
On the Files tab of the archive window and highlight all classes in the following subdirectories:
- If a dialog box opens asking you to confirm that no deployment descriptors are required for the .jsp files, click OK to confirm. The entries for the .jsp files in the archive window now display in black.
Choose Edit, then Remove Files to delete them from the archive window.
- bank\bank\
- bank\customer\
- bank\databases\
- This step removes all bean components from the .war archive. The application components for the archive have now been defined.
Declaring Servlet Deployment Descriptors
On the Files tab of the bank.war archive window, select all classes in the servlet directory and choose Servlet, then Create Descriptor.
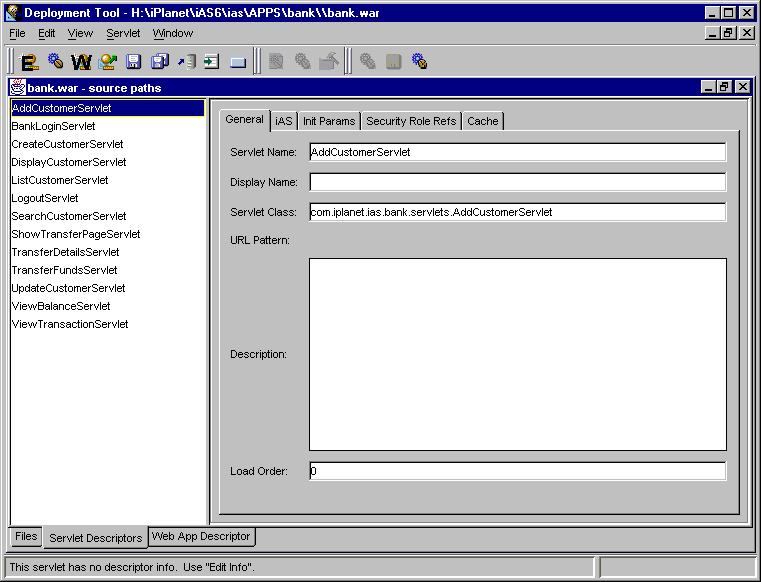
Click the Servlet Descriptors tab.
Highlight the AddCustomerServlet at the left.
On the General tab, rename it to AddCustomer.
Highlight the BankLoginServlet at the left and change the name to Login on the General tab.
Continue to select each servlet on the left and change its name on the General tab, removing the Servlet extension. Make the following exceptions:
- When you highlight the BankLoginServlet a dialog may open that prompts you to save descriptor for the AddCustomerServlet. Click Yes.
Choose File, then Save to write the descriptor changes out to the XML files.
Declaring Web Application Deployment Descriptor Properties
Unlike the EJB-JAR module, the Web Application module has deployment descriptor declarations that apply at the module level.
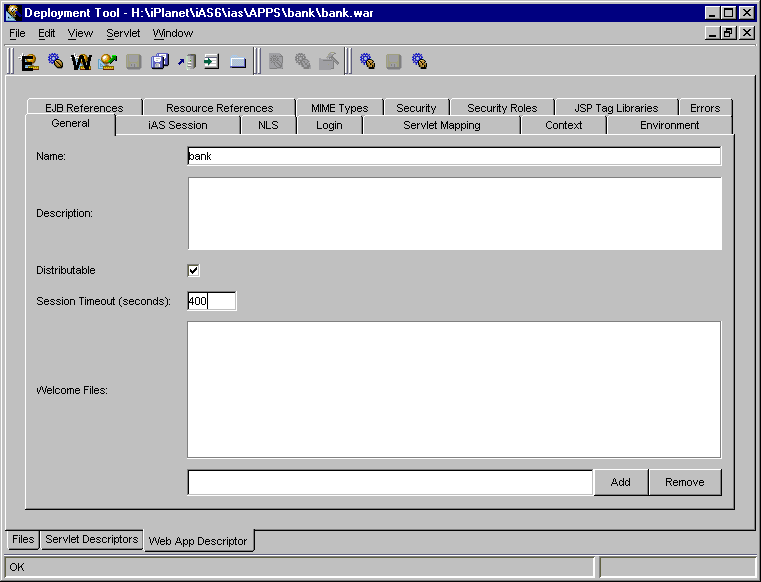
Select the Web App Descriptor tab near the bottom of the bank.war archive window.
The Web Application module, bank.war is now complete.
Select the General tab.
- The descriptor editor window opens. Note that individual components are not listed to the left as before. This is because the Webb App Descriptor applies to the Web Application module and not to individual components.
Specify 400 seconds for the session time out for this Web Application.
Select the iAS Session tab and choose Local for the Data Synchronization.
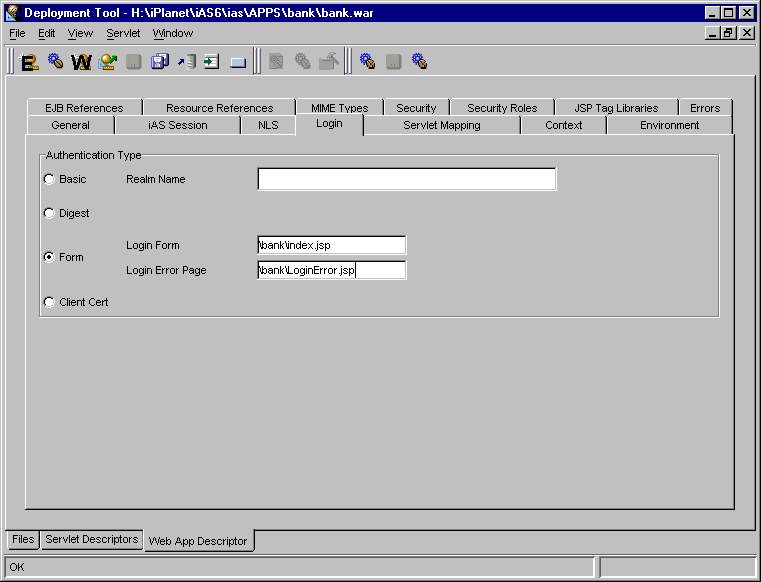
Select the Login tab and choose Form Authentication Type.
Specify the Login Form, /bank/index.jsp and Login Error Page, /bank/LoginError.jsp.
Select the Security Roles tab and add the following roles for authorization.
Select the Security tab and add the following to define Resource Collection:
Define the Access Control for the Resource Collection as follows:
Select the EJB References tab and enter the following information:
Session
com.iplanet.ias.bank.
CustomerService
Session
com.iplanet.ias.bank.
com.iplanet.ias.bank.
Assembling the Bank.Ear File
An application .ear file consists of one or more modules (Web Application and EJB-JAR) and an application deployment descriptor. The application-level deployment descriptor, application.xml, is saved in the /META-INF directory of the archive.To create the bank.ear file for the Bank application, perform the following steps.
Choose File, then New J2EE Application.
The bank.ear creation is now complete. You are ready to deploy the bank application.
Enter bank as the archive file name and specify <iAS installation directory>\ias\Apps as the directory to save bank.ear.
- The New Application dialog box opens.
Select the Modules tab and click the Add Module button.
- The bank.ear, bankEJB.jar and bank.war will all reside in the APPS\bank directory.
To add the bankEJB.jar file, navigate to the directory where it is stored and click OK.
Click the Add Module button.
- <iAS installation directory>\ias\Apps\bank\bankEJB\
To add the bank.war file, navigate to the directory where it is stored and click OK.
Set the Context Root to bank.
- <iAS installation directory>\ias\Apps\bank\
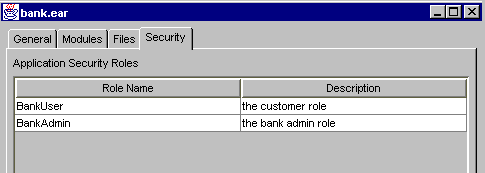
Click the Security Roles tab and create the following security roles.
Deploying the J2EE Bank Application
When you deploy an application, the iAS Deployment Tool installs all the application's files and registers all it components on the destination server, an iAS machine.
With the bank.ear archive opened in the iAS Deployment Tool, choose File, then Deploy.
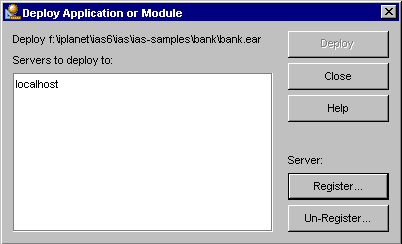
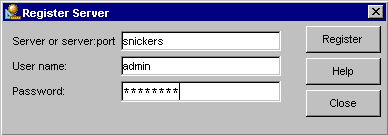
Optionally, if the server for which you want to deploy is not shown in the Servers to Deploy box, click the Register button.
- The Deploy Application or Module dialog opens for you to choose the target server(s) for deployment.
Enter the server name followed by the :port number. If no port number is given, it defaults to 10817.
Highlight the server(s) targeted for deployment and click the Deploy button.Enter the Admin user name and password specified during iAS installation.
Click Register and the server is added to the list of registered servers.
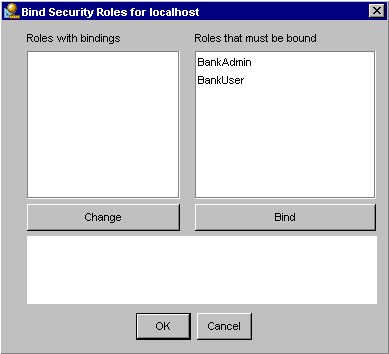
Highlight a role in the right box and click the Bind button.
- The messages window pops open and the Bind Security Roles dialog opens.
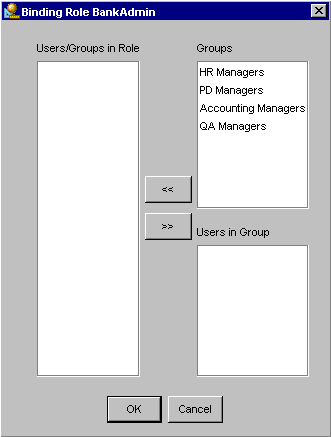
- Before you deploy an application, the security roles declared in the deployment descriptor parameters of the application or its modules must be bound to groups and users that are known to the server. This is used for authentication when a user tries to gain access to a method or data that is under access control. This information is not part of the application's descriptor, since it can be different for different servers to which the application might be deployed. Note that this binding does not modify the bank.ear file.
- Two roles have been defined for the bank application, BankAdmin and BankUser. You need to bind these roles to users and groups defined for the targeted iAS machine(s).
Highlight Users and Groups to belong to this role and click the left-arrow.
When you are finished binding the role to users and groups, click OK.
Repeat steps 4 through 6 until all roles have been bound and then click OK.
Click the Messages window to select it, and choose File, then Save.
- The deployment process begins with the status of the deployment process appearing in the messages window.
- When the deployment process is complete, a dialog opens with the message, "Deployment of bank.ear to snickers complete." Deployment is completed to each machine in turn, if several iAS machines are targeted for deployment.
- The contents of the messages window is saved to messages.text in the current directory.
Viewing the Bank Application in the Administration Tool
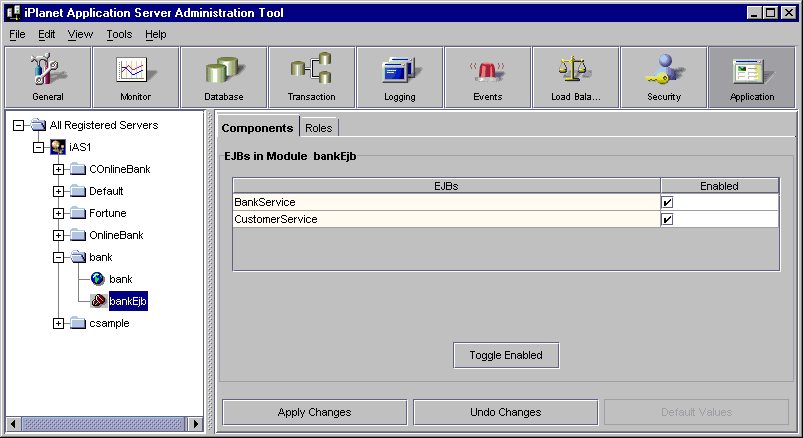
After you have deployed the bank application, you can view it in the Administration Tool and then set attributes for the application components (servlets only) as needed.
Launch the Administration Tool as follows:
On a Windows NT system: from the Start menu, choose Programs, then choose iPlanet Application Server 6.0. Finally, choose iAS Administration Tool.
Click the Application button on the toolbar.On a UNIX system: make sure your PATH variable contains the absolute path to the iAS bin directory and then type the following at the command prompt:
- ksvradmin &
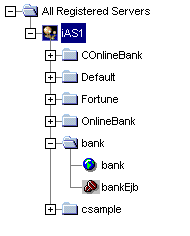
Expand the iAS machines to which you deployed and open the bank folder.
Highlight the bankEJB icon and view the deployed BankService and CustomerService EJBs.
Compiling the Application
If you are using Deployment Tool to assemble and deploy the application or you are modifying the application source code to experiment with J2EE, then you will need to recompile the source code. To help you easily compile the larger iAS sample applications, a Makefile infrastructure has been implemented as part of iAS samples. This Makefile approach is patterned after the approach taken in Sun's Java Pet Store sample application.You will need the GNU Makefile tool, gmake, to use this makefile infrastructure.
Makefile Structure
The supporting files are located in the <iAS install path>/ias/ias-samples/ directory as follows:
Defs.mk - Definitions used by most of the sample business application Makefiles.
A Makefile under each business application's src/ directory references these supporting files.Rules.mk - Definitions of common make targets.
unix.mk- Unix-dependent environment settings as well as iAS install path environment variable.
win32.mk - NT-dependent environment settings as well as iAS install path environment variable.
Download and install GNU Make (gmake) if you do not already have access to a copy.
- GNU make is available at http://www.gnu.org. You can find binaries for GNU make at:
http://www.sunfreeware.com/ (for Solaris binaries)
http://sourceware.cygnus.com/cygwin/ (for Windows NT binaries)
Go to the Bank sample directory.
- GNU make is free software and is covered by the GNU General Public License.
Set the IAS_HOME variable
- cd <iAS install path>/ias-samples/bank/
Compile the EJBs and dependent classes
- Edit either the unix.mk or win32.mk files to change the IAS_HOME variable to match your installation path.
Compile the Servlets and dependent classes
- cd src/
- gmake compile_ejbs
- Note that the class files are placed in ias-samples/bank/build/lib/classes/
Create JavaDocs
- gmake compile_war
- gmake javadoc
- Note that the Java Docs are placed in ias-samples/bank/docs/api/
Previous Contents Index DocHome Next
Copyright © 2000 Sun Microsystems, Inc. Some preexisting portions Copyright © 2000 Netscape Communications Corp. All rights reserved.
Last Updated April 25, 2000
