| Previous Contents Index DocHome Next |
| iPlanet Application Server Installation Guide |
Chapter 2 Installing on Solaris
This chapter explains how to install iPlanet Application Server. It includes the following topics:
Preparing for Installation
Read this chapter carefully before installing iPlanet Application Server. Check the release notes for any updates to these instructions at:Installing the Application Server
Installing Multiple Instances on Solaris
Upgrading iPlanet Application Server 6.0 to SP1
Verifying Installation of the Application Server
http://docs.iplanet.com/docs/manuals/ias/60/sp1/releasenotes.html
Refer to for more information about configuring your application server during and after installation.
Preparing for Installation
Before you begin installing iPlanet Application Server, you will need to:
Check system requirements
Install and configure the web server
Check System Requirements
Your system must meet the following requirements before you can install iPlanet Application Server:
Total disk space: 400 MB Solaris, 800 MB Solaris if installing both NetDynamics and iPlanet Application Server 6.0
Install and Configure the Web Server
The web server and web browser must be installed and configured before you install iPlanet Application Server. You will need the full path of the web server for Solaris installation.The iPlanet Application Server user and the web server user must either be the same or from the same group. If the web server is installed as a regular user, and the iPlanet Application Server user is installed as the root user, a file permission problem will exist. The web server won't start because it won't have access to the registry file reg.dat.
Know whether your web server runs on the machine where you are about to install iPlanet Application Server or whether it resides on another machine. If it is on another machine, you perform what is referred to as a "webless" installation of iPlanet Application Server. If you are performing a webless installation of iPlanet Application Server, know the type of web server you have and remember to install the Web Connector plug-in on the web server after you finish installing iPlanet Application Server.
Create a Raw Partition
Create a raw partition on a separate disk prior to running the installation program. This is where the transaction manager log file gets stored for each Java Server.
Create a Mirror Directory for Transaction Manager
The iPlanet Application Server is installed on the default disk drive. Create a directory on a seperate drive and specify a path to it prior to running the installation program.
Install and Configure All Database Servers
Before installing iPlanet Application Server install and configure the database servers and clients you will use. iPlanet Application Server.iPlanet Application Server 6.0 SP1 is configured to work with the database clients and servers listed below:
Installing the Application Server
You can choose from four installation types: custom, typical, express, and ezSetup. The following table shows which questions are asked for each type of installation. Use the table in conjunction with Using the Custom Installation Wizard.For information on the ezSetup option, see Using ezSetup.
Using the Custom Installation Wizard
The following procedure describes how to install iPlanet Application Server using the Custom installation option:
Insert the iPlanet Application Server Install CD-ROM into the CD-ROM drive.
During installation, press:Mount the CD-ROM on, for example, /cdrom/cdrom0.
At the shell prompt, run the following command:
- /cdrom/cdrom0/solaris/setup
The Enter key to accept the default and continue.
CTL+B to back up to the previous screen within an installation section, as defined by the title at the top of the screen. For example, "iPlanet Directory," is a section within the installation program. You cannot use CTL+B to go back to a screen in a different section than the one you are currently in.
CTL+C if you need to exit the installation. If you want to install again, you must run the installation program from the beginning.
In the temporary directory you have created type #./setup
- The following dialog will appear in a Terminal window:
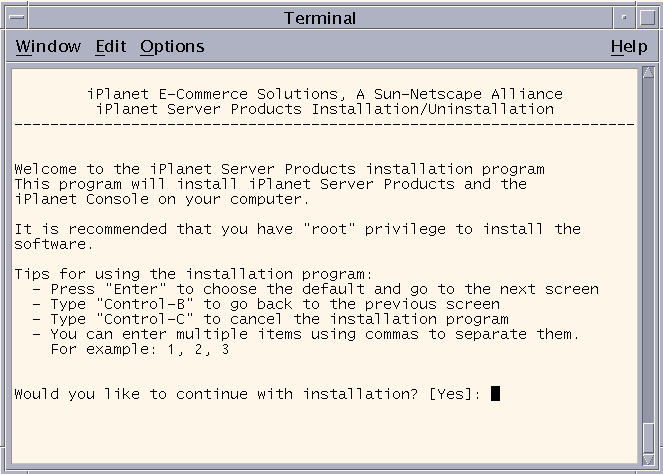
Accept the default, or type Yes to continue.
You must type Yes to continue the installation. Do not accept the default.
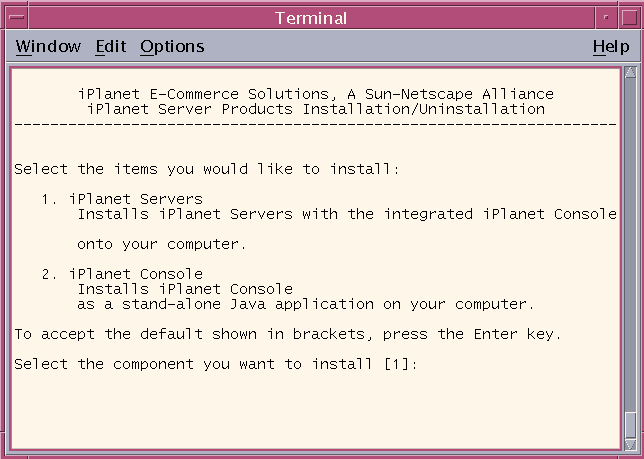
Enter to accept the default, or type 1.
- iPlanet Console can be installed as a stand-alone application.
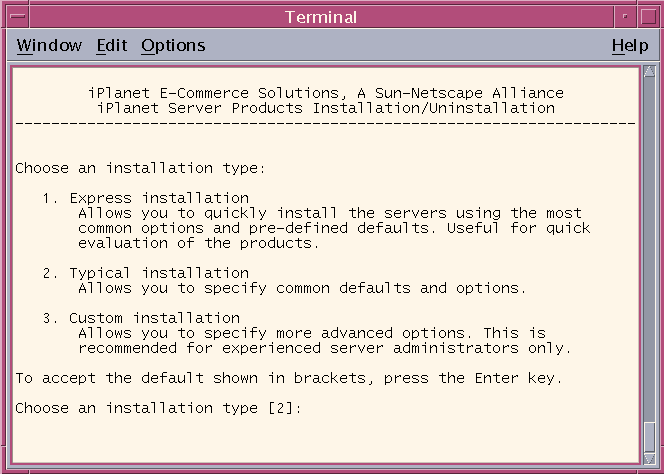
Enter the number of the installation type. Typical is the default installation. (A Custom installation is detailed in these steps.)
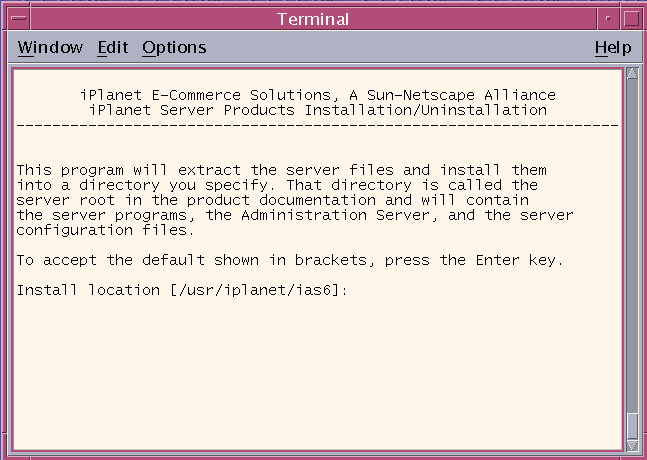
Enter to accept the default directory of /usr/iplanet/ias6., or type in a different location. If you do not have 400MB available on this drive for the installation of iPlanet Application Server, browse to select a different drive. If you enter a different location, do not include spaces in the path name. All components will be installed in this base directory.
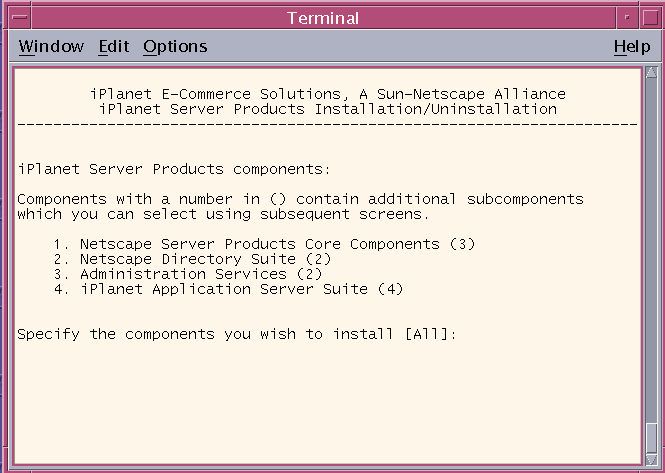
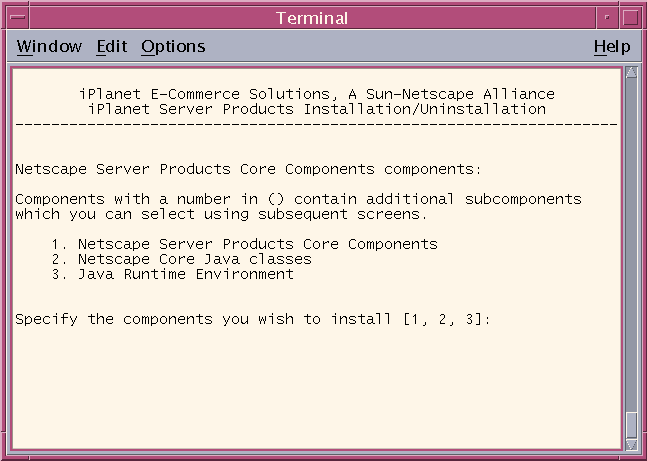
Accept the default and install all components.
- For information about the components, see "Server Components" on page 124.
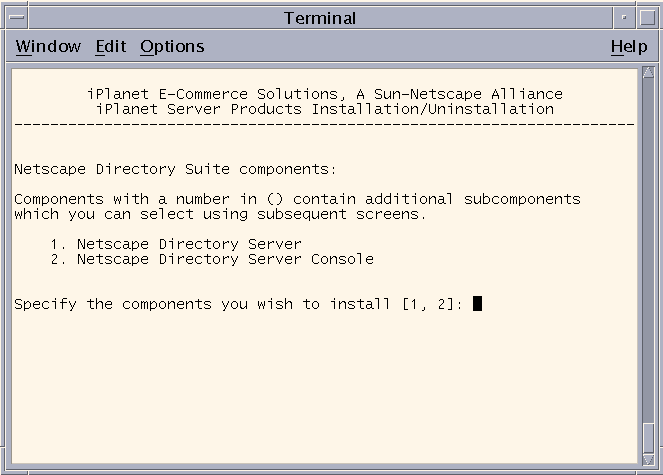
Accept the default and install all components.
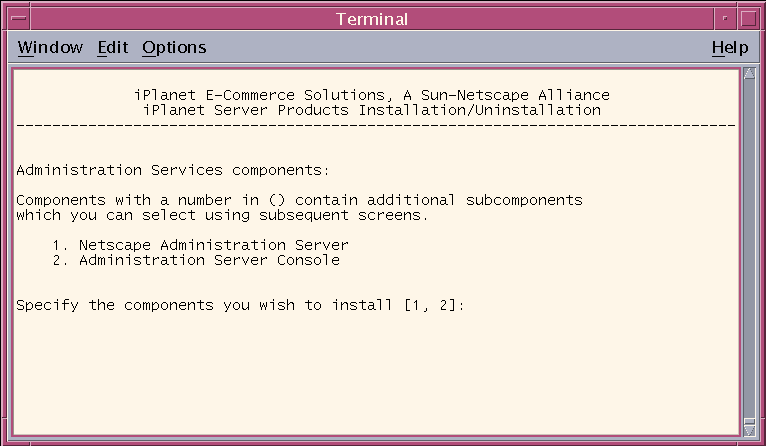
Accept the default and install all components.
Accept the default and install all components.
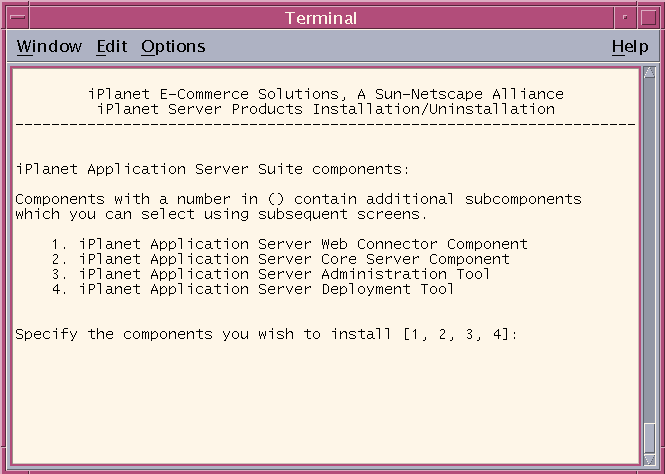
Accept the default and install all components.
Configuring the Directory Server
For information about the Directory Server, see page 124, or the Netscape Directory Server documentation at:http://docs.iplanet.com/docs/manuals/directory.html#dirserver
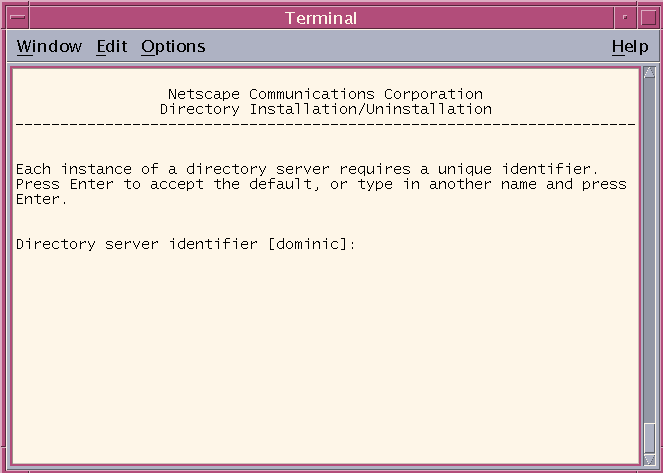
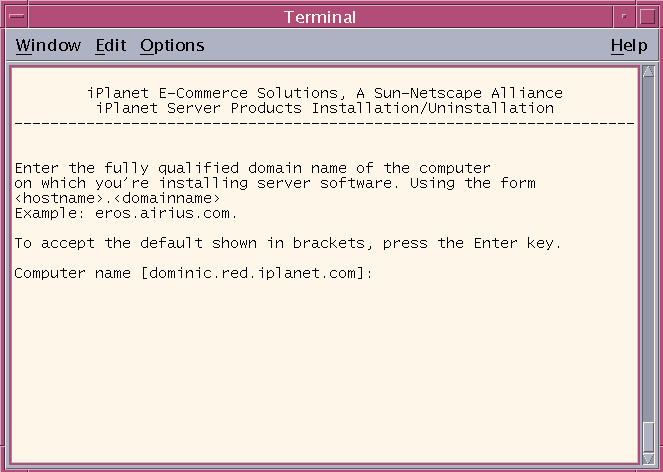
Enter to accept the default computer name.
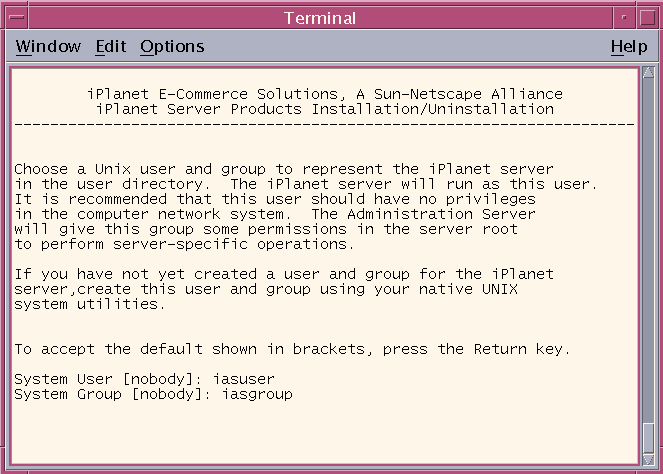
Type in the system user and system group names.
- You should have already set up this user and group prior to running the installation program. Specify a user that has no privileges elsewhere on the system to avoid access to restricted servers, such as the configuration Directory Server.

Enter to accept the default and register this Directory Server as the configuration Directory Server. If not installing the configuration Directory Server included in this installation, specify an existing Directory Server and type in the Relay Host.
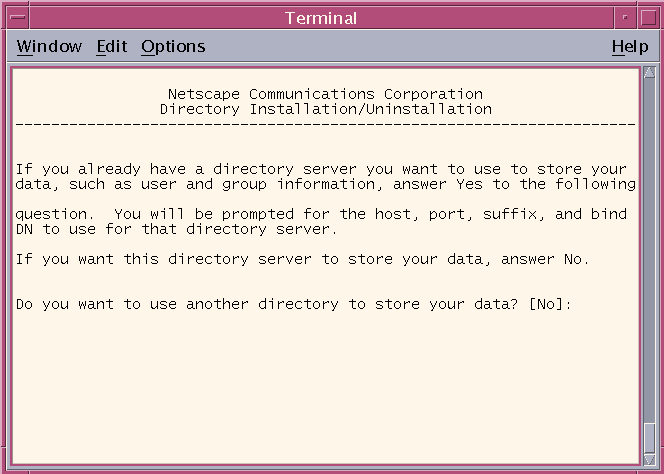
Accept the default specifying this Directory Server as the storage server. If you are not installing this Directory Server, you can only specify a Directory Server already installed on your system.

Accept the default port number to be used by the Directory Server. The default value is 389 if you install as root, otherwise, the default value will be a random available port number.
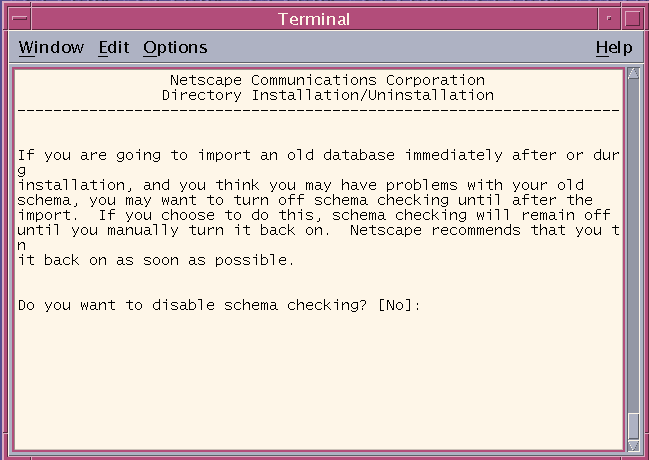
Accept the default.

Enter the administrator ID and password for the configuration Directory Server.
Note The Administrator ID and password supplied here will be required to uninstall iPlanet Application Server and Directory Server.
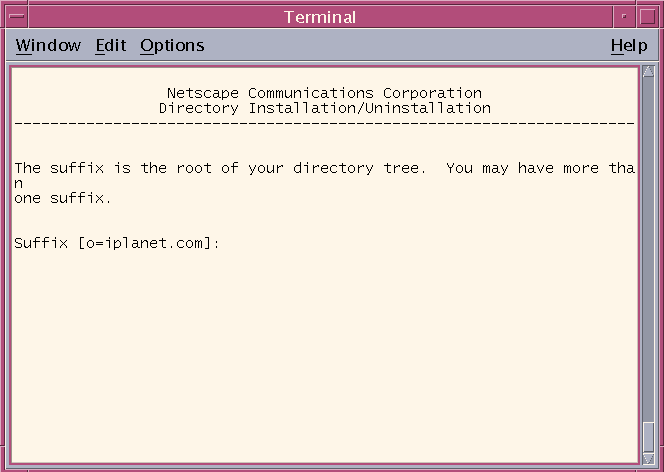
Enter to accept the default, or select the top level domain name for your system.
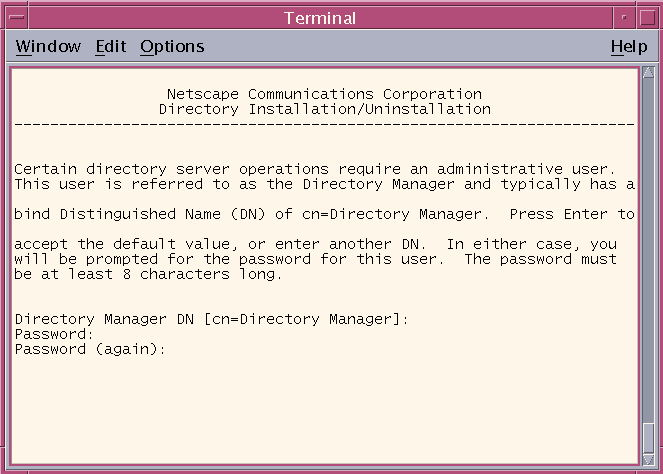
Enter to accept the default, or type in a Distinguished Name (DN).
- For information about the Directory Manager DN, see page 126.
Accept the default, or enter a unique name for the Administration Domain.
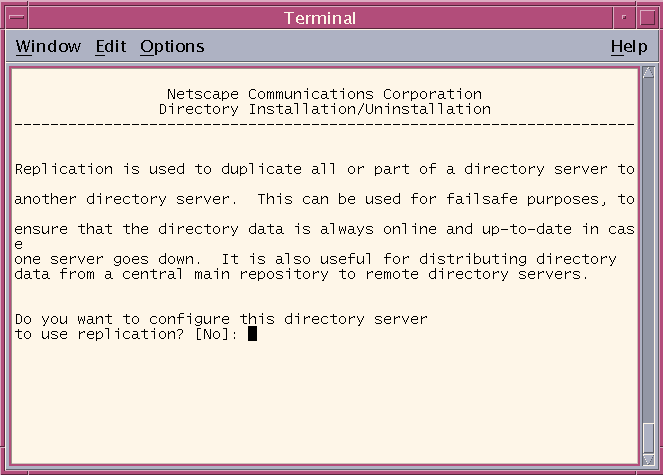
Enter to accept the default or type Yes.
Enter to accept the default or type Yes.
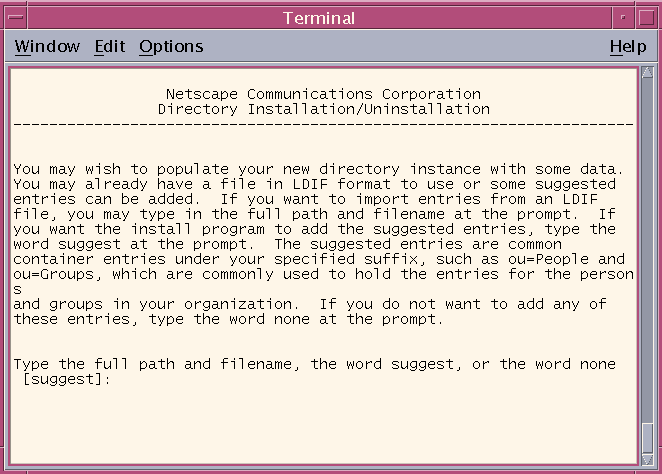
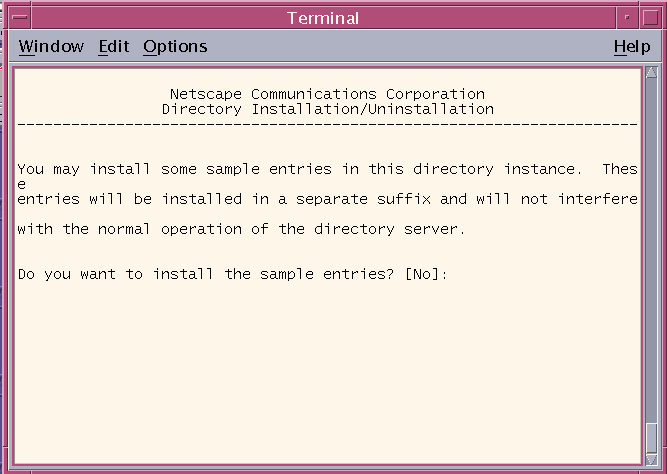
Enter to accept the default or type none, or the full path and file name of the data you wish to populate the instance with.
Enter to accept the default or type Yes.
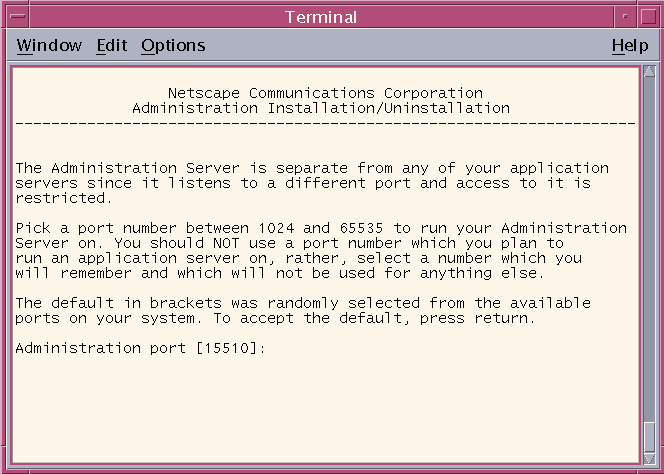
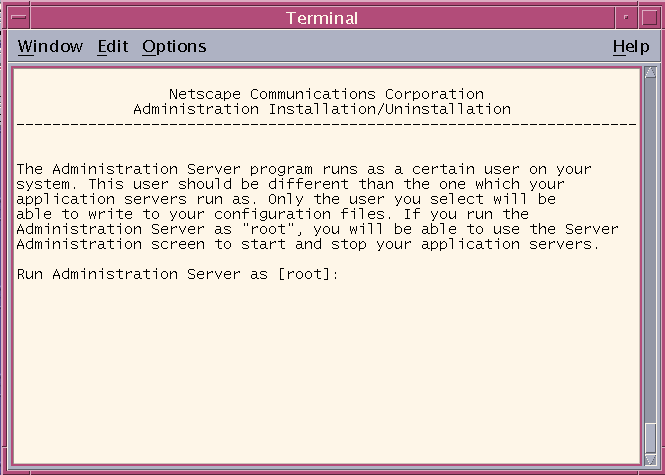
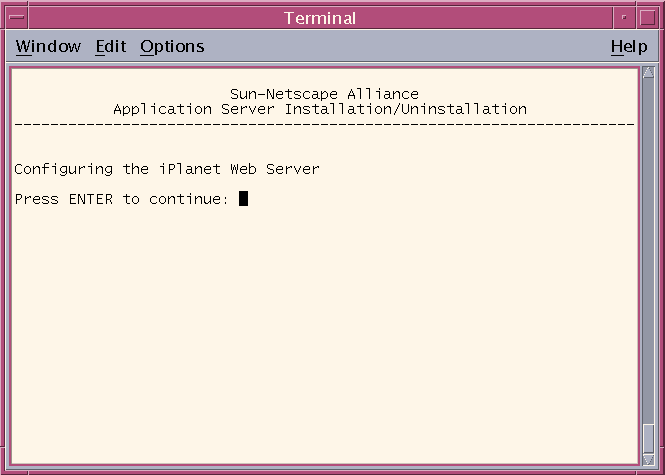
Configuring the Administration Server
For information about the Administration Server, see page 126.
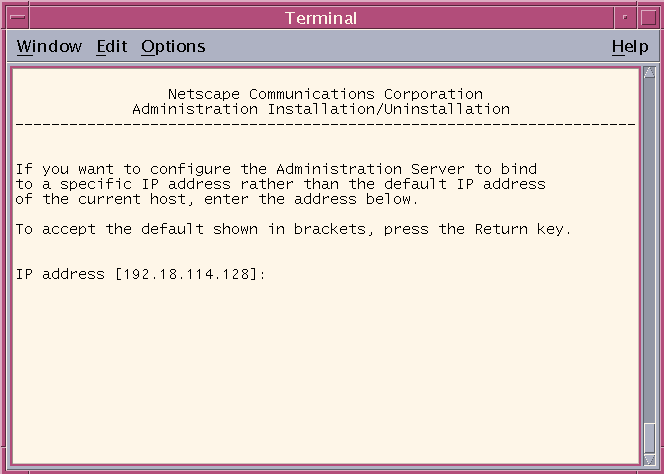
Enter to accept the default, or type in a different port number.
Enter to accept the default.
Enter to continue.
You must type Yes to continue. There is no default for this step.
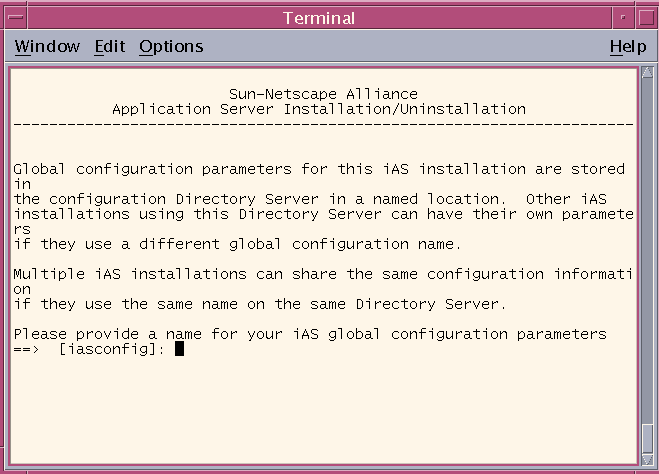
Enter to accept the default, or type in a unique global configuration name for this installation of iPlanet Application Server. This name is stored on the configuration Directory Server, under the o=iPlanetRoot tree, along with global configuration names of any other iPlanet Application Server installations.
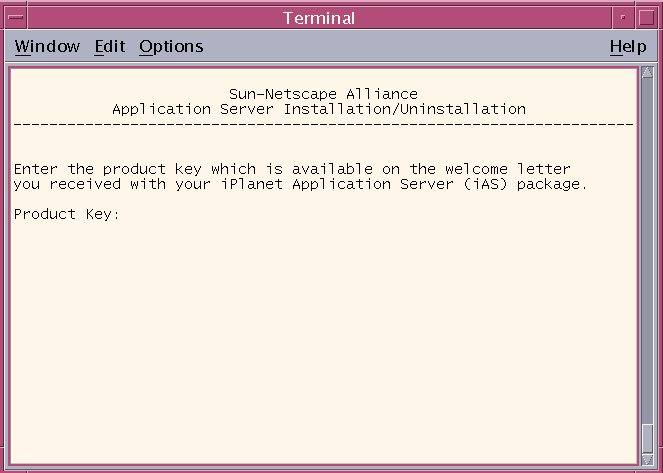
Type in the Solaris product key.
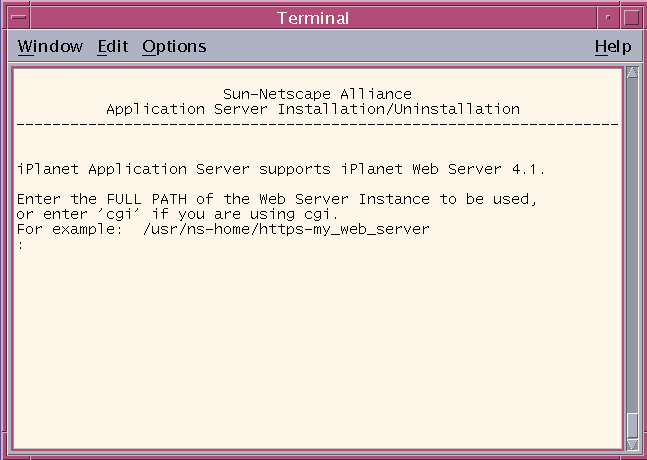
Type in the full path of your web server instance. No default is provided.
- To learn more about web servers and webless installations , see "Web Servers," page 127.
Enter to continue.
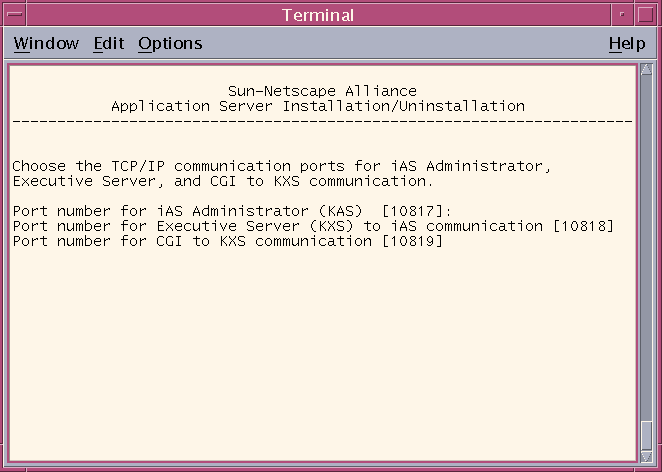
Enter to accept the defaults.
- Listener ports must be within the acceptable range (1025 to 32768), and must be unique (not used by any other services on your system). For more information, see "Port Numbers," page 126.
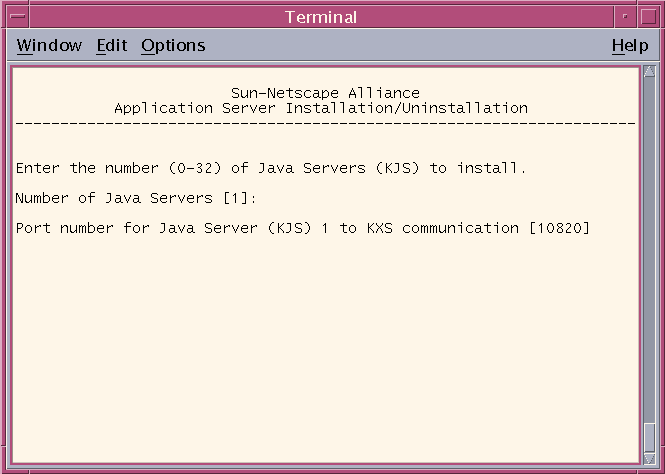
Enter to accept the default number of Java Servers (KJS) you intend to use and their default port number(s), or type in different port numbers.
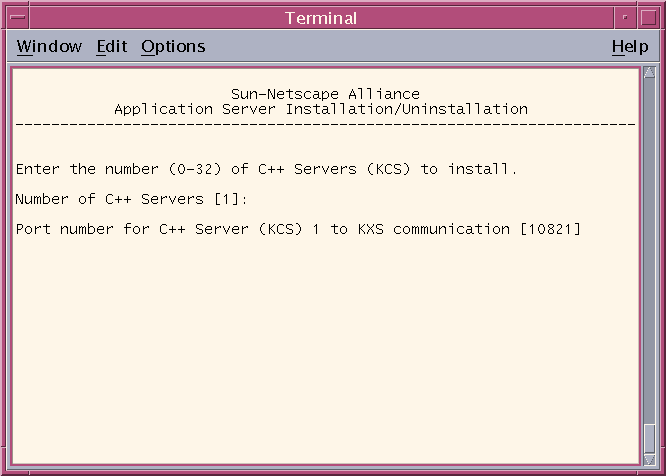
Enter to accept the default number of C++ Servers (KCS) you intend to use and their default port number(s). Or type in different port numbers.
- All Java Server port numbers are listener ports and must be within the acceptable range of 1025 to 32768. Port numbers must be unique (not used by any other services on your system).
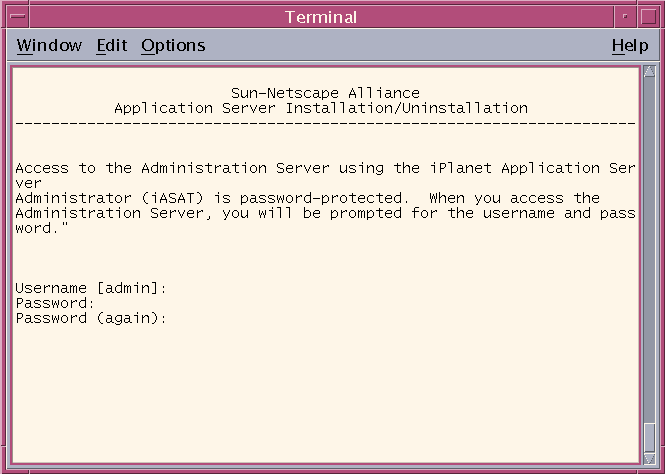
Type in your Administration Server username and password.
- All C++ port numbers are listener ports and must be within the acceptable range of 1025 to 32768. Port numbers must be unique (not used by any other services on your system).
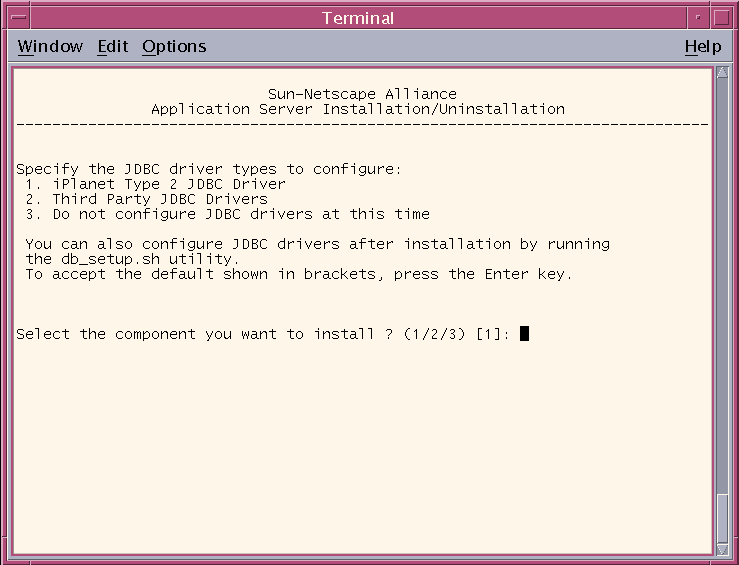
Setting up JDBC Third Party or Native Drivers
To learn more about Third Party JDBC Driver Support, see page 130.
Enter whether you will use iPlanet Type 2 JDBC drivers, third party JDBC drivers, or none at this time.
If you select third party JDBC drivers, you will need to complete the following steps:

Enter the number of JDBC third party drivers you will use.

For each third party JDBC driver enter the driver identifier, Classname, and CLASSPATH. Follow the formats in the examples to enter your information. The Third Party Native Driver Directory is required for Type 2 drivers only.
Note For typical Classnames and CLASSPATHS, see Third Party JDBC Driver Support, Resource Managerpage 130. After installation you must register the datasource files for the third party JDBC drivers. The above reference also explains registration.
Configuring Database Connectivity

Enter to accept each default.
- The installation program lists the database clients supported by iPlanet Application Server. The clients are required for your iPlanet Application Server applications to process data. Indicate if you want to configure this instance of iPlanet Application Server to connect with each of the supported database clients. For each client that you specify "Yes," provide the client's home directory and library name.
- For information about the Database connectivity, see page 128.
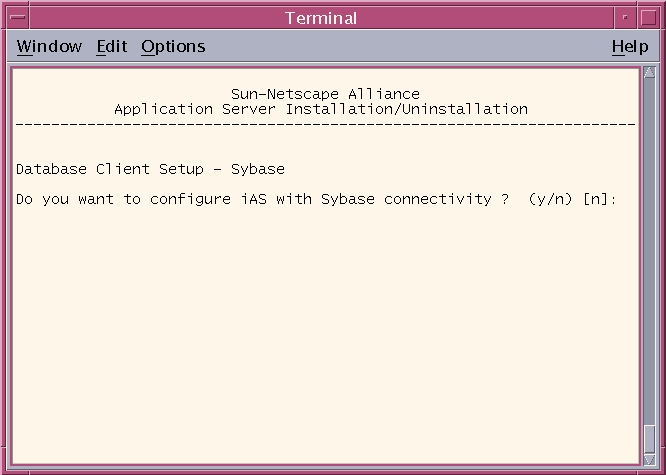
Type y (yes) or n (no). You will be required to do this for Oracle, Sybase, Informix, and IBM DB2.
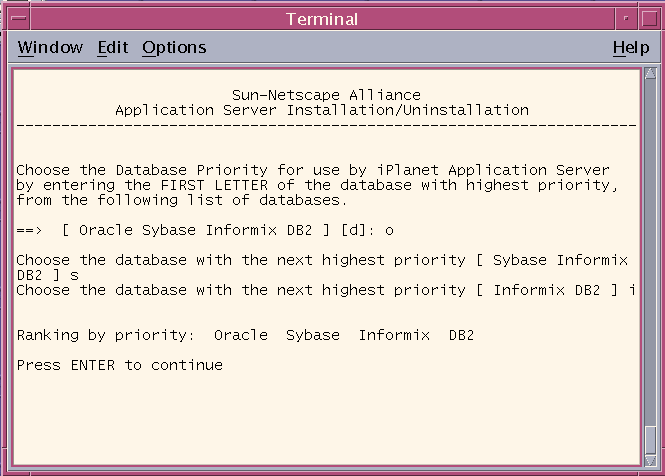
Rank each database.
Configuring Transaction Manager and Resource Manager
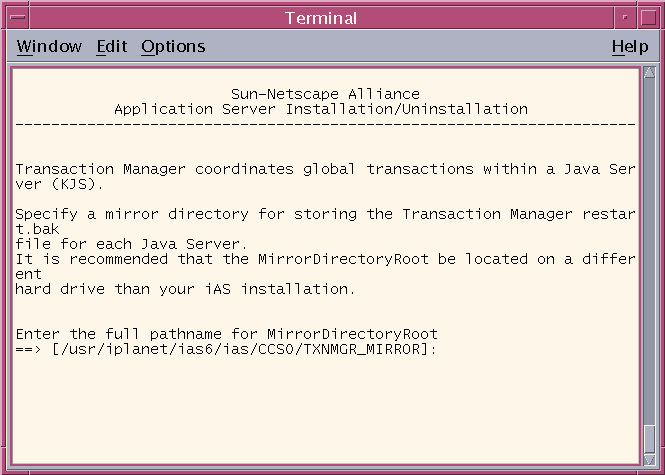
Enter to accept the default mirror directory path where the transaction manager restart.bak file of each KJS process is to be stored.
- The default directory is iAS install directory/CCS0/TXNMGR_MIRROR/. This is the same path that is used to store the restart file. It is recommended that you store restart.bak in a different location than restart. Consider using a pointer to the different physical disk drive.
- For information about the Transaction Manager, see page 128.
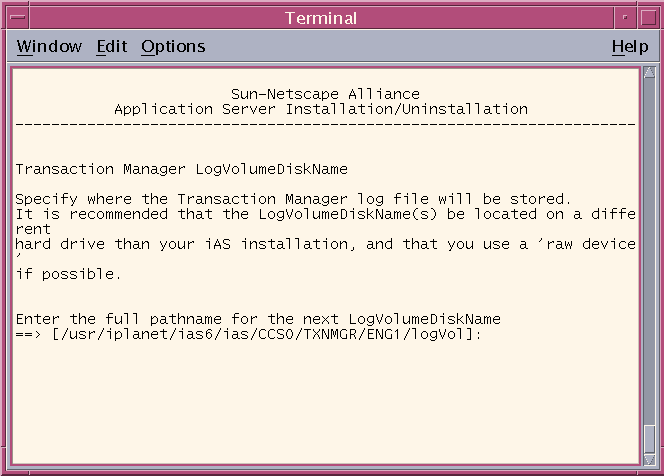
Enter to accept the default. The log volume disk name is where the transaction manager log file is stored. The engine /ENGx/represents the KJS engine process number. Create a directory on a separate disk drive and specify if it is a raw partition.
- For more information see Raw Partitions, page 129.
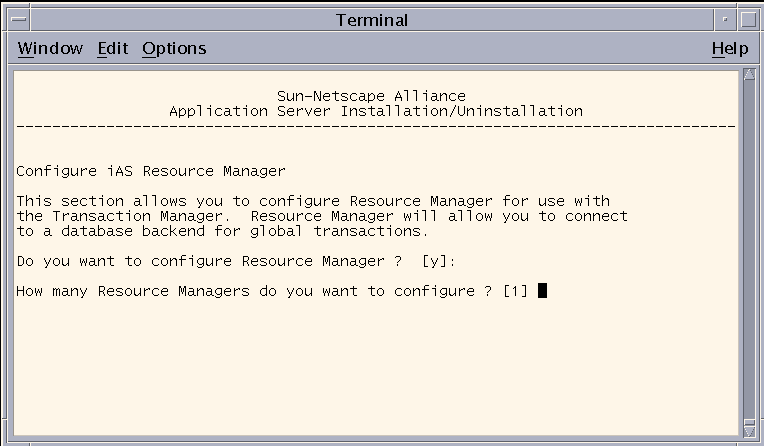
Accept the defaults. If you have not yet configured a database, you will be prompted to do it here.
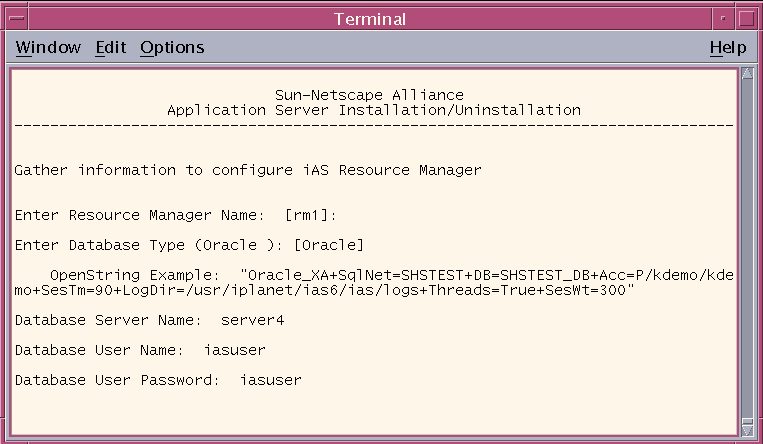
Enter to accept the defaults, or type in the information.
- To learn more see Open String Information, page 141.

Enter to accept the default, or type Yes.
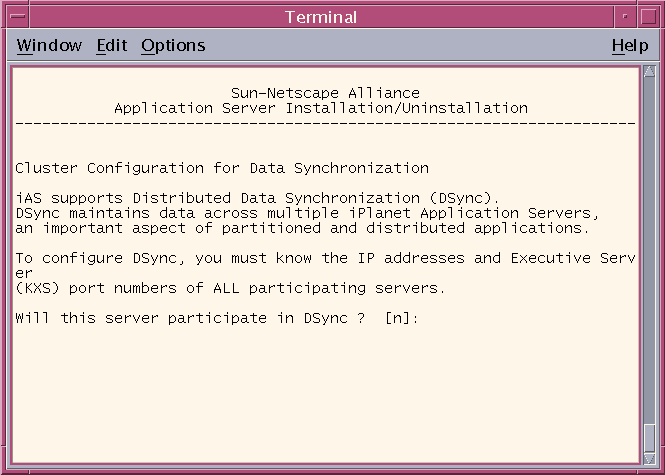
Enter to accept default, or type y (yes) if you intend to synchronize session and state information across multiple servers for failover and fault tolerance.
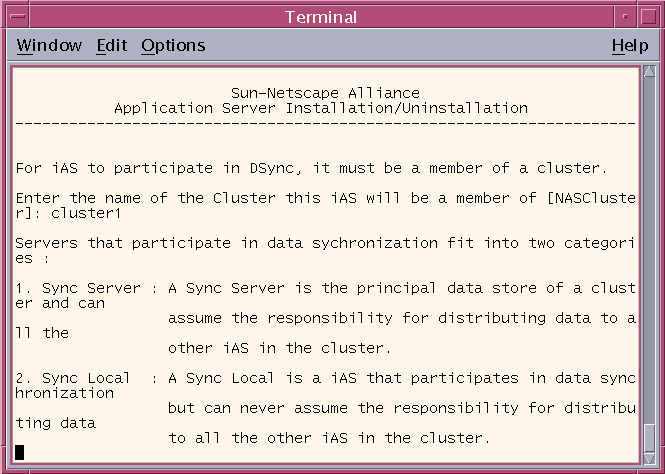
If you answered y (yes) in the previous screen, you will be asked to:
To learn more see Clusters and Data Synchronization, page 142.
Enter the name of the cluster where this instance of iPlanet Application Server belongs. The cluster may already exist, or this may be the first server assigned to the cluster.
Indicate if Sync Local or Sync Server.
Enter the IP address and priority for each Sync Server. Start with the highest priority Sync Server in the cluster: the first server to take over if Sync Primary fails. Enter each Sync Server's priority until all are ranked.
Enter the same IP addresses and port numbers for each installation of iPlanet Application Server in the cluster. These IP addresses and port numbers must match across installations for the cluster to function properly.
Specify the number of Sync Backup servers that should be active while the cluster is running.
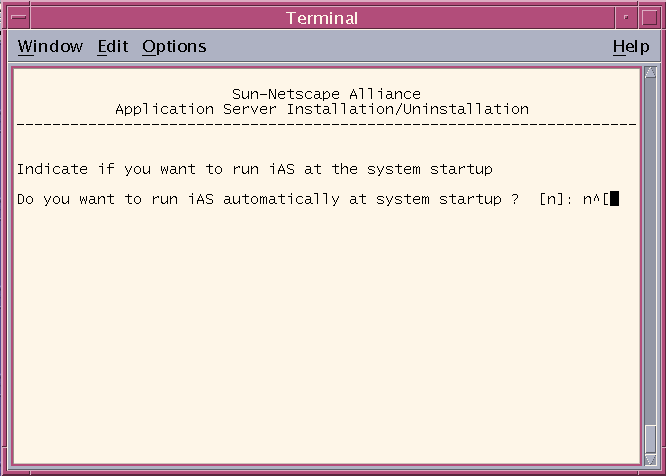
Enter to accept the default or type y (yes). You can only run iPlanet Application Server automatically at startup if you logged on as root.
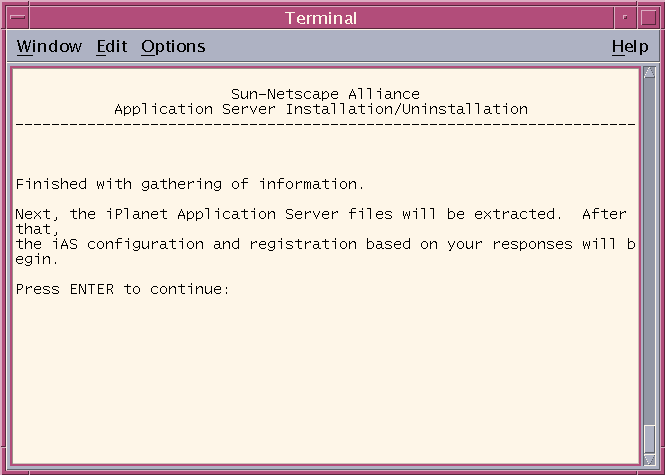
The installation program will now configure Planet Application Server files in your system.I
i
Note After using Typical or Express installation, you can configure your database connection and resource manager by going to $iAS_home/bin and running db_setup.sh.
Using ezSetup
The EZ Install option facilitates fast and easy installation of iPlanet Application Server for evaluation purposes. This installation is not intended for working developer or production environments.
Uninstall any previously installed application servers following the instructions for that version.
The following default usernames and passwords are set for ezSetup:Make sure the web server is installed and running.
Access the ezSetup from the CD-ROM.
Choose the same username and group to represent the iPlanet server in the user directory that installed the web server.
Directory manager
iAS Administration server
Installing Multiple Instances on Solaris
Multiple instances benefit two environments:
This option is not available on NT. See "Multiple Instances of iPlanet Application Server," page 144, to learn more.
To Install for Developer Deployment:
Create logins for each instance.
Install the initial instance of the application server on each system.
Use a non-default home directory, e.g. /usr/iplanet/ias6/instance0.
Install additional instances.Store config data in "iasconfig0" on the directory server.
Configure the number KJS processes so there is one KJS per instance.
Use Custom Install to change port numbers.
Store config data on the primary directory server in "iasconfig1", "iasconfig2", etc.Input non-default home directories for each instance, e.g.
Do not install the iPlanet Directory Suite or Administration Services.
- /usr/iplanet/ias6/instance1, /usr/iplanet/ias6/instance2, etc.
Do not install iPlanet Core Java classes or Java Runtime Environment.
Install the Web Connector on all web server instances. Each web server instance will be associated with one application server instance.
To Install for Production Deployment:
Install the directory server in both a primary and secondary server. Configure the directory servers so that the primary replicates to the secondary.
Create logins for each instance. The best performance will come from using 1 instance per processor, but more processors can be used (up to 8) in each instance.
Install the initial instance of the application server on each system.
Use a non-default home directory, e.g. /usr/iplanet/ias6/instance0.
Install additional instances.Store config data in iasconfig_global on the primary directory server.
Configure for the secondary directory server.
Configure the number KJS processes so there are at least two KJS
Configure the application server so that it starts up automatically (if that
- processes per instance.
- behavior is desirable).
Use Custom Install to change port numbers.
Store config data on the primary directory server in:Input non-default home directories for each instance, e.g.
Do not install the iPlanet Directory Suite or Administration Services.
- /usr/iplanet/ias6/instance1, /usr/iplanet/ias6/instance2, etc.
Do not install iPlanet Core Java classes or Java Runtime Environment.
Do not install iPlanet Application Server Web Connector Component or Administration Tool or Deployment Tool.
iasconfig_global for most instances
Configure for the secondary directory server.iasconfig_aol for web and iPlanet Application Servers in cluster dedicated to handling AOL customers
iasconfig_isp1 for web and iPlanet Application Servers in cluster dedicated to handling isp1 customers
iasconfig_ispN for web and iPlanet Application Servers in cluster dedicated to handling ispN customers
Configure the number of KXS and KJS processes so that there are at least two KJS processes per instance. Configure for a maximum of 8 processors per instance, but definitely consider starting with 1 processor per instance.
Configure each instance so that it does NOT start up automatically.
Create a script to bind processes to individual processors. Consider binding the KXS and two KJS processes of an instance to the same processor if a processor per instance has been allocated. Otherwise, bind the KXS to one processor and each of the KJS processes to separate processors for each instance. Consider 2 processor sets for KXS processes on Primary instances.
Create a crontab script to periodically check process bindings. A restart of a KJS process should cause this script to run the process binding script.
Configure pairs so that a ring topology is achieved as much as possible.
Configure pairs so that each instance is on a separate server.
- Example 1:
- Server A runs Instance 0 and Instance 1
- Server B runs Instance 2 and Instance 3
- Server C runs Instance 4 and Instance 5
Create Cluster 0 with Instance 1 and Instance 2
Create Cluster 1 with Instance 3 and Instance 4
Create Cluster 2 with Instance 5 and Instance 0
- Server A runs Instance 0, 1, 2, and 3
- Server B runs Instance 4, 5, 6, and 7
- Server C runs Instance 8 and 9
- Create Cluster 0 with Instance 0 and 4
- Create Cluster 1 with Instance 1 and 5
- Create Cluster 2 with Instance 2 and 6
- Create Cluster 3 with Instance 3 and 9
- Create Cluster 4 with Instance 7 and 8
Configure all iPlanet Application Server clusters for Per Component load balancing. Per Server LB will be confused by the sharing of servers between instances.
Install Web Connector on all web server instances. Allocate appropriate numbers of web server instances for each cluster that is allocated to ISP proxies. All other web server instances can be shared by the remaining cluster pairs.
- On each server, modify the rc2 startup scripts so that all Sync Primary instances are started as soon as possible. Delay the startup of all Sync Backup Instances. Determine which instances are to be Sync Primary or Sync Backup by evenly dividing the load between the physical servers. The reason for making these changes is that Sync Primary servers do more work, so it is desirable to evenly divide the work. Sync Primary instances are determined based on the startup order.
- Example 1:
- Continuing from Example 1 in the previous section. Primary instances could be 1, 3, and 5.
- Example 2:
- Continuing from Example 2 in the previous section. Primary instances could be 0, 1, 6, 7, and 8.
Configure the web tier load balancer so that sessions return to their original web servers.
Configure the web tier load balancer so that known ISP proxies are associated with the web servers which have been allocated for that purpose.
Configure the web tier load balancer so that application partitioning between clusters is supported (in cases where applications do not exist on all clusters).
Note Not all load balancing solutions can support all of these features. Resonate Central Dispatch is an example of a load balancer with these features.
Upgrading iPlanet Application Server 6.0 to SP1
The following information applies only to upgrading version 6.0 to SP1, and not the upgrading of Netscape Application Servers.
To Upgrade iPlanet Application Server 6.0 to SP1 on Solaris:
Run setup.
At the "Select the component you want to install [1]" prompt, press enter to accept default.
At the "Choose an installation type [2]" prompt, press enter to accept the default.
Enter the original installation location for iPlanet Application Server 6.0 at the "Install location [/usr/iplanet/ias6]" prompt.
At the "iPlanet Server Products Components" screen, enter 1,3,4 for the "Specify the components you wish to install [All]" prompt.
Press enter to accept the default for installing all three "iPlanet Server Family Core Components."
- Do not select the number 2 component, "iPlanet Directory Suite," for upgrade.
Press enter to accept default for installing all "iPlanet Administration Service Components."
Press enter to accept default for installing all "iPlanet Application Server Suite Components."
Enter hostname.domainname at the "Computer name" prompt.
Enter System User, System Group.
Enter Configuration Admin ID and password.
Answer "Do you want to reconfigure this server? [No]" question.
Enter [1] at the "A version of iPlanet Application Server is already installed."
Choose (1) Upgrade (2) Completely re-install NAS prompt for upgrading your iPlanet Application Server software.
Verifying Installation of the Application Server
You can use a pre-installed application to verify that iPlanet Application Server is running. Since this basic application, which uses servlets and JSPs, does not rely on a backend database, it runs without any post-installation setup.
Open your browser and enter the following URL:
Press Enter.
- http://yourwebserver:portnumber/ias-samples/index.html
Click the Test Connectivity to iPlanet Application Server link to run a basic application. Press shift the shift key and click on the browser's Reload button to ensure the application repeatedly returns a new HTML stream.
Installing the Web Connector Plug-in
The Web Connector plug-in passes requests from your web server to applications on iPlanet Application Server.iPlanet provides Web Connector plug-ins for the iPlanet Web Server.
If you install iPlanet Application Server on a different machine than where the web server resides, you are configuring what is referred to as a "webless installation" of iPlanet Application Server. If this is the case, you must install the iPlanet Application Server Web Connector plug-in on the web server machine.
Before you install the Web Connector plug-in, do the following:
Check whether or not the iPlanet Application Server 6.0 Web Connector plug-in has already been installed. If it has, the web server instance is already configured for iPlanet Application Server and you do not need to re-install the plug-in.
This procedure assumes that you have already installed iPlanet Application Server and Directory Server.Stop running your web server instance.
On Solaris, log on as the root user, or as a user from the same group as the root user, who installed iPlanet Application Server before installing the Web Connector plug-in
To Install the Web Connector Plug-in:
After you finish installing iPlanet Application Server as a webless installation, take the installation CD-ROM to the machine or machines that host the web server.
More information about the iPlanet Application Server Web Connector Component is contained in the Administrator's Guide and in the Deployment Tool Help system.Follow the instructions of the installation program.
When prompted, select "iPlanet Servers" as an installation.
Specify the installation type "Typical."
Specify a target installation directory. Do not include spaces in the path name.
When prompted for the components you want to install, select an iAS-only installation.
When prompted to install the iPlanet Application Server components, select the iPlanet Application Server Web Connector Component.
Using the Sample Applications
To better understand specific technology features provided by iPlanet Application Server, run the iPlanet Application Server Technology Samples.
To Use the Sample Applications:
Start running iPlanet Application Server.
After you become familiar with the iPlanet Application Server sample applications, run the Sun Samples, which are applications based on those found at http://java.sun.com. The Java Pet Store example in particular demonstrates how a popular J2EE application is deployed to iPlanet Application Server.Open your browser, enter the following URL, and press Enter:
Select the iPlanet Application Server J2EE Application Samples link and select a specific sample application. Follow the application-specific setup instructions to establish the necessary database settings and to run the application.
- http://yourwebserver:portnumber/ias-samples/index.html
You can review the source code of the sample applications and associated J2EE XML Deployment Descriptors by browsing in the following location:
iAS Installation Path/ias/ias-samples/
You can also find compile scripts at this site for experimenting with the sample code.
Uninstalling
When uninstalling iPlanet Application Server, use the procedure described in this section. Do not uninstall iPlanet Application Server by deleting directories or modifying parameters in the registry.This procedure is for uninstalling iPlanet Application Server and its subcomponents only. If you installed Directory Server along with iPlanet Application Server, other servers may also have since been configured with that Directory Server. Uninstalling the Directory Server could cause problems for these other servers. Therefore, you should not uninstall Directory Server with iPlanet Application Server, unless you are absolutely certain that the only system configured with this installation of Directory Server is the iPlanet Application Server you are uninstalling.
The following directories remain after you uninstall iPlanet Application Server:
iPlanet Application Server root directory
After uninstalling iPlanet Application Server, decide if you want to remove these directories, particularly the custom and APPS directories which may contain applications you've developed and files you wish to keep.The install directory/APPS directory, which is moved by the uninstall program to install directory/ias_APPS/
Before running the iPlanet Application Server uninstall program, make sure that Directory Server is running. Do not uninstall Directory Server before you uninstall iPlanet Application Server.
During the uninstall process, you are prompted to provide a user name and password with administrator access to the configuration Directory Server. If you do not want to use the user name and password you entered at the beginning of the installation process, enter another user name and password, as long as it has administrator privileges on the configuration Directory Server.
On Solaris, the uninstall program overwrites the web server configuration file (obj.conf) with a version of the same file that existed before you installed iPlanet Application Server and the Web Connector plug-in. Therefore, all changes you made to the web server's obj.conf file after installing iPlanet Application Server and the Web Connector plug-in are lost.
From the iPlanet installation directory (the default is /usr/iPlanet/iAS6), type uninstall and press Enter.
You will receive the message "Uninstallation completed." when the files have been removed.Specify the components and subcomponents you want to uninstall.
Enter a user ID and password that has administrator privileges on the configuration Directory Server. If you do not want to use the user name and password entered during installation, enter another user name and password having administrator privileges on the configuration Directory Server.

Previous Contents Index DocHome Next
Copyright © 2000 Sun Microsystems, Inc. Some preexisting portions Copyright © 2000 Netscape Communications Corp. All rights reserved.
Last Updated September 21, 2000