In this section of the tutorial you will:
The sample container-managed entity bean is stored in the database for persistence. Here are SQL statements that will create a table, named obcustomer, where the bean instances will be stored:
CREATE TABLE obcustomer
(
    ssn                 char(9)      NOT NULL ,
    username            varchar2(10) NOT NULL ,
    prefix              varchar2(4)  NULL     ,
    firstname           varchar2(30) NOT NULL ,
    middlename          varchar2(30) NULL     ,
    lastname            varchar2(30) NOT NULL ,
    address             varchar2(30) NOT NULL ,
    address2            varchar2(30) NULL     ,
    city                varchar2(25) NOT NULL ,
    state               char(2)      NOT NULL ,
    zip                 varchar2(9)  NOT NULL ,
    homephone           char(10)     NOT NULL ,
    workphone           char(10)     NOT NULL ,
    constraint PK_obcustomer primary key (ssn)
);
commit;
You may use any application of your choice, including Oracle SQL*Plus, to exeute the statements above.
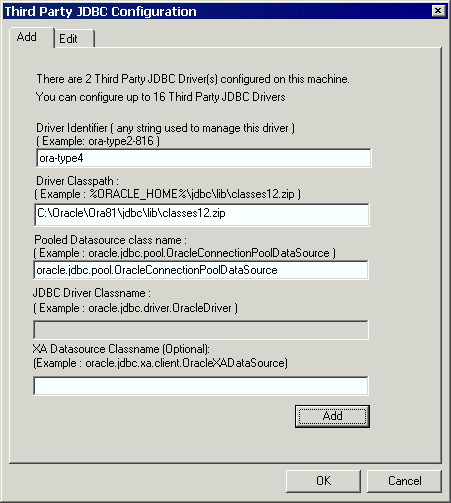
In this subsection, you will configure Oracle JDBC database driver on iPlanet Application Server, naming the driver identifier ora-type4. If you already have configured Oracle JDBC driver, you may skip this section.
To configure Oracle JDBC driver on Solaris:
db_setup.sh
/usr/iplanet/ias65. Press Enter.
To configure Oracle JDBC driver on Windows
jdbcsetup.exe
C:\Lang\Java\Oracle\lib\classes12.zip
The window should look similar to below:
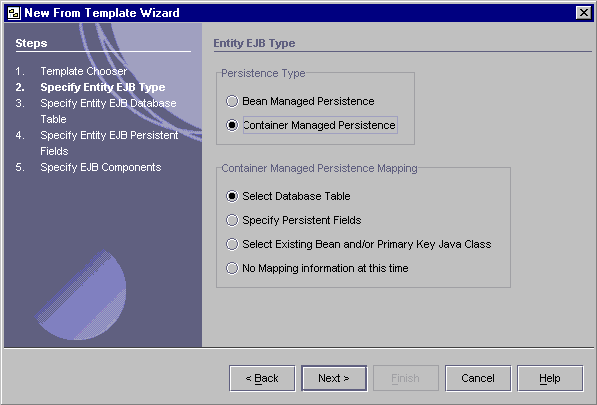
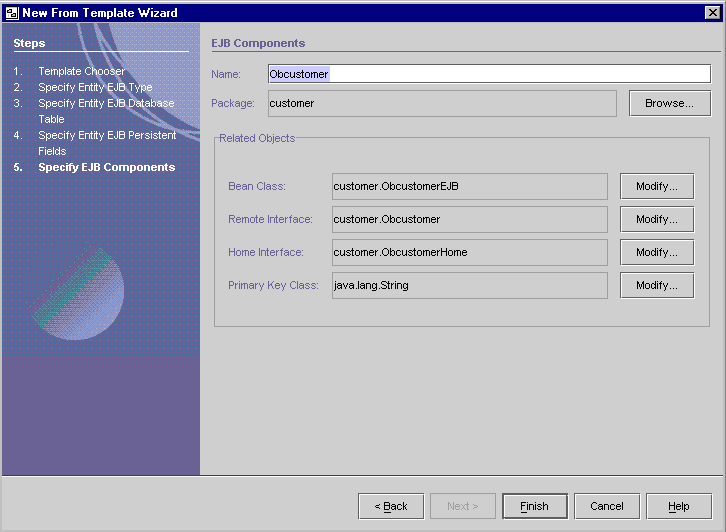
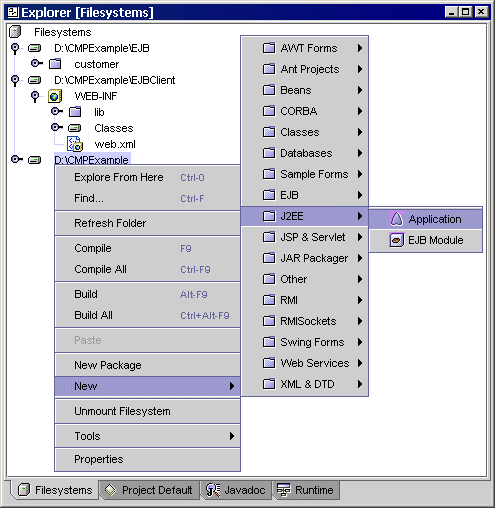
In this subsection, you will create a Container-Managed Persistence EJB. To create the EJB:
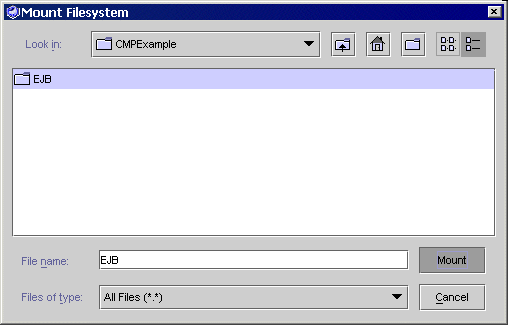
In this example, the directory is named EJB under the CMPExample directory.
Right click on the EJB directory and select New Package.


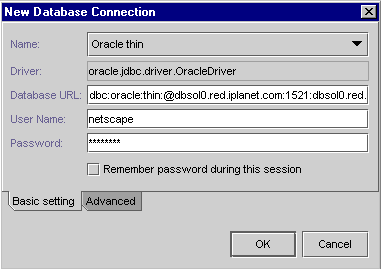
Name: select Oracle thin
Driver: oracle.jdbc.driver.OracleDriver should already be displayed
Database URL: jdbc:oracle:thin:@hostname:portnumber:servicename
User Name: enter the username defined for the database connection
Password: enter the password defined for the database connection


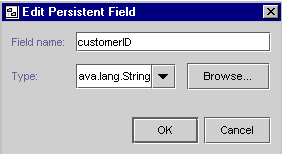
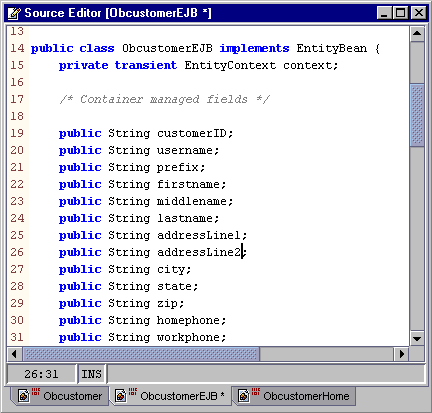
The Java Fields Name for selected entry is changed to customerID.
Once the CMP EJB is created, the following files are available from Explorer (Filesystems) window:

Where:
 is the Obcustomer (EJB) node
 is the Obcustomer remote interface
 is the Obcustomer bean class
 is the Obcustomer home interface
A reminder message displays in the output window prompting you to set the resource references and JNDI name.
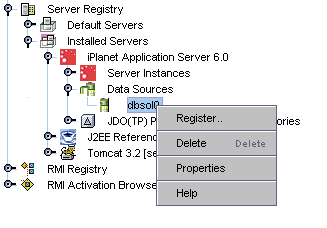
Resource factory reference is an external reference to a resource, such as a database connection, that must be created so an enterprise bean can perform its work. The enterprise bean accesses the resource by making an JNDI lookup when it is running. In this subsection, you will add a new resource factory reference for the database connection whose name is dbsol0. Later in Register the Datasource, you will connect the name dbsol0 to the ora-type4 driver.
To add the reference:
node. button; select the button.

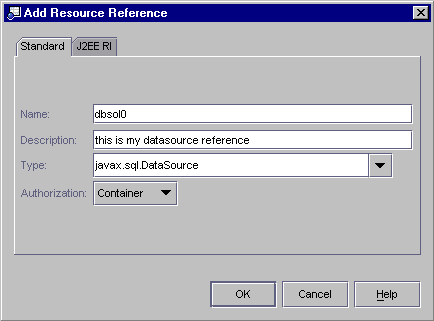
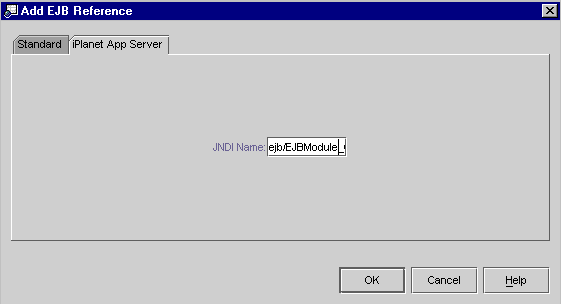
Name: the name of your datasource (in this example jdbc/dbsol0 is
used)
Description: any description you wish
Type: select javax.sql.DataSource
Authorization: select container
The J2EE RI tab is not applicable for cmp EJBs.
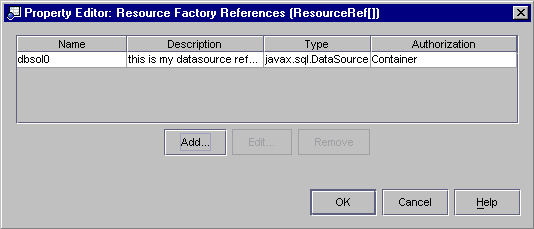
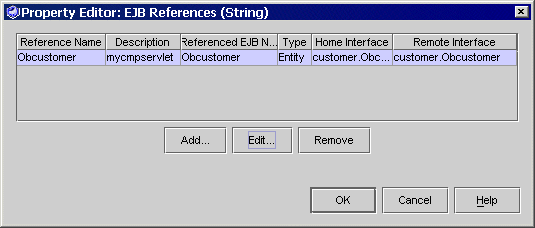
The resource reference entries are then displayed in the Properties editor.
button,
and select the buttonIn this subsection you will map map the database fields to EJB fields and write business methods for accesing EJB fields. Follow the instruction below:
to view it in the Source Editor.
node.
button.


Through this panel you can change the mapping settings of each field in your database table. If you edit the mappings here, you must also edit the corresponding Java file.
| NOTE: If the database changes, or you change the mapping information, you can edit the mappings through this panel. |
node.Name: setUsername
Return Type: void
Method Parameters: Select Add and enter the following data in
the Enter Method Parameter dialog.

The New Business Method dialog should appear as follows:

node again and right click to
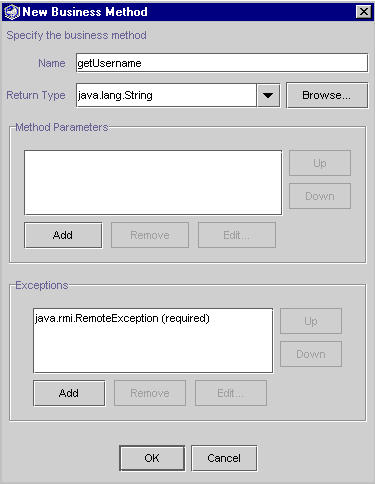
select New Business Method.Name: getUsername
Return Type: java.lang.String
The New Business Method dialog should appear as follows:
node once again and right click
to select New Business Method.Name: getFirstname
Return Type: java.lang.String
The New Business Method dialog should appear as follows:

node for the
last time and right click to select New Business Method.Name: getLastname
Return Type: java.lang.String
The New Business Method dialog should appear as follows:

node to open it in the Source Editor.
node to open it in
the source editor.public Obcustomer create (String customerID, String username, String prefix, String firstname, String middlename, String lastname, String addressLine1, String addressLine2, String city, String state, String zip, String homephone, String workphone) throws CreateException,RemoteException;
bean class
to open it in the source editor.


You are now ready to add the finder methods.
In this subsection, you will add 2 new finder methods, named findAll and findByFirstName, in addition to automaticall generated findByPrimaryKey method. A call to findAll will retrieve all Obcustomer instances. With findByFirstName, you can retrieved EJB instances with the specified firstname. To create the finder methods:
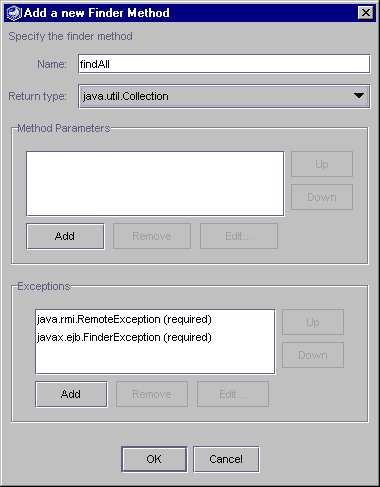
node.Name: findAll
Return type: select java.util.Collection
The New Finder Method dialog should appear as follows:
node.
Name: findByFirstName
Return type: select java.util.Collection
Method Parameters: select Add and enter the following data in
the Method Parameters dialog:
The Add a new Finder Method dialog should appear as follows:

node. node.
node. node and right click on Properties.
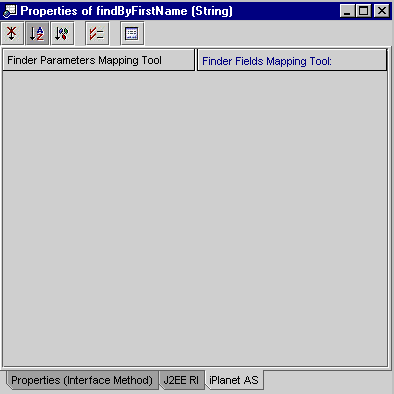
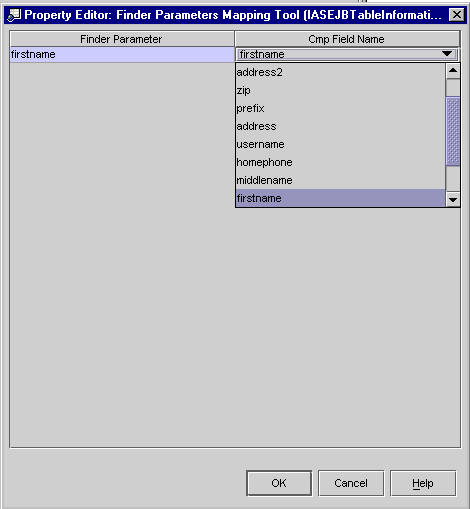
button; select the buttonThe Property Editor: Finder Parameters Mapping Tool dialog is displayed.
You are now ready to validate and compile the EJB Classes.
The IDE can run a validation check on an enterprise bean to ensure that it matches the J2EE specification. You can run a validation check after doing development work on a bean before you compile it; the validation check will catch J2EE errors not caught by the compiler.
In this subsection, you will validate the Obcustomer EJB, and compile it. To validate and compile:
node.Once your EJB is validated, a Finished message is displayed in the
status bar.
node.Once compilation is complete, the message Finished Obcustomer (EJB)
is displayed in the status bar.
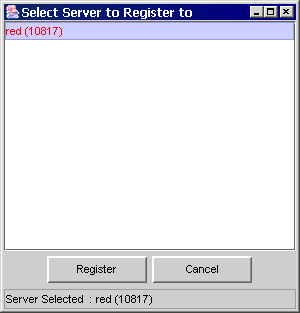
node again.You are now ready to register the datasource with the iPlanet Application Server.
If your module/application depends on a data source, you need to add the datasource and register it so that when it is deployed to the iPlanet Application Server the identfied datasource is used.
DataBase the server name (required only for a Sybase server; leave it as displayed)
Database URL jdbc:oracle:thin:@hostname:portnumber:servicename
DataSource your datasource name (in this example, dbsol0 is
used)
Driver the registered driver name (ora-type4 was
created earlier in this tutorial)
User Name yourusername
Password yourpassword

After a few moments, the Output window iPlanet Deployment Tab displays a message indicating that deployment is finished.
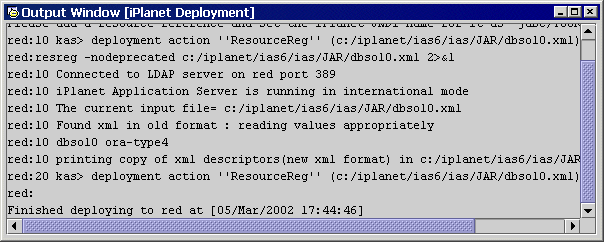
Also, the status message window displays the message Deployment to iPlanet Application Server finished.
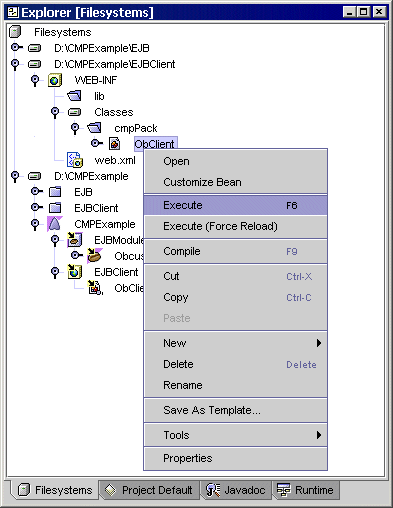
You are now ready to create a servlet to call your Container Managed Persistence EJB.
In this subsection, you will create a servlet that will use the Obcustomer EJB. The servlet creates Obcustomer instances and looks them up with the findByPrimaryKey, findByFirstName, and findAll methods. To create the servlet:
button to create a new
directory.You may see the following dialog informiing you of an alternate project view.

The Source Editor opens the ObClient.java file.
import javax.ejb.*;
import javax.naming.*;
import java.rmi.*;
import java.util.*;
import customer.*;
Your ObClient.java file should look like this:

protected void processRequest(HttpServletRequest request, HttpServletResponse response)
throws ServletException, java.io.IOException {
    response.setContentType("text/html");
    java.io.PrintWriter out = response.getWriter();
    String JNDI = "java:comp/env/Obcustomer";
    Object beanObject = null;
    out.println("<html>");
    out.println("<head>");
    out.println("<title>ObClient Servlet Output</title>");
    out.println("</head>");
    out.println("<body>");
    try
    {
       InitialContext ctx = new InitialContext();
       beanObject = ctx.lookup(JNDI);
       System.out.println("Lookup OK");
       ObcustomerHome home = (ObcustomerHome) beanObject;
       System.out.println("before emptying database");
       Collection c = (java.util.Collection) home.findAll();
       Iterator i = c.iterator();
       while (i.hasNext()) {
         Obcustomer cust =( Obcustomer)i.next();
         cust.remove();
       }
       System.out.println("Before Home.create");
       Obcustomer remote = (Obcustomer) home.create("987654321","SRoberts","Mr","Steve","o","Roberts","Main Street","Suite 20","Santa Clara","CA","95054","4081112222","4082223333");
       out.println("<h1>CMP Bean Sample Application<br /></h1>");
       out.println("<h5>Inserting the Record for Steve Roberts in DB: ");
       out.println("FirstName : " + remote.getFirstname()+ "<br />");
       out.println("LastName : " + remote.getLastname()+ "<br />");
       out.println("UserID : " + remote.getUsername()+ "<br />");
       out.println("<P> Changing the UserID for Steve Roberts from " + remote.getUsername() + " to " + "Roberts :</P>");
       remote.setUsername("Roberts");
       out.println("Accesing DB for UserID for Steve Roberts: <br />");
       out.println("The UserID for Steve Roberts now is : " + remote.getUsername()+ "<br />");
       remote = (Obcustomer) home.create("876543219","LHall","Mr","Larry","M","Hall","South Street","#89","Santa Clara","CA","95054","4088889999","4086667777");
       remote = (Obcustomer) home.create("789123456","LAllen","Mrs","Lora","C","Allen","First Street","# 1895","Santa Clara","CA","95054","4083334444","4085558888");
       remote = (Obcustomer) home.create("678912345","LReeves","Mrs","Lora","K","Reeves","Market Street","# 6677","Santa Clara","CA","95054","4087779999","4088880098");
       System.out.println("Now calling findByPrimaryKey");
       Obcustomer primKey = home.findByPrimaryKey("876543219");
       System.out.println("primKey: "+ primKey.toString()+"\n");
       String id = (String)primKey.getPrimaryKey();
       System.out.println(id);
       out.println("<P> Using findByPrimaryKey : Getting User record for SSN = " + id);
       out.println("FirstName : " + primKey.getFirstname()+"<br />");
       out.println("LastName : " + primKey.getLastname()+"<br />");
       out.println("UserID : " + primKey.getUsername()+"<br />");
       System.out.println("calling findByFirstname");
       c = home.findByFirstName("Lora");
       i = c.iterator();
       out.println("<P> Using findByFirstname : Getting User record for : Lora");
       while (i.hasNext()) {
          Obcustomer cust = (Obcustomer)i.next();
          String customerId = (String)cust.getPrimaryKey();
          String firstname = cust.getFirstname();
          String lastname = cust.getLastname();
          out.println(customerId + ": " + firstname + " " + lastname + "<br />");
        }
        System.out.println("calling findAll");
        out.println("<P> Calling findAll");
        c = (java.util.Collection) home.findAll();
        i = c.iterator();
        while (i.hasNext()) {
           Obcustomer cust =( Obcustomer)i.next();
           String customerId = (String)cust.getPrimaryKey();
           String firstname = cust.getFirstname();
           String lastname = cust.getLastname();
           out.println(customerId + ": " + firstname + " " + lastname + "<br />");
         }
     } catch (Exception ex) {
           System.err.println("Caught an exception." );
           ex.printStackTrace();
     }
     out.println("</body>");
     out.println("</html>");
     out.close();
}
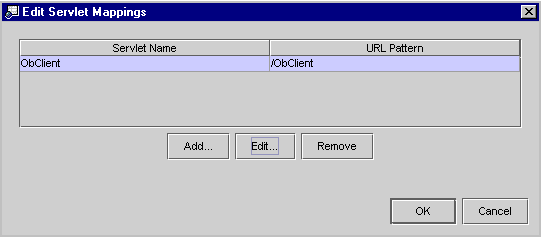
Reference Name: Obcustomer
Description: any description you like
Referenced EJB Name: Obcustomer
Type: Entity
Home Interface: customer.ObcustomerHome
Remote Interface: customer.Obcustomer
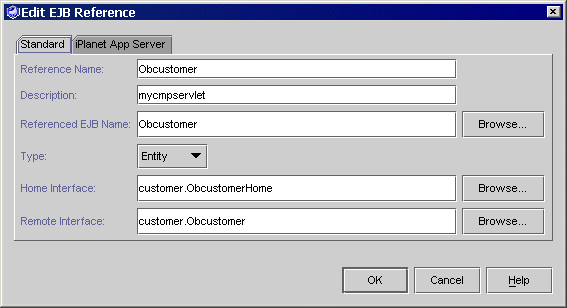
The EJB References dialog should appear as follows:

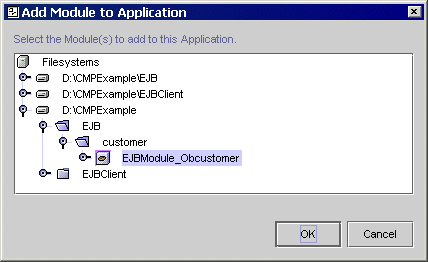
In this subsection, you will create, deploy, and run a J2EE application. The application contains the Obcustomer EJB and ObClient servlet created previously. To run the sample application:
The Progress Monitor dialog is displayed. It will disappear when the deployment process is finished.

The web browser launches and displays the following screen.

The next step in the iPlanet Application Server Integration Module Tutorial is deploying and executing the CDShopCart Forte for Java.
| © 2002 Sun Microsystems, Inc. | terms of use privacy policy feedback |