| Previous Contents Index Next |
| iPlanet Market Maker 4.5 Installation Guide |
Chapter 3 Installing iPlanet Market Maker
This chapter describes the tasks needed to install the iPlanet Market Maker software, which you should perform in the following order:
Uninstall Previous iPlanet Market Maker Installation
Steps to Follow Before Installing the iPlanet Market Maker Software
Uninstall Previous iPlanet Market Maker Installation
The previous iPlanet Market Maker installation must be fully uninstalled prior to installing the Version 4.5 Release.
An upgrade from iPlanet Market Maker versions 1.0, 1.0 SP1, 4.0, or 4.0 SP1 is not supported within the installer.
- See "iPlanet Market Maker Database Setup" and "Uninstallation", "Versions 4.0, 4.0 SP1, and 4.5".
Steps to Follow Before Installing the iPlanet Market Maker Software
Before you start the installation process, check the following:
Login as Oracle user and run sqlplus system/<password>@<net service name>
Check Java version. For example, java -version should report 1.2.2_07.
Note Net Service Name=whatever you selected during the Oracle database creation. You must specify the <net service name>. See the "Using the Oracle Universal Installer" section in Appendix B.
- If you are not able to connect with the above parameters, the installation does not succeed. See the "Troubleshooting" section of this Installation Guide.
Verify that the iPlanet Directory Server is running.
Verify that the iPlanet Application Server is running.
Verify that the iPlanet Messaging Queue is running.
The bash utility should be available on the system and should be included in PATH. Run the bash -version command to check for the bash version number, which should be 2.00.0 or higher.
Installing the iPlanet Market Maker Software
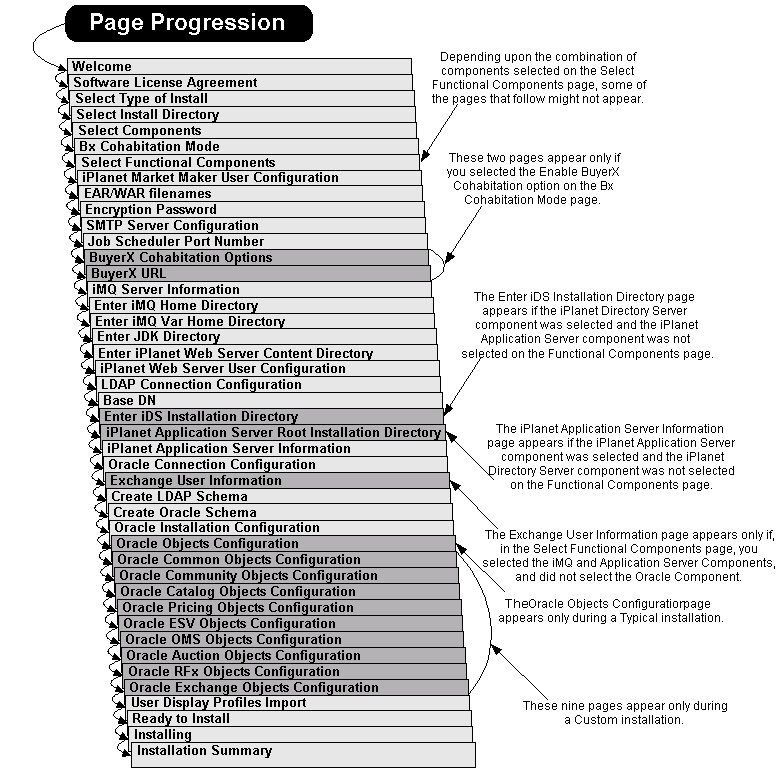
iPlanet Market Maker Software Page Progression
Using Separate Servers for iPlanet Web Server and iPlanet Application Server
The iPlanet Market Maker installer supports the installation of different components on separate machines.
Install a webless instance of iPlanet Application Server on machine A.
Export a local file system in machine A, so that it is mountable from machine B.
Mount the exported file system of machine A on machine B.
Create a new web server instance if you already have iPlanet Web Server installed (otherwise, install iWS on machine B), and select the mounted location as the docs directory location for the iWS instance.
Install the iPlanet Application Server software with the Web Connector plug-in only on machine B (see the notes below regarding how to do this).
Install the iPlanet Market Maker software on machine A, and select the exported location for iWS static pages.
Now connect to URL http://<B><domain>:<port>/NASApp/imm40/iMM/imm.jsp
Installing the Web Connector Plug-in
The Installation Instructions and Release Notes for the iPlanet Application Server you are installing can be found at: http://docs.iplanet.com/docs/manuals/ias.htmlMore information about the iPlanet Application Server Web Connector Component is contained in the iPlanet Application Server Administrator's Guide, and in the Deployment Tool online help system, which is accessible directly from the Deployment Tool software.
Note Mounting of the NFS file system has not been tested with firewalls.
File Attachments / File Uploads
There is an inconsistency in the behavior of various modules with regard to attachments and uploads of files.
RFx
Auctions
- Attached files during RFx create is uploaded to the iPlanet Market Maker machine (for example, the iPlanet Application Server); this is configurable in the VortexConfiguration.properties.
- Regarding RFx attachments:
- To make an attachments folder and its contents (attachments) globally accessible by all registered users in the marketplace, configure the folder location in property file:
<iAS_HOME>/ias/APPS/imm40/imm40/WEB-INF/classes/VortexConfiguration.properties
- by the following property:
#CFG_ATTACHMENT_DEFAULT_SAVE_DIRECTORY
# - The directory in which file attachments are saved.
24=/export/home/imm/iMM/misc
Catalog
- Images uploaded are saved in the web server instance content directory (for example, web server machine); this is configurable in the AuctionConfiguration.properties.
Note The image directory should be shared by all web servers.
- Following are the configurable parameters for uploading images:
#CFG_IMAGE_ATTACHMENT_TMP_URI
# - relative URI to where the image files are located
10=auction/images/uploaded_images/tmp
#CFG_IMAGE_ATTACHMENT_URI
# - relative URI to where the image files are located
11=auction/images/uploaded_images
#CFG_CATALOG_IMAGE_DIR
# - Catalog item images stored here.
12=/export/home/iws/docs/imm40/iMM
- Images must be manually copied to the web server instance content directory (for example, web server machine); this is not configurable.
Order for Installing iPlanet Market Maker Functional Components
The order in which you install the iPlanet Market Maker functional components depends on which components are to be installed on which servers. The Functional Component Installation Sequence section below explains the required component installation order to follow.
Functional Component Installation Sequence
When multiple machines are used, a separate installation is required for each machine. When using more than one machine, a general dependency order for component installation applies as follows:
Install the iPlanet Market Maker Directory Server Database (LDAP) component on the iPlanet Directory Server machine, or from any machine having the iPlanet Application Server software or the iPlanet Directory Server software installed.
Install the iPlanet Market Maker Oracle Database component from a machine that has installed an Oracle client that points to the Oracle server.
Install the iPlanet Market Maker Messaging Queue component.
Install the iPlanet Market Maker Web component.
Install the iPlanet Market Maker Application Server component on the iPlanet Application Server machine.
Note The iPlanet Market Maker software can be installed on a single machine in the normal manner if Oracle client is already installed on Machine A.
Based on the example in Table Table 3-1:
Run the installer on Machine A and, on the Select Functional Components page, click to place a checkmark in the textbox next to iPlanet Directory Server (LDAP).
Based on the example in Table 3-2:Run the installer on Machine B and click to place a checkmark in the textbox next to Oracle Database.
Run the uninstaller to remove the iPlanet Market Maker installation carried out in step 1. Do not delete the directory server entries.
Run a separate instance of the installer on Machine A and click to place checkmarks in the textboxes next to iPlanet Application Server, iPlanet Web Server, and iPlanet Messaging Queue.
Run the installer on Machine A and, on the Select Functional Components page, click to place a checkmark in the textboxes next to iPlanet Directory Server (LDAP), Oracle Database Server, and iPlanet Messaging Queue.
Run the installer on Machine B and click to place a checkmark in the textboxes next to iPlanet Web Server and iPlanet Application Server.
Extracting Installation Files
To extract iPlanet Market Maker installation files, do the following.
Log in as the root user.
Choose the temporary directory location to extract iPlanet Market Maker installation files.
Copy iMM_45.tar to your temporary directory.
Type in the following command to extract iMM_45.tar to your temporary directory:
- % tar xvfo iMM_45.tar
- This places the setup files and Release Notes in your current working directory.
You can use one Oracle instance for multiple iPlanet Market Maker instances. In this case, usernames should be unique across all iPlanet Market Maker instances.
You can use one iPlanet Messaging Queue instance for multiple iPlanet Market Maker instances. In this case, using one single Oracle instance, usernames (created in Oracle), datafile names, index names, tablespace names, and so forth, should be unique across all iPlanet Market Maker instances.
- For example:
- Or, you can use a separate Oracle instance for each iPlanet Market Maker instance. In this case, you can use the same Oracle username for each iPlanet Market Maker instance.
You can use one LDAP instance for multiple iPlanet Market Maker instances. In this case, the Base DN should be unique across all iPlanet Market Maker instances.
- See the example above in this table.
- Or, you can use a separate iPlanet Messaging Queue instance for each iPlanet Market Maker instance. In this case, you can use the same username for each iPlanet Market Maker instance, provided that the users are created on a separate Oracle instance.
You can use one iPlanet Web Server instance for multiple iPlanet Market Maker instances, or you can use a separate iPlanet Web Server instance for each iPlanet Market Maker instance. In either case, the EAR and WAR filenames should be unique across all iPlanet Market Maker instances.
- See the example above in this table.
- Or, you can use a separate LDAP instance for each iPlanet Market Maker instance. In this case, you can use the same Base DN name, or you can use a different Base DN name for each iPlanet Market Maker instance.
"> Multi-Domain Installer
Starting the Installation Process
To continue installing iPlanet Market Maker, follow these steps.
Run the setup command:
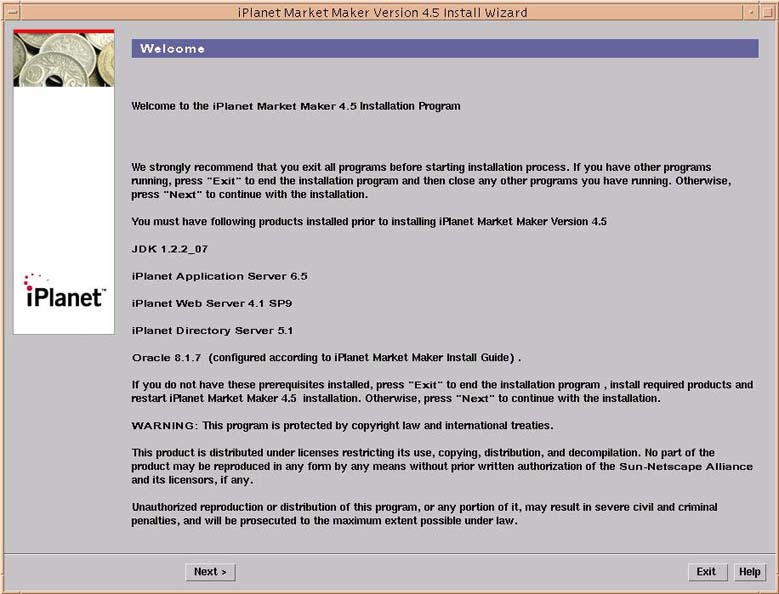
On the Welcome page:
- % ./setup
- This command starts the iPlanet Market Maker installation wizard in graphical mode that guides you through the installation procedure. Each wizard page has a Help button that provides information about that page. To exit the wizard at any time, press the Exit button on any page.
Note If you are performing the installation from a remote server, verify that your DISPLAY environment variable is set correctly.
- If you want to run setup in the command line mode (for example, if you do not have an X-server available and you are trying to install from a remote location), run the following command:
- % ./setup -nodisplay
- If running in the command line mode, the initial page contains instructions for entering data and running the installer.
On the Software License Agreement page:
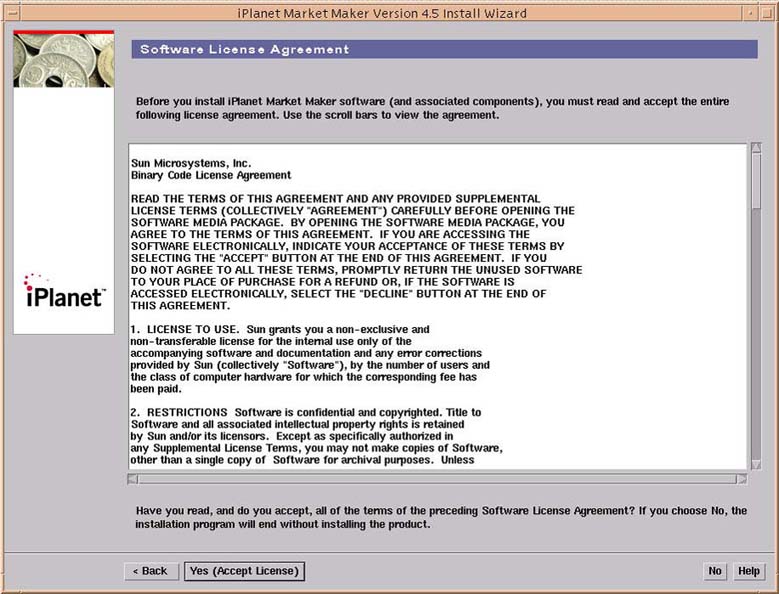
If necessary, increase the window size to make the entire agreement visible.
On the Select Type of Install page:Select the Yes (Accept License) option to accept and continue the installation.
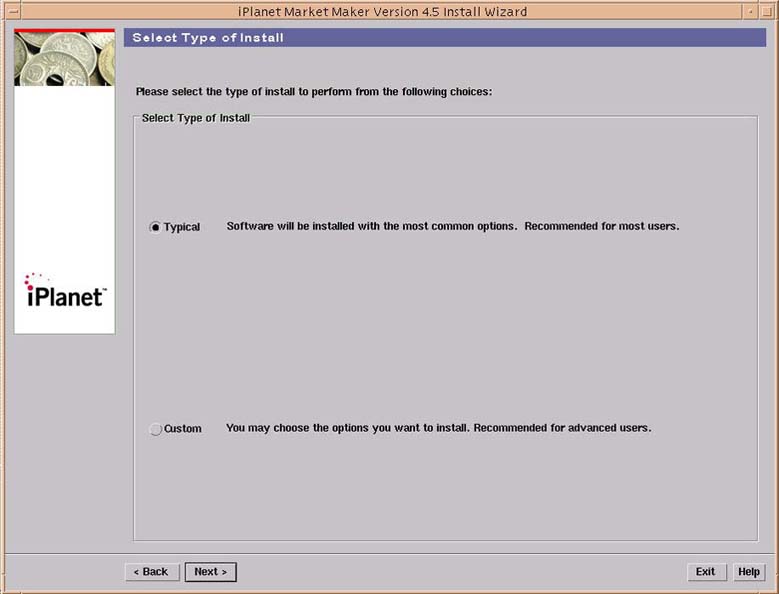
- Select the Typical or Custom installation option:
Select a Typical installation that uses default values to create schemas in the Oracle database for OMS, Auctions, RFx, and so forth.
Select the Next button to continue the installation.
- Or:
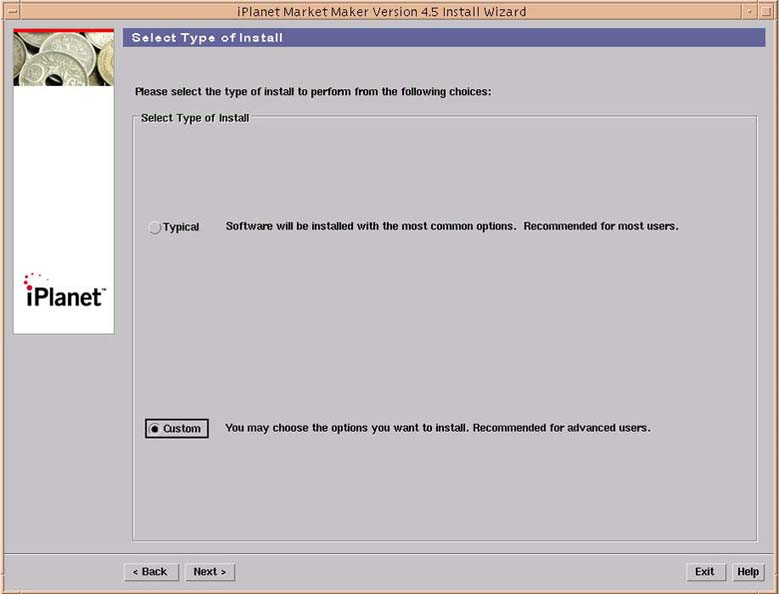
Select a Custom installation to provide options to customize the Oracle schema creation to your requirements.
On the Select Install Directory page:
Select the Next button to continue the installation.
- Select a Custom installation if you want to install more than one iPlanet Market Maker instance on a single iPlanet Application Server.
- These page options appear later in this installation, beginning with Step 33, through and including Step 41.

Accept the default or select the Browse... button to search for a new location.
On the Select Components page:Select the Next button to continue the installation.
Click the Create New Directory button or the Choose Another Directory button.
- If you enter an existing directory that contains the iPlanet Market Maker product, the following warning appears after you click the Next button informing you of the existing directory, and that the installation you are performing may modify the existing directory:

Accept the default, or create a new directory, or choose another directory.
- This action takes you back to the Select Install Directory page:
Click the OK button to continue.
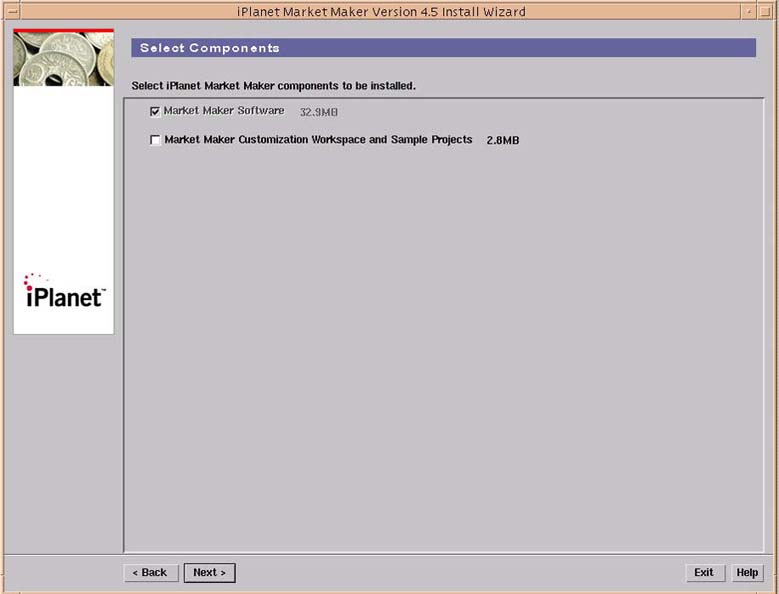
- The iPlanet Market Maker software is installed by default.
(Optional) Select the Market Maker Sample Projects option to install customization workspace and sample projects.
On the BuyerX Cohabitation Mode page:Select the Next button to continue the installation.
On the Select Functional Components page:
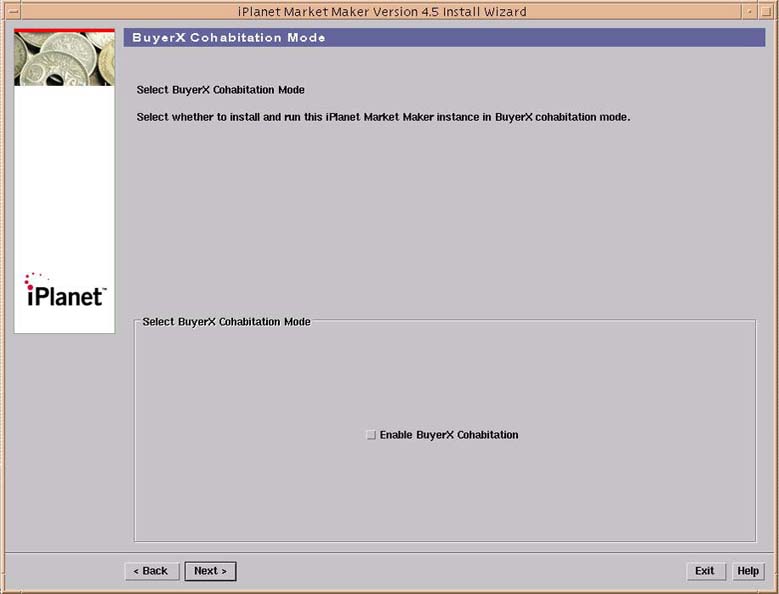
The BuyerX Cohabitation Mode page that is seen during the installation of iPlanet Market Maker 4.5 cannot be used in conjunction with any BuyerXpert versions prior to BuyerXpert 4.5.
- If you want the iPlanet Market Maker software to operate in conjunction with an existing iPlanet BuyerXpert 4.5 installation (that must be installed before installing iPlanet Market Maker):
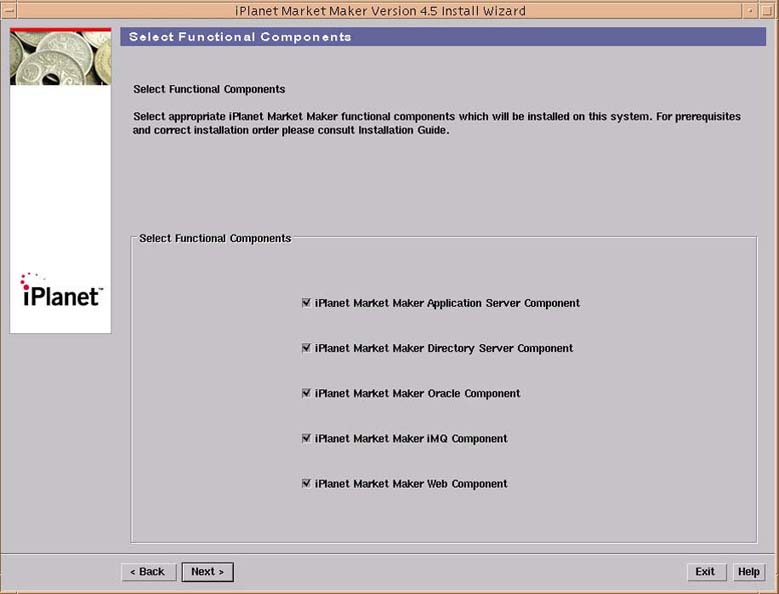
- The iPlanet Market Maker functional components, each showing a checked box, are installed.
Accept the defaults to accept all components (or select the necessary components).
On the iPlanet Market Maker User Configuration page:
Click the Next button to continue the installation.
- To find out which components need to be selected, consult the Order for Installing iPlanet Market Maker Functional Components section that appears earlier in this guide.

Enter the user and group accounts that will own the iPlanet Market Maker files.
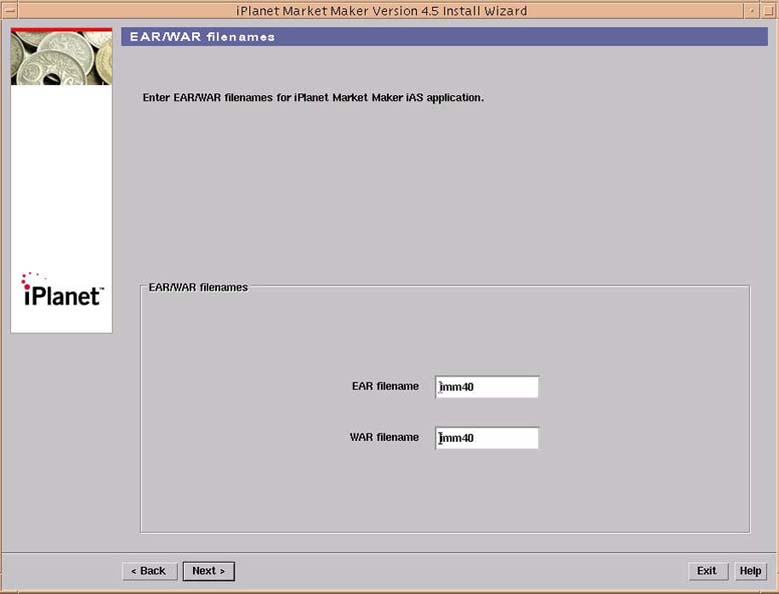
On the EAR/WAR filenames page:
Select the Next button to continue the installation.
- The User ID and Group ID are the UNIX user IDs.
- The installer creates these accounts if they do not exist.
- This page only shows up if the Custom Install option was previously selected and if the iPlanet Application Server and/or iPlanet Web Server components were chosen on the Functional Components page.
- These entries affect the iPlanet Market Maker URL: http://localhost/NASApp/<WAR_filename>/iMM/imm.jsp
Accept the default in the EAR textbox, or enter a new EAR filename.
On the Encryption Password page:
Accept the default in the WAR textbox, or enter a new WAR filename.
- If you are installing multiple instances of iPlanet Market Maker on the same server, you need to specify a different EAR filename for each instance.
Select the Next button to continue the installation.
- If you are installing multiple instances of iPlanet Market Maker on the same server, you need to specify a different WAR filename for each instance.
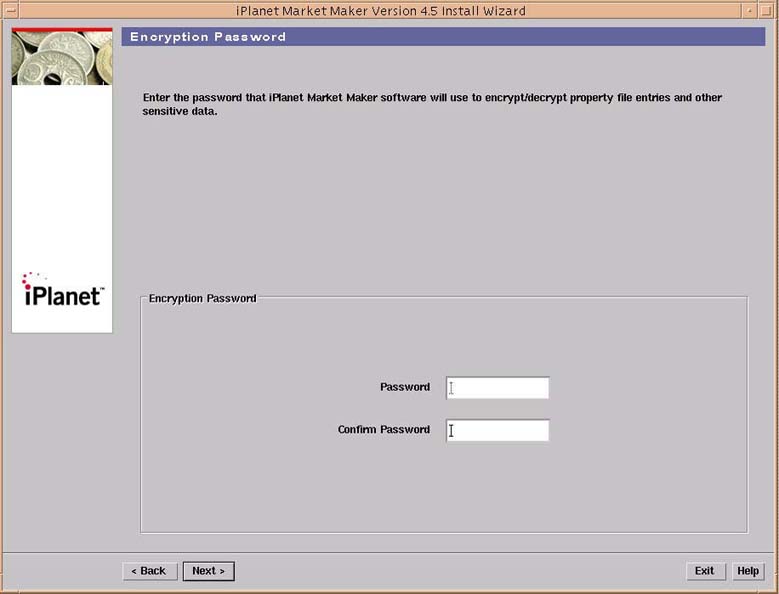
Enter a password to be used by the iPlanet Market Maker software to encrypt/decrypt property file entries and other sensitive data (for example, order details stored in the Oracle database).
On the SMTP Server Configuration page:
Enter the same password again in the Confirm Password textbox.
- If you are reinstalling iPlanet Market Maker, you must use the same password you specified for your previous installation.
- You risk losing important data if you do not specify your original password. This password is used for encrypting sensitive data stored in the properties files and in the Oracle database.
- If iPlanet Market Maker should cohabit with a previously installed version of BuyerXpert, then you must use the same encrypt/decrypt password that was used for the BuyerXpert installation.
Select the Next button to continue the installation.
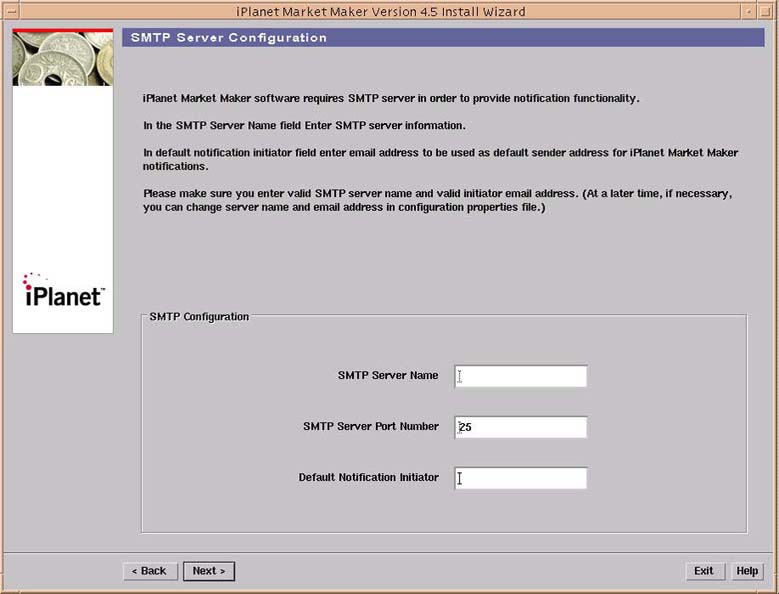
Enter the SMTP server name used for email notification.
On the Job Scheduler Port Number page:Enter the SMTP server port number.
Enter the Default notification initiator.
Select the Next button to continue the installation.
- Specify a valid email address to be used to send and receive iPlanet Market Maker messages. This email address is not checked for validity in the installation process. After installation, you can change this email address in the VortexConfiguration.properties file.
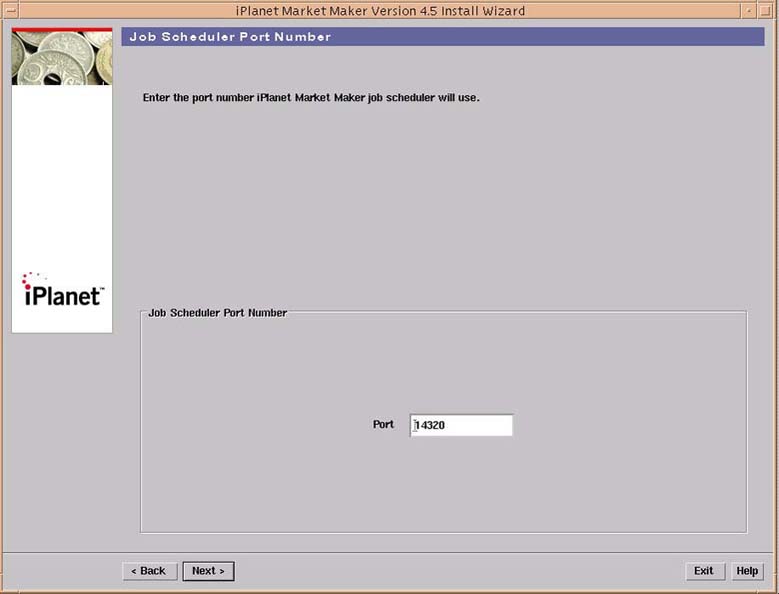
Accept the default, or enter a new Job Scheduler port number.
On the BuyerX Cohabitation Options page:Select the Next button to continue the installation.
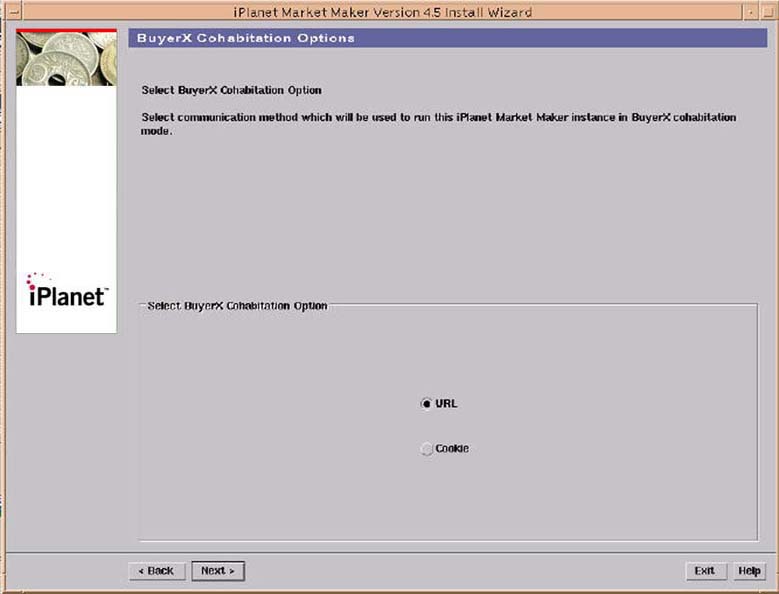
- This page appears only if you selected the Enable BuyerX Cohabitation option in Step 7 (BuyerX Cohabitation Mode page) above.
Select the URL option (less secure than the Cookie option)
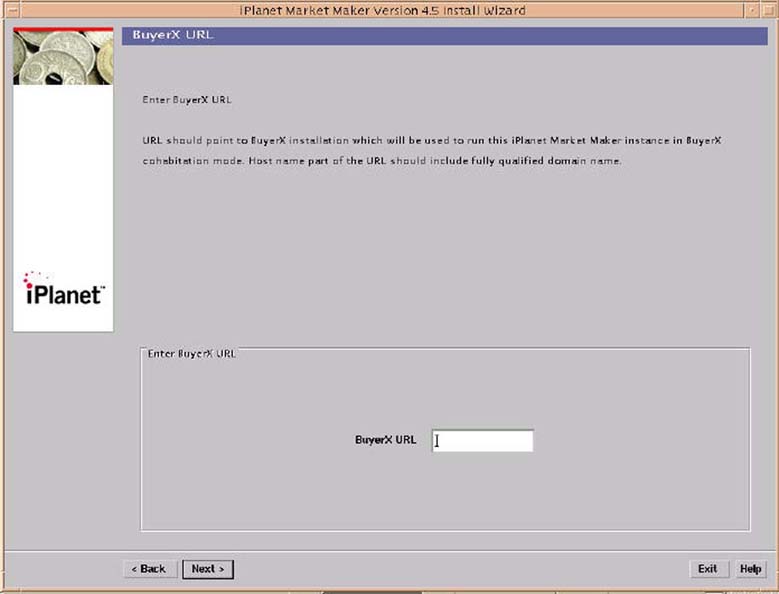
On the BuyerX URL page:
Select the Next button to continue the installation.
- or
- Select the Cookie option (more secure than the URL option).
- This page appears only if you selected the Enable BuyerX Cohabitation option in Step 7 (BuyerX Cohabitation Mode page) above.
Enter the BuyerXpert login page URL.
On the iMQ Server Information page:
Select the Next button to continue the installation.
- The name of the host must be fully qualified (http://<hostname.domain.com>/NASApp/buyer/Login).
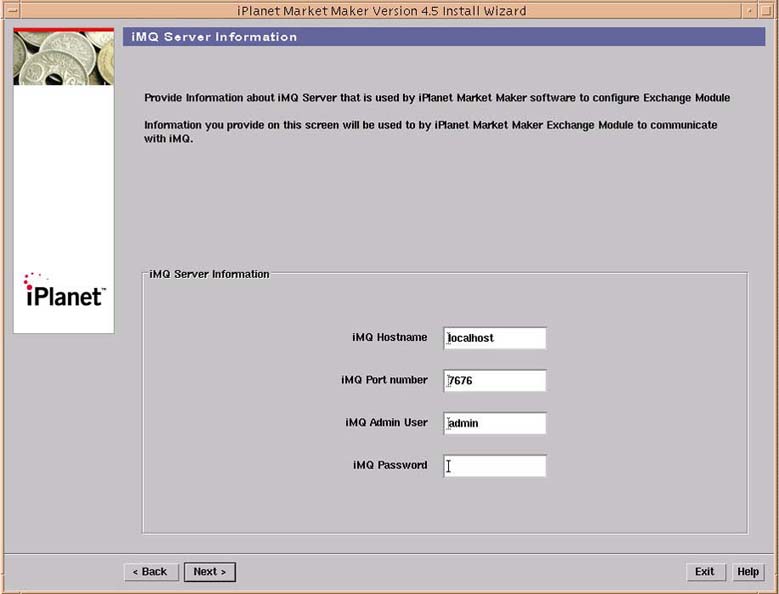
- Use this panel to provide information about the iPlanet Messaging Queue server to be used by iPlanet Market Maker Exchange Module.
- This page appears only if you selected the checkbox next to the iPlanet Market Maker iMQ Component or iAS Component in Step 8 (Select Functional Components page) above.
The iPlanet Market Maker Oracle component must exist before you can install the iMQ component.
Accept the default, or enter the iMQ Hostname.
On the Enter iMQ Home Directory page:Accept the default, or enter the Port number.
Accept the default, or enter the iMQ Admin Username.
Enter the iMQ password.
- If you are installing multiple instances of iPlanet Market Maker using the same iMQ instance, usernames should be unique across all iPlanet Market Maker instances.
Select the Next button to continue the installation.
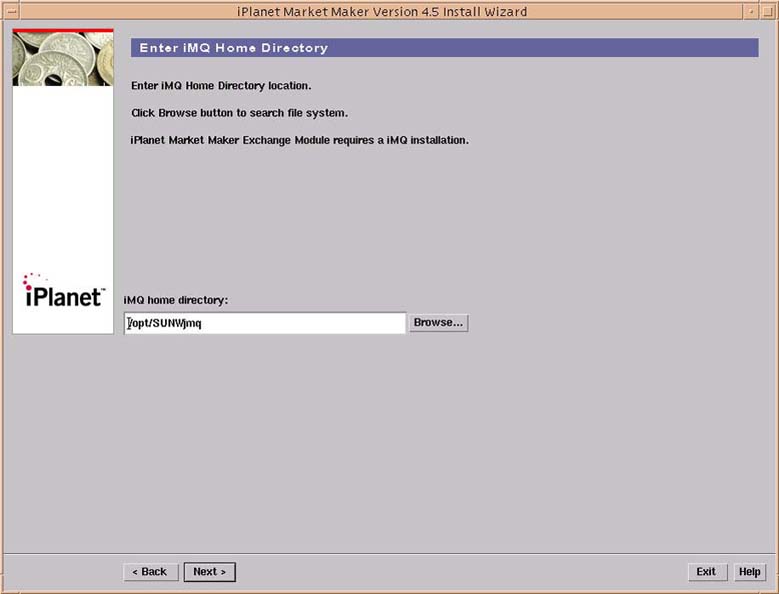
Enter the iMQ Home Directory name, or select the Browse... button to search for the directory.
On the Enter iMQ Var Home Directory page:Select the Next button to continue the installation.
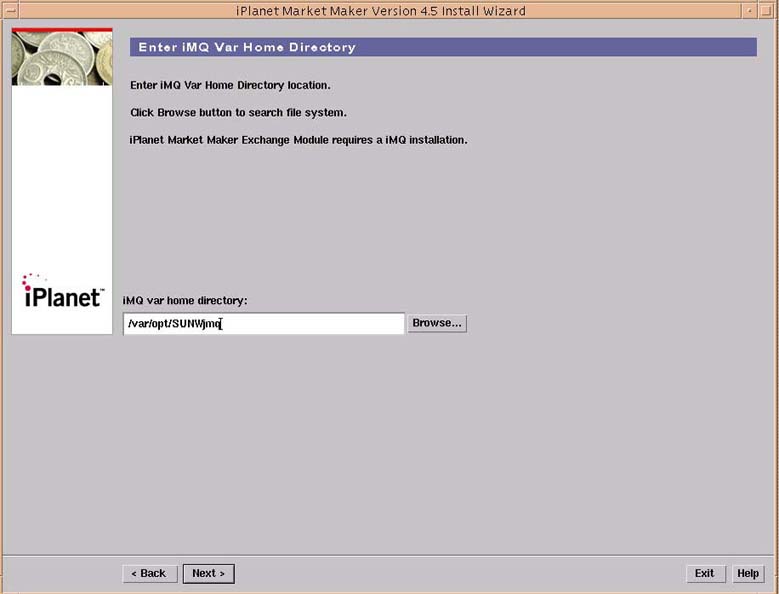
Accept the default for the iMQ var home directory location, or select the Browse... button to search for the directory.
On the Enter JDK directory page:Select the Next button to continue the installation.

Accept the default (/usr/java1.2), or select the Browse... button to search for a new location where JDK is installed.
On the Enter iPlanet Web Server Content Directory page:Select the Next button to continue the installation.
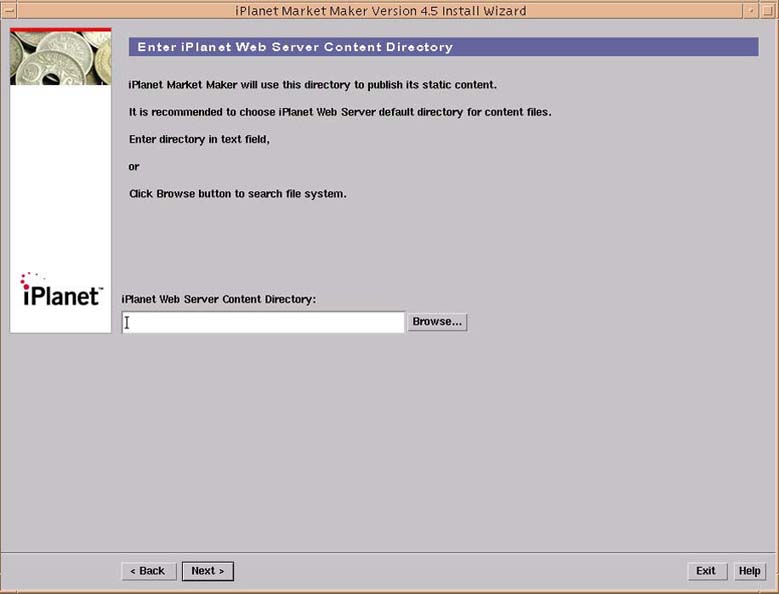
Enter the iPlanet Web Server content directory location name, or select the Browse... button to search for a location.
On the iPlanet Web Server User Configuration page:
Select the Next button to continue the installation.
This is a required field, and should not be left blank.
- iPlanet Market Maker uses this directory to publish its static environment. The default is usually docs directory under the iPlanet Web Server directory, such as /export/home/iws/docs.
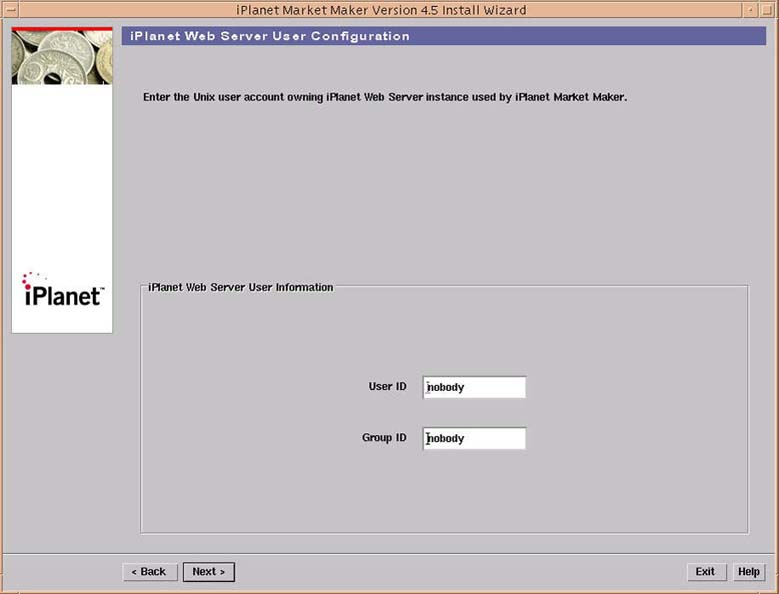
Enter the UNIX User ID as iPlanet Web Server runs.
On the LDAP Connection Configuration page:
Enter the UNIX Group ID to which the iPlanet Web Server belongs.
- Typically, that User ID is nobody.
Select the Next button to continue the installation.
- Typically, that Group ID is nobody.
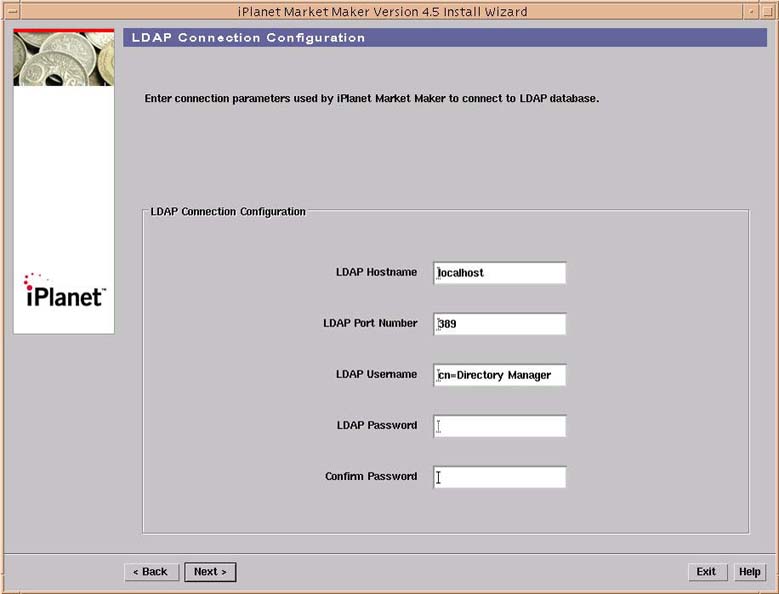
- This page specifies the parameters used by the iPlanet Market Maker software to establish connections to the iPlanet Directory Server database.
Accept the default of localhost in the LDAP Host Name textbox, or enter a value specific to your configuration.
On the Base DN page:Accept the default of 389 in the LDAP Port Number textbox, or enter a value specific to your configuration.
Accept the default of cn=Directory Manager in the LDAP Username textbox, or enter a value specific to your configuration.
Enter in the LDAP Password textbox the password used when installing the Directory Server.
Repeat the LDAP password entry in Confirm Password textbox.
Select the Next button to continue the installation.

Enter a Base DN name.
On the Enter iDS Installation Directory page:
Select the Next button to continue the installation.
- If you want to use the same directory server instance to store LDAP data for more than one iPlanet Market Maker instance, you need to use a different Base DN entry for each iPlanet Market Maker instance.
- If you are using separate directory server instances, you can use the same Base DN entry for each iPlanet Market Maker instance.
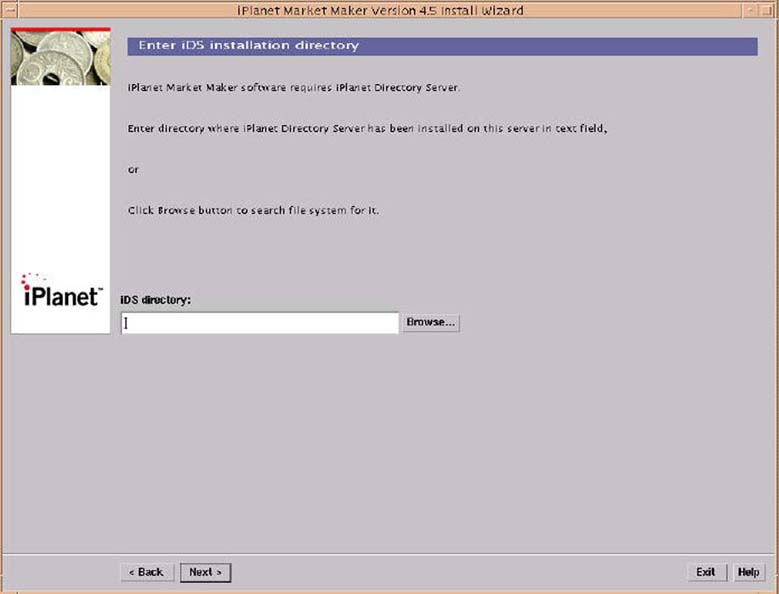
- This page appears only if the iPlanet Directory Server component was selected and the iPlanet Application Server component was not selected in Step 8 (Select Functional Components page) above.
Enter the directory name containing either the iPlanet Directory Server installation or the iPlanet Application Server installation.
On the iPlanet Application Server Root Installation Directory page:
Select the Next button to continue the installation.
- This directory is utilized to locate the ldapmodify utility (found in <directory>/shared/bin) that is used to import the LDAP schema and data.
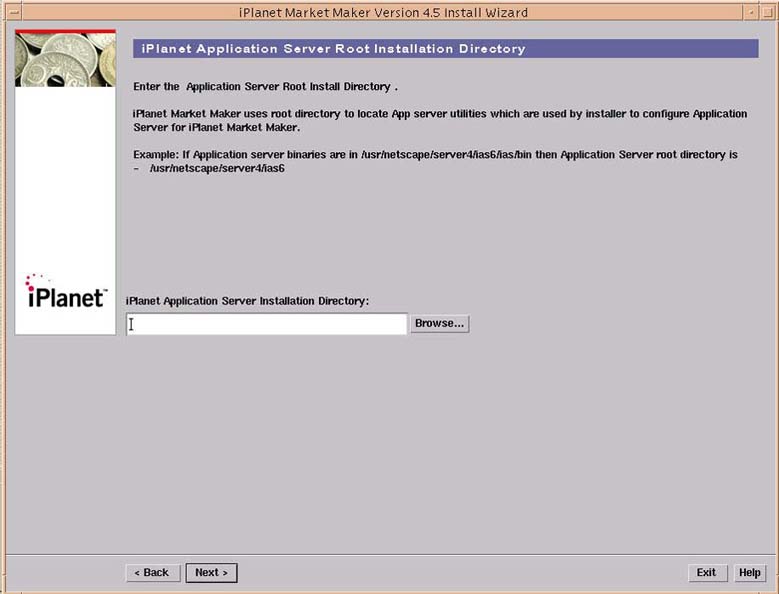
Enter the iPlanet Application Server Installation Directory name, or select the Browse... button to search for the directory.
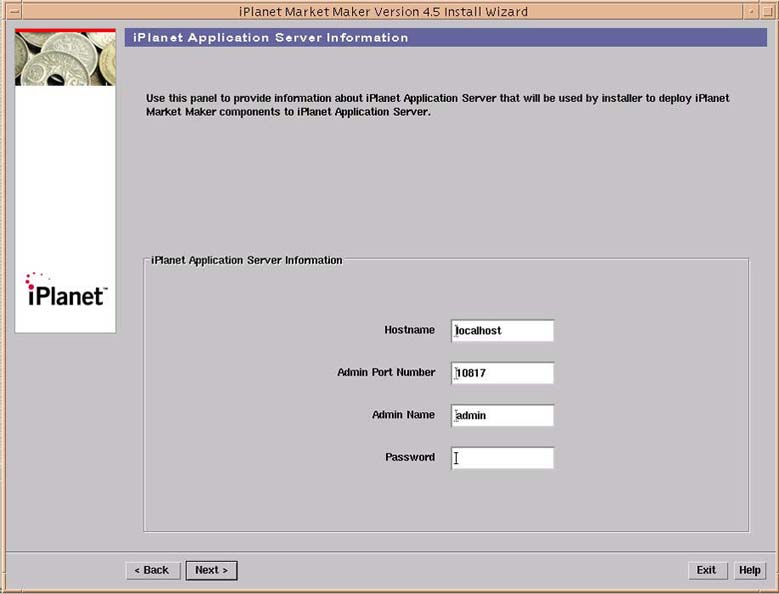
On the iPlanet Application Server Information page:Select the Next button to continue the installation.
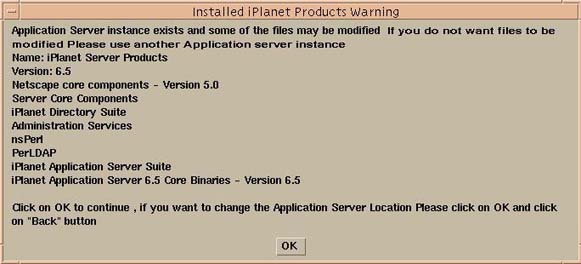
Click the OK button to continue.
- If you enter a directory name where an iAS instance is already installed, after you click the Next button, a warning appears (an expected behavior) informing you of the existing directory and that the installation might modify the existing directory.
- This page appears only if you selected the iPlanet Application Server component and did not select the iPlanet Directory Server component in Step 8 (Select Functional Components page) above.
- This page provides information about the application server that is used by iPlanet Market Maker to deploy iPlanet Market Maker components to an application server.
Accept the default in the Hostname textbox, or enter a value specific to your configuration.
On the Oracle Connection Configuration page:Accept the default in the Admin Port number textbox, or enter a value specific to your configuration.
Accept the default in the Admin name textbox, or enter a value specific to your configuration.
Enter a password in the Password textbox.
Select the Next button to continue the installation.
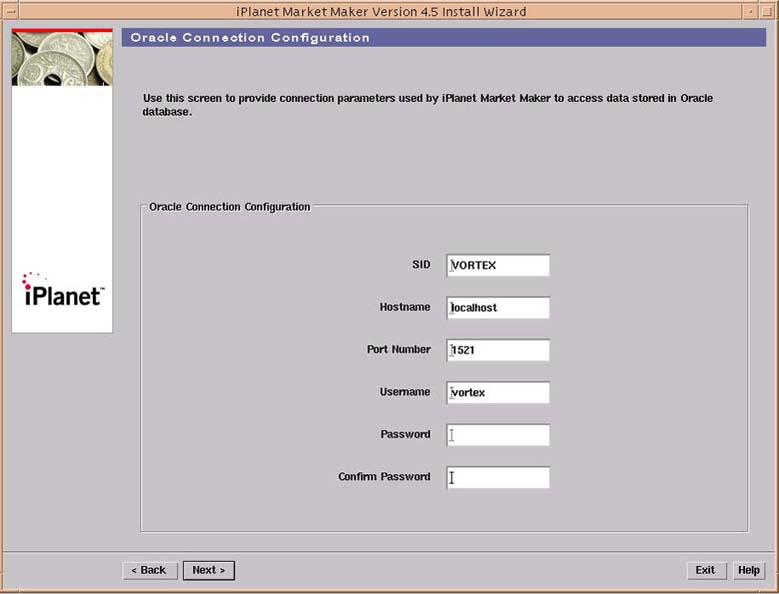
- This page specifies the parameters used by the iPlanet Market Maker software to establish the JDBC connection to the Oracle database.
Accept the default in the SID textbox, or enter an SID you selected during database creation.
On the Exchange User Information page:Accept the default in the Hostname textbox, or enter an Oracle server machine name.
Accept the default in the Port number textbox, or enter the Oracle Port Number on which Oracle is running.
Enter an Oracle Username, or accept the default of vortex.
Choose a user password for user (for example, vortex) and enter it in the Password textbox.
- The username you select is created as part of the Oracle schema installation.
- If you are installing multiple instances of iPlanet Market Maker using the same SID, you need to specify a different username for each iPlanet Market Maker instance.
Type your user password again in the Confirm Password textbox.
Select the Next button to continue the installation.
- This page appears only if you selected the iMQ and application Server Components and did not select the Oracle Component in Step 8 (Select Functional Components page) above.
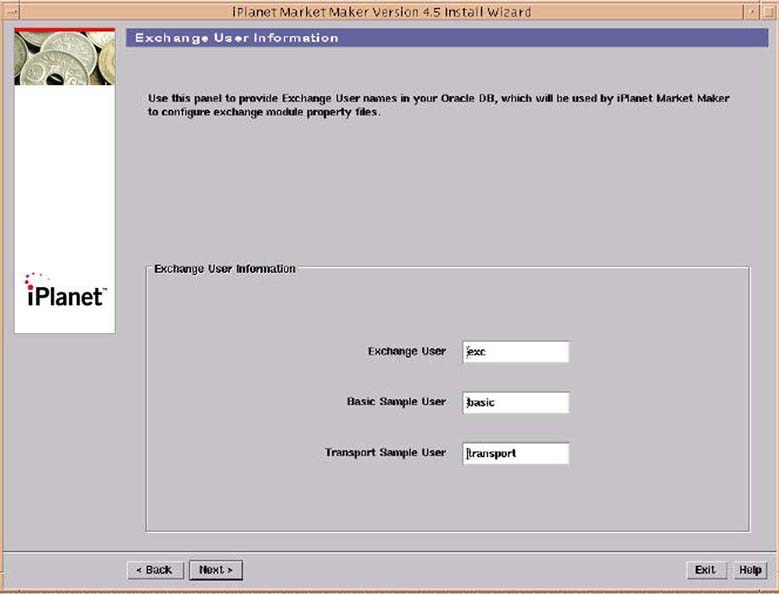
Accept the default in the Exchange User textbox, or enter a new Exchange User name.
On the Create LDAP Schema page:Accept the default in the Basic Sample User textbox, or enter a new Basic Sample User name.
Accept the default in the Transport Sample User textbox, or enter a new Transport Sample User name.
- If you are installing multiple instances of iPlanet Market Maker using the same Oracle SID, you need to specify a different username for each iPlanet Market Maker instance.
Click the Next button to continue the installation.
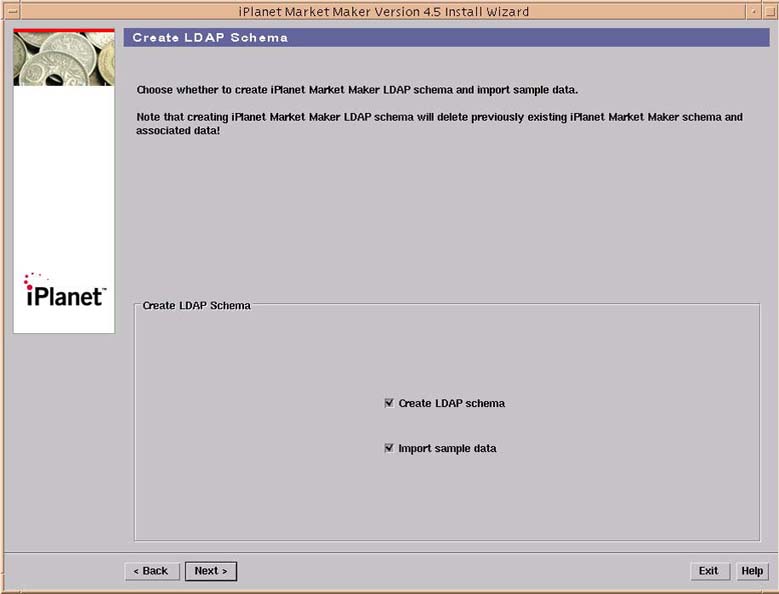
- This page appears only if you selected the checkbox next to the iPlanet Market Maker Directory Server Component in Step 8 (Select Functional Components page) above.
- This step recreates the iPlanet Market Maker LDAP schema and import sample data.
- The Create LDAP Schema page does not appear if you selected the BX Cohabitation option in Step 7 (BuyerX Cohabitation Mode page) above.
- If you selected the BX Cohabitation option in Step 7 (BuyerX Cohabitation Mode page) above, iPlanet Market Maker uses the BX LDAP database. Otherwise, iPlanet Market Maker requires its own LDAP instance.
- The LDAP Schema is required to run the iPlanet Market Maker software.
- You need to accept the Create LDAP Schema option to use the iPlanet Market Maker software.
Click to remove the checkmark next to the Create LDAP schema option to turn off the Create LDAP schema option and preserve your existing LDAP schema,
On the Create Oracle Schema page:
(Optional): Accept the Import sample data default.
- If you leave the checkmark in the checkbox, you accept the Create LDAP schema option, and all of your previous iPlanet Market Maker LDAP schema data will be deleted.
Select the Next button to continue the installation.
Click the Continue button to continue the installation.
- After clicking the Next button, a warning notice appears asking: Schema creation will delete any existing iPlanet Market Maker LDAP Schema and data. Do you want to proceed?

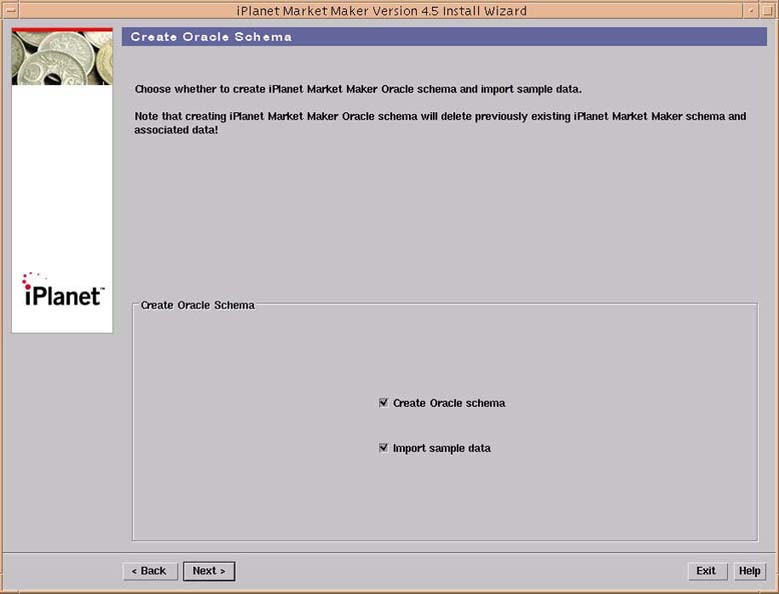
- The Create Oracle Schema page does not appear if you did not select the BX Cohabitation option in Step 7 (BuyerX Cohabitation Mode page) above.
- If you selected the BX Cohabitation option in Step 7 (BuyerX Cohabitation Mode page) above, iPlanet Market Maker uses the BX Oracle database. Otherwise, iPlanet Market Maker requires its own Oracle instance.
- This page appears only if you selected the checkbox next to the iPlanet Market Maker Directory Server Component in the Select Functional Components page in Step 8 above.
- This step recreates the iPlanet Market Maker Oracle schema and import sample data.
Click to remove the checkmark next to Create Oracle schema to turn off the Create Oracle schema option and preserve your existing Oracle schema.
On the Oracle Installation Configuration page:
(Optional): Accept the Import sample data default.
- If you leave the checkmark in the checkbox, you accept the Create Oracle schema option, and all of your previous iPlanet Market Maker Oracle schema data will be deleted.
- The Oracle Schema is required to run the iPlanet Market Maker software.
- You need to accept the Create Oracle Schema option to use the iPlanet Market Maker software.
Select the Next button on the Create Oracle Schema page to continue the installation.
Click the Continue button to proceed with the installation.
- After clicking the Next button, a warning notice appears stating: Schema creation will delete any existing iPlanet Market Maker Oracle Schema and data. Do you want to proceed?
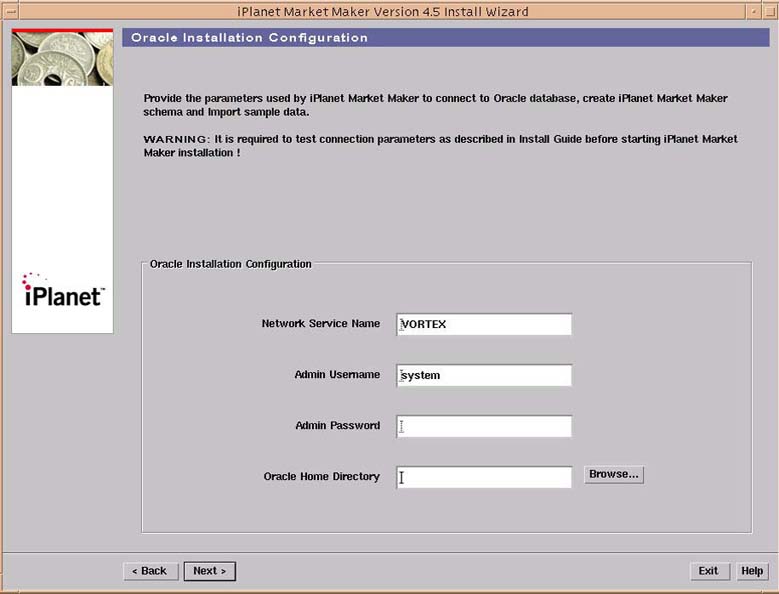
- This page defines the parameters used by iPlanet Market Maker installer to establish a connection to your Oracle database, create the iPlanet Market Maker schema, and import sample data.
- Consult your Oracle Database Administrator if you have questions about what information to enter in this page.
Enter the same Network Service Name as specified during Oracle database creation. This net service name should be obtained from the tnsnames.ora file. This is not necessarily the same as the SID name. See the Procedures for the Oracle User section in Appendix B.
On the Oracle Objects Configuration page:Accept the default (Admin Username). Contact your Oracle database administrator for further information.
Enter the Oracle Admin password for above user.
Enter the Oracle Home Directory pathname to be used to start the Oracle client. Contact your Oracle database administrator for further information.
Select the Next button to proceed with the installation.
- This page appears only if you selected the Typical Installation option in Step 4 (Select Type of Install page) above.
- Parameters entered on this server are used to install all Oracle objects for all modules.
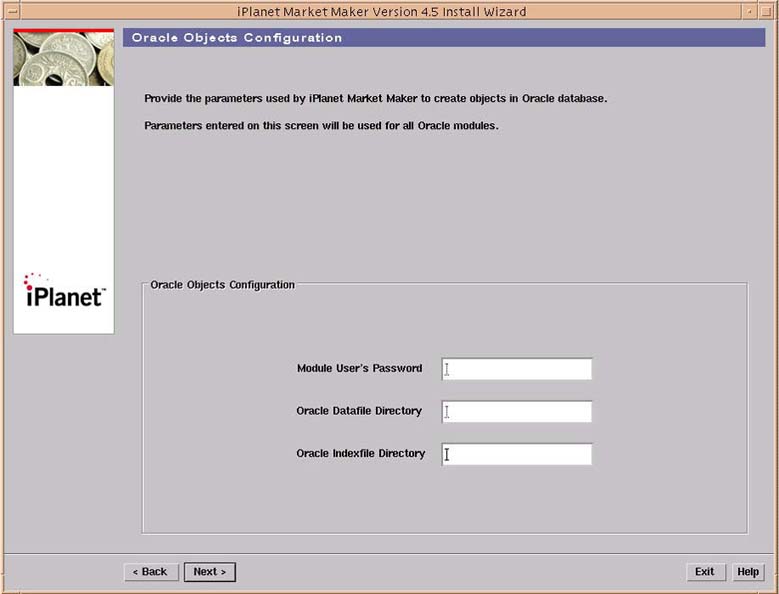
Enter a password in the Module User's Password textbox.
On the Oracle Common Objects Configuration page:Enter the Oracle Datafile and Indexfile Directory location information. These directories must exist on the Oracle server.
Click the Next button to continue the installation.

- This page appears only during a Custom Installation
- This page defines a set of Oracle database objects required for installing the iPlanet Market Maker modules.
- See your database administrator who specifies the location and size for the entry needed in the Oracle Datafile and Indexfile textbox. If installing iPlanet Market Maker against Oracle on a separate server, then datafile and index file locations are for the server system. The default location is $ORACLE_BASE/oradata/$ORACLE_SID directory on the Oracle Server. Do not provide a forward slash (/) at the end.
- Go to the Oracle server to verify the locations. Entries are case sensitive and should include the full path to the index and data file locations. The paths entered on this page will be used as default values on the following eight Oracle module configuration pages.
Accept the defaults and enter a password, or change any page parameters.
On the Oracle Community Objects Configuration page:
Select the Next button to continue the installation.
- If you are installing multiple instances of iPlanet Market Maker, you need to specify a different username for each iPlanet Market Maker instance.
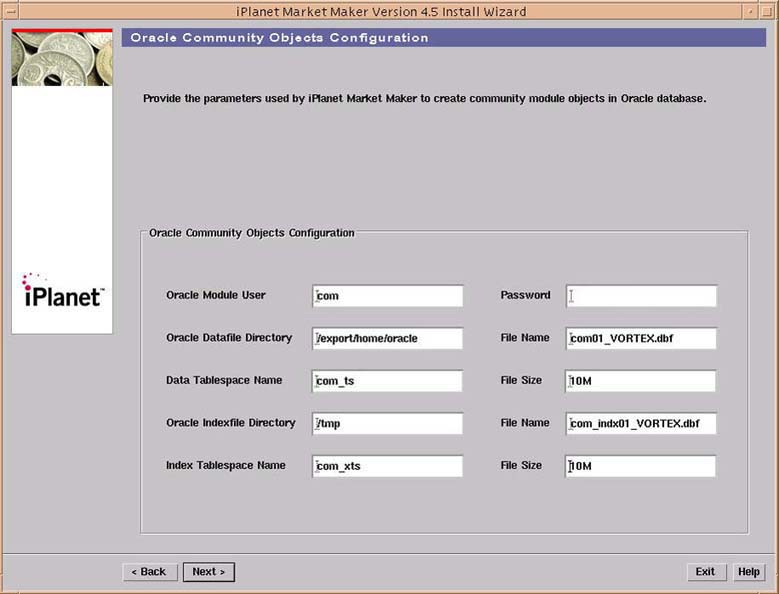
- This page appears only during a Custom Installation.
- Provide parameters used by the iPlanet Market Maker software to create Community Module objects in the Oracle database.
Accept the defaults and enter a password, or change any page parameters.
On the Oracle Catalog Objects Configuration page:
Select the Next button to continue the installation.
- If you are installing multiple instances of iPlanet Market Maker, you need to specify a different username for each iPlanet Market Maker instance.
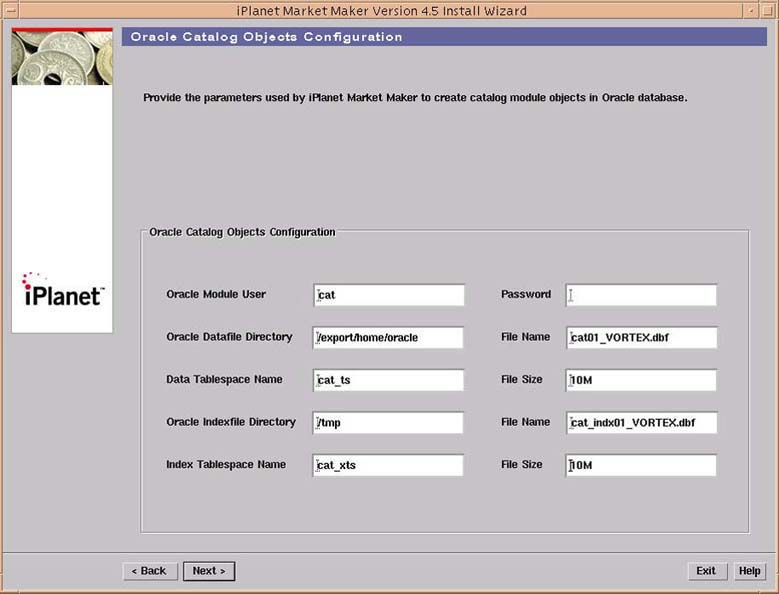
- This page appears only during a Custom Installation.
- Provide parameters used by the iPlanet Market Maker software to create Catalog Module objects in the Oracle database.
Accept the defaults and enter a password, or change any page parameters.
On the Oracle Pricing Objects Configuration page:
Select the Next button to continue the installation.
- If you are installing multiple instances of iPlanet Market Maker, you need to specify a different username for each iPlanet Market Maker instance.
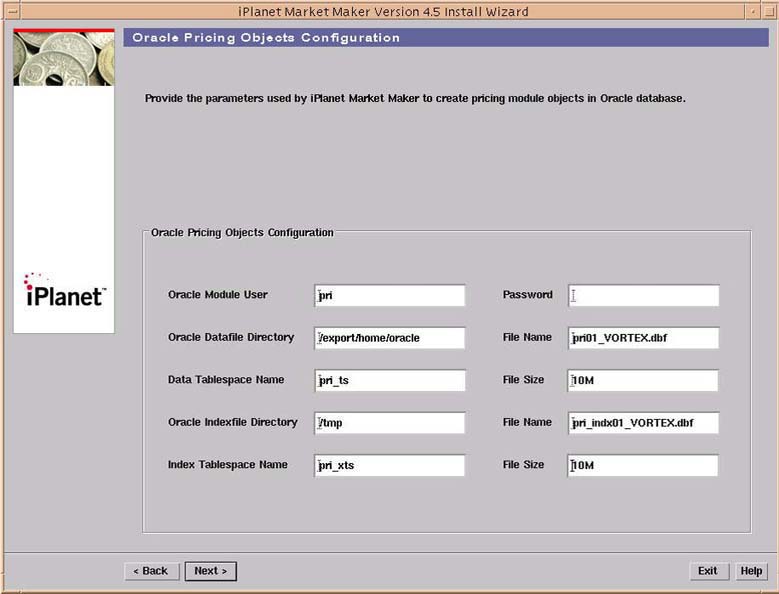
- This page appears only during a Custom Installation.
- Provide parameters used by the iPlanet Market Maker software to create Pricing Module objects in the Oracle database.
Accept the defaults and enter a password, or change any page parameters.
On the Oracle ESV Objects Configuration page:
Select the Next button to continue the installation.
- If you are installing multiple instances of iPlanet Market Maker, you need to specify a different username for each iPlanet Market Maker instance.
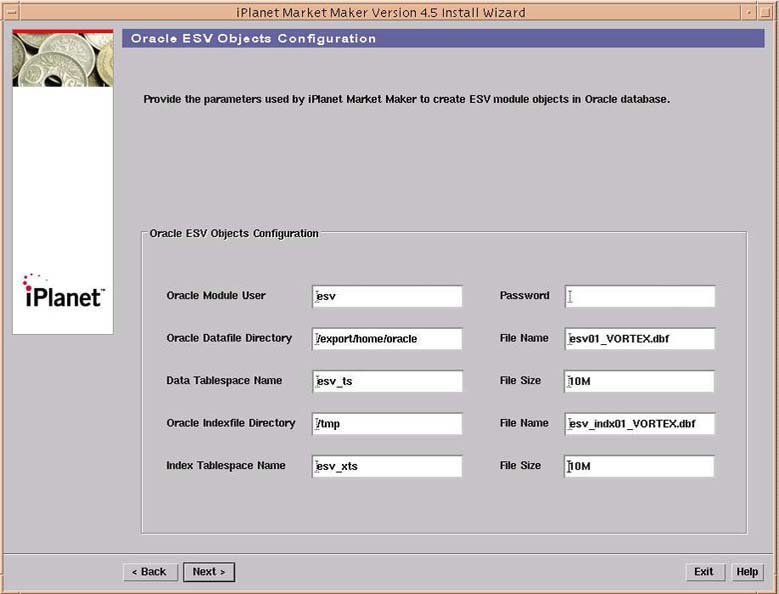
- This page appears only during a Custom Installation.
- Provide parameters used by the iPlanet Market Maker software to create ESV Module objects in the Oracle database.
Accept the defaults and enter a password, or change any page parameters.
On the Oracle OMS Objects Configuration page:
Select the Next button to continue the installation.
- If you are installing multiple instances of iPlanet Market Maker, you need to specify a different username for each iPlanet Market Maker instance.
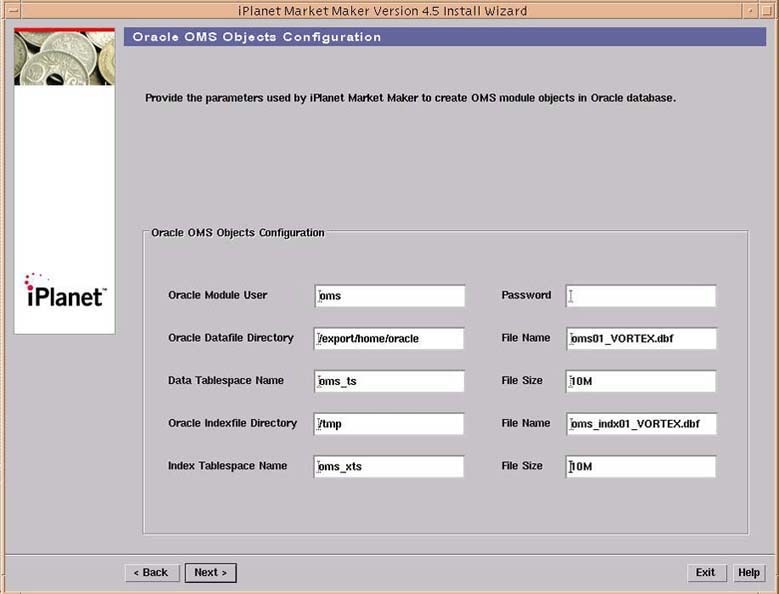
- This page appears only during a Custom Installation.
- Provide parameters used by the iPlanet Market Maker software to create OMS Module objects in the Oracle database.
Accept the defaults and enter a password, or change any page parameters.
On the Oracle Auction Objects Configuration page:
Select the Next button to continue the installation.
- If you are installing multiple instances of iPlanet Market Maker, you need to specify a different username for each iPlanet Market Maker instance.
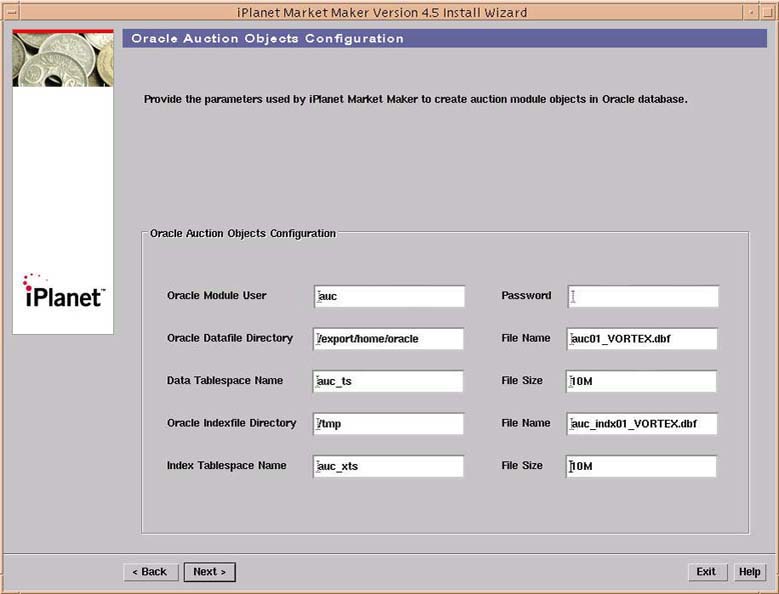
- This page appears only during a Custom Installation.
- Provide parameters used by the iPlanet Market Maker software to create Auction Module objects in the Oracle database.
Accept the defaults and enter a password, or change any page parameters.
On the Oracle RFx Objects Configuration page:
Select the Next button to continue the installation.
- If you are installing multiple instances of iPlanet Market Maker, you need to specify a different username for each iPlanet Market Maker instance.

- This page appears only during a Custom Installation.
- Provide parameters used by the iPlanet Market Maker software to create RFx Module objects in the Oracle database.
Accept the defaults and enter a password, or change any page parameters.
On the Oracle Exchange Objects Configuration page:
Select the Next button to continue the installation.
- If you are installing multiple instances of iPlanet Market Maker, you need to specify a different username for each iPlanet Market Maker instance.
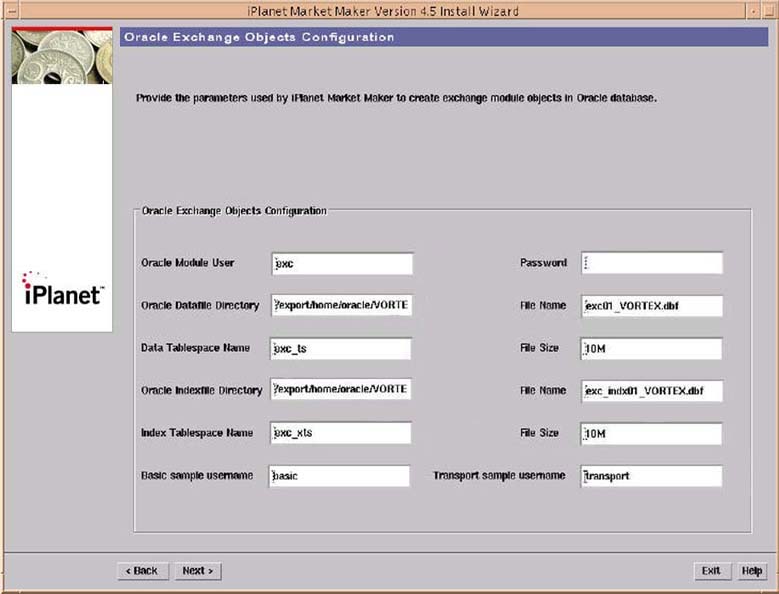
- This page appears only during a Custom Installation.
- Provide parameters used by the iPlanet Market Maker software to create Exchange Module objects in the Oracle database.
Accept the defaults, or make any required changes to the page parameters.
On the User Display Profiles Import page:Enter a Basic Sample Username.
Enter a Transport Sample Username.
- If you are installing multiple instances of iPlanet Market Maker, you need to specify a different username for each iPlanet Market Maker instance.
Select the Next button to continue the installation.
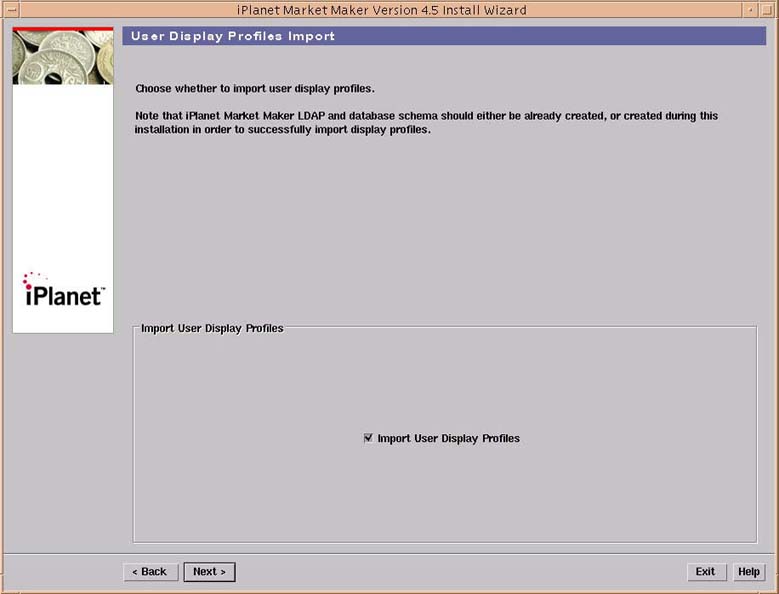
- This page appears during both Typical and Custom installations.
Choose Import Display Profiles the first time you install the iPlanet Market Maker software, and when you want to recreate either the database or the directory schema for iPlanet Market Maker.
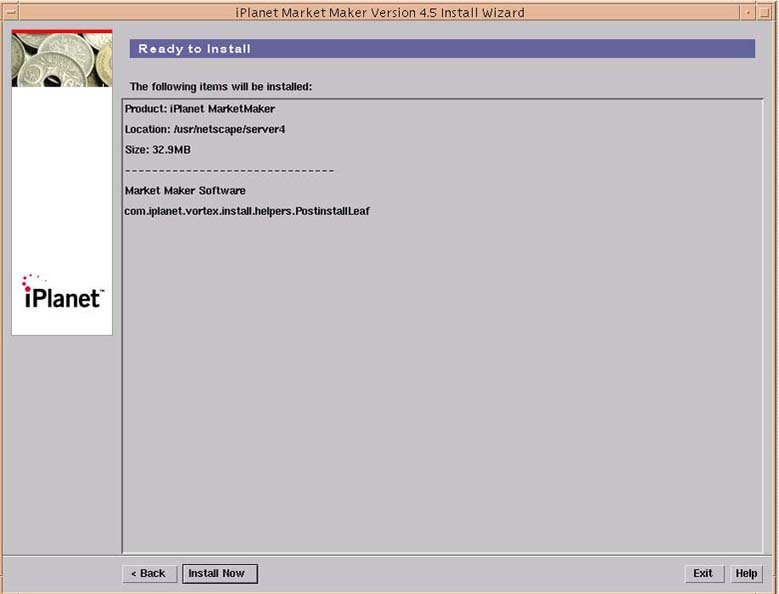
On the Ready to Install page:
Select the Continue button to proceed with installation.
- If you are reinstalling the iPlanet Market Maker software and want to preserve both the Oracle database and the directory server schema for the iPlanet Market Maker software, turn off this option.
- A warning notice appears asking: Are you sure you want to import display profiles?

On the Installing... page:
- Select the Install Now button to initiate installation.
- Installation takes approximately twenty minutes.
Note
On the Installation Summary page:
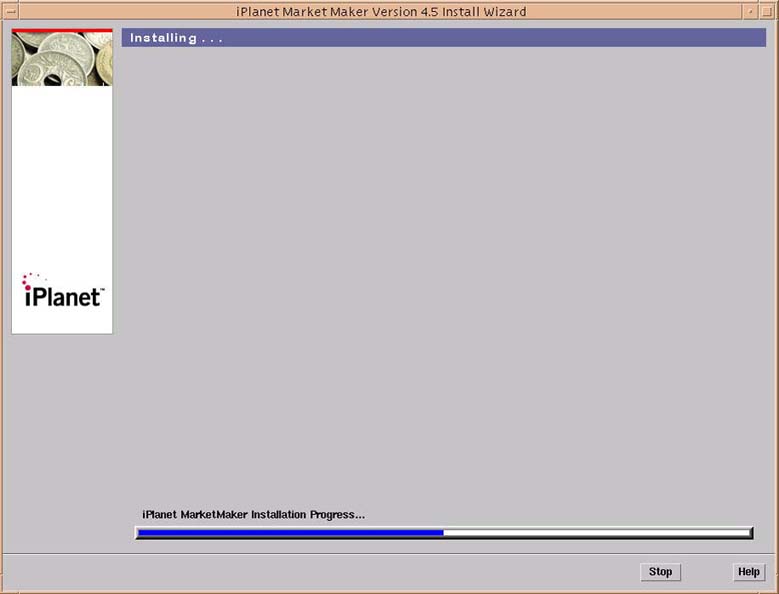
- The Progress Bar indicates the installation progress.
- The post installation process runs after the iPlanet Market Maker files have been installed and you have exited the installation (see the next page to exit). This is not necessarily evident from the Progress Bar display.
Note If running in the command line mode, the Installing... page appears indicating the installation progress.
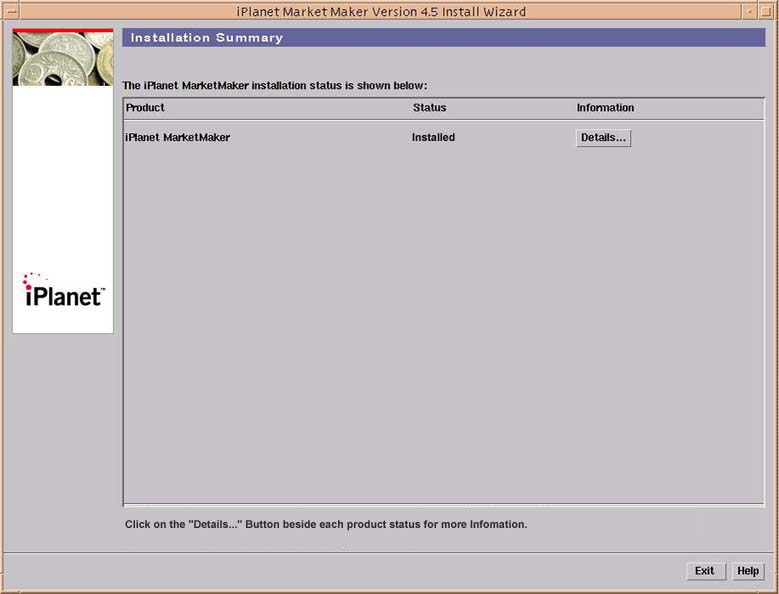
- This page displays a summary of the installation process:
Product: iPlanet Market Maker
Information: Details: Provides an installation summary log. This summary log does not contain full information regarding post installation (for example, Oracle/LDAP schema creation).
After installation is complete, check the iPlanet_MarketMaker_postinstall.log file for any possible warnings or errors. The log files are in the directory /var/sadm/install/logs. For errors, consult Troubleshooting section that follows these instructions.
- Select the Exit button on the Installation Summary page to complete the installation process.
- In both graphical and command line modes, more details from post installation script are available in the /var/sadm/install/logs/iPlanet_MarketMaker_postinstall.log file.
Restart iPlanet Application Server.
Source the environment file $IMM_HOME/iMM/mm.[c|k]shrc
Start the Job scheduler using js_start.sh.
- If you have trouble with your mm.[c|k]shrc file, see the "Troubleshooting" section.
Start the Netscape or Internet Explorer browser and specify the URL to start iPlanet Market Maker, such as: http://localhost/NASApp/<WAR_filename>/iMM/imm.jsp.
Previous Contents Index Next
Copyright © 2002 Sun Microsystems, Inc. All rights reserved.
Last Updated April 08, 2002