This chapter describes how to deploy and upgrade applications on a Netscape Application Server machine.
Deploying an Application Using Deployment Manager
Deploying Application Files Manually
Upgrading an Application
Editing EJB Properties at Run Time
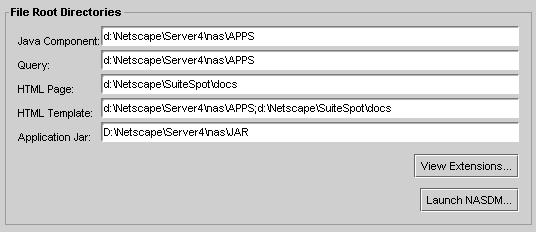
From the NAS Administrator toolbar, click the Application button to open the Application window.
In the left pane of the Application window, select the NAS machine whose application root directories you want to change.
In the right pane of the Application window, use the text boxes to modify root directories for the specified application components as shown in the following figure:
Use a semicolon-delimited list when specifying more than one directory for an application component.
Click Apply Changes to save your changes to your NAS machine.
Open the Deployment Manager in one of two ways:
From the NAS Administrator Application window, click the Launch NASDM button.
From the Windows Start menu, under Programs, choose Netscape Application Server 4.0, then NAS Deployment Manager.
From the Deployment Manager's File menu, choose New Project.
The following dialog box appears:
Type a name for your project.
This name is also used to identify your JAR file or package. The project name and directory name must be the same.
If necessary, edit the path to the directory where your JAR file is stored.
Click OK.
From the Edit menu, choose Insert.
You can insert files one at a time, insert all files in a directory, or insert all files from the subtree of a selected directory.
Navigate to the directory where application files are stored and select the files to include in the package.
If necessary, edit the application and web file root directories for your application server using the arrow buttons.
On a Windows machine, the default root directory for application files is similar to the following:
C:\Netscape\Server4\nas\APPS\
When you deploy an application using the Deployment Manager, the destination server organizes the application files relative to the root directory on your development machine. For instance, application files stored on your development machine in the location
C:\Netscape\Server4\nas\APPS\myapps\
are organized on the destination server in the following location:
destination server application root directory/myapps/
In the previous figure, pressing the down arrow button would add the OnlineBank portion of the path to the target directories as shown in the following figure:
Click Yes if the directory contains .class files that will be used in the application.
If the directory does not contain .class files that will be used in the application, there is no need to add to the class path. If the directory does contain .class files and you click No, the Deployment Manager will not be able to load these .class files or deploy them correctly.
The Deployment Manager must have a class path in order to load .class files. Class files must be loaded to edit an EJB's deployment descriptor or to determine if a .class file is a servlet.
Once the application files appear in the JAR window as shown in the following figure, create meta-info files such as:
EJB descriptors: see Building an Enterprise Java Bean.
servletInfo files: see Editing a Servlet.
From the File menu, choose Save JAR when all files you want to include in the package appear in the list.
If the list of files in your project shows files marked in red with an asterisk, these files require additional action. Skip to step 13.
If your project files require no further action, the following dialog box appears:
A Name Type Value (NTV) file called appinfo.ntv is created by default if such a file doesn't already exist. This file contains the name of the JAR file, associated session information, and a list of servlets included in the JAR file.
Choose one of the following options:
Click Cancel to open the appInfo editor.
If you choose to edit the appInfo file, see Editing a Servlet for more information about this editor.
Click OK to save the JAR file without editing the appInfo file.
If your project files require additional action (indicated by red type and an asterisk next to the files in the JAR window), the following dialog box appears:
You can click a file to see what action is required. For instance, an EJB may be missing stubs. Click Cancel to dismiss the dialog box and correct these problems or click Save to save the JAR as-is.
When saving a JAR file, you can filter .java files out of the package by selecting the corresponding checkbox in the Save JAR File dialog box as shown in the following figure:
If you want to save an "in-progress" list of files without completing the package, you can save the list of files as a .dxm file by choosing Save List from the File menu. You can later open the file and modify it.
The package is ready for deployment.
From the list of files in the JAR window, select the following three types of classes:
implementation class
remote interface class
home interface class
These three classes are required to create an EJB. You can add other classes in addition to these three.
From the EJB menu, choose Create Descriptor.
A dialog appears showing which classes are used in which roles.
If you selected only one .class file, that file appears next to the appropriate class type (Remote Interface, for example). You can then select the remaining two required files from drop-down boxes that appear next to the appropriate class type as shown in the following figure:
The drop-down boxes list only those .class files that satisfy the requirements of the EJB.
Click OK when each field is satisfied.
The EJB deployment descriptor editor appears as a separate tool in the Deployment Manager window:
Edit EJB deployment information if necessary using this editor.
See Editing an EJB's Deployment Descriptor.
From the Deployment Manager's EJB menu, choose Save Descriptor.
The file is saved as a .properties file.
If your EJB is a session bean rather than an entity bean, and you have neglected to specify the state management type in the bean's deployment descriptor, the following dialog box appears:
Select the type of your EJB: Stateful Session or Stateless Session.
A stateless session bean is completely transient and encapsulates a temporary piece of business logic needed by a specific client for a limited time span.
A stateful session bean is also transient, and uses a "conversational state" to preserve information about its contents and values between client calls. The conversational state enables the container to maintain information about the state of the session bean and to recreate that state at a later point in program execution when needed.
Decide whether to build stubs for the EJB or not.
Stubs and skeletons are required by the EJB container and must be deployed with the application files. These stubs and skeletons enable remote communication and allow the container to intercept all bean requests. When you create stubs and skeletons, the Deployment Manager automatically adds them to the list of application files.
After the Deployment Manager builds the stubs, the following status window appears (this may take a moment or two):
If you choose to build stubs later, you can select Build Stubs from the EJB menu while the EJB deployment descriptor editor is open and displaying that EJB. You can choose Build All Stubs at anytime to build stubs for all EJBs whose .properties files are in the list of files appearing in the JAR window.
From the Servlet menu, choose Edit Info.
The NTV editor appears.
Right-click a branch in the tree to edit that branch or remove it.
To edit the General Attributes of an EJB, perform the following steps:
If the editor is not already open, you can open it by right-clicking on a .properties file displayed in the JAR window and choosing Edit Descriptor.
You can edit the Bean Home Name as necessary, change the State Management Type of the bean, or edit the bean's session timeout value.
See the Programmer's Guide for more information about these values.
From the File menu, choose Save Descriptor to save your changes.
The Control Descriptor tab allows you to configure meta-data for an EJB at deployment time. You can edit transaction isolation levels, transactional attributes, and the mode entry for the bean.
Click the Control Descriptors tab to display the window as shown in the previous figure.
The EJB's meta-data appears in the Bean Default area of the window. You can edit this information for the bean as a whole or choose a particular method within the bean and change that method's meta-data in the Method Overrides area of the window.
The Run As Mode entry defines the identity a bean uses during execution and how a bean identifies its user to other beans or resources. Most commonly, this value is Client, which means that a bean or its methods are executed using the client's identity. See Writing Secure Applications in the Programmer's Guide for more information.
Transaction Attributes specify when a bean needs to begin a transaction. See Handling Transactions with EJBs in the Programmer's Guide for more information.
An isolation level specifies how much or how little a transaction can see of other, simultaneous interactions with a database. For more information, see Handling Transactions with EJBs in the Programmer's Guide.
See Setting Environment Properties.
See Viewing and Editing EJB Access Control.
From the File menu, choose Deploy.
You can deploy the currently open package, or you can choose a directory and deploy one or more packages stored therein.
You are prompted to save the JAR file as well as the appInfo file if either has changed since you last saved it.
From the list of registered servers, choose a NAS machine to deploy to.
To register additional servers, click Register and enter the necessary server information.
Click Deploy.
The status of the deployment process appears in a separate window.
From the File menu of the Deployment Manager, choose Download.
Select a server from which to download an application.
You can register additional servers by clicking the Register button. See Using the Deployment Tool to Deploy an Application for details.
From the list of JAR files found on the selected server, select a JAR file to download.
Click Download.
Choose the directory where you will save the JAR file on your local machine or the network.
The message window displays the status of the file you are downloading.
Manually Deploying EJBs
Manually Deploying Servlets and JSPs
Manually Deploying Data Sources
Compile the EJB.
Generate stubs and skeletons.
Create a deployment descriptor.
Copy files to NAS.
Register the EJB.
% $GX_ROOTDIR/usr/java/bin/javac ShoppingCartBean.java
IShoppingCart.java IShoppingCartHome.java
Z:\> C:\Netscape\server4\nas\bin\javac ShoppingCartBean.java
IShoppingCart.java IShoppingCartHome.java
$GX_ROOTDIR/bin/ejbc -sf cart.ShoppingCartBean cart.IShoppingCart
cart.IShoppingCartHome

Z:\>ejbc -sf cart.ShoppingCartBean cart.IShoppingCart
cart.IShoppingCartHome
% $GX_ROOTDIR/bin/beanreg filename.properties
Z:\>beanreg filename.properties
Create servlet configuration files.
Register the servlet.
NTV-ASCII

{

	"SessionInfo"     NTV     {

		"timeout"     Int     "400",

		"flags"          StrArr     ["SESSION DISTRIB"],

		"sessionManagement"     Int     "0"

	},

	"ServletFiles"     StrArr     ["servInfo"],

	"AppName"     Str     "nsOnlineBookstore",

}
NAS install directory/APPS/NSOnlineBookstore/ntv
Copy Servlets as Part of an Application
Copy JSPs as Part of an Application
Copy Servlets Not Part of an Application
Copy JSPs Not Part of an Application
For a servlet that's part of an application, the following URL would appear in the web client:
http://$HOSTNAME:$PORT/NASApp/$AppName/$ServletName
For a JSP that's part of an application, copy the JSP into the $GX_ROOTDIR/APPS/$AppName directory, then refer to them using $AppName/jspname.jsp.
For a servlet that's not part of an application, the following URL would appear in the web client:
http://$HOSTNAME:$PORT/servlets/$ServletName
For a JSP that's not part of an application, copy the JSP into the $GX_ROOTDIR/APPS/ directory, then refer to them using jspname.jsp.
For servlets and JSPs not in an application, use the following directory structures as examples:
/disk2/ns-home/nas/APPS/
/disk2/ns-home/nas/APPS/javaSpec.jsp
/disk2/ns-home/nas/APPS/ntv
/disk2/ns-home/nas/APPS/ntv/appInfo.ntv
For servlets and JSPs in an application, use the following directory structures as examples. Here, the application name is Project 1.
/disk2/ns-home/nas/APPS/Project1/
/disk2/ns-home/nas/APPS/Project1/ntv/
/disk2/ns-home/nas/APPS/Project1/ntv/appInfo.ntv
/disk2/ns-home/nas/APPS/Project1/ntv/NASservlet.ntv
/disk2/ns-home/nas/APPS/Project1/webapp/NASservlet.class
/disk2/ns-home/nas/APPS/Poject1/webapp/NASservlet.jsp
http://warp/NASApps/Project1/NASservlet
%$GX_ROOTDIR/bin/servletReg.sh -i appInfo.ntv
Create the data source file.
Register the data source.
DataBase=ksample

DataSource=ksample

UserName=kdemo

PassWord=kdemo

ResourceMgr=rm_orcl       #Optional
$GX_ROOTDIR/bin/dsreg "jdbc/BookstoreDS" BookstoreDS.props
Z:\>dsreg "jdbc/BookstoreDS" BookstoreDS.props
Click the Application button on the NAS Administrator toolbar to open the Application window.
From the tree in the left pane of the window, select the EJB whose properties you want to edit.
For example, dataaccess is selected in the following figure:
In the right pane of the Application window, click the Edit Deployment Descriptor button.
Click Choose Default Identities.
Add or remove allowed identities from the list boxes using the arrow buttons.
Click OK to dismiss the dialog box.
Click the Add Method Override button.
Select one or more methods.
The method appears in the Method Overrides sections of the Access Control tab as shown in the following figure:
Click a method to select it.
Click the Edit Allowed Identities button.
Add or remove Allowed Identities from the list boxes using the arrow buttons.
Click the Add New Property button.
Type the name of the property in the Key field.
For example, if you are going enter a zip code, enter the city name in the Key column: Petoskey.
Type the value of the property in the Value field.
Following the zip code example, enter the zip code corresponding to the city name in the Value column: 49770.