Before you set up and begin managing clusters, review the following steps, which provide an overview of the general procedure. More specific procedures for setting up and managing clusters are described in subsequent sections.
Decide which servers will participate in a synchronization group (cluster), and which of those servers will be Sync Servers, eligible to act as the Sync Primary and as Sync Backups, and which will be Sync Locals.
Edit the kregedit keys under Clusters and ClusterName on one of the Sync Servers. Duplicate the ClusterName edits to the registries of all the other servers in the cluster (including the Sync Locals). You need not duplicate edits to the Clusters key since this information is stored in a centrally located Directory Server.
Create the kregedit keys that will contain synchronization information, if necessary.
Edit the SyncServers kregedit key to contain identification information and the priority setting for each Sync Server in the cluster. Often, the larger and more powerful servers are chosen to be the highest-priority Sync Servers.
Set the MaxBackups kregedit key to the number of Sync Backups. Sync Backups are servers that duplicate the data on the Sync Primary.
Enter the name of the cluster in the ClusterName key.
Start the Sync Server that will be the Sync Primary. The server that you want to be the Sync Primary must always be the first server to be started in the cluster, and it becomes the Sync Primary simply because it started first.
After starting the Sync Primary, start the other servers (including the Sync Locals). Although the starting order is not mandated after the Sync Primary starts, it is a good practice to start the Sync Servers in priority order, and then to start the Sync Locals.
Start the servers that will become the Sync Backups, up to the value of MaxBackups. By default, the next servers listed in the SyncServer key that start, up to the value stored under the MaxBackups kregedit key, will become the Sync Backups.
After MaxBackups number of servers have started, remaining Sync Servers that start become Sync Alternates.
All servers not listed in the SyncServers kregedit key become Sync Locals. Sync Locals are part of the cluster simply because each is mapped to the cluster and the SyncServers kregedit key on each contains a list of all the Sync Servers in the cluster.
Determining Sync Server Priority
The specific procedure for setting priority is covered in Modifying the Default Cluster for Fast Cluster Set Up and Defining a Cluster. The following section discusses general priority issues and gives a comprehensive example of cluster coordination.
Priority is indicated by an integer value that is set in the SyncServers kregedit key. The lower the value, the higher the priority, so the server assigned a value of 0 has the highest possible priority. The highest acceptable value, and so the lowest priority value, is 65,535.
Priority values are used only to select between Sync Servers in the same status (either between a group of Sync Backups or between a group of Sync Alternates). Only the order in which instances of NAS are started, not priority, determines which server should be the Sync Primary and which Sync Servers will start out as Sync Backups or Sync Alternates.
A Sync Local is not assigned a priority because it is not eligible to become a Sync Server, so a Sync Local cannot become a Sync Primary, Sync Backup, or Sync Alternate.
Which Sync Server becomes the Sync Primary in a cluster is determined simply by which Sync Server is started before any of the other servers. The next Sync Servers that start, up to the value in MaxBackups, become Sync Backups. When the Sync Primary fails, the Sync Backup with the highest priority, which is the lowest integer value, becomes the new Sync Primary.
When a Sync Backup becomes a Sync Primary, the number of Sync Backups falls below the value of MaxBackups. To restore the number of Sync Backups, the Sync Alternate with the highest priority becomes a Sync Backup.
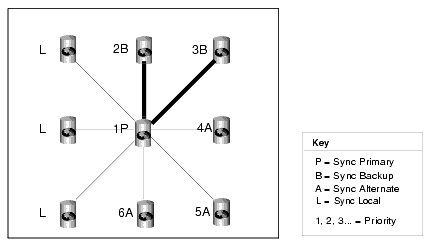
Example: Coordination Within a Seven-Server Cluster
The following example illustrates cluster coordination through server roles, and the part that priority plays in determining those roles. As you trace the role changes through the example, keep in mind that server fallibility has been purposely exaggerated to provide many scenarios.
Although not required, you can ease cluster maintenance by assigning the highest priority to the NAS machine that you will start as the Sync Primary, and the next highest priorities (in descending order) to the Sync Backups. Be aware that the cluster in this example does not do this. Also, notice that this cluster does not follow the recommended practice of starting the servers in priority order.
Assume a seven-server cluster with NAS machines that are numbered 0 to 6. Servers 0 through 4 are Sync Servers that are assigned the same priorities as their server numbers (for example, server 0 has a priority of zero). Servers 5 and 6 are Sync Locals. MaxBackups for the cluster is set to two.
Server 3 fails and goes down. Between the two Sync Backups, server 4 and server 1, server 1 has the higher priority (lower integer value) and it becomes the new Sync Primary. This leaves server 4 as the only Sync Backup.
Because MaxBackups is set to two, one of the Sync Alternates is converted to a Sync Backup. Server 0 becomes the new Sync Backup because it has a higher priority than the other remaining Sync Alternate, server 2. At this point:
Server 3 comes back online. It becomes a Sync Alternate. Even though it was originally a Sync Primary, the synchronizer now sees it as just another Sync Server, so the server does not resume its Sync Primary role. At this point:
Server 0 fails. Server 2 becomes a Sync Backup because it has the higher priority (lower integer value) among the Sync Alternates. At this point:
Server 0 comes back online and becomes a Sync Alternate. Server 1, the Sync Primary, fails. Among the Sync Backups, server 2 has a higher priority than server 4, so server 2 becomes the new Sync Primary. Server 0 becomes a Sync Backup. At this point:
Server 2 fails. Server 0 becomes the Sync Primary and server 3 becomes a Sync Backup. At this point:
Server 3 fails. Even though only one Sync Backup remains, neither server 5 nor server 6 is considered because neither is a Sync Server. At this point:
Modifying the Default Cluster for Fast Cluster Setup
The fastest and easiest way to set up a cluster is to set the cluster up when you install NAS.
After installation, the easiest way to set up a cluster is to modify the default cluster that was automatically created when you installed NAS. At installation, the SyncServers kregedit key for the default cluster lists only one server—the server itself. The default cluster is the name of hostname-NoDsync, where hostname is the name of your local machine. For instance, if you install NAS on a machine named "acarey," the default cluster is acarey-NoDysnc. The default cluster contains all that a cluster needs to be complete and active except for the new name for the cluster and the names of all Sync Servers with which to synchronize.
Because the default cluster already contains all the kregedit keys that a cluster needs, you can easily set up a cluster by making a few substitutions in the kregedit keys for the default cluster. If you were creating a completely new cluster, you would have to create the kregedit keys for that new cluster.
Entering IP Addresses Using kregedit
When you edit the SyncServers key for the default cluster, you will enter the IP address for each of the Sync Servers in your cluster.
At installation, the IP address for each NAS machine is placed in the SyncServers key of that server's default cluster. When you enter the address for each Sync Server into the first SyncServer registry key, remember that you can find the information in the registry for each NAS machine.
Note, however, that you will remove this entry on each Sync Local. If you decide later to promote a Sync Local to a Sync Server, you will have to find the address information elsewhere.
Editing Default Cluster Keys
Sync Locals are never listed in the SyncServers key for a legitimate cluster. But, because each Sync Local is automatically listed in its own default cluster, you must remove each Sync Local from its own SyncServers key.
This necessity will be obvious if the cluster settings you edit belong to a Sync Server.
To edit the default cluster keys, perform the following steps:
Stop the application server whose settings you will edit.
Open kregedit by typing kregedit at the command prompt.
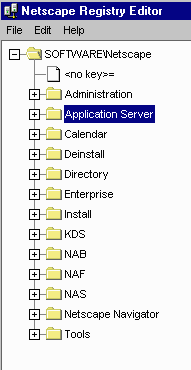
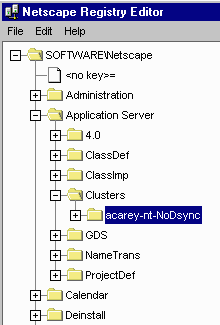
Open the following folder: SOFTWARE\Netscape\Application Server\Clusters\
SOFTWARE\Netscape\Application Server\Clusters\acarey-
NoDsync\SyncServers
Whenever one of the following steps directs you to modify a key name or
value, you can modify that name or value by performing the following
steps:
Double-click the key name to bring up the Modify Value dialog box.
Enter the new name or value in the dialog box.
Click OK.
Note.
Check and modify the SyncTimerInterval value, as necessary, which is found in the following location: SOFTWARE\Netscape\Application Server\Clusters\hostname-NoDsync
Change the default name (in this case, acarey-NoDsync) to a new, unique name for your cluster.
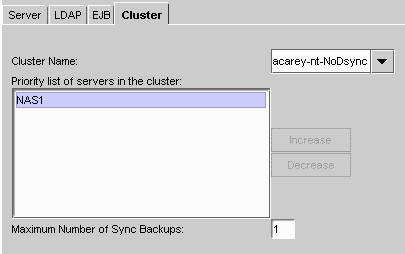
Check and modify the MaxBackups value, as necessary.
Note.
Add each Sync Server to the cluster under SyncServers.
Add the IP address and port number for the Sync Server.
Set the priority for each Sync Server by double-clicking the priority value to bring up a pop-up window, entering the priority number, and clicking OK. The IP address, port number, and priority for the Sync Server should have been listed under the SyncServers key at installation.
Close kregedit when you're finished.
Restart all application servers effected by these modifications.
All changes you make to the SyncServers key now apply to each server in the cluster.
After correctly completing these steps, you have redefined the default cluster. Now, follow the procedure in Mapping the Synchronizer to the Cluster to enable communication between the servers in the cluster.
Mapping the Synchronizer to the Cluster
For a cluster to communicate, the synchronizer in each server must know to which cluster the synchronizer belongs. This is done by mapping the ClusterName key of each synchronizer to the name of an actual cluster.
To map the synchronizer to a cluster, perform the following steps:
Stop the application server whose registry you will edit.
Open kregedit by typing kregedit at the command prompt.
Open the following key: SOFTWARE\Netscape\Application Server\4.0 \CCS0\Clustername
SOFTWARE\Application Server\4.0\CCS0\ClusterName\hostname-NoDsync=0
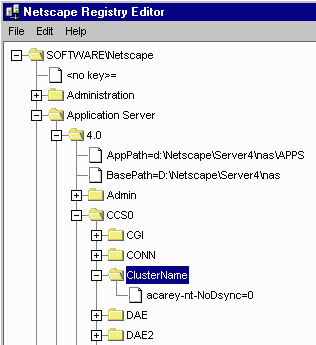
Rename the key under ClusterName to the name of the cluster to which the synchronizer should connect.
Close kregedit when you are finished. The synchronizer should now be mapped to the cluster
Defining a Cluster
Create a cluster to organize NAS machines into data-synchronizing network-centric groups.
Even though each NAS machine can be mapped to only one cluster at a time, you can define as many clusters as you like. Some installations might define multiple clusters for testing purposes, for example.
While you can edit the default cluster to easily set up your first cluster definition, editing the default cluster defines only one cluster. To get more than one definition, create the additional clusters.
To create a cluster, perform the following steps:
Stop the application server whose registry you will edit.
Open kregedit by typing kregedit at the command prompt.
Open the following key: SOFTWARE\Netscape\Application Server\Clusters
SOFTWARE\Netscape\Application Server\Clusters\acarey-NoDsync\
Note.
Add the SyncTimerInterval value, as necessary, which can be found in the following location: SOFTWARE\Netscape\Application Server\Clusters\ClusterName
Add a new, unique name for your cluster.
Add the MaxBackups value, as necessary.
Note.
Add the SyncServers key under the name of the cluster.
Add each Sync Server to the cluster under SyncServers.
Add the IP address and port number for the Sync Server.
Set the priority for each Sync Server.
Close kregedit when you're finished.
After correctly completing these steps, you have defined a cluster. You can define as many clusters as you like, but you can map the synchronizer to only one cluster at a time. See Mapping the Synchronizer to the Cluster for the procedure that enables communication.
|