Previous Next Contents Index


Chapter 17 Writing Custom Activities

This chapter describes how to write and use custom activities. The sections in this document are:


Introduction
PAE lets you create custom activities as Java classes and bring them into your process definitions.

Custom activities are useful when you want to do more than can easily be done in an automation script, such as when the programming logic or data resides outside of PAE. For example, you might build a custom activity to interface with external applications and databases. Custom activities might also run local applications and then interact with mail gateways or FAX servers.

Comparison to Automated Activities
Custom activities are similar to automated activities. In both cases:

Automated and custom activities have one main difference: an automated activity is carried out by an automation script, whereas a custom activity is carried out by a Java class.

Usage Overview
Creating and using a custom activity involves the following major steps:

  1. Write and compile a Java class that implements the ISimpleWorkPerformer interface.
  2. Define an XML description file for the activity.
  3. Package the Java class and the XML description file as a zip or jar file.
  4. Bring the custom activity into an application.

Implementing ISimpleWorkPerformer
The first step in creating a custom activity is to write a Java class that implements ISimpleWorkPerformer, an interface in the package com.netscape.pm.model. The Java class must reside in the server class path. Note also that the ISimpleWorkPerformer class you create will be stateless.

ISimpleWorkPerformer defines a custom activity that:

  1. gets data field values as input
  2. performs some task
  3. sets data field values as output
Other than getting and setting data field values, your ISimpleWorkPerformer class has no access to information on the work item or the process instance.

This section describes the following topics:

Methods of ISimpleWorkPerformer
ISimpleWorkPerformer has three methods:

The init( ) method

public void init (Hashtable environment) throws Exception

The init() method performs initialization tasks that the custom activity requires when the application starts. For example, use init() to set up database connections that are shared by all instances of the activity, or use init() to define variables that are constant across all instances of the activity.

The init() method does not execute each time a custom activity is created in a process instance. Instead, this method is called only once—when the application starts.

As its input argument, init() takes a hashtable of environment variables. A hashtable is a java.util.Hashtable object that contains a series of parameter-value pairs. The parameters in the environment hashtable are defined in the ENVIRONMENT section of an XML description file.

A process designer sets the values of the hashtable parameters while creating the process map.

For example, suppose a Language parameter is defined in the environment hashtable of a custom activity. In Process Builder, the Language parameter would appear as a property for the custom activity (you would open the Inspector window and view the Properties tab).

In your Java class, define the init() method to perform the desired initialization tasks. Then, to obtain the value of a parameter in the environment hashtable, call the get() method on the environment hashtable. The get() method returns either the value of the parameter, or null if the parameter doesn't exist.

The perform( ) method

public void perform (Hashtable in, Hashtable out) throws Exception

The perform() method does whatever tasks must be done for the activity. This method takes two java.util.Hashtable arguments. The input hashtable contains values taken from data fields, and the output hashtable contains values to put into data fields.

The parameters in the input and output hashtables are defined in the INPUT and OUTPUT sections, respectively, of an XML description file.

The Input Hashtable

To obtain the value of a parameter in the input hashtable, call the get() method on the input hashtable. The get() method returns either the value of the parameter, or null if the parameter doesn't exist. Note that the get() method returns a Java object, so you must cast this object to the object class type that your custom activity is expecting. For example:

String sizeOrder = (String) input.get("order");

The Output Hashtable

To set data field values, the perform() method must put values into the output hashtable by calling put() on the output hashtable. When the perform() method finishes executing, you then assign the values to the corresponding data fields.

The destroy( ) method

public void destroy()

The destroy() method is called when the application that uses the custom activity is unloaded or removed. Typically, you use the destroy() method to clean up resources that were used by the init() method.

Sample Java Class
The following code samples are from HelloWorldPerformer.java, the class that implements the HelloWorld custom activity. HelloWorld is included in PAE as a sample custom activity, so you can view the source code directly.

HelloWorld constructs a welcome message in either French or English. The message value is derived from two things: the value of the customerName data field in the process instance, and the Language property of the HelloWorld activity instance. The HelloWorld activity puts the welcome message in the greeting data field.

Creating HelloWorldPerformer.java
Using your favorite Java editor and compiler, create and compile a Java class that implements the ISimpleWorkPerformer interface. The compiled class file must reside in the server class path. When you use Process Builder to add a custom activity, PAE automatically places the custom activity's class file in the server's class path.

Note
Don't define any constructors in classes implementing ISimpleWorkPerformer, because PAE does not use them. A Java exception will be thrown. Defining a class without any constructors is the same as defining one with just a default constructor.

Here are the steps for creating HelloWorldPerformer.java:

  1. Define a package for your class:
  2.    package com.netscape.pm.sample;

  3. Import the required standard Java packages:
  4.    import java.lang.*;
       import java.util.*;

  5. Define the class HelloWorldPerformer to implement com.netscape.pm.model.ISimpleWorkPerformer, as follows:
  6.    public class HelloWorldPerformer
          implements com.netscape.pm.model.ISimpleWorkPerformer
    {

  7. Define two variables to hold the English and French parts of the greeting. Define another variable to hold the complete greeting when it has been derived (such as "Bonjour Nikki.")
  8.    // Greeting Messages
       public static final String GREETING_FRENCH = "Bonjour";
       public static final String GREETING_ENGLISH = "Hello";

       // Holds the greeting message once the language has been specified
       String mGreeting;

  9. Define the init() method to get the value of the Language environment variable and to set the language-specific part of the greeting. In addition, throw an exception if the language is not provided, or if the language is neither English nor French. For example:
  10.    /**

        * The HelloWorld custom activity knows to generate both French

        * and English greetings. The Language argument defines which

        * language should be used.

        */

       public void init( Hashtable env ) throws Exception

       {

          String lang = (String) env.get( "language" );

          if( lang == null )

          {

                throw new Exception( "-- language not defined.") ;

          }

          else if( lang.equalsIgnoreCase("French") )

          {

                mGreeting = GREETING_FRENCH;

          }

          else if( lang.equalsIgnoreCase("English") )

          {

                mGreeting = GREETING_ENGLISH;

          }

          else

          {

             throw new Exception( "-- Unknown language:"+ lang +

             ". We currently support English or French--" ) ;

          }

       }

    Later, you will set the exact value of the Language environment. You'll do this in Process Builder, when you set up the custom activity in a process definition.

  11. Define the perform() method to construct a welcome message consisting of the language-specific part of the greeting and the user's name, for example "Hello Billy." The value of the userName parameter is derived later—from a data field in a process instance that uses the custom activity.
  12. Finally, define the destroy() method, which is invoked when the application is unloaded from the application server. In this case, the method does nothing because no resource cleanup is needed.
  13.       public void destroy( )

          {

          }

       // End of class
       }

  14. Compile HelloWorldPerformer.java to get a class file, HelloWorldPerformer.class.

Writing the XML Description File
After you write and compile the Java class that implements ISimpleWorkPerformer, your next step is to define an XML description file for the class. This XML file specifies the environment, input, and output parameters that the class uses. In addition, the XML file specifies some optional design parameters. Design parameters control the custom activity's appearance in Process Builder.

This section describes the following topics:

File Format
The XML description file starts with a tag indicating the XML version, such as:

   <?XML version = "1.0" ?>

The body of the description is contained between an opening <WORKPERFORMER> tag and a closing </WORKPERFORMER> tag. Within the WORKPERFORMER section you define four sections, as summarized in Table 17.1.

Table 17.1 Sections within the WORKPERFORMER Tags
XML Section
What this section describes
ENVIRONMENT
Environment hashtable used by init() method.
INPUT
Input hashtable used by perform() method.
OUTPUT
Output hashtable used by perform() method.
DESIGN
Appearance of custom activity icons in Process Builder.

Here is the structural overview of an XML description file:

<?XML version = "1.0" ?>

<WORKPERFORMER >

<ENVIRONMENT>
   <PARAMETER> ... </PARAMETER> ...
</ENVIRONMENT>

<INPUT>
   <PARAMETER> ... </PARAMETER> ...
</INPUT>

<OUTPUT>
   <PARAMETER> ... </PARAMETER> ...
</OUTPUT>

<DESIGN>
   <PARAMETER> ... </PARAMETER> ...
</DESIGN>

</WORKPERFORMER>

WORKPERFORMER Tag
The <WORKPERFORMER> tag has four attributes: TYPE, NAME, CLASS_ID, and VERSION.

Here is a sample <WORKPERFORMER> tag:

<WORKPERFORMER
   TYPE="com.netscape.pm.model.ISimpleWorkPerformer"
   NAME="HelloWorld"
   CLASS_ID="com.netscape.pm.sample.HelloWorldPerformer"
   VERSION="1.1">

ENVIRONMENT Section
The <ENVIRONMENT> tag defines environment parameters that are constant within all instances of the custom activity. For example, suppose that in an application named HelloWorld, you set the value of the Language environment parameter to French. Then, the value is always French in every process instance of that application.

The ENVIRONMENT section contains embedded <PARAMETER> tags. Each <PARAMETER> tag describes a parameter in the environment hashtable—the argument used by the init() method. The <ENVIRONMENT> tag has a corresponding closing </ENVIRONMENT> tag , and each <PARAMETER> tag has a closing </PARAMETER> tag.

When you add the custom activity to the process map in Process Builder, each parameter in the <ENVIRONMENT> tag will appear as a field in the Inspector Window.

Here's a sample ENVIRONMENT section:

<ENVIRONMENT>
   <PARAMETER NAME="Language">"French"</PARAMETER>
</ENVIRONMENT>

Warning. Parameter values (such as "French" in the example above) are actually JavaScript expressions, so you can supply the value as a string, integer, or function. However, be sure to quote any string expression. Note that French (without quotes) and "French" (with quotes) mean different things.

For details on the syntax of the <PARAMETER> tag, see the section "PARAMETER Tag".

INPUT Section
The <INPUT> tag contains embedded <PARAMETER> tags. Each <PARAMETER> tag describes a parameter in the input hashtable, the input argument of the perform() method. The <INPUT> tag has a corresponding closing </INPUT> tag , and each <PARAMETER> tag has a closing </PARAMETER> tag.

To set the value of the parameter to the value of a data field in the process instance, embed a call to getData() in the <PARAMETER> tag. For example, the following code sets the value of the userName parameter in the input hashtable to the value of the customerName data field in the process instance.

<INPUT>

   <PARAMETER

         NAME="userName"

         DISPLAYNAME="User Name"

         TYPE="java.lang.String"

         DESCRIPTION="Last Name">

   getData("customerName")

   </PARAMETER>

</INPUT>

For details on the syntax of the <PARAMETER> tag, see the section "PARAMETER Tag".

The corresponding code in your Java class file uses the perform() method to get the value of the userName parameter. Within the perform() method, you call the get() method. Here is a code fragment:

public void perform( Hashtable input, Hashtable output )

         throws Exception

{

   // Read the userName attribute from the input hashtable

   String userName = (String) input.get( "userName" );


   if( userName == null )

   {

         throw new Exception( "userName has not been initialized!" ) ;

   }


   // Generate greetings

   String msg = mGreeting + " " +userName;

OUTPUT Section
The <OUTPUT> tag contains embedded <PARAMETER> tags. Each <PARAMETER> tag describes a parameter in the output hashtable, the output argument of the perform() method. The <OUTPUT> tag has a corresponding closing </OUTPUT> tag , and each <PARAMETER> tag has a closing </PARAMETER> tag.

The output hashtable contains parameters whose values will be automatically installed in data fields in the process instance. For each parameter, embed a call to mapTo() to indicate which data field in the process instance is to receive the value of the parameter.

For example, the following code specifies that when the perform() method has finished executing, the value of the welcomeMsg parameter in the output hashtable is automatically installed in the greeting data field in the process instance.

<OUTPUT>

   <PARAMETER

            NAME="welcomeMsg"

            DISPLAYNAME="Welcome Message"

            TYPE="java.lang.String"

            DESCRIPTION="Greeting for the user">

   mapTo("greeting")

   </PARAMETER>

</OUTPUT>

For details on the syntax of the <PARAMETER> tag, see the section "PARAMETER Tag".

The corresponding code in your Java class file uses the perform() method to put a value in the welcomeMsg parameter of the output hashtable. Within the perform() method, call the put() method:

   output.put( "welcomeMessage" , msg );

PARAMETER Tag
The <PARAMETER> tag has the attributes as summarized in Table 17.2. When you define parameters within the DESIGN section of the XML description file, only the NAME and DESCRIPTION attributes apply. However, within the ENVIRONMENT, INPUT, or OUTPUT sections, all of the attributes apply.

Table 17.2 PARAMETER tag attributes
Attribute
Meaning
NAME
Name of the parameter.
DESCRIPTION
The text for the tool tip (also called bubble help) that appears when you place the mouse over the item in Process Builder.
TYPE
The Java object class of the parameter. This attribute is optional. The value can be given as a complete class name, such as java.lang.String or com.netscape.pm.ShoppingCart.
VALUESET
A comma-delimited list of possible values for this parameter. These values appear as a pop up menu in the Inspector Window. This attribute is optional.
EDITOR
The type of editor window to use. For example, use this attribute to set a Browse button, text area, drop down list, dialog box. This attribute is optional.
EDITABLE
A boolean that determines whether the parameter value can be edited in the Inspector Window. The default is true. This attribute is optional.

DESIGN Section
The <DESIGN> tag contains embedded <PARAMETER> tags. Each <PARAMETER> tag describes a parameter in the output hashtable, the output argument of the perform() method. The <DESIGN> tag has a corresponding closing </DESIGN> tag , and each <PARAMETER> tag has a closing </PARAMETER> tag.

Use the DESIGN section to define the custom activity's user interface within Process Builder. In the DESIGN section, the <PARAMETER> tag accepts two attributes: NAME and DESCRIPTION.

By setting the NAME attribute, you define a particular aspect of the custom activity's user interface. Table 17.3 summarizes the available values for the NAME attribute:

Table 17.3 NAME attributes for the DESIGN parameter
NAME Attribute
Meaning
Icon
The image file to use for the icon in the custom palette.
Label
A text label that appears under the icon.
BubbleHelp
The text for the tool tip that appears when the mouse pointer is over the icon.
HelpUrl
The URL for the online help for this custom activity, accessible from a right-click.
MapIcon
The image file to use for the icon in the process map. In typical usage, this is the same as Icon.
SelectedMapIcon
The image file to use for the icon in the process map, when the activity is selected.
TreeViewIcon
The file to use for a small image that represents the activity in the Application Tree View.

Sample XML Description File
Define a file called HelloWorld.xml as shown below. Things to note are:

Here is the entire code for the HelloWorld.xml description file:

<?XML version = "1.0" ?>

<WORKPERFORMER

   TYPE="com.netscape.pm.model.ISimpleWorkPerformer"

   NAME="HelloWorld"

   CLASS_ID="com.netscape.pm.sample.HelloWorldPerformer"

   VERSION="1.1">

<ENVIRONMENT>

   <PARAMETER

            NAME="Language"

            VALUESET="'English','French'"

            TYPE="java.lang.String">

   'English'

   </PARAMETER>

</ENVIRONMENT>

<INPUT>

   <PARAMETER

            NAME="userName"

            DISPLAYNAME="User Name"

            TYPE="java.lang.String"

            DESCRIPTION="Last Name">

   getData("customerName")

   </PARAMETER>

</INPUT>

<OUTPUT>

   <PARAMETER

            NAME="welcomeMsg"

            DISPLAYNAME="Welcome Message"

            TYPE="java.lang.String"

            DESCRIPTION="Greeting for the user">

   mapTo("greeting")

   </PARAMETER>

</OUTPUT>

<DESIGN>

   <PARAMETER

            NAME="Icon"

            DESCRIPTION="A 32x32 icon that is placed on the palette">

   drap_uk2.gif

   </PARAMETER>

   <PARAMETER

            NAME="Label"

            DESCRIPTION="The DISPLAYNAME used for this palette element.">

   Hello World

   </PARAMETER>

   <PARAMETER

            NAME="BubbleHelp"

            DESCRIPTION="Bubble help for the palette element">

   HelloWorld - A simple work performer Custom Activity.

   </PARAMETER>

   <PARAMETER

            NAME="HelpURL"

            DESCRIPTION="URL explaing this palette element">

   http://people.netscape.com/michal/

   </PARAMETER>

   <PARAMETER

            NAME="MapIcon"

            DESCRIPTION="Icon for the process map (48x48)">

   drap_uk2.gif

   </PARAMETER>

   <PARAMETER

            NAME="SelectedMapIcon"

            DESCRIPTION="Icon for the process map (48x48)">

   drap_fr2.gif

   </PARAMETER>

   <PARAMETER

            NAME="TreeViewIcon"

            DESCRIPTION="Icon for the tree view (48x48)">

   mailer_tree_view.gif

   </PARAMETER>

</DESIGN>

</WORKPERFORMER>


Packaging a Custom Activity
After you create the Java class file and the XML description file, the next step is to package the custom activity. A custom activity consists of the following files:

Create a zip or jar archive that contains these files. The archive must have the same root name as the XML file. For example, if the XML file is HelloWorld.xml, then name the zip file HelloWorld.zip.

As you create the archive, check that the directory structure reflects the package structure of the class. For example, the HelloWorldPerformer class is in the package com.netscape.pm.sample. Therefore, the class file must be in the directory com/netscape/pm/sample, as shown in Figure 17.1. The HelloWorld.xml file must be at the top level.

Figure 17.1    Directory structure for the HelloWorld activity

Note the two image files, drap_fr2.gif and drap_uk2.gif. These images will be used by Process Builder in the process map. The images, shown in Figure 17.2, will correspond to the selected state of the Language property, either French or English.

Figure 17.2    Image files in the HelloWorld activity


Adding a Custom Activity to the Process Map
There are two ways to add a custom activity to the process map:

Adding a Custom Activity from a Custom Palette
To use a custom activity from a custom palette, do the following:

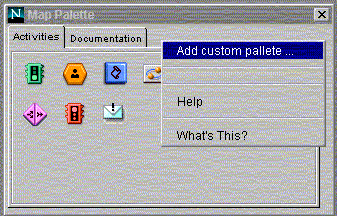
  1. In the palette, right-click the area below the title bar, and choose "Add custom palette," as shown in Figure 17.3. This adds a new tab to the palette.
  2. Figure 17.3    Adding a custom palette

  3. In the "New palette name" dialog box (shown in Figure 17.4), type the label for the new tab. For example, enter "HelloWorld".
  4. Figure 17.4    Enter a name for the new palette

    A new tab is added to the palette.

  5. Click your new custom tab to make it active. Note that the area contains no icons.
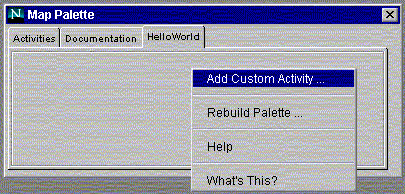
  6. Right-click in the empty area under the tabs, and select "Add Custom Activity ...". See Figure 17.5.
  7. Figure 17.5    Add a custom activity to the palette

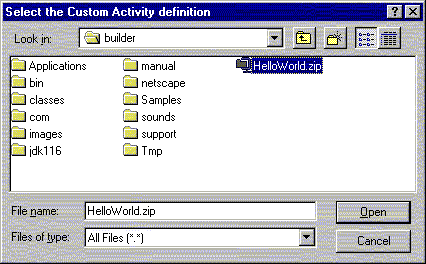
    A file selection window appears.

  8. Using the file selection window, locate the archive file that represents the custom activity, and select the file. For example, Figure 17.6 show the selection of HelloWorld.zip:
  9. Figure 17.6    Select the file that represents a custom activity

    The custom activity is added to your new palette. For example, as shown in Figure 17.7, the HelloWorld activity appears on the palette like this:

    Figure 17.7    A custom activity icon appearing on the HelloWorld custom palette

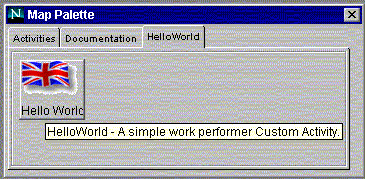
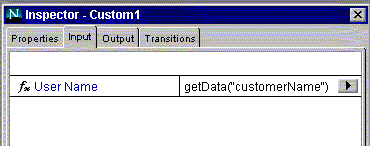
    Note that the custom activity's appearance in Process Builder is controlled by the DESIGN section of the XML file. In the HelloWorld tab pictured above, you see the effects of setting the Icon, Label, and BubbleHelp parameters in the DESIGN section.

  10. To add the activity to your application, drag the icon from the custom palette to the process map.
Adding a Custom Activity without Using a Custom Palette
If you don't have a custom palette or don't want to create one, you can add a custom activity as follows:

  1. In the palette, drag the Custom Activity icon to the process map.
  2. Select the custom activity and open the Inspector window.
  3. On the Properties tab of the Inspector, locate the property named Custom Activity.
  4. Click the Browse button to bring up a file selection window, and locate the zip or jar file that represents the custom activity. An example is shown in Figure 17.8.
  5. Figure 17.8    Setting the Custom Activity property

  6. Click Open to associate the selected file with the Custom Activity icon. The Custom Activity icon now has the characteristics defined by the file.

Working with a Custom Activity
After you place a custom activity on the process map, you can view or set its properties in the Inspector window. For example, Figure 17.9 shows the Inspector window's Input tab for HelloWorld.

Figure 17.9    Input properties for a custom activity

The Input tab shows the parameter names in the input hashtable, and shows how the value for each parameter is derived. In this case, the value for the input parameter userName is derived by getting the value of the customerName datafield.

The INPUT section of the XML description file determines the appearance of the Input tab in the Inspector window. For example, note that the userName parameter displays as "User Name," which was specified through the DISPLAYNAME attribute in the XML file.

Similarly, the Output tab shows the parameter names in the output hashtable, and shows how the value for each parameter is mapped back into the process instance. In this case, the value for the output parameter welcomeMsg is put in the greeting data field.

As you design the process, be sure to add the data fields that are used by the custom activity. For example, the HelloWorld activity uses two Textfields: greeting and customerName.


Implementation Tips
This section describes some of the design tips you should consider as you create and implement a custom activity.

Avoid Instance Data
Custom activities, like custom fields, are stateless entities. There can be only one instance of a custom activity per Java Virtual Machine. The custom activity must be multithreaded. This means the activity must safely handle calls from concurrent requests.

As a result, it's recommended that you avoid using instance data in the class that implements a custom activity, particularly if the perform() method is likely to change this data. If you can't avoid using instance data, be sure to synchronize the data. With unsynchronized data, a variable set during one request might not exist for the next request.

Use Consistent Data Types
Watch for is consistent data typing. Make sure that the data types you specify in the XML file are consistent with the corresponding values you pass to the input and output hashtables. Although PAE performs some basic data matching for you, inconsistent data is likely to generate an error.

Avoid Non-default Constructors
In classes that implement ISimpleWorkPerformer, avoid defining non-default constructors (meaning constructors with non-zero arguments). Otherwise, you may encounter problems during dynamic loading. The problem may arise because PAE dynamically loads the class that implements your custom activity. In other words, PAE has no prior awareness of non-default constructors and therefore cannot call them.

When to Use a Custom Activity
Custom activities are useful when you want to integrate an existing legacy process into a PAE process through a well-defined interface. For example, use a custom activity in a PAE process that exchanges data with external resources such as a CORBA server, a CICS system, or the business logic in an EJB component.

By contrast, custom activities are not a good solution if you must represent a complex data structure from an external source. For example, to represent result sets or other data types from Oracle databases or SAP R/3 systems, you are better off using a custom field. Reserve custom activities for situations where data can be easily parsed and stored (either directly in a data field or in the content store).


Copyright © 1999 Netscape Communications Corp. All rights reserved.