|
|
| iPlanet Process Manager, Version 6.5 Process Administrator's and Business Manager's Guide |
Chapter 7 Managing Process Instances and Work Items
This chapter and the next one present information needed by business managers to use Process Business Manager to manage and monitor process instances and work items.
This chapter contains the following sections:
- "About Process Instances and Work Items"
- "Accessing Process Business Manager"
- "Managing Process Instances"
- "Managing Work Items"
About Process Instances and Work Items
A process instance is an instance of a deployed Process Builder application that has been initiated by an end user in Process Express. For example, if a user wants to issue a request for time off, they could initiate a new time off request in Process Express. When they do this, a new instance of the Time Off application is created in the database. This application consists of several tasks, called work items, each of which is assigned to a different user. (In Process Builder, work items are referred to as activities.)
For example, an employee, her manager, and her HR representative may be assigned to different activities in a process map in Process Builder. In Process Express, each has their assigned task appear as work item in their work list. As each person completes their assigned task, the request is routed to the next assignee's work list as a work item that they must act upon. Each time the process instance moves to a new work item, is accepted, or is completed, the process instance and work item states are updated internally.
Process Manager has the concept of parallel processing and subprocesses. When a parallel processing application such as Office Setup is initiated by an end user in Process Express, a single process instance can have many work items that are active simultaneously. This results in a one-to-many relationship between the process instance and its work items, and they can be in different states. For example, a process instance may be open and in a running state, but one of its work items could be suspended.
When a parent process arrives at the subprocess activity in the process map, it generates a subprocess. A single work item is created in the parent process to track the subprocess as a whole. This work item is unusual in that no one is assigned to the task, but it allows the Process Engine to track the start and end of the subprocess, so that it knows when to continue with the other activities in the process. In addition to the single subprocess work item in the parent process, individual work items are created as usual for each defined subprocess activity as the subprocess continues through its own defined process.
At any given time, a process instance or its work items can be in one of several different states. As business manager, you can move them from one state to another. For example, you may want to suspend a particular process instance when an assigned user ID is no longer valid.
As with process instances, at any given time, a work item can be in one of several different states. As business manager, you can move them from one state to another. For example, you may want to suspend a particular work item when an assigned user ID is no longer valid. When you suspend a work item, you do not affect the other work items in the process instance nor do you affect the state of the process instance itself. Completed work items are removed immediately from the database, so they are no longer in any state.
As business manager, you can make some state changes for open process instances and work items, but not for closed ones. The table here identifies the permitted state changes.
Although expiration is not a state, a work item can be flagged as expired. Timer agents periodically check for expired work items. A work item can become expired if it has an expiration setter script set up for it in Process Builder and it has not been acted upon in Process Express before the date indicated in the script.
The Process Builder designer can use expiration setter scripts to define an absolute or a relative expiration date for each work item. The designer can define a change of state as part of a work item's expiration handler script. A typical example is that upon expiration a work item's state changes to a suspended or terminated state.
Whenever a timer finds an expired work item, it is flagged as overdue (expired) in Process Express and in Process Business Manager with a warning icon

in the Due Date column. You can extend the expiration date for any work item that has passed its expiration date. See "Administering a Work Item" for more information.Accessing Process Business Manager
Process Business Manager is a web-based interface for managing and monitoring process instances and work items. You access Process Business Manager's interface in a web browser using a specific client URL.
Process Business Manager uses a tabbed HTML-based interface that provides access to management functions in these areas:
- Process Instance Forms
Process Business Manager provides several forms for finding and administering process instances. You can find all process instances that match certain criteria, or you can manage a specific process instance and view its details and history. You can also administer work items that belong to a process instance.
For more information, see "Managing Process Instances" and "Managing Work Items".
- Statistics Forms
Process Business Manager provides two forms for obtaining statistics about process instances. You can set up criteria for the process instances you are interested in and you can obtain a report about them.
For more information, see Chapter 8, "Statistics."
The URL that business managers use to access for Process Business Manager depends on the implementation of iPM clusters an Administrator sets up:
- Single Cluster
- Multiple Clusters
Table 7-4 shows the information a Process Business Manager user needs to access the Process Business Manager client based on the above cluster implementations. Your Process Manager Administrator should set you up with an account (User Name, Password, Cluster Name, if needed) and tell you which url to use.
To access Process Business Manager
- Enter the correct Process Business Manager client URL in the location bar of your browser.
Single cluster implementation:
http://server_name/Business.apm/
Multiple cluster implementation:
http://server_name/ProcessBusiness.apm/
A login screen appears.
- Log in to the Process Business Manager client.
Managing Process Instances
You can view and modify the process instances in your cluster. You can obtain a list of process instances by defining a set of search criteria such as by user, by application, across all applications in cluster, for specific creation or modification time periods, by expiration date, or by state.
This section includes these topics:
- "Finding Process Instances"
- "The Process Instances List"
- "Administering a Process Instance"
- "Viewing Details and History"
To manage your process instances
- Log in to the Process Business Manager.
For instructions on how to do this, see "Accessing Process Business Manager".
- Select the Process Instances tab.
This displays the Find Process Instances page.
- Enter search criteria for process instances.
For details on the above search criteria options, see "Finding Process Instances".
- Select Find.
A list showing all matching process instances appears.
Finding Process Instances
You can get a list of process instances based on the values you enter for one or more of these fields. For more general, conceptual information, see "About Process Instances and Work Items".
Figure 7-1 The Find Process Instances page
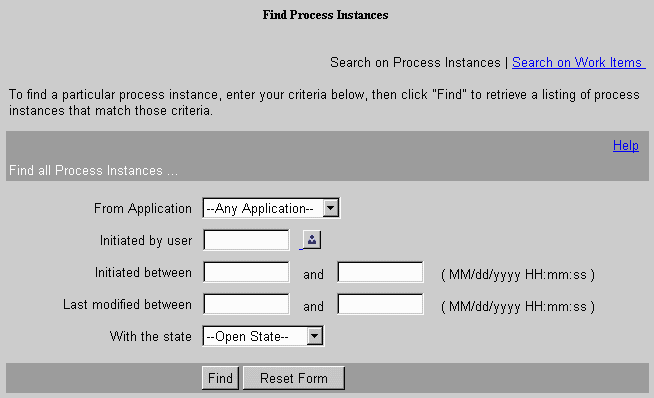
From application Select Any Application or a specific application from the drop-down list.
Initiated by user Enter the user ID of a Process Express end user.
Initiated between Enter a from and to range of dates formatted as mm/dd/yyyy [hh:mi:ss]. Note that this field uses a 24-hour clock.
Last modified between Enter a from and to range of dates formatted as mm/dd/yyyy [hh:mi:ss]. Note that this field uses a 24-hour clock.
With the state Select Open State or a specific state from the drop-down list.
The Process Instances List
Once you submit your process instance criteria, the Process Manager displays a list of all process instances that meet your criteria.
Figure 7-2 The Process Instances List
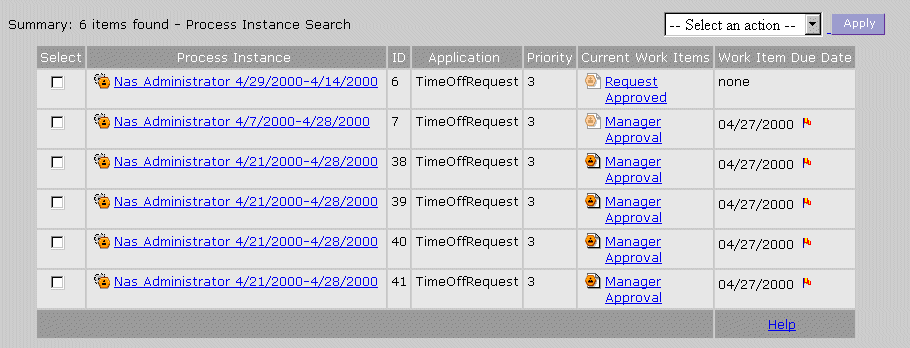
Descriptions of column headings for the list:
- Select: This radio box can be used to select/deselect many process instances at the same time. Multiple process instances can be suspended or resumed by selecting the radio boxes and hitting the "Apply" button.
- (State Icon): An icon indicating whether the process instance is currently running (normal orange activity icon), suspended (dimmed out), completed (green), or terminated (X).
- Process Instance: The name of the process instance, such as Joe's Timeoff Request. This name is a link to the Display Process Instance page for that process instance. (For details, see "Administering a Process Instance".)
Note If the application is in the Testing stage, all process instances are renamed to the user ID of their initiator.
- ID: The process instance ID number. With parallel processing applications, there may be multiple work items for a single process instance ID.
- Application: The application that the process instance belongs to.
- Priority: The priority level for the current activity. The default value is 3.
- Current Work Items: The work items that are currently active. There may be several for a parallel processing application. If the item is an exception handler or a subprocess, a specific icon is displayed. For example, the last work item in Figure 7-2 is a subprocess. The work item is a link to the Display Work Item page.
- Work Item Due Date: The date when the current activity is due to expire. Items that are due on that day have a flag icon next to them. Items that are overdue (expired) show a warning icon next to them.
Administering a Process Instance
You can select an open process instance from the listings page and administer it by changing its state.
To administer a process instance
- Select the link for a specific process instance in the Process Instances List page.
The Display Process Instance page is displayed.
- Choose one or more actions for that process instance.
- Select Perform Actions when you are done.
Figure 7-3 The Display Process Instance page
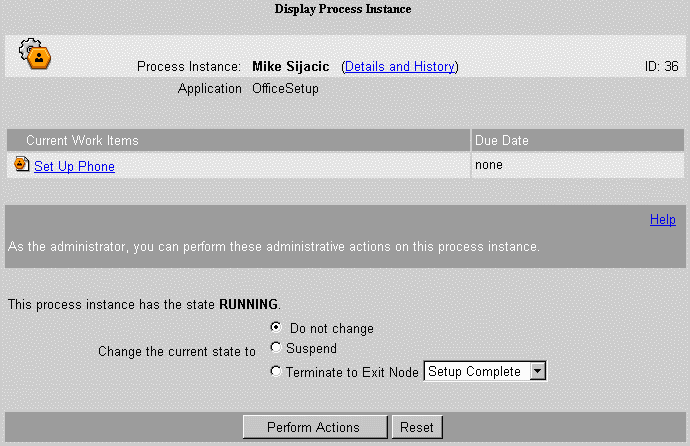
This page allows you to change the process instance's state.
Changing the State of a Process Instance
You can change the state of open process instances, but you can only change them to certain other states. See Table 7-3 for details.
To change a process instance's state
- Select the radio button that reflects your choice:
Suspend (suspend the process instance and all of its constituent work items)
Resume (resume a suspended process instance and any of its work items that are suspended to their previous state)
Terminate (abnormally terminate the process instance) If you choose this option, you must select the exit point you want to use as the designated termination activity. This automatically terminates its constituent work items. You can select any exit point in the process map to terminate a process instance.
- Select Perform Actions to change the state.
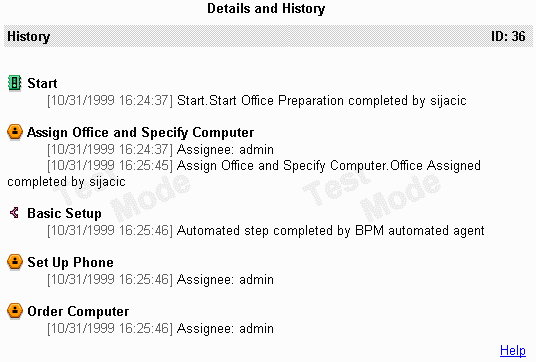
Viewing Details and History
The heading of the Display Process Instance page includes a link to the Details and History page. This provides a detailed history of every action users have performed for every work item for the process instance.
To view the details and history page
- Log in to the Process Business Manager.
For instructions on how to do this, see "Accessing Process Business Manager".
- Select the Process Instances tab.
- Enter search criteria and select Submit.
- Select a process instance link on the Process Instances List.
This displays the Display Process Instance page.
- Select the View Details & History link in the heading at the top of the page.
This displays the details and history for that process instance.
- Close the window when you are done.
Figure 7-4 The Details and History page
Managing Work Items
You can view and modify the work items for the process instances in your cluster. You can obtain a list of work items by defining a set of search criteria such as by user, by application, across all applications in cluster, for specific creation or modification time periods, by expiration date, or by state.
This section includes these topics:
To manage your work items
- Log in to the Process Business Manager client.
For instructions on how to do this, see "Accessing Process Business Manager".
- Select the Process Instances tab.
The Find Process Instances page is displayed.
- Select the Search on Work Items link.
The Find Work Items page is displayed.
- Enter search criteria for work items.
For details on the above options, see "Finding Work Items."
- Select Find.
A list showing all matching work items appears.
Finding Work Items
You can get a list of work items based on the values you enter for one or more of these fields.
Figure 7-5 The Find Work Items page
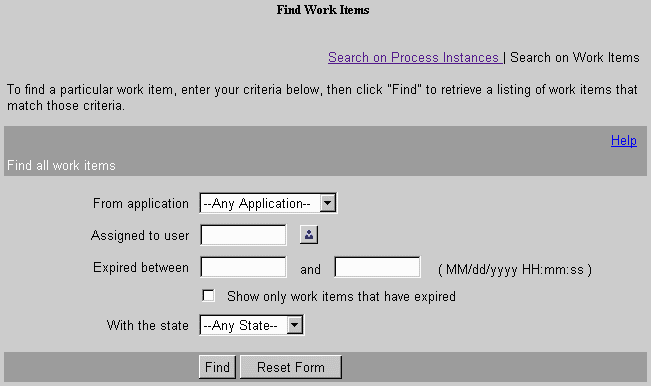
From application Select "Any Application" or a specific application from the drop-down list.
Assigned to user Enter the user ID of a Process Express end user.
Expired between Enter a from and to range of dates formatted as mm/dd/yyyy [hh:mi:ss]. Note that this field uses a 24-hour clock. This applies only to the work items of open process instances.
Show only work items that have expired This checkbox allows you to limit the listing to only those work items that have expired. This applies only to the work items of open process instances.
With the state Select "Any State" or a specific state from the drop-down list.
The Work Item List
Once you submit your work item criteria, Process Manager displays a list of all work items that meet your criteria.
Figure 7-6 The Work Items List page
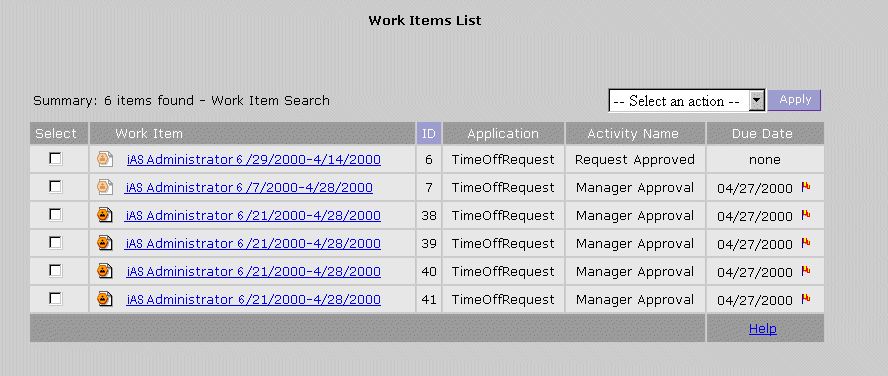
The columns of data for the listing are:
- Select: This radio box can be used to select/deselect many work items at the same time. Multiple work items can be suspended or resumed by selecting the radio boxes and hitting the "Apply" button.
- (State Icon): An icon indicating whether the work item is currently available (orange activity icon) or suspended (dimmed out).
- Work Item: The name of the work item. This name is a link to the Display a Work Item page for that work item. (For details, see the next section, "Administering a Work Item.")
- ID: The ID number for the process instance that this work item belongs to.
- Application: The display name of the application for which this work item was created.
- Activity Name: The name of the activity that the work item performs, as defined in Process Builder.
- Due Date: The date when the current activity is due to expire. Items that are due on that day have a flag icon next to them. Items that are overdue (expired) show a warning icon next to them.
Administering a Work Item
You can select an open work item from the listings page and perform additional administrative actions on it. If you choose to perform more than one administrative action, and one of the actions is to move the work item to another activity, the move operation is executed first.
The administrative page, Display a Work Item, can be displayed in two formats: the administrative portion alone or a form with the administrative portion at the bottom. If no form was defined for the administrator by the designer in Process Builder, then only the administrative portion is displayed. If a form was defined, then that form is displayed with a section at the bottom where you can perform administrative actions.
To administer a work item
- Select the link for a specific work item in the Work Item List page.
This displays the Display a Work Item page for that work item.
- Choose one or more actions for that work item.
- Select Perform Actions when you are done.
Figure 7-7 The Display and Administer a Work Item page
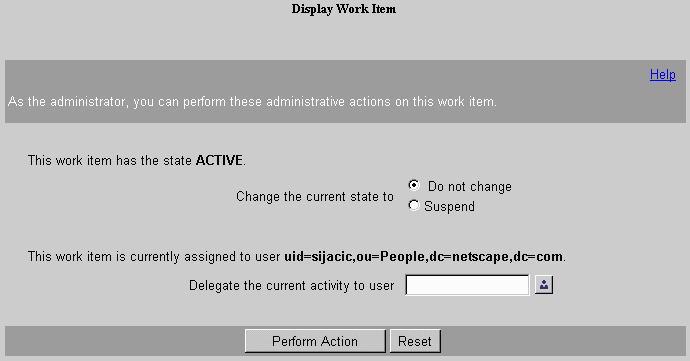
The choices for actions you can perform are:
- change the work item's state
- extend the current activity's expiration date (only displayed when the activity has already been flagged as expired)
- move the current activity to a different activity
- delegate the current activity to another user
This page allows you to change the work item's state.
Changing the State of a Work Item
You can only change the state of open work items, and you can only change them to certain other states. See Table 7-3 for details.
To change a work item's state
- Select the radio button that reflects your choice:
- Select Perform Actions to change the state.
Extending the Expiration Date
You can extend the expiration date for an open work item if its due date has already passed.
To extend the work item's due date
- Enter the new expiration date in the format MM/DD/YY [hh:mm:ss]. The date or time must be in the future.
- Select Perform Actions to extend the work item's due date.
Moving to a Different Activity
You can change the current work item to any other activity that is defined for the application. That is, you can switch to an activity that is further along in the process definition or to one that precedes the current activity. You can move to a different activity even if the current activity is unfinished.
For parallel processing applications, you can only change to an activity that is on the same processing branch as the current work item.
To move the work item to another activity
- Choose an activity from the drop-down list.
Process Business Manager only displays the activities that are defined for this process instance.
- Select Perform Actions to change the activity.
Note No notification goes to the initiator or to the previous assignee about the switch.
Delegating to Another User
You can reassign an open work item to another user.
To delegate the work item
- Enter the user ID for the person or group to whom you want to reassign the work item.
- Select the Find User icon if you do not know the user ID or group ID.
This displays the Find User page.
Figure 7-8 The Find User page
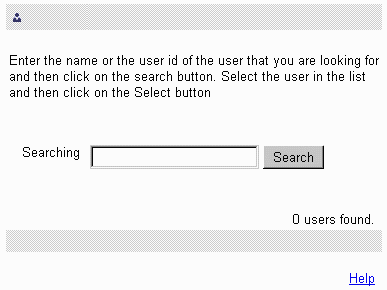
- Enter a partial name and select Search.
This displays a second Find User page that lists all matching user IDs.
- Select a user from the displayed list and choose Select.
This returns you to the Display and Administer a Work Item page.
- Select Perform Actions to delegate the activity.
Contents