|
|
| iPlanet Process Manager, Version 6.5 Process Administrator's and Business Manager's Guide |
Process Manager associates a configuration directory, a corporate user directory, and a relational database into a cluster. When Process Manager application designers deploy a new application, they must identify its Process Manager cluster. Process Manager replicates all deployed applications across all iPlanet Application Servers in a cluster.
This chapter contains the following sections:
- "About Clusters"
- "Before Creating a Cluster"
- "Creating a Cluster"
- "Joining an Existing Cluster"
- "Managing a Cluster"
About Clusters
A Process Manager cluster associates the following components with each other:
- an LDAP-compliant corporate user directory
- an LDAP-compliant configuration directory
- a relational database
The initial cluster includes one iPlanet Application Server. Later you can join additional application servers to an existing cluster as needed.
Each Process Manager-enabled application server has its own Process Administrator client. You can use any Process Administrator client and get the same view of a cluster because all applications are fully replicated to all application servers in a cluster.
As the Process Manager administrator, you can use the Process Administrator client to perform the following tasks that relate to clusters:
- Create a new cluster
- Join your iPlanet Application Server to an existing cluster
- Change cluster information
- View the Process Administrator logs
- Remove your iPlanet Application Server from a cluster
- Delete a cluster
Single and Multiple Clusters
As a Process Manager Administrator you can set up either single or multiple clusters, as described below:
- single cluster
Choose this option if you use only one type of database to collect and manage Process Manager process application data, and one configuration or corporate directory.
- multiple clusters
Choose this option if you use more than one type of database to collect and manage Process Manager process application data, or use different configuration or corporate directories.
A multiple cluster implementation allows you to configure a separate cluster to accommodate each department's database, configuration directory, and corporate directory requirements. For example, your marketing department uses Sybase to manage its process application data, while your sales department requires the use of an Oracle database. They also use different configuration directories to store application definitions.
In many cases, you use the multiple cluster implementation to create only a single cluster. This implementation allows you the ability to create another cluster at a later time.
As an administrator, You use specific URLs to access a cluster's Process Administrator, Process Business Manager, and Process Express clients depending on the cluster implementation you choose to use with Process Manager.
If you already have applications deployed using a single cluster implementation, and you want to migrate to multiple clusters, you need to redeploy these applications to a cluster created using the multiple cluster URL. For information about migration from earlier releases of Process Manager, see the Release Notes.
Note Make sure that your business managers and process application end-users are aware of the cluster schema you use. They must access different URLs based on your cluster set up. For a list of these URLs, see Table 1-1.
In a multiple cluster implementation, business managers and process application end-users must know the name of the specific cluster they want to log in to when working with applications.
Before Creating a Cluster
Before you create a Process Manager cluster, you must:
- Decide which cluster implementation to use. For more information, see "Single and Multiple Clusters".
- Establish database connectivity for your iPlanet Application Server.
Solaris
You are required to set up database connectivity if you use native or third-party JDBC database drivers on Solaris before you create a cluster. You do this using the db-setup utility, located in the <ipm_install_directory>\ias\bin directory. For more information on the db-setup utility, see the iPlanet Application Server Administrator's Guide.
Windows
You are required to set up database connectivity for third party JDBC drivers on Windows. If you use native database drivers, you do not need to set up database connectivity for Windows. You establish database connectivity for third-party JDBC drivers using the jdbcsetup utility, located in the <ipm_install_directory>/ias/bin directory. For more information on the jdbcsetup utility, see the iPlanet Application Server Administrator's Guide.
Note After you establish database connectivity, restart your iPlanet Application Server for your new settings to take effect.
For information on configuring specific third-party JDBC drivers with iAS, see iPlanet Knowledge Base article number 7831, entitled "Registering Third-party JDBC Drivers with iAS for Database Connectivity with iPM Applications."
- Decide whether to use a second directory server for failover for either the configuration directory or the corporate directory in your Process Manager cluster.
Process Administrator's Create Cluster form allows you to specify multiple directory servers to associate with the Process Manager cluster for failover. A primary directory server is called a supplier and a secondary directory server is called a consumer. For information on how to configure a supplier and consumer directory server for failover, see the iPlanet Directory Server Administrator's Guide.
- Decide whether to create a cluster using the Basic or Advanced Create Cluster form (multiple cluster implementation only).
When you use Process Administrator to create a cluster, the Basic Create Cluster form appears by default. This Basic Create Cluster form allows you to create a cluster without specifying the configuration directory port, corporate directory port, and mail server information.
When you create a cluster using the Basic form, you create a cluster using the default corporate directory port, default configuration directory port, and default mail server on the host machine you specify.
You must register a local datasource with the iPlanet Application Server before you create a cluster using the Basic Create Cluster form. You can do this in one of two ways:
create an xml file that defines your local datasource and use the iasdeploy resreg command to register the file with the application server
use the iPlanet Application Server Administration Tool UI to register the datasource
For more information about registering a local datasource with the iPlanet Application Server, see the iPlanet Application Server Administrator's Guide.
Creating a Cluster
You administer Process Manager through the Process Administrator client interface on an enterprise server. The first time you access the Process Administrator client after installing Process Manager, Process Administrator detects that the iPlanet Application Server is not yet associated with any cluster and immediately prompts you to create or join a cluster.
To create a cluster
- Enter the correct Process Administrator client URL in the location bar of your browser.
Single cluster implementation:
http://server_name/Administrator.apm/
Multiple cluster implementation:
http://server_name/SiteAdmin.apm/
A login screen appears.
- Log in to the Process Administrator client.
This initializes Process Administrator client and displays the Create or Join Cluster page.
Figure 4-1 The Create or Join Cluster page
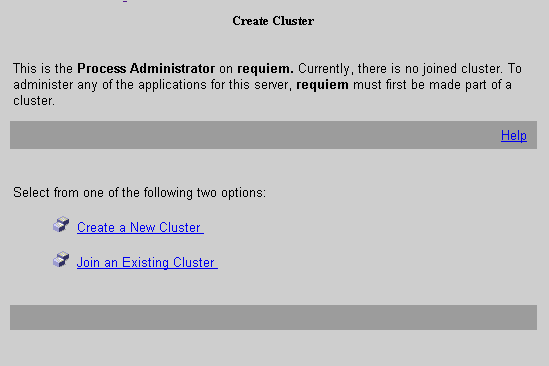
- Select the Create a New Cluster link to display the Create Cluster form.
Note If you are creating a cluster in a multiple cluster implementation you have two options: Basic or Advanced. For more information about using the Basic Create Cluster form, see the section "Before Creating a Cluster".
- Enter the following into the fields provided.
"Corporate User Directory Information"
"Configuration Directory Information"
"Event User Information" (single cluster implementation only)
"Cluster Administrators Information" (multiple cluster implementation only)
For details on the above options, see "New Cluster Information".
- Select Create Cluster when you are done.
A series of diagnostic messages are displayed onscreen as the Process Administrator creates the cluster. The last few lines contain instructions for modifying the Process Builder preferences.ini file.
- Copy the lines from the onscreen message and paste them into the preferences.ini file.
The Process Builder's preferences.ini file is located in the Process Builder root directory. This is the <iPM_install_directory>/builder directory by default.
The lines you copy to this file identify to the Process Builder which Directory Server to use as the corporate user directory and where one or more clusters are located in the configuration directory. You must copy the Directory Server references to every Process Builder client's preferenes.ini file that you want to use with this cluster.
Once you complete these steps, Process Builder application designers can deploy applications to this new cluster. For more information on deploying applications to a cluster, see the Process Builder's Guide.
New Cluster Information
You must provide information about your new cluster. The only general restriction on the field entries you provide is that you cannot use double quotation marks.
General Cluster Information
Figure 4-2 General Cluster Information
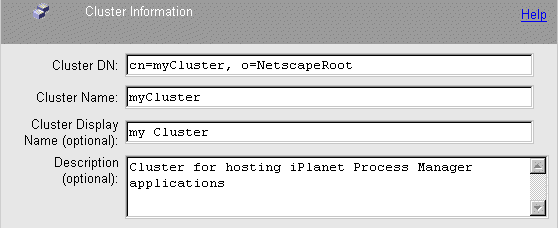
Cluster DN The full distinguished name for your cluster.
The directory path for the cluster data. For example, cn=PM Cluster, o=NetscapeRoot. For details on which LDAP attributes to enter here, see "Directory Server Terms and Attributes".
This field is not available when you choose the Basic Create Cluster form in a multiple cluster implementation.
Cluster Name The name that is used to differentiate the cluster from others in a multiple cluster implementation.
Note The Cluster Name cannot contain spaces.
This is the cluster name that administrators, business managers, and process application end-users specify to log in to the cluster. It is also the cluster name that process application designers use to programatically access a specific cluster.
This field is not available in the Create Cluster form in a single cluster implementation.
Cluster Display Name (Optional) The display name you choose for your cluster.
Description (Optional) A more meaningful description of the cluster.
This field is not available when you choose the Basic Create Cluster form in a multiple cluster implementation.
Corporate User Directory Information
You cannot use the Basic Create Cluster form if your directory server is installed on any other port than the default installation port of 389. If this is the case, use the Advanced Create Cluster form.
Figure 4-3 Corporate User Directory Information
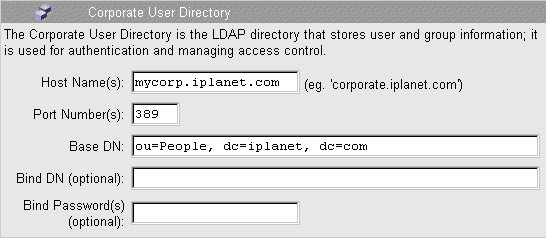
For details on Directory Server terminology, see "LDAP Terms".
Host Name(s) The full host name for the Directory Server you plan to use for your corporate user directory. For example, mycorp.iplanet.com.
Port Number(s) The port number for this directory server.
This field is not available when you choose the Basic Create Cluster form in a multiple cluster implementation. If the port number used by the directory server specified in the Host Name field is not the default installation port of 389, you cannot use the Basic Create Cluster form to create a cluster.
Base DN The base distinguished name for the directory. For example, dc=iplanet, dc=com. For details about which LDAP attributes to enter here, see "Directory Server Terms and Attributes".
Bind DN (Optional) A valid user ID for a user of this directory. Leave this blank if Process Manager will be accessing the corporate directory as an anonymous user, which is the default. This allows read-only access.
This field is not available when you choose the Basic Create Cluster form in a multiple cluster implementation. If the bind DN is anything other than the default installation ID of anonymous user, you cannot use the Basic Create Cluster form to create a cluster.
Bind Password(s) (Optional) The password for this directory user. Leave this blank if Process Manager will be accessing the corporate directory as an anonymous user.
This field is not available when you choose the Basic Create Cluster form in a multiple cluster implementation.
Configuration Directory Information
You cannot use the Basic Create Cluster form if your directory server is installed on any other port than the default installation port of 389. If this is the case, use the Advanced Create Cluster form.
Figure 4-4 Configuration Directory Information
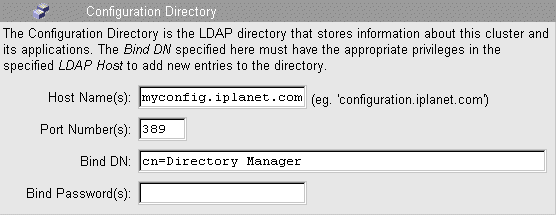
For details on Directory Server terminology, see "LDAP Terms".
Host Name(s) The full host name for the Directory Server that you plan to use for your cluster and application configuration. For example, myconfig.iplanet.com.
Port Number(s) The port number for this directory.
This field is not available when you choose the Basic Create Cluster form in a multiple cluster implementation. If the port number used by the directory server specified in the Host Name field is not the default installation port of 389, you cannot use the Basic Create Cluster form to create a cluster.
Bind DN A valid user ID for a user of this directory. This user must have full Directory Server privileges. For example, the installation default is cn=Directory Manager. For details about which LDAP attributes to enter here, see "Directory Server Terms and Attributes".
Bind Password The password for this directory user.
Database Information
The database information fields you fill in are different depending on the Create Cluster form you choose:
- "Single Cluster or Advanced Create Cluster form database information"
- "Basic Create Cluster form database information"
Single Cluster or Advanced Create Cluster form database information
Figure 4-5 Database Information (Single Cluster and Advanced Create Cluster form)
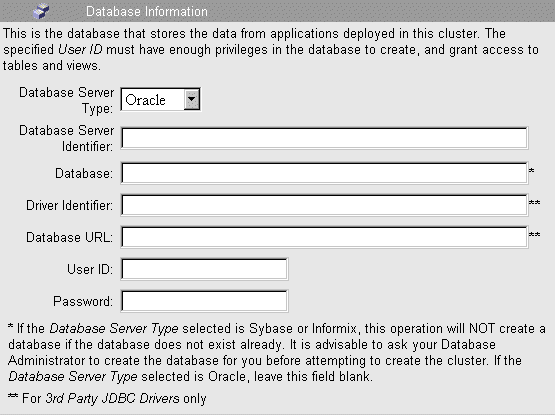
Database Server Type Select the type of database you are using from the drop-down list. The choices are: Informix, Oracle, and Sybase.
Database Server Identifier (Required for native drivers only) The database server name that you used when you installed the database. Leave this field blank when using a third-party JDBC driver. See Chapter 6 "Databases" for more information about databases.
Database For Oracle, leave this field blank. For Informix and Sybase, use the name for the database that Process Administrator should use for creating tables and views.
Note This database must already exist.
Driver Indentifier (Required for third-party JDBC drivers only) The name of the driver used when you configured the third-party JDBC driver. Leave this field blank when using a native driver. For more information about setting up third-party database drivers see, the iPlanet Application Server Administrator's Guide.
Database URL (Required for third-party JDBC drivers only) The URL that specifies the subprotocol (the database connectivity mechanism), the database and list of properties. Leave this field blank when using a native driver. The format of the database URL is specific to each driver. (Check the database manufacturer's documentation for the database-specific URL format.)
User ID (Required for native drivers; optional for third-party JDBC drivers) The user ID for a valid user for this database. The user must have enough privileges to create tables and views. For third-party JDBC drivers, the User ID can be part of the Database URL field above. (Check the database manufacturer's documentation for the database-specific URL format.)
Password (Required for native drivers; optional for third-party JDBC drivers) The password for this database user. The user must have enough privileges to create tables and write to them. For third-party JDBC drivers, the Password can be part of the Database URL field above. (Check the database manufacturer's documentation for the database-specific URL format.)
Note If you are using Sybase on Windows NT, be sure that your DSQuery system environment is set to point to the correct Sybase database server to enable connection to the database.
Basic Create Cluster form database information
Figure 4-6
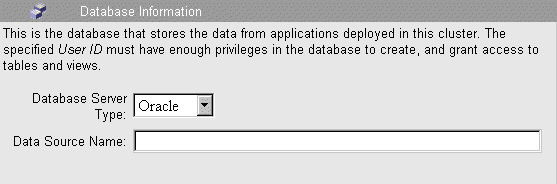
Database Information (Basic Create Cluster form)Database Server Type Select the type of database you are using from the drop-down list. The choices are: Informix, Oracle, and Sybase.
Data Source Name The JNDI Name used for the database when you registered your datasource with the iPlanet Application Server using the iAS Administration Tool or the iasdeploy resreg command.
For more information about registering a local datasource with the iPlanet Application Server, see the iPlanet Application Server Administrator's Guide.
Mail Server Information
The Mail Server information section is not available when you use the Basic create cluster screen to create a cluster. The cluster uses the default localhost identified by the Directory Server in this implementation as the mail server.
Figure 4-7 Mail Server Information
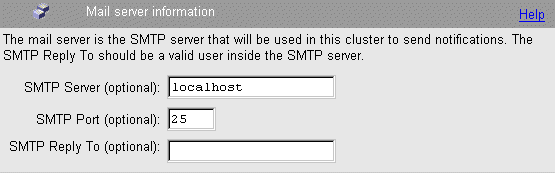
SMTP Server (Optional) The mail server associated with the cluster.
SMTP Port (Optional) The mail server port.
SMTP Reply To (Optional) The reply-to address that appears on notifications sent to users by Process Manager applications. This address could be set to the Process Manager administrator's email address, so that the administrator would be the one handling any notification replies users send.
Event User Information
The Event User information section is not available when you create a cluster in a multiple cluster implementation.
Figure 4-8 Event User Information
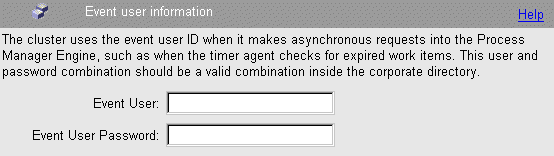
Event User Process Manager uses a timer event to expire work items and execute expiration handler scripts of process instances. The timer event is a feature provided by the Application Server. The timer event is created during the creation of the cluster. It is executed every two minutes and makes a HTTP POST to one of the Process Manager servlets every time it executes. Since the servlets are protected, the timer event has to make a POST with a valid user name and password. This user name should be an existing user in the corporate directory.
Event Password The password for the event user.
Cluster Administrators Information
The Cluster Administrators information section of the Create Cluster form is only available in a multiple cluster implementation.
Figure 4-9 Cluster Administrators Information

User Name(s) A comma-separated list of LDAP user IDs of people who have administrative permission to access Process Administrator and Process Business Manager interfaces on this cluster, and to deploy applications to this cluster. You must provide at least one LDAP user ID in this field.
What Happens at Cluster Creation
When you create a new cluster, Process Administrator performs the following operations:
- creates entries in the configuration directory
- creates database tables
- creates a cluster definition file (PMExtensionManager.properties) in your local Process Manager folder, at serverRoot/bpm/ <ClusterName>, where ClusterName is the name of the cluster. In a single cluster implementation, the default name of the cluster is "PMCluster".
This file stores the machine name, port number, bind DN, and bind password for the configuration directory.
- displays the URLs for the cluster and the corporate user directory so you or the designer can paste these lines into the preferences.ini file.
Joining an Existing Cluster
The initial cluster includes one iPlanet Application Server, but you can add more servers any time. Whenever you access Process Administrator for the first time from a new application server, Process Administrator checks the cluster relationship for that server. If the server is not associated with a cluster, you are prompted to create a cluster or join an existing cluster.
To join an existing cluster
- Enter the correct Process Administrator client URL in the location bar of your browser.
Single cluster implementation:
http://server_name/Administrator.apm/
Multiple cluster implementation:
http://server_name/SiteAdmin.apm/
A login screen appears.
- Log in to the Process Administrator client.
This displays the Create or Join Cluster page.
- Select the Join an Existing Cluster link.
This displays the Join Cluster form.
- Enter information for the following components:
For details on the above options, see "Existing Cluster Information".
- Select Join Cluster when you are done.
Joining a Cluster creates a cluster definition file in the Process Manager folder on your local machine at serverRoot/bpm/<ClusterName>/PMExtensionManager.properties, where <ClusterName> is the name of the cluster. In a single cluster implementation, the default name of the cluster is "PMCluster".
Existing Cluster Information
The administrator must provide this information about an existing cluster. The only general restriction on the field entries you provide is that you cannot use double quotation marks.
Figure 4-10 Join Cluster form
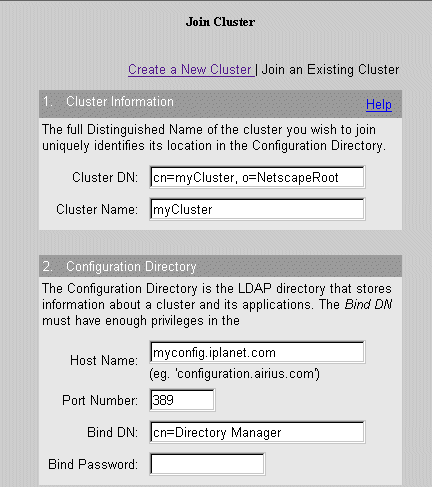
General Cluster Information
Cluster DN The full distinguished name for your cluster. This is the directory path for the cluster data. For example, you could enter cn=PM Cluster, dc=iPlanet, dc=com.
For details about which LDAP attributes to enter here, see "Directory Server Terms and Attributes".
Cluster Name The name that is used to differentiate the cluster from others in a multiple cluster implementation.
Note The cluster name cannot contain spaces.
This is the cluster name that administrators, business managers, and process application end-users specify to log in to the cluster. It is also the cluster name that process application designers use to programatically access a specific cluster.
This field is not available if you created your cluster using a single cluster implementation.
Configuration Directory Information
Host Name The full host name for the Directory Server you plan to use for your cluster and application configuration. For example, myconfig.iplanet.com.
Port Number The port number for this directory.
Bind DN A valid user ID for a user of this directory. This user must have full Directory Server privileges.
If you installed your directory server using the default anonymous user, you should enter cn=Directory Manager. For more information about what LDAP attributes to enter here, see "Directory Server Terms and Attributes".
Bind Password The password for this directory user.
What Happens at Cluster Joining
When you join an existing cluster, Process Administrator performs the following actions:
- creates a cluster properties file on the local iPlanet Application Server machine at
bpm/<ClusterName>/PMExtensionManager.properties
where <ClusterName> is the name of the cluster. In a single cluster implementation, the default name of the cluster is "PMCluster".
- registers all applications that are stored in the cluster's directory server to the local application server you just joined to the cluster.
Managing a Cluster
Process Administrator provides a main Cluster Management page at the Cluster Management tab.
This section includes the following topics:
- "Changing Cluster Information"
- "Accessing Directory Server Information"
- "Viewing the Process Administrator Logs"
- "Unjoining From a Cluster"
- "Deleting a Cluster"
The URL Administrators use to access the Process Administrator client depends on the implementation of Process Manager clusters you set up:
- Single Cluster
- Multiple Clusters
Table 4-1 shows the information an Administrator needs to access the Process Administrator client to manage a cluster based on the above cluster implementations.
For information on the difference between single and multiple cluster implementations, see "About Clusters".
Note You can also access the Process Administrator for management of a specific cluster in a multiple cluster implementation using the Site Administrator:
Figure 4-11 The Cluster Management Page
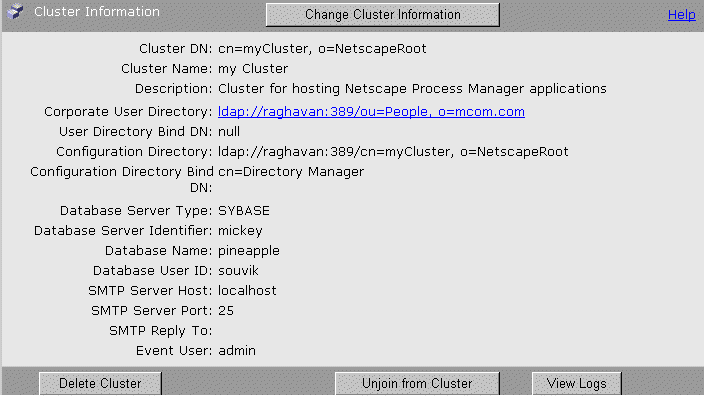
Changing Cluster Information
As an administrator, you can change some cluster information. You can change the cluster's name and description and you can change which corporate user directory you include in the cluster You cannot switch to use a different configuration directory or database in this cluster.
To change a cluster's information
- Enter the correct Process Administrator client URL in the location bar of your browser.
Single cluster implementation:
http://server_name/Administrator.apm/
Multiple cluster implementation:
http://server_name/ClusterAdmin.apm/
A login screen appears.
- Log in to the Process Administrator client.
- Select the Cluster Management tab.
- Select Change Cluster Information.
The Change Cluster Information form appears.
- Enter information about the following components:
cluster (name, description, directory server information, and administrator IDs)
database (user ID and password only)
For details on the above options, see "Change Cluster Information Fields".
- Select Apply Changes.
Figure 4-12 The Change Cluster Information page
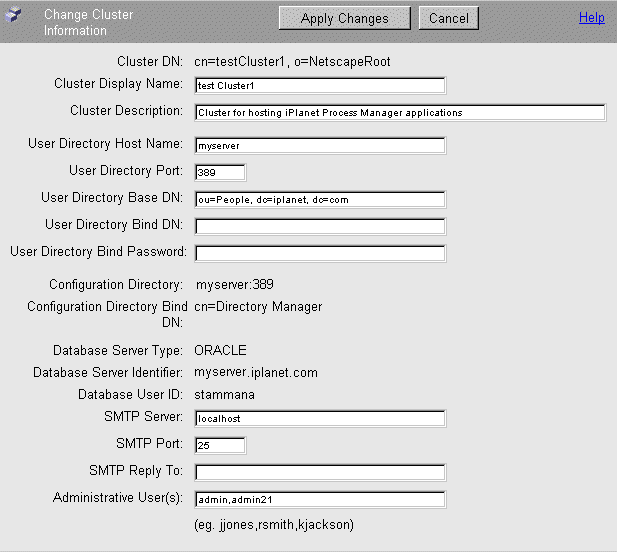
Change Cluster Information Fields
The administrator can modify the following information about an existing cluster.
Note You cannot use double quotation marks (") in any of the Change Cluster Information entries.
Cluster Name The user-defined display name for the cluster.
Cluster Description Text describing the cluster.
User Directory Host Name The server name for the corporate user directory.
User Directory Port The port number for the corporate user directory.
User Directory Base DN The directory suffix (or "base DN") for the corporate user directory. For details on which LDAP attributes to enter here, see "Directory Server Terms and Attributes".
User Directory Bind DN (Optional) The user ID for a user of this directory server. Leave this blank if Process Manager will be accessing the corporate directory as an anonymous user.
User Directory Bind Password (Optional) The password for this directory user. Leave this blank if Process Manager will be accessing the corporate directory as an anonymous user.
SMTP Server Host The mail server associated with the cluster.
SMTP Server Port The mail server port.
SMTP Reply To The reply-to address that appears on notifications sent to users by Process Manager applications.
This address could be set to the Process Manager administrator's email address, so that the administrator would be the one handling any notification replies users send.
Event User (Single cluster implementation only) The timer event user.
Event User Password (Single cluster implementation only) The password for the timer event user.
Administrative User(s) (Multiple cluster implementation only) A comma-separated list of LDAP user IDs of people who have administrative permission to access Process Administrator and Process Business Manager interfaces on this cluster, and to deploy applications to this cluster. You must provide at least one LDAP user ID in this field.
Accessing Directory Server Information
You can access Directory Server information by selecting one of the LDAP directory links on the Cluster Management page.
Viewing the Process Administrator Logs
You can view the Process Administrator logs by selecting the View Logs button.
Figure 4-13 A sample Process Administrator log

If Process Administrator is not available, you can access the Process Administrator logs (error.html, info.html, and security.html) at the following location:
serverRoot/bpm/<ClusterName>/admin/logs
<ClusterName> is the name of the cluster. In a single cluster implementation, the default name of the cluster is "PMCluster".
Unjoining From a Cluster
You can unjoin an application server from a cluster. This revises the entries in the configuration directory and removes the applications that are stored on that server machine.
To unjoin an application server from a cluster
- Enter the correct Process Administrator client URL in the location bar of your browser.
Single cluster implementation:
http://server_name/Administrator.apm/
Multiple cluster implementation:
http://server_name/ClusterAdmin.apm/
A login screen appears.
- Log in to the Process Administrator client.
- Select the Cluster Management tab.
- Select the Unjoin from Cluster link located at the bottom of the page.
After you unjoin the server from its cluster, the next time you access Process Administrator, you will be prompted to create or join a cluster.
When you unjoin a server from a cluster, Process Administrator performs the following operations:
- removes that server's entry from the configuration directory
- deletes the PMExtensionManager.properties file from the server's file system
Deleting a Cluster
You can delete a cluster that you no longer need. When you delete a cluster, Process Administrator deletes the cluster entry in the configuration directory and deletes the local application server copy of the PMExtensionManager.properties file. You can also choose to delete the database tables.
To delete a cluster
- Enter the correct Process Administrator client URL in the location bar of your browser.
Single cluster implementation:
http://server_name/Administrator.apm/
Multiple cluster implementation:
http://server_name/ClusterAdmin.apm/
A login screen appears.
- Log in to the Process Administrator client.
- Select the Cluster Management tab.
- Select the Delete Cluster button at the bottom of the page.
This displays the Delete Cluster page.
Note You can choose to delete the application data for all cluster applications, which also deletes the application-specific database tables. This is not recoverable.
If you are not sure whether you want to do this, even for an old unused cluster, first archive the application data. For details, see the section "Exporting and Deleting Data".
Figure 4-14 The Delete a Cluster Page
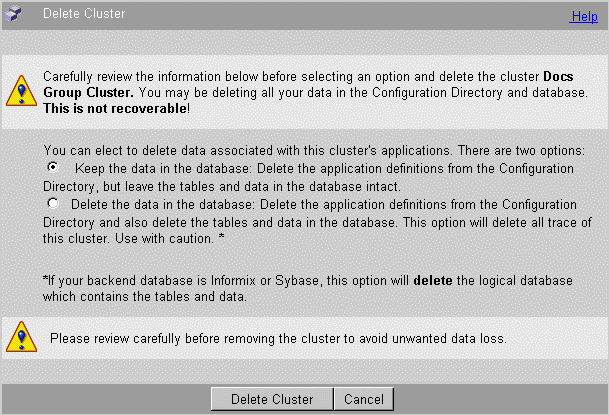
- Select the Keep the data in the database radio button if you want to keep the application data.
or
Select the Delete the data in the database radio button if you want to delete the application data.
- Select Delete Cluster to delete the cluster (and your user data if you chose that option).
If you try to delete a cluster that still has other active servers running, Process Administrator first removes the other servers, then it removes your local server and deletes the cluster.
Note that this also removes the PMExtensionManager.properties file from your local server, so the next time you try to access Process Administrator, you are "initializing" it again and you will have to create a new cluster.
Contents