|
|
| Sun ONE Integration Server B2B, TradingXpert 3.6.2 Installation Guide |
Chapter 4 Testing Your TradingXpert Installation
This chapter explains how to test your TradingXpert installation using an example document exchange scenario. In this test scenario, a browser-based ECXpert trading partner (webuser1) receives a purchase order from an EDI-based trading partner (TXhost), and turns that purchase order around to submit an invoice, as well as a file attachment, back to TXhost.
To carry out the test scenario, you must first set up the required ECXpert service lists and partnerships between webuser1 and TXhost. Once this is done, you can run through the test scenario: TXhost submits a purchase order (EDI doc type = 850) to ECXpert, and webuser1 uses TradingXpert to retrieve that document and send back an invoice (EDI doc type = 810), as well as an attachment, to TXhost.
This chapter covers two topics:
Setting Up ECXpert for the Test Scenario
In order to conduct the test scenario, ECXpert must first be set up with the memberships, partnerships, and service lists required to perform the example document exchange. You can do the set up in either of two ways:
- using the ECXpert user interface to manually perform the setup—this helps you understand how to set up ECXpert for browser-based trading partners
- importing setup data provided in the TradingXpert software distribution—this might save you time.
The sections that follow describe these two approaches.
Either way, the test scenario assumes that TXhost receives documents over FTP protocols, and you are therefore required to provide the TCP configuration information indicated in the following worksheet:
TCP Configuration Worksheet
FTP Configuration Parameter
Default string in setup data
Your Value
Host_name:port
ftphost
User name
ftpusername
Password
ftpuserpwd
Outbound directory
outputdir
Note Be sure to copy the required map files to BDGHOME/maps. See "Copying TradingXpert Map Files to ECXpert" for the Solaris platform and "Copying TradingXpert Map Files to ECXpert" for the Windows platform.
Setting up ECXpert Manually
To set up the necessary memberships, service lists, and partnerships for the test scenario manually, rather than import them (see "Importing/Deleting Setup Data"), you perform the following steps:
To set up ECXpert manually
- Set up memberships for TXhost and webuser1.
- TXhost with EDI trading address of ZZ:TXhost.
- webuser1 with EDI trading address of ZZ:webuser1.
- Set up a service list and partnership for the following exchanges:
Exchange A: TXhost sends purchase order to webuser1
Exchange B: webuser1 sends an invoice back to TXhost
Exchange C: webuser1 sends a file attachment back to TXhost
The procedures for Step 2 are covered in detail in the following sections.
Exchange A: TXhost Sends Purchase Orders to webuser1
This section explains how to set up the service list and partnership needed for TXhost to send purchase orders to webuser1.
Service List Setup A
This service list does not include the Gateway service: after a purchase order (ANSI X.12 850) is parsed and translated to TradingXpert format, it is stored by ECXpert until being retrieved by TradingXpert. If Gateway is in this service list, ECXpert attempts to send purchase orders directly to the trading partner.
Figure 4-1 and the accompanying Table 4-1 show how to set up a service list for this exchange.
Figure 4-1 Service List Screen for TXhost Sending Purchase Order to webuser1

Partnership Setup A
The partnership setup includes a number of screens corresponding to the different tabs required to configure the partnership.
Partnership Info Figure 4-2 and the accompanying Table 4-2 show how to set up the Partnership Info tab for this exchange.Figure 4-2 Partnership Info for TXhost Sending Purchase Order to webuser1

Figure 4-3 Input EDI for TXhost Sending Purchase Order to webuser1

Figure 4-4 Protocols for TXhost Sending Purchase Order to webuser1
Exchange B: webuser1 Sends Invoices to TXhost
This section explains how to set up the service list and partnership needed for webuser1 to send invoices to TXhost.
Service List Setup B
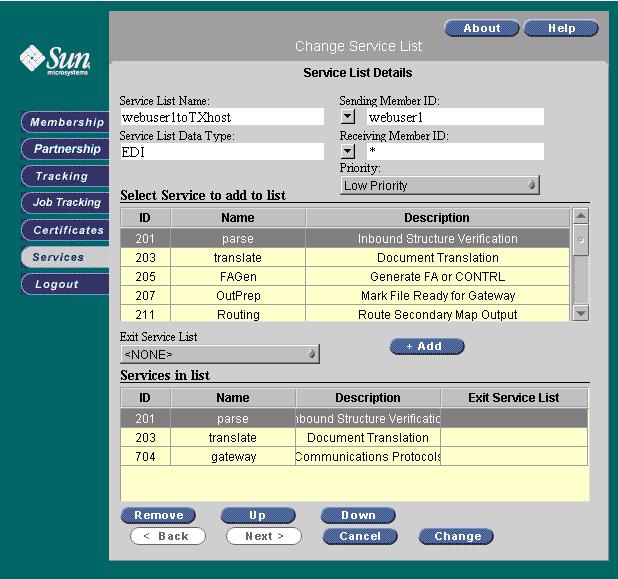
Figure 4-5 and the accompanying Table 4-5 show how to set up a service list for this exchange.
Figure 4-5 Service List for webuser1 Sending Invoices to TXhost
Partnership Setup B
The partnership setup includes a number of screens corresponding to the different tabs required to configure the partnership.
Partnership Info Figure 4-6 and the accompanying Table 4-6 show how to set up the Partnership Info tab for this exchange.Figure 4-6 Partnership Info for webuser1 Sending Invoices to TXhost
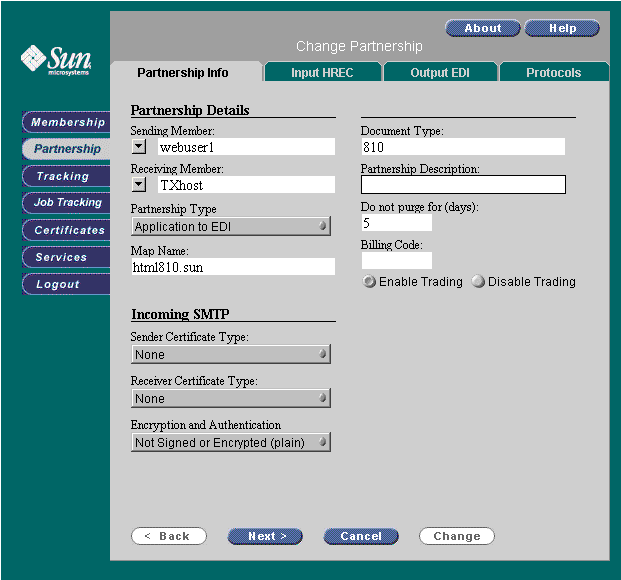
Figure 4-7 Input HREC for webuser1 Sending Invoices to TXhost
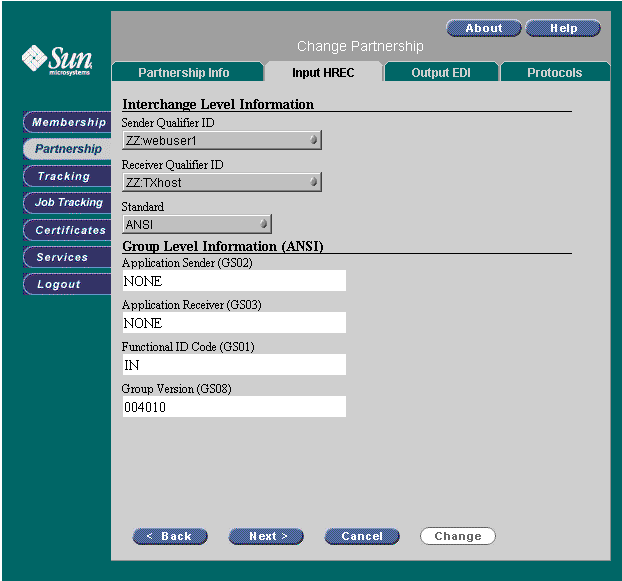
Figure 4-8 Output EDI for webuser1 Sending Invoices to TXhost

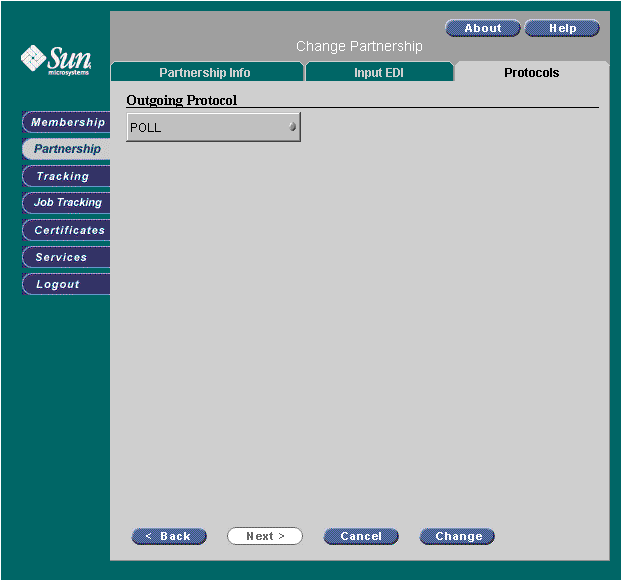
Figure 4-9 Protocols for webuser1 Sending Invoices to TXhost

Note You should also go to the ECXpert Server Administration interface to check that the ECXpert FTP server is on. For instructions, see your ECXpert Administrator's Guide, Chapter 3.
Exchange C: webuser1 Sends File Attachment to TXhost
This section explains how to set up the service list and partnership needed for webuser1 to send file attachments to TXhost.
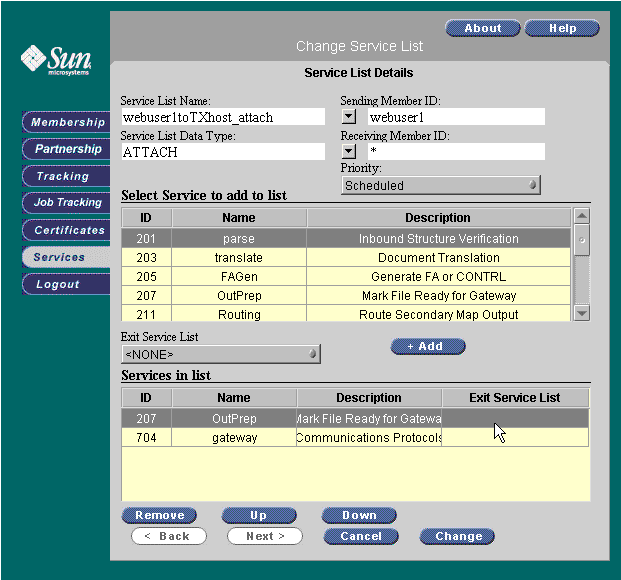
Service List Setup C
Figure 4-10 and the accompanying Table 4-10 show how to set up a service list for this exchange.
Figure 4-10 Service List for webuser1 Sending Attachments to TXhost
Partnership Setup C
The partnership setup includes a number of screens corresponding to the different tabs required to configure the partnership.
Partnership Info Figure 4-11 and the accompanying Table 4-11 show how to set up the Partnership Info tab for this exchange.Figure 4-11 Partnership Info for webuser1 Sending Attachments to TXhost
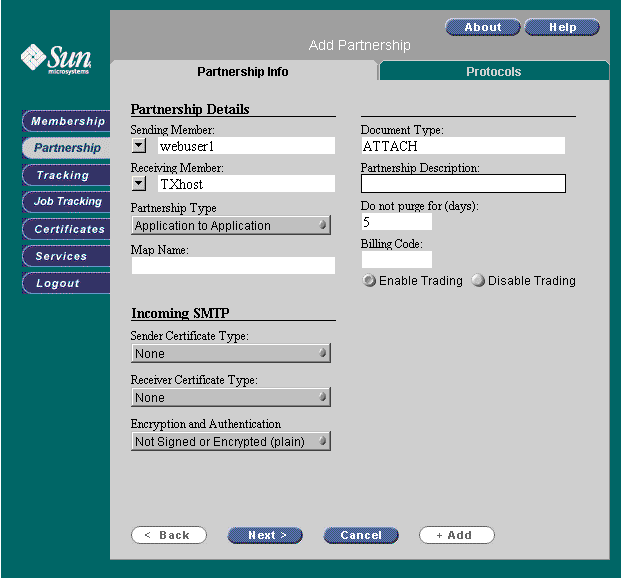
Figure 4-12 Protocols for webuser1 Sending Attachments to TXhost
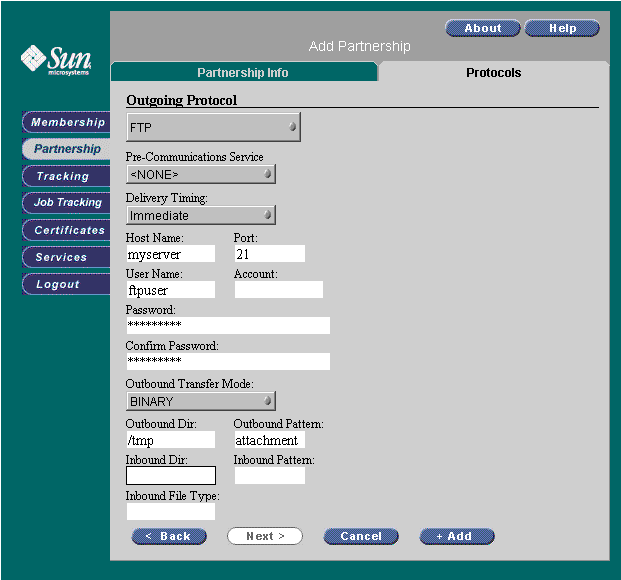
Note You should also go to the ECXpert Server Administration interface to check that the ECXpert FTP server is on. For instructions, see your ECXpert Administrator's Guide, Chapter 3.
Importing/Deleting Setup Data
Rather than manually setting up ECXpert to support the TradingXpert test scenario, as detailed in "Setting up ECXpert Manually", you can import the memberships, service lists, and partnerships for the test scenario using the import files provided on your installation disk.
Note The import files provided on your installation disk are intended only to provide example data. The import files should not be modified except as instructed in the following procedure. Also, because of an error in the import file, you must correct the imported data, as described in the note appended to Step 7.
Importing Setup Data
You import data in the tx-mem.imp file into the ECXpert Oracle database using the ECXpert import utility.
To import Test Scenario Setup Data
- Log in to the TradingXpert machine as the same user under which you installed TradingXpert.
- Change to the maps_etc/import directory in the TradingXpert installed directory structure (see "Installed Directory Structure").
cd TX_HOME/maps_etc/import
- Make backup copies of the tx-mem.imp and del-tx-mem.imp files.
- Edit the tx-mem.imp and del-tx-mem.imp files.
Using a text editor, do a global search and replace of the strings "ftphost," "ftpusername," "ftpuserpwd," and "outputdir" with the appropriate values from the table "TCP Configuration Worksheet".
- Make sure BDGHOME is set to the location of the ECXpert installation (see Table 3) so that the application server will use the same ecx.ini file that ECXpert uses.
On Solaris:
setenv BDGHOME /disk1/Root_ECX_Install/NS-apps/ECXpert
where Root_ECX_Install is the root installation directory of ECXpert software.
On Windows:
In the Control Panel of the machine on which ECXpert is installed, double-click the System icon, then click the Environment tab. Make sure the BDGHOME variable has the value:
Root_ECX_Install\NS-apps\ECXpert
where Root_ECX_Install is the root installation directory of ECXpert software.
- Make sure the application server can reference the BGDHOME/lib directory.
On Solaris:
If it is not, use the following syntax to modify the LD_LIBRARY_PATH environment variable in the administrator user's .profile or .login file.
For the C shell:
setenv LD_LIBRARY_PATH BGDHOME/lib:$LD_LIBRARY_PATH
For the Bourne shell:
LD_LIBRARY_PATH=BGDHOME/lib:$LD_LIBRARY_PATH
export LD_LIBRARY_PATH
On Windows:
In the Control Panel of the machine on which ECXpert is installed, double-click the System icon, then click the Environment tab. Make sure the PATH environment variable includes the value:
BGDHOME/lib
- Populate the database.
Use the ECXpert import utility, which is located at BDGHOME/bin/import. Type the following command in the Command Prompt window:
BDGHOME/bin/import ECX ECX
TX_HOME/maps_etc/import/tx-mem.imp /tmp/good /tmp/badwhere
- ECX is both the username and the password of the ECXpert administrator
- TX_HOME/maps_etc/import/tx-mem.imp is the location of the import file that will populate TradingXpert members, partnership, and service lists
- /tmp/good is the log file that records successful data imports
- /tmp/bad is the log file that records rejected data.
Deleting Setup Data
To clean up the database and erase all the TradingXpert members, partnerships, and service lists that you just created, follow these steps:
To delete Test Scenario Setup Data
- Log in to the TradingXpert machine as the same user under which you installed TradingXpert.
- Erase the TradingXpert Commerce Integration Suite test data in the database.
Use the ECXpert import utility, which is located at BDGHOME/bin/import. Type the following command in the Command Prompt window:
BDGHOME/bin/import ECX ECX
TX_HOME/maps_etc/import/del-tx-mem.imp /tmp/good /tmp/badwhere
- ECX is both the username and the password of the ECXpert administrator
- TX_HOME/maps_etc/import/del-tx-mem.imp is the location of the import file that will delete the TradingXpert setup data.
- /tmp/good is the log file that records successful data deletions
- /tmp/bad is the log file that records rejected data deletions.
Testing TradingXpert with the Test Scenario
This section describes the procedure for conducting the TradingXpert test scenario: TXhost submits a purchase order (EDI doc type = 850) to ECXpert, and webuser1 uses TradingXpert to retrieve that document and send back an invoice (EDI doc type = 810), as well as an attachment.
To conduct the TradingXpert test scenario
- Open the ECXpert administration interface by entering the following URL in your browser:
http://ECXhostname:port/
where ECXhostname is the name of the host machine where ECXpert is installed, and port is the port number ECXpert is using.
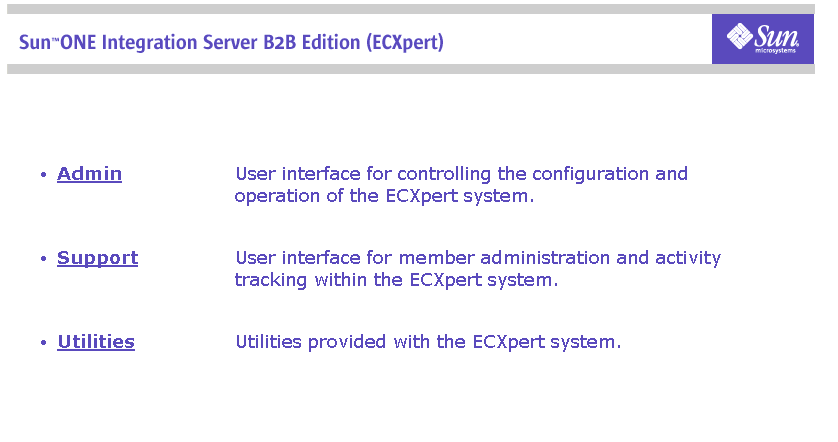
The ECXpert Home Page (Figure 4-13) appears.
Figure 4-13 ECXpert Home Page
- Click the Utilities button.
The ECXpert Utilities Menu (Figure 4-14) appears.
Figure 4-14 ECXpert Utilities Menu

- Click the Document Submission Form link.
The Document Submission Form (Figure 4-15) appears.
Figure 4-15 Document Submission Form

- Enter parameters for the submit command.
Refer to Table 4-13 for detailed information about the parameters.
- Click the Submit button.
A message appears providing feedback on the command. If any errors are encountered they are displayed first.
- Optionally, view the tracking information for your submission.
- Log in to the ECXpert Product Administrative Interface.
- Click the Tracking button on the left.
The Enter Search Constraints tab appears.
- Set Search Level to Document.
- Enter today's date.
- Click the Search button.
- Open the TradingXpert user interface by entering the following URL in your browser:
http://TradingXpert_hostname:port/TX
where hostname is the name of the host machine where TradingXpert is installed, and port is the port number TradingXpert is using.
The TradingXpert Login Screen (Figure 4-16) appears.
Figure 4-16 TradingXpert Login Screen

- Log in to TradingXpert as webuser1.
Use the User ID webuser1 and the Password webuser1 and click Login.
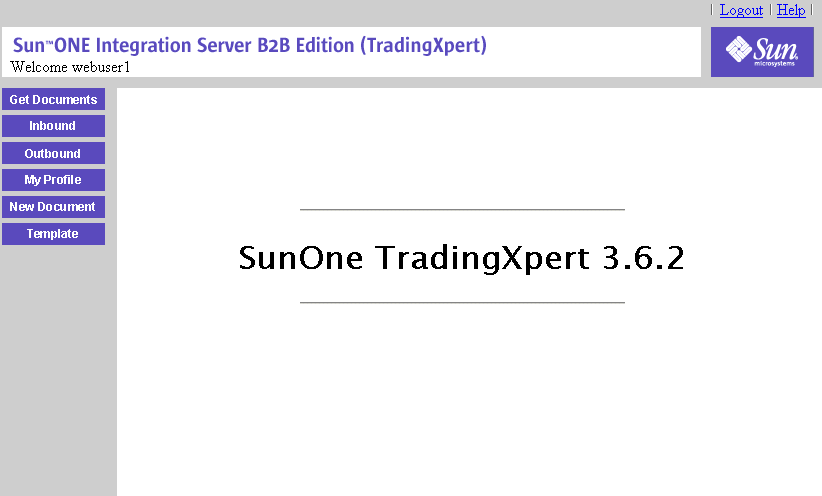
The Trade Center Screen (Figure 4-17) appears.
Figure 4-17 Trade Center Screen
- View the incoming purchase order.
- Click the Inbound icon to view incoming documents.
The Inbound Documents Screen (Figure 4-18) appears.
Figure 4-18 Inbound Documents Screen
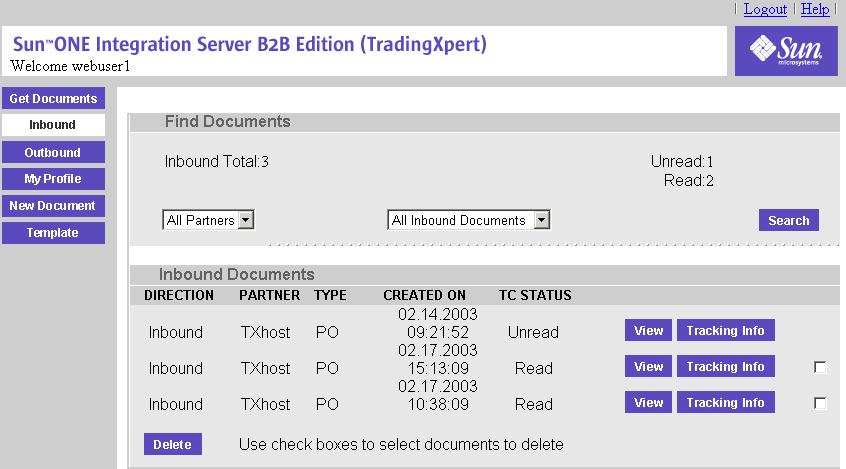
- Search for all incoming documents from TXhost.
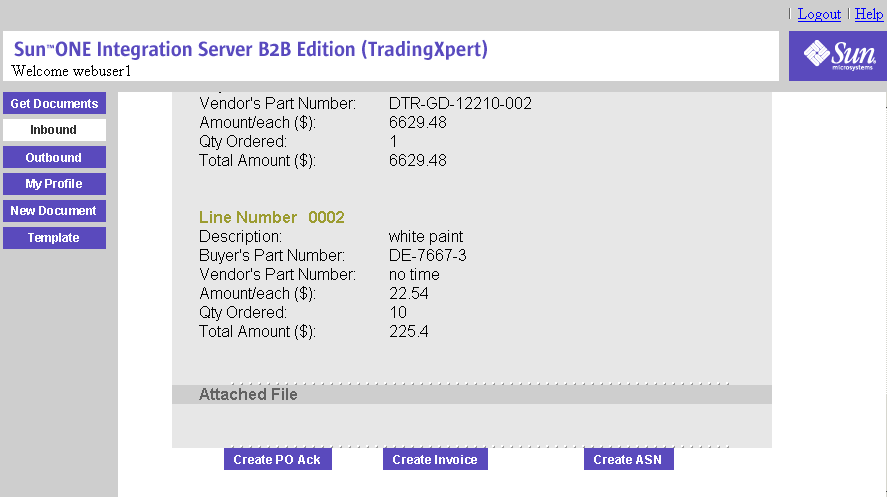
- Find the purchase order just sent from TXhost and click View.
The Purchase Order Document (Figure 4-19) is displayed.
Figure 4-19 Purchase Order Document
- Create an invoice from the purchase order.
At the bottom of the purchase order, click the Create Invoice button.
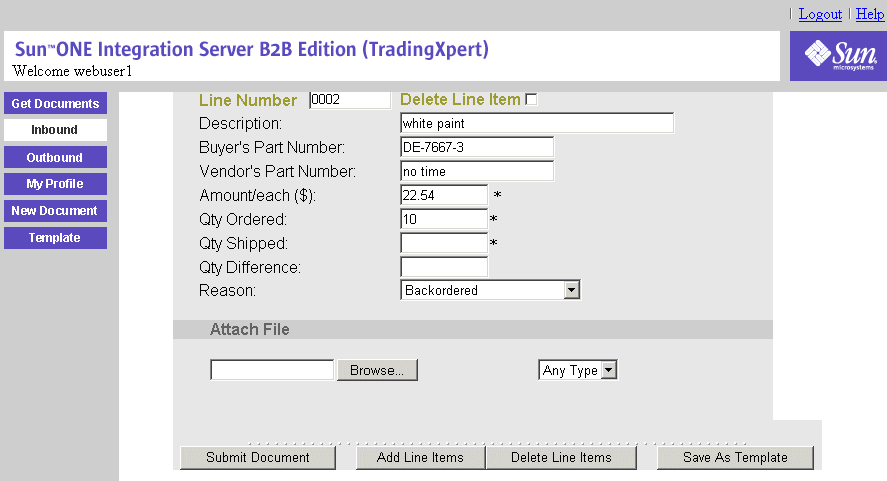
An invoice form (Figure 4-20) will appear; the data fields will be pre-filled with data from the purchase order.
Figure 4-20 Attachment Options at Bottom of an Invoice
- Attach a file to the invoice.
At the bottom of the invoice screen is an Attach File section. Attach any file on your hard drive by first either entering the full path of the file or clicking Browse to select a file, and then selecting Any Type from the drop-down menu.
- Submit the invoice with attachment to TXhost by clicking the Submit Document button.
A screen will appear confirming that the document was submitted successfully.
- Verify receipt of the invoice and attachment in ECXpert.
- Return to the ECXpert administration interface:
http://ECXhostname:port
where ECXhostname is the name of the host machine where ECXpert is installed, and port is the port number ECXpert is using.
- On the ECXpert home page (Figure 4-13), click Support.
- Enter the ECXpert administrator user name and password and click Enter.
- Click the Tracking button, then enter search constraints to find the 810 invoice document sent by webuser1 to TXhost.
- View tracking information for the inbound document and attached file.