|
|
| Sun ONE Integration Server B2B, ECXpert 3.6.2 Installation Guide |
This appendix describes the procedures required to install Oracle on Solaris™ and Windows. Read the section that describes the installation process for your platform.
Oracle Installation for Solaris
This section describes how you install Oracle 8.1.7 on Solaris. This process includes the following tasks:
- "Configure Shared Memory and Semaphores"
- "Create the Oracle User"
- "Set Environment Variables"
- "Install Oracle 8.1.7"
- "Run the root.sh Script"
ECXpert Version 3.6.2 is certified to run with Oracle 8.1.7 Enterprise Server edition (also known as Oracle 8i). If you have an earlier installed version of Oracle, refer to the Oracle 8.1.7 Installation documentation or contact Oracle for instructions on upgrading to version 8.1.7. Once you have upgraded to 8.1.7, continue with the section "Create the Oracle User".
Configure Shared Memory and Semaphores
Before you install Oracle 8.1.7, you must edit the /etc/system file to properly configure shared memory and semaphores.
The values for shared memory and semaphores given below are the recommended minimum values from Oracle. They are intentionally low. If you set your shared memory parameters too high for your system, you might not be able to reboot your machine. Refer to your operating system documentation for parameter limits.
To configure shared memory and semaphores
- Log in as, or become, the root user:
# su - root
- Change to the /etc directory
# cd /etc
- Create a backup copy of your system file:
# cp system system.backup
- Carefully edit the system file to append the following lines to the end of your file. Insert these lines immediately following the comments regarding "set."
set shmsys: shminfo_shmmax = 134217728
set shmsys: shminfo_shmmin = 1
set shmsys: shminfo_shmmni = 100
set shmsys: shminfo_shmseg = 50
set semsys: seminfo_semmns = 1750
set semsys: seminfo_semmni = 70
set semsys: seminfo_semmsl = 200
set semsys: seminfo_semmap = 100
set semsys: seminfo_semmnu = 300
set semsys: seminfo_semume = 100
set semsys: seminfo_semopm = 100
- Reboot your machine.
For the changes to take effect, you must reboot your machine using the following two commands:
# sync
# init 6
Create the Oracle User
The next step is to create an Oracle user on Solaris. If you want to set up Oracle in a remote client configuration you must create an oracle user ID on each machine.
To create an Oracle user
- Log on as or become the root user:
# su - root
- Create the dba group if the machine you are using does not already have one.
# groupadd dba
- Create a home directory for the Oracle user using a command like the following:
# mkdir /disk1/oracle
where /disk1/oracle is the oracle user's UNIX home directory.
- Add the oracle user. For example:
# useradd -g dba -d /disk1/oracle -s /bin/csh oracle
- Transfer ownership of the oracle user's home directory. For example:
# chown oracle /disk1/oracle
- Change the group association of the oracle user's home directory:
# chgrp dba /disk1/oracle
- Set the oracle user's password; typically this is set to oracle. In the example below, password is the new password for the oracle user.
# passwd oracle
New password: password
Re-enter new password: password
Set Environment Variables
You must set the variables described in this section to set up the environment for installation. These variables are defined in the Oracle user's .profile or .login file.
To set environment variables
- Log on as or become user Oracle:
# su - oracle
- Set up the environment for the installation.
Use the following syntax to set the environment variables:
For the C shell:
setenv variable_name value
For the Bourne shell:
set variable_name value
export variable_name
Use the information in Table C-1 to determine how to set up each environment variable.
Table C-1 Environment Variables
Environment Variable
Configuration Details
DISPLAY
Set to the name and monitor of the machine from which you are installing the Oracle software.
Example: myhost:0.0
LD_LIBRARY_PATH
Set to include $ORACLE_HOME/lib and the directory containing your Motif libraries.
Important: When you set up your environment prior to installing or upgrading, make sure that the $ORACLE_HOME/lib directory appears as the first value in the $LD_LIBRARY_PATH environment variable. If you do not do this, you will get errors when you later use SQL*Plus.
Note: The default location for Motif libraries on Solaris 2.x is /usr/openwin/lib or /usr/dt/lib.
ORACLE_BASE
Set to the directory at the top of the Oracle software.
Example: /export2/oracle8i/app/oracle
ORACLE_HOME
Set to the directory containing the Oracle software for a given Oracle Server release. The OFA-recommended value is:
$ORACLE_BASE/product/release
Example:
/export2/oracle8i/app/oracle/product/8iImportant: Write this value in Table 2-8.
ORACLE_SID
Set to the Oracle SID, which is the name of the Oracle Server instance.
Note: If you are installing Oracle as a remote client, set this value to the database on the server machine.
Example: myHost
Important: Write this value in item 10 of the Configuration Worksheet on Table 2-8.
ORACLE_TERM
Set to the terminal definition resource file to be used with the Installer. Refer to your Oracle documentation for a complete list of terminal definition resource files.
Example: xterm
NLS_LANG
Set to the correct NLS_LANG character set. The character set name is case sensitive. See "Set Up Support for Foreign Character Sets" if you need to support foreign character sets on Solaris.
The character set is named according to the following convention:
<language>_<territory>.<number>
To determine the Oracle database character set, you need to be able to see the table V$NLS_PARAMETERS. Typically, only the users system or manager can see this table.
Use the following SQL statement to check the character set language:
select * from V$NLS_PARAMETERS where parameter = `NLS_LANGUAGE'
Use the following SQL statement to check the character set territory:
select * from V$NLS_PARAMETERS where parameter = `NLS_TERRITORY'
Use the following SQL statement to check the character set number:
select * from V$NLS_PARAMETERS where parameter = `NLS_CHARACTERSET'
Example: american_america.US7ASCII.
Important: Enter this value in Table 2-8.
oratab
Create an oratab file as follows:
Example:
#cd /var
where $ORACLE_HOME is the $ORACLE_HOME of the new Oracle 8i, release 8.1.6 or 8.1.7 installation.
Note: This environment variable must be properly set if you plan to use a non-US7ASCII character set.
PATH
Set to include:
Example: /export2/oracle8i/app/oracle/product/8.1.6/ bin:/bin:/usr/bin:/usr/ccs/bin:$PATH
TNS_ADMIN
Set this as follows:
TNS_ADMIN = $ORACLE_HOME/network/admin
TERM
Set this to the same value as the ORACLE_TERM environment variable.
Example: xterm
USER
Set this to the oracle user.
Example: oracle
Install Oracle 8.1.7
- Log on as or become the oracle user. You must be logged in as user oracle; do not run the Installer as root user.
# su - oracle
- Run the Oracle Universal Installer.
Insert your Oracle8i, release 8.1.7 CD-Rom in the CD drive
Change to the CD installation directory:
# cd /cdrom/oracle8i/
To start the installer, enter the following command:
# ./setup
The Oracle Universal Installer will lead you through the Oracle installation process. The typical installation type option will suffice for most installations. When asked about installing the Multi-threaded Server option (MTS), accept installation using that option. Other custom installation options should be handled by an experienced Oracle database administrator.
During installation, you will be prompted for some of the environment variables set according to the guidelines presented in Table C-1. You will also be instructed to open another terminal window and log in as root to run the root.sh script.
Run the root.sh Script
- Log on as or become the root user.
# su root
- Change to the ORACLE_HOME/orainst directory:
# cd $ORACLE_HOME/orainst
- Run the root.sh script:
# ./root.sh
If you run root.sh from a directory other than ORACLE_HOME, you get the following message:
ORACLE_HOME does not match the home directory for oracle.
Okay to continue? [N]:If you indicate Yes, the root.sh script continues, using the ORACLE_HOME environment variable you specified.
Depending on the products you installed, you may be prompted for user names and may be given further instructions. Refer to your Oracle documentation for more information on these messages.
Note The message
Please raise the ORACLE owner's ulimit per the IUG.
is purely informational and does not require action.
- Return to "Oracle on Solaris" to complete database configuration and testing before installing ECXpert.
Oracle Installation for Windows
This section describes how you install Oracle 8.1.7 on Windows. This process includes the following tasks:
On the Windows platform, environment variables that relate to Oracle are automatically set during installation.
ECXpert Version 3.6.2 is certified to run with Oracle 8.1.7 Enterprise Server edition (also known as Oracle 8i). If you have an earlier installed version of Oracle, refer to the Oracle 8.1.7 Installation documentation or contact Oracle for instructions on upgrading to version 8.1.7. Once you have upgraded to 8.1.7, continue with the section "Create the Oracle User".
Create the Oracle User
- From the Windows task bar, select Start > Programs > Oracle > Extended Administration > Enterprise Security Manager.
- Fill in the Login Information dialog box with the following values:
Table C-2 Login Information Values for the Oracle User Account
Field
Value
Username
system
Password
manager
Service
(leave blank)
Connect As
Normal
- Click OK. The Oracle Security Manager window appears.
- In the Oracle Security Manager, select User > Create to display the Create User dialog box.
- Fill in the Create User dialog box with the following values:
Table C-3 Values for the Create User Dialog Box
Field
Value
Name
ORACLE (all capitals)
Profile
DEFAULT
Enter Password
ORACLE (all capitals)
Confirm Password
ORACLE (all capitals)
Note The default tablespace is USER_DATA, and the default temporary tablespace is TEMPORARY_DATA. You can use different tablespaces if you want to.
- Click the Roles/Privileges tab. From the Privilege Type dropdown list, select Roles.
- From the Available list box, select Connect and Resource.
- Click the down arrow icon to move Connect and Resource to the Granted list.
- Click Create to create the user ORACLE.
- In the Oracle Security Manager window, select File > Exit to quit.
Note If you want to set up Oracle in a remote client configuration you must create an oracle user ID on each machine.
Install Oracle 8.1.7
The Oracle Universal Installer will lead you through the Oracle installation process. The typical installation option will suffice for most installations. When asked about installing the Multi-threaded Server option (MTS), accept that option. Other custom installation options should be handled by an experienced Oracle DBA. The typical installation option requires approximately 1.3Gb of disk space.
Depending on which installation options you choose, the Oracle installation can take a considerable amount of time to complete.
- Insert your Oracle8i, release 8.1.7 CD-ROM in the CD drive.
- Change to the CD installation directory:
# cd C:\> \cdrom\oracle8i\
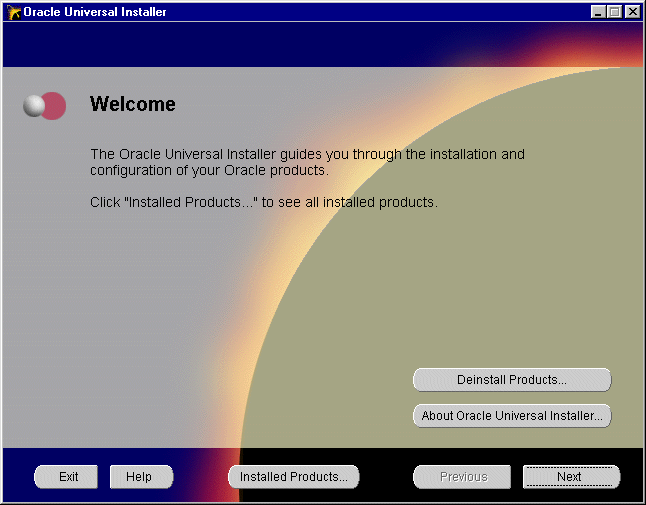
- To start the installer, double click the file setup.exe. You will see the Oracle splash screen, illustrated in Figure C-1.
Figure C-1 Oracle Installation Splash Screen
- Click Next. You will see the File Locations screen, as shown in Figure C-2.
Figure C-2 File Locations Screen
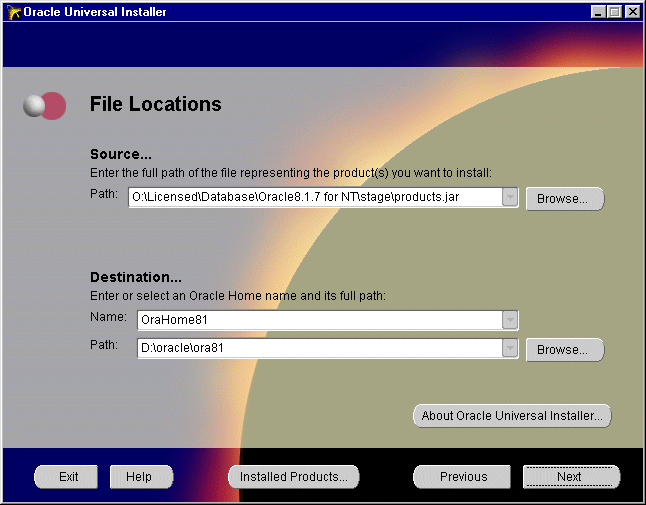
- In the Destination Name field, enter the name that will be used to represent the full path to your Oracle installation. This name is used as the ORACLE_HOME environment variable.
- In the Destination Path field, enter the full path on which you want the Oracle distribution to be located.
- Click Next. You will see the Available Products screen, illustrated in Figure C-3.
Figure C-3 Available Products Screen
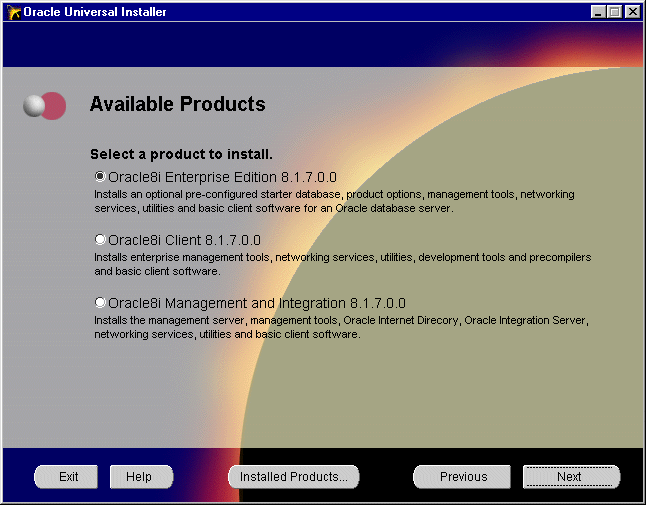
- Click the radio buttons for the product(s) you want to install.
- Click Next. You will see the Installation Types screen, illustrated in Figure C-4.
Figure C-4 Installation Types Screen

- Unless your site has special requirements you should select the Typical installation.
Click the radio button for Typical.
- Click Next. You will see the Database Identification screen, illustrated in Figure C-5.
Figure C-5 Database Identification Screen
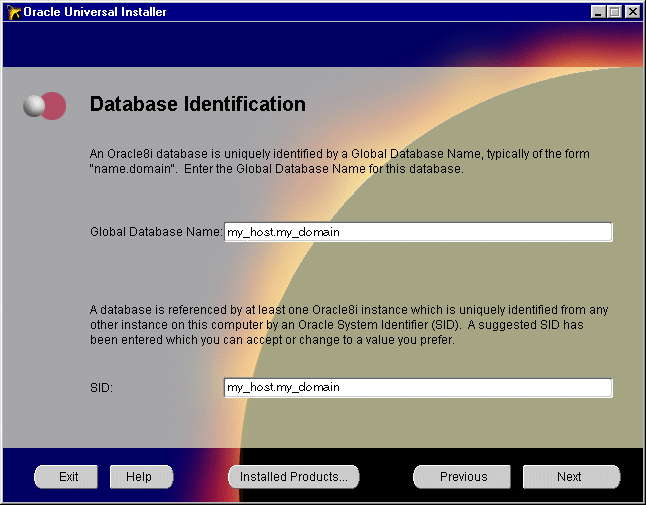
- In the Global Database Name field, enter the name you want to use to identify this Oracle database.
- The SID field is automatically populated with whatever you entered in the Global Database Name field. However, if you want to use a different Oracle system identifier, enter the name you want to use.
- Click Next. You will see the Installer Summary screen, as illustrated in Figure C-6.
Figure C-6 Installer Summary Screen

- Review the installation summary to make sure all the settings are correct.
If you find something you need to change, click the Previous button as many times as you need to in order to get to the screen where you can fix the incorrect entry. Then click Next until you come back to the installation summary screen.
- When you are satisfied that all the settings are correct, click Install. This launches the actual installation process. The Install screen is displayed, as illustrated in Figure C-7.
Figure C-7 Install Screen

- The installation process takes considerable time to complete. If no errors occur, the installation process completes and displays the Configuration Tools screen, illustrated in Figure C-8.
Figure C-8 Configuration Tools Screen
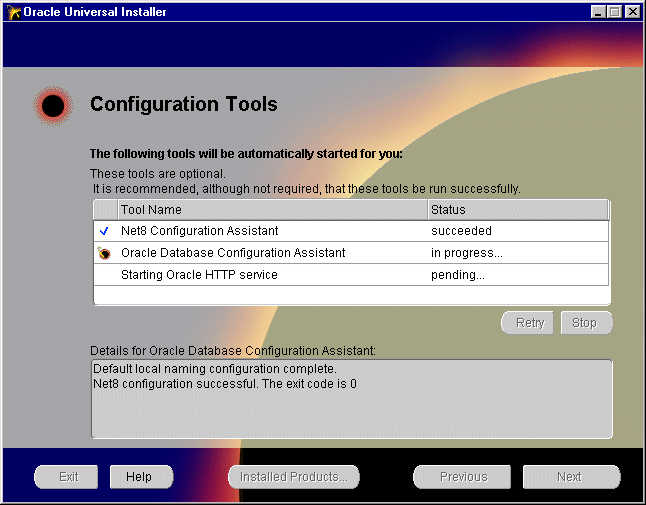
- If you do not want any of displayed tools to be started at the present time, click that tool and click Stop.
If a tool that you would like to be automatically started has encountered some sort of problem launching, click that tool and click Retry.
- Click Next. The End of Installation screen is displayed, as illustrated in Figure C-9.
Figure C-9 End of Installation Screen
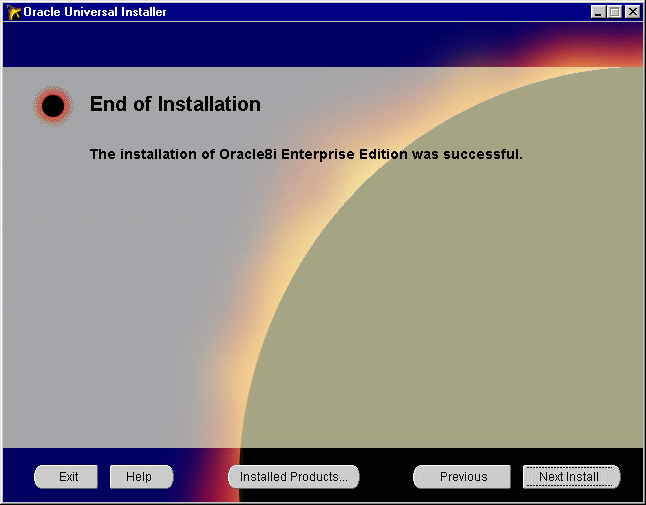
- If you want to install other Oracle products click Next Install.
If you want to view a list of currently installed products click Installed Products.
If you want to exit the installation program click Exit.
- When you click Exit the Oracle Database Configuration Assistant Alert screen is displayed, as illustrated in Figure C-10.
Figure C-10 Oracle Database Configuration Assistant Alert Screen
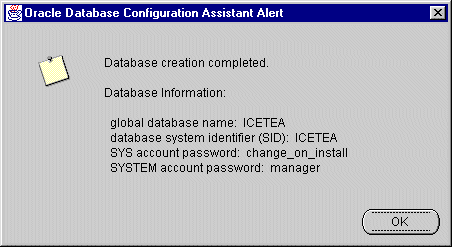
- Click OK.
- Return to "Oracle on Solaris" to complete database configuration and testing before installing ECXpert.