|
|
| Sun ONE Application Server 7, Standard Edition Sun[tm] ONE Studio 4, Enterprise Edition for Java[tm] with Application Server 7 Tutorial |
Developing Session Beans and Web Applications
In this exercise you will create a simple stateless session bean and a web front end using the IDE. After testing the session bean, you will compose a J2EE[tm] application, verify that the application works properly, modify several components in the application and then step through various parts of the application using the IDE's debugging facilities.
- Becoming Familiar with the Sample
- Creating a Session Bean with the EJB[tm] Builder
- Testing the Session Bean
- Packaging the Enterprise Bean in an EJB[tm] Module
- Creating the Web Application
- Assembling the J2EE[tm] Application
- Setting Up Database Connectivity
- Deploying and Running the J2EE[tm] Application
- Modifying the Application
- Debugging the Application
Proceed to Becoming Familiar with the Sample for a brief introduction to the sample application prior to deploying and exercising it.
Becoming Familiar with the Sample
If you are already familiar with the JDBC[tm] Simple sample application (it is the sample used in Getting Started with Sun ONE Application Server 7), proceed to the next section, Creating a Session Bean with the EJB[tm] Builder.
The sample application that you will be using during this exercise consists of a web application module and an EJB module containing a single stateless session bean. The web and EJB modules are packaged in an Enterprise Application Archive (EAR) file. Although patterned after basic "Hello World" applications, this sample displays a greeting based on the user's input and the time of day. Since each greeting is recorded to a database table, the user also has the option to list all previously generated greetings.
The display greeting path through the application is represented by the yellow numbered steps in the following diagram while the greeting log display path through the application is represented by the lettered blue steps in the diagram.
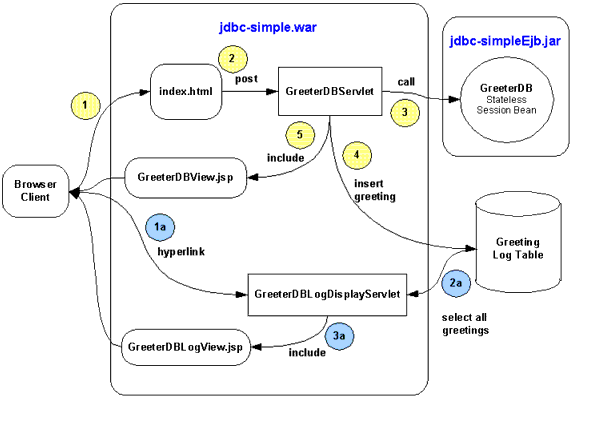
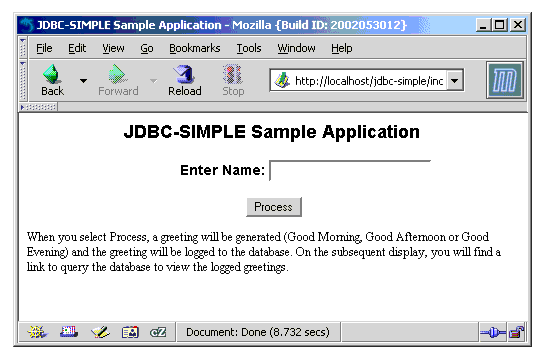
When the user accesses the application, the first page of the application prompts the user to enter a name that will be displayed in a subsequent greeting page.
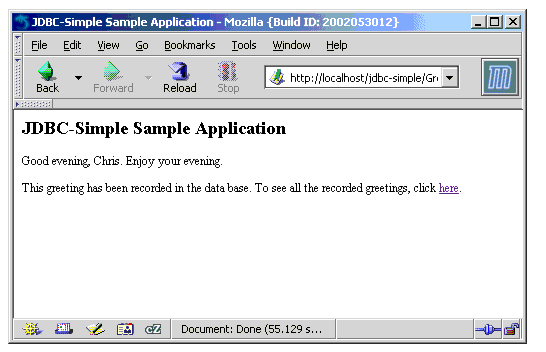
After entering a name and clicking on the Process button, the following page is displayed with the appropriate greeting for the time of day.
In the background, the GreeterDBServlet accessed the stateless session bean to determine the appropriate greeting ("morning", "afternoon" or "evening"). The GreeterDBServlet sets the appropriate greeting message in the request object of the servlet request and specifies a JavaServer Pages[tm] page to display the result.
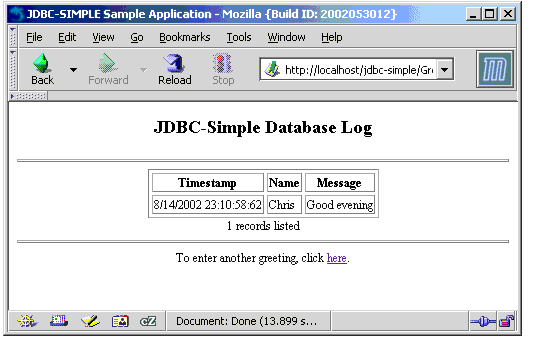
The greeting is displayed. When the user elects to list all previously generated greetings, the GreeterDBLogDisplayServlet performs a select all on the database table of greetings and specifies a JSP[tm] page to display the result
Proceed to Creating a Session Bean with the EJB[tm] Builder to create the stateless session bean from scratch.
Creating a Session Bean with the EJB[tm] Builder
The session bean that you will create is called GreeterDB. It generates a greeting message based on the current time upon request.
- Create the Session Bean
- Modify JNDI Name
- Modify Automatically Generated Methods
- Create a Business Method
Create the Session Bean
To create the session bean using the IDE's EJB Builder facility:
- In the IDE, click the Explorer window's Filesystems tab.
- Select the Filesystems node, right-click, select Mount -> Local Directory.
The New Wizard - Local Directory window is displayed.
- Navigate to the IDE user directory that you specified during the first startup of the IDE:
<ide_user_dir>/sampledir/examples
For example:
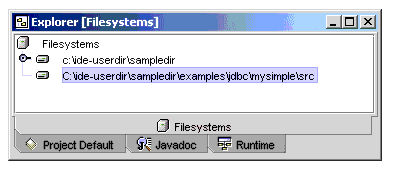
C:\ide-userdir\sampledir\examples
The user directory is automatically created when you start the IDE for the first time. You may have specified a different base user directory than presented in this example, but the sampledir directory is created automatically.
- Click the Create New Folder icon in the upper left hand portion of the window.
A folder named New Folder appears.
- Click on the New Folder item and enter the name "jdbc".
- Double click the newly named "jdbc" directory and create a new folder named "mysimple" under this directory.
- Repeat this operation to create a directory named "src" under the mysimple directory.
- Click once on the "src" directory and click the Finish button.
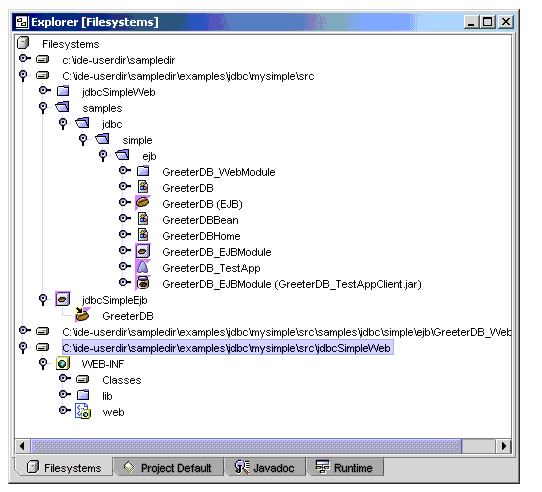
The newly created jdbc/mysimple/src directory appears as a mounted filesystem in the Explorer window.
- Right-click the new filesystem and choose New -> Java Package.
You will use this Java package to hold the EJB source code of the application.
- Name the new Java package:
samples.jdbc.simple.ejb
Click Finish.
A new directory named samples/jdbc/simple/ejb appears under the mysimple/src filesystem.
- Right-click the ejb directory node and choose New -> J2EE -> Session EJB.
The Session Bean Name and Properties pane of the New Wizard is displayed.
- Type GreeterDB in the EJB Name field and click Finish.
The default settings are used when creating the session bean and then the GreeterDB session bean is displayed in the Explorer window.
Note the presence of a new GreeterDB (EJB) node and three other nodes:
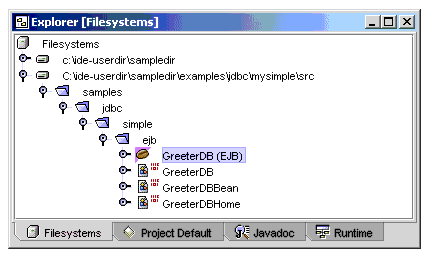
The GreeterDB (EJB) node is a logical representation of the session bean while the three other nodes represent the class files of the remote, implementation and home interfaces. The IDE creates the minimal set of required methods in the EJB implementation class file.
Modify JNDI Name
To avoid the possibility of naming conflicts with previously deployed versions of the JDBC Simple application, you need to modify the JNDI Name of the EJB.
- Right-click the GreeterDB (EJB) node and select Properties.
- Select the Sun ONE AS tab.
- Enter ejb/my-jdbc-simple in the JNDI Name field.
- Close the Properties window.
This JNDI name will uniquely identify this EJB throughout the application server instance to which the EJB is deployed.
Modify Automatically Generated Methods
Your next step is to enhance the automatically generated methods of the session bean. These modifications will result in output being written to the stdout stream when each standard method is invoked by the EJB container of the application server. Since output written to stdout is automatically redirected to the application server's event log, you will see this output in the server's log file when you test the session bean.
To update methods:
- Double-click the GreeterDBBean node that represents the implementation class of the session bean.
The source editor shows the GreeterDBBean.java file.
- Add the following code (the bold text only) to the body of the session bean methods to display the status of the bean instance:
/**
* @see javax.ejb.SessionBean#ejbActivate()
*/
public void ejbActivate() {
System.out.println("ejbActivate() on obj " + this);
}
...
/**
* @see javax.ejb.SessionBean#ejbPassivate()
*/
public void ejbPassivate() {
System.out.println("ejbPassivate() on obj " + this);
}
...
/**
* @see javax.ejb.SessionBean#ejbRemove()
*/
public void ejbRemove() {
System.out.println("ejbRemove() on obj " + this);
}
...
/**
* See section 7.10.3 of the EJB 2.0 specification
*/
public void ejbCreate() {
System.out.println("ejbCreate() on obj " + this);
}
- In the IDE, choose File -> Save All.
This will save the GreeterDB session bean and the changes that you have made thus far.
Create a Business Method
The EJB Builder automatically generated the required methods of the session bean and you have customized these methods with output statements. Now you need to add a simple business method to the bean. This method, getGreeting(), generates a greeting based on the current time.
To create the getGreeting() business method:
- Right-click the GreeterDB (EJB) node and choose Add Business Method.
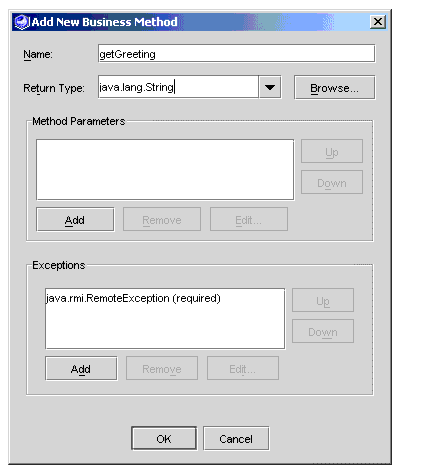
The Add New Business Method dialog box appears.
- Type getGreeting in the Name field.
- Choose java.lang.String in the Return Type field.
The completed dialog window should look like this:
- Click OK.
The getGreeting() business method is added to the GreeterDB session bean and its method signature is automatically added to the GreeterDB bean's remote interface.
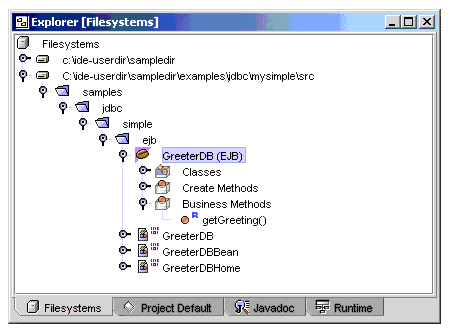
- Expand the GreeterDB (EJB) node and its Business Methods node.
The getGreeting() method node is displayed under the Business Methods node.
- Double-click the getGreeting() method node.
The source editor displays the content of the bean implementation source file and places the cursor at the start of the getGreeting() method.
- Add the following code (the bold text only) to the body of the getGreeting() method:
public java.lang.String getGreeting() {
System.out.println("GreeterDB EJB is determining message...");
String message = null;
Calendar calendar = new GregorianCalendar();
int currentHour = calendar.get(Calendar.HOUR_OF_DAY);
if(currentHour < 12) {
message = "morning";
} else {
if((currentHour >= 12) &&
(calendar.get(Calendar.HOUR_OF_DAY) < 18)) {
message = "afternoon";
} else {
message = "evening";
}
}
System.out.println("- Message determined successfully");
return message;
}
- Add an import statement (the bold text only) for the java.util.* package at the top of the source file.
package samples.jdbc.simple.ejb;
import javax.ejb.*;
import java.util.*;
...
- In the source editor window, right-click and select Save to ensure that your changes have been saved.
- In the Explorer window, right-click the GreeterDB (EJB) node and select Validate EJB.
An Output Window specifying "Finished GreeterDB (EJB)" should be displayed.
If this message is not displayed, the code segments above were not copied properly into the source file. Based on the specific error displayed as a result of the validation step, go back and double check your source code.
After the bean validates successfully, close the source code editing window and proceed to Testing the Session Bean to use the IDE's built-in EJB test facility.
Testing the Session Bean
The IDE includes a facility to automatically generate a test environment for the Enterprise JavaBeans[tm]. This feature creates a web-based test client application and packages it along with the enterprise bean. You can use this test application to create an instance of the enterprise bean and to interact with it. In this section you will use this test facility to exercise the GreeterDB bean's create() and getGreeting() methods.
Create the Test Client
When you create a test client, the IDE generates an EJB[tm] module, supporting elements, and a J2EE[tm] application module.
To create a test client for the GreeterDB session bean:
- Right-click the GreeterDB (EJB) node and select Create New EJB Test Application.
The EJB Test Application wizard is displayed.
- Accept all default values and click the OK button.
A progress monitor appears briefly and then goes away when the process is complete.
Another window is displayed informing you that the web module that was created is also visible in the Project tab. It should go away automatically also. If not, click OK to close the window.
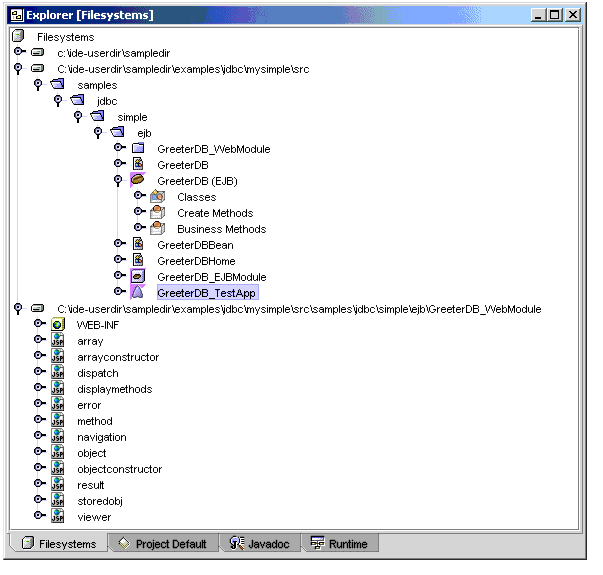
- View the resulting test objects in the Explorer.
The IDE has created an EJB module named GreeterDB_EJBModule, a web module named GreeterDB_WebModule, and a J2EE application named GreeterDB_TestApp in the ejb subdirectory.
The EJB module contains the GreeterDB session bean. The web module contains a number of JavaServer Pages[tm] pages and Java class files that make up the test client. The J2EE application includes references to the EJB module and to the web module. In addition, the IDE mounts the web module.
Deploy the Test Client
Before deploying the test application, ensure that the application server is running and it is set as the default server in the IDE.
To deploy the test application:
- Right-click the GreeterDB_TestApp J2EE application node and select Deploy.
The progress of the deployment process is displayed in a dialog window.
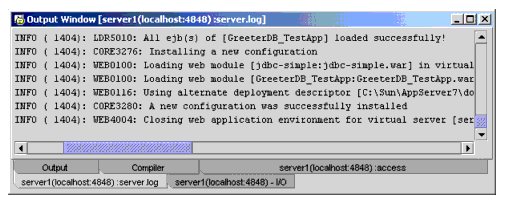
See the new tabs in the IDE's Output window that display messages about the deployment.
- Click the server1(localhost:port):server.log tab in the output window.
The server.log view displays any error conditions that prevent deployment. When the deployment was successful, the output window resembles the following:
- On the IDE's toolbar, select the Editing tab.
The Explorer window should be displayed. If not, select View -> Explorer from the IDE's menu bar.
- In the Explorer window, select the Runtime tab.
- Expand the Server Registry, Installed Servers, Sun ONE Application Server 7, localhost:port, server1(localhost:port), and Deployed Applications nodes.
You should see the GreeterDB_TestApp node under the Deployed Applications node. If the GreeterDB_TestApp node is not listed, right-click on the Deployed Applications node and select Refresh List.
Run the Test Client
Since the test client is web-based, you need to open a web browser window to access the initial test page of the generated web application.
On the initial test client's web page, you'll invoke the create() method of the GreeterDB bean's home interface to create an instance of the bean. Then you'll execute the getGreeting() business method of the bean.
To test the GreeterDB bean:
- Start a web browser and point it to the following URL:
http://localhost:port/GreeterDB_TestApp
Where port is the HTTP server port number specified during installation. The default HTTP server port number is 80, but it may be different based on the ports in use during installation.
Your browser displays the test client.
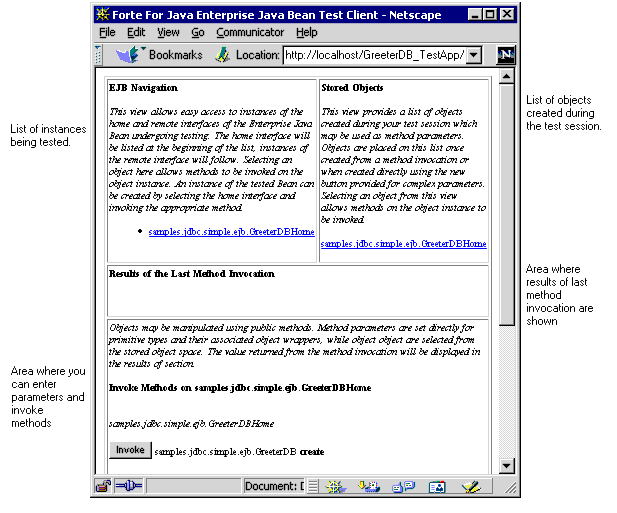
From this page, you can invoke the methods of the GreeterDBHome remote interface.
- Click the Invoke button next to the create method to create an instance of the GreeterDB bean.
The create method is under the heading "Invoke Methods on samples.jdbc.simple.ejb.GreeterDBHome."
The web browser displays the new GreeterDB instance as shown below:
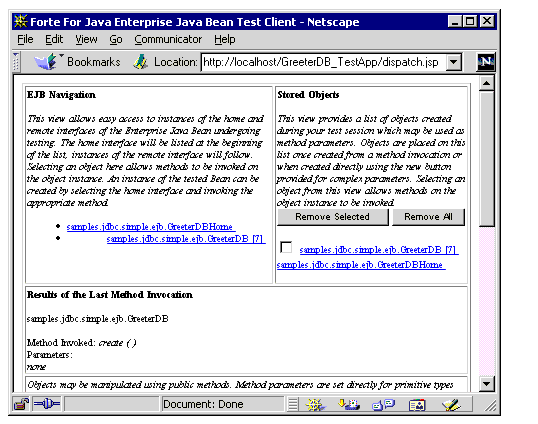
Notice that the samples.jdbc.simple.ejb.GreeterDB [7] item is added in the instances list in the upper left hand portion of the page. The item represents the instance of the GreeterDB bean created by invoking the create method on the GreeterDBHome interface.
- Click the samples.jdbc.simple.ejb.GreeterDB [7] instance link.
This action selects the GreeterDB instance as the EJB module to test. The web browser displays the methods that can be invoked, including the getGreeting() business method.
- Click the Invoke button next to the getGreeting method.
The getGreeting() method is called, and its return value is listed in the Results area:
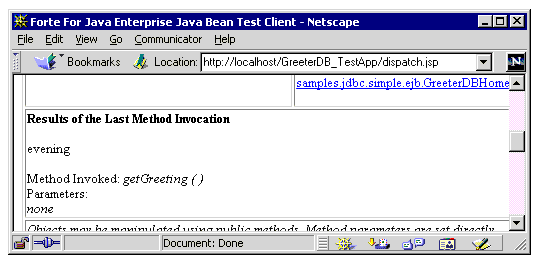
In the example above, the web browser above shows the word "evening" as the return value. Because the getGreeting() method generates a greeting based on the current time, you might see a different greeting value.
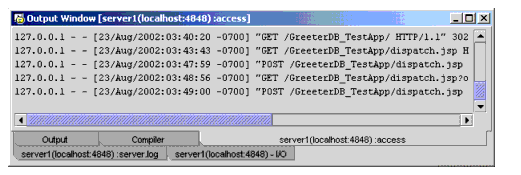
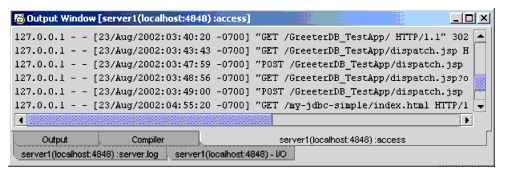
- In the main menu bar of the IDE, select the Running tab. In the Output window, click the server1:(localhost:port): access tab.
A display of the HTTP requests and responses processed by the application server is shown:
If you encountered problems while running your EJB, you might normally want to exercise the debugging facilities at this stage. However, for the purposes of this tutorial, we'll defer debugging exercises until we develop and deploy the combined web and EJB application.
Now that you've successfully tested your session bean, proceed to Packaging the Enterprise Bean in an EJB[tm] Module to prepare to include the EJB in an enterprise application.
Packaging the Enterprise Bean in an EJB[tm] Module
Although the test client automatically packaged your session bean in an EJB module, this module was specifically created for testing purposes. In this section you will package your session bean in a new EJB module that will be used as part of your enterprise application.
To create the EJB module:
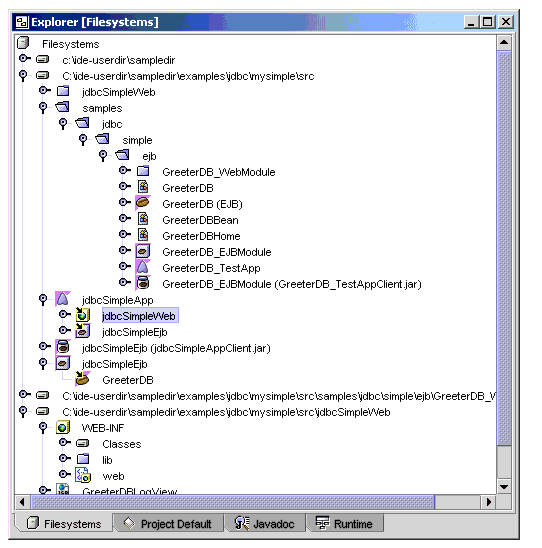
- In the Explorer, select the Filesystem tab. (You might need to click the GUI Editing tab of the IDE's menu bar to display the Explorer window).
- Right-click the .../mysimple/src filesystem and select New -> J2EE -> EJB Module
- Type jdbcSimpleEjb in the Name field.
- Click Finish.
- Right-click the new jdbcSimpleEjb EJB module and select Add EJB....
The Add EJB to EJB Module browser is displayed.
- Select the GreeterDB (EJB) bean under the mysimple/src/samples/jdbc/simple/ejb node
- Click OK.
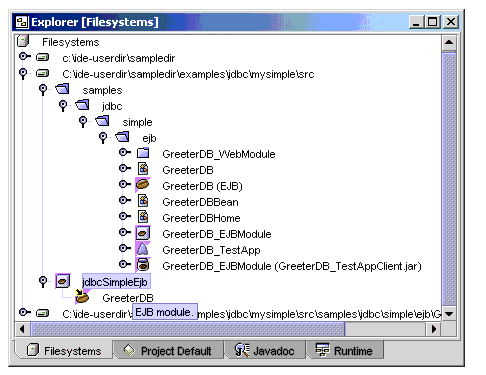
The GreeterDB session bean is included in the EJB module. Expanding the jdbcSimpleEjb node shows the included session bean.
Now that you've prepared the EJB for assembly in an enterprise application, proceed to Creating the Web Application to create the web interface portion of the application.
Creating the Web Application
In this section you will develop the web application by creating the servlet, JavaServer Pages[tm] (JSP[tm]) pages and HTML files and packaging them in a web application module.
- Create the Web Module
- Create Servlets
- Define Servlet Mappings
- Create HTML and JSP Files
- Define EJB Reference
- Define JDBC Resource Reference
Create the Web Module
To create a web module:
- In the Explorer window, select the the Filesystems node, right click, and select Mount -> Local Directory.
The New Wizard - Local Directory dialog window appears.
- Navigate into the mysimple/src directory.
- Within the src/ directory, click the Create New Folder button.
A new directory named New Folder is created.
- Rename the new directory to jdbcSimpleWeb. To rename the directory, click the New Folder directory icon, pause for a few seconds, and click the directory icon again, type jdbcSimpleWeb, and press the Enter key.
- Select the jdbcSimpleWeb directory icon and click Finish. The new directory is mounted in the Explorer window as a filesystem.
- Right-click the mysimple/src/jdbcSimpleWeb filesystem that you just mounted and select New -> JSP & Servlet -> Web Module.
The New wizard appears, showing mysimple/src/jdbcSimpleWeb in the Directory field.
- Click Finish.
The Question dialog box appears.
- Click OK in the Question dialog box. The IDE creates a web module.
A window might be displayed informing you that the web module is visible in the Project tab. If it appears, click OK to close the window.
- Expand the mysimple/src/jdbcSimpleWeb filesystem.
You will see a WEB-INF node under the filesystem.
Create Servlets
You will now create two servlets that handle requests. The first servlet, named GreeterDBServlet, requests greetings from the GreeterDB session bean, logs the greeting to the database, and delivers the result via a JSP page. The second servlet, named GreeterDBLogDisplayServlet, retrieves previously generated greetings from the database and displays them via another JSP page.
Create GreeterDBServlet
- Expand the WEB-INF folder of the web module filesystem, right-click the Classes folder and select New -> Java Package.
The New Wizard appears.
- Type samples.jdbc.simple.servlet in the Name field and click Finish.
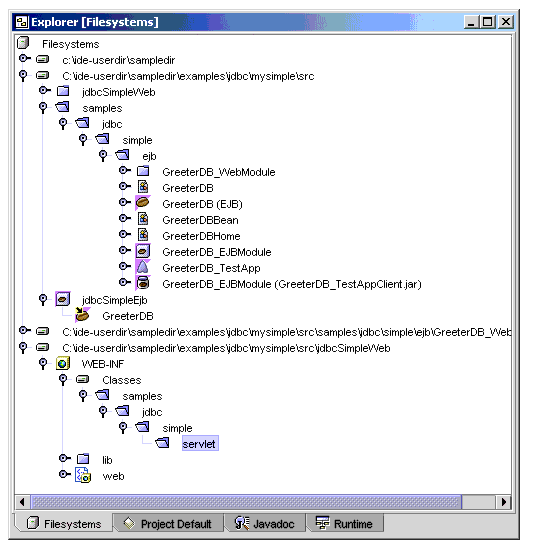
The new samples.jdbc.simple.servlet package is created under the WEB-INF/Classes folder.
- Expand the Classes folder and its nested folders.
- Right-click the servlet folder and select New -> JSP Servlet -> Servlet.
The New Wizard appears.
- Type GreeterDBServlet in the Name field.
- Click Finish.
The GreeterDBServlet servlet is created in the servlet package and is displayed in the source editor.
- Add the following import statements in bold to the top of the source file below the package statement.
package samples.jdbc.simple.servlet;
import javax.servlet.*;
import javax.servlet.http.*;
import java.io.*;
import java.util.*;
import javax.naming.*;
import javax.ejb.*;
import java.sql.*;
import javax.sql.*;
import samples.jdbc.simple.ejb.*;
public class GreeterDBServlet extends HttpServlet {
- Replace the body of the doGet() method with the following code in bold:
public void doGet (HttpServletRequest request,HttpServletResponse response)
throws ServletException, IOException {
javax.ejb.Handle beanHandle;
GreeterDBHome myGreeterDBHome;
GreeterDB myGreeterDBRemote;
InitialContext initContext = null;
Hashtable env = new java.util.Hashtable(1);
System.out.println("\nGreeterDBServlet is executing ...");
System.out.println("Retrieving JNDI initial context...");
try {
initContext = new javax.naming.InitialContext();
System.out.println("- Retrieved initial context successfully");
}
catch (Exception e) {
System.out.println("- Exception creating InitialContext: " + e.toString());
return;
}
try {
System.out.println("Looking up dbGreeter bean home interface...");
String JNDIName = "java:comp/env/ejb/jdbc-simple";
System.out.println("- Looking up: " + JNDIName);
myGreeterDBHome = (GreeterDBHome)initContext.lookup(JNDIName);
System.out.println("- Looked up the EJB successfully");
}
catch(Exception e) {
System.out.println("- Greeter bean home not found - " +
"Is bean registered with JNDI?: " + e.toString());
return;
}
try {
System.out.println("Creating the dbGreeter bean...");
myGreeterDBRemote = myGreeterDBHome.create();
System.out.println("- Created EJB successfully");
}
catch(CreateException e) {
System.out.println("- Could not create the dbGreeter bean: " + e.toString());
return;
}
System.out.println("Getting the message from the dbGreeter bean...");
String theMessage = myGreeterDBRemote.getGreeting();
System.out.println("- Got this message from greeter bean: " + theMessage);
System.out.println("Getting the name input to this servlet...");
String name = request.getParameter("name");
System.out.println("- Got name: " + name);
System.out.println("Recording the greeting in the database...");
StringBuffer timeStamp = new StringBuffer();
Calendar rightNow = Calendar.getInstance();
timeStamp.append(rightNow.get(Calendar.MONTH)+1); timeStamp.append("/");
timeStamp.append(rightNow.get(Calendar.DAY_OF_MONTH)); timeStamp.append("/");
timeStamp.append(rightNow.get(Calendar.YEAR)); timeStamp.append(" ");
timeStamp.append(rightNow.get(Calendar.HOUR_OF_DAY)); timeStamp.append(":");
timeStamp.append(rightNow.get(Calendar.MINUTE)); timeStamp.append(":");
timeStamp.append(rightNow.get(Calendar.SECOND)); timeStamp.append(":");
timeStamp.append(rightNow.get(Calendar.MILLISECOND));
StringBuffer query = new StringBuffer("insert into Greeting (timeStamp,name,message) values ");
query.append("('");
query.append(timeStamp.toString()); query.append("','");
query.append(name); query.append("','");
query.append("Good " + theMessage); query.append("')");
try {
System.out.println("Getting datasource...");
String dsName = "java:comp/env/jdbc/jdbc-simple";
DataSource ds = (javax.sql.DataSource)initContext.lookup(dsName);
System.out.println("- Got datasource successfully");
System.out.println("Getting connection...");
Connection conn = ds.getConnection();
System.out.println("- Got connection successfully");
System.out.println("Getting statement...");
Statement stmt = conn.createStatement();
System.out.println("- Got statement successfully");
System.out.println("Executing query...");
int nRows = stmt.executeUpdate(query.toString());
System.out.println("- Executed query with result: " + nRows);
System.out.println("Closing statement...");
stmt.close();
System.out.println("- Closed statement successfully");
System.out.println("Closing connection...");
conn.close();
System.out.println("- Closed connection successfully");
}
catch (Exception ex) {
System.out.println("- Could not interact with the database");
System.out.println("Exception: " + ex.toString());
}
System.out.println("Storing the message in request object for the JSP...");
request.setAttribute("message", theMessage);
System.out.println("- Stored message successfully");
System.out.println("Dispatching JSP for output...");
response.setContentType("text/html");
RequestDispatcher dispatcher = getServletContext().getRequestDispatcher("/GreeterDBView.jsp");
dispatcher.include(request, response);
System.out.println("- Dispatched JSP successfully");
System.out.println("\nGreeterDBServlet is all done\n");
return;
}
- Replace the body of the doPost() method with the following code in bold:
public void doPost (HttpServletRequest request,HttpServletResponse response)
throws ServletException, IOException {
doGet(request,response);
}
- Replace the body of the getServletInfo() method with the following code in bold:
public String getServletInfo() {
return "Call a session bean from a servlet" +
" and deliver result via a JSP." +
" Log greeting to database.";
}
- Remove the init(), destroy(), and processRequest() methods from the source code.
- Right-click within the source code window, and select Compile.
When the operation is complete, the word `Finished' appears in the IDE's Output window.
Now, you will create the second servlet.
Create GreeterDBLogDisplayServlet
- Using the same procedure as before, create new servlet named GreeterDBLogDisplayServlet under the servlet folder.
- Add the following import statements in bold to the top of the source file below the package statement.
package samples.jdbc.simple.servlet;
import javax.servlet.*;
import javax.servlet.http.*;
import java.io.*;
import java.util.*;
import javax.naming.*;
import javax.ejb.*;
import java.sql.*;
import javax.sql.*;
import samples.jdbc.simple.ejb.*;
public class GreeterDBServlet extends HttpServlet {
- Replace the body of the doGet() method with the following code in bold:
public void doGet (HttpServletRequest request,HttpServletResponse response)
throws ServletException, IOException {
java.sql.ResultSet rs = null;
java.sql.Connection conn = null;
java.sql.Statement stmt = null;
System.out.println("\nGreeterDBLogDisplayServlet is executing...");
try {
System.out.println("Getting initial context...");
InitialContext ctx = new InitialContext();
System.out.println("- Got initial context successfully");
System.out.println("Getting datasource...");
String dsName = "java:comp/env/jdbc/jdbc-simple";
DataSource ds = (javax.sql.DataSource)ctx.lookup(dsName);
System.out.println("- Got datasource successfully");
System.out.println("Getting connection...");
conn = ds.getConnection();
System.out.println("- Got connection successfully");
System.out.println("Getting statement...");
stmt = conn.createStatement();
System.out.println("- Got statement successfully");
System.out.println("Executing query...");
StringBuffer query = new StringBuffer("select * from Greeting");
rs = stmt.executeQuery(query.toString());
System.out.println("- Executed query successfully");
}
catch (Exception ex) {
System.out.println("- Could not interact with the database");
System.out.println("- Exception: " + ex.toString());
}
System.out.println("Storing the data base resuts in request object for JSP...");
request.setAttribute("dbResults", rs);
System.out.println("Results stored successfully");
System.out.println("Dispatching JSP for output...");
response.setContentType("text/html");
RequestDispatcher dispatcher = getServletContext().getRequestDispatcher("/GreeterDBLogView.jsp");
dispatcher.include(request, response);
System.out.println("- Dispatched JSP successfully");
try {
System.out.println("Closing statement...");
stmt.close();
System.out.println("- Closed statement successfully");
System.out.println("Closing connection...");
conn.close();
System.out.println("- Closed statement successfully");
}
catch (Exception ex) {
System.out.println("- Could not close the statement and connection");
}
System.out.println("\nGreeterDBLogDisplayServlet is all done\n");
return;
}
- Replace the body of the doPost() method with the following code in bold:
public void doPost (HttpServletRequest request,HttpServletResponse response)
throws ServletException, IOException {
doGet(request,response);
}
- Replace the body of the getServletInfo() method with the following code in bold:
public String getServletInfo() {
return "Retrieve greetings from database and display via a JSP.";
}
- Remove the init(), destroy() and processRequest() methods from the source code.
- Right-click the GreeterDBLogDisplayServlet servlet in the Explorer and choose Compile.
Define Servlet Mappings
The next step in preparing the servlets for use is to define the names by which the servlets can be referred to in web requests. Servlet mappings are defined at the web module level.
To define the servlet mappings:
- Expand the WEB-INF folder and select the web folder in the Explorer window.
The web folder represents the web.xml file, also known as the deployment descriptor, of the web application.
- Right-click the web folder and select Properties.
If the Properties window is not already visible, choose View -> Properties.
- Select the Servlet Mappings field and then click the ellipsis (...) button.
The Servlet Mappings property editor appears.
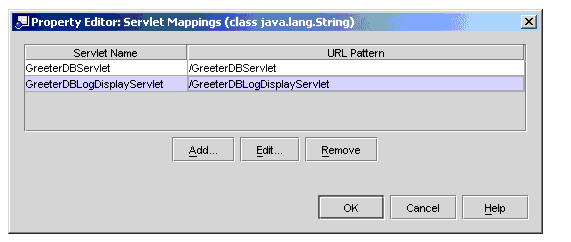
- Select the row with GreeterDBServlet in the Servlet Name column and click the Edit... button.
- Type /GreeterDBServlet in the URL Pattern field.
- Click OK.
- Make the same type of change for the GreeterDBLogDisplayServlet by setting the URL Pattern field to /GreeterDBLogDisplayServlet.
The Servlet Mappings property editor should look like this when you are finished modifying the mappings:
- Click OK to complete the mappings.
Create HTML and JSP Files
The application consists of a single HTML file and two JSP files. In this step, you will create these files.
To create the HTML page and JSP pages:
- Right-click the mysimple/src/jdbcSimpleWeb filesystem and select New -> JSP & Servlet -> HTML File.
The New Wizard appears.
- Type index in the Name field
- Click Finish.
The index.html file is created and is displayed in the source editor.
- Copy the content of the index.html file from the following location and paste it into the source editor, overwriting the existing page.
<appserver_install_dir>/samples/jdbc/simple/src/docroot/index.html
- Right-click the mysimple/src/jdbcSimpleWeb filesystem again and select New -> JSP & Servlet -> JSP.
The New Wizard appears.
- Type GreeterDBView in the Name field.
- Click Finish.
The GreeterDBView.jsp file is created and is displayed in the source editor.
- Copy the content of the GreeterDBView.jsp file from the following location and paste it into the source editor, overwriting the existing page.
<appserver_install_dir>/samples/jdbc/simple/src/docroot/GreeterDBView.jsp
- Create another JSP file named GreeterDBLogView by following the same steps as above, but using the existing GreeterDBLogView.jsp file as the source.
Define EJB Reference
Before using JNDI to look up EJB references, you need to set up a reference declaration. The reference declaration maps the reference name (used in the lookup statement) to an actual enterprise bean.
To set up a reference declaration to the referenced session bean:
- Select the web folder in the Explorer, right-click and select Properties.
- Select the References tab of the Properties window.
- Select the EJB References field and then click the ellipsis (...) button.
The EJB References property editor appears.
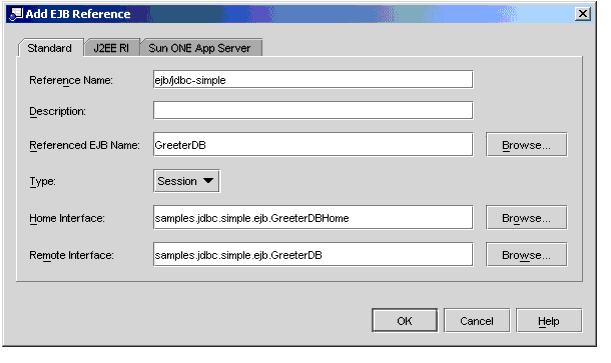
- Click Add....
- Type ejb/jdbc-simple in the Reference Name field.
- For the Referenced EJB Name field, click the Browse button.
The Select an EJB browser is displayed.
- Select the GreeterDB (EJB) bean under the mysimple/src/samples/jdbc/simple/ejb folder and click OK.
Notice that the Home Interface and Remote Interface fields are automatically filled when you select the referenced enterprise bean. The Add EJB Reference property editor looks like this:
- Click the Sun ONE App Server tab.
- Enter ejb/my-jdbc-simple in the JNDI Name field.
- Click OK to close the Add EJB References dialog box.
- Click OK to close the EJB References property editor.
Define JDBC Resource Reference
Similar to EJB references, before an application references JDBC resources, these resources must be defined in the module's deployment descriptor.
To add the reference:
- In the References tab of the web folder's property window, select the Resource References field and then click the ellipsis (...) button.
The Resource References property editor appears.
- Click Add...
- Type jdbc/jdbc-simple in the Name field.
This reference name must match the JNDI name used in the servlets.
- Click the Sun ONE App Server tab.
- Type jdbc/jdbc-simple in the JNDI Name field.
This name specifies JDBC resource, defined in the application server's configuration. Later in this tutorial, you will define this resource.
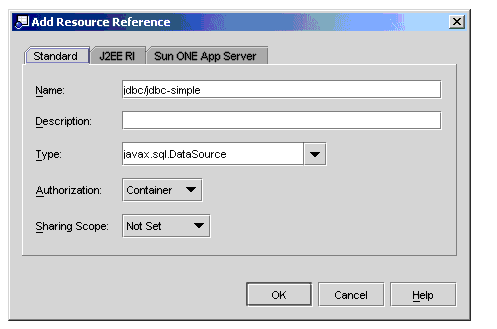
- Click OK to close the Add Resource Reference dialog box.
- Click OK to close the Resource References property editor.
Your next step is to combine the EJB and web modules into an enterprise application. Proceed to Assembling the J2EE[tm] Application.
Assembling the J2EE[tm] Application
You have created the EJB[tm] module and web module so far. You will now create a J2EE application that will be deployed to the application server.
To create the J2EE Application:
- Right-click the mysimple/src filesystem select New -> J2EE -> Application.
The New Wizard is displayed.
- Type jdbcSimpleApp in the Name field.
- Click Finish.
- Right-click the jdbcSimpleApp J2EE application node and select Add Module....
The Add Module to Application browser is displayed.
- Using the Control key, select both the jdbcSimpleEjb node under the mysimple/src filesystem and the WEB-INF node under the mysimple/src/jdbcSimpleWeb filesystem.
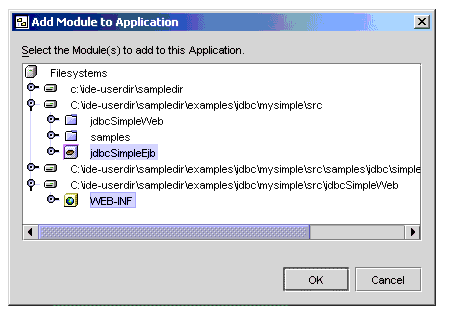
- Click OK.
If you expand the jdbcSimpleApp application node, the two modules are listed:
- In the IDE's menu bar, select File -> Save All.
Before exercising the application, you need to configure the database connectivity for the application. Proceed to Setting Up Database Connectivity.
Setting Up Database Connectivity
Since the enterprise application uses the Java Database Connectivity (JDBC[tm]) API to record greetings to a database, you need to define the necessary JDBC-related settings in the application server environment prior to deploying and exercising the application. JDBC configuration involves setting up a JDBC driver, defining a JDBC connection pool and registering the JDBC resources used by your application.
Once you define the necessary JDBC connection pool and resource entries, you will start the PointBase Server database.
- Configure the JDBC Driver
- Define the JDBC Connection Pool
- Define the JDBC Resource
- Start the PointBase Server Database
Configure the JDBC Driver
A JDBC driver must be configured in the classpath of the application server before you can exercise applications that use JDBC.
Since the PointBase Type 4 JDBC driver should already be configured in your application server instance's environment (based on either the combined installation of the application server with PointBase or through your installation and configuration of PointBase), there is no need for you to perform any additional JDBC driver set up steps.
Define the JDBC Connection Pool
Before running the sample application, you need to define a suitable JDBC connection pool that maps to the PointBase database server and a JDBC resource that associates the JDBC references made in the sample application to the JDBC connection pool definition.
If you already exercised this sample application as part of the Getting Started guide, the JDBC connection pool may already be defined with the application server.
To determine whether or not the connection pool has already been registered:
- Select the Runtime tab of the Explorer window.
- Expand the Server Registry, Installed Servers, Sun ONE Application Server 7 nodes.
- Expand the localhost:4848 node followed by the server1(localhost:port) node. Use the appropriate administrative server port number for your environment.
- Attempt to expand the Registered JDBC Connection Pool node to list any registered connection pools.
If you either cannot expand the connection pool node or do not see a connection pool entry named PointBasePool, continue with the next section to register the appropriate connection pool.
If you see an entry named PointBasePool, scan the following instructions to ensure that the settings of this pool match the requirements of the application.
To register the JDBC connection pool:
- Right-click the Unregistered JDBC Connection Pools node and select Add New JDBC Connection Pool.
The Properties of JdbcConnectionPool property sheet is displayed.
- Type com.pointbase.jdbc.jdbcDataSource in the Datasource Classname.
- Type PointBasePool in the Name field.
- Select the Properties field and then click the ellipsis (...) button.
A property editor appears without any entries.
- Add the following sets of values to the property name, value, and description fields, using the Add button:
Name
Value
DatabaseName
jdbc:pointbase:server://localhost/sun-appserv-samples
User
jdbc
Password
jdbc
- Click OK.
- Clear the value of the Table Name field.
- Close the property sheet.
- Right-click the PointBasePool node and choose Register.
A new Select Server to Register dialog box appears.
- Select server1 and click Register.
An Information dialog box appears indicating a successful registration.
- Click OK to close the Information dialog box.
- Click OK to close the Select Server to Register to dialog box.
- Expand the Registered JDBC Connection Pools node under the server1(localhost:4848) node.
The registered PointBasePool JDBC connection pool is displayed.
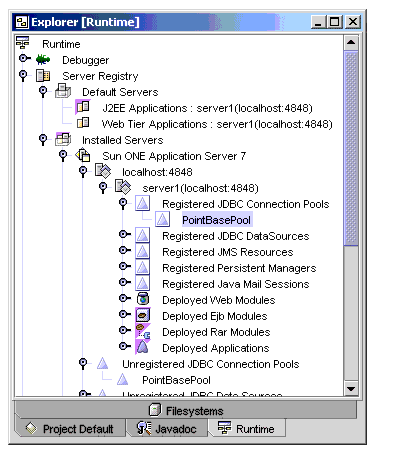
If you do not see the PointBasePool node under the Registered JDBC Connection Pools node, right-click the Registered JDBC Connection Pools node and select Refresh List.
Define the JDBC Resource
Now that the JDBC connection pool definition has been created, you are ready to define a JDBC resource and associate it with the connection pool entry.
If you already exercised this sample application as part of the Getting Started with Sun ONE Application Server 7 on the Sun Microsystems documentation web site, a suitable JDBC resource may already be defined with the application server.
To determine whether or not a suitable JDBC resource has already been registered:
- Expand the localhost:4848 node followed by the server1(localhost:port) node. Use the appropriate administrative server port number for your environment.
- Attempt to expand the Registered JDBC DataSources node to list the registered JDBC resources.
If you either cannot expand the JDBC DataSources node or do not see a datasource entry named jdbc/jdbc-simple, continue with the next section to register the appropriate resource.
If you see an entry named jdbc/jdbc-simple, scan the following instructions to ensure that the settings of this resource match the requirements of the application.
To register the JDBC resource (referred to as a JDBC "DataSource" in the IDE):
- Right-click the Unregistered JDBC DataSources node and select Add new Data Source.
The Properties of DataSource property sheet is displayed, and a new DataSource node is created under the Unregistered Data Sources node
- Type jdbc/jdbc-simple in the JNDI Name field.
The resource name here must match the JNDI name that you have assigned when creating the web application.
- Select PointBase(server1:localhost:port) in the Pool Name field.
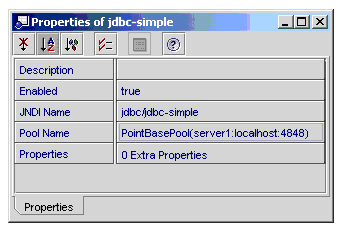
- Close the property sheet.
- Right-click the new jdbc-simple node and choose Register...
A Select Server to Register to dialog box is displayed.
- Select server1 and click Register.
An Information dialog box appears indicating a success.
- Click OK to close the Information dialog box.
- Click OK to close the Select Server to Register to dialog box.
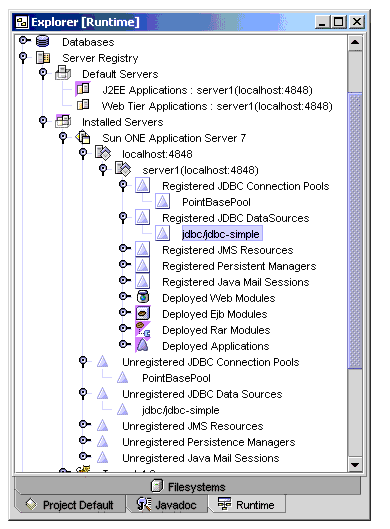
- Expand the Registered JDBC DataSources node under the server1 (localhost:4848) node.
The registered jdbc/jdbc-simple data source is displayed.
Start the PointBase Server Database
The database server can be started by performing one of the following actions:
- Windows Platforms:
PointBase installed with the application server:
Start -> Programs -> Sun Microsystems -> Sun ONE Application Server 7 -> Start PointBase
PointBase downloaded and installed separately:
Execute: <pointbase_install_dir>/tools/server/startserver.bat
- UNIX Platforms:
PointBase installed with the application server:
Execute: <appserver_install_dir>/pointbase/server/StartServer.sh
PointBase downloaded and installed separately:
Execute: <pointbase_install_dir>/tools/server/startserver.sh
Once you execute this script, you will see the following text in either a command window or at the UNIX terminal prompt:
Server started, listening on port 9092, display level: 0 ...
>
You are finally ready to exercise the application. Proceed to Deploying and Running the J2EE[tm] Application.
Deploying and Running the J2EE[tm] Application
In this exercise you will first override the default value assigned to the context root of the web application. Then you will deploy and run the application.
Disable EJB Test Application
Since both the EJB Test and the JDBC Simple applications contain the same EJB module, if you attempted to deploy the JDBC Simple application without at least disabling the EJB Test application, a JNDI naming conflict would occur during deployment of the JDBC Simple application. This is because the <jndi-name> value of ejb/my-jdbc-simple as contained in the EJB module's deployment descriptor is scoped globally throughout the application server instance.
To disable the EJB Test application:
- In the Explorer, select the Runtime tab and drill down to the server1(localhost:4848) node.
- Expand the Deployed Applications node, select GreeterDB_TestApp, right-click and select Disable.
No JNDI naming conflicts will occur with a prior deployment of the JDBC Simple sample application because you changed the JNDI name of the EJB in the second version of this application to a unique value.
Define Web Context Root
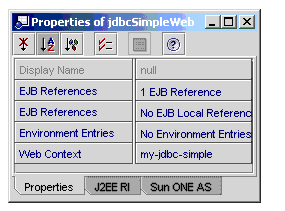
The context root provides a way to distinguish resources of one web application from resources of other web applications deployed to the same server instance. You set the context root on the web module object that is represented in the J2EE application object. In this exercise, you will specify my-jdbc-simple as the context root. (If you set the context root to the same value as used by a previously deployed copy of the JDBC Simple sample, an error would occur during deployment because you cannot deploy two web applications with the same context root to the same virtual server).
The context root value determines how end users will access the web application:
http://hostname:port/my-jdbc-simple/...
To define the context root of the web module:
- In the Explorer window, under the Filesystems tab, expand the jdbcSimpleApp node, select the jdbcSimpleWeb object, right-click and select Properties.
Note that we modify the context setting at the J2EE application level because a single module may be added to different J2EE applications. Each application may require different web context values even though the underlying web application is the same.
- Type my-jdbc-simple in the Web Context field.
The property sheet looks like this:
Deploy the Application
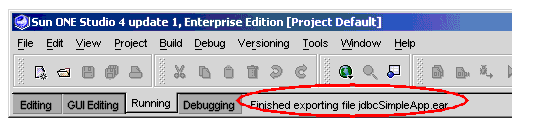
To deploy the application, right-click the jdbcSimpleApp node and select Deploy.
Several views appear in the Output window while a Progress Monitor window shows the deployment progress. Wait for the Progress Monitor to close automatically.
You can monitor the status of the many operations in the IDE through the status area of the IDE's menu bar. As you deploy the application, you will see status information in this area.
Run the Application
Before running the application, make sure that the PointBase server is running.
To run the application:
- Open a web browser window and access the following URL:
http://hostname:port/my-jdbc-simple/index.html
When the web browser connects to the server, the server1: access view tab in the output window displays a new line.
- Enter a name and click Process in the web browser.
As the servlet, EJB, and JSP page are executed, the output of System.out.println statements are displayed in the server1: server.log view tab in the output window.
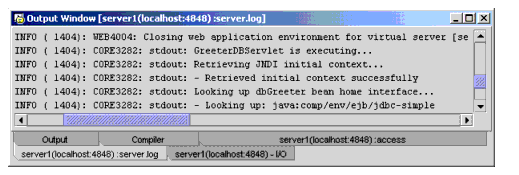
- Click the here link to display a list of the greeting messages generated thus far.
More log entries appear in the server.log view window.
After having run the application successfully, proceed to Modifying the Application to gain a sense of the speed of typical development activities.
Modifying the Application
In this section, you will leverage the dynamic redeployment feature of the application server by modifying several different components in the application, redeploying and retesting the application without restarting the application server. Each exercise is very basic in that you will modify the source code of various types of files, recompile when necessary and simply redeploy the application. The combination of the IDE's automatic reassembly features and the application server's dynamic redeployment capabilities should make your cycle times as short as possible.
Modify HTML File
- In Explorer, double click the index.html file located under the web module.
- Change the following line from:
<title>JDBC-SIMPLE Sample Application</title>
to:
<title>MODIFIED JDBC-SIMPLE Sample Application</title>
Also modify the page title that is displayed as part of the HTML content. Change:
<b><font face="Arial"><font color="#000000"><font size=+2>JDBC-SIMPLE
Sample Application</font></font></font></b>to:
<b><font face="Arial"><font color="#000000"><font size=+2>MODIFIED JDBC-SIMPLE
Sample Application</font></font></font></b>
- Save your changes to the file.
- Select the jdbcSimpleApp node in Explorer, right-click and select Deploy.
- After deployment completes, access the application to see the change.
You should see the modified page title at the top of the browser window.
Modify JavaServer Pages[tm] (JSP[tm]) File
- In Explorer, double click the GreeterDBView.jsp file located under the web module.
- Change the following line from:
Good <%= messageString%>, <%= nameString%>. Enjoy your <%= messageString%>.
to:
Good <%= messageString%>, <%= nameString%>. Have a great <%= messageString%>.
- Save your changes to the file.
- Select the jdbcSimpleApp node in Explorer, right-click and select Deploy.
- After deployment completes, access the application to see the change.
Enter your name and click Process.
You should see the modified greeting string.
- Access the application once more to see how quickly the subsequent requests are processed.
Modify Servlet
- In Explorer, navigate to the GreeterDBServlet file under the WEB-INF -> Classes area of the mounted web module.
- Double click the GreeterDBServlet located under the web module.
- In the doGet() method, change the following line from:
System.out.println("\nGreeterDBServlet is executing...");
to:
System.out.println("\nMODIFIED GreeterDBServlet is executing...");
- Recompile the servlet by right clicking on the source editor and selecting Compile.
- Select the jdbcSimpleApp node in Explorer, right-click and select Deploy.
- After deployment completes, run the application and monitor the server log file. Look for the MODIFIED string to appear at the very beginning of the stdout messages generated by the application.
Modify EJB
- In Explorer, navigate to the GreeterDBBean file under the mysimple/src filesystem.
- Double click the GreeterDBBean object.
- In the getGreeting() method, change the following line from:
System.out.println("GreeterDB EJB is determining message ...");
to:
System.out.println("MODIFIED GreeterDB EJB is determining message ...");
- Recompile the implementation class by right clicking on the source editor and selecting Compile.
- Select the jdbcSimpleApp node in Explorer, right-click and select Deploy.
- After deployment completes, run the application and monitor the server log file. Look for the MODIFIED string to appear in the stdout messages generated by the application.
Now that you've experienced the quick modification cycle, proceed to Debugging the Application to gain a sense of stepping through various components of the application.
Debugging the Application
This section introduces you the ease by which you can debug class files and JavaServer Pages[tm] (JSP[tm]) source files using the IDE and the application server. To start debugging with the application server there is no set up required outside the IDE. All underlying debugging configuration is established automatically by the IDE and the application server.
Prepare Web Module for Debugging
Verify that several web module settings are defined for debugging JSP files. Also set the context root value in the web module.
- In Explorer, navigate to the mysimple/src/jdbcSimpleWeb filesystem.
- Select the web module's web.xml node and display its property sheet.
- Select Sun ONE AS tab.
- Select the JSP Param field and then click the ellipsis (...) button.
- Verify that classdebuginfo and mappedfile properties are set to true.
- Click OK to close the property editor.
- Select the web module's WEB-INF node in the mysimple/src/jdbcSimpleWeb filesystem and display its property sheet.
- Enter /my-jdbc-simple in the Context Root field.
This value matches the servlet context root value that you assigned while defining the web application.
Start the Debugger
To start the debugger:
- Choose the jdbcSimpleApp J2EE application node.
- In the IDE's main menu bar, choose Debug -> Start.
The server1 instance of the application server restarts, and the IDE switches to the debugging workspace. In addition, the index.html page is displayed in the web browser. Note that the application is redpeloyed before the debugging session begins.
Caution
Browser does not come up? Depending on the browser in use, you might have to access the web application through your browser directly.
Debug the EJB
- Open GreeterDBBean.java file in the source editor.
- Move the cursor to the following line:
if(currentHour < 12) {
- Right-click and select Debug -> Toggle Breakpoint.
The line in the source editor changes its background color indicating that a breakpoint has been set.
- In the web browser, type a name, for example TESTER, and click Process.
Execution of GreeterDBBean.java stops at the breakpoint, and the line is highlighted in another color.
- In the IDE's main menu bar, select the Debug tab.
In the Call Stack view, expand the samples.jdbc.simple.ejb.GreeterDBBean.getGreeting node.
Under the node, you can see the variables declared in the getGreeting method. One of the variables is named currentHour and it stores the current hour.
- In the IDE's main menu bar, choose Debug -> Step Over a few times until the execution reaches the System.out.println statement.
The value of the message variable changes from null to "morning," "afternoon," or "evening" depending on the value of currentHour variable.
- Select the message variable and display its properties.
If the properties sheet is not visible, click Properties () button in the Debug window.
- Type "day" (including the quotes) in the Value field.
- Select Debug -> Continue.
The debugger continues execution, and the web browser greets "Good day, TESTER."
- Move the cursor to the line with the breakpoint and select Debug -> Toggle Breakpoint.
The breakpoint is removed from the line, and its background color resets to the normal editing color.
Debug a JSP
To debug GreeterDBView.jsp:
- Open GreeterDBView.jsp in the source editor.
- Move the cursor to the following line:
Good <%= messageString%>, <%= nameString%>.
- Right-click inside the source editor and choose Compile.
You must compile the JSP in the IDE to allow the IDE to correlate between the JSP source file statements and the underlying servlet class file which implements the JSP file.
- Right-click and select Debug -> Toggle Breakpoint.
The line in the source editor changes its background color indicating that breakpoint has been set.
- In the web browser, type a name, for example TESTER, and click Process.
Execution of the GreeterDBView.jsp page stops at the breakpoint, and the line is highlighted indicating that execution stopped at the line.
- In the Call Stack view, expand the _jasper._GreeterDBViwe_jsp._jspService node.
Under the node, you can see the variables for GreeterDBView.jsp.
- Select nameString variable.
Next to the nameString variable, the "TESTER" string is shown because the name, entered in Step 5, is stored in the nameString variable.
- Type "HUMAN" (including the quotes) in the Value field.
The value of nameString variable changes to "HUMAN".
- In the IDE's main menu bar, select Debug -> Continue.
The debugger now continues execution of GreeterDBView.jsp, and the web browser shows HUMAN in the greeting instead of TESTER.
- Move the cursor to the line with the breakpoint and select Debug -> Toggle Breakpoint.
The breakpoint is removed from the line, and its background color resets to the normal editing color.
Stop the Debugger
To stop the debugger:
- In the IDE's main menu bar, select Debug -> Finish.
The Finish Debugging Session dialog box appears.
- Make sure that all running sessions are checked.
- Click OK.
Once you have completed these exercises, proceed to the final section, Summary.