|
|
| Sun ONE Application Server 7, Standard Edition Sun[tm] ONE Studio 4, Enterprise Edition for Java[tm] with Application Server 7 Tutorial |
Setting Up Your Development Environment
Before configuring your development environment, take a few moments to learn about how the Sun ONE Studio 4, Enterprise Edition for Java and Application Server 7 products are integrated.
Sun ONE Studio 4 and Application Server Integration
The application server software that extends the IDE's functionality is generally referred to as the application server's "plugin" for the IDE. The plugin consists of a series of JAR and configuration files that are installed in either the IDE's installation directory or a user's IDE directory.
Installing the IDE Plugin
There are three means by which a user can install the application server plugin in a Studio 4 installation:
- Plugin is installed as part of a combined application server and IDE installation.
- Plugin is installed as a component using the application server's installation program.
- Plugin is downloaded and installed as a NetBeans[tm] module from the Sun ONE Studio Update Center.
Although editing of Sun ONE deployment descriptors and development of CMP EJBs can be accomplished by using only the plugin and the IDE, the most common scenario is to also configure the IDE connect to an application server deployment environment for the purpose of deploying and testing applications.
Connecting the IDE to Application Server Deployments
The plugin relies on a small number of administrative client JAR files that enable the plugin to communicate with the administrative server of an application server deployment. Once the plugin is installed in either the IDE or a user's IDE directory and the administrative client libraries have been made available on the same machine, a property must be set to inform the plugin about the location of the administrative client libraries.
Once the administrative client libraries are installed and the IDE is configured properly, the developer is able to register any number of either local or remote application server deployment environments in the IDE. Any one of these registered application server deployments can be designated as the default server in the IDE.
When you install the evaluation distribution of Sun ONE Application Server 7 that also includes Sun ONE Studio 4, Enterprise Edition for Java, the plugin and dependent administrative client files are installed automatically. In the case of a combined installation, the plugin is automatically configured to point to the application server's installation location so that the plugin can access the administrative client libraries.
Setting Up Your Development Environment
Your first step in working with Sun ONE Studio 4 and Application Server 7 is to set up the two environments to work together. Based on the products that you've installed on your system(s), use the following table to determine the steps required to set up your development environment.
Note
Application Server Must be Installed: The following starting points assume that you've already installed the application server. If you have not already installed the application server, download Sun ONE Application Server 7 and install it according to the instructions contained in the Getting Started with Sun ONE Application Server 7 guide on the Sun Microsystems documentation web site. If you have not already installed Sun ONE Studio 4, Enterprise Edition for Java, download the application server distribution containing the IDE. Installation of the combined Sun ONE Application Server 7 and Sun ONE Studio 4, Enterprise Edition for Java distribution results in a minimal number of post installation configuration steps.
Starting Point
Description
Steps
Application Server and Studio 4 Installed Together
Evaluation distribution of Sun ONE Application Server 7 including Studio 4 has already been installed on your system.
Studio 4 Not Yet Installed
or
Studio 4 Installed Separately from the Application Server
Products installed separately.
1. Install Sun ONE Studio 4, Enterprise Edition for Java (if not already installed)
2. Install IDE Plugin (Sun ONE Application Server 7 Plugin for Studio 4)
Studio 4 and Application Server Installed on Separate Machines
Remote development server scenario.
1. Install IDE Plugin (Application Server 7 Plugin for Studio 4 Enterprise Edition) on Development Workstation.
Install Sun ONE Studio 4, Enterprise Edition for Java
If you have not already installed the IDE, download Sun ONE Studio 4, Enterprise Edition for Java and follow the installation instructions in the Getting Started Guide for Sun ONE Studio 4, Enterprise Edition for Java. The Getting Started Guide for Sun ONE Studio 4, Enterprise Edition for Java can be accessed through either the Documentation section of the Sun ONE Studio 4 product page or docs.sun.com.
When installing the IDE, it is recommended that you use either Java[tm] 2 SDK (J2SDK), Standard Edition 1.4.0_02 or greater so as to match the J2SDK requirements of Sun ONE Application Server 7. Refer to the Sun ONE Studio 4, Enterprise Edition for Java Getting Started Guide and Sun ONE Application Server 7 Installation Guide for detailed J2SDK compatibility information.
Once you've installed the IDE according to the instructions in the IDE's Getting Started Guide, continue following instructions in this section to install the Sun ONE Application Server 7 plugin and to register a Sun ONE Application Server 7 runtime environment as the default application server in the IDE.
Install IDE Plugin
If you installed the combined Sun ONE Application Server 7 and Sun ONE Studio 4, Enterprise Edition for Java evaluation distribution, then you do not need to install the IDE plugin. In this case, proceed to the section Register Target Application Serverto complete the IDE set up process.
If you did not install the combined application server and IDE distribution, follow these instructions to install the application server's plugin for the IDE. The plugin installation instructions vary depending on whether the IDE is installed on the same machine as the application server or the IDE and application server are installed on different machines.
- Application Server and IDE Installed on Same Machine
- Application Server Installed on Remote Development Server
Application Server and IDE Installed on Same Machine
If the application server is installed on the same machine as the IDE but you did not install the combined application server and IDE products, you must install the application server's plugin for the IDE. There are two ways in which you can accomplish the plugin installation:
- Download Plugin from the Sun ONE Studio Update Center
- Install the Plugin Using the Sun ONE Application Server 7 Installer
Download Plugin from the Sun ONE Studio Update Center
The application server's plugin for the IDE is available as a NetBeans Module file (.nbm file) through the Sun ONE Studio Update Center. You can use the IDE's Update Center Wizard to connect to the update center and install the Sun ONE Application Server 7 IDE plugin module.
- In the IDE, select Tools -> Update Center... to access the Sun ONE Studio Update Center.
The Select Modules to Install window is displayed.
- Under Available Updates and New Modules, select the Sun ONE Application Server 7 plugin module and move it to the Include in Install portion of the window. Click Finish to begin installation of the plugin module.
To complete the installation of the plugin module, the IDE must be restarted.
Proceed to the section Register Target Application Server to complete the IDE set up process.
Install the Plugin Using the Sun ONE Application Server 7 Installer
If you have access to the non-evaluation distribution of Sun ONE Application Server 7, you can use the application server's installation program to install the application server's plugin.
- Start the application server's installation program.
- In the Select Installation Directory screen, ensure that the location of your existing application server installation directory is specified.
- In the components selection screen, select the component named Support for Sun ONE Studio 4, Enterprise Edition for Java.
- When prompted for the installation location of the IDE, enter the appropriate location and continue with the installation process.
If the IDE is running, then restart it and proceed to the section Register Target Application Server to complete the IDE set up process.
Application Server Installed on Remote Development Server
If the application server is not installed on the same machine as the IDE and you plan to use the IDE to work with an application server installed on a remote server, then you need to install both the application server's plugin for the IDE and the application server's administrative client support on the development workstation.
If the application server is already installed on the same machine as the IDE and you'd like to use the IDE to work against a remote application server, the application server's administrative client support is already installed. In this case, proceed to the section Register Target Application Server to complete the IDE set up process.
To install the application server's plugin for the IDE and the administrative client support, you can use the non-evaluation distribution of the Sun ONE Application Server 7 product. In this distribution the installation program enables you to select a component named Support for Sun ONE Studio 4, Enterprise Edition for Java. Selection of this component results in the installation of both the application server's plugin for the IDE and the administrative client support.
Alternatively, if you have access to only the evaluation distribution of the application server, you can install the complete application server on the development workstation and follow the steps in Application Server and IDE Installed on Same Machine to install the application server's plugin for the IDE.
In any case, once you've installed the plugin and the administrative client support, proceed to the next section to complete the IDE set up process.
Register Target Application Server
Once you've installed Sun ONE Studio 4, Enterprise Edition for Java and the application server's plugin, you are ready to register a target Sun ONE Application Server 7 runtime with the IDE.
Start the Application Server
If the application server is not already started on either your local workstation or on a development server, start the application server at this time.
The application server must be started in order for you to register an application server with the IDE.
Start the Application Server on Windows Platforms
To start the application server from the Windows desktop, select:
Start -> Programs -> Sun Microsystems -> Sun ONE Application Server 7 -> Start Application Server
After selecting Start Application Server, a command window is displayed to show the status of the startup process.
A second command window also appears on your desktop. This command window is a read only representation of the server event log file content. The second command window remains on your desktop as long as the associated application server instance is running. As the initially configured server starts, event messages appear in the second command window. After a few seconds, a message confirming that the server instance has started successfully appears in the command window.
Start the Application Server on UNIX Platforms
On UNIX platforms, execute the following command:
$ <appserver_install_dir>/bin/asadmin start-domain --domain domain1
Execution of this command starts the initially configured domain, named "domain1", on your system.
Start the IDE
Start the IDE by running the program executable, as described in this section. For more detailed information about starting the IDE, see the Getting Started Guide for the Sun ONE Studio 4, Enterprise Edition on the Sun Microsystems web site.
The first time you use the IDE, several dialog windows appear that allow you to do the following:
- Set the user directory to store user and IDE configuration information.
- Import settings from a previous installation of the IDE.
- Configure a proxy server if you are behind a firewall.
- Set your preferred web browser.
- Register the product. After registering, you will be eligible for any product updates that are released.
Start the IDE on Windows Platforms
There are three methods of starting the IDE:
- From the Windows desktop, select:
Start -> Programs -> Sun ONE Studio 4u1 EEfJ -> Sun ONE Studio
- Double-click the Sun ONE Studio 4u1 EEfJ icon on your desktop.
- Run the runide.exe executable from the command line. For example:
c:\> <ide_install_dir>\bin
Start the IDE on UNIX Platforms
A runide.sh script is located in the ide_install_dir/bin/ directory. Start the IDE by executing following command in a terminal window:
<ide_install_dir>/bin/runide.sh
Set Sun ONE Application Server as the Default Server
Since the exercises in the guide depend on the Sun ONE Application Server, you need to make sure that an available Sun ONE Application Server is registered and is set as the default server in the IDE.
Once you set an application server as a default server, all deployment, execution and debugging operations selected from within the IDE automatically targets the default server.
Ensure Plugin is Configured with Application Server Installation Directory
In order for the IDE and plugin to interact with a Sun ONE Application Server 7 runtime, the plugin must be configured to point to the installation location of either the fully installed application server or the application server's administrative client libraries. If you installed the evaluation distribution of Sun ONE Application Server 7 that also included the IDE, the plugin has already been configured with the appropriate application server installation directory.
- In the IDE, bring up the Explorer window and Runtime tab at the bottom of this window. If you do not see the Explorer window, simply select View->Explorer from the main IDE window.
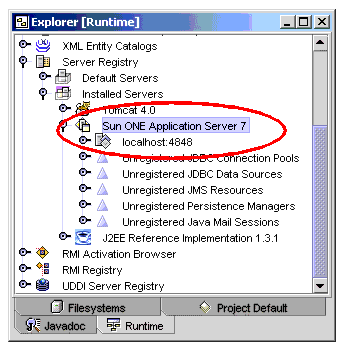
- Expand the Server Registry, Installed Servers, and Sun ONE Application Server 7 nodes.
Caution
Sun ONE Application Server 7 Does Not Exist: If you do not see Sun ONE Application Server 7 node in the Installed Servers area, then it is likely that the plugin module for the application server has not yet been installed. See the Install IDE Plugin section for instructions on installing the application server plugin.
- Right-click the Sun ONE Application Server 7 node and select Properties.
The properties editor is displayed.
- Ensure that the Sun ONE Application Server Home property is configured with the location of either the application server or application server's administrative client component.
For example, on Windows systems, this property value may appears as follows:
c:\Sun\AppServer7
On Solaris[tm] systems, examples of the property setting include:
/usr/appserver
/opt/SUNWappserver7
<home_dir>/appserver7
Register a Sun ONE Application Server
Now that you've ensured that the plugin is configured properly, your next step is to register a specific application server runtime environment with the IDE.
To register an application server:
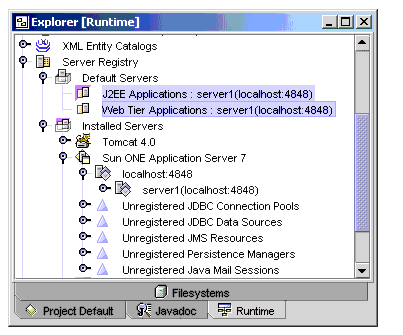
- Under Installed Servers section, expand the Sun ONE Application Server 7 node.
If you see a localhost:port node under the Sun ONE Application Server 7 node, an application server instance is already registered. If the named server is the one with which you plan to work, you can proceed to the Verify that the Application Server Instance is Running section.
- If you either do not see a registered application server or the registered server is the not the server of interest, right-click the Sun ONE Application Server 7 node and choose Add Admin Server.
The Add Admin Server dialog box appears.
- Type localhost in the Admin Server Host field.
- Type your server's administrative server port number in the Admin Server Port field.
- Type the administrative user name in the User Name field.
- Type the administrative password you specified during installation in the User Password field.
- Click OK.
You should now be able to see the application server listed as an installed server.
- Expand the localhost:port administration server node, you can see a node named server1(localhost:4848) that corresponds to the application server instance that was created during installation of the application server. You will be using this instance throughout this tutorial.
- Right-click the server1(localhost:4848) node and select Set As Default.
- Verify that the default server has been set correctly by expanding the Default Servers node under the Server Registry area.
You should see the server1(localhost:4848) item as the default server instance.
Verify that the Application Server Instance is Running
In this section, you will examine whether or not the application server instance is running and to start it if it is not running.
- Right-click the server1(localhost:port) instance node and select Status.
The Server Status dialog box appears. If the Start Server Instance button is disabled, the application server instance is already running and you can skip the next step, number 2.
- Click the Start Server Instance button.
After several seconds, the application server instance starts, and the Server Status dialog box indicates that the instance is started.
- Click OK to close the Server Status dialog box.
Now that the application server is started and the IDE is configured properly, you are ready to proceed to Developing Session Beans and Web Applications.