| Chapter 5- |
|
CST Administration |
This chapter provides an overview of the Configuration and Service Tracker (CST) software for version CST 3.5. It includes the following sections:
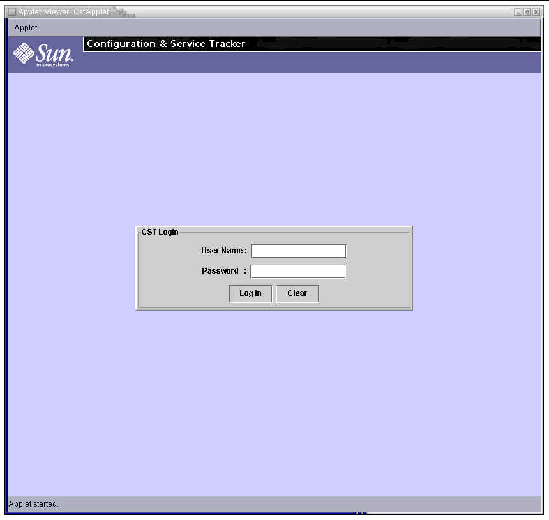
Access control is implemented to enhance security when viewing and annotating data. This security feature allows only authenticated users to view and annotate the CST data by providing a login session when a user accesses the CST console or applet. The user needs to have a Unix login account on the middleware host in order to access CST data. When prompted with "Username" and "Password", login as he, or she, would log into the host through the login Unix command.

Each CST 3.5 user is assigned a login and a user access level.
In addition to the usrname and passwd check, CST includes its own access control. Each user belongs to a group, either cstadm or cstops.
1. Become superuser on the server system.
2. Create the desired group. Type:
1. Open the /etc/group file in a file editor.
2. Add your login name to the cstadmin or cstops group in the /etc/group file.
3. Save the file and exit the editor.
Following is a sample /etc/group file:
root::0:root
other::1:
bin::2:root,bin,daemon
sys::3:root,bin,sys,adm
adm::4:root,adm,daemon
uucp::5:root,uucp
mail::6:root
tty::7:root,tty,adm
lp::8:root,lp,adm
nuucp::9:root,nuucp
daemon::12:root,daemon
sysadmin::14:
nobody::60001:
noaccess::60002:
nogroup::65534:
cstadm::99015:joe
cstops::99016:gwen,tom
CST user access levels are an extension of the Sun Management Center access levels. This security measure allows access control to the CST console.
|
Note - The user access control functionality is available in both the Sun Management Center add-on and stand-alone CST 3.5 versions. |
The Sun Management Center security feature authenticates login and access control privileges for users and groups. It enables users to set security permissions at the administrative domain, group, host and module levels. You can restrict access to different groups by setting different permissions. To access Sun Management Center security features, select the Attribute Editor option under the Sun Management Center Tools menu.
Sun Management Center has three levels of access for user accounts:
For more information about Sun Management Center access levels, refer to the Sun Management Center 3.0 Software User's Guide.
A Sun Management Center general user has read-only permissions as a general CST user. Any level of user can open a CST console and view its data. A general user can select buttons and icons to view information, but cannot affect or edit the comments. See TABLE 5-1 for a list of permitted actions.
In addition to this, CST has two levels of its own: cstadm and cstops. Currently, these levels have identical privileges. cstadm and cstops have lower privileges than the Sun Management Center Admin level, and only affect CST data. Only a system administrator with root privileges can add or delete users for the CST-specific levels.
The cstadm and cstops user levels have access to all privileges in the CST console. The primary difference in permissions is that a cstadm can create cstops users and groups and cstadm users and groups. See TABLE 5-1 for a list of permitted actions.
|
View the Status Panel {System displayed, System status, CST status) |
||
|
Note - If a user is not added to cstadm or cstops, the user cannot log into CST. An error message, "ERROR: not authorized to access CST" displays in the login session. |
CST 3.5 has a built-in feature to send all collected CST data to a secure database in Sun. The benefit of sending the data to Sun is to enable generation of detailed availability and configuration reports using the data collected. The reports are enriched by the use of normalized data from multiple customer sites and can provide insight into the overall availability of systems in the enterprise. These reports can be obtained with the help and interaction of your local Sun representative. For more details about the benefits of this registration, contact your local Sun representative.
Before this feature can be enabled, the user must register the site with Sun and enable data flow from the CST server to Sun. The registration process can be completed through the Site Info Dialog window.
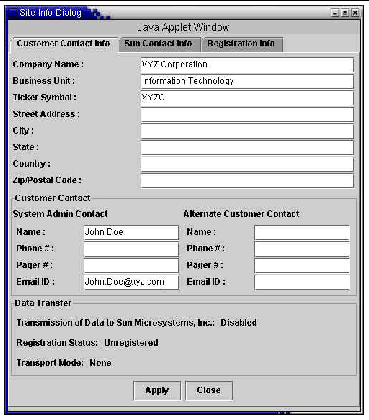
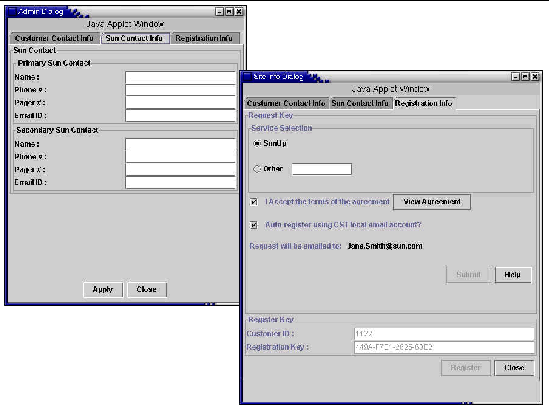
There are three tab folders within the Site Info Dialog window: Customer Contact Info, Sun Contact Info, and Registration Info. All three screens need to be filled in to configure your environment. See the CST Features and Functions chapter, Site Information section, for details on entering your site information into these screens.

You must set up the environment. In particular, ensure that the server has the ability to send email to the outside world.
1. Ensure all fields in the Customer Contact Info. and Sun Contact Info. of the Site Info Dialog window are completely and accurately filled in.
2. Since the registration key will be sent to the system administrator's contact email address, this information must be correct. If the contact email address is incorrect, the key will be lost.

3. Ensure the agreement is fully read and understood. Once you have read and agree, check the AGREE TO THE AGREEMENT box.
4. If setting up an account for CST in the middleware server is acceptable, CST will set up an account and use it as sender to transmit the data from that account. It can also receive email coming in and can be used in future to provide automated reporting and other services. If this is acceptable, select the SETUP CST ACCOUNT button. Selecting this flag is optional.
1. On a successful submit (if all mandatory data fields are completed) an email is sent to the Sun representative identified in the Sun Contact Info. that includes all the data entered in the Admin Dialog box.
2. The Sun representative will confirm that the installation is adequately set up for sending data to Sun and that all the mandatory fields have appropriate information.
3. Once confirmed, the Sun representative will forward the email to Sun for a registration key and a customer ID.
4. When granted, the registration key and customer ID are forwarded by email to the address given in system administrator contact email address.
5. Access this information and enter them in the Register Key panel in the Admin dialog box (the screen currently active) and click the REGISTER button.
1. If the registration is successful, a "CST registered" event is created on each of the agents currently reporting into this middleware server.
2. The CST registered event, configuration files, and the user data files for these agents are sent to Sun.
3. On the Admin dialog box, under Customer Contact Info, Transfer Data to Sun is set to ENABLED.
4. If setting up a CST account is selected, a CST account is created on the server.
CST support for TCP protocol between the CST agent and server is introduced with CST 3.5. The network transport between the CST agent and the CST server can be either TCP or UDP (RPC). If you want to use TCP protocol, you must specify your selection when the CST agent is first attached to the server. See the Utilities chapter, for details.
The default network transport between the CST agent and the CST server is UDP(RPC). This protocol is a full-duplex protocol, i.e. the CST agent will issue RPC to the CST server and vice versa.
If the selected transport protocol is TCP, the CST server and agents listen on TCP port 3742. You must open port 3742 through the firewall for the traffic, if any, to pass in both directions.
If the selected transport protocol is UDP, the RPC program number used by CST is 805306372 (30000004 hex). By default, the system assigns a random port as the UDP port). However, the user can overwrite the random port assignment by setting a range of ports to which the CST process binds. In order to do this, there is a file on both the agent and the server which needs to be edited.
/var/opt/SUNWcst/files/port_cfg
Check the port_cfg file for the following two lines. Add these two lines if they are not currently in the file.:
minport=<a minimum port number>
maxport=<a maximum port number>
Each user needs to restart the CST process for the port range to take effect.
Stop and restart CST by following these steps. At a root prompt, type:
In case of an upgrade from an earlier version of CST to CST 3.5, the transport protocol used will be UDP. To force the CST agent to use TCP as the network transport protocol follow the procedure.
# /opt/SUNWcstu/sbin/cstadm stop
2. Edit the file, /var/opt/SUNWcst/xprt, with this command:
3. Restart the CST agent. Type:
# /opt/SUNWcstu/sbin/cstadm start
After you successfully execute these steps, the CST agent and server automatically negotiate to use TCP as the transport protocol.
The network transport between the CST server and the CST client is TCP. By default, a random port is assigned by the system, The user can overwrite it by setting a range of ports for the CST server to bind to. To override the default, edit the file:
/var/opt/SUNWcst/files/port_cfg
Check the port_cfg file for the following two lines. Add these two lines if they are not currently in the file.:
tcpminport=<a minimum port number>
tcpmaxport=<a maximum port number>
|
Note - You must restart the CST server for the port range to take effect. |
Do the following to stop and restart CST:
CST automatically decides if a resource is present and, when detected, assigns the default tracking interval and invokes the tracking thread for that detected resource. The tracking thread includes, for example, detection of dynamic reconfiguration of hardware change and cluster configuration changes. The defaults are preset to keep the load on the system light and still be frequent enough to detect most, if not all, events.
The tracking intervals are tunable to better suit specific system needs. The tuning is achieved by:
1. Manually editing the cst.conf file in the /var/opt/SUNWcst directory of each system.
2. Restarting CST by issuing a CST STOP followed by a CST START.
|
Note - See the syntax to edit the file and restarting in section To Tune CST Event Detectors. |
The following table indicates the various entries that control the tracking intervals and their limits. The value must be within the stated limits. Values outside of these limits are automatically reset to the minimum or maximum value.
*These two entries apply to only the listed server platforms.
Some of the event detectors use polling to check for changes. The monitoring frequency of those event detectors can be tuned through the cst.conf file in /var/opt/SUNWcst directory. The format adopted in this file is:
<event detector_interval><tab><value>
For all parameters ending with _INTERVAL, the value indicates the monitoring interval in seconds. Each monitoring entity has a pre-specified maximum, minimum, and a default period. The CST process resets any setting above the maximum or below the minimum to the maximum or minimum periods respectively. The default setting is the one set when CST is installed. A preset value of 0 indicates that the monitoring of that entity has been stopped.
FRUINFO_ENABLE is a binary parameter.
A sample cst.conf file is shown below:
# CST Configuration File.
# REVISION: 3.5
# Format:
# <Key Name><tab><value>
#
#
DR_INTERVAL 3600
VXVM_INTERVAL 900
FRUINFO_ENABLE 1
CLUSTER_INTERVAL 300
SF15K_FRU_INTERVAL 1800
SF15K_EVENT_INTERVAL 3600
To change a monitoring interval for a specific entity, the value parameter for that entity must be manually edited in the cst.conf file.
|
Note - The change does not take effect until the cst daemon is restarted. |
To stop and restart the CST daemon use the following commands:
Follow these steps to detach CST from a middleware:
1. Create an app_event in the agent with event name "CST detached." Type:
$ /opt/SUNWcstu/bin/app_event "CST detach" "CST detached from <middleware_name>"
3. Edit the /var/opt/SUNWcst/cst.pref file and remove the value for MIDDLEWARE field.
4. If CST is to run in a stand-alone mode (without reporting to any middleware), restart CST. Type:
Ensure that a copy of CST is running on the systems at all times.
After an OS upgrade on the agent, if the CST data on the agent is lost, the agent must be restored from the copy on the middleware.
1. To restore, copy all the agent files under the agent hierarchy in the middleware repository to the directory, /var/opt/SUNWcst, on the agent host.
2. Then run the command, pkgadd, for the agent package on the agent system.
For the System Service Processors (SSP) and System Controllers (SC) on multi-domain systems, the restore also involves restoring the platform data in addition to the agent data. The platform data under the platform hierarchy must be copied to:
Consult the guidelines in the section, To Attach a Multi-domain Agent to CST Server, of Chapter to determine the location of the platform data.
|
Note - CST is not automatically installed as part of an OS upgrade. It must be installed after the OS upgrade. |
While installing CST, remember that the CST software is only `fresh installed' the first time. A fresh installation of CST software means that no CST files or data have ever existed on the agent system nor on its middleware repository.
CST provides you with the functionality to group your monitored systems for ease of viewing a specific system as well as a group of systems. By configuring the hierarchy of your monitored nodes in groups, you can browse through the top level group names and drill down as required. Using the Hierarchy functionality can also help with UI loading performance.
You may want to change the CST hierarchy configuration due to regroup your monitored systems. Upgrading your CST version does not alter the hierarchy. When you want to change the hierarchy of your CST monitored systems, perform the steps in the following section.
CST events are collected on the agent and forwarded to the CST server, middleware, and stored in the server repository. Each monitored agent machine includes a file, cst.pref, where the hierarchy settings are read when events are to be sent to the repository. A copy of that file resides on the middleware under the repository. The location where the agent events are stored in the repository on the middleware must be created so, when the location is read in the cst.pref file, the data can be sent correctly.
These steps include backing up the event data for the agent system being moved and establishing all of the correct links within this structure. Follow these steps to alter the hierarchy for an agent and move the agent data:
1. Back up the agent data that resides under the server repository. This is located on the CST server, middleware.
2. Before you proceed, check that there is no /var/opt/SUNWcst/bkup_events file on the agent system. If you see the file, it means the agent is still trying to send the backlogged events to the server. Make sure that the middleware server is up and running and wait until bkup_events is no longer present.
3. Log onto the agent system as superuser.
4. Stop the CST daemon on the agent system. At the root prompt on the agent machine, type:
/opt/SUNWcstu/sbin/cstadm stop
5. Log onto the middleware server system as superuser and perform hierarchy moving. Run these commands at the root prompt:
cat /var/opt/SUNWcst/cst.pref | grep ROOT_PATH
cd <ROOT_PATH value in cst.pref>
These commands find the location of the repository and the cst.pref file on the CST server.
6. Locate the agent hierarchy and create a directory in the new location to hold agent data.
7. After you create the new location, move the hierarchy to the new place inside the ROOT_PATH using the 'mv' command.
In this step you create the new location on the middleware under the repository where the agent data will be stored, and you move the existing data for the agent into the new location.
Execute the commands on the middleware at a root prompt as superuser.
Example:
Moving a/b/Agent1.Sun.COM to b/c/Agent1.Sun.COM
8. On the middleware server, manually edit the cst.pref file to update the HIERARCHY value. The new value must reflect the directory created in the above step. (e.g., b/c/Agent1.Sun.COM/cst.pref)
9. On the agent system, manually edit the cst.pref file to update the HIERARCHY value. The location of this file is: /var/opt/SUNWcst/cst.pref
10. Make sure that the HIERARCHY values in both copies of the cst.pref files, as modified in in steps 8 and 9, are identical.
11. If you use CST in a SunMC environment, remove the IPLINK of the agent IP address and create a new link to the new hierarchy. The IPLINK directory is located under the repository directory (ROOT_PATH).
12. Start the CST agent daemon. At the root prompt on the agent machine, type:
/opt/SUNWcstu/sbin/cstadm start
Copyright © 2003, Sun Microsystems, Inc. All rights reserved.