Enabling Sharing of a Portlet
You can enable sharing of a portlet on any website, on Facebook, and by Friends.
Sharing a Portlet With Other Websites
Consider the example of sharing the Calendar portlet on a website created by you. The following is the scenario involved:
-
Click on the Configuration button among the edit controls for a portlet.
-
Click on the Sharing tab.
Any Website, Facebook and Friends are the three tabs within the Sharing tab.
-
Copy the code in the Any Website tab.
-
Select the Allow users to add <portlet> to any website option and click Save.
-
Paste the copied code into the html source of any website and save the page. The portlet is added to the website.
 To Share a Portlet With Other Websites
-
Login to Project WebSynergy as any user of your choice.
In this example, login as Paul Tester.
-
Click on the Configuration button among the edit controls for the portlet.
In this example, click on the Configuration button among the edit controls for the Calendar portlet.
-
Click on the Sharing tab.
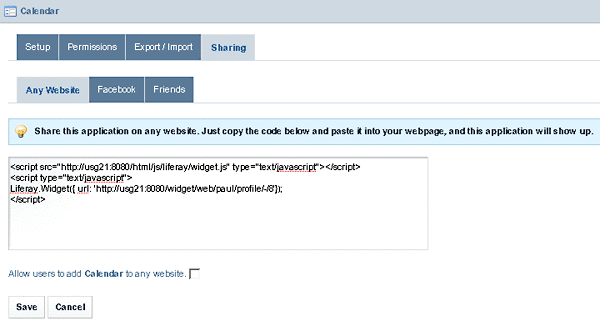
Figure 7–34 The code for sharing the portlet on any website

-
Copy the code for sharing the portlet on any website.
-
Select the Allow users to add Calendar to any website option.
-
Click Save.
-
Open the source code of any website and copy the sharing code into it, and save changes to add the portlet to the website.
As a simple example for this, do the following:
-
Open the Mozilla Classic browser
-
Click Edit Page from the file menu.
-
Click on HTML Source.
-
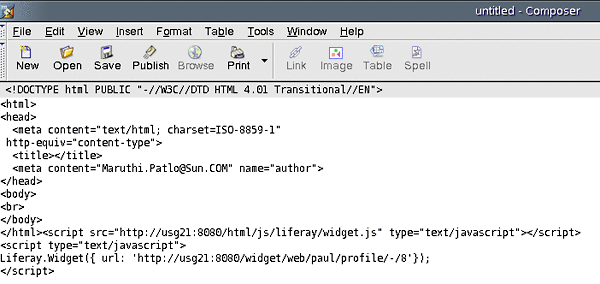
Paste the copied sharing code into the page.
Figure 7–35 Adding the sharing code to the source code of a website

-
Click Save.
-
A dialog box requesting for a page title appears. Type a title and click OK, and save the page your desktop.
In this example, we are naming the page as Calendar Sharing.
-
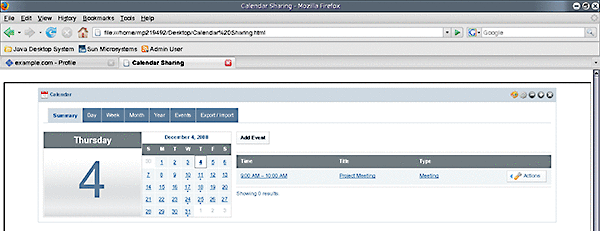
Open the page in a web browser. You can notice that the Calendar portlet is added to the page.
Figure 7–36 The portlet added to the website

-
Sharing a Portlet With Facebook
The following is the scenario involved in sharing a portlet with Facebook:
-
Click on the Configuration button among the edit controls for the portlet.
-
Click on the Sharing tab.
-
Click on Facebook under Sharing.
-
Click the Get the API key and canvas page URL from Facebook, and follow the instructions to get the API key and a canvas page URL for the portlet.
-
Specify the API key and the canvas page URL and click Save.
-
You can access the portlet on Facebook by using the canvas page URL.
 To Share a Portlet With Facebook
-
Login to Project WebSynergy as any user of your choice.
In this example, login as Paul Tester.
-
Click on the Configuration button among the edit controls for the portlet.
In this example, click on the Configuration button among the edit controls for the Calendar portlet.
-
Click on the Sharing tab.
-
Click on Facebook under Sharing.
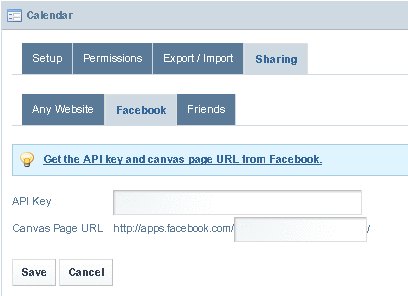
Figure 7–37 Sharing on Facebook

-
Click on 'Get the API key and canvas page URL from Facebook' link and follow the instructions to get the API key and canvas page URL from Facebook.
-
specify the API key and the canvas page URL and click Save.
-
Access the portlet on Facebook by using the canvas page URL.
Sharing a Portlet With Friends
The Friends portlet lists the WebSynergy users who are registered as your friends. You can authorize your friends to access a portlet which is on your page.
You need to perform the following steps to enable friends to access a portlet on your page:
-
Click on the Configuration button among the edit controls for the portlet.
-
Click on the Sharing tab.
-
Click on Friends under Sharing.
-
Select the Allow users to share <portlet> with friends option and click Save.
- © 2010, Oracle Corporation and/or its affiliates
