Chapter 7 Sample Use Cases for WebSynergy Portlets
To be done.
Using the Friends Portlet
The following is a use case for adding a friend to the Friends Portlet.
You can view the list of your friends and their profiles on the Friends widget. There is no easy and straight forward way of adding friends to the Friends widget.
This use case explains a scenario where you make use of the Search and Invite Friends widgets and the Requests widget to add a friend to the Friends widget.
 To Add a Friend
-
login to WebSynergy as Paul.
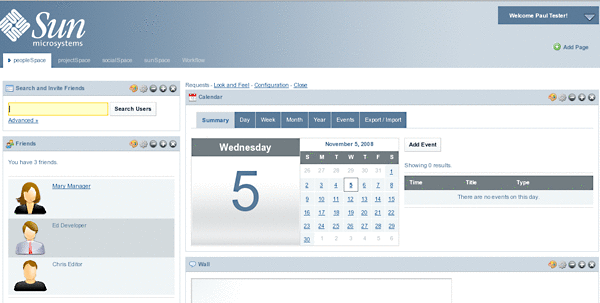
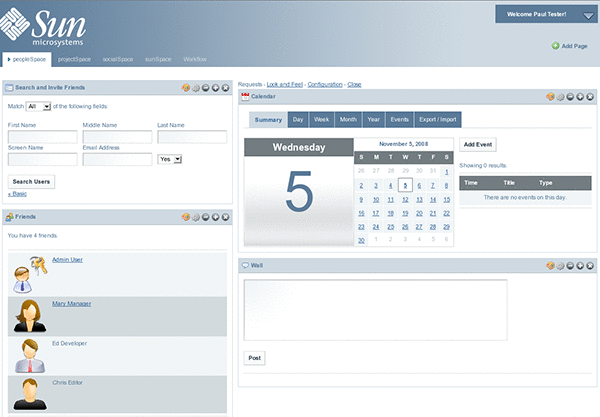
The Friends widget is displaying Mary manager, Ed Developer, and Chris Editor as the friends for Paul Tester.
-
Add the Search and Invite Friends widget to your page.
Figure 7–1 To Add a Friend
-
Click on the Advanced link.
Specify the search strings which need to be included in you search. For example, type 'example' in the Email Address field to search for users with email id containing the text 'example'.
Figure 7–2 To Add a Friend
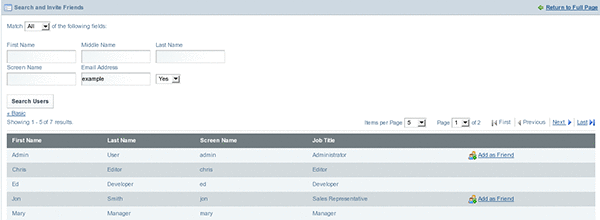
You can notice that Chris, Ed, and Mary are already friends for Paul, and there is no Add as Friend link against them.
-
Select a user and click Add as Friend link against the user.
In our example, Click Add as Friend against the Admin user. You get a message saying 'Your request is processed successfully'.
-
Logout and login again as the user selected as friend.
In our example, login as Admin user.
-
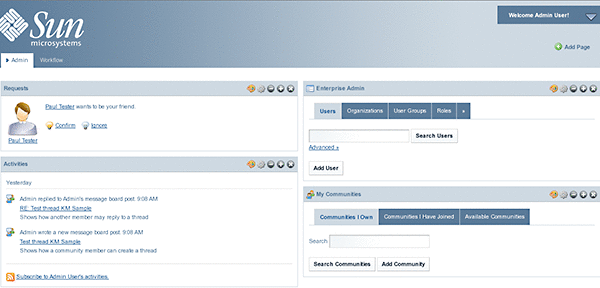
Add the Requests portlet to your page.
Figure 7–3 To Add a Friend
-
Click on the Confirm link.
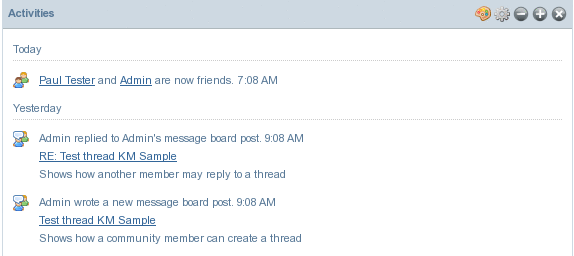
You can see on the Activities portlet that Paul Tester and Admin are now friends.
Figure 7–4 To Add a Friend
The Friends portlet on the Paul Testers page includes Admin as among the friends for Paul.
Figure 7–5 To Add a Friend
Using the Expense Report Portlet
The Expense Report widget models the Expenses Reports Reclaim process that is typical in any large organization. An Expense Report is a report comprising details of the expenses (like Business Travel, Relocation, Broadband Bills Claim) incurred by an employee that can be reclaimed from the organization.
An Expense Report created by an employee can be approved by his or her superior. Users available to the system created using the Enterprise Admin Portlet are mapped to either the Employee role or the Manager role. Let us consider the following Use Case:
Paul Tester (Employee) submits an Expense Report for a business trip. Mary Manager (Manager) verifies and approves the Expense Report. The following is the process involved:
-
Paul Tester submits an Expense Report. Paul performs the following steps to submit his report:
-
Paul selects the expense category, and enters an expense amount and description and saves the report. The system assigns a unique expense ID to the report.
-
Paul reviews the report summary.
-
Paul submits the saved report for approval by his manager.
-
-
Mary Manager verifies the details of the Expense Report. She can either approve or reject the report.
 To Submit an Expense Report
-
Login to WebSynergy as Paul Tester.
-
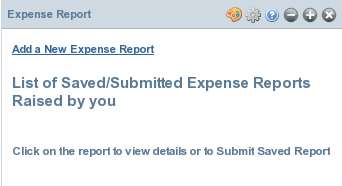
Add the Expense Report Portlet to your page.
Figure 7–6 To Submit an Expense Report
-
Click on the Add a New Expense Report link.
-
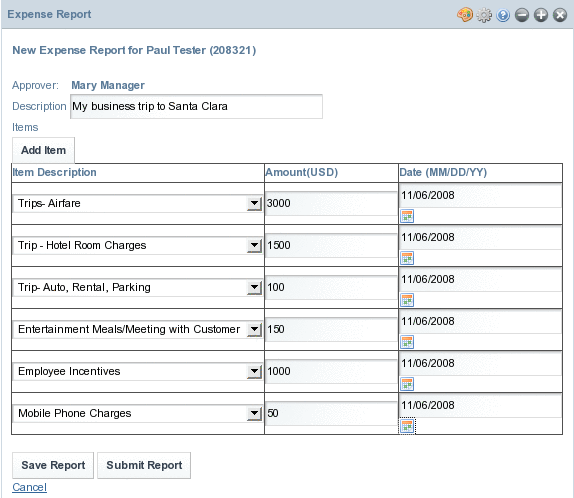
Enter a description for the Expense Report.
Enter values for Item Description, Amount, and Date fields. Click on Add Item to add a new row.
Figure 7–7 To Submit an Expense Report
-
Click on Save Report.
-
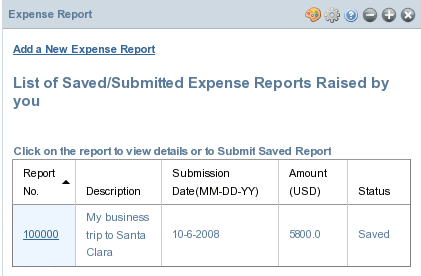
Click on the Go back to Report Summary link to view the report summary.
The summary page displays the Report No., Description, Submission Date, Amount, and the Status.
Figure 7–8 To Submit an Expense Report
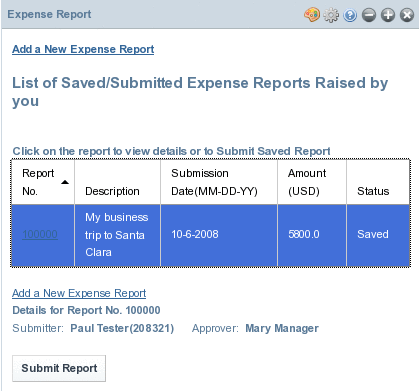
Click on the report ID. The report is enabled for submit.
Figure 7–9 To Submit an Expense Report
-
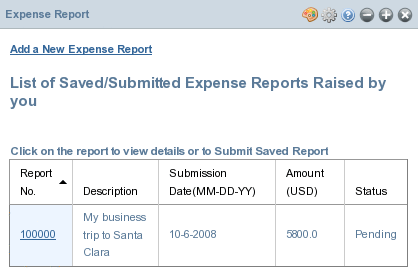
Click Submit Report.
The report is submitted for approval. Status of the report changes to Pending.
Figure 7–10 To Submit an Expense Report
 To Approve an Expense Report
-
Login to WebSynergy as Mary Manager.
-
Add the Expense Report Portlet to your page.
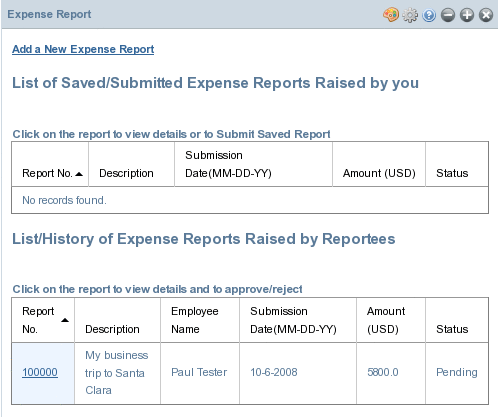
The report submitted by Paul is displayed under the List/History of Expense Reports Raised by Reportees.
Figure 7–11 To Approve an Expense Report
-
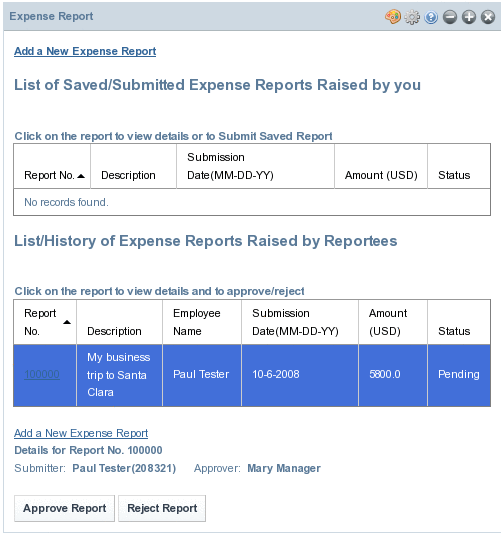
Click on the report ID.
Details of the Submitter are displayed. Also, the Approve Report and Reject Report buttons appear.
Figure 7–12 To Approve an Expense Report
-
Click on the Approve Report button to approve the report.
Delegating Portlets to Users
A User has a number of Roles associated to him. Each portlet is also associated with one or more Roles. A user can access only the portlets which are associated with his roles. If the administrator (Admin User) assigns a new role to a user, all the portlets which are associated with the role are accessible by the user. If the administrator creates a new role and associates it with some portlets, those portlets will be accessible by any of the users who have this new role assigned to them. Like this, roles can be used to delegate portlets to users.
A portlet has one or more of the four roles (Guest, Power User, User, and Administrator) by default. You can associate more roles to a portlet. For example, you can add 'Power User' and 'User' roles to a portlet which has 'Guest' role associated with it. In this case, any user with either 'Guest', 'Power User', or 'User' role will be able to access the portlet.
Consider the following scenario:
The user 'Chris Editor' has 'Power User' and 'User' Roles assigned to him. He can access only the portlets with Power User and User roles. The 'Admin portlet' has only the 'Administrator' role assigned to it, and only the 'Admin User' can access that portlet. Creating a new role named 'DelegatedAdmin' and assigning it to the Admin portlet. Then, assign the DelegatedAdmin role to Chris Editor. Now, Chris Editor has Power User, User, and DelegatedAdmin roles. Chris Editor becomes the delegated administrator for the Admin Portlet. Chris Editor can access the Admin Portlet.
This following are the steps involved:
-
Login to WebSynergy as Admin User and use the Enterprise Admin portlet to create a new role named 'DelegatedAdmin'.
-
Add the DelegatedAdmin role to the Admin Portlet.
-
Assign the DelegatedAdmin role to Chris Editor.
-
Login to WebSynergy as Chris Editor. You can access the Admin Portlet.
The following are the tasks involved:
 To Create a new Role
-
Login to WebSynergy as Admin User.
-
Click on the Roles tab in the Enterprise Admin portlet.
-
Click on the Add Role button.
-
Specify a name for the role.
In this example, DelegatedAdmin is the name of the role.
-
Click Save.
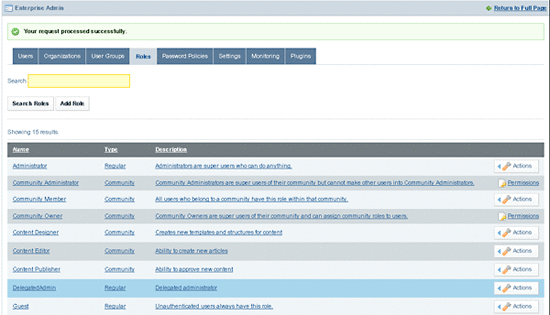
The new role is added to the list of roles.
Figure 7–13 To Create a new Role
 To Assign a new Role to a Portlet
-
Login to WebSynergy as Admin User.
-
click any of the tabs in the Enterprise Admin portlet.
The Enterprise Admin portlet expands.
-
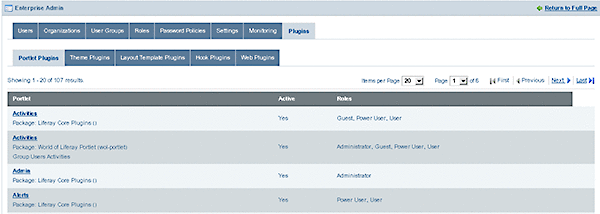
Click on the plugins tab.
All plugins are listed. The first tab displays portlet plugins.
Figure 7–14 To Create a new Role
-
Click on a portlet plugin.
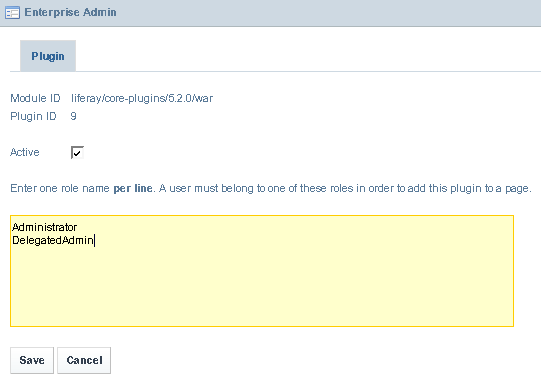
In this example, click on 'Admin'. The edit page for plugin attributes appears.
-
Add a new role for the plugin.
In this example, add the 'DelegatedAdmin' role.
Figure 7–15 To Create a new Role
-
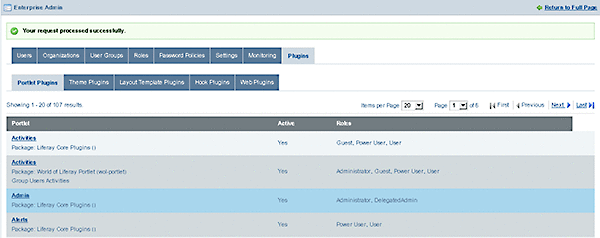
Click Save.
The new role is added to the portlet plugin.
Figure 7–16 To Create a new Role
 To Assign a new Role to a User
-
Login to WebSynergy as Admin User.
-
Click on the Users tab.
-
Click on a user.
In this example, choose 'Chris'. The page for the user appears
-
Click on the Select button below Roles.
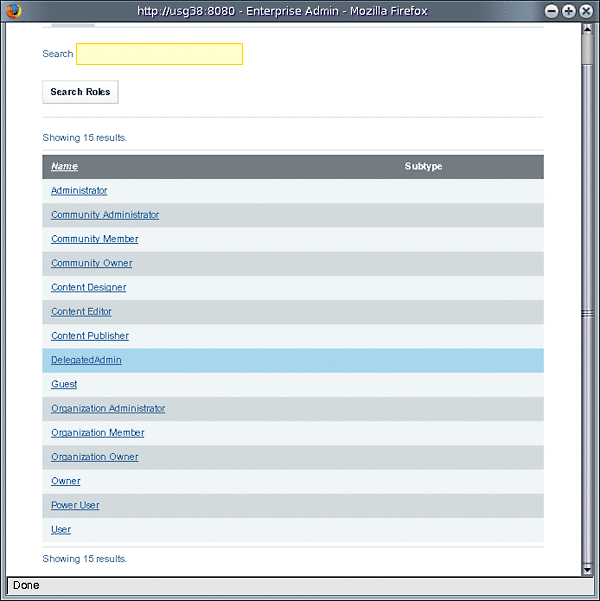
The window listing all available roles appears.
Figure 7–17 To Assign a new Role to a User
-
Click on a selected Role.
In this example, click on 'DelegatedAdmin'. The Role is assigned to the User.
-
Click Save.
 To Access a Portlet
-
Login to WebSynergy as a general user.
In this example, login as Chris Editor.
-
Click Add Application form the welcome menu.
-
Search for the delegated portlet using the search box in the Add Application window.
In this example, search for 'Admin'.
-
Add the portlet to your page by clicking on the Add button against the portlet.
In this example, add the Admin portlet to your page.
Using the Presence Feature
To be done.
Chatting Using Project WebSynergy
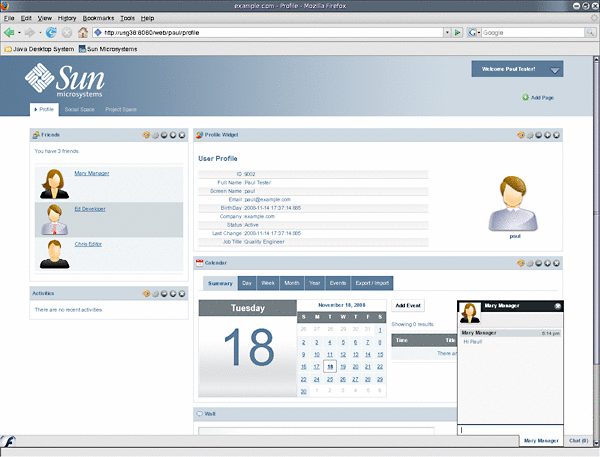
The 'Chat' feature in Project WebSynergy enables you to chat with the 'Friends' who are currently online.
If you consider the example of Sample Users for Project WebSynergy, Ed Developer, Mary Manager, and Chris Editor are the Friends for Paul Tester. The Friends portlet displays all the friends for the user.
This means, Paul can chat with Ed, Mary or Chris if they are online. You can chat with friends by clicking on Chat at the right-bottem of your page. Chat {0} indicates that no friends are online. Chat {1} indicates that there is one friend online.
Consider, a simple use case to demonstrate the working on the Chat feature.
-
Open a browser window and login to Project WebSynergy as Paul Tester.
-
Open another browser window and login as Mary Manager.
-
Click on Chat. It displays all the friends who are online. In this example, it displays 'Paul Tester'. Click on 'Paul Tester' to write a message, and press Enter.
-
When you login again as Paul Tester, you can view the message form Mary Manager by clicking on Chat. You can reply to the message from Mary Manager.
Figure 7–18 Chat feature
Making Calls Using Project WebSynergy
To be done.
Using the Portlets for Enterprise Social Networking
Facebook, Linkedin, Plaxo, and Twitter are the most popular Enterprise Social Networking websites. The Facebook, Linkedin, Plaxo, and Twitter portlets inWebSynergy provide the interface to work with these Enterprise Social Networking websites respectively.
-
To Access the Linkedin Portlet
Similarly, you can access Plaxo and Twitter.
 To Access the Facebook Portlet
-
Login to WebSynergy as a general user.
In this example, login as Chris Editor.
-
Click Add Application form the welcome menu.
-
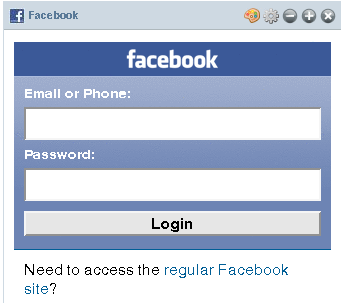
Add the Facebook portlet to your page.
Figure 7–19 Facebook portlet
-
Login to Facebook by using the interface provided by the portlet.
 To Access the Linkedin Portlet
-
Login to WebSynergy as a general user.
In this example, login as Chris Editor.
-
Click Add Application form the welcome menu.
-
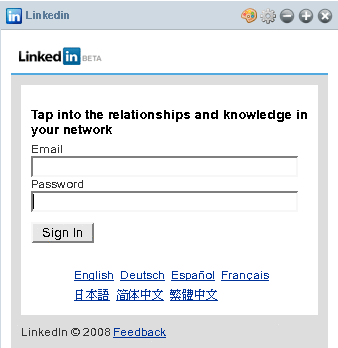
Add the Linkedin portlet to your page.
Figure 7–20 Linkedin portlet
-
Login to Facebook by using the interface provided by the portlet.
Working with Communities and Organizations
To be done.
Adding Public and Private Pages
You can add public and private pages to Communities and Organizations.
The below procedure explains how you can add a public page and a private page to an Organization. You can add public page and private pages to a Community by following the similar procedure.
For the procedure to create an Organization, see To Create an Organization.
 To add a Public and a Private Page to an Organization
-
Login to Project WebSynergy as Admin User.
-
Click on the Organizations tab in the Enterprise Admin portlet.
All existing Organizations are listed.
-
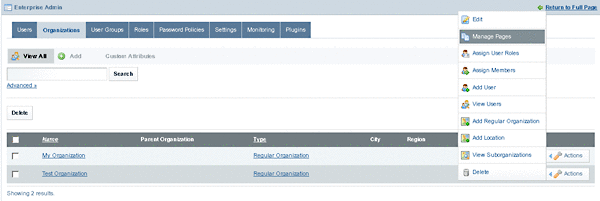
To add a page, click on the Actions button against an Organization and choose Manage Pages from the menu.
In this example, we are adding pages to an Organization called 'Test Organization'.
Figure 7–21 Adding a page
-
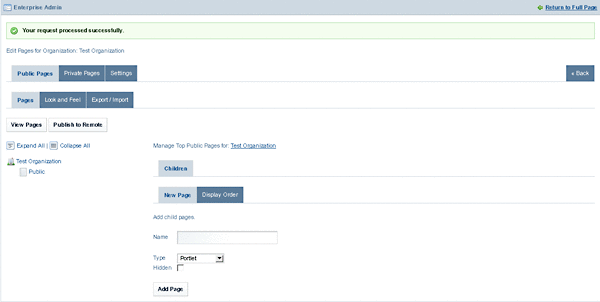
To add a public page, choose the Public Pages tab and specify Name and Type for the page.
In this example, we are creating a public page named as 'Public' with the type 'portlet'
-
Click on the Add Page button.
The page is added to the Organization.
Figure 7–22 Adding a page
-
To add a private page, click on the Private Pages tab and specify Name and Type for the page.
In this example, we are creating a private page named as 'Private' with the type 'portlet'
-
Click on the Add Page button.
The page is added to the Organization.
Figure 7–23 Adding a page
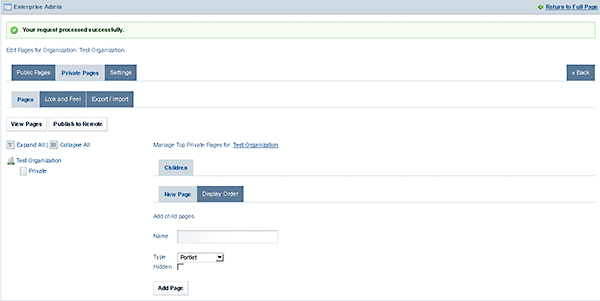
You can add more Public or Private pages and can change the display order for pages by clicking on the Display Order tab.
Activating Staging and Workflow
To be done.
Activating Staging
The admin user can activate staging for Communities and Organizations. When you activate staging for Communities or Organizations, they can be used in the production environment.
WebSynergy by default has Content Management Sample, Knowledge Management Sample, and Collaboration Sample Communities. For the procedure to create a new Community, see NULL.
The below procedure explains how we can stage Communities. You can stage Organizations by following the similar procedure.
 To Stage a Community
-
Login to Project WebSynergy as Admin User.
-
Click on the Communities I Own tab in the My Communities portlet.
-
To stage a Community, click on the Actions button against a Community and choose Manage Pages from the menu.
In this example, choose the 'Knowledge Management Sample' Community.
Figure 7–24 Staging Communities

-
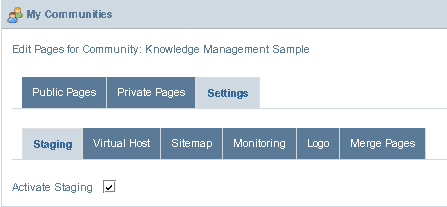
Click on the Settings tab, and enable the Activate Staging option.
The community is staged to the production environment.
Figure 7–25 Staging Communities
-
Choose My Places from the welcome menu and navigate to the page.
The live page for 'Knowledge Management Sample' is displayed.
Figure 7–26 Staging Communities

-
To view the staged page, choose Staging –> View Staged Page from the welcome menu.
Figure 7–27 Staging Communities

-
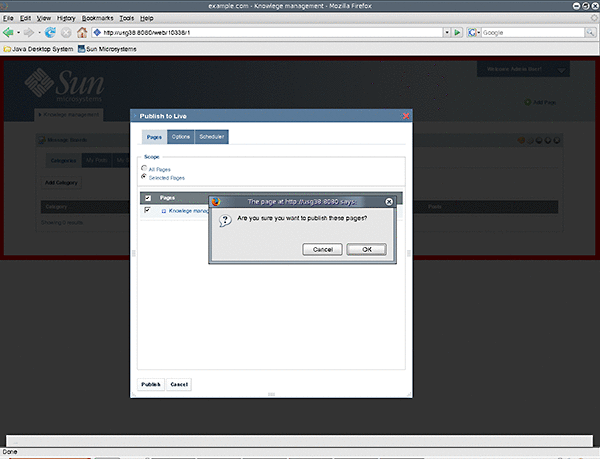
To publish the page to live, choose Staging —> Publish to live from the welcome menu and follow the UI instructions.
Figure 7–28 Staging Communities
-
To view the live page, choose Staging —> View Live Page from the welcome menu.
Activating Workflow
In the above described procedure, when you select the Activate Staging option, the Activate Workflow option appears. If you select the Activate Workflow option, you are allowed to define a Workflow to the Community or the Organization.
Enabling Crawling of Page URLs by Search Engines
You can enable crawling of a page url by a search engine for the pages on Communities and Organizations.
The below procedure discusses enabling crawling of a page url on the Collaboration Sample Community. You can enable crawling for the pages on any other Community or Organization by following the similar procedure.
 To Enable Crawling of Page URLs by Search Engines
-
Login to Project WebSynergy as Admin User.
-
Click on the Communities I Own tab in the My Communities portlet.
-
Click on the Actions button against the Collaboration Sample community and select Manage Pages from the menu.
-
Navigate to Settings —> Sitemap.
You have Google and Yahoo links are available. By clicking on the Google link, you add your Sitemap to the Sitemaps to crawl on Google search engine. It works similarly for Yahoo. By clicking on the preview link, you can view the XML file which is sent to the webmaster on the selected serach engine for sitemap.
Virtual Hosting of Portlet Pages
WebSynergy supports virtual hosting of Communities and Organizations. Public and Private pages in a Community or an Organization have a unique common friendly URL. You have to provide separate host names for public and private pages for virtual hosting of public and private pages on separate machines. In the below example, we consider a simple use case of virtual hosting on the same machine by providing a convenient friendly URL.
 To Virtual Host a Page for a Community
-
Login to Project WebSynergy as Admin User.
-
Click on the Organizations tab in the Enterprise Admin portlet.
All existing Organizations are listed.
-
Click on the Actions button against a selected Organization and choose Manage Pages from the menu.
-
Click on the settings tab.
-
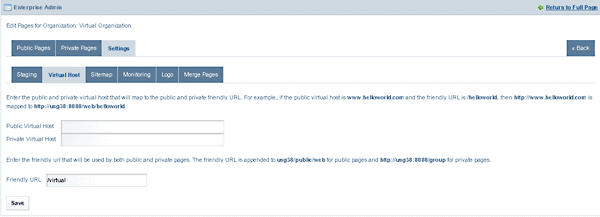
Click on the Virtual Host tab.
-
Specify a Friendly URL.
In our example, 'virtual' is the friendly URL.
Figure 7–29 Virtual hosting
-
click Save.
-
To view the public page, click on the Public Pages tab.
-
Click on View Pages button.
The public page for the Organization opens in a separate browser with its virtual hosting URL.
Figure 7–30 Virtual hosting

Using the Mail Portlet
To be done.
 To Configure Email Accounts
-
Login to Project WebSynergy as Admin User.
-
Choose Add Applications from the welcome menu and add Mail portlet to your page.
-
Click on the Configure email accounts link.
You are prompted to add mail accounts.
Figure 7–31 Adding Email Accounts

It is easy to add Gmail account as you can enable IMAP in a few simple steps. Follow the below procedure to enable IMAP for your Gmail account:
-
Click on Add a Gmail Account.
-
Enter your user name and password and click Save.
Your email account is added.
-
Click on the Check your email link.
You can read the mails and folders in your Gmail account and can compose new mails.
Exporting and Importing of Portlet Data
You can take a backup for the data that you have on a portlet by exporting it to the disk. When you upgrade the WebSynergy installation on your machine, or when you reinstall WebSynergy due to some other reason, you can import the data back to your portlet. Consider the example of exporting the date available on the Calendar portlet.
The following is the scenario involved:
-
Add the Calender portlet to your page. The portlet is available by default on some sample user pages.
-
Added an event to the Calendar.
-
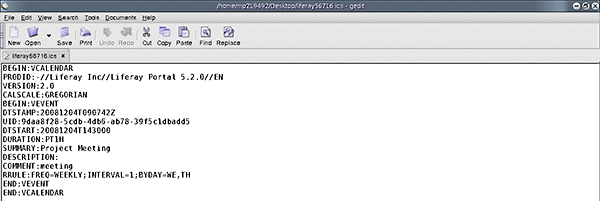
Export the date to your disk. The data is exported to the disk in .ics format. You can open the file in any text editor and can view the information related with the event. The ICS file can be used to import the event information when needed.
Note –
ICS is a data format store calendar information in a text file on the Internet. ICS stands for iCalendar Calendar Data. ICS files have .ics extension.
 To Demonstrate Exporting the Data on Calendar Portlet
-
Login to Project WebSynergy as Paul Tester.
-
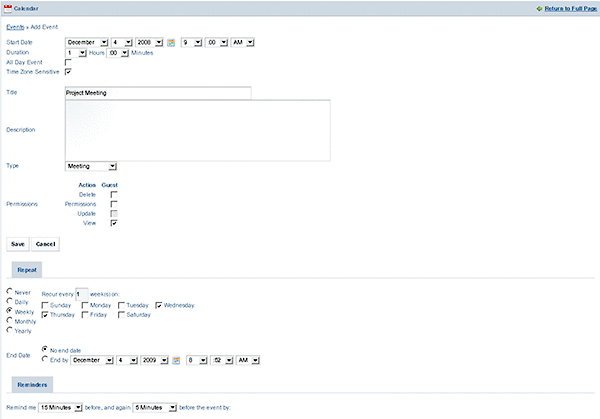
Click on the Add Event button.
In this example, we are adding a weekly event called project meeting. You can modify permissions for the guest user by clicking on the Permissions link.
Figure 7–32 Adding an event
-
Click Save.
-
Click on the Export/Import tab.
-
Click Export and save the file to the disk.
You can open the file by using any text editor. The file includes the event description. You can import the event information by importing the file to the Calendar portlet.
Figure 7–33 The event data
Enabling Sharing of a Portlet
You can enable sharing of a portlet on any website, on Facebook, and by Friends.
Sharing a Portlet With Other Websites
Consider the example of sharing the Calendar portlet on a website created by you. The following is the scenario involved:
-
Click on the Configuration button among the edit controls for a portlet.
-
Click on the Sharing tab.
Any Website, Facebook and Friends are the three tabs within the Sharing tab.
-
Copy the code in the Any Website tab.
-
Select the Allow users to add <portlet> to any website option and click Save.
-
Paste the copied code into the html source of any website and save the page. The portlet is added to the website.
 To Share a Portlet With Other Websites
-
Login to Project WebSynergy as any user of your choice.
In this example, login as Paul Tester.
-
Click on the Configuration button among the edit controls for the portlet.
In this example, click on the Configuration button among the edit controls for the Calendar portlet.
-
Click on the Sharing tab.
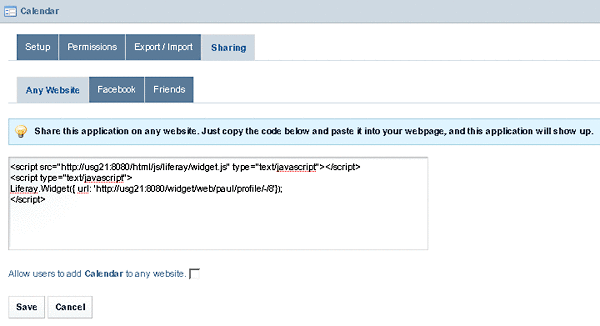
Figure 7–34 The code for sharing the portlet on any website
-
Copy the code for sharing the portlet on any website.
-
Select the Allow users to add Calendar to any website option.
-
Click Save.
-
Open the source code of any website and copy the sharing code into it, and save changes to add the portlet to the website.
As a simple example for this, do the following:
-
Open the Mozilla Classic browser
-
Click Edit Page from the file menu.
-
Click on HTML Source.
-
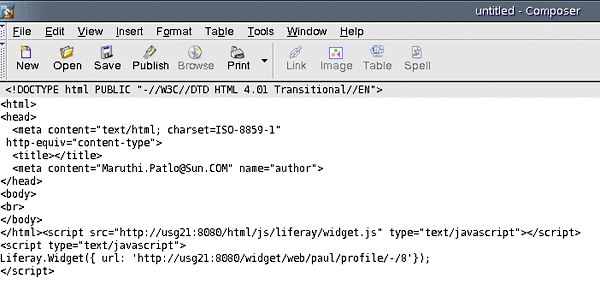
Paste the copied sharing code into the page.
Figure 7–35 Adding the sharing code to the source code of a website
-
Click Save.
-
A dialog box requesting for a page title appears. Type a title and click OK, and save the page your desktop.
In this example, we are naming the page as Calendar Sharing.
-
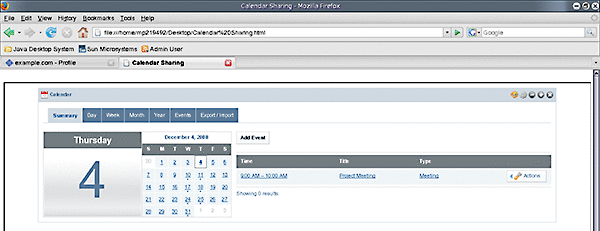
Open the page in a web browser. You can notice that the Calendar portlet is added to the page.
Figure 7–36 The portlet added to the website
-
Sharing a Portlet With Facebook
The following is the scenario involved in sharing a portlet with Facebook:
-
Click on the Configuration button among the edit controls for the portlet.
-
Click on the Sharing tab.
-
Click on Facebook under Sharing.
-
Click the Get the API key and canvas page URL from Facebook, and follow the instructions to get the API key and a canvas page URL for the portlet.
-
Specify the API key and the canvas page URL and click Save.
-
You can access the portlet on Facebook by using the canvas page URL.
 To Share a Portlet With Facebook
-
Login to Project WebSynergy as any user of your choice.
In this example, login as Paul Tester.
-
Click on the Configuration button among the edit controls for the portlet.
In this example, click on the Configuration button among the edit controls for the Calendar portlet.
-
Click on the Sharing tab.
-
Click on Facebook under Sharing.
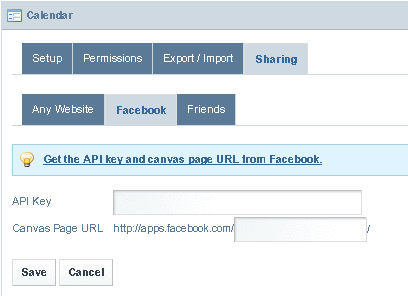
Figure 7–37 Sharing on Facebook
-
Click on 'Get the API key and canvas page URL from Facebook' link and follow the instructions to get the API key and canvas page URL from Facebook.
-
specify the API key and the canvas page URL and click Save.
-
Access the portlet on Facebook by using the canvas page URL.
Sharing a Portlet With Friends
The Friends portlet lists the WebSynergy users who are registered as your friends. You can authorize your friends to access a portlet which is on your page.
You need to perform the following steps to enable friends to access a portlet on your page:
-
Click on the Configuration button among the edit controls for the portlet.
-
Click on the Sharing tab.
-
Click on Friends under Sharing.
-
Select the Allow users to share <portlet> with friends option and click Save.
Using Document Library Plugins on OpenOffice
Document Library Plugins are helpful to establish an interface with WebSynergy from OpenOffice. Document Library Plugins are shipped along with the standard product. When you install the pulgins on OpenOffice, you will be able to interface will the CMS feature of WebSynergy. This enables you to use OpenOffice to edit the documents you have in the Document Library. Also, you can add documents to the Document Library.
Note –
OpenOffice bundle can be downloaded freely form http://www.openoffice.org/.
 To Store a Document to CMS
-
Open OpenOffice – Writer.
-
Choose Tools —> Extension Manager.
-
Click on the Add button and browse 'ShareSpaceDocumentLibraryPlugin.oxt'.
Figure 7–38 Installing the Document Library plugins
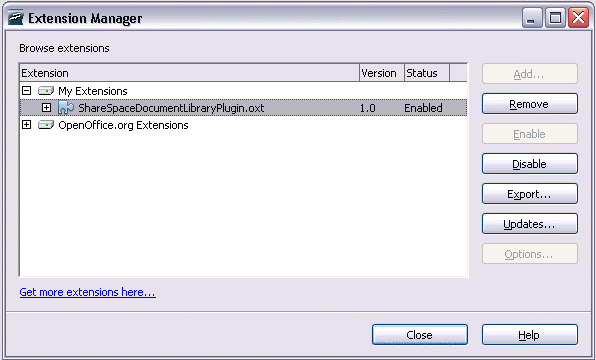
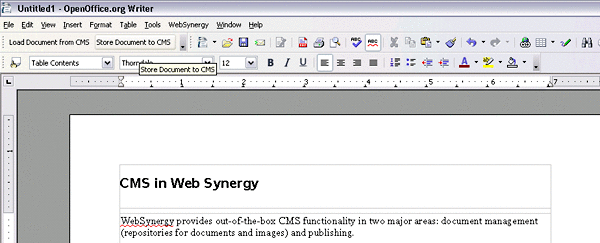
The Document Library plugins are added to your page. You can notice the Load Document from CMS and Store Document to CMS buttons on the toolbar.
-
Write some content that you want to store on the CMS.
-
Click on the Store Document to CMS button to upload the document to CMS.
Figure 7–39 Storing a document to Document Library
Using the Widget Consumer Portlet
You can embed a web widget by copying the embed-able javascript or flash code snippet and pasting it in the text box after clicking the Configuration button on the Widget Consumer portlet. On saving the changes to the configuration, you will be able to view the web widget from the portlet.
Widget Consumer portlet is an instanceable portlet, and it allows you to add any number of instances of the portlet to your page with each portlet instance embedding a separate widget. For example, in any YouTube link, you can find a code snippet named 'Embed' at the right top corner where you see the Subscribe button. You can copy paste the code to the Widget Consumer portlet to view the YouTube link.
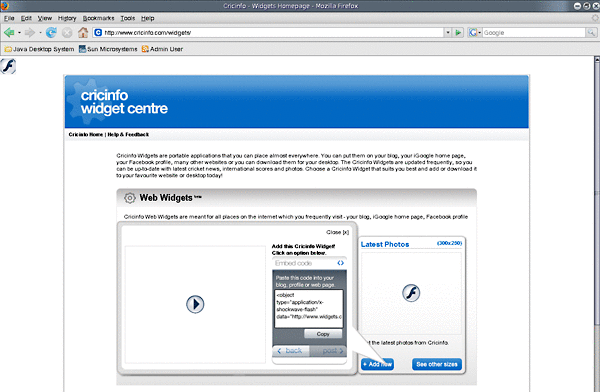
The below procedure, describes an example of copying the snippet code for a web widget from the website cricinfo.com and using it on the Widget Consumer portlet.
 To Configure the Widget Consumer Portlet
-
Login to Project WebSynergy as any user of your choice.
-
Choose Add Application from the welcome menu and add Widget Consumer portlet to your page.
-
Copy the code snippet to embed a web widget.
In this example, copy the code snippet to embed a web widget from the site cricinfo.com.
Figure 7–40 Copying the code snippet to embed a widget
-
Click on the Configuration button on the portlet.
-
Paste the widget code into the text box.
-
Click Save.
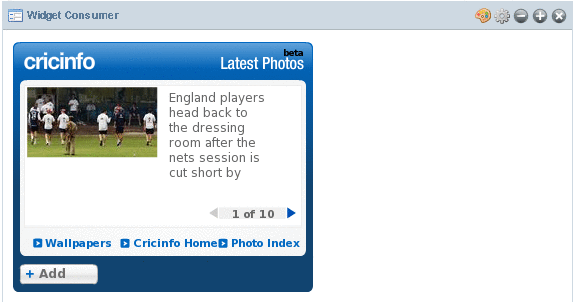
You can view the widget from the Widget Consumer portlet.
Figure 7–41 The widget added to Widget Consumer
Tagging in WebSynergy
The tagging system in WebSynergy helps to group blogs, wikis, and articles. Admin user can create tag sets and tags, and can define permissions to use tags by using the Tags and Categories portlet. Tags follows a kind of taxonomy and classification, as the admin user can define tag sets and tags within them. Users will have the freedom to create their own tags or to use the existing tags. The basic process of using the tagging system is:
-
The admin user creates tags and tag sets, and defines permissions for usage.
-
The user applies tags for his blogs, wikis, or articles. He can select the tags that he want to apply, or can define his own tags.
-
Any content that is tagged is grouped or aggregated.
- © 2010, Oracle Corporation and/or its affiliates
