Table of Contents
- 2.1. General Installation Guidance
- 2.2. Standard MySQL Installation Using a Binary Distribution
- 2.3. Installing MySQL on Windows
- 2.3.1. Choosing An Installation Package
- 2.3.2. Installing MySQL with the Automated Installer
- 2.3.3. Using the MySQL Installation Wizard
- 2.3.4. MySQL Server Instance Configuration Wizard
- 2.3.5. Installing MySQL from a Noinstall Zip Archive
- 2.3.6. Extracting the Install Archive
- 2.3.7. Creating an Option File
- 2.3.8. Selecting a MySQL Server Type
- 2.3.9. Starting the Server for the First Time
- 2.3.10. Starting MySQL from the Windows Command Line
- 2.3.11. Starting MySQL as a Windows Service
- 2.3.12. Testing The MySQL Installation
- 2.3.13. Troubleshooting a MySQL Installation Under Windows
- 2.3.14. Upgrading MySQL on Windows
- 2.3.15. MySQL on Windows Compared to MySQL on Unix
- 2.4. Installing MySQL from RPM Packages on Linux
- 2.5. Installing MySQL on Mac OS X
- 2.6. Installing MySQL on Solaris
- 2.7. Installing MySQL on NetWare
- 2.8. Installing MySQL from
tar.gzPackages on Other Unix-Like Systems - 2.9. MySQL Installation Using a Source Distribution
- 2.10. Post-Installation Setup and Testing
- 2.11. Upgrading or Downgrading MySQL
- 2.12. Operating System-Specific Notes
- 2.13. Environment Variables
- 2.14. Perl Installation Notes
This chapter describes how to obtain and install MySQL. A summary of the procedure follows and later sections provide the details. If you plan to upgrade an existing version of MySQL to a newer version rather than install MySQL for the first time, see Section 2.11.1, “Upgrading MySQL”, for information about upgrade procedures and about issues that you should consider before upgrading.
If you are interested in migrating to MySQL from another database system, you may wish to read Section A.8, “MySQL 6.0 FAQ: Migration”, which contains answers to some common questions concerning migration issues.
Determine whether MySQL runs and is supported on your platform. Please note that not all platforms are equally suitable for running MySQL, and that not all platforms on which MySQL is known to run are officially supported by Oracle Corporation:
For MySQL Enterprise Server, the officially supported platforms are listed at http://www.mysql.com/support/supportedplatforms.html.
MySQL Community Server runs on the platforms listed at Section 2.1.1, “Operating Systems Supported by MySQL Community Server”.
Choose which distribution to install. Several versions of MySQL are available, and most are available in several distribution formats. You can choose from pre-packaged distributions containing binary (precompiled) programs or source code. When in doubt, use a binary distribution. We also provide public access to our current source tree for those who want to see our most recent developments and help us test new code. To determine which version and type of distribution you should use, see Section 2.1.2, “Choosing Which MySQL Distribution to Install”.
Download the distribution that you want to install. For instructions, see Section 2.1.3, “How to Get MySQL”. To verify the integrity of the distribution, use the instructions in Section 2.1.4, “Verifying Package Integrity Using MD5 Checksums or
GnuPG”.Install the distribution. To install MySQL from a binary distribution, use the instructions in Section 2.2, “Standard MySQL Installation Using a Binary Distribution”. To install MySQL from a source distribution or from the current development source tree, use the instructions in Section 2.9, “MySQL Installation Using a Source Distribution”.
If you encounter installation difficulties, see Section 2.12, “Operating System-Specific Notes”, for information on solving problems for particular platforms.
Perform any necessary post-installation setup. After installing MySQL, read Section 2.10, “Post-Installation Setup and Testing”. This section contains important information about making sure the MySQL server is working properly. It also describes how to secure the initial MySQL user accounts, which have no passwords until you assign passwords. The section applies whether you install MySQL using a binary or source distribution.
If you want to run the MySQL benchmark scripts, Perl support for MySQL must be available. See Section 2.14, “Perl Installation Notes”.
The MySQL installation procedure depends on whether you will install MySQL Enterprise Server or MySQL Community Server. The set of applicable platforms depends on which distribution you will install:
For MySQL Enterprise Server, the officially supported platforms are listed at http://www.mysql.com/support/supportedplatforms.html.
MySQL Community Server runs on the platforms listed at Section 2.1.1, “Operating Systems Supported by MySQL Community Server”.
For MySQL Enterprise Server, install the main distribution plus any service packs or hotfixes that you wish to apply using the Enterprise Installer. For platforms that do not yet have an Enterprise Installer, use the Community Server instructions.
For MySQL Community Server, install the main distribution plus any hotfixes and updates:
Download a binary release, or download a source release and build MySQL yourself from the source code.
Retrieve MySQL from the Bazaar tree and build it from source. The Bazaar tree contains the latest developer code.
The immediately following sections contain the information necessary to choose, download, and verify your distribution. The instructions in later sections of the chapter describe how to install the distribution that you choose. For binary distributions, see the instructions at Section 2.2, “Standard MySQL Installation Using a Binary Distribution”. To build MySQL from source, use the instructions at Section 2.9, “MySQL Installation Using a Source Distribution”.
This section lists the operating systems on which MySQL Community Server is known to run.
Important
Oracle Corporation does not necessarily provide official support for all the platforms listed in this section. For information about those platforms that are officially supported, see http://www.mysql.com/support/supportedplatforms.html on the MySQL Web site.
We use GNU Autoconf, so it is possible to port MySQL to all modern systems that have a C++ compiler and a working implementation of POSIX threads. (Thread support is needed for the server. To compile only the client code, the only requirement is a C++ compiler.)
MySQL has been reported to compile successfully on the following combinations of operating system and thread package.
AIX 4.x, 5.x with native threads. See Section 2.12.5.3, “IBM-AIX notes”. AIX 5.3 should be upgraded to technology level 7 (5300-07).
Amiga.
FreeBSD 5.x and up with native threads.
HP-UX 11.x with the native threads. See Section 2.12.5.2, “HP-UX Version 11.x Notes”.
Linux, builds on all fairly recent Linux distributions with
glibc2.3. See Section 2.12.1, “Linux Notes”.Mac OS X. See Section 2.12.2, “Mac OS X Notes”.
NetBSD 1.3/1.4 Intel and NetBSD 1.3 Alpha. See Section 2.12.4.2, “NetBSD Notes”.
Novell NetWare 6.0 and 6.5. See Section 2.7, “Installing MySQL on NetWare”.
OpenBSD 2.5 and with native threads. OpenBSD earlier than 2.5 with the MIT-pthreads package. See Section 2.12.4.3, “OpenBSD 2.5 Notes”.
SCO OpenServer 5.0.X with a recent port of the FSU Pthreads package. See Section 2.12.5.8, “SCO UNIX and OpenServer 5.0.x Notes”.
SCO Openserver 6.0.x. See Section 2.12.5.9, “SCO OpenServer 6.0.x Notes”.
SCO UnixWare 7.1.x. See Section 2.12.5.10, “SCO UnixWare 7.1.x and OpenUNIX 8.0.0 Notes”.
SGI Irix 6.x with native threads. See Section 2.12.5.7, “SGI Irix Notes”.
Solaris 2.5 and above with native threads on SPARC and x86. See Section 2.12.3, “Solaris Notes”.
Tru64 Unix. See Section 2.12.5.5, “Alpha-DEC-UNIX Notes (Tru64)”.
Windows 2000, Windows XP, Windows Vista, Windows Server 2003, and Windows Server 2008. See Section 2.3, “Installing MySQL on Windows”.
MySQL has also been known to run on other systems in the past. See Section 2.12, “Operating System-Specific Notes”. Some porting effort might be required for current versions of MySQL on these systems.
Not all platforms are equally well-suited for running MySQL. How well a certain platform is suited for a high-load mission-critical MySQL server is determined by the following factors:
General stability of the thread library. A platform may have an excellent reputation otherwise, but MySQL is only as stable as the thread library it calls, even if everything else is perfect.
The capability of the kernel and the thread library to take advantage of symmetric multi-processor (SMP) systems. In other words, when a process creates a thread, it should be possible for that thread to run on a CPU different from the original process.
The capability of the kernel and the thread library to run many threads that acquire and release a mutex over a short critical region frequently without excessive context switches. If the implementation of
pthread_mutex_lock()is too anxious to yield CPU time, this hurts MySQL tremendously. If this issue is not taken care of, adding extra CPUs actually makes MySQL slower.General file system stability and performance.
Table size. If your tables are large, performance is affected by the ability of the file system to deal with large files at all and to deal with them efficiently.
Our level of expertise here at Oracle Corporation with the platform. If we know a platform well, we enable platform-specific optimizations and fixes at compile time. We can also provide advice on configuring your system optimally for MySQL.
The amount of testing we have done internally for similar configurations.
The number of users that have run MySQL successfully on the platform in similar configurations. If this number is high, the likelihood of encountering platform-specific surprises is much smaller.
When preparing to install MySQL, you should decide which version to use. MySQL development occurs in several release series, and you can pick the one that best fits your needs. After deciding which version to install, you can choose a distribution format. Releases are available in binary or source format.
The first decision to make is whether you want to use a production (stable) release or a development release. In the MySQL development process, multiple release series co-exist, each at a different stage of maturity:
MySQL 5.5 is the current development release series.
MySQL 5.1 is the current General Availability (Production) release series. New releases are issued for bugfixes only; no new features are being added that could affect stability.
MySQL 5.0 is the previous stable (production-quality) release series. MySQL 5.0 is now at the end of the product lifecycle. Active development and support for this version has ended.
Extended support for MySQL 5.0 remains available. According to the http://www.mysql.com/about/legal/lifecycle/, only Security and Severity Level 1 issues are still being fixed for MySQL 5.0.
MySQL 4.1, 4.0, and 3.23 are old stable (production-quality) release series. Active development and support for these versions has ended.
We do not believe in a complete code freeze because this prevents us from making bugfixes and other fixes that must be done. By “somewhat frozen” we mean that we may add small things that should not affect anything that currently works in a production release. Naturally, relevant bugfixes from an earlier series propagate to later series.
Normally, if you are beginning to use MySQL for the first time or trying to port it to some system for which there is no binary distribution, go with the General Availability release series. Currently, this is MySQL 5.1. All MySQL releases, even those from development series, are checked with the MySQL benchmarks and an extensive test suite before being issued.
If you are running an older system and want to upgrade, but do not want to take the chance of having a nonseamless upgrade, you should upgrade to the latest version in the same release series you are using (where only the last part of the version number is newer than yours). We have tried to fix only fatal bugs and make only small, relatively “safe” changes to that version.
If you want to use new features not present in the production release series, you can use a version from a development series. Note that development releases are not as stable as production releases.
If you want to use the very latest sources containing all current patches and bugfixes, you can use one of our Bazaar repositories. These are not “releases” as such, but are available as previews of the code on which future releases are to be based.
The MySQL naming scheme uses release names that consist of three numbers and a suffix; for example, mysql-5.0.14-rc. The numbers within the release name are interpreted as follows:
The first number (5) is the major version and describes the file format. All MySQL 5 releases have the same file format.
The second number (0) is the release level. Taken together, the major version and release level constitute the release series number.
The third number (14) is the version number within the release series. This is incremented for each new release. Usually you want the latest version for the series you have chosen.
For each minor update, the last number in the version string is incremented. When there are major new features or minor incompatibilities with previous versions, the second number in the version string is incremented. When the file format changes, the first number is increased.
Release names also include a suffix to indicates the stability level of the release. Releases within a series progress through a set of suffixes to indicate how the stability level improves. The possible suffixes are:
alpha indicates that the release is for preview purposes only. Known bugs should be documented in the News section (see Appendix C, MySQL Change History). Most alpha releases implement new commands and extensions. Active development that may involve major code changes can occur in an alpha release. However, we do conduct testing before issuing a release.
beta indicates that the release is appropriate for use with new development. Within beta releases, the features and compatibility should remain consistent. However, beta releases may contain numerous and major unaddressed bugs.
All APIs, externally visible structures, and columns for SQL statements will not change during future beta, release candidate, or production releases.
rc indicates a Release Candidate. Release candidates are believed to be stable, having passed all of MySQL's internal testing, and with all known fatal runtime bugs fixed. However, the release has not been in widespread use long enough to know for sure that all bugs have been identified. Only minor fixes are added. (A release candidate is what formerly was known as a gamma release.)
If there is no suffix, it indicates that the release is a General Availability (GA) or Production release. GA releases are stable, having successfully passed through all earlier release stages and are believed to be reliable, free of serious bugs, and suitable for use in production systems. Only critical bugfixes are applied to the release.
MySQL uses a naming scheme that is slightly different from most other products. In general, it is usually safe to use any version that has been out for a couple of weeks without being replaced by a new version within the same release series.
All releases of MySQL are run through our standard tests and benchmarks to ensure that they are relatively safe to use. Because the standard tests are extended over time to check for all previously found bugs, the test suite keeps getting better.
All releases have been tested at least with these tools:
An internal test suite
The
mysql-testdirectory contains an extensive set of test cases. We run these tests for every server binary. See Section 22.1.2, “MySQL Test Suite”, for more information about this test suite.The MySQL benchmark suite
This suite runs a range of common queries. It is also a test to determine whether the latest batch of optimizations actually made the code faster. See Section 7.1.3, “The MySQL Benchmark Suite”.
We also test the newest MySQL version in our internal production environment, on at least one machine. We have more than 100GB of data to work with.
After choosing which version of MySQL to install, you should decide whether to use a binary distribution or a source distribution. In most cases, you should probably use a binary distribution, if one exists for your platform. Binary distributions are available in native format for many platforms, such as RPM files for Linux or PKG package installers for Mac OS X or Solaris. Distributions also are available as Zip archives or compressed tar files.
Reasons to choose a binary distribution include the following:
Binary distributions generally are easier to install than source distributions.
To satisfy different user requirements, we provide several servers in binary distributions. mysqld is an optimized server that is a smaller, faster binary. mysqld-debug is compiled with debugging support.
Each of these servers is compiled from the same source distribution, though with different configuration options. All native MySQL clients can connect to servers from either MySQL version.
Under some circumstances, you may be better off installing MySQL from a source distribution:
You want to install MySQL at some explicit location. The standard binary distributions are ready to run at any installation location, but you might require even more flexibility to place MySQL components where you want.
You want to configure mysqld to ensure that features are available that might not be included in the standard binary distributions. Here is a list of the most common extra options that you may want to use to ensure feature availability:
--with-libwrap--with-named-z-libs(this is done for some of the binaries)
You want to configure mysqld without some features that are included in the standard binary distributions. For example, distributions normally are compiled with support for all character sets. If you want a smaller MySQL server, you can recompile it with support for only the character sets you need.
You have a special compiler (such as
pgcc) or want to use compiler options that are better optimized for your processor. Binary distributions are compiled with options that should work on a variety of processors from the same processor family.You want to use the latest sources from one of the Bazaar repositories to have access to all current bugfixes. For example, if you have found a bug and reported it to the MySQL development team, the bugfix is committed to the source repository and you can access it there. The bugfix does not appear in a release until a release actually is issued.
You want to read (or modify) the C and C++ code that makes up MySQL. For this purpose, you should get a source distribution, because the source code is always the ultimate manual.
Source distributions contain more tests and examples than binary distributions.
MySQL is evolving quite rapidly and we want to share new developments with other MySQL users. We try to produce a new release whenever we have new and useful features that others also seem to have a need for.
We also try to help users who request features that are easy to implement. We take note of what our licensed users want, and we especially take note of what our support customers want and try to help them in this regard.
No one is required to download a new release. The News section helps you determine whether the new release has something you really want. See Appendix C, MySQL Change History.
We use the following policy when updating MySQL:
Enterprise Server releases are meant to appear every 18 months, supplemented by quarterly service packs and monthly rapid updates. Community Server releases are meant to appear 2 to 3 times per year.
Releases are issued within each series. For each release, the last number in the version is one more than the previous release within the same series.
Binary distributions for some platforms are made by us for major releases. Other people may make binary distributions for other systems, but probably less frequently.
We make fixes available as soon as we have identified and corrected small or noncritical but annoying bugs. The fixes are available in source form immediately from our public Bazaar repositories, and are included in the next release.
If by any chance a security vulnerability or critical bug is found in a release, our policy is to fix it in a new release as soon as possible. (We would like other companies to do this, too!)
Oracle Corporation provides a set of binary distributions of
MySQL. In addition to binaries provided in platform-specific
package formats, we offer binary distributions for a number of
platforms in the form of compressed tar
files (.tar.gz files). See
Section 2.2, “Standard MySQL Installation Using a Binary Distribution”. For Windows
distributions, see Section 2.3, “Installing MySQL on Windows”.
If you want to compile a debug version of MySQL from a source
distribution, you should add
--with-debug or
--with-debug=full to the
configure command used to configure the
distribution and remove any
-fomit-frame-pointer options.
Check our downloads page at http://dev.mysql.com/downloads/ for information about the current version of MySQL and for downloading instructions. For a complete up-to-date list of MySQL download mirror sites, see http://dev.mysql.com/downloads/mirrors.html. You can also find information there about becoming a MySQL mirror site and how to report a bad or out-of-date mirror.
Our main mirror is located at http://mirrors.sunsite.dk/mysql/.
After you have downloaded the MySQL package that suits your needs and before you attempt to install it, you should make sure that it is intact and has not been tampered with. There are three means of integrity checking:
MD5 checksums
Cryptographic signatures using
GnuPG, the GNU Privacy GuardFor RPM packages, the built-in RPM integrity verification mechanism
The following sections describe how to use these methods.
If you notice that the MD5 checksum or GPG signatures do not
match, first try to download the respective package one more
time, perhaps from another mirror site. If you repeatedly cannot
successfully verify the integrity of the package, please notify
us about such incidents, including the full package name and the
download site you have been using, at
<webmaster@mysql.com> or
<build@mysql.com>. Do not report downloading
problems using the bug-reporting system.
After you have downloaded a MySQL package, you should make
sure that its MD5 checksum matches the one provided on the
MySQL download pages. Each package has an individual checksum
that you can verify with the following command, where
package_name is the name of the
package you downloaded:
shell> md5sum package_name
Example:
shell> md5sum mysql-standard-6.0.14-linux-i686.tar.gz
aaab65abbec64d5e907dcd41b8699945  mysql-standard-6.0.14-linux-i686.tar.gz
You should verify that the resulting checksum (the string of hexadecimal digits) matches the one displayed on the download page immediately below the respective package.
Note
Make sure to verify the checksum of the archive
file (for example, the .zip
or .tar.gz file) and not of the files
that are contained inside of the archive.
Note that not all operating systems support the
md5sum command. On some, it is simply
called md5, and others do not ship it at
all. On Linux, it is part of the GNU
Text Utilities package, which is available for a
wide range of platforms. You can download the source code from
http://www.gnu.org/software/textutils/ as well.
If you have OpenSSL installed, you can use the command
openssl md5
package_name instead. A
Windows implementation of the md5 command
line utility is available from
http://www.fourmilab.ch/md5/.
winMd5Sum is a graphical MD5 checking tool
that can be obtained from
http://www.nullriver.com/index/products/winmd5sum.
Another method of verifying the integrity and authenticity of a package is to use cryptographic signatures. This is more reliable than using MD5 checksums, but requires more work.
We sign MySQL downloadable packages with GnuPG (GNU Privacy Guard). GnuPG is an Open Source alternative to the well-known Pretty Good Privacy (PGP) by Phil Zimmermann. See http://www.gnupg.org/ for more information about GnuPG and how to obtain and install it on your system. Most Linux distributions ship with GnuPG installed by default. For more information about GnuPG, see http://www.openpgp.org/.
To verify the signature for a specific package, you first need
to obtain a copy of our public GPG build key, which you can
download from http://keyserver.pgp.com/. The
key that you want to obtain is named
build@mysql.com. Alternatively, you can cut
and paste the key directly from the following text:
-----BEGIN PGP PUBLIC KEY BLOCK-----
Version: GnuPG v1.4.5 (GNU/Linux)

mQGiBD4+owwRBAC14GIfUfCyEDSIePvEW3SAFUdJBtoQHH/nJKZyQT7h9bPlUWC3
RODjQReyCITRrdwyrKUGku2FmeVGwn2u2WmDMNABLnpprWPkBdCk96+OmSLN9brZ
fw2vOUgCmYv2hW0hyDHuvYlQA/BThQoADgj8AW6/0Lo7V1W9/8VuHP0gQwCgvzV3
BqOxRznNCRCRxAuAuVztHRcEAJooQK1+iSiunZMYD1WufeXfshc57S/+yeJkegNW
hxwR9pRWVArNYJdDRT+rf2RUe3vpquKNQU/hnEIUHJRQqYHo8gTxvxXNQc7fJYLV
K2HtkrPbP72vwsEKMYhhr0eKCbtLGfls9krjJ6sBgACyP/Vb7hiPwxh6rDZ7ITnE
kYpXBACmWpP8NJTkamEnPCia2ZoOHODANwpUkP43I7jsDmgtobZX9qnrAXw+uNDI
QJEXM6FSbi0LLtZciNlYsafwAPEOMDKpMqAK6IyisNtPvaLd8lH0bPAnWqcyefep
rv0sxxqUEMcM3o7wwgfN83POkDasDbs3pjwPhxvhz6//62zQJ7Q7TXlTUUwgUGFj
a2FnZSBzaWduaW5nIGtleSAod3d3Lm15c3FsLmNvbSkgPGJ1aWxkQG15c3FsLmNv
bT6IXQQTEQIAHQULBwoDBAMVAwIDFgIBAheABQJLcC5lBQkQ8/JZAAoJEIxxjTtQ
cuH1oD4AoIcOQ4EoGsZvy06D0Ei5vcsWEy8dAJ4g46i3WEcdSWxMhcBSsPz65sh5
lohMBBMRAgAMBQI+PqPRBYMJZgC7AAoJEElQ4SqycpHyJOEAn1mxHijft00bKXvu
cSo/pECUmppiAJ41M9MRVj5VcdH/KN/KjRtW6tHFPYhMBBMRAgAMBQI+QoIDBYMJ
YiKJAAoJELb1zU3GuiQ/lpEAoIhpp6BozKI8p6eaabzF5MlJH58pAKCu/ROofK8J
Eg2aLos+5zEYrB/LsrkCDQQ+PqMdEAgA7+GJfxbMdY4wslPnjH9rF4N2qfWsEN/l
xaZoJYc3a6M02WCnHl6ahT2/tBK2w1QI4YFteR47gCvtgb6O1JHffOo2HfLmRDRi
Rjd1DTCHqeyX7CHhcghj/dNRlW2Z0l5QFEcmV9U0Vhp3aFfWC4Ujfs3LU+hkAWzE
7zaD5cH9J7yv/6xuZVw411x0h4UqsTcWMu0iM1BzELqX1DY7LwoPEb/O9Rkbf4fm
Le11EzIaCa4PqARXQZc4dhSinMt6K3X4BrRsKTfozBu74F47D8Ilbf5vSYHbuE5p
/1oIDznkg/p8kW+3FxuWrycciqFTcNz215yyX39LXFnlLzKUb/F5GwADBQf+Lwqq
a8CGrRfsOAJxim63CHfty5mUc5rUSnTslGYEIOCR1BeQauyPZbPDsDD9MZ1ZaSaf
anFvwFG6Llx9xkU7tzq+vKLoWkm4u5xf3vn55VjnSd1aQ9eQnUcXiL4cnBGoTbOW
I39EcyzgslzBdC++MPjcQTcA7p6JUVsP6oAB3FQWg54tuUo0Ec8bsM8b3Ev42Lmu
QT5NdKHGwHsXTPtl0klk4bQk4OajHsiy1BMahpT27jWjJlMiJc+IWJ0mghkKHt92
6s/ymfdf5HkdQ1cyvsz5tryVI3Fx78XeSYfQvuuwqp2H139pXGEkg0n6KdUOetdZ
Whe70YGNPw1yjWJT1IhMBBgRAgAMBQI+PqMdBQkJZgGAAAoJEIxxjTtQcuH17p4A
n3r1QpVC9yhnW2cSAjq+kr72GX0eAJ4295kl6NxYEuFApmr1+0uUq/SlsQ==
=Mski

-----END PGP PUBLIC KEY BLOCK-----
To import the build key into your personal public GPG keyring,
use gpg --import. For example, if you have
saved the key in a file named
mysql_pubkey.asc, the import command
looks like this:
shell> gpg --import mysql_pubkey.asc
gpg: key 5072E1F5: public key "MySQL Package signing key (www.mysql.com) <build@mysql.com>" imported
gpg: Total number processed: 1
gpg:               imported: 1
gpg: no ultimately trusted keys found
You can also download the key from the public keyserver using
the public key id, 5072E1F5:
shell> gpg --recv-keys 5072E1F5
gpg: requesting key 5072E1F5 from hkp server subkeys.pgp.net
gpg: key 5072E1F5: "MySQL Package signing key (www.mysql.com) <build@mysql.com>" 2 new signatures
gpg: no ultimately trusted keys found
gpg: Total number processed: 1
gpg:         new signatures: 2
If you want to import the key into your RPM configuration to validate RPM install packages, you should be able to import the key directly:
shell> rpm --import mysql_pubkey.ascIf you experience problems, try exporting the key from gpg and importing:
shell> gpg --export -a 5072e1f5 > 5072e1f5.asc
shell> rpm --import 5072e1f5.asc
Alternatively, rpm also supports loading the key directly from a URL, and you cas use this manual page:
shell> rpm --import http://dev.mysql.com/doc/refman/6.0/en/checking-gpg-signature.html
After you have downloaded and imported the public build key,
download your desired MySQL package and the corresponding
signature, which also is available from the download page. The
signature file has the same name as the distribution file with
an .asc extension, as shown by the
examples in the following table.
| Distribution file | mysql-standard-6.0.14-linux-i686.tar.gz |
| Signature file | mysql-standard-6.0.14-linux-i686.tar.gz.asc |
Make sure that both files are stored in the same directory and then run the following command to verify the signature for the distribution file:
shell> gpg --verify package_name.asc
Example:
shell> gpg --verify mysql-standard-6.0.14-linux-i686.tar.gz.asc
gpg: Signature made Tue 12 Jul 2005 23:35:41 EST using DSA key ID 5072E1F5
gpg: Good signature from "MySQL Package signing key (www.mysql.com) <build@mysql.com>"
The Good signature message indicates that
everything is all right. You can ignore any insecure
memory warning you might obtain.
See the GPG documentation for more information on how to work with public keys.
For RPM packages, there is no separate signature. RPM packages have a built-in GPG signature and MD5 checksum. You can verify a package by running the following command:
shell> rpm --checksig package_name.rpm
Example:
shell> rpm --checksig MySQL-server-6.0.14-0.glibc23.i386.rpm
MySQL-server-6.0.14-0.glibc23.i386.rpm: md5 gpg OK
Note
If you are using RPM 4.1 and it complains about
(GPG) NOT OK (MISSING KEYS:
            GPG#5072e1f5)
, even though you have imported the
MySQL public build key into your own GPG keyring, you need
to import the key into the RPM keyring first. RPM 4.1 no
longer uses your personal GPG keyring (or GPG itself).
Rather, it maintains its own keyring because it is a
system-wide application and a user's GPG public keyring is a
user-specific file. To import the MySQL public key into the
RPM keyring, first obtain the key as described in
Section 2.1.4.2, “Signature Checking Using GnuPG”. Then use
rpm --import to import the key. For
example, if you have saved the public key in a file named
mysql_pubkey.asc, import it using this
command:
shell> rpm --import mysql_pubkey.asc
If you need to obtain the MySQL public key, see
Section 2.1.4.2, “Signature Checking Using GnuPG”.
This section describes the default layout of the directories created by installing binary or source distributions provided by Oracle Corporation. A distribution provided by another vendor might use a layout different from those shown here.
For MySQL 6.0 on Windows, the default installation
directory is C:\Program Files\MySQL\MySQL Server
6.0. (Some Windows users prefer to
install in C:\mysql, the directory that
formerly was used as the default. However, the layout of the
subdirectories remains the same.) The installation directory has
the following subdirectories.
| Directory | Contents of Directory |
bin | Client programs and the mysqld server |
data | Log files, databases |
Docs | Manual in CHM format |
examples | Example programs and scripts |
include | Include (header) files |
lib | Libraries |
scripts | Utility scripts |
share | Error message files |
Installations created from our Linux RPM distributions result in files under the following system directories.
| Directory | Contents of Directory |
/usr/bin | Client programs and scripts |
/usr/sbin | The mysqld server |
/var/lib/mysql | Log files, databases |
/usr/share/info | Manual in Info format |
/usr/share/man | Unix manual pages |
/usr/include/mysql | Include (header) files |
/usr/lib/mysql | Libraries |
/usr/share/mysql | Error message and character set files |
/usr/share/sql-bench | Benchmarks |
On Unix, a tar file binary distribution is
installed by unpacking it at the installation location you
choose (typically /usr/local/mysql) and
creates the following directories in that location.
| Directory | Contents of Directory |
bin | Client programs and the mysqld server |
data | Log files, databases |
docs | Manual in Info format |
man | Unix manual pages |
include | Include (header) files |
lib | Libraries |
scripts | mysql_install_db |
share/mysql | Error message files |
sql-bench | Benchmarks |
A source distribution is installed after you configure and
compile it. By default, the installation step installs files
under /usr/local, in the following
subdirectories.
| Directory | Contents of Directory |
bin | Client programs and scripts |
include/mysql | Include (header) files |
Docs | Manual in Info, CHM formats |
man | Unix manual pages |
lib/mysql | Libraries |
libexec | The mysqld server |
share/mysql | Error message files |
sql-bench | Benchmarks and crash-me test |
var | Databases and log files |
Within its installation directory, the layout of a source installation differs from that of a binary installation in the following ways:
The mysqld server is installed in the
libexecdirectory rather than in thebindirectory.The data directory is
varrather thandata.mysql_install_db is installed in the
bindirectory rather than in thescriptsdirectory.The header file and library directories are
include/mysqlandlib/mysqlrather thanincludeandlib.
You can create your own binary installation from a compiled
source distribution by executing the
scripts/make_binary_distribution script
from the top directory of the source distribution.
In some cases, the compiler used to build MySQL affects the features available for use. The notes in this section apply for binary distributions provided by Oracle Corporation or that you compile yourself from source.
icc (Intel C++ Compiler) Builds
A server built with icc has these characteristics:
SSL support is not included.
The next several sections cover the installation of MySQL on
platforms where we offer packages using the native packaging
format of the respective platform. (This is also known as
performing a “binary install.”) However, binary
distributions of MySQL are available for many other platforms as
well. See Section 2.8, “Installing MySQL from tar.gz Packages on Other
Unix-Like Systems”, for generic
installation instructions for these packages that apply to all
platforms.
See Section 2.1, “General Installation Guidance”, for more information on what other binary distributions are available and how to obtain them.
- 2.3.1. Choosing An Installation Package
- 2.3.2. Installing MySQL with the Automated Installer
- 2.3.3. Using the MySQL Installation Wizard
- 2.3.4. MySQL Server Instance Configuration Wizard
- 2.3.5. Installing MySQL from a Noinstall Zip Archive
- 2.3.6. Extracting the Install Archive
- 2.3.7. Creating an Option File
- 2.3.8. Selecting a MySQL Server Type
- 2.3.9. Starting the Server for the First Time
- 2.3.10. Starting MySQL from the Windows Command Line
- 2.3.11. Starting MySQL as a Windows Service
- 2.3.12. Testing The MySQL Installation
- 2.3.13. Troubleshooting a MySQL Installation Under Windows
- 2.3.14. Upgrading MySQL on Windows
- 2.3.15. MySQL on Windows Compared to MySQL on Unix
A native Windows distribution of MySQL has been available since version 3.21 and represents a sizable percentage of the daily downloads of MySQL. This section describes the process for installing MySQL on Windows.
Note
If you are upgrading MySQL from an existing installation older than MySQL 4.1.5, you must first perform the procedure described in Section 2.3.14, “Upgrading MySQL on Windows”.
To run MySQL on Windows, you need the following:
A Windows operating system such as Windows 2000, Windows XP, Windows Vista, Windows Server 2003, or Windows Server 2008. Both 32-bit and 64-bit versions are supported.
A Windows operating system permits you to run the MySQL server as a service. See Section 2.3.11, “Starting MySQL as a Windows Service”.
Generally, you should install MySQL on Windows using an account that has administrator rights. Otherwise, you may encounter problems with certain operations such as editing the
PATHenvironment variable or accessing the Service Control Manager. Once installed, MySQL does not need to be executed using a user with Administrator privileges.TCP/IP protocol support.
Enough space on the hard drive to unpack, install, and create the databases in accordance with your requirements (generally a minimum of 200 megabytes is recommended.)
For a list of limitations within the Windows version of MySQL, see Section D.10.3, “Windows Platform Limitations”.
There may also be other requirements, depending on how you plan to use MySQL:
If you plan to connect to the MySQL server via ODBC, you need a Connector/ODBC driver. See Section 21.1, “MySQL Connector/ODBC”.
If you plan to use MySQL server with ADO.NET applications, you need the Connector/NET driver. See Section 21.2, “MySQL Connector/NET”.
If you need tables with a size larger than 4GB, install MySQL on an NTFS or newer file system. Do not forget to use
MAX_ROWSandAVG_ROW_LENGTHwhen you create tables. See Section 12.1.14, “CREATE TABLESyntax”.
MySQL for Windows is available in several distribution formats:
Binary distributions are available that contain a setup program that installs everything you need so that you can start the server immediately. Another binary distribution format contains an archive that you simply unpack in the installation location and then configure yourself. For details, see Section 2.3.1, “Choosing An Installation Package”.
The source distribution contains all the code and support files for building the executables using the Visual Studio compiler system.
Generally speaking, you should use a binary distribution that includes an installer. It is simpler to use than the others, and you need no additional tools to get MySQL up and running. The installer for the Windows version of MySQL, combined with a GUI Configuration Wizard, automatically installs MySQL, creates an option file, starts the server, and secures the default user accounts.
Caution
Using virus scanning software such as Norton/Symantec Anti-Virus on directories containing MySQL data and temporary tables can cause issues, both in terms of the performance of MySQL and the virus-scanning software mis-identifying the contents of the files as containing spam. This is because of the fingerprinting mechanism used by the virus scanning software, and the way in which MySQL rapidly updates different files, which may be identified as a potential security risk.
After installing MySQL Server, it is recommended that you
disable virus scanning on the main directory
(datadir) being used to store
your MySQL table data. There is usually a system built into the
virus scanning software to allow certain directories to be
specifically ignored during virus scanning.
In addition, by default, MySQL creates temporary files in the
standard Windows temporary directory. To prevent the temporary
files also being scanned, you should configure a separate
temporary directory for MySQL temporary files and add this to
the virus scanning exclusion list. To do this, add a
configuration option for the
tmpdir parameter to your
my.ini configuration file. For more
information, see Section 2.3.7, “Creating an Option File”.
The following section describes how to install MySQL on Windows using a binary distribution. To use an installation package that does not include an installer, follow the procedure described in Section 2.3.5, “Installing MySQL from a Noinstall Zip Archive”. To install using a source distribution, see Section 2.9.6, “Installing MySQL from Source on Windows”.
MySQL distributions for Windows can be downloaded from http://dev.mysql.com/downloads/. See Section 2.1.3, “How to Get MySQL”.
For MySQL 6.0, there are three installation packages to choose from when installing MySQL on Windows:
The Essentials Package: This package has a file name similar to
mysql-essential-6.0.14-win32.msiand contains the minimum set of files needed to install MySQL on Windows, including the Configuration Wizard. This package does not include optional components such as the embedded server and benchmark suite.The Complete Package: This package has a file name similar to
mysql-6.0.14-win32.zipand contains all files needed for a complete Windows installation, including the Configuration Wizard. This package includes optional components such as the embedded server and benchmark suite.The Noinstall Archive: This package has a file name similar to
mysql-noinstall-6.0.14-win32.zipand contains all the files found in the Complete install package, with the exception of the Configuration Wizard. This package does not include an automated installer, and must be manually installed and configured.
The Essentials package is recommended for most users. Both the
Essentials and Complete distributions are available as an
.msi file for use with the Windows
Installer. The Noinstall distribution is packaged as Zip
archives. To use Zip archives, you must have a tool that can
unpack .zip files.
Your choice of install package affects the installation process you must follow. If you choose to install either the Essentials or Complete install packages, see Section 2.3.2, “Installing MySQL with the Automated Installer”. If you choose to install MySQL from the Noinstall archive, see Section 2.3.5, “Installing MySQL from a Noinstall Zip Archive”.
New MySQL users can use the MySQL Installation Wizard and MySQL Configuration Wizard to install MySQL on Windows. These are designed to install and configure MySQL in such a way that new users can immediately get started using MySQL.
The MySQL Installation Wizard and MySQL Configuration Wizard are available in the Essentials and Complete install packages. They are recommended for most standard MySQL installations. Exceptions include users who need to install multiple instances of MySQL on a single server host and advanced users who want complete control of server configuration.
MySQL Installation Wizard is an installer for the MySQL server that uses the latest installer technologies for Microsoft Windows. The MySQL Installation Wizard, in combination with the MySQL Configuration Wizard, allows a user to install and configure a MySQL server that is ready for use immediately after installation.
The MySQL Installation Wizard is the standard installer for all MySQL server distributions, version 4.1.5 and higher. Users of previous versions of MySQL need to shut down and remove their existing MySQL installations manually before installing MySQL with the MySQL Installation Wizard. See Section 2.3.3.6, “Upgrading MySQL with the Installation Wizard”, for more information on upgrading from a previous version.
Microsoft has included an improved version of their Microsoft Windows Installer (MSI) in the recent versions of Windows. MSI has become the de-facto standard for application installations on Windows 2000, Windows XP, and Windows Server 2003. The MySQL Installation Wizard makes use of this technology to provide a smoother and more flexible installation process.
The Microsoft Windows Installer Engine was updated with the release of Windows XP; those using a previous version of Windows can reference this Microsoft Knowledge Base article for information on upgrading to the latest version of the Windows Installer Engine.
In addition, Microsoft has introduced the WiX (Windows Installer XML) toolkit recently. This is the first highly acknowledged Open Source project from Microsoft. We have switched to WiX because it is an Open Source project and it allows us to handle the complete Windows installation process in a flexible manner using scripts.
Improving the MySQL Installation Wizard depends on the support and feedback of users like you. If you find that the MySQL Installation Wizard is lacking some feature important to you, or if you discover a bug, please report it in our bugs database using the instructions given in Section 1.7, “How to Report Bugs or Problems”.
The MySQL installation packages can be downloaded from http://dev.mysql.com/downloads/. If the package you download is contained within a Zip archive, you need to extract the archive first.
Note
If you are installing on Windows Vista it is best to open a
network port before beginning the installation. To do this,
first ensure that you are logged in as an Administrator, go
to the Control Panel, and double click
the Windows Firewall icon. Choose the
Allow a program through Windows Firewall
option and click the button.
Enter MySQL into the
Name text box and
3306 (or the port of your choice) into
the Port number text box. Also ensure
that the TCP protocol radio button is
selected. If you wish, you can also limit access to the
MySQL server by choosing the Change
scope button. Confirm your choices by clicking
the button. If you do not open a
port prior to installation, you cannot configure the MySQL
server immediately after installation. Additionally, when
running the MySQL Installation Wizard on Windows Vista,
ensure that you are logged in as a user with administrative
rights.
The process for starting the wizard depends on the contents of
the installation package you download. If there is a
setup.exe file present, double-click it
to start the installation process. If there is an
.msi file present, double-click it to
start the installation process.
Starting with MySQL 6.0.6, on starting the MySQL Installation Wizard you will be asked whether you want to run the MySQL Configuration Wizard once installation has completed and whether you want to register your installation with MySQL. If you decide to send the registration information, a small file will be uploaded to the SunConnect service. A browser window will also open and ask you to sign in to your Sun Developer Network account or to register for a new account. Your MySQL registration information will be appended to your Sun Developer Network account, and you can use the inventory management system to keep track of the pacakges you have registered. Only information about your server, version and environment is sent to the SunConnect system.
If an internet connection is not available, then the
information will be stored in two files within the base
directory of your MySQL installation. The files are called
register and svctag.
You can run then run the registration once an internet
connection is available by running the SunInventory
Registration link from the server installation
folder within the Start menu.
There are three installation types available: Typical, Complete, and Custom.
The Typical installation type installs the MySQL server, the mysql command-line client, and the command-line utilities. The command-line clients and utilities include mysqldump, myisamchk, and several other tools to help you manage the MySQL server.
The Complete installation type installs all components included in the installation package. The full installation package includes components such as the embedded server library, the benchmark suite, support scripts, and documentation.
The Custom installation type gives you complete control over which packages you wish to install and the installation path that is used. See Section 2.3.3.3, “The Custom Install Dialog”, for more information on performing a custom install.
If you choose the Typical or Complete installation types and click the button, you advance to the confirmation screen to verify your choices and begin the installation. If you choose the Custom installation type and click the button, you advance to the custom installation dialog, described in Section 2.3.3.3, “The Custom Install Dialog”.
If you wish to change the installation path or the specific components that are installed by the MySQL Installation Wizard, choose the Custom installation type.
A tree view on the left side of the custom install dialog lists all available components. Components that are not installed have a red X icon; components that are installed have a gray icon. To change whether a component is installed, click on that component's icon and choose a new option from the drop-down list that appears.
You can change the default installation path by clicking the button to the right of the displayed installation path.
After choosing your installation components and installation path, click the button to advance to the confirmation dialog.
Once you choose an installation type and optionally choose your installation components, you advance to the confirmation dialog. Your installation type and installation path are displayed for you to review.
To install MySQL if you are satisfied with your settings, click the button. To change your settings, click the button. To exit the MySQL Installation Wizard without installing MySQL, click the button.
After installation is complete, you have the option of registering with the MySQL Web site. Registration gives you access to post in the MySQL forums at forums.mysql.com, along with the ability to report bugs at bugs.mysql.com and to subscribe to our newsletter. The final screen of the installer provides a summary of the installation and gives you the option to launch the MySQL Configuration Wizard, which you can use to create a configuration file, install the MySQL service, and configure security settings.
Once you click the button, the MySQL Installation Wizard begins the installation process and makes certain changes to your system which are described in the sections that follow.
Changes to the Registry
The MySQL Installation Wizard creates one Windows registry key
in a typical install situation, located in
HKEY_LOCAL_MACHINE\SOFTWARE\MySQL AB.
The MySQL Installation Wizard creates a key named after the
major version of the server that is being installed, such as
MySQL Server 6.0. It contains
two string values, Location and
Version. The Location
string contains the path to the installation directory. In a
default installation it contains C:\Program
Files\MySQL\MySQL Server 6.0\. The
Version string contains the release number.
For example, for an installation of MySQL Server
6.0.14, the key contains a value of
6.0.14.
These registry keys are used to help external tools identify
the installed location of the MySQL server, preventing a
complete scan of the hard-disk to determine the installation
path of the MySQL server. The registry keys are not required
to run the server, and if you install MySQL using the
noinstall Zip archive, the registry keys
are not created.
Changes to the Start Menu
The MySQL Installation Wizard creates a new entry in the Windows menu under a common MySQL menu heading named after the major version of MySQL that you have installed. For example, if you install MySQL 6.0, the MySQL Installation Wizard creates a section in the menu.
The following entries are created within the new menu section:
: This is a shortcut to the mysql command-line client and is configured to connect as the
rootuser. The shortcut prompts for arootuser password when you connect.: This is a shortcut to the MySQL Configuration Wizard. Use this shortcut to configure a newly installed server, or to reconfigure an existing server.
: This is a link to the MySQL server documentation that is stored locally in the MySQL server installation directory. This option is not available when the MySQL server is installed using the Essentials installation package.
Changes to the File System
The MySQL Installation Wizard by default installs the MySQL
6.0 server to C:\, where
Program
Files\MySQL\MySQL Server
6.0Program Files is the default
location for applications in your system, and
6.0 is the major
version of your MySQL server. This is the recommended location
for the MySQL server, replacing the former default location
C:\mysql.
By default, all MySQL applications are stored in a common
directory at C:\, where
Program
Files\MySQLProgram Files is the default
location for applications in your Windows installation. A
typical MySQL installation on a developer machine might look
like this:
C:\Program Files\MySQL\MySQL Server 6.0 C:\Program Files\MySQL\MySQL Workbench 5.1 OSS
This approach makes it easier to manage and maintain all MySQL applications installed on a particular system.
In MySQL 5.1.23 and earlier, the default location for the data
files used by MySQL is located within the corresponding MySQL
Server installation directory. For MySQL 5.1.24 and later, the
default location of the data directory is the
AppData directory configured for the user
that installed the MySQL application.
The MySQL Installation Wizard can perform server upgrades automatically using the upgrade capabilities of MSI. That means you do not need to remove a previous installation manually before installing a new release. The installer automatically shuts down and removes the previous MySQL service before installing the new version.
Automatic upgrades are available only when upgrading between installations that have the same major and minor version numbers. For example, you can upgrade automatically from MySQL 4.1.5 to MySQL 4.1.6, but not from MySQL 5.5 to MySQL 6.0.
- 2.3.4.1. Starting the MySQL Server Instance Configuration Wizard
- 2.3.4.2. Choosing a Maintenance Option
- 2.3.4.3. Choosing a Configuration Type
- 2.3.4.4. The Server Type Dialog
- 2.3.4.5. The Database Usage Dialog
- 2.3.4.6. The InnoDB Tablespace Dialog
- 2.3.4.7. The Concurrent Connections Dialog
- 2.3.4.8. The Networking and Strict Mode Options Dialog
- 2.3.4.9. The Character Set Dialog
- 2.3.4.10. The Service Options Dialog
- 2.3.4.11. The Security Options Dialog
- 2.3.4.12. The Confirmation Dialog
The MySQL Server Instance Configuration Wizard helps automate
the process of configuring your server. It creates a custom
MySQL configuration file (my.ini or
my.cnf) by asking you a series of questions
and then applying your responses to a template to generate the
configuration file that is tuned to your installation.
The MySQL Server Instance Configuration Wizard is included with the MySQL 6.0 server. The MySQL Server Instance Configuration Wizard is only available for Windows.
The MySQL Server Instance Configuration Wizard is normally started as part of the installation process. You should only need to run the MySQL Server Instance Configuration Wizard again when you need to change the configuration parameters of your server.
If you chose not to open a port prior to installing MySQL on Windows Vista, you can choose to use the MySQL Server Configuration Wizard after installation. However, you must open a port in the Windows Firewall. To do this see the instructions given in Section 2.3.3.1, “Downloading and Starting the MySQL Installation Wizard”. Rather than opening a port, you also have the option of adding MySQL as a program that bypasses the Windows Firewall. One or the other option is sufficient—you need not do both. Additionally, when running the MySQL Server Configuration Wizard on Windows Vista ensure that you are logged in as a user with administrative rights.
You can launch the MySQL Configuration Wizard by clicking the entry in the section of the Windows menu.
Alternatively, you can navigate to the
bin directory of your MySQL installation
and launch the MySQLInstanceConfig.exe
file directly.
The MySQL Server Instance Configuration Wizard places the
my.ini file in the installation directory
for the MySQL server. This helps associate configuration files
with particular server instances.
To ensure that the MySQL server knows where to look for the
my.ini file, an argument similar to this
is passed to the MySQL server as part of the service
installation:
--defaults-file="C:\Program Files\MySQL\MySQL Server 6.0\my.ini"
Here, C:\Program Files\MySQL\MySQL Server
6.0 is replaced with the
installation path to the MySQL Server. The
--defaults-file option
instructs the MySQL server to read the specified file for
configuration options when it starts.
Apart from making changes to the my.ini
file by running the MySQL Server Instance Configuration Wizard
again, you can modify it by opening it with a text editor and
making any necessary changes. You can also modify the server
configuration with the
http://www.mysql.com/products/administrator/ utility. For more
information about server configuration, see
Section 5.1.2, “Server Command Options”.
MySQL clients and utilities such as the
mysql and mysqldump
command-line clients are not able to locate the
my.ini file located in the server
installation directory. To configure the client and utility
applications, create a new my.ini file in
the Windows installation directory (for example,
C:\WINDOWS).
Under Windows Server 2003, Windows Server 2000 and Windows XP,
MySQL Server Instance Configuration Wizard will configure
MySQL to work as a Windows service. To start and stop MySQL
you use the Services application that is
supplied as part of the Windows Administrator Tools.
If the MySQL Server Instance Configuration Wizard detects an existing configuration file, you have the option of either reconfiguring your existing server, or removing the server instance by deleting the configuration file and stopping and removing the MySQL service.
To reconfigure an existing server, choose the option and click the button. Any existing configuration file is not overwritten, but renamed (within the same directory) using a timestamp (Windows) or sequential number (Linux). To remove the existing server instance, choose the option and click the button.
If you choose the
option, you advance to a confirmation window. Click the
button. The MySQL Server
Configuration Wizard stops and removes the MySQL service, and
then deletes the configuration file. The server installation
and its data folder are not removed.
If you choose the option, you advance to the dialog where you can choose the type of installation that you wish to configure.
When you start the MySQL Server Instance Configuration Wizard for a new MySQL installation, or choose the option for an existing installation, you advance to the dialog.
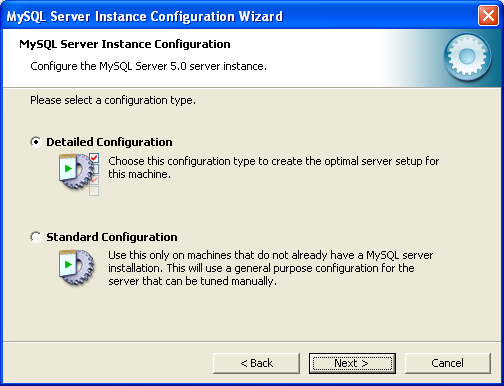
There are two configuration types available: and . The option is intended for new users who want to get started with MySQL quickly without having to make many decisions about server configuration. The option is intended for advanced users who want more fine-grained control over server configuration.
If you are new to MySQL and need a server configured as a single-user developer machine, the should suit your needs. Choosing the option causes the MySQL Configuration Wizard to set all configuration options automatically with the exception of and .
The sets options that may be incompatible with systems where there are existing MySQL installations. If you have an existing MySQL installation on your system in addition to the installation you wish to configure, the option is recommended.
To complete the , please refer to the sections on and in Section 2.3.4.10, “The Service Options Dialog”, and Section 2.3.4.11, “The Security Options Dialog”, respectively.
There are three different server types available to choose from. The server type that you choose affects the decisions that the MySQL Server Instance Configuration Wizard makes with regard to memory, disk, and processor usage.
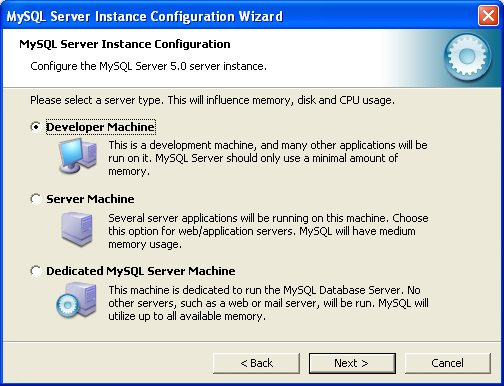
: Choose this option for a typical desktop workstation where MySQL is intended only for personal use. It is assumed that many other desktop applications are running. The MySQL server is configured to use minimal system resources.
: Choose this option for a server machine where the MySQL server is running alongside other server applications such as FTP, email, and Web servers. The MySQL server is configured to use a moderate portion of the system resources.
: Choose this option for a server machine that is intended to run only the MySQL server. It is assumed that no other applications are running. The MySQL server is configured to use all available system resources.
Note
By selecting one of the preconfigured configurations, the
values and settings of various options in your
my.cnf or my.ini
will be altered accordingly. The default values and options
as described in the reference manual may therefore be
different to the options and values that were created during
the execution of the configuration wizard.
The dialog allows you to
indicate the storage engines that you expect to use when
creating MySQL tables. The option you choose determines
whether the InnoDB storage engine is
available and what percentage of the server resources are
available to InnoDB.
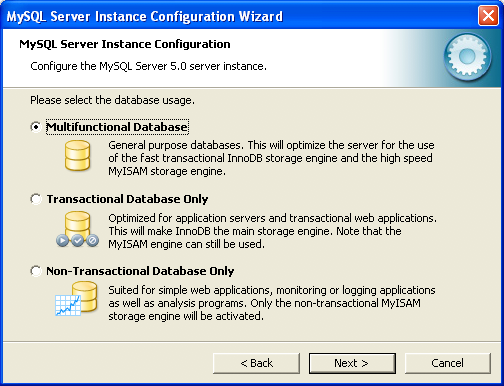
: This option enables both the
InnoDBandMyISAMstorage engines and divides resources evenly between the two. This option is recommended for users who use both storage engines on a regular basis.: This option enables both the
InnoDBandMyISAMstorage engines, but dedicates most server resources to theInnoDBstorage engine. This option is recommended for users who useInnoDBalmost exclusively and make only minimal use ofMyISAM.: This option disables the
InnoDBstorage engine completely and dedicates all server resources to theMyISAMstorage engine. This option is recommended for users who do not useInnoDB.
The Configuration Wizard uses a template to generate the server configuration file. The dialog sets one of the following option strings:
Multifunctional Database: MIXED Transactional Database Only: INNODB Non-Transactional Database Only: MYISAM
When these options are processed through the default template (my-template.ini) the result is:
Multifunctional Database: default-storage-engine=InnoDB _myisam_pct=50 Transactional Database Only: default-storage-engine=InnoDB _myisam_pct=5 Non-Transactional Database Only: default-storage-engine=MyISAM _myisam_pct=100 skip-innodb
The _myisam_pct value is used to calculate
the percentage of resources dedicated to
MyISAM. The remaining resources are
allocated to InnoDB.
Some users may want to locate the InnoDB
tablespace files in a different location than the MySQL server
data directory. Placing the tablespace files in a separate
location can be desirable if your system has a higher capacity
or higher performance storage device available, such as a RAID
storage system.

To change the default location for the
InnoDB tablespace files, choose a new drive
from the drop-down list of drive letters and choose a new path
from the drop-down list of paths. To create a custom path,
click the button.
If you are modifying the configuration of an existing server, you must click the button before you change the path. In this situation you must move the existing tablespace files to the new location manually before starting the server.
To prevent the server from running out of resources, it is important to limit the number of concurrent connections to the MySQL server that can be established. The dialog allows you to choose the expected usage of your server, and sets the limit for concurrent connections accordingly. It is also possible to set the concurrent connection limit manually.
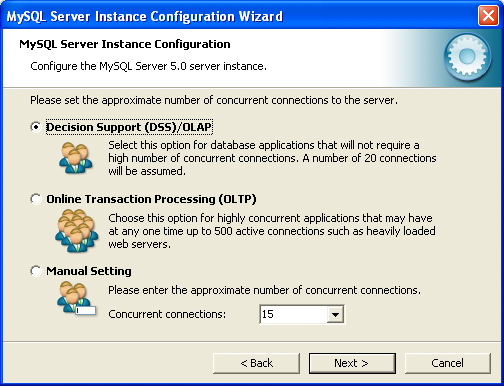
: Choose this option if your server does not require a large number of concurrent connections. The maximum number of connections is set at 100, with an average of 20 concurrent connections assumed.
: Choose this option if your server requires a large number of concurrent connections. The maximum number of connections is set at 500.
: Choose this option to set the maximum number of concurrent connections to the server manually. Choose the number of concurrent connections from the drop-down box provided, or enter the maximum number of connections into the drop-down box if the number you desire is not listed.
Use the dialog to enable or disable TCP/IP networking and to configure the port number that is used to connect to the MySQL server.
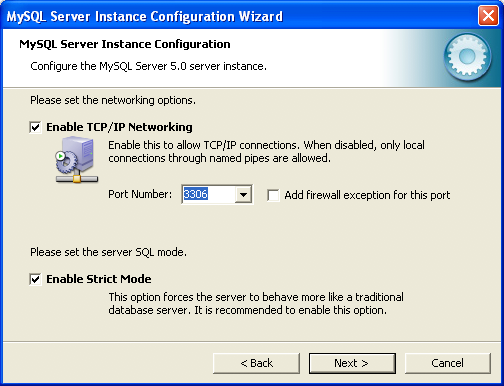
TCP/IP networking is enabled by default. To disable TCP/IP networking, uncheck the box next to the option.
Port 3306 is used by default. To change the port used to access MySQL, choose a new port number from the drop-down box or type a new port number directly into the drop-down box. If the port number you choose is in use, you are prompted to confirm your choice of port number.
Set the to either enable or disable strict mode. Enabling strict mode (default) makes MySQL behave more like other database management systems. If you run applications that rely on MySQL's old “forgiving” behavior, make sure to either adapt those applications or to disable strict mode. For more information about strict mode, see Section 5.1.7, “Server SQL Modes”.
The MySQL server supports multiple character sets and it is possible to set a default server character set that is applied to all tables, columns, and databases unless overridden. Use the dialog to change the default character set of the MySQL server.
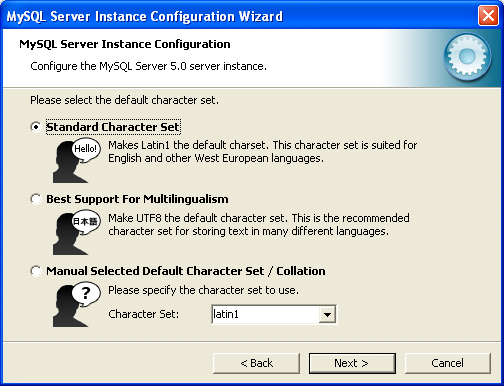
: Choose this option if you want to use
latin1as the default server character set.latin1is used for English and many Western European languages.: Choose this option if you want to use
utf8as the default server character set. This is a Unicode character set that can store characters from many different languages.: Choose this option if you want to pick the server's default character set manually. Choose the desired character set from the provided drop-down list.
On Windows platforms, the MySQL server can be installed as a Windows service. When installed this way, the MySQL server can be started automatically during system startup, and even restarted automatically by Windows in the event of a service failure.
The MySQL Server Instance Configuration Wizard installs the
MySQL server as a service by default, using the service name
MySQL. If you do not wish to install the
service, uncheck the box next to the option. You can change the
service name by picking a new service name from the drop-down
box provided or by entering a new service name into the
drop-down box.
Note
Service names can include any legal character except forward
(/) or backward (\)
slashes, and must be less than 256 characters long.
Warning
If you are installing multiple versions of MySQL onto the same machine, you must choose a different service name for each version that you install. If you do not choose a different service for each installed version then the service manager information will be inconsistent and this will cause problems when you try to uninstall a previous version.
If you have already installed multiple versions using the
same service name, you must manually edit the contents of
the
HKEY_LOCAL_MACHINE\SYSTEM\CurrentControlSet\Services
parameters within the Windows registry to update the
association of the service name with the correct server
version.
Typically, when installing multiple versions you create a
service name based on the version information. For example,
you might install MySQL 6.x as mysql6, or
specific versions such as MySQL 6.0.8 as
mysql60008.
To install the MySQL server as a service but not have it started automatically at startup, uncheck the box next to the option.
The content of the security options portion of the MySQL Server Instance Configuration Wizard will depend on whether this is a new installation, or modifying an existing installation.
Setting the root password for a new installation
It is strongly recommended that you set a
rootpassword for your MySQL server, and the MySQL Server Instance Config Wizard requires by default that you do so. If you do not wish to set arootpassword, uncheck the box next to the option.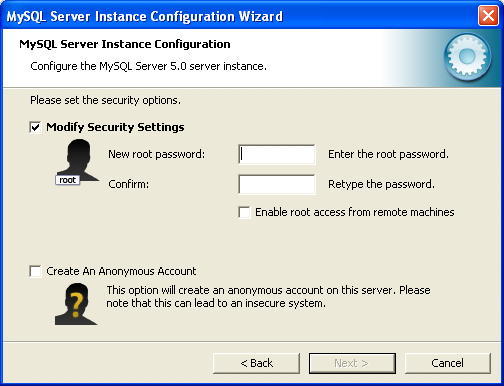
To set the
rootpassword, enter the desired password into both the and boxes.Setting the root password for an existing installation
If you are modifying the configuration of an existing configuration, or you are installing an upgrade and the MySQL Server Instance Configuration Wizard has detected an existing MySQL system, then you must enter the existing password for
rootbefore changing the configuration information.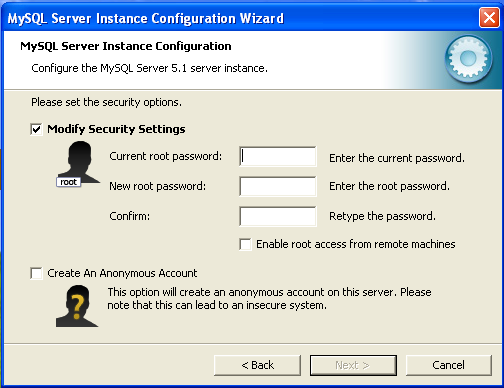
If you want to change the current
rootpassword, enter the desired new password into both the and boxes.
To allow root logins from across the
network, check the box next to the option. This
decreases the security of your root
account.
To create an anonymous user account, check the box next to the option. Creating an anonymous account can decrease server security and cause login and permission difficulties. For this reason, it is not recommended.
The final dialog in the MySQL Server Instance Configuration Wizard is the . To start the configuration process, click the button. To return to a previous dialog, click the button. To exit the MySQL Server Instance Configuration Wizard without configuring the server, click the button.
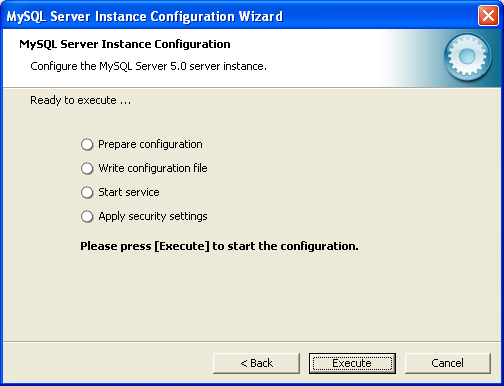
After you click the button, the MySQL Server Instance Configuration Wizard performs a series of tasks and displays the progress onscreen as the tasks are performed.
The MySQL Server Instance Configuration Wizard first
determines configuration file options based on your choices
using a template prepared by MySQL developers and engineers.
This template is named my-template.ini
and is located in your server installation directory.
The MySQL Configuration Wizard then writes these options to the corresponding configuration file.
If you chose to create a service for the MySQL server, the MySQL Server Instance Configuration Wizard creates and starts the service. If you are reconfiguring an existing service, the MySQL Server Instance Configuration Wizard restarts the service to apply your configuration changes.
If you chose to set a root password, the
MySQL Configuration Wizard connects to the server, sets your
new root password, and applies any other
security settings you may have selected.
After the MySQL Server Instance Configuration Wizard has completed its tasks, it displays a summary. Click the button to exit the MySQL Server Configuration Wizard.
Users who are installing from the Noinstall package can use the instructions in this section to manually install MySQL. The process for installing MySQL from a Zip archive is as follows:
Extract the archive to the desired install directory
Create an option file
Choose a MySQL server type
Start the MySQL server
Secure the default user accounts
This process is described in the sections that follow.
To install MySQL manually, do the following:
If you are upgrading from a previous version please refer to Section 2.3.14, “Upgrading MySQL on Windows”, before beginning the upgrade process.
Make sure that you are logged in as a user with administrator privileges.
Choose an installation location. Traditionally, the MySQL server is installed in
C:\mysql. The MySQL Installation Wizard installs MySQL underC:\Program Files\MySQL. If you do not install MySQL atC:\mysql, you must specify the path to the install directory during startup or in an option file. See Section 2.3.7, “Creating an Option File”.Extract the install archive to the chosen installation location using your preferred Zip archive tool. Some tools may extract the archive to a folder within your chosen installation location. If this occurs, you can move the contents of the subfolder into the chosen installation location.
If you need to specify startup options when you run the server, you can indicate them on the command line or place them in an option file. For options that are used every time the server starts, you may find it most convenient to use an option file to specify your MySQL configuration. This is particularly true under the following circumstances:
The installation or data directory locations are different from the default locations (
C:\Program Files\MySQL\MySQL Server 6.0andC:\Program Files\MySQL\MySQL Server 6.0\data).You need to tune the server settings, such as memory, cache, or InnoDB configuration information.
When the MySQL server starts on Windows, it looks for option
files in several locations, such as the Windows directory,
C:\, and the MySQL installation directory
(for the full list of locations, see
Section 4.2.3.3, “Using Option Files”). The Windows directory typically
is named something like C:\WINDOWS. You can
determine its exact location from the value of the
WINDIR environment variable using the
following command:
C:\> echo %WINDIR%
MySQL looks for options in each location first in the
my.ini file, and then in the
my.cnf file. However, to avoid confusion,
it is best if you use only one file. If your PC uses a boot
loader where C: is not the boot drive, your
only option is to use the my.ini file.
Whichever option file you use, it must be a plain text file.
You can also make use of the example option files included with your MySQL distribution; see Section 4.2.3.3.2, “Preconfigured Option Files”.
An option file can be created and modified with any text editor,
such as Notepad. For example, if MySQL is installed in
E:\mysql and the data directory is in
E:\mydata\data, you can create an option
file containing a [mysqld] section to specify
values for the basedir and
datadir options:
[mysqld] # set basedir to your installation path basedir=E:/mysql # set datadir to the location of your data directory datadir=E:/mydata/data
Note that Windows path names are specified in option files using (forward) slashes rather than backslashes. If you do use backslashes, double them:
[mysqld] # set basedir to your installation path basedir=E:\\mysql # set datadir to the location of your data directory datadir=E:\\mydata\\data
The rules for use of backslash in option file values are given in Section 4.2.3.3, “Using Option Files”.
MySQL Enterprise For expert advice on the start-up options appropriate to your circumstances, subscribe to the MySQL Enterprise Monitor. For more information, see http://www.mysql.com/products/enterprise/advisors.html.
In MySQL 5.1.23 and earlier, the MySQL installer places the data
directory directly under the directory where you install MySQL.
On MySQL 5.1.24 and later, the data directory is located within
the AppData directory for the user running
MySQL.
If you would like to use a data directory in a different
location, you should copy the entire contents of the
data directory to the new location. For
example, if you want to use E:\mydata as
the data directory instead, you must do two things:
Move the entire
datadirectory and all of its contents from the default location (for exampleC:\Program Files\MySQL\MySQL Server 6.0\data) toE:\mydata.Use a
--datadiroption to specify the new data directory location each time you start the server.
The following table shows the available servers for Windows in MySQL 6.0.
| Binary | Description |
| mysqld | Optimized binary with named-pipe support |
| mysqld-debug | Like mysqld, but compiled with full debugging and automatic memory allocation checking |
All of the preceding binaries are optimized for modern Intel processors, but should work on any Intel i386-class or higher processor.
Each of the servers in a distribution support the same set of
storage engines. The SHOW ENGINES
statement displays which engines a given server supports.
All Windows MySQL 6.0 servers have support for symbolic linking of database directories.
MySQL supports TCP/IP on all Windows platforms. MySQL servers on Windows support named pipes as indicated in the following list. However, the default is to use TCP/IP regardless of platform. (Named pipes are slower than TCP/IP in many Windows configurations.)
Named pipes are enabled only if you start the server with the
--enable-named-pipe option. It is
necessary to use this option explicitly because some users have
experienced problems with shutting down the MySQL server when
named pipes were used.
This section gives a general overview of starting the MySQL server. The following sections provide more specific information for starting the MySQL server from the command line or as a Windows service.
The information here applies primarily if you installed MySQL
using the Noinstall version, or if you wish
to configure and test MySQL manually rather than with the GUI
tools.
The examples in these sections assume that MySQL is installed
under the default location of C:\Program
Files\MySQL\MySQL Server 6.0. Adjust the
path names shown in the examples if you have MySQL installed in
a different location.
Clients have two options. They can use TCP/IP, or they can use a named pipe if the server supports named-pipe connections.
MySQL for Windows also supports shared-memory connections if the
server is started with the
--shared-memory option. Clients
can connect through shared memory by using the
--protocol=MEMORY option.
For information about which server binary to run, see Section 2.3.8, “Selecting a MySQL Server Type”.
Testing is best done from a command prompt in a console window (or “DOS window”). In this way you can have the server display status messages in the window where they are easy to see. If something is wrong with your configuration, these messages make it easier for you to identify and fix any problems.
To start the server, enter this command:
C:\> "C:\Program Files\MySQL\MySQL Server 6.0\bin\mysqld" --console
For a server that includes InnoDB support,
you should see the messages similar to those following as it
starts (the path names and sizes may differ):
InnoDB: The first specified datafile c:\ibdata\ibdata1 did not exist: InnoDB: a new database to be created! InnoDB: Setting file c:\ibdata\ibdata1 size to 209715200 InnoDB: Database physically writes the file full: wait... InnoDB: Log file c:\iblogs\ib_logfile0 did not exist: new to be created InnoDB: Setting log file c:\iblogs\ib_logfile0 size to 31457280 InnoDB: Log file c:\iblogs\ib_logfile1 did not exist: new to be created InnoDB: Setting log file c:\iblogs\ib_logfile1 size to 31457280 InnoDB: Log file c:\iblogs\ib_logfile2 did not exist: new to be created InnoDB: Setting log file c:\iblogs\ib_logfile2 size to 31457280 InnoDB: Doublewrite buffer not found: creating new InnoDB: Doublewrite buffer created InnoDB: creating foreign key constraint system tables InnoDB: foreign key constraint system tables created 011024 10:58:25 InnoDB: Started
When the server finishes its startup sequence, you should see something like this, which indicates that the server is ready to service client connections:
mysqld: ready for connections Version: '6.0.14' socket: '' port: 3306
The server continues to write to the console any further diagnostic output it produces. You can open a new console window in which to run client programs.
If you omit the --console option,
the server writes diagnostic output to the error log in the data
directory (C:\Program Files\MySQL\MySQL Server
6.0\data by default). The error log is
the file with the .err extension.
Note
The accounts that are listed in the MySQL grant tables initially have no passwords. After starting the server, you should set up passwords for them using the instructions in Section 2.10, “Post-Installation Setup and Testing”.
The MySQL server can be started manually from the command line. This can be done on any version of Windows.
To start the mysqld server from the command line, you should start a console window (or “DOS window”) and enter this command:
C:\> "C:\Program Files\MySQL\MySQL Server 6.0\bin\mysqld"
The path to mysqld may vary depending on the install location of MySQL on your system.
You can stop the MySQL server by executing this command:
C:\> "C:\Program Files\MySQL\MySQL Server 6.0\bin\mysqladmin" -u root shutdown
Note
If the MySQL root user account has a
password, you need to invoke mysqladmin
with the -p option and supply the password
when prompted.
This command invokes the MySQL administrative utility
mysqladmin to connect to the server and tell
it to shut down. The command connects as the MySQL
root user, which is the default
administrative account in the MySQL grant system. Note that
users in the MySQL grant system are wholly independent from any
login users under Windows.
If mysqld doesn't start, check the error log
to see whether the server wrote any messages there to indicate
the cause of the problem. The error log is located in the
C:\Program Files\MySQL\MySQL Server
6.0\data directory. It is the file with
a suffix of .err. You can also try to start
the server as mysqld --console; in this case,
you may get some useful information on the screen that may help
solve the problem.
The last option is to start mysqld with the
--standalone and
--debug options. In this case,
mysqld writes a log file
C:\mysqld.trace that should contain the
reason why mysqld doesn't start. See
MySQL
Internals: Porting.
Use mysqld --verbose --help to display all the options that mysqld supports.
On Windows, the recommended way to run MySQL is to install it as a Windows service, whereby MySQL starts and stops automatically when Windows starts and stops. A MySQL server installed as a service can also be controlled from the command line using NET commands, or with the graphical Services utility. Generally, to install MySQL as a Windows service you should be logged in using an account that has administrator rights.
The Services utility (the Windows Service Control Manager) can be found in the Windows Control Panel (under on Windows 2000, XP, Vista, and Server 2003). To avoid conflicts, it is advisable to close the Services utility while performing server installation or removal operations from the command line.
Before installing MySQL as a Windows service, you should first stop the current server if it is running by using the following command:
C:\>"C:\Program Files\MySQL\MySQL Server 6.0\bin\mysqladmin"-u root shutdown
Note
If the MySQL root user account has a
password, you need to invoke mysqladmin
with the -p option and supply the password
when prompted.
This command invokes the MySQL administrative utility
mysqladmin to connect to the server and tell
it to shut down. The command connects as the MySQL
root user, which is the default
administrative account in the MySQL grant system. Note that
users in the MySQL grant system are wholly independent from any
login users under Windows.
Install the server as a service using this command:
C:\> "C:\Program Files\MySQL\MySQL Server 6.0\bin\mysqld" --install
The service-installation command does not start the server. Instructions for that are given later in this section.
To make it easier to invoke MySQL programs, you can add the path
name of the MySQL bin directory to your
Windows system PATH environment variable:
On the Windows desktop, right-click on the My Computer icon, and select .
Next select the tab from the menu that appears, and click the button.
Under System Variables, select , and then click the button. The dialogue should appear.
Place your cursor at the end of the text appearing in the space marked Variable Value. (Use the End key to ensure that your cursor is positioned at the very end of the text in this space.) Then enter the complete path name of your MySQL
bindirectory (for example,C:\Program Files\MySQL\MySQL Server 6.0\bin), Note that there should be a semicolon separating this path from any values present in this field. Dismiss this dialogue, and each dialogue in turn, by clicking until all of the dialogues that were opened have been dismissed. You should now be able to invoke any MySQL executable program by typing its name at the DOS prompt from any directory on the system, without having to supply the path. This includes the servers, the mysql client, and all MySQL command-line utilities such as mysqladmin and mysqldump.You should not add the MySQL
bindirectory to your WindowsPATHif you are running multiple MySQL servers on the same machine.
Warning
You must exercise great care when editing your system
PATH by hand; accidental deletion or
modification of any portion of the existing
PATH value can leave you with a
malfunctioning or even unusable system.
The following additional arguments can be used in MySQL 6.0 when installing the service:
You can specify a service name immediately following the
--installoption. The default service name isMySQL.If a service name is given, it can be followed by a single option. By convention, this should be
--defaults-file=to specify the name of an option file from which the server should read options when it starts.file_nameThe use of a single option other than
--defaults-fileis possible but discouraged.--defaults-fileis more flexible because it enables you to specify multiple startup options for the server by placing them in the named option file.You can also specify a
--local-serviceoption following the service name. This causes the server to run using theLocalServiceWindows account that has limited system privileges. This account is available only for Windows XP or newer. If both--defaults-fileand--local-serviceare given following the service name, they can be in any order.
For a MySQL server that is installed as a Windows service, the following rules determine the service name and option files that the server uses:
If the service-installation command specifies no service name or the default service name (
MySQL) following the--installoption, the server uses the a service name ofMySQLand reads options from the[mysqld]group in the standard option files.If the service-installation command specifies a service name other than
MySQLfollowing the--installoption, the server uses that service name. It reads options from the[mysqld]group and the group that has the same name as the service in the standard option files. This allows you to use the[mysqld]group for options that should be used by all MySQL services, and an option group with the service name for use by the server installed with that service name.If the service-installation command specifies a
--defaults-fileoption after the service name, the server reads options only from the[mysqld]group of the named file and ignores the standard option files.
As a more complex example, consider the following command:
C:\>"C:\Program Files\MySQL\MySQL Server 6.0\bin\mysqld"--install MySQL --defaults-file=C:\my-opts.cnf
Here, the default service name (MySQL) is
given after the --install option. If no
--defaults-file option had been
given, this command would have the effect of causing the server
to read the [mysqld] group from the standard
option files. However, because the
--defaults-file option is
present, the server reads options from the
[mysqld] option group, and only from the
named file.
You can also specify options as Start parameters in the Windows Services utility before you start the MySQL service.
Once a MySQL server has been installed as a service, Windows starts the service automatically whenever Windows starts. The service also can be started immediately from the Services utility, or by using a NET START MySQL command. The NET command is not case sensitive.
When run as a service, mysqld has no access
to a console window, so no messages can be seen there. If
mysqld does not start, check the error log to
see whether the server wrote any messages there to indicate the
cause of the problem. The error log is located in the MySQL data
directory (for example, C:\Program Files\MySQL\MySQL
Server 6.0\data). It is the file with a
suffix of .err.
When a MySQL server has been installed as a service, and the
service is running, Windows stops the service automatically when
Windows shuts down. The server also can be stopped manually by
using the Services utility, the NET
STOP MySQL command, or the mysqladmin
shutdown command.
You also have the choice of installing the server as a manual
service if you do not wish for the service to be started
automatically during the boot process. To do this, use the
--install-manual option rather than the
--install option:
C:\> "C:\Program Files\MySQL\MySQL Server 6.0\bin\mysqld" --install-manual
To remove a server that is installed as a service, first stop it
if it is running by executing NET STOP MySQL.
Then use the --remove option to remove it:
C:\> "C:\Program Files\MySQL\MySQL Server 6.0\bin\mysqld" --remove
If mysqld is not running as a service, you can start it from the command line. For instructions, see Section 2.3.10, “Starting MySQL from the Windows Command Line”.
Please see Section 2.3.13, “Troubleshooting a MySQL Installation Under Windows”, if you encounter difficulties during installation.
You can test whether the MySQL server is working by executing any of the following commands:
C:\>"C:\Program Files\MySQL\MySQL Server 6.0\bin\mysqlshow"C:\>"C:\Program Files\MySQL\MySQL Server 6.0\bin\mysqlshow" -u root mysqlC:\>"C:\Program Files\MySQL\MySQL Server 6.0\bin\mysqladmin" version status procC:\>"C:\Program Files\MySQL\MySQL Server 6.0\bin\mysql" test
If mysqld is slow to respond to TCP/IP
connections from client programs, there is probably a problem
with your DNS. In this case, start mysqld
with the --skip-name-resolve
option and use only localhost and IP numbers
in the Host column of the MySQL grant tables.
You can force a MySQL client to use a named-pipe connection
rather than TCP/IP by specifying the
--pipe or
--protocol=PIPE option, or by
specifying . (period) as the host name. Use
the --socket option to specify
the name of the pipe if you do not want to use the default pipe
name.
Note that if you have set a password for the
root account, deleted the anonymous account,
or created a new user account, then you must use the appropriate
-u and -p options with the
commands shown above in order to connect with the MySQL Server.
See Section 4.2.2, “Connecting to the MySQL Server”.
For more information about mysqlshow, see Section 4.5.6, “mysqlshow — Display Database, Table, and Column Information”.
When installing and running MySQL for the first time, you may encounter certain errors that prevent the MySQL server from starting. The purpose of this section is to help you diagnose and correct some of these errors.
Your first resource when troubleshooting server issues is the
error log. The MySQL server uses the error log to record
information relevant to the error that prevents the server from
starting. The error log is located in the data directory
specified in your my.ini file. The default
data directory location is C:\Program
Files\MySQL\MySQL Server 6.0\data. See
Section 5.2.2, “The Error Log”.
Another source of information regarding possible errors is the console messages displayed when the MySQL service is starting. Use the NET START MySQL command from the command line after installing mysqld as a service to see any error messages regarding the starting of the MySQL server as a service. See Section 2.3.11, “Starting MySQL as a Windows Service”.
The following examples show other common error messages you may encounter when installing MySQL and starting the server for the first time:
If the MySQL server cannot find the
mysqlprivileges database or other critical files, you may see these messages:System error 1067 has occurred. Fatal error: Can't open privilege tables: Table 'mysql.host' doesn't exist
These messages often occur when the MySQL base or data directories are installed in different locations than the default locations (
C:\Program Files\MySQL\MySQL Server 6.0andC:\Program Files\MySQL\MySQL Server 6.0\data, respectively).This situation may occur when MySQL is upgraded and installed to a new location, but the configuration file is not updated to reflect the new location. In addition, there may be old and new configuration files that conflict. Be sure to delete or rename any old configuration files when upgrading MySQL.
If you have installed MySQL to a directory other than
C:\Program Files\MySQL\MySQL Server 6.0, you need to ensure that the MySQL server is aware of this through the use of a configuration (my.ini) file. Themy.inifile needs to be located in your Windows directory, typicallyC:\WINDOWS. You can determine its exact location from the value of theWINDIRenvironment variable by issuing the following command from the command prompt:C:\>
echo %WINDIR%An option file can be created and modified with any text editor, such as Notepad. For example, if MySQL is installed in
E:\mysqland the data directory isD:\MySQLdata, you can create the option file and set up a[mysqld]section to specify values for thebasediranddatadiroptions:[mysqld] # set basedir to your installation path basedir=E:/mysql # set datadir to the location of your data directory datadir=D:/MySQLdata
Note that Windows path names are specified in option files using (forward) slashes rather than backslashes. If you do use backslashes, double them:
[mysqld] # set basedir to your installation path basedir=C:\\Program Files\\MySQL\\MySQL Server 6.0 # set datadir to the location of your data directory datadir=D:\\MySQLdata
The rules for use of backslash in option file values are given in Section 4.2.3.3, “Using Option Files”.
If you change the
datadirvalue in your MySQL configuration file, you must move the contents of the existing MySQL data directory before restarting the MySQL server.If you reinstall or upgrade MySQL without first stopping and removing the existing MySQL service and install MySQL using the MySQL Configuration Wizard, you may see this error:
Error: Cannot create Windows service for MySql. Error: 0
This occurs when the Configuration Wizard tries to install the service and finds an existing service with the same name.
One solution to this problem is to choose a service name other than
mysqlwhen using the configuration wizard. This allows the new service to be installed correctly, but leaves the outdated service in place. Although this is harmless, it is best to remove old services that are no longer in use.To permanently remove the old
mysqlservice, execute the following command as a user with administrative privileges, on the command-line:C:\>
sc delete mysql[SC] DeleteService SUCCESSIf the
scutility is not available for your version of Windows, download thedelsrvutility from http://www.microsoft.com/windows2000/techinfo/reskit/tools/existing/delsrv-o.asp and use thedelsrv mysqlsyntax.
This section lists some of the steps you should take when upgrading MySQL on Windows.
Review Section 2.11.1, “Upgrading MySQL”, for additional information on upgrading MySQL that is not specific to Windows.
You should always back up your current MySQL installation before performing an upgrade. See Section 6.2, “Database Backup Methods”.
Download the latest Windows distribution of MySQL from http://dev.mysql.com/downloads/.
Before upgrading MySQL, you must stop the server. If the server is installed as a service, stop the service with the following command from the command prompt:
C:\>
NET STOP MySQLIf you are not running the MySQL server as a service, use the following command to stop it:
C:\>
"C:\Program Files\MySQL\MySQL Server 6.0\bin\mysqladmin" -u root shutdownNote
If the MySQL
rootuser account has a password, you need to invoke mysqladmin with the-poption and supply the password when prompted.When upgrading to MySQL 6.0 from a version previous to 4.1.5, or when upgrading from a version of MySQL installed from a Zip archive to a version of MySQL installed with the MySQL Installation Wizard, you must manually remove the previous installation and MySQL service (if the server is installed as a service).
To remove the MySQL service, use the following command:
C:\>
C:\mysql\bin\mysqld --removeIf you do not remove the existing service, the MySQL Installation Wizard may fail to properly install the new MySQL service.
If you are using the MySQL Installation Wizard, start the wizard as described in Section 2.3.3, “Using the MySQL Installation Wizard”.
If you are installing MySQL from a Zip archive, extract the archive. You may either overwrite your existing MySQL installation (usually located at
C:\mysql), or install it into a different directory, such asC:\mysql5. Overwriting the existing installation is recommended.If you were running MySQL as a Windows service and you had to remove the service earlier in this procedure, reinstall the service. (See Section 2.3.11, “Starting MySQL as a Windows Service”.)
Restart the server. For example, use NET START MySQL if you run MySQL as a service, or invoke mysqld directly otherwise.
If you encounter errors, see Section 2.3.13, “Troubleshooting a MySQL Installation Under Windows”.
MySQL for Windows has proven itself to be very stable. The Windows version of MySQL has the same features as the corresponding Unix version, with the following exceptions:
Limited number of ports
Windows systems have about 4,000 ports available for client connections, and after a connection on a port closes, it takes two to four minutes before the port can be reused. In situations where clients connect to and disconnect from the server at a high rate, it is possible for all available ports to be used up before closed ports become available again. If this happens, the MySQL server appears to be unresponsive even though it is running. Note that ports may be used by other applications running on the machine as well, in which case the number of ports available to MySQL is lower.
For more information about this problem, see http://support.microsoft.com/default.aspx?scid=kb;en-us;196271.
Concurrent reads
Before MySQL 6.0.8, the I/O subsystem depends on the
pread()andpwrite()system calls to be able to mixINSERTandSELECT. The server uses mutexes to emulatepread()andpwrite(). The implementation limits the number of open files that MySQL can use to 2,048, which means that you cannot run as many concurrent threads on Windows as on Unix.As of MySQL 6.0.8, native Windows file I/O calls are used, so that concurrent reads are more efficiently implemented. Also, the limit of 2,048 open files is removed. The default is 16,384, but this can be increased by using the
--open-files-limitoption.Blocking read
MySQL uses a blocking read for each connection. That has the following implications if named-pipe connections are enabled:
A connection is not disconnected automatically after eight hours, as happens with the Unix version of MySQL.
If a connection hangs, it is not possible to break it without killing MySQL.
mysqladmin kill does not work on a sleeping connection.
mysqladmin shutdown cannot abort as long as there are sleeping connections.
We plan to fix this problem in the future.
While you are executing an
ALTER TABLEstatement, the table is locked from being used by other threads. This has to do with the fact that on Windows, you can't delete a file that is in use by another thread. In the future, we may find some way to work around this problem.DROP TABLEon a table that is in use by aMERGEtable does not work on Windows because theMERGEhandler does the table mapping hidden from the upper layer of MySQL. Because Windows does not allow dropping files that are open, you first must flush allMERGEtables (withFLUSH TABLES) or drop theMERGEtable before dropping the table.DATA DIRECTORYandINDEX DIRECTORYThe
DATA DIRECTORYandINDEX DIRECTORYoptions forCREATE TABLEare ignored on Windows, because Windows doesn't support symbolic links. These options also are ignored on systems that have a nonfunctionalrealpath()call.You cannot drop a database that is in use by some thread.
Case-insensitive names
File names are not case sensitive on Windows, so MySQL database and table names are also not case sensitive on Windows. The only restriction is that database and table names must be specified using the same case throughout a given statement. See Section 8.2.2, “Identifier Case Sensitivity”.
Directory and file names
On Windows, MySQL Server supports only directory and file names that are compatible with the current ANSI code pages. For example, the following Japanese directory name will not work in the Western locale (code page 1252):
datadir="C:/私たちのプロジェクトのデータ"
The same limitation applies to directory and file names referred to in SQL statements, such as the data file path name in
LOAD DATA INFILE.The “
\” path name separator characterPath name components in Windows are separated by the “
\” character, which is also the escape character in MySQL. If you are usingLOAD DATA INFILEorSELECT ... INTO OUTFILE, use Unix-style file names with “/” characters:mysql>
LOAD DATA INFILE 'C:/tmp/skr.txt' INTO TABLE skr;mysql>SELECT * INTO OUTFILE 'C:/tmp/skr.txt' FROM skr;Alternatively, you must double the “
\” character:mysql>
LOAD DATA INFILE 'C:\\tmp\\skr.txt' INTO TABLE skr;mysql>SELECT * INTO OUTFILE 'C:\\tmp\\skr.txt' FROM skr;Problems with pipes
Pipes do not work reliably from the Windows command-line prompt. If the pipe includes the character
^Z/CHAR(24), Windows thinks that it has encountered end-of-file and aborts the program.This is mainly a problem when you try to apply a binary log as follows:
C:\>
mysqlbinlogbinary_log_file| mysql --user=rootIf you have a problem applying the log and suspect that it is because of a
^Z/CHAR(24)character, you can use the following workaround:C:\>
mysqlbinlogC:\>binary_log_file--result-file=/tmp/bin.sqlmysql --user=root --execute "source /tmp/bin.sql"The latter command also can be used to reliably read in any SQL file that may contain binary data.
Access denied for usererrorIf MySQL cannot resolve your host name properly, you may get the following error when you attempt to run a MySQL client program to connect to a server running on the same machine:
Access denied for user '
some_user'@'unknown' to database 'mysql'To fix this problem, you should create a file named
\windows\hostscontaining the following information:127.0.0.1 localhost
Here are some open issues for anyone who might want to help us improve MySQL on Windows:
Add macros to use the faster thread-safe increment/decrement methods provided by Windows.
The recommended way to install MySQL on RPM-based Linux
distributions is by using the RPM packages. The RPMs that we
provide to the community should work on all versions of Linux that
support RPM packages and use glibc 2.3. To
obtain RPM packages, see Section 2.1.3, “How to Get MySQL”.
For non-RPM Linux distributions, you can install MySQL using a
.tar.gz package. See
Section 2.8, “Installing MySQL from tar.gz Packages on Other
Unix-Like Systems”.
We do provide some platform-specific RPMs; the difference between a platform-specific RPM and a generic RPM is that a platform-specific RPM is built on the targeted platform and is linked dynamically whereas a generic RPM is linked statically with LinuxThreads.
Note
RPM distributions of MySQL often are provided by other vendors. Be aware that they may differ in features and capabilities from those built by us, and that the instructions in this manual do not necessarily apply to installing them. The vendor's instructions should be consulted instead.
If you have problems with an RPM file (for example, if you receive
the error Sorry, the host
'), see Section 2.12.1.2, “Linux Binary Distribution Notes”.
xxxx' could not be looked
up
In most cases, you need to install only the
MySQL-server and
MySQL-client packages to get a functional MySQL
installation. The other packages are not required for a standard
installation.
For upgrades, if your installation was originally produced by installing multiple RPM packages, it is best to upgrade all the packages, not just some. For example, if you previously installed the server and client RPMs, do not upgrade just the server RPM.
If you get a dependency failure when trying to install MySQL
packages (for example, error: removing these packages
would break dependencies: libmysqlclient.so.10 is needed by
...), you should also install the
MySQL-shared-compat package, which includes
both the shared libraries for backward compatibility
(libmysqlclient.so.12 for MySQL 4.0 and
libmysqlclient.so.10 for MySQL 3.23).
Some Linux distributions still ship with MySQL 3.23 and they
usually link applications dynamically to save disk space. If these
shared libraries are in a separate package (for example,
MySQL-shared), it is sufficient to simply leave
this package installed and just upgrade the MySQL server and
client packages (which are statically linked and do not depend on
the shared libraries). For distributions that include the shared
libraries in the same package as the MySQL server (for example,
Red Hat Linux), you could either install our 3.23
MySQL-shared RPM, or use the
MySQL-shared-compat package instead. (Do not
install both.)
The RPM packages shown in the following list are available. The
names shown here use a suffix of
.glibc23.i386.rpm, but particular packages
can have different suffixes, as described later.
MySQL-server-VERSION.glibc23.i386.rpmThe MySQL server. You need this unless you only want to connect to a MySQL server running on another machine.
MySQL-client-VERSION.glibc23.i386.rpmThe standard MySQL client programs. You probably always want to install this package.
MySQL-devel-VERSION.glibc23.i386.rpmThe libraries and include files that are needed if you want to compile other MySQL clients, such as the Perl modules.
MySQL-debuginfo-VERSION.glibc23.i386.rpmThis package contains debugging information.
debuginfoRPMs are never needed to use MySQL software; this is true both for the server and for client programs. However, they contain additional information that might be needed by a debugger to analyze a crash.MySQL-shared-VERSION.glibc23.i386.rpmThis package contains the shared libraries (
libmysqlclient.so*) that certain languages and applications need to dynamically load and use MySQL. It contains single-threaded and thread-safe libraries. If you install this package, do not install theMySQL-shared-compatpackage.MySQL-shared-compat-VERSION.glibc23.i386.rpmThis package includes the shared libraries for MySQL 3.23, 4.0, and so on, up to the current release. It contains single-threaded and thread-safe libraries. Install this package instead of
MySQL-sharedif you have applications installed that are dynamically linked against older versions of MySQL but you want to upgrade to the current version without breaking the library dependencies.MySQL-embedded-VERSION.glibc23.i386.rpmThe embedded MySQL server library.
MySQL-test-VERSION.glibc23.i386.rpmThis package includes the MySQL test suite.
MySQL-VERSION.src.rpmThis contains the source code for all of the previous packages. It can also be used to rebuild the RPMs on other architectures (for example, Alpha or SPARC).
The suffix of RPM package names (following the
VERSION value) has the following
syntax:
.PLATFORM.CPU.rpm
The PLATFORM and
CPU values indicate the type of system
for which the package is built.
PLATFORM indicates the platform and
CPU indicates the processor type or
family.
All packages are dynamically linked against
glibc 2.3. The
PLATFORM value indicates whether the
package is platform independent or intended for a specific
platform, as shown in the following table.
glibc23 | Platform independent, should run on any Linux distribution that supports
glibc 2.3 |
rhel3, rhel4 | Red Hat Enterprise Linux 3 or 4 |
sles9, sles10 | SuSE Linux Enterprise Server 9 or 10 |
In MySQL 6.0, only glibc23
packages are available currently.
The CPU value indicates the processor
type or family for which the package is built.
i386 | x86 processor, 386 and up |
i586 | x86 processor, Pentium and up |
x86_64 | 64-bit x86 processor |
ia64 | Itanium (IA-64) processor |
To see all files in an RPM package (for example, a
MySQL-server RPM), run a command like this:
shell> rpm -qpl MySQL-server-VERSION.glibc23.i386.rpm
To perform a standard minimal installation, install the server and client RPMs:
shell>rpm -i MySQL-server-shell>VERSION.glibc23.i386.rpmrpm -i MySQL-client-VERSION.glibc23.i386.rpm
To install only the client programs, install just the client RPM:
shell> rpm -i MySQL-client-VERSION.glibc23.i386.rpm
RPM provides a feature to verify the integrity and authenticity of
packages before installing them. If you would like to learn more
about this feature, see
Section 2.1.4, “Verifying Package Integrity Using MD5 Checksums or
GnuPG”.
The server RPM places data under the
/var/lib/mysql directory. The RPM also
creates a login account for a user named mysql
(if one does not exist) to use for running the MySQL server, and
creates the appropriate entries in
/etc/init.d/ to start the server
automatically at boot time. (This means that if you have performed
a previous installation and have made changes to its startup
script, you may want to make a copy of the script so that you do
not lose it when you install a newer RPM.) See
Section 2.10.2.2, “Starting and Stopping MySQL Automatically”, for more information on how
MySQL can be started automatically on system startup.
If you want to install the MySQL RPM on older Linux distributions
that do not support initialization scripts in
/etc/init.d (directly or via a symlink), you
should create a symbolic link that points to the location where
your initialization scripts actually are installed. For example,
if that location is /etc/rc.d/init.d, use
these commands before installing the RPM to create
/etc/init.d as a symbolic link that points
there:
shell>cd /etcshell>ln -s rc.d/init.d .
However, all current major Linux distributions should support the
new directory layout that uses /etc/init.d,
because it is required for LSB (Linux Standard Base) compliance.
If the RPM files that you install include
MySQL-server, the mysqld
server should be up and running after installation. You should be
able to start using MySQL.
If something goes wrong, you can find more information in the
binary installation section. See
Section 2.8, “Installing MySQL from tar.gz Packages on Other
Unix-Like Systems”.
Note
The accounts that are listed in the MySQL grant tables initially have no passwords. After starting the server, you should set up passwords for them using the instructions in Section 2.10, “Post-Installation Setup and Testing”.
During RPM installation, a user named mysql and
a group named mysql are created on the system.
This is done using the useradd,
groupadd, and usermod
commands. Those commands require appropriate administrative
privileges, which is ensured for locally managed users and groups
(as listed in the /etc/passwd and
/etc/group files) by the RPM installation
process being run by root.
For nonlocal user management (LDAP, NIS, and so forth), the administrative tools may require additional authentication (such as a password), and will fail if the installing user does not provide this authentication. Even if they fail, the RPM installation will not abort but succeed, and this is intentional. If they failed, some of the intended transfer of ownership may be missing, and it is recommended that the system administrator then manually ensures some appropriate user andgroup exists and manually transfers ownership following the actions in the RPM spec file.
You can install MySQL on Mac OS X 10.3.x (“Panther”) or newer using a Mac OS X binary package in PKG format instead of the binary tarball distribution. Please note that older versions of Mac OS X (for example, 10.1.x or 10.2.x) are not supported by this package.
The package is located inside a disk image
(.dmg) file that you first need to mount by
double-clicking its icon in the Finder. It should then mount the
image and display its contents.
When installing from the package version, you should also install the MySQL Preference Pane, which will allow you to control the startup and execution of your MySQL server from System Preferences.
To obtain MySQL, see Section 2.1.3, “How to Get MySQL”.
Note
Before proceeding with the installation, be sure to shut down all running MySQL server instances by either using the MySQL Manager Application (on Mac OS X Server) or via mysqladmin shutdown on the command line.
To actually install the MySQL PKG file, double-click on the package icon. This launches the Mac OS X Package Installer, which guides you through the installation of MySQL.
Due to a bug in the Mac OS X package installer, you may see this error message in the destination disk selection dialog:
You cannot install this software on this disk. (null)
If this error occurs, simply click the Go Back
button once to return to the previous screen. Then click
Continue to advance to the destination disk
selection again, and you should be able to choose the destination
disk correctly. We have reported this bug to Apple and it is
investigating this problem.
The Mac OS X PKG of MySQL installs itself into
/usr/local/mysql-
and also installs a symbolic link,
VERSION/usr/local/mysql, that points to the new
location. If a directory named
/usr/local/mysql exists, it is renamed to
/usr/local/mysql.bak first. Additionally, the
installer creates the grant tables in the mysql
database by executing mysql_install_db.
The installation layout is similar to that of a
tar file binary distribution; all MySQL
binaries are located in the directory
/usr/local/mysql/bin. The MySQL socket file
is created as /tmp/mysql.sock by default. See
Section 2.1.5, “Installation Layouts”.
MySQL installation requires a Mac OS X user account named
mysql. A user account with this name should
exist by default on Mac OS X 10.2 and up.
If you are running Mac OS X Server, a version of MySQL should already be installed. The following table shows the versions of MySQL that ship with Mac OS X Server versions.
| Mac OS X Server Version | MySQL Version |
| 10.2-10.2.2 | 3.23.51 |
| 10.2.3-10.2.6 | 3.23.53 |
| 10.3 | 4.0.14 |
| 10.3.2 | 4.0.16 |
| 10.4.0 | 4.1.10a |
This manual section covers the installation of the official MySQL Mac OS X PKG only. Make sure to read Apple's help information about installing MySQL: Run the “Help View” application, select “Mac OS X Server” help, do a search for “MySQL,” and read the item entitled “Installing MySQL.”
If you previously used Marc Liyanage's MySQL packages for Mac OS X from http://www.entropy.ch, you can simply follow the update instructions for packages using the binary installation layout as given on his pages.
If you are upgrading from Marc's 3.23.x versions or from the Mac OS X Server version of MySQL to the official MySQL PKG, you also need to convert the existing MySQL privilege tables to the current format, because some new security privileges have been added. See Section 4.4.8, “mysql_upgrade — Check Tables for MySQL Upgrade”.
If you want MySQL to start automatically during system startup, you also need to install the MySQL Startup Item. It is part of the Mac OS X installation disk images as a separate installation package. Simply double-click the MySQLStartupItem.pkg icon and follow the instructions to install it. The Startup Item need be installed only once. There is no need to install it each time you upgrade the MySQL package later.
The Startup Item for MySQL is installed into
/Library/StartupItems/MySQLCOM. (Before MySQL
4.1.2, the location was
/Library/StartupItems/MySQL, but that
collided with the MySQL Startup Item installed by Mac OS X
Server.) Startup Item installation adds a variable
MYSQLCOM=-YES- to the system configuration file
/etc/hostconfig. If you want to disable the
automatic startup of MySQL, simply change this variable to
MYSQLCOM=-NO-.
On Mac OS X Server, the default MySQL installation uses the
variable MYSQL in the
/etc/hostconfig file. The MySQL Startup Item
installer disables this variable by setting it to
MYSQL=-NO-. This avoids boot time conflicts
with the MYSQLCOM variable used by the MySQL
Startup Item. However, it does not shut down a running MySQL
server. You should do that yourself.
After the installation, you can start up MySQL by running the following commands in a terminal window. You must have administrator privileges to perform this task.
If you have installed the Startup Item, use this command:
shell>sudo /Library/StartupItems/MySQLCOM/MySQLCOM start(Enter your password, if necessary)(Press Control-D or enter "exit" to exit the shell)
If you do not use the Startup Item, enter the following command sequence:
shell>cd /usr/local/mysqlshell>sudo ./bin/mysqld_safe(Enter your password, if necessary)(Press Control-Z)shell>bg(Press Control-D or enter "exit" to exit the shell)
You should be able to connect to the MySQL server, for example, by
running /usr/local/mysql/bin/mysql.
Note
The accounts that are listed in the MySQL grant tables initially have no passwords. After starting the server, you should set up passwords for them using the instructions in Section 2.10, “Post-Installation Setup and Testing”.
You might want to add aliases to your shell's resource file to make it easier to access commonly used programs such as mysql and mysqladmin from the command line. The syntax for bash is:
alias mysql=/usr/local/mysql/bin/mysql alias mysqladmin=/usr/local/mysql/bin/mysqladmin
For tcsh, use:
alias mysql /usr/local/mysql/bin/mysql alias mysqladmin /usr/local/mysql/bin/mysqladmin
Even better, add /usr/local/mysql/bin to your
PATH environment variable. You can do this by
modifying the appropriate startup file for your shell. For more
information, see Section 4.2.1, “Invoking MySQL Programs”.
If you are upgrading an existing installation, note that installing a new MySQL PKG does not remove the directory of an older installation. Unfortunately, the Mac OS X Installer does not yet offer the functionality required to properly upgrade previously installed packages.
To use your existing databases with the new installation, you'll
need to copy the contents of the old data directory to the new
data directory. Make sure that neither the old server nor the new
one is running when you do this. After you have copied over the
MySQL database files from the previous installation and have
successfully started the new server, you should consider removing
the old installation files to save disk space. Additionally, you
should also remove older versions of the Package Receipt
directories located in
/Library/Receipts/mysql-.
VERSION.pkg
To obtain a binary MySQL distribution for Solaris in tarball or PKG format, http://dev.mysql.com/downloads/mysql/6.0.html.
If you install MySQL using a binary tarball distribution on Solaris, you may run into trouble even before you get the MySQL distribution unpacked, as the Solaris tar cannot handle long file names. This means that you may see errors when you try to unpack MySQL.
If this occurs, you must use GNU tar (gtar) to unpack the distribution.
You can install MySQL on Solaris using a binary package in PKG
format instead of the binary tarball distribution. Before
installing using the binary PKG format, you should create the
mysql user and group, for example:
groupadd mysql useradd -g mysql mysql
Some basic PKG-handling commands follow:
To add a package:
pkgadd -d
package_name.pkgTo remove a package:
pkgrm
package_nameTo get a full list of installed packages:
pkginfo
To get detailed information for a package:
pkginfo -l
package_nameTo list the files belonging to a package:
pkgchk -v
package_nameTo get packaging information for an arbitrary file:
pkgchk -l -p
file_name
For additional information about installing MySQL on Solaris, see Section 2.12.3, “Solaris Notes”.
Porting MySQL to NetWare was an effort spearheaded by Novell. Novell customers should be pleased to note that NetWare 6.5 ships with bundled MySQL binaries, complete with an automatic commercial use license for all servers running that version of NetWare.
MySQL for NetWare is compiled using a combination of Metrowerks CodeWarrior for NetWare and special cross-compilation versions of the GNU autotools.
The latest binary packages for NetWare can be obtained at http://dev.mysql.com/downloads/. See Section 2.1.3, “How to Get MySQL”.
To host MySQL, the NetWare server must meet these requirements:
The latest Support Pack of NetWare 6.5 must be installed.
The system must meet Novell's minimum requirements to run the respective version of NetWare.
MySQL data and the program binaries must be installed on an NSS volume; traditional volumes are not supported.
To install MySQL for NetWare, use the following procedure:
If you are upgrading from a prior installation, stop the MySQL server. This is done from the server console, using the following command:
SERVER: mysqladmin -u root shutdown
Note
If the MySQL
rootuser account has a password, you need to invoke mysqladmin with the-poption and supply the password when prompted.Log on to the target server from a client machine with access to the location where you are installing MySQL.
Extract the binary package Zip file onto the server. Be sure to allow the paths in the Zip file to be used. It is safe to simply extract the file to
SYS:\.If you are upgrading from a prior installation, you may need to copy the data directory (for example,
SYS:MYSQL\DATA), as well asmy.cnf, if you have customized it. You can then delete the old copy of MySQL.You might want to rename the directory to something more consistent and easy to use. The examples in this manual use
SYS:MYSQLto refer to the installation directory.Note that MySQL installation on NetWare does not detect if a version of MySQL is already installed outside the NetWare release. Therefore, if you have installed the latest MySQL version from the Web (for example, MySQL 4.1 or later) in
SYS:\MYSQL, you must rename the folder before upgrading the NetWare server; otherwise, files inSYS:\MySQLare overwritten by the MySQL version present in NetWare Support Pack.At the server console, add a search path for the directory containing the MySQL NLMs. For example:
SERVER: SEARCH ADD SYS:MYSQL\BIN
Initialize the data directory and the grant tables, if necessary, by executing mysql_install_db at the server console.
Start the MySQL server using mysqld_safe at the server console.
To finish the installation, you should also add the following commands to
autoexec.ncf. For example, if your MySQL installation is inSYS:MYSQLand you want MySQL to start automatically, you could add these lines:#Starts the MySQL 6.0.x database server SEARCH ADD SYS:MYSQL\BIN MYSQLD_SAFE
If you are running MySQL on NetWare 6.0, we strongly suggest that you use the
--skip-external-lockingoption on the command line:#Starts the MySQL 6.0.x database server SEARCH ADD SYS:MYSQL\BIN MYSQLD_SAFE --skip-external-locking
It is also necessary to use
CHECK TABLEandREPAIR TABLEinstead of myisamchk, because myisamchk makes use of external locking. External locking is known to have problems on NetWare 6.0; the problem has been eliminated in NetWare 6.5. Note that the use of MySQL on Netware 6.0 is not officially supported.mysqld_safe on NetWare provides a screen presence. When you unload (shut down) the mysqld_safe NLM, the screen does not go away by default. Instead, it prompts for user input:
*<NLM has terminated; Press any key to close the screen>*
If you want NetWare to close the screen automatically instead, use the
--autocloseoption to mysqld_safe. For example:#Starts the MySQL 6.0.x database server SEARCH ADD SYS:MYSQL\BIN MYSQLD_SAFE --autoclose
The behavior of mysqld_safe on NetWare is described further in Section 4.3.2, “mysqld_safe — MySQL Server Startup Script”.
When installing MySQL, either for the first time or upgrading from a previous version, download and install the latest and appropriate Perl module and PHP extensions for NetWare:
If there was an existing installation of MySQL on the NetWare
server, be sure to check for existing MySQL startup commands in
autoexec.ncf, and edit or delete them as
necessary.
Note
The accounts that are listed in the MySQL grant tables initially have no passwords. After starting the server, you should set up passwords for them using the instructions in Section 2.10, “Post-Installation Setup and Testing”.
This section covers the installation of MySQL binary distributions
that are provided for various platforms in the form of compressed
tar files (files with a
.tar.gz extension). See
Section 2.1.2.4, “MySQL Binaries Compiled by Oracle Corporation”, for a detailed list.
To obtain MySQL, see Section 2.1.3, “How to Get MySQL”.
MySQL tar file binary distributions have names
of the form
mysql-,
where VERSION-OS.tar.gzVERSION6.0.14), and
OS indicates the type of operating
system for which the distribution is intended (for example,
pc-linux-i686).
In addition to these generic packages, we also offer binaries in platform-specific package formats for selected platforms. See Section 2.2, “Standard MySQL Installation Using a Binary Distribution”, for more information on how to install these.
You need the following tools to install a MySQL tar file binary distribution:
GNU
gunzipto uncompress the distribution.A reasonable tar to unpack the distribution. GNU tar is known to work. Some operating systems come with a preinstalled version of tar that is known to have problems. For example, the tar provided with early versions of Mac OS X, SunOS 4.x, Solaris 8, Solaris 9, Solaris 10 and OpenSolaris, and HP-UX are known to have problems with long file names. On Mac OS X, you can use the preinstalled gnutar program. On Solaris 10 and OpenSolaris you can use the preinstalled gtar. On other systems with a deficient tar, you should install GNU tar first.
If you run into problems and need to file a bug report, please use the instructions in Section 1.7, “How to Report Bugs or Problems”.
The basic commands that you must execute to install and use a MySQL binary distribution are:
shell>groupadd mysqlshell>useradd -g mysql mysqlshell>cd /usr/localshell>gunzip <shell>/path/to/mysql-VERSION-OS.tar.gz | tar xvf -ln -sshell>full-path-to-mysql-VERSION-OSmysqlcd mysqlshell>chown -R mysql .shell>chgrp -R mysql .shell>scripts/mysql_install_db --user=mysqlshell>chown -R root .shell>chown -R mysql datashell>bin/mysqld_safe --user=mysql &
Note
This procedure does not set up any passwords for MySQL accounts. After following the procedure, proceed to Section 2.10, “Post-Installation Setup and Testing”.
A more detailed version of the preceding description for installing a binary distribution follows:
Add a login user and group for mysqld to run as:
shell>
groupadd mysqlshell>useradd -g mysql mysqlThese commands add the
mysqlgroup and themysqluser. The syntax for useradd and groupadd may differ slightly on different versions of Unix, or they may have different names such as adduser and addgroup.You might want to call the user and group something else instead of
mysql. If so, substitute the appropriate name in the following steps.Pick the directory under which you want to unpack the distribution and change location into it. In the following example, we unpack the distribution under
/usr/local. (The instructions, therefore, assume that you have permission to create files and directories in/usr/local. If that directory is protected, you must perform the installation asroot.)shell>
cd /usr/localObtain a distribution file using the instructions in Section 2.1.3, “How to Get MySQL”. For a given release, binary distributions for all platforms are built from the same MySQL source distribution.
Unpack the distribution, which creates the installation directory. Then create a symbolic link to that directory:
shell>
gunzip <shell>/path/to/mysql-VERSION-OS.tar.gz | tar xvf -ln -sfull-path-to-mysql-VERSION-OSmysqlThe tar command creates a directory named
mysql-. TheVERSION-OSlncommand makes a symbolic link to that directory. This lets you refer more easily to the installation directory as/usr/local/mysql.With GNU tar, no separate invocation of
gunzipis necessary. You can replace the first line with the following alternative command to uncompress and extract the distribution:shell>
tar zxvf/path/to/mysql-VERSION-OS.tar.gzChange location into the installation directory:
shell>
cd mysqlYou will find several files and subdirectories in the
mysqldirectory. The most important for installation purposes are thebinandscriptssubdirectories:The
bindirectory contains client programs and the server. You should add the full path name of this directory to yourPATHenvironment variable so that your shell finds the MySQL programs properly. See Section 2.13, “Environment Variables”.The
scriptsdirectory contains the mysql_install_db script used to initialize themysqldatabase containing the grant tables that store the server access permissions.
Ensure that the distribution contents are accessible to
mysql. If you unpacked the distribution asmysql, no further action is required. If you unpacked the distribution asroot, its contents will be owned byroot. Change its ownership tomysqlby executing the following commands asrootin the installation directory:shell>
chown -R mysql .shell>chgrp -R mysql .The first command changes the owner attribute of the files to the
mysqluser. The second changes the group attribute to themysqlgroup.If you have not installed MySQL before, you must create the MySQL data directory and initialize the grant tables:
shell>
scripts/mysql_install_db --user=mysqlIf you run the command as
root, include the--useroption as shown. If you run the command while logged in as that user, you can omit the--useroption.The command should create the data directory and its contents with
mysqlas the owner.After creating or updating the grant tables, you need to restart the server manually.
Most of the MySQL installation can be owned by
rootif you like. The exception is that the data directory must be owned bymysql. To accomplish this, run the following commands asrootin the installation directory:shell>
chown -R root .shell>chown -R mysql dataIf the plugin directory is writable by the server, it may be possible for a user to write executable code to a file in the directory using
SELECT ... INTO DUMPFILE. This can be prevented by makingplugin_dirread only to the server or by setting--secure-file-privto a directory whereSELECTwrites can be made safely.If you want MySQL to start automatically when you boot your machine, you can copy
support-files/mysql.serverto the location where your system has its startup files. More information can be found in thesupport-files/mysql.serverscript itself and in Section 2.10.2.2, “Starting and Stopping MySQL Automatically”.You can set up new accounts using the bin/mysql_setpermission script if you install the
DBIandDBD::mysqlPerl modules. See Section 4.6.14, “mysql_setpermission — Interactively Set Permissions in Grant Tables”. For Perl module installation instructions, see Section 2.14, “Perl Installation Notes”.If you would like to use mysqlaccess and have the MySQL distribution in some nonstandard location, you must change the location where mysqlaccess expects to find the mysql client. Edit the
bin/mysqlaccessscript at approximately line 18. Search for a line that looks like this:$MYSQL = '/usr/local/bin/mysql'; # path to mysql executable
Change the path to reflect the location where mysql actually is stored on your system. If you do not do this, a
Broken pipeerror will occur when you run mysqlaccess.
After everything has been unpacked and installed, you should test your distribution. To start the MySQL server, use the following command:
shell> bin/mysqld_safe --user=mysql &
If you run the command as root, you must use
the --user option as shown.
The value of the option is the name of the login account that you
created in the first step to use for running the server. If you
run the command while logged in as mysql, you
can omit the --user option.
If the command fails immediately and prints mysqld
ended, you can find some information in the
host_name.err
More information about mysqld_safe is given in Section 4.3.2, “mysqld_safe — MySQL Server Startup Script”.
Note
The accounts that are listed in the MySQL grant tables initially have no passwords. After starting the server, you should set up passwords for them using the instructions in Section 2.10, “Post-Installation Setup and Testing”.
Before you proceed with an installation from source, first check whether our binary is available for your platform and whether it works for you. We put a great deal of effort into ensuring that our binaries are built with the best possible options.
To obtain a source distribution for MySQL, Section 2.1.3, “How to Get MySQL”. If you want to build MySQL from source on Windows, see Section 2.9.6, “Installing MySQL from Source on Windows”.
MySQL source distributions are provided as compressed
tar archives and have names of the form
mysql-,
where VERSION.tar.gzVERSION is a number like
6.0.14.
You need the following tools to build and install MySQL from source:
GNU
gunzipto uncompress the distribution.A reasonable tar to unpack the distribution. GNU tar is known to work. Some operating systems come with a preinstalled version of tar that is known to have problems. For example, the tar provided with early versions of Mac OS X, SunOS 4.x, Solaris 8, Solaris 9, Solaris 10 and OpenSolaris, and HP-UX are known to have problems with long file names. On Mac OS X, you can use the preinstalled gnutar program. On Solaris 10 and OpenSolaris you can use the preinstalled gtar. On other systems with a deficient tar, you should install GNU tar first.
A working ANSI C++ compiler. GCC 3.2 or later, Sun Studio 10 or later, Visual Studio 2005 or later, and many current vendor-supplied compilers are known to work.
A good make program. GNU make is always recommended and is sometimes required. (BSD make fails, and vendor-provided make implementations may fail as well.) If you have problems, use GNU make 3.75 or newer.
libtool 1.5.24 or later is also recommended.
This is particularly true when building 64-bit binaries on Solaris for x86_64 processors (see Bug#31268). In addition, to guarantee that the binaries are 64-bit, you should do the following:
Provide
--build=x86_64-pc-solaris2.10as a configure argument.Provide
-m64as part of CFLAGS, CXXFLAGS and LDFLAGSRun configure and
makeas shown here:% LIBRARY_PATH=/usr/local/lib/amd64 ./configure ..... % LIBRARY_PATH=/usr/local/lib/amd64 gmake
If you are using a version of gcc recent enough
to understand the -fno-exceptions option, it is
very important that you use this option.
Otherwise, you may compile a binary that crashes randomly. Also
use -felide-constructors and
-fno-rtti along with
-fno-exceptions. When in doubt, do the following:
CFLAGS="-O3" CXX=gcc CXXFLAGS="-O3 -felide-constructors \
-fno-exceptions -fno-rtti" ./configure \
--prefix=/usr/local/mysql --enable-assembler \
--with-mysqld-ldflags=-all-static
On most systems, this gives you a fast and stable binary.
If you run into problems and need to file a bug report, please use the instructions in Section 1.7, “How to Report Bugs or Problems”.
The basic commands that you must execute to install a MySQL source distribution are:
shell>groupadd mysqlshell>useradd -g mysql mysqlshell>gunzip < mysql-shell>VERSION.tar.gz | tar -xvf -cd mysql-shell>VERSION./configure --prefix=/usr/local/mysqlshell>makeshell>make installshell>cp support-files/my-medium.cnf /etc/my.cnfshell>cd /usr/local/mysqlshell>chown -R mysql .shell>chgrp -R mysql .shell>bin/mysql_install_db --user=mysqlshell>chown -R root .shell>chown -R mysql varshell>bin/mysqld_safe --user=mysql &
If you start from a source RPM, do the following:
shell> rpmbuild --rebuild --clean MySQL-VERSION.src.rpm
This makes a binary RPM that you can install. For older versions of RPM, you may have to replace the command rpmbuild with rpm instead.
Note
This procedure does not set up any passwords for MySQL accounts. After following the procedure, proceed to Section 2.10, “Post-Installation Setup and Testing”, for post-installation setup and testing.
A more detailed version of the preceding description for installing MySQL from a source distribution follows:
Add a login user and group for mysqld to run as:
shell>
groupadd mysqlshell>useradd -g mysql mysqlThese commands add the
mysqlgroup and themysqluser. The syntax for useradd and groupadd may differ slightly on different versions of Unix, or they may have different names such as adduser and addgroup.You might want to call the user and group something else instead of
mysql. If so, substitute the appropriate name in the following steps.Perform the following steps as the
mysqluser, except as noted.Pick the directory under which you want to unpack the distribution and change location into it.
Obtain a distribution file using the instructions in Section 2.1.3, “How to Get MySQL”.
Unpack the distribution into the current directory:
shell>
gunzip </path/to/mysql-VERSION.tar.gz | tar xvf -This command creates a directory named
mysql-.VERSIONWith GNU tar, no separate invocation of
gunzipis necessary. You can use the following alternative command to uncompress and extract the distribution:shell>
tar zxvf/path/to/mysql-VERSION-OS.tar.gzChange location into the top-level directory of the unpacked distribution:
shell>
cd mysql-VERSIONNote that currently you must configure and build MySQL from this top-level directory. You cannot build it in a different directory.
Configure the release and compile everything:
shell>
./configure --prefix=/usr/local/mysqlshell>makeWhen you run configure, you might want to specify other options. Run ./configure --help for a list of options. Section 2.9.2, “Typical configure Options”, discusses some of the more useful options.
If configure fails and you are going to send mail to a MySQL mailing list to ask for assistance, please include any lines from
config.logthat you think can help solve the problem. Also include the last couple of lines of output from configure. To file a bug report, please use the instructions in Section 1.7, “How to Report Bugs or Problems”.If the compile fails, see Section 2.9.4, “Dealing with Problems Compiling MySQL”, for help.
Install the distribution:
shell>
make installYou might need to run this command as
root.If you want to set up an option file, use one of those present in the
support-filesdirectory as a template. For example:shell>
cp support-files/my-medium.cnf /etc/my.cnfYou might need to run this command as
root.If you want to configure support for
InnoDBtables, you should edit the/etc/my.cnffile, remove the#character before the option lines that start withinnodb_..., and modify the option values to be what you want. See Section 4.2.3.3, “Using Option Files”, and Section 13.7.2, “InnoDBConfiguration”.Change location into the installation directory:
shell>
cd /usr/local/mysqlIf you ran the make install command as
root, the installed files will be owned byroot. Ensure that the installation is accessible tomysqlby executing the following commands asrootin the installation directory:shell>
chown -R mysql .shell>chgrp -R mysql .The first command changes the owner attribute of the files to the
mysqluser. The second changes the group attribute to themysqlgroup.If you have not installed MySQL before, you must create the MySQL data directory and initialize the grant tables:
shell>
bin/mysql_install_db --user=mysqlIf you run the command as
root, include the--useroption as shown. If you run the command while logged in asmysql, you can omit the--useroption.The command should create the data directory and its contents with
mysqlas the owner.After using mysql_install_db to create the grant tables for MySQL, you must restart the server manually. The mysqld_safe command to do this is shown in a later step.
Most of the MySQL installation can be owned by
rootif you like. The exception is that the data directory must be owned bymysql. To accomplish this, run the following commands asrootin the installation directory:shell>
chown -R root .shell>chown -R mysql varIf the plugin directory is writable by the server, it may be possible for a user to write executable code to a file in the directory using
SELECT ... INTO DUMPFILE. This can be prevented by makingplugin_dirread only to the server or by setting--secure-file-privto a directory whereSELECTwrites can be made safely.If you want MySQL to start automatically when you boot your machine, you can copy
support-files/mysql.serverto the location where your system has its startup files. More information can be found in thesupport-files/mysql.serverscript itself; see also Section 2.10.2.2, “Starting and Stopping MySQL Automatically”.You can set up new accounts using the bin/mysql_setpermission script if you install the
DBIandDBD::mysqlPerl modules. See Section 4.6.14, “mysql_setpermission — Interactively Set Permissions in Grant Tables”. For Perl module installation instructions, see Section 2.14, “Perl Installation Notes”.
After everything has been installed, you should test your distribution. To start the MySQL server, use the following command:
shell> /usr/local/mysql/bin/mysqld_safe --user=mysql &
If you run the command as root, you should
use the --user option as shown. The value of
the option is the name of the login account that you created in
the first step to use for running the server. If you run the
command while logged in as that user, you can omit the
--user option.
If the command fails immediately and prints mysqld
ended, you can find some information in the
host_name.err
More information about mysqld_safe is given in Section 4.3.2, “mysqld_safe — MySQL Server Startup Script”.
Note
The accounts that are listed in the MySQL grant tables initially have no passwords. After starting the server, you should set up passwords for them using the instructions in Section 2.10, “Post-Installation Setup and Testing”.
The configure script gives you a great deal of control over how you configure a MySQL source distribution. Typically you do this using options on the configure command line. You can also affect configure using certain environment variables. See Section 2.13, “Environment Variables”. For a full list of options supported by configure, run this command:
shell> ./configure --help
A list of the available configure options is provided in the table below.
Table 2.1. Build (configure)
options
| Formats | Description | Default | Introduced | Removed |
|---|---|---|---|---|
| --bindir=DIR | User executables | EPREFIX/bin | ||
| --build=BUILD | Configure for building on BUILD | guessed | ||
| --cache-file=FILE | Cache test results in FILE | disabled | ||
| -C | Alias for `--cache-file=config.cache' | |||
| --config-cache | ||||
| --datadir=DIR | Read-only architecture-independent data | PREFIX/share | ||
| --disable-FEATURE | Do not include FEATURE | |||
| --disable-dependency-tracking | Disable dependency tracking | |||
| --disable-grant-options | Disable GRANT options | |||
| --disable-largefile | Omit support for large files | |||
| --disable-libtool-lock | Disable libtool lock | |||
| --disable-thread-safe-client | Compile the client without threads | |||
| --enable-FEATURE | Enable FEATURE | |||
| --enable-assembler | Use assembler versions of some string functions if available | |||
| --enable-debug-sync | Compile in Debug Sync facility | 6.0.6 | ||
| --enable-dependency-tracking | Do not reject slow dependency extractors | |||
| --enable-dtrace | Compile in DTrace support | 6.0.4 | ||
| --enable-fast-install | Optimize for fast installation | yes | ||
| --enable-local-infile | Enable LOAD DATA LOCAL INFILE | disabled | ||
| --enable-shared | Build shared libraries | yes | ||
| --enable-static | Build static libraries | yes | ||
| --enable-thread-safe-client | Compile the client with threads | |||
| --exec-prefix=EPREFIX | Install architecture-dependent files in EPREFIX | |||
| -h | Display this help and exit | |||
| --help | ||||
| --help=short | Display options specific to this package | |||
| --help=recursive | Display the short help of all the included packages | |||
| --host=HOST | Cross-compile to build programs to run on HOST | |||
| --includedir=DIR | C header files | PREFIX/include | ||
| --infodir=DIR | Info documentation | PREFIX/info | ||
| --libdir=DIR | Object code libraries | EPREFIX/lib | ||
| --libexecdir=DIR | Program executables | EPREFIX/libexec | ||
| --localstatedir=DIR | Modifiable single-machine data | PREFIX/var | ||
| --mandir=DIR | man documentation | PREFIX/man | ||
| -n | Do not create output files | |||
| --no-create | ||||
| --oldincludedir=DIR | C header files for non-gcc | /usr/include | ||
| --prefix=PREFIX | Install architecture-independent files in PREFIX | |||
| --program-prefix=PREFIX | Prepend PREFIX to installed program names | |||
| --program-suffix=SUFFIX | Append SUFFIX to installed program names | |||
| --program-transform-name=PROGRAM | run sed PROGRAM on installed program names | |||
| -q | Do not print `checking...' messages | |||
| --quiet | ||||
| --sbindir=DIR | System admin executables | EPREFIX/sbin | ||
| --sharedstatedir=DIR | Modifiable architecture-independent data | PREFIX/com | ||
| --srcdir=DIR | Find the sources in DIR | configure directory or .. | ||
| --sysconfdir=DIR | Read-only single-machine data | PREFIX/etc | ||
| --target=TARGET | Configure for building compilers for TARGET | |||
| -V | Display version information and exit | |||
| --version | ||||
| --with-PACKAGE | Use PACKAGE | |||
| --with-archive-storage-engine | Enable the Archive Storage Engine | no | ||
| --with-atomic-ops | Implement atomic operations using pthread rwlocks or atomic CPU instructions for multi-processor | |||
| --with-berkeley-db-includes | Find Berkeley DB headers in DIR | |||
| --with-big-tables | Support tables with more than 4 G rows even on 32 bit platforms | |||
| --with-blackhole-storage-engine | Enable the Blackhole Storage Engine | no | ||
| --with-charset | Default character set | |||
| --with-client-ldflags | Extra linking arguments for clients | |||
| --with-collation | Default collation | |||
| --with-comment | Comment about compilation environment | |||
| --with-csv-storage-engine | Enable the CSV Storage Engine | yes | ||
| --with-darwin-mwcc | Use Metrowerks CodeWarrior wrappers on OS X/Darwin | |||
| --with-debug | Add debug code | |||
| --with-debug=full | Add debug code (adds memory checker, very slow) | |||
| --with-embedded-privilege-control | Build parts to check user's privileges (only affects embedded library) | |||
| --with-embedded-server | Build the embedded server | |||
| --with-error-inject | Enable error injection in MySQL Server | |||
| --with-example-storage-engine | Enable the Example Storage Engine | no | ||
| --with-extra-charsets | Use charsets in addition to default | |||
| --with-fast-mutexes | Compile with fast mutexes | enabled | ||
| --with-federated-storage-engine | Enable federated storage engine | no | ||
| --with-gnu-ld | Assume the C compiler uses GNU ld | no | ||
| --with-innodb | Enable innobase storage engine | no | ||
| --with-lib-ccflags | Extra CC options for libraries | |||
| --with-libevent | Include libevent for thread-pool support | 6.0.4 | ||
| --with-low-memory | Try to use less memory to compile to avoid memory limitations | |||
| --with-machine-type | Set the machine type, like "powerpc" | |||
| --with-maria-temp-tables | Make the temporary tables within MySQL use the Maria storage engine | 6.0.6 | ||
| --with-max-indexes=N | Sets the maximum number of indexes per table | 64 | ||
| --with-mysqld-ldflags | Extra linking arguments for mysqld | |||
| --with-mysqld-libs | Extra libraries to link with for mysqld | |||
| --with-mysqld-user | What user the mysqld daemon shall be run as | |||
| --with-named-curses-libs | Use specified curses libraries | |||
| --with-named-thread-libs | Use specified thread libraries | |||
| --with-ndb-ccflags | Extra CC options for ndb compile | |||
| --with-ndb-docs | Include the NDB Cluster ndbapi and mgmapi documentation | |||
| --with-ndb-port | Port for NDB Cluster management server | |||
| --with-ndb-port-base | Port for NDB Cluster management server | |||
| --with-ndb-sci=DIR | Provide MySQL with a custom location of sci library | |||
| --with-ndb-test | Include the NDB Cluster ndbapi test programs | |||
| --with-ndbcluster | Include the NDB Cluster table handler | no | ||
| --with-openssl-libs | Find OpenSSL libraries in DIR | |||
| --with-other-libc=DIR | Link against libc and other standard libraries installed in the specified nonstandard location | |||
| --with-pic | Try to use only PIC/non-PIC objects | Use both | ||
| --with-plugin-PLUGIN | Forces the named plugin to be linked into mysqld statically | |||
| --with-plugins | Plugins to include in mysqld | none | ||
| --with-pstack | Use the pstack backtrace library | |||
| --with-pthread | Force use of pthread library | |||
| --with-row-based-replication | Include row-based replication | |||
| --with-server-suffix | Append value to the version string | |||
| --with-ssl=DIR | Include SSL support | |||
| --with-system-type | Set the system type, like "sun-solaris10" | |||
| --with-tags | Include additional configurations | automatic | ||
| --with-tcp-port | Which port to use for MySQL services | 3306 | ||
| --with-unix-socket-path | Where to put the unix-domain socket | |||
| --with-zlib-dir=no|bundled|DIR | Provide MySQL with a custom location of compression library | |||
| --without-PACKAGE | Do not use PACKAGE | |||
| --without-debug | Build a production version without debugging code | |||
| --without-docs | Skip building of the documentation | |||
| --without-extra-tools | Skip building utilities in the tools directory | |||
| --without-geometry | Do not build geometry-related parts | |||
| --without-libedit | Use system libedit instead of bundled copy | |||
| --without-libevent | Do not include libevent for thread-pool support | 6.0.4 | ||
| --without-man | Skip building of the man pages | |||
| --without-ndb-binlog | Disable ndb binlog | |||
| --without-ndb-debug | Disable special ndb debug features | |||
| --without-plugin-PLUGIN | Exclude PLUGIN | |||
| --without-query-cache | Do not build query cache | |||
| --without-readline | Use system readline instead of bundled copy | |||
| --without-row-based-replication | Don't include row-based replication | |||
| --without-server | Only build the client | |||
| --without-uca | Skip building of the national Unicode collations |
Some of the configure options available are described here. For options that may be of use if you have difficulties building MySQL, see Section 2.9.4, “Dealing with Problems Compiling MySQL”.
To compile just the MySQL client libraries and client programs and not the server, use the
--without-serveroption:shell>
./configure --without-serverIf you have no C++ compiler, some client programs such as mysql cannot be compiled because they require C++.. In this case, you can remove the code in configure that tests for the C++ compiler and then run ./configure with the
--without-serveroption. The compile step should still try to build all clients, but you can ignore any warnings about files such asmysql.cc. (If make stops, try make -k to tell it to continue with the rest of the build even if errors occur.)If you want to build the embedded MySQL library (
libmysqld.a), use the--with-embedded-serveroption.If you do not want your log files and database directories located under
/usr/local/var, use a configure command something like one of these:shell>
./configure --prefix=/usr/local/mysqlshell>./configure --prefix=/usr/local \--localstatedir=/usr/local/mysql/dataThe first command changes the installation prefix so that everything is installed under
/usr/local/mysqlrather than the default of/usr/local. The second command preserves the default installation prefix, but overrides the default location for database directories (normally/usr/local/var) and changes it to/usr/local/mysql/data.You can also specify the installation directory and data directory locations at server startup time by using the
--basedirand--datadiroptions. These can be given on the command line or in an MySQL option file, although it is more common to use an option file. See Section 4.2.3.3, “Using Option Files”.This option specifies the port number on which the server listens for TCP/IP connections. The default is port 3306. To listen on a different port, use a configure command like this:
shell>
./configure --with-tcp-port=3307If you are using Unix and you want the MySQL socket file location to be somewhere other than the default location (normally in the directory
/tmpor/var/run), use a configure command like this:shell>
./configure \--with-unix-socket-path=/usr/local/mysql/tmp/mysql.sockThe socket file name must be an absolute path name. You can also change the location of
mysql.sockat server startup by using a MySQL option file. See Section B.5.4.5, “How to Protect or Change the MySQL Unix Socket File”.If you want to compile statically linked programs (for example, to make a binary distribution, to get better performance, or to work around problems with some Red Hat Linux distributions), run configure like this:
shell>
./configure --with-client-ldflags=-all-static \--with-mysqld-ldflags=-all-staticIf you are using gcc and do not have
libg++orlibstdc++installed, you can tell configure to use gcc as your C++ compiler:shell>
CC=gcc CXX=gcc ./configureWhen you use gcc as your C++ compiler, it does not attempt to link in
libg++orlibstdc++. This may be a good thing to do even if you have those libraries installed. Some versions of them have caused strange problems for MySQL users in the past.The following list indicates some compilers and environment variable settings that are commonly used with each one.
gcc 2.7.2:
CC=gcc CXX=gcc CXXFLAGS="-O3 -felide-constructors"
gcc 2.95.2:
CFLAGS="-O3 -mpentiumpro" CXX=gcc CXXFLAGS="-O3 -mpentiumpro \ -felide-constructors -fno-exceptions -fno-rtti"
pgcc2.90.29 or newer:CFLAGS="-O3 -mpentiumpro -mstack-align-double" CXX=gcc \ CXXFLAGS="-O3 -mpentiumpro -mstack-align-double \ -felide-constructors -fno-exceptions -fno-rtti"
In most cases, you can get a reasonably optimized MySQL binary by using the options from the preceding list and adding the following options to the configure line:
--prefix=/usr/local/mysql --enable-assembler \ --with-mysqld-ldflags=-all-static
The full configure line would, in other words, be something like the following for all recent gcc versions:
CFLAGS="-O3 -mpentiumpro" CXX=gcc CXXFLAGS="-O3 -mpentiumpro \ -felide-constructors -fno-exceptions -fno-rtti" ./configure \ --prefix=/usr/local/mysql --enable-assembler \ --with-mysqld-ldflags=-all-static
The binaries we provide on the MySQL Web site at http://dev.mysql.com/downloads/ are all compiled with full optimization and should be perfect for most users. See Section 2.1.2.4, “MySQL Binaries Compiled by Oracle Corporation”. There are some configuration settings you can tweak to build an even faster binary, but these are only for advanced users. See Section 7.5.1, “How Compiling and Linking Affects the Speed of MySQL”.
If the build fails and produces errors about your compiler or linker not being able to create the shared library
libmysqlclient.so.(whereNNis a version number), you can work around this problem by giving the--disable-sharedoption to configure. In this case, configure does not build a sharedlibmysqlclient.so.library.NBy default, MySQL uses the
latin1(cp1252 West European) character set. To change the default set, use the--with-charsetoption:shell>
./configure --with-charset=CHARSETCHARSETmay be one ofbinary,armscii8,ascii,big5,cp1250,cp1251,cp1256,cp1257,cp850,cp852,cp866,cp932,dec8,eucjpms,euckr,gb2312,gbk,geostd8,greek,hebrew,hp8,keybcs2,koi8r,koi8u,latin1,latin2,latin5,latin7,macce,macroman,sjis,swe7,tis620,ucs2,ujis,utf8,utf8mb3,utf16,utf32. (Additional character sets might be available. Check the output from ./configure --help for the current list.)The default collation may also be specified. MySQL uses the
latin1_swedish_cicollation by default. To change this, use the--with-collationoption:shell>
./configure --with-collation=COLLATIONTo change both the character set and the collation, use both the
--with-charsetand--with-collationoptions. The collation must be a legal collation for the character set. (Use theSHOW COLLATIONstatement to determine which collations are available for each character set.)With the configure option
--with-extra-charsets=, you can define which additional character sets should be compiled into the server.LISTLISTis one of the following:A list of character set names separated by spaces
complexto include all character sets that can't be dynamically loadedallto include all character sets into the binaries
Clients that want to convert characters between the server and the client should use the
SET NAMESstatement. See Section 5.1.4, “Server System Variables”, and Section 9.1.4, “Connection Character Sets and Collations”.To configure MySQL with debugging code, use the
--with-debugoption:shell>
./configure --with-debugThis causes a safe memory allocator to be included that can find some errors and that provides output about what is happening. See MySQL Internals: Porting.
Using
--with-debugto configure MySQL with debugging support enables you to use the--debug="d,parser_debug"option when you start the server. This causes the Bison parser that is used to process SQL statements to dump a parser trace to the server's standard error output. Typically, this output is written to the error log.To cause the Debug Sync facility to be compiled into the server, use the
--enable-debug-syncoption. This facility is used for testing and debugging. When compiled in, Debug Sync is disabled by default. To enable it, start mysqld with the--debug-sync-timeout=option, whereNNis a timeout value greater than 0. (The default value is 0, which disables Debug Sync.)Nbecomes the default timeout for individual synchronization points.Debug Sync is also compiled in if you configure with the
--with-debugoption (which implies--enable-debug-sync), unless you also use the--disable-debug-syncoption.For a description of the Debug Sync facility and how to use synchronization points, see MySQL Internals: Test Synchronization.
The
--enable-debug-syncand--disable-debug-syncoptions were added in MySQL 6.0.6.The
--enable-dtraceoption causes support for DTrace probes to be included. Use the--disable-dtraceto disable DTrace probe support.The
--enable-dtraceand--disable-dtraceoptions were added in MySQL 6.0.4.If your client programs are using threads, you must compile a thread-safe version of the MySQL client library with the
--enable-thread-safe-clientconfigure option. This creates alibmysqlclient_rlibrary with which you should link your threaded applications. See Section 21.9.16.2, “How to Make a Threaded Client”.Some features require that the server be built with compression library support, such as the
COMPRESS()andUNCOMPRESS()functions, compression of the client/server protocol, and compression byBACKUP DATABASE. The--with-zlib-dir=no|bundled|option provides control over compression library support. The valueDIRnoexplicitly disables compression support.bundledcauses thezliblibrary bundled in the MySQL sources to be used. ADIRpath name specifies the directory in which to find the compression library sources.It is possible to build MySQL with large table support using the
--with-big-tablesoption.This option causes the variables that store table row counts to be declared as
unsigned long longrather thanunsigned long. This enables tables to hold up to approximately 1.844E+19 ((232)2) rows rather than 232 (~4.295E+09) rows. Previously it was necessary to pass-DBIG_TABLESto the compiler manually in order to enable this feature.Run configure with the
--disable-grant-optionsoption to cause the--bootstrap,--skip-grant-tables, and--init-fileoptions for mysqld to be disabled. For Windows, the configure.js script recognizes theDISABLE_GRANT_OPTIONSflag, which has the same effect.As of MySQL 6.0.4, client connections can be managed by a fix-size pool of threads rather than allocating one thread per connection. Thread pooling is based on the
libeventlibrary. To build a server that includes the thread-pool capability, configure MySQL using the--with-libeventoption. The--without-libeventoption excludes thelibeventcode. For information about choosing which thread model the server uses, see Section 7.5.7, “How MySQL Uses Threads for Client Connections”.This option allows MySQL Community Server features to be enabled. Additional options may be required for individual features, such as
--enable-profilingto enable statement profiling. This option was added in MySQL 6.0.5. It is enabled by default; to disable it, use--disable-community-features.When given with
--enable-community-features, the--enable-profilingoption enables the statement profiling capability exposed by theSHOW PROFILEandSHOW PROFILESstatements. (See Section 12.4.6.32, “SHOW PROFILESSyntax”.) This option was added in MySQL 6.0.5. It is enabled by default; to disable it, use--disable-profiling.See Section 2.12, “Operating System-Specific Notes”, for options that pertain to particular operating systems.
See Section 5.5.6.2, “Using SSL Connections”, for options that pertain to configuring MySQL to support secure (encrypted) connections.
Several configure options apply to plugin selection and building:
--with-plugins=
PLUGIN[,PLUGIN]... --with-plugins=GROUP--with-plugin-PLUGIN--without-plugin-PLUGINPLUGINis an individual plugin name such ascsvorarchive.As shorthand,
GROUPis a configuration group name such asnone(select no plugins) orall(select all plugins).You can build a plugin as static (compiled into the server) or dynamic (built as a dynamic library that must be installed using the
INSTALL PLUGINstatement before it can be used). Some plugins might not support static or dynamic build.configure --help shows the following information pertaining to plugins:
The plugin-related options
The names of all available plugins
For each plugin, a description of its purpose, which build types it supports (static or dynamic), and which plugin groups it is a part of.
--with-pluginscan take a list of one or more plugin names separated by commas, or a plugin group name. The named plugins are configured to be built as static plugins.--with-plugin-configures the given plugin to be built as a static plugin.PLUGIN--without-plugin-disables the given plugin from being built.PLUGINIf a plugin is named both with a
--withand--withoutoption, the result is undefined.For any plugin that is not explicitly selected or disabled, it is selected to be built dynamically if it supports dynamic build, and not built if it does not support dynamic build. (Thus, in the case that no plugin options are given, all plugins that support dynamic build are selected to be built as dynamic plugins. Plugins that do not support dynamic build are not built.)
Caution
You should read this section only if you are interested in helping us test our new code. If you just want to get MySQL up and running on your system, you should use a standard release distribution (either a binary or source distribution).
To obtain the most recent development source tree, you must have Bazaar installed. You can obtain Bazaar from the Bazaar VCS Web site. Bazaar is supported by any platform that supports Python, and is therefore compatible with any Linux, Unix, Windows or Mac OS X host. Instructions for downloading and installing Bazaar on the different platforms are available on the Bazaar Web site.
All MySQL projects are hosted on Launchpad. MySQL projects, including MySQL server, MySQL Workbench, and others are available from the Sun/MySQL Engineering page. For the repositories related only to MySQL server, see the MySQL Server page.
To build under Unix/Linux, you must have the following tools installed:
GNU make, available from http://www.gnu.org/software/make/. Although some platforms come with their own make implementations, it is highly recommended that you use GNU make. It may already be available on your system as gmake.
autoconf 2.58 (or newer), available from http://www.gnu.org/software/autoconf/.
automake 1.8.1, available from http://www.gnu.org/software/automake/.
libtool 1.5, available from http://www.gnu.org/software/libtool/.
m4, available from http://www.gnu.org/software/m4/.
bison, available from http://www.gnu.org/software/bison/. You should use the latest version of bison where possible. Version 1.75 and version 2.1 are known to work. There have been reported problems with bison 1.875. If you experience problems, upgrade to a later, rather than earlier, version. Versions of bison older than 1.75 may report this error:
sql_yacc.yy:#####: fatal error: maximum table size (32767) exceeded
The maximum table size is not actually exceeded; the error is caused by bugs in older versions of bison.
To build under Windows you must have Microsoft Visual C++ 2005 Express Edition, Visual Studio .Net 2003 (7.1), or Visual Studio 2005 (8.0) compiler system.
Once the necessary tools are installed, you must create a local branch of the MySQL source code on your machine:
To obtain a copy of the MySQL source code, you must create a new Bazaar branch. If you do not already have a Bazaar repository directory set up, you need to initialize a new directory:
shell>
mkdir mysql-servershell>bzr init-repo --trees mysql-serverOnce you have an initialized directory, you can
branchfrom the public MySQL server repositories to create a local source tree. To create a branch of a specific version:shell>
cd mysql-servershell>bzr branch lp:mysql-server/6.0 mysql-6.0The initial download will take some time to complete, depending on the speed of your connection. Please be patient. Once you have downloaded the first tree, additional trees should take significantly less time to download.
When building from the Bazaar branch, you may want to create a copy of your active branch so that you can make configuration and other changes without affecting the original branch contents. You can achieve this by branching from the original branch:
shell>
bzr branch mysql-6.0 mysql-6.0-buildTo obtain changes made after you have set up the branch initially, update it using the
pulloption periodically. Use this command in the top-level directory of the local copy:shell>
bzr pullYou can examine the changeset comments for the tree by using the
logoption to bzr:shell> bzr log
You can also browse changesets, comments, and source code online. To browse this information for MySQL 6.0, go to the Launchpad MySQL Server page.
If you see diffs (changes) or code that you have a question about, do not hesitate to send email to the MySQL
internalsmailing list. See Section 1.6.1, “MySQL Mailing Lists”. Also, if you think you have a better idea on how to do something, send an email message to the list with a patch.
After you have the local branch, you can build MySQL server from the source code. On Windows, the build process is different from Unix/Linux: see Section 2.9.6, “Installing MySQL from Source on Windows”.
On Unix/Linux, use the autoconf system to create the configure script so that you can configure the build environment before building. The following example shows the typical commands required to build MySQL from a source tree.
Change location to the top-level directory of the source tree; replace
mysql-6.0with the appropriate directory name.shell>
cd mysql-6.0Prepare the source tree for configuration:
shell>
autoreconf --force --installAs an alternative to the preceding autoreconf command, you can use BUILD/autorun.sh, which acts as a shortcut for the following sequence of commands:
shell>
aclocal; autoheadershell>libtoolize --automake --forceshell>automake --force --add-missing; autoconfIf you get some strange errors during this stage, verify that you have the correct version of libtool installed.
Configure the source tree and compile MySQL:
shell>
./configure # Add your favorite options hereshell>makeFor a description of some configure options, see Section 2.9.2, “Typical configure Options”.
A collection of our standard configuration scripts is located in the
BUILD/subdirectory. For example, you may find it more convenient to use theBUILD/compile-pentium-debugscript than the preceding set of shell commands. To compile on a different architecture, modify the script by removing flags that are Pentium-specific, or use another script that may be more appropriate. These scripts are provided on an “as-is” basis. They are not officially maintained and their contents may change from release to release.When the build is done, run make install. Be careful with this on a production machine; the command may overwrite your live release installation. If you already have MySQL installed and do not want to overwrite it, run ./configure with values for the
--prefix,--with-tcp-port, and--with-unix-socket-pathoptions different from those used for your production server.Play hard with your new installation and try to make the new features crash. Start by running make test. See Section 22.1.2, “MySQL Test Suite”.
If you have gotten to the make stage, but the distribution does not compile, please enter the problem into our bugs database using the instructions given in Section 1.7, “How to Report Bugs or Problems”. If you have installed the latest versions of the required GNU tools, and they crash trying to process our configuration files, please report that also. However, if you get a
command not founderror or a similar problem for aclocal, configure, or other required tools, do not report it. Instead, make sure that all the required tools are installed and that yourPATHvariable is set correctly so that your shell can find them.
All MySQL programs compile cleanly for us with no warnings on Solaris or Linux using gcc. On other systems, warnings may occur due to differences in system include files. See Section 2.9.5, “MIT-pthreads Notes”, for warnings that may occur when using MIT-pthreads. For other problems, check the following list.
The solution to many problems involves reconfiguring. If you do need to reconfigure, take note of the following:
If configure is run after it has previously been run, it may use information that was gathered during its previous invocation. This information is stored in
config.cache. When configure starts up, it looks for that file and reads its contents if it exists, on the assumption that the information is still correct. That assumption is invalid when you reconfigure.Each time you run configure, you must run make again to recompile. However, you may want to remove old object files from previous builds first because they were compiled using different configuration options.
To prevent old configuration information or object files from being used, run these commands before re-running configure:
shell>rm config.cacheshell>make clean
Alternatively, you can run make distclean.
The following list describes some of the problems when compiling MySQL that have been found to occur most often:
If you get errors such as the ones shown here when compiling
sql_yacc.cc, you probably have run out of memory or swap space:Internal compiler error: program cc1plus got fatal signal 11 Out of virtual memory Virtual memory exhausted
The problem is that gcc requires a huge amount of memory to compile
sql_yacc.ccwith inline functions. Try running configure with the--with-low-memoryoption:shell>
./configure --with-low-memoryThis option causes
-fno-inlineto be added to the compile line if you are using gcc and-O0if you are using something else. You should try the--with-low-memoryoption even if you have so much memory and swap space that you think you can't possibly have run out. This problem has been observed to occur even on systems with generous hardware configurations, and the--with-low-memoryoption usually fixes it.By default, configure picks c++ as the compiler name and GNU c++ links with
-lg++. If you are using gcc, that behavior can cause problems during configuration such as this:configure: error: installation or configuration problem: C++ compiler cannot create executables.
You might also observe problems during compilation related to g++,
libg++, orlibstdc++.One cause of these problems is that you may not have g++, or you may have g++ but not
libg++, orlibstdc++. Take a look at theconfig.logfile. It should contain the exact reason why your C++ compiler didn't work. To work around these problems, you can use gcc as your C++ compiler. Try setting the environment variableCXXto"gcc -O3". For example:shell>
CXX="gcc -O3" ./configureThis works because gcc compiles C++ source files as well as g++ does, but does not link in
libg++orlibstdc++by default.Another way to fix these problems is to install g++,
libg++, andlibstdc++. However, do not uselibg++orlibstdc++with MySQL because this only increases the binary size of mysqld without providing any benefits. Some versions of these libraries have also caused strange problems for MySQL users in the past.If your compile fails with errors such as any of the following, you must upgrade your version of make to GNU make:
making all in mit-pthreads make: Fatal error in reader: Makefile, line 18: Badly formed macro assignment
Or:
make: file `Makefile' line 18: Must be a separator (:
Or:
pthread.h: No such file or directory
Solaris and FreeBSD are known to have troublesome make programs.
GNU make 3.75 is known to work.
If you want to define flags to be used by your C or C++ compilers, do so by adding the flags to the
CFLAGSandCXXFLAGSenvironment variables. You can also specify the compiler names this way usingCCandCXX. For example:shell>
CC=gccshell>CFLAGS=-O3shell>CXX=gccshell>CXXFLAGS=-O3shell>export CC CFLAGS CXX CXXFLAGSSee Section 2.1.2.4, “MySQL Binaries Compiled by Oracle Corporation”, for a list of flag definitions that have been found to be useful on various systems.
If you get errors such as those shown here when compiling mysqld, configure did not correctly detect the type of the last argument to
accept(),getsockname(), orgetpeername():cxx: Error: mysqld.cc, line 645: In this statement, the referenced type of the pointer value ''length'' is ''unsigned long'', which is not compatible with ''int''. new_sock = accept(sock, (struct sockaddr *)&cAddr, &length);To fix this, edit the
config.hfile (which is generated by configure). Look for these lines:/* Define as the base type of the last arg to accept */ #define SOCKET_SIZE_TYPE XXX
Change
XXXtosize_torint, depending on your operating system. (You must do this each time you run configure because configure regeneratesconfig.h.)The
sql_yacc.ccfile is generated fromsql_yacc.yy. Normally, the build process does not need to createsql_yacc.ccbecause MySQL comes with a pre-generated copy. However, if you do need to re-create it, you might encounter this error:"sql_yacc.yy", line
xxxfatal: default action causes potential...This is a sign that your version of yacc is deficient. You probably need to install bison (the GNU version of yacc) and use that instead.
On Debian Linux 3.0, you need to install
gawkinstead of the defaultmawk.If you need to debug mysqld or a MySQL client, run configure with the
--with-debugoption, and then recompile and link your clients with the new client library. See MySQL Internals: Porting.If you get a compilation error on Linux (for example, SuSE Linux 8.1 or Red Hat Linux 7.3) similar to the following one, you probably do not have g++ installed:
libmysql.c:1329: warning: passing arg 5 of `gethostbyname_r' from incompatible pointer type libmysql.c:1329: too few arguments to function `gethostbyname_r' libmysql.c:1329: warning: assignment makes pointer from integer without a cast make[2]: *** [libmysql.lo] Error 1
By default, the configure script attempts to determine the correct number of arguments by using g++ (the GNU C++ compiler). This test yields incorrect results if g++ is not installed. There are two ways to work around this problem:
Make sure that the GNU C++ g++ is installed. On some Linux distributions, the required package is called
gpp; on others, it is named gcc-c++.Use gcc as your C++ compiler by setting the
CXXenvironment variable to gcc:export CXX="gcc"
You must run configure again after making either of those changes.
This section describes some of the issues involved in using MIT-pthreads.
On Linux, you should not use MIT-pthreads. Use the installed LinuxThreads implementation instead. See Section 2.12.1, “Linux Notes”.
If your system does not provide native thread support, you should build MySQL using the MIT-pthreads package. This includes older FreeBSD systems, SunOS 4.x, Solaris 2.4 and earlier, and some others. See Section 2.1.1, “Operating Systems Supported by MySQL Community Server”.
MIT-pthreads is not part of the MySQL 6.0 source distribution. If you require this package, you need to download it separately from http://dev.mysql.com/Downloads/Contrib/pthreads-1_60_beta6-mysql.tar.gz
After downloading, extract this source archive into the top
level of the MySQL source directory. It creates a new
subdirectory named mit-pthreads.
On most systems, you can force MIT-pthreads to be used by running configure with the
--with-mit-threadsoption:shell>
./configure --with-mit-threadsBuilding in a nonsource directory is not supported when using MIT-pthreads because we want to minimize our changes to this code.
The checks that determine whether to use MIT-pthreads occur only during the part of the configuration process that deals with the server code. If you have configured the distribution using
--without-serverto build only the client code, clients do not know whether MIT-pthreads is being used and use Unix socket file connections by default. Because Unix socket files do not work under MIT-pthreads on some platforms, this means you need to use-hor--hostwith a value other thanlocalhostwhen you run client programs.When MySQL is compiled using MIT-pthreads, system locking is disabled by default for performance reasons. You can tell the server to use system locking with the
--external-lockingoption. This is needed only if you want to be able to run two MySQL servers against the same data files, but that is not recommended, anyway.Sometimes the pthread
bind()command fails to bind to a socket without any error message (at least on Solaris). The result is that all connections to the server fail. For example:shell>
mysqladmin versionmysqladmin: connect to server at '' failed; error: 'Can't connect to mysql server on localhost (146)'The solution to this problem is to kill the mysqld server and restart it. This has happened to us only when we have forcibly stopped the server and restarted it immediately.
With MIT-pthreads, the
sleep()system call isn't interruptible withSIGINT(break). This is noticeable only when you run mysqladmin --sleep. You must wait for thesleep()call to terminate before the interrupt is served and the process stops.When linking, you might receive warning messages like these (at least on Solaris); they can be ignored:
ld: warning: symbol `_iob' has differing sizes: (file /my/local/pthreads/lib/libpthread.a(findfp.o) value=0x4; file /usr/lib/libc.so value=0x140); /my/local/pthreads/lib/libpthread.a(findfp.o) definition taken ld: warning: symbol `__iob' has differing sizes: (file /my/local/pthreads/lib/libpthread.a(findfp.o) value=0x4; file /usr/lib/libc.so value=0x140); /my/local/pthreads/lib/libpthread.a(findfp.o) definition takenSome other warnings also can be ignored:
implicit declaration of function `int strtoll(...)' implicit declaration of function `int strtoul(...)'
We have not been able to make
readlinework with MIT-pthreads. (This is not necessary, but may be of interest to some.)
These instructions describe how to build binaries from source for MySQL 6.0 on Windows. Instructions are provided for building binaries from a standard source distribution or from the Bazaar tree that contains the latest development source.
Note
The instructions here are strictly for users who want to test MySQL on Microsoft Windows from the latest source distribution or from the Bazaar tree. For production use, we do not advise using a MySQL server built by yourself from source. Normally, it is best to use precompiled binary distributions of MySQL that are built specifically for optimal performance on Windows by Oracle Corporation. Instructions for installing binary distributions are available in Section 2.3, “Installing MySQL on Windows”.
To build MySQL on Windows from source, you must satisfy the following system, compiler, and resource requirements:
Windows 2000, Windows XP, or newer version.
Windows Vista is supported when using Visual Studio 2005 provided you have installed the following updates:
CMake, which can be downloaded from http://www.cmake.org. After installing, modify your path to include the
cmakebinary.Microsoft Visual C++ 2005 Express Edition, Visual Studio .Net 2003 (7.1), or Visual Studio 2005 (8.0) compiler system.
If you are using Visual C++ 2005 Express Edition, you must also install an appropriate Platform SDK. More information and links to downloads for various Windows platforms is available from http://www.microsoft.com/downloads/details.aspx?familyid=0baf2b35-c656-4969-ace8-e4c0c0716adb.
If you are compiling from a Bazaar tree or making changes to the parser, you need
bisonfor Windows, which can be downloaded from http://gnuwin32.sourceforge.net/packages/bison.htm. Download the package labeled “Complete package, excluding sources”. After installing the package, modify your path to include the bison binary and ensure that this binary is accessible from Visual Studio.Cygwin might be necessary if you want to run the test script or package the compiled binaries and support files into a Zip archive. (Cygwin is needed only to test or package the distribution, not to build it.) Cygwin is available from http://cygwin.com.
3GB to 5GB of disk space.
The exact system requirements can be found here: http://msdn.microsoft.com/vstudio/Previous/2003/sysreqs/default.aspx and http://msdn.microsoft.com/vstudio/products/sysreqs/default.aspx
You also need a MySQL source distribution for Windows, which can be obtained two ways:
Obtain a source distribution packaged by Oracle Corporation. These are available from http://dev.mysql.com/downloads/.
Package a source distribution yourself from the latest Bazaar developer source tree. For instructions on pulling the latest source files, see Section 2.9.3, “Installing from the Development Source Tree”.
If you find something not working as expected, or you have
suggestions about ways to improve the current build process on
Windows, please send a message to the win32
mailing list. See Section 1.6.1, “MySQL Mailing Lists”.
You can build MySQL on Windows by using a combination of cmake and Microsoft Visual Studio .NET 2003 (7.1), Microsoft Visual Studio 2005 (8.0), Microsoft Visual Studio 2008 (9.0) or Microsoft Visual C++ 2005 Express Edition. You must have the appropriate Microsoft Platform SDK installed.
Note
To compile from the source code on Windows you must use the
standard source distribution (for example,
mysql-6.0.14.tar.gz). You
build from the same distribution as used to build MySQL on
Unix, Linux and other platforms. Do not
use the Windows Source distributions as they do not contain
the necessary configuration script and other files.
Follow this procedure to build MySQL:
If you are installing from a packaged source distribution, create a work directory (for example,
C:\workdir), and unpack the source distribution there using WinZip or another Windows tool that can read.zipfiles. This directory is the work directory in the following instructions.Note
If you are installing from a Bazaar tree, the root directory of that tree is the work directory in the following instructions.
Note
You must run the commands in the
windirectory from the top-level source directory. Do not change into thewindirectory, as the commands will not be executed correctly.Start a command shell. If you have not configured the
PATHand other environment variables for all command shells, you may be able to start a command shell from the Start Menu within the Windows Visual Studio menu that contains the necessary environment changes.Within the command shell, navigate to the work directory and run the following command:
C:\workdir>
win\configure.jsoptionsIf you have associated the
.jsfile extension with an application such as a text editor, then you may need to use the following command to forceconfigure.jsto be executed as a script:C:\workdir>
cscript win\configure.jsoptionsThese options are available for
configure.js:WITH_INNOBASE_STORAGE_ENGINE: Enable theInnoDBstorage engine.WITH_PARTITION_STORAGE_ENGINE: Enable user-defined partitioning.WITH_ARCHIVE_STORAGE_ENGINE: Enable theARCHIVEstorage engine.WITH_BLACKHOLE_STORAGE_ENGINE: Enable theBLACKHOLEstorage engine.WITH_EXAMPLE_STORAGE_ENGINE: Enable theEXAMPLEstorage engine.WITH_FEDERATED_STORAGE_ENGINE: Enable theFEDERATEDstorage engine.MYSQL_SERVER_SUFFIX=: Server suffix, default none.suffixCOMPILATION_COMMENT=: Server comment, default "Source distribution".commentMYSQL_TCP_PORT=: Server port, default 3306.portDISABLE_GRANT_OPTIONS: Disables the--bootstrap,--skip-grant-tables, and--init-fileoptions for mysqld.
For example (type the command on one line):
C:\workdir>
win\configure.js WITH_INNOBASE_STORAGE_ENGINEWITH_PARTITION_STORAGE_ENGINE MYSQL_SERVER_SUFFIX=-proFrom the work directory, execute the
win\build-vs9.bat(Windows Visual Studio 2008),win\build-vs8.bat(Windows Visual Studio 2005), orwin\build-vs71.bat(Windows Visual Stidion 2003) script, depending on the version of Visual Studio you have installed. The script invokes CMake, which generates themysql.slnsolution file.You can also use the corresponding 64-bit file (for example
win\build-vs8_x64.batorwin\build-vs9_x64.bat) to build the 64-bit version of MySQL. However, you cannot build the 64-bit version with Visual Studio Express Edition. You must use Visual Studio 2005 (8.0) or higher.From the work directory, open the generated
mysql.slnfile with Visual Studio and select the proper configuration using the menu. The menu provides , , , options. Then select > to build the solution.Remember the configuration that you use in this step. It is important later when you run the test script because that script needs to know which configuration you used.
Test the server. The server built using the preceding instructions expects that the MySQL base directory and data directory are
C:\mysqlandC:\mysql\databy default. If you want to test your server using the source tree root directory and its data directory as the base directory and data directory, you need to tell the server their path names. You can either do this on the command line with the--basedirand--datadiroptions, or by placing appropriate options in an option file. (See Section 4.2.3.3, “Using Option Files”.) If you have an existing data directory elsewhere that you want to use, you can specify its path name instead.When the server is running in standalone fashion or as a service based on your configuration, try to connect to it from the mysql interactive command-line utility.
You can also run the standard test script, mysql-test-run.pl. This script is written in Perl, so you'll need either Cygwin or ActiveState Perl to run it. You may also need to install the modules required by the script. To run the test script, change location into the
mysql-testdirectory under the work directory, set theMTR_VS_CONFIGenvironment variable to the configuration you selected earlier (or use the--vs-configoption), and invoke mysql-test-run.pl. For example (using Cygwin and the bash shell):shell>
cd mysql-testshell>export MTR_VS_CONFIG=debugshell>./mysql-test-run.pl --force --timershell>./mysql-test-run.pl --force --timer --ps-protocol
When you are satisfied that the programs you have built are
working correctly, stop the server. Now you can install the
distribution. One way to do this is to use the
make_win_bin_dist script in the
scripts directory of the MySQL source
distribution (see Section 4.4.2, “make_win_bin_dist — Package MySQL Distribution as ZIP Archive”). This
is a shell script, so you must have Cygwin installed if you
want to use it. It creates a Zip archive of the built
executables and support files that you can unpack in the
location at which you want to install MySQL.
It is also possible to install MySQL by copying directories and files directly:
Create the directories where you want to install MySQL. For example, to install into
C:\mysql, use these commands:C:\>
mkdir C:\mysqlC:\>mkdir C:\mysql\binC:\>mkdir C:\mysql\dataC:\>mkdir C:\mysql\shareC:\>mkdir C:\mysql\scriptsIf you want to compile other clients and link them to MySQL, you should also create several additional directories:
C:\>
mkdir C:\mysql\includeC:\>mkdir C:\mysql\libC:\>mkdir C:\mysql\lib\debugC:\>mkdir C:\mysql\lib\optIf you want to benchmark MySQL, create this directory:
C:\>
mkdir C:\mysql\sql-benchBenchmarking requires Perl support. See Section 2.14, “Perl Installation Notes”.
From the work directory, copy into the
C:\mysqldirectory the following files and directories:C:\>
cd \workdirC:\workdir>mkdir C:\mysqlC:\workdir>mkdir C:\mysql\binC:\workdir>copy client\Release\*.exe C:\mysql\binC:\workdir>copy sql\Release\mysqld.exe C:\mysql\bin\mysqld.exeC:\workdir>xcopy scripts\*.* C:\mysql\scripts /EC:\workdir>xcopy share\*.* C:\mysql\share /EIf you want to compile other clients and link them to MySQL, you should also copy several libraries and header files:
C:\workdir>
copy lib\Release\mysqlclient.lib C:\mysql\lib\debugC:\workdir>copy lib\Release\libmysql.* C:\mysql\lib\debugC:\workdir>copy lib\Release\zlib.* C:\mysql\lib\debugC:\workdir>copy lib\Release\mysqlclient.lib C:\mysql\lib\optC:\workdir>copy lib\Release\libmysql.* C:\mysql\lib\optC:\workdir>copy lib\Release\zlib.* C:\mysql\lib\optC:\workdir>copy include\*.h C:\mysql\includeC:\workdir>copy libmysql\libmysql.def C:\mysql\includeNote
If you have compiled a Debug, rather than Release solution, you can replace
ReleasewithDebugin the source file names shown above.If you want to benchmark MySQL, you should also do this:
C:\workdir>
xcopy sql-bench\*.* C:\mysql\bench /E
After installation, set up and start the server in the same way as for binary Windows distributions. This includes creating the system tables by running mysql_install_db. For more information, see Section 2.3, “Installing MySQL on Windows”.
In your source files, you should include
my_global.h before
mysql.h:
#include <my_global.h> #include <mysql.h>
my_global.h includes any other files needed
for Windows compatibility (such as
windows.h) if you compile your program on
Windows.
You can either link your code with the dynamic
libmysql.lib library, which is just a
wrapper to load in libmysql.dll on demand,
or link with the static mysqlclient.lib
library.
The MySQL client libraries are compiled as threaded libraries, so you should also compile your code to be multi-threaded.
After installing MySQL, there are some issues that you should address. For example, on Unix, you should initialize the data directory and create the MySQL grant tables. On all platforms, an important security concern is that the initial accounts in the grant tables have no passwords. You should assign passwords to prevent unauthorized access to the MySQL server. Optionally, you can create time zone tables to enable recognition of named time zones.
The following sections include post-installation procedures that are specific to Windows systems and to Unix systems. Another section, Section 2.10.2.3, “Starting and Troubleshooting the MySQL Server”, applies to all platforms; it describes what to do if you have trouble getting the server to start. Section 2.10.3, “Securing the Initial MySQL Accounts”, also applies to all platforms. You should follow its instructions to make sure that you have properly protected your MySQL accounts by assigning passwords to them.
When you are ready to create additional user accounts, you can find information on the MySQL access control system and account management in Section 5.4, “The MySQL Access Privilege System”, and Section 5.5, “MySQL User Account Management”.
On Windows, you need not create the data directory and the grant
tables. MySQL Windows distributions include the grant tables
with a set of preinitialized accounts in the
mysql database under the data directory. It
is unnecessary to run the mysql_install_db
script that is used on Unix. Regarding passwords, if you
installed MySQL using the Windows Installation Wizard, you may
have already assigned passwords to the accounts. (See
Section 2.3.3, “Using the MySQL Installation Wizard”.) Otherwise, use the
password-assignment procedure given in
Section 2.10.3, “Securing the Initial MySQL Accounts”.
Before setting up passwords, you might want to try running some
client programs to make sure that you can connect to the server
and that it is operating properly. Make sure that the server is
running (see Section 2.3.9, “Starting the Server for the First Time”), and
then issue the following commands to verify that you can
retrieve information from the server. You may need to specify
directory different from C:\mysql\bin on
the command line. If you used the Windows Installation Wizard,
the default directory is C:\Program Files\MySQL\MySQL
Server 6.0, and the
mysql and mysqlshow client
programs are in C:\Program Files\MySQL\MySQL Server
6.0\bin. See
Section 2.3.3, “Using the MySQL Installation Wizard”, for more information.
Use mysqlshow to see what databases exist:
C:\> C:\mysql\bin\mysqlshow
+--------------------+
| Databases |
+--------------------+
| information_schema |
| mysql |
| test |
+--------------------+
The list of installed databases may vary, but will always
include the minimum of mysql and
information_schema. In most cases, the
test database will also be installed
automatically.
The preceding command (and commands for other MySQL programs
such as mysql) may not work if the correct
MySQL account does not exist. For example, the program may fail
with an error, or you may not be able to view all databases. If
you installed using the MSI packages and used the MySQL Server
Instance Config Wizard, then the root user
will have been created automatically with the password you
supplied. In this case, you should use the -u
root and -p options. (You will also
need to use the -u root and -p
options if you have already secured the initial MySQL accounts.)
With -p, you will be prompted for the
root password. For example:
C:\>C:\mysql\bin\mysqlshow -u root -pEnter password:(enter root password here)+--------------------+ | Databases | +--------------------+ | information_schema | | mysql | | test | +--------------------+
If you specify a database name, mysqlshow displays a list of the tables within the database:
C:\> C:\mysql\bin\mysqlshow mysql
Database: mysql
+---------------------------+
| Tables |
+---------------------------+
| columns_priv |
| db |
| event |
| func |
| help_category |
| help_keyword |
| help_relation |
| help_topic |
| host |
| plugin |
| proc |
| procs_priv |
| servers |
| tables_priv |
| time_zone |
| time_zone_leap_second |
| time_zone_name |
| time_zone_transition |
| time_zone_transition_type |
| user |
+---------------------------+
Use the mysql program to select information
from a table in the mysql database:
C:\> C:\mysql\bin\mysql -e "SELECT Host,Db,User FROM mysql.db"
+------+--------+------+
| host | db | user |
+------+--------+------+
| % | test | |
| % | test_% | |
+------+--------+------+
For more information about mysqlshow and mysql, see Section 4.5.6, “mysqlshow — Display Database, Table, and Column Information”, and Section 4.5.1, “mysql — The MySQL Command-Line Tool”.
If you are running a version of Windows that supports services, you can set up the MySQL server to run automatically when Windows starts. See Section 2.3.11, “Starting MySQL as a Windows Service”.
After installing MySQL on Unix, you must initialize the grant tables, start the server, and make sure that the server works satisfactorily. You may also wish to arrange for the server to be started and stopped automatically when your system starts and stops. You should also assign passwords to the accounts in the grant tables.
On Unix, the grant tables are set up by the mysql_install_db program. For some installation methods, this program is run for you automatically:
If you install MySQL on Linux using RPM distributions, the server RPM runs mysql_install_db.
If you install MySQL on Mac OS X using a PKG distribution, the installer runs mysql_install_db.
Otherwise, you'll need to run mysql_install_db yourself.
The following procedure describes how to initialize the grant tables (if that has not previously been done) and start the server. It also suggests some commands that you can use to test whether the server is accessible and working properly. For information about starting and stopping the server automatically, see Section 2.10.2.2, “Starting and Stopping MySQL Automatically”.
After you complete the procedure and have the server running, you should assign passwords to the accounts created by mysql_install_db and perhaps tighten access to test databases. For instructions, see Section 2.10.3, “Securing the Initial MySQL Accounts”.
In the examples shown here, the server runs under the user ID of
the mysql login account. This assumes that
such an account exists. Either create the account if it does not
exist, or substitute the name of a different existing login
account that you plan to use for running the server.
Change location into the top-level directory of your MySQL installation, represented here by
BASEDIR:shell>
cdBASEDIRBASEDIRis likely to be something like/usr/local/mysqlor/usr/local. The following steps assume that you have changed location to this directory.If necessary, run the mysql_install_db program to set up the initial MySQL grant tables containing the privileges that determine how users are allowed to connect to the server. You'll need to do this if you used a distribution type for which the installation procedure doesn't run the program for you.
Typically, mysql_install_db needs to be run only the first time you install MySQL, so you can skip this step if you are upgrading an existing installation, However, mysql_install_db does not overwrite any existing privilege tables, so it should be safe to run in any circumstances.
To initialize the grant tables, use one of the following commands, depending on whether mysql_install_db is located in the
binorscriptsdirectory:shell>
bin/mysql_install_db --user=mysqlshell>scripts/mysql_install_db --user=mysqlIt might be necessary to specify other options such as
--basediror--datadirif mysql_install_db does not use the correct locations for the installation directory or data directory. For example:shell>
bin/mysql_install_db --user=mysql \--basedir=/opt/mysql/mysql \--datadir=/opt/mysql/mysql/dataThe mysql_install_db script creates the server's data directory. Under the data directory, it creates directories for the
mysqldatabase that holds the grant tables and thetestdatabase that you can use to test MySQL. The script also creates privilege table entries forrootand anonymous-user accounts. The accounts have no passwords initially. Section 2.10.3, “Securing the Initial MySQL Accounts”, describes the initial privileges. Briefly, these privileges allow the MySQLrootuser to do anything, and allow anybody to create or use databases with a name oftestor starting withtest_.It is important to make sure that the database directories and files are owned by the
mysqllogin account so that the server has read and write access to them when you run it later. To ensure this, the--useroption should be used as shown if you run mysql_install_db asroot. Otherwise, you should execute the script while logged in asmysql, in which case you can omit the--useroption from the command.mysql_install_db creates several tables in the
mysqldatabase, includinguser,db,host,tables_priv,columns_priv,func, and others. See Section 5.4, “The MySQL Access Privilege System”, for a complete listing and description of these tables.If you do not want to have the
testdatabase, you can remove it after starting the server, using the instructions in Section 2.10.3, “Securing the Initial MySQL Accounts”.If you have trouble with mysql_install_db at this point, see Section 2.10.2.1, “Problems Running mysql_install_db”.
Start the MySQL server:
shell>
bin/mysqld_safe --user=mysql &It is important that the MySQL server be run using an unprivileged (non-
root) login account. To ensure this, the--useroption should be used as shown if you run mysqld_safe as systemroot. Otherwise, you should execute the script while logged in to the system asmysql, in which case you can omit the--useroption from the command.Further instructions for running MySQL as an unprivileged user are given in Section 5.3.6, “How to Run MySQL as a Normal User”.
If you neglected to create the grant tables by running mysql_install_db before proceeding to this step, the following message appears in the error log file when you start the server:
mysqld: Can't find file: 'host.frm'
This error also occurs if you run mysql_install_db as
rootwithout the--useroption. Remove thedatadirectory and run mysql_install_db with the--useroption as described previously.If you have other problems starting the server, see Section 2.10.2.3, “Starting and Troubleshooting the MySQL Server”.
Use mysqladmin to verify that the server is running. The following commands provide simple tests to check whether the server is up and responding to connections:
shell>
bin/mysqladmin versionshell>bin/mysqladmin variablesThe output from mysqladmin version varies slightly depending on your platform and version of MySQL, but should be similar to that shown here:
shell>
bin/mysqladmin versionmysqladmin Ver 14.12 Distrib 6.0.14, for pc-linux-gnu on i686 ... Server version 6.0.14 Protocol version 10 Connection Localhost via UNIX socket UNIX socket /var/lib/mysql/mysql.sock Uptime: 14 days 5 hours 5 min 21 sec Threads: 1 Questions: 366 Slow queries: 0 Opens: 0 Flush tables: 1 Open tables: 19 Queries per second avg: 0.000To see what else you can do with mysqladmin, invoke it with the
--helpoption.Verify that you can shut down the server:
shell>
bin/mysqladmin -u root shutdownVerify that you can start the server again. Do this by using mysqld_safe or by invoking mysqld directly. For example:
shell>
bin/mysqld_safe --user=mysql --log &If mysqld_safe fails, see Section 2.10.2.3, “Starting and Troubleshooting the MySQL Server”.
Run some simple tests to verify that you can retrieve information from the server. The output should be similar to what is shown here:
shell>
bin/mysqlshow+--------------------+ | Databases | +--------------------+ | information_schema | | mysql | | test | +--------------------+ shell>bin/mysqlshow mysqlDatabase: mysql +---------------------------+ | Tables | +---------------------------+ | columns_priv | | db | | event | | func | | help_category | | help_keyword | | help_relation | | help_topic | | host | | plugin | | proc | | procs_priv | | servers | | tables_priv | | time_zone | | time_zone_leap_second | | time_zone_name | | time_zone_transition | | time_zone_transition_type | | user | +---------------------------+ shell>bin/mysql -e "SELECT Host,Db,User FROM db" mysql+------+--------+------+ | host | db | user | +------+--------+------+ | % | test | | | % | test_% | | +------+--------+------+There is a benchmark suite in the
sql-benchdirectory (under the MySQL installation directory) that you can use to compare how MySQL performs on different platforms. The benchmark suite is written in Perl. It requires the Perl DBI module that provides a database-independent interface to the various databases, and some other additional Perl modules:DBI DBD::mysql Data::Dumper Data::ShowTable
These modules can be obtained from CPAN (http://www.cpan.org/). See also Section 2.14.1, “Installing Perl on Unix”.
The
sql-bench/Resultsdirectory contains the results from many runs against different databases and platforms. To run all tests, execute these commands:shell>
cd sql-benchshell>perl run-all-testsIf you do not have the
sql-benchdirectory, you probably installed MySQL using RPM files other than the source RPM. (The source RPM includes thesql-benchbenchmark directory.) In this case, you must first install the benchmark suite before you can use it. There are separate benchmark RPM files namedmysql-bench-that contain benchmark code and data.VERSION.i386.rpmIf you have a source distribution, there are also tests in its
testssubdirectory that you can run. For example, to runauto_increment.tst, execute this command from the top-level directory of your source distribution:shell>
mysql -vvf test < ./tests/auto_increment.tstThe expected result of the test can be found in the
./tests/auto_increment.resfile.At this point, you should have the server running. However, none of the initial MySQL accounts have a password, and the server allows permissive access to test databases. To tighten security, follow the instructions in Section 2.10.3, “Securing the Initial MySQL Accounts”.
The MySQL 6.0 installation procedure creates time
zone tables in the mysql database. However,
you must populate the tables manually using the instructions in
Section 9.6, “MySQL Server Time Zone Support”.
The purpose of the mysql_install_db script is to generate new MySQL privilege tables. It does not overwrite existing MySQL privilege tables, and it does not affect any other data.
If you want to re-create your privilege tables, first stop the
mysqld server if it is running. Then rename
the mysql directory under the data
directory to save it, and then run
mysql_install_db. Suppose that your current
directory is the MySQL installation directory and that
mysql_install_db is located in the
bin directory and the data directory is
named data. To rename the
mysql database and re-run
mysql_install_db, use these commands.
shell>mv data/mysql data/mysql.oldshell>bin/mysql_install_db --user=mysql
When you run mysql_install_db, you might encounter the following problems:
mysql_install_db fails to install the grant tables
You may find that mysql_install_db fails to install the grant tables and terminates after displaying the following messages:
Starting mysqld daemon with databases from XXXXXX mysqld ended
In this case, you should examine the error log file very carefully. The log should be located in the directory
XXXXXXnamed by the error message and should indicate why mysqld didn't start. If you do not understand what happened, include the log when you post a bug report. See Section 1.7, “How to Report Bugs or Problems”.There is a mysqld process running
This indicates that the server is running, in which case the grant tables have probably been created already. If so, there is no need to run mysql_install_db at all because it needs to be run only once (when you install MySQL the first time).
Installing a second mysqld server does not work when one server is running
This can happen when you have an existing MySQL installation, but want to put a new installation in a different location. For example, you might have a production installation, but you want to create a second installation for testing purposes. Generally the problem that occurs when you try to run a second server is that it tries to use a network interface that is in use by the first server. In this case, you should see one of the following error messages:
Can't start server: Bind on TCP/IP port: Address already in use Can't start server: Bind on unix socket...
For instructions on setting up multiple servers, see Section 5.6, “Running Multiple MySQL Servers on the Same Machine”.
You do not have write access to the
/tmpdirectoryIf you do not have write access to create temporary files or a Unix socket file in the default location (the
/tmpdirectory), an error occurs when you run mysql_install_db or the mysqld server.You can specify different locations for the temporary directory and Unix socket file by executing these commands prior to starting mysql_install_db or mysqld, where
some_tmp_diris the full path name to some directory for which you have write permission:shell>
TMPDIR=/shell>some_tmp_dir/MYSQL_UNIX_PORT=/shell>some_tmp_dir/mysql.sockexport TMPDIR MYSQL_UNIX_PORTThen you should be able to run mysql_install_db and start the server with these commands:
shell>
bin/mysql_install_db --user=mysqlshell>bin/mysqld_safe --user=mysql &If mysql_install_db is located in the
scriptsdirectory, modify the first command toscripts/mysql_install_db.See Section B.5.4.5, “How to Protect or Change the MySQL Unix Socket File”, and Section 2.13, “Environment Variables”.
There are some alternatives to running the mysql_install_db script provided in the MySQL distribution:
If you want the initial privileges to be different from the standard defaults, you can modify mysql_install_db before you run it. However, it is preferable to use
GRANTandREVOKEto change the privileges after the grant tables have been set up. In other words, you can run mysql_install_db, and then usemysql -u root mysqlto connect to the server as the MySQLrootuser so that you can issue the necessaryGRANTandREVOKEstatements.If you want to install MySQL on several machines with the same privileges, you can put the
GRANTandREVOKEstatements in a file and execute the file as a script usingmysqlafter running mysql_install_db. For example:shell>
bin/mysql_install_db --user=mysqlshell>bin/mysql -u root < your_script_fileBy doing this, you can avoid having to issue the statements manually on each machine.
It is possible to re-create the grant tables completely after they have previously been created. You might want to do this if you're just learning how to use
GRANTandREVOKEand have made so many modifications after running mysql_install_db that you want to wipe out the tables and start over.To re-create the grant tables, remove all the
.frm,.MYI, and.MYDfiles in themysqldatabase directory. Then run the mysql_install_db script again.You can start mysqld manually using the
--skip-grant-tablesoption and add the privilege information yourself using mysql:shell>
bin/mysqld_safe --user=mysql --skip-grant-tables &shell>bin/mysql mysqlFrom mysql, manually execute the SQL commands contained in mysql_install_db. Make sure that you run mysqladmin flush-privileges or mysqladmin reload afterward to tell the server to reload the grant tables.
Note that by not using mysql_install_db, you not only have to populate the grant tables manually, you also have to create them first.
Generally, you start the mysqld server in one of these ways:
Invoke mysqld directly. This works on any platform.
Run the MySQL server as a Windows service. The service can be set to start the server automatically when Windows starts, or as a manual service that you start on request. For instructions, see Section 2.3.11, “Starting MySQL as a Windows Service”.
Invoke mysqld_safe, which tries to determine the proper options for mysqld and then runs it with those options. This script is used on Unix and Unix-like systems. See Section 4.3.2, “mysqld_safe — MySQL Server Startup Script”.
Invoke mysql.server. This script is used primarily at system startup and shutdown on systems that use System V-style run directories, where it usually is installed under the name
mysql. The mysql.server script starts the server by invoking mysqld_safe. See Section 4.3.3, “mysql.server — MySQL Server Startup Script”.On Mac OS X, install a separate MySQL Startup Item package to enable the automatic startup of MySQL on system startup. The Startup Item starts the server by invoking mysql.server. See Section 2.5, “Installing MySQL on Mac OS X”, for details.
The mysqld_safe and mysql.server scripts and the Mac OS X Startup Item can be used to start the server manually, or automatically at system startup time. mysql.server and the Startup Item also can be used to stop the server.
To start or stop the server manually using the
mysql.server script, invoke it with
start or stop arguments:
shell>mysql.server startshell>mysql.server stop
Before mysql.server starts the server, it
changes location to the MySQL installation directory, and then
invokes mysqld_safe. If you want the server
to run as some specific user, add an appropriate
user option to the
[mysqld] group of the
/etc/my.cnf option file, as shown later
in this section. (It is possible that you will need to edit
mysql.server if you've installed a binary
distribution of MySQL in a nonstandard location. Modify it to
change location into the proper directory before it runs
mysqld_safe. If you do this, your modified
version of mysql.server may be overwritten
if you upgrade MySQL in the future, so you should make a copy
of your edited version that you can reinstall.)
mysql.server stop stops the server by sending a signal to it. You can also stop the server manually by executing mysqladmin shutdown.
To start and stop MySQL automatically on your server, you need
to add start and stop commands to the appropriate places in
your /etc/rc* files.
If you use the Linux server RPM package
(MySQL-server-),
the mysql.server script is installed in the
VERSION.rpm/etc/init.d directory with the name
mysql. You need not install it manually.
See Section 2.4, “Installing MySQL from RPM Packages on Linux”, for more information on the
Linux RPM packages.
Some vendors provide RPM packages that install a startup script under a different name such as mysqld.
If you install MySQL from a source distribution or using a
binary distribution format that does not install
mysql.server automatically, you can install
it manually. The script can be found in the
support-files directory under the MySQL
installation directory or in a MySQL source tree.
To install mysql.server manually, copy it
to the /etc/init.d directory with the
name mysql, and then make it executable. Do
this by changing location into the appropriate directory where
mysql.server is located and executing these
commands:
shell>cp mysql.server /etc/init.d/mysqlshell>chmod +x /etc/init.d/mysql
Older Red Hat systems use the
/etc/rc.d/init.d directory rather than
/etc/init.d. Adjust the preceding
commands accordingly. Alternatively, first create
/etc/init.d as a symbolic link that
points to /etc/rc.d/init.d:
shell>cd /etcshell>ln -s rc.d/init.d .
After installing the script, the commands needed to activate
it to run at system startup depend on your operating system.
On Linux, you can use chkconfig:
shell> chkconfig --add mysql
On some Linux systems, the following command also seems to be necessary to fully enable the mysql script:
shell> chkconfig --level 345 mysql on
On FreeBSD, startup scripts generally should go in
/usr/local/etc/rc.d/. The
rc(8) manual page states that scripts in
this directory are executed only if their basename matches the
*.sh shell file name pattern. Any other
files or directories present within the directory are silently
ignored. In other words, on FreeBSD, you should install the
mysql.server script as
/usr/local/etc/rc.d/mysql.server.sh to
enable automatic startup.
As an alternative to the preceding setup, some operating
systems also use /etc/rc.local or
/etc/init.d/boot.local to start
additional services on startup. To start up MySQL using this
method, you could append a command like the one following to
the appropriate startup file:
/bin/sh -c 'cd /usr/local/mysql; ./bin/mysqld_safe --user=mysql &'
For other systems, consult your operating system documentation to see how to install startup scripts.
You can add options for mysql.server in a
global /etc/my.cnf file. A typical
/etc/my.cnf file might look like this:
[mysqld] datadir=/usr/local/mysql/var socket=/var/tmp/mysql.sock port=3306 user=mysql [mysql.server] basedir=/usr/local/mysql
The mysql.server script supports the
following options: basedir,
datadir, and pid-file. If
specified, they must be placed in an
option file, not on the command line.
mysql.server supports only
start and stop as
command-line arguments.
The following table shows which option groups the server and each startup script read from option files.
| Script | Option Groups |
| mysqld | [mysqld], [server],
[mysqld- |
| mysqld_safe | [mysqld], [server],
[mysqld_safe] |
| mysql.server | [mysqld], [mysql.server],
[server] |
[mysqld-
means that groups with names like
major_version][mysqld-5.5] and
[mysqld-6.0] are read by
servers having versions 5.5.x,
6.0.x, and so forth. This feature can be used to
specify options that can be read only by servers within a
given release series.
For backward compatibility, mysql.server
also reads the [mysql_server] group and
mysqld_safe also reads the
[safe_mysqld] group. However, you should
update your option files to use the
[mysql.server] and
[mysqld_safe] groups instead when using
MySQL 6.0.
This section provides troubleshooting suggestions for problems starting the server on Unix. If you are using Windows, see Section 2.3.13, “Troubleshooting a MySQL Installation Under Windows”.
If you have problems starting the server, here are some things to try:
Check the error log to see why the server does not start.
Specify any special options needed by the storage engines you are using.
Make sure that the server knows where to find the data directory.
Make sure that the server can access the data directory. The ownership and permissions of the data directory and its contents must be set such that the server can read and modify them.
Verify that the network interfaces the server wants to use are available.
Some storage engines have options that control their behavior.
You can create a my.cnf file and specify
startup options for the engines that you plan to use. If you
are going to use storage engines that support transactional
tables (InnoDB,
NDB), be sure that you have them
configured the way you want before starting the server:
If you are using
InnoDBtables, see Section 13.7.2, “InnoDBConfiguration”.
MySQL Enterprise For expert advice on start-up options appropriate to your circumstances, subscribe to The MySQL Enterprise Monitor. For more information, see http://www.mysql.com/products/enterprise/advisors.html.
Storage engines will use default option values if you specify none, but it is recommended that you review the available options and specify explicit values for those for which the defaults are not appropriate for your installation.
When the mysqld server starts, it changes location to the data directory. This is where it expects to find databases and where it expects to write log files. The server also writes the pid (process ID) file in the data directory.
The data directory location is hardwired in when the server is
compiled. This is where the server looks for the data
directory by default. If the data directory is located
somewhere else on your system, the server will not work
properly. You can determine what the default path settings are
by invoking mysqld with the
--verbose and
--help options.
If the default locations do not match the MySQL installation layout on your system, you can override them by specifying options to mysqld or mysqld_safe on the command line or in an option file.
To specify the location of the data directory explicitly, use
the --datadir option. However,
normally you can tell mysqld the location
of the base directory under which MySQL is installed and it
looks for the data directory there. You can do this with the
--basedir option.
To check the effect of specifying path options, invoke
mysqld with those options followed by the
--verbose and
--help options. For example, if
you change location into the directory where
mysqld is installed and then run the
following command, it shows the effect of starting the server
with a base directory of /usr/local:
shell> ./mysqld --basedir=/usr/local --verbose --help
You can specify other options such as
--datadir as well, but
--verbose and
--help must be the last
options.
Once you determine the path settings you want, start the
server without --verbose and
--help.
If mysqld is currently running, you can find out what path settings it is using by executing this command:
shell> mysqladmin variables
Or:
shell> mysqladmin -h host_name variables
host_name is the name of the MySQL
server host.
If you get Errcode 13 (which means
Permission denied) when starting
mysqld, this means that the privileges of
the data directory or its contents do not allow the server
access. In this case, you change the permissions for the
involved files and directories so that the server has the
right to use them. You can also start the server as
root, but this raises security issues and
should be avoided.
On Unix, change location into the data directory and check the
ownership of the data directory and its contents to make sure
the server has access. For example, if the data directory is
/usr/local/mysql/var, use this command:
shell> ls -la /usr/local/mysql/var
If the data directory or its files or subdirectories are not
owned by the login account that you use for running the
server, change their ownership to that account. If the account
is named mysql, use these commands:
shell>chown -R mysql /usr/local/mysql/varshell>chgrp -R mysql /usr/local/mysql/var
If it possible that even with correct ownership, MySQL may fail to start up if there is other security software running on your system that manages application access to various parts of the file system. In this case, you may need to reconfigure that software to enable mysqld to access the directories it uses during normal operation.
If the server fails to start up correctly, check the error
log. Log files are located in the data directory (typically
C:\Program Files\MySQL\MySQL Server
6.0\data on Windows,
/usr/local/mysql/data for a Unix binary
distribution, and /usr/local/var for a
Unix source distribution). Look in the data directory for
files with names of the form
host_name.errhost_name.loghost_name is the name of your
server host. Then examine the last few lines of these files.
On Unix, you can use tail to display them:
shell>tailshell>host_name.errtailhost_name.log
The error log should contain information that indicates why the server couldn't start.
If either of the following errors occur, it means that some other program (perhaps another mysqld server) is using the TCP/IP port or Unix socket file that mysqld is trying to use:
Can't start server: Bind on TCP/IP port: Address already in use Can't start server: Bind on unix socket...
Use ps to determine whether you have another mysqld server running. If so, shut down the server before starting mysqld again. (If another server is running, and you really want to run multiple servers, you can find information about how to do so in Section 5.6, “Running Multiple MySQL Servers on the Same Machine”.)
If no other server is running, try to execute the command
telnet . (The
default MySQL port number is 3306.) Then press Enter a couple
of times. If you do not get an error message like
your_host_name
tcp_ip_port_numbertelnet: Unable to connect to remote host: Connection
refused, some other program is using the TCP/IP port
that mysqld is trying to use. You'll need
to track down what program this is and disable it, or else
tell mysqld to listen to a different port
with the --port option. In this
case, you'll also need to specify the port number for client
programs when connecting to the server via TCP/IP.
Another reason the port might be inaccessible is that you have a firewall running that blocks connections to it. If so, modify the firewall settings to allow access to the port.
If the server starts but you can't connect to it, you should
make sure that you have an entry in
/etc/hosts that looks like this:
127.0.0.1 localhost
This problem occurs only on systems that do not have a working thread library and for which MySQL must be configured to use MIT-pthreads.
If you cannot get mysqld to start, you can
try to make a trace file to find the problem by using the
--debug option. See
MySQL
Internals: Porting.
Part of the MySQL installation process is to set up the
mysql database that contains the grant
tables:
Windows distributions contain preinitialized grant tables.
On Unix, the mysql_install_db program populates the grant tables. Some installation methods run this program for you. Others require that you execute it manually. For details, see Section 2.10.2, “Unix Post-Installation Procedures”.
The mysql.user grant table defines the
initial MySQL user accounts and their access privileges:
Some accounts have the user name
root. These are superuser accounts that have all privileges and can do anything. The initialrootaccount passwords are empty, so anyone can connect to the MySQL server asrootwithout a password and be granted all privileges.On Windows,
rootaccounts are created that allow connections from the local host only. Connections can be made by specifying a host name oflocalhost,127.0.0.1, or::1. If the user selects the Enable root access from remote machines option during installation, the Windows installer creates anotherrootaccount that allows connections from any host.On Unix, each
rootaccount allows connections from the local host. Connections can be made by specifying a host name oflocalhost,127.0.0.1,::1, or the actual host name or IP number.
An attempt to connect to the host
127.0.0.1normally resolves to thelocalhostaccount. However, this fails if the server is run with the--skip-name-resolveoption, so the127.0.0.1account is useful in that case. The::1account is used for IPv6 connections.Some accounts are for anonymous users. These have an empty user name. The anonymous accounts have no password, so anyone can use them to connect to the MySQL server.
On Windows, there is one anonymous account that allows connections from the local host. Connections can be made by specifying a host name of
localhost.On Unix, each anonymous account allows connections from the local host. Connections can be made by specifying a host name of
localhostfor one of the accounts, or the actual host name or IP number for the other.
To display which accounts exist in the
mysql.user table and check whether their
passwords are empty, use the following statement:
mysql> SELECT User, Host, Password FROM mysql.user;
+------+--------------------+----------+
| User | Host | Password |
+------+--------------------+----------+
| root | localhost | |
| root | myhost.example.com | |
| root | 127.0.0.1 | |
| root | ::1 | |
| | localhost | |
| | myhost.example.com | |
+------+--------------------+----------+
This output indicates that there are several
root and anonymous-user accounts, none of
which have passwords. The output might differ on your system,
but the presence of accounts with empty passwords means that
your MySQL installation is unprotected until you do something
about it:
You should assign a password to each MySQL
rootaccount.If you want to prevent clients from connecting as anonymous users without a password, you should either assign a password to each anonymous account or else remove the accounts.
In addition, the mysql.db table contains rows
that allow all accounts access to the test
database and other databases with names that start with
test_. This is true even for accounts that
otherwise have no special privileges such as the default
anonymous accounts. This is convenient for testing, but
administrators may want database access restricted only to
accounts that have permissions granted explicitly for that
purpose, particularly on production servers. Such administrators
should remove these mysql.db table rows.
The following instructions describe how to set up passwords for
the initial MySQL accounts, first for for the
root accounts, then for the anonymous
accounts. The instructions also cover how to remove the
anonymous accounts, should you prefer not to allow anonymous
access at all, and describe how to remove permissive access to
test databases. Replace newpwd in the
examples with the password that you want to use. Replace
host_name with the name of the server
host. You can determine this name from the output of the
preceding SELECT statement. For
the output shown, host_name is
myhost.example.com.
Note
If you forget your root password after
setting it, see Section B.5.4.1, “How to Reset the Root Password”.
You might want to defer setting the passwords until later, to avoid the need to specify them while you perform additional setup or testing. However, be sure to set them before using your installation for production purposes.
To set up additional accounts, see Section 5.5.2, “Adding User Accounts”.
Assigning root Account Passwords
The root account passwords can be set several
ways. The following discussion demonstrates three methods:
Use the
SET PASSWORDstatementUse the
UPDATEstatementUse the mysqladmin command-line client program
To assign passwords using SET
PASSWORD, connect to the server as
root and issue a SET
PASSWORD statement for each root
account listed in the mysql.user table. Be
sure to encrypt the password using the
PASSWORD() function.
For Windows, do this:
shell>mysql -u rootmysql>SET PASSWORD FOR 'root'@'localhost' = PASSWORD('mysql>newpwd');SET PASSWORD FOR 'root'@'127.0.0.1' = PASSWORD('mysql>newpwd');SET PASSWORD FOR 'root'@'::1' = PASSWORD('mysql>newpwd');SET PASSWORD FOR 'root'@'%' = PASSWORD('newpwd');
The last statement is unnecessary if the
mysql.user table has no
root account with a host value of
%.
For Unix, do this:
shell>mysql -u rootmysql>SET PASSWORD FOR 'root'@'localhost' = PASSWORD('mysql>newpwd');SET PASSWORD FOR 'root'@'127.0.0.1' = PASSWORD('mysql>newpwd');SET PASSWORD FOR 'root'@'::1' = PASSWORD('mysql>newpwd');SET PASSWORD FOR 'root'@'host_name' = PASSWORD('newpwd');
You can also use a single statement that assigns a password to
all root accounts by using
UPDATE to modify the
mysql.user table directly. This method works
on any platform:
shell>mysql -u rootmysql>UPDATE mysql.user SET Password = PASSWORD('->newpwd')WHERE User = 'root';mysql>FLUSH PRIVILEGES;
The FLUSH statement causes the
server to reread the grant tables. Without it, the password
change remains unnoticed by the server until you restart it.
To assign passwords to the root accounts
using mysqladmin, execute the following
commands:
shell>mysqladmin -u root password "shell>newpwd"mysqladmin -u root -hhost_namepassword "newpwd"
Those commands apply both to Windows and to Unix. The double quotation marks around the password are not always necessary, but you should use them if the password contains spaces or other characters that are special to your command interpreter.
The mysqladmin method of setting the
root account passwords does not work for the
'root'@'127.0.0.1' or
'root'@'::1' account. Use the
SET PASSWORD method shown
earlier.
After the root passwords have been set, you
must supply the appropriate password whenever you connect as
root to the server. For example, to shut down
the server with mysqladmin, use this command:
shell>mysqladmin -u root -p shutdownEnter password:(enter root password here)
Assigning Anonymous Account Passwords
The mysql commands in the following
instructions include a -p option based on the
assumption that you have set the root account
passwords using the preceding instructions and must specify that
password when connecting to the server.
To assign passwords to the anonymous accounts, connect to the
server as root, then use either
SET PASSWORD or
UPDATE. Be sure to encrypt the
password using the PASSWORD()
function.
To use SET PASSWORD on Windows,
do this:
shell>mysql -u root -pEnter password:(enter root password here)mysql>SET PASSWORD FOR ''@'localhost' = PASSWORD('newpwd');
To use SET PASSWORD on Unix, do
this:
shell>mysql -u root -pEnter password:(enter root password here)mysql>SET PASSWORD FOR ''@'localhost' = PASSWORD('mysql>newpwd');SET PASSWORD FOR ''@'host_name' = PASSWORD('newpwd');
To set the anonymous-user account passwords with a single
UPDATE statement, do this (on any
platform):
shell>mysql -u root -pEnter password:(enter root password here)mysql>UPDATE mysql.user SET Password = PASSWORD('->newpwd')WHERE User = '';mysql>FLUSH PRIVILEGES;
The FLUSH statement causes the
server to reread the grant tables. Without it, the password
change remains unnoticed by the server until you restart it.
Removing Anonymous Accounts
If you prefer to remove any anonymous accounts rather than assigning them passwords, do so as follows on Windows:
shell>mysql -u root -pEnter password:(enter root password here)mysql>DROP USER ''@'localhost';
On Unix, remove the anonymous accounts like this:
shell>mysql -u root -pEnter password:(enter root password here)mysql>DROP USER ''@'localhost';mysql>DROP USER ''@'host_name';
Securing Test Databases
By default, the mysql.db table contains rows
that allow access by any user to the test
database and other databases with names that start with
test_. (These rows have an empty
User column value, which for access-checking
purposes matches any user name.) This means that such databases
can be used even by accounts that otherwise possess no
privileges. If you want to remove any-user access to test
databases, do so as follows:
shell>mysql -u root -pEnter password:(enter root password here)mysql>DELETE FROM mysql.db WHERE Db LIKE 'test%';mysql>FLUSH PRIVILEGES;
The FLUSH statement causes the
server to reread the grant tables. Without it, the privilege
change remains unnoticed by the server until you restart it.
With the preceding change, only users who have global database
privileges or privileges granted explicitly for the
test database can use it. However, if you do
not want the database to exist at all, drop it:
mysql> DROP DATABASE test;
As a general rule, to upgrade from one release series to another, you should go to the next series rather than skipping a series. To upgrade from a release series previous to MySQL 5.5, upgrade to each successive release series in turn until you have reached MySQL 5.5, and then proceed with the upgrade to MySQL 6.0. For example, if you currently are running MySQL 5.1 and wish to upgrade to a newer series, upgrade to MySQL 5.5 first before upgrading to 6.0, and so forth. For information on upgrading to MySQL 5.5, see the MySQL 5.5 Reference Manual.
To upgrade from MySQL 5.5 to 6.0, use the items in the following checklist as a guide:
Before any upgrade, back up your databases, including the
mysqldatabase that contains the grant tables. See Section 6.2, “Database Backup Methods”.Read all the notes in Section 2.11.1.1, “Upgrading from MySQL 5.1 to 6.0”. These notes enable you to identify upgrade issues that apply to your current MySQL installation. Some incompatibilities discussed in that section require your attention before upgrading. Others should be dealt with after upgrading.
Read Appendix C, MySQL Change History as well, which provides information about features that are new in MySQL 6.0 or differ from those found in MySQL 5.5.
After upgrading to a new version of MySQL, run mysql_upgrade (see Section 4.4.8, “mysql_upgrade — Check Tables for MySQL Upgrade”). This program checks your tables, and attempts to repair them if necessary. It also updates your grant tables to make sure that they have the current structure so that you can take advantage of any new capabilities. (Some releases of MySQL introduce changes to the structure of the grant tables to add new privileges or features.)
mysql_upgrade does not upgrade the contents of the help tables. For upgrade instructions, see Section 5.1.8, “Server-Side Help”.
If you run MySQL Server on Windows, see Section 2.3.14, “Upgrading MySQL on Windows”.
If you use replication, see Section 16.4.3, “Upgrading a Replication Setup”, for information on upgrading your replication setup.
If you upgrade an installation originally produced by installing multiple RPM packages, it is best to upgrade all the packages, not just some. For example, if you previously installed the server and client RPMs, do not upgrade just the server RPM.
If you have created a user-defined function (UDF) with a given name and upgrade MySQL to a version that implements a new built-in function with the same name, the UDF becomes inaccessible. To correct this, use
DROP FUNCTIONto drop the UDF, and then useCREATE FUNCTIONto re-create the UDF with a different nonconflicting name. The same is true if the new version of MySQL implements a built-in function with the same name as an existing stored function. See Section 8.2.4, “Function Name Parsing and Resolution”, for the rules describing how the server interprets references to different kinds of functions.
You can always move the MySQL format files and data files between different versions on systems with the same architecture as long as you stay within versions for the same release series of MySQL.
If you are cautious about using new versions, you can always rename your old mysqld before installing a newer one. For example, if you are using a version of MySQL 5.5 and want to upgrade to 6.0, rename your current server from mysqld to mysqld-5.5. If your new mysqld then does something unexpected, you can simply shut it down and restart with your old mysqld.
If, after an upgrade, you experience problems with compiled client
programs, such as Commands out of sync or
unexpected core dumps, you probably have used old header or
library files when compiling your programs. In this case, you
should check the date for your mysql.h file
and libmysqlclient.a library to verify that
they are from the new MySQL distribution. If not, recompile your
programs with the new headers and libraries. Recompilation might
also be necessary for programs compiled against the shared client
library if the library major version number has changed (for
example from libmysqlclient.so.15 to
libmysqlclient.so.16.
If problems occur, such as that the new mysqld
server does not start or that you cannot connect without a
password, verify that you do not have an old
my.cnf file from your previous installation.
You can check this with the
--print-defaults option (for
example, mysqld --print-defaults). If this
command displays anything other than the program name, you have an
active my.cnf file that affects server or
client operation.
If your MySQL installation contains a large amount of data that
might take a long time to convert after an in-place upgrade, you
might find it useful to create a “dummy” database
instance for assessing what conversions might be needed and the
work involved to perform them. Make a copy of your MySQL instance
that contains a full copy of the mysql
database, plus all other databases without data. Run your upgrade
procedure on this dummy instance to see what actions might be
needed so that you can better evaluate the work involved when
performing actual data conversion on your original database
instance.
It is a good idea to rebuild and reinstall the Perl
DBD::mysql module whenever you install a new
release of MySQL. The same applies to other MySQL interfaces as
well, such as PHP mysql extensions and the
Python MySQLdb module.
Note
It is good practice to back up your data before installing any new version of software. Although MySQL works very hard to ensure a high level of quality, you should protect your data by making a backup.
To upgrade to 6.0 from any previous version, MySQL recommends that you dump your tables with mysqldump before upgrading and reload the dump file after upgrading.
In general, you should do the following when upgrading from MySQL 5.5 to 6.0:
Read all the items in the following sections to see whether any of them might affect your applications:
Section 2.11.1, “Upgrading MySQL”, has general update information.
The items in the change lists found later in this section enable you to identify upgrade issues that apply to your current MySQL installation.
The MySQL 6.0 change history describes significant new features you can use in 6.0 or that differ from those found in MySQL 5.5. Some of these changes may result in incompatibilities. See Section C.1, “Changes in Release 6.0.x (Development)”.
Note particularly any changes that are marked Known issue or Incompatible change. These incompatibilities with earlier versions of MySQL may require your attention before you upgrade. Our aim is to avoid these changes, but occasionally they are necessary to correct problems that would be worse than an incompatibility between releases. If any upgrade issue applicable to your installation involves an incompatibility that requires special handling, follow the instructions given in the incompatibility description. Often this will involve dumping and reloading tables, or use of a statement such as
CHECK TABLEorREPAIR TABLE.For dump and reload instructions, see Section 2.11.4, “Rebuilding or Repairing Tables or Indexes”. Any procedure that involves
REPAIR TABLEwith theUSE_FRMoption must be done before upgrading. Use of this statement with a version of MySQL different from the one used to create the table (that is, using it after upgrading) may damage the table. See Section 12.4.2.5, “REPAIR TABLESyntax”.Before upgrading to a new version of MySQL, Section 2.11.3, “Checking Whether Tables or Indexes Must Be Rebuilt”, to see whether changes to table formats or to character sets or collations were made between your current version of MySQL and the version to which you are upgrading. If so and these changes result in an incompatibility between MySQL versions, you will need to upgrade the affected tables using the instructions in Section 2.11.4, “Rebuilding or Repairing Tables or Indexes”.
After upgrading to a new version of MySQL, run mysql_upgrade (see Section 4.4.8, “mysql_upgrade — Check Tables for MySQL Upgrade”). This program checks your tables, and attempts to repair them if necessary. It also updates your grant tables to make sure that they have the current structure so that you can take advantage of any new capabilities. (Some releases of MySQL introduce changes to the structure of the grant tables to add new privileges or features.)
mysql_upgrade does not upgrade the contents of the help tables. For upgrade instructions, see Section 5.1.8, “Server-Side Help”.
If you run MySQL Server on Windows, see Section 2.3.14, “Upgrading MySQL on Windows”.
If you use replication, see Section 16.4.3, “Upgrading a Replication Setup”, for information on upgrading your replication setup.
If your MySQL installation contains a large amount of data that
might take a long time to convert after an in-place upgrade, you
might find it useful to create a “dummy” database
instance for assessing what conversions might be needed and the
work involved to perform them. Make a copy of your MySQL
instance that contains a full copy of the
mysql database, plus all other databases
without data. Run your upgrade procedure on this dummy instance
to see what actions might be needed so that you can better
evaluate the work involved when performing actual data
conversion on your original database instance.
MySQL Enterprise MySQL Enterprise subscribers will find more information about upgrading in the Knowledge Base articles found at Upgrading. Access to the MySQL Knowledge Base collection of articles is one of the advantages of subscribing to MySQL Enterprise. For more information, see http://www.mysql.com/products/enterprise/advisors.html.
The following lists describe changes that may affect applications and that you should watch out for when upgrading from MySQL 5.5 to 6.0.
Server Changes:
Known issue: MySQL introduces encoding for table names that have non-ASCII characters (see Section 8.2.3, “Mapping of Identifiers to File Names”). After a binary upgrade from MySQL 5.0 to 5.1 or higher, the server recognizes names that have non-ASCII characters and adds a
#mysql50#prefix to them.As of MySQL 6.0.10, mysql_upgrade encodes these names by executing the following command:
mysqlcheck --all-databases --check-upgrade --fix-db-names --fix-table-names
Prior to MySQL 6.0.10, mysql_upgrade does not execute this command, so you should execute it manually if you have database or table names that contain nonalphanumeric characters.
mysqlcheck cannot fix names that contain literal instances of the
@character that is used for encoding special characters. If you have databases or tables that contain this character, use mysqldump to dump them before upgrading to MySQL 6.0, and then reload the dump file after upgrading.Known issue: Before MySQL 6.0.8, the
CHECK TABLE ... FOR UPGRADEstatement did not check for incompatible collation changes made in MySQL 5.1.24. (This also affects mysqlcheck and mysql_upgrade, which cause that statement to be executed.)Prior to the fix made in 6.0.8, a binary upgrade (performed without dumping tables with mysqldump before the upgrade and reloading the dump file after the upgrade) would corrupt tables. After the fix,
CHECK TABLE ... FOR UPGRADEproperly detects the problem and warns about tables that need repair.However, the fix is not backward compatible and can result in a downgrading problem under these circumstances:
Perform a binary upgrade to a version of MySQL that includes the fix.
Run
CHECK TABLE ... FOR UPGRADE(or mysqlcheck or mysql_upgrade) to upgrade tables.Perform a binary downgrade to a version of MySQL that does not include the fix.
The solution is to dump tables with mysqldump before the downgrade and reload the dump file after the downgrade. Alternatively, drop and recreate affected indexes after upgrading.
Known issue: In connection with view creation, the server created
arcdirectories inside database directories and maintained useless copies of.frmfiles there. Creation and renaming procedures of those copies as well as creation ofarcdirectories has been discontinued in MySQL 6.0.8.This change does cause a problem when downgrading to older server versions which manifests itself under these circumstances:
Create a view
v_origin MySQL 6.0.8 or higher.Rename the view to
v_newand then back tov_orig.Downgrade to an older 6.0.x server and run mysql_upgrade.
Try to rename
v_origtov_newagain. This operation fails.
As a workaround to avoid this problem, use either of these approaches:
Dump your data using mysqldump before downgrading and reload the dump file after downgrading.
Instead of renaming a view after the downgrade, drop it and recreate it.
Incompatible change: Character set or collation changes were made in MySQL 6.0.1, 6.0.5, and 6.0.6 that may require table indexes to be rebuilt. For details, see Section 2.11.3, “Checking Whether Tables or Indexes Must Be Rebuilt”.
Incompatible change: From MySQL 6.0.5 to 6.0.9, the
UPDATEstatement was changed such that assigningNULLto aNOT NULLcolumn caused an error even when strict SQL mode was not enabled. The original behavior before MySQL 6.0.5 was that such assignments caused an error only in strict SQL mode, and otherwise set the column to the implicit default value for the column data type and generated a warning. (For information about implicit default values, see Section 10.1.4, “Data Type Default Values”.)The change caused compatibility problems for applications that relied on the original behavior. It also caused replication problems between servers that had the original behavior and those that did not, for applications that assigned
NULLtoNOT NULLcolumns inUPDATEstatements without strict SQL mode enabled. The change was reverted in MySQL 6.0.10 so thatUPDATEagain had the original behavior. Problems can still occur if you replicate between servers that have the modifiedUPDATEbehavior and those that do not.Incompatible change: In MySQL 6.0.6, a change was made to the way that the server handles prepared statements. This affects prepared statements processed at the SQL level (using the
PREPAREstatement) and those processed using the binary client-server protocol (using themysql_stmt_prepare()C API function).Previously, changes to metadata of tables or views referred to in a prepared statement could cause a server crash when the statement was next executed, or perhaps an error at execute time with a crash occurring later. For example, this could happen after dropping a table and recreating it with a different definition.
Now metadata changes to tables or views referred to by prepared statements are detected and cause automatic repreparation of the statement when it is next executed. Metadata changes occur for DDL statements such as those that create, drop, alter, rename, or truncate tables, or that analyze, optimize, or repair tables. Repreparation also occurs after referenced tables or views are flushed from the table definition cache, either implicitly to make room for new entries in the cache, or explicitly due to
FLUSH TABLES.Repreparation is automatic, but to the extent that it occurs, performance of prepared statements is diminished.
Table content changes (for example, with
INSERTorUPDATE) do not cause repreparation, nor doSELECTstatements.An incompatibility with previous versions of MySQL is that a prepared statement may now return a different set of columns or different column types from one execution to the next. For example, if the prepared statement is
SELECT * FROM t1, alteringt1to contain a different number of columns causes the next execution to return a number of columns different from the previous execution.Older versions of the client library cannot handle this change in behavior. For applications that use prepared statements with the new server, an upgrade to the new client library is strongly recommended.
Along with this change to statement repreparation, the default value of the
table_definition_cachesystem variable has been increased from 128 to 256. The purpose of this increase is to lessen the chance that prepared statements will need repreparation due to referred-to tables/views having been flushed from the cache to make room for new entries.A new status variable,
Com_stmt_reprepare, has been introduced to track the number of repreparations.Incompatible change: As of MySQL 6.0.5, the server includes
dtoa, a library for conversion between strings and numbers by David M. Gay. In MySQL, this library provides the basis for improved conversion between string orDECIMALvalues and approximate-value (FLOAT/DOUBLE) numbers.Because the conversions produced by this library differ in some cases from previous results, the potential exists for incompatibilities in applications that rely on previous results. For example, applications that depend on a specific exact result from previous conversions might need adjustment to accommodate additional precision.
For additional information about the properties of
dtoaconversions, see Section 11.2.2, “Type Conversion in Expression Evaluation”.Incompatible change:
SHOW CREATE VIEWdisplays view definitions using anASclause for each column. If a column is created from an expression, the default alias is the expression text, which can be quite long. As of MySQL 6.0.4, aliases for column names inalias_nameCREATE VIEWstatements are checked against the maximum column length of 64 characters (not the maximum alias length of 256 characters). As a result, views created from the output ofSHOW CREATE VIEWfail if any column alias exceeds 64 characters. This can cause problems for replication or loading dump files. For additional information and workarounds, see Section D.5, “Restrictions on Views”.Incompatible change: As of MySQL 6.0.4, the Unicode implementation has been extended to provide support for supplementary characters that lie outside the Basic Multilingual Plane (BMP). Noteworthy features:
utf16andutf32character sets have been added. These correspond to the UTF-16 and UTF-32 encodings of the Unicode character set, and they both support supplementary characters.The
utf8character set from previous versions of MySQL has been renamed toutf8mb3, to reflect that its encoding uses a maximum of three bytes for multi-byte characters. (Old tables that previously usedutf8will be reported as usingutf8mb3after an in-place upgrade to MySQL 6.0, but otherwise work as before.)The new
utf8character set in MySQL 6.0 is similar toutf8mb3, but its encoding allows up to four bytes per character to enable support for supplementary characters.The
ucs2character set is essentially unchanged except for the inclusion of some newer BMP characters.
In most respects, upgrading from MySQL 5.1 to 6.0 should present few problems with regard to Unicode usage, although there are some potential areas of incompatibility. Some examples:
For the variable-length character data types (
VARCHARand theTEXTtypes), the maximum length in characters forutf8columns is less in MySQL 6.0 than previously.For all character data types (
CHAR,VARCHAR, and theTEXTtypes), the maximum number of characters forutf8columns that can be indexed is less in MySQL 6.0 than previously.
Consequently, if you want to upgrade tables from the old
utf8(nowutf8mb3) to the currentutf8, it may be necessary to change some column or index definitions.For additional details about the new Unicode character sets and potential incompatibilities, see Section 9.1.10, “Unicode Support”, and Section 9.1.11, “Upgrading from Previous to Current Unicode Support”.
If you use events, a known issue is that if you upgrade from MySQL 5.1 to 6.0.4 though 6.0.6, the event scheduler will not work, even after you run mysql_upgrade. (This is an issue only for an upgrade, not for a new installation of MySQL 6.0.x.) As of MySQL 6.0.7, mysql_upgrade handles upgrading the system tables properly. For this reason, avoid upgrading to MySQL 6.0.4 through 6.0.6.
Incompatible change: As of MySQL 6.0.3,
DROP TABLEis allowed only if you have acquired aWRITElock withLOCK TABLES, or if you hold no locks, or if the table is aTEMPORARYtable.Previously, if other tables were locked, you could drop a table with a read lock or no lock, which could lead to deadlocks between clients. The new stricter behavior means that some usage scenarios will fail when previously they did not.
SQL Changes:
Incompatible change: Several changes were made to the processing of multiple-table
DELETEstatements:Statements could not perform cross-database deletes unless the tables were referred to without using aliases. This limitation has been lifted and table aliases now are allowed.
Previously, alias declarations could be given for tables elsewhere than in the
table_referencespart of the syntax. This could lead to ambiguous statements that have unexpected results such as deleting rows from the wrong table. Example:DELETE FROM t1 AS a2 USING t1 AS a1 INNER JOIN t2 AS a2;
Now alias declarations can be declared only in the
table_referencespart. Elsewhere in the statement, alias references are allowed but not alias declarations.Alias resolution was improved so that it is no longer possible to have inconsistent or ambiguous aliases for tables.
Statements containing alias constructs that are no longer allowed must be rewritten.
Some keywords may be reserved in MySQL 6.0 that were not reserved in MySQL 5.5. See Section 8.3, “Reserved Words”.
This section describes what you should do to downgrade to an older MySQL version in the unlikely case that the previous version worked better than the new one.
If you are downgrading within the same release series (for example, from 5.5.13 to 5.5.12) the general rule is that you just have to install the new binaries on top of the old ones. There is no need to do anything with the databases. As always, however, it is always a good idea to make a backup.
The following items form a checklist of things you should do whenever you perform a downgrade:
Read the upgrading section for the release series from which you are downgrading to be sure that it does not have any features you really need. See Section 2.11.1, “Upgrading MySQL”.
If there is a downgrading section for that version, you should read that as well.
To see which new features were added between the version to which you are downgrading and your current version, see the change logs (Appendix C, MySQL Change History).
Check Section 2.11.3, “Checking Whether Tables or Indexes Must Be Rebuilt”, to see whether changes to table formats or to character sets or collations were made between your current version of MySQL and the version to which you are downgrading. If so and these changes result in an incompatibility between MySQL versions, you will need to downgrade the affected tables using the instructions in Section 2.11.4, “Rebuilding or Repairing Tables or Indexes”.
In most cases, you can move the MySQL format files and data files between different versions on the same architecture as long as you stay within versions for the same release series of MySQL.
If you downgrade from one release series to another, there may be incompatibilities in table storage formats. In this case, use mysqldump to dump your tables before downgrading. After downgrading, reload the dump file using mysql or mysqlimport to re-create your tables. For examples, see Section 2.11.5, “Copying MySQL Databases to Another Machine”.
A typical symptom of a downward-incompatible table format change when you downgrade is that you cannot open tables. In that case, use the following procedure:
Stop the older MySQL server that you are downgrading to.
Restart the newer MySQL server you are downgrading from.
Dump any tables that were inaccessible to the older server by using mysqldump to create a dump file.
Stop the newer MySQL server and restart the older one.
Reload the dump file into the older server. Your tables should be accessible.
It might also be the case that system tables in the
mysql database have changed and that
downgrading introduces some loss of functionality or requires some
adjustments. Here are some examples:
Trigger creation requires the
TRIGGERprivilege as of MySQL 5.1. In MySQL 5.0, there is noTRIGGERprivilege andSUPERis required instead. If you downgrade from MySQL 5.1 to 5.0, you will need to give theSUPERprivilege to those accounts that had theTRIGGERprivilege in 5.1.Triggers were added in MySQL 5.0, so if you downgrade from 5.0 to 4.1, you cannot use triggers at all.
The
mysql.proc.commentcolumn definition changed between MySQL 5.1 and 5.5. After a downgrade from 5.5 to 5.1, this table is seen as corrupt and in need of repair. To workaround this problem, execute mysql_upgrade from the version of MySQL to which you downgraded.
A binary upgrade or downgrade is one that installs one version of MySQL “in place” over an existing version, without dumping and reloading tables:
Stop the server for the existing version if it is running.
Install a different version of MySQL. This is an upgrade if the new version is higher than the original version, a downgrade if the version is lower.
Start the server for the new version.
In many cases, the tables from the previous version of MySQL can be used without problem by the new version. However, sometimes changes occur that require tables or table indexes to be rebuilt, as described in this section. If you have tables that are affected by any of the issues described here, rebuild the tables or indexes as necessary using the instructions given in Section 2.11.4, “Rebuilding or Repairing Tables or Indexes”.
Table Incompatibilities
After a binary upgrade to MySQL 5.1 from a MySQL 5.0 installation
that contains ARCHIVE tables,
accessing those tables causes the server to crash, even if you
have run mysql_upgrade or
CHECK TABLE ... FOR
UPGRADE. To work around this problem, use
mysqldump to dump all
ARCHIVE tables before upgrading, and
reload them into MySQL 5.1 after upgrading. The same problem
occurs for binary downgrades from MySQL 5.1 to 5.0.
Index Incompatibilities
If you perform a binary upgrade without dumping and reloading
tables, you cannot upgrade directly from MySQL 4.1 to 5.1 or
higher. This occurs due to an incompatible change in the
MyISAM table index format in MySQL 5.0. Upgrade
from MySQL 4.1 to 5.0 and repair all MyISAM
tables. Then upgrade from MySQL 5.0 to 5.1 and check and repair
your tables.
Modifications to the handling of character sets or collations might change the character sort order, which causes the ordering of entries in any index that uses an affected character set or collation to be incorrect. Such changes result in several possible problems:
Comparison results that differ from previous results
Inability to find some index values due to misordered index entries
Misordered
ORDER BYresultsTables that
CHECK TABLEreports as being in need of repair
The solution to these problems is to rebuild any indexes that use an affected character set or collation, either by dropping and re-creating the indexes, or by dumping and reloading the entire table. For information about rebuilding indexes, see Section 2.11.4, “Rebuilding or Repairing Tables or Indexes”.
To check whether a table has indexes that must be rebuilt, consult the following list. It indicates which versions of MySQL introduced character set or collation changes that require indexes to be rebuilt. Each entry indicates the version in which the change occurred and the character sets or collations that the change affects. If the change is associated with a particular bug report, the bug number is given.
The list applies both for binary upgrades and downgrades. For example, Bug#27877 was fixed in MySQL 5.1.24 and 6.0.5, so it applies to MySQL 5.1 upgrades from versions older than 5.1.24 to 5.1.24 or newer, and to MySQL 5.1 downgrades from 5.1.24 or newer to versions older than 5.1.24. It also applies to MySQL 6.0 upgrades from versions older than 6.0.5 to 6.0.5 or newer, and to MySQL 6.0 downgrades from 6.0.5 or newer to versions older than 6.0.5. For upgrades or downgrades between MySQL series, similar principles apply. For example, the Bug#27877 item applies to an upgrade from any MySQL 5.0 release to MySQL 5.1 for 5.1.24 or newer.
In many cases, you can use
CHECK TABLE ... FOR
UPGRADE to identify tables for which index rebuilding is
required. (It will report: Table upgrade required. Please
do "REPAIR TABLE `tbl_name`" or dump/reload to fix it!)
In these cases, you can also use mysqlcheck
--check-upgrade or mysql_upgrade,
which execute CHECK TABLE. However,
the use of CHECK TABLE applies only
after upgrades, not downgrades. Also, CHECK
TABLE is not applicable to all storage engines. For
details about which storage engines CHECK
TABLE supports, see Section 12.4.2.2, “CHECK TABLE Syntax”.
Changes that cause index rebuilding to be necessary:
MySQL 5.0.48, 5.1.21 (Bug#29461)
Affects indexes for columns that use any of these character sets:
eucjpms,euc_kr,gb2312,latin7,macce,ujisAffected tables can be detected by
CHECK TABLE ... FOR UPGRADEas of MySQL 5.1.29, 6.0.8 (see Bug#39585).MySQL 5.0.48, 5.1.23 (Bug#27562)
Affects indexes that use the
ascii_general_cicollation for columns that contain any of these characters:'`'GRAVE ACCENT,'['LEFT SQUARE BRACKET,'\'REVERSE SOLIDUS,']'RIGHT SQUARE BRACKET,'~'TILDEAffected tables can be detected by
CHECK TABLE ... FOR UPGRADEas of MySQL 5.1.29, 6.0.8 (see Bug#39585).MySQL 5.1.24, 6.0.5 (Bug#27877)
Affects indexes that use the
utf8_general_ciorucs2_general_cicollation for columns that contain'ß'LATIN SMALL LETTER SHARP S (German).Affected tables can be detected by
CHECK TABLE ... FOR UPGRADEas of MySQL 5.1.30, 6.0.8 (see Bug#40053).MySQL 6.0.5 (Bug#33452)
Affects indexes that use the
latin2_czech_cscollation.Affected tables can be detected by
CHECK TABLE ... FOR UPGRADEas of MySQL 6.0.9 (see Bug#40054).MySQL 6.0.6 (Bug#25420)
Affects indexes for columns that use the following collations, if the columns contain the indicated characters:
big5_chinese_ci:'~'TILDE or'`'GRAVE ACCENT;cp866_general_ci:jLATIN SMALL LETTER J;gb2312_chinese_ci:'~'TILDE;gbk_chinese_ci:'~'TILDEAffected tables can be detected by
CHECK TABLE ... FOR UPGRADEas of MySQL 6.0.9 (see Bug#40054).
This section describes how to rebuild a table. This can be
necessitated by changes to MySQL such as how data types are
handled or changes to character set handling. For example, an
error in a collation might have been corrected, necessitating a
table rebuild to update the indexes for character columns that use
the collation. (For examples, see
Section 2.11.3, “Checking Whether Tables or Indexes Must Be Rebuilt”.) It might also
be that a table repair or upgrade should be done as indicated by a
table check operation such as that performed by CHECK
TABLE, mysqlcheck, or
mysql_upgrade.
Methods for rebuilding a table include dumping and reloading it,
or using ALTER TABLE or
REPAIR TABLE.
Note
If you are rebuilding tables because a different version of MySQL will not handle them after a binary (in-place) upgrade or downgrade, you must use the dump-and-reload method. Dump the tables before upgrading or downgrading using your original version of MySQL. Then reload the tables after upgrading or downgrading.
If you use the dump-and-reload method of rebuilding tables only for the purpose of rebuilding indexes, you can perform the dump either before or after upgrading or downgrading. Reloading still must be done afterward.
To rebuild a table by dumping and reloading it, use mysqldump to create a dump file and mysql to reload the file:
shell>mysqldumpshell>db_namet1 > dump.sqlmysqldb_name< dump.sql
To rebuild all the tables in a single database, specify the database name without any following table name:
shell>mysqldumpshell>db_name> dump.sqlmysqldb_name< dump.sql
To rebuild all tables in all databases, use the
--all-databases option:
shell>mysqldump --all-databases > dump.sqlshell>mysql < dump.sql
To rebuild a table with ALTER
TABLE, use a “null” alteration; that is, an
ALTER TABLE statement that
“changes” the table to use the storage engine that it
already has. For example, if t1 is a
MyISAM table, use this statement:
mysql> ALTER TABLE t1 ENGINE = MyISAM;
If you are not sure which storage engine to specify in the
ALTER
            TABLE
statement, use
SHOW CREATE TABLE to display the
table definition.
If you must rebuild a table because a table checking operation
indicates that the table is corrupt or needs an upgrade, you can
use REPAIR TABLE if that statement
supports the table's storage engine. For example, to repair a
MyISAM table, use this statement:
mysql> REPAIR TABLE t1;
For storage engines such as InnoDB that
REPAIR TABLE does not support, use
mysqldump to create a dump file and
mysql to reload the file, as described earlier.
For specifics about which storage engines
REPAIR TABLE supports, see
Section 12.4.2.5, “REPAIR TABLE Syntax”.
mysqlcheck --repair provides command-line
access to the REPAIR TABLE
statement. This can be a more convenient means of repairing tables
because you can use the
--databases or
--all-databases option to
repair all tables in specific databases or all databases,
respectively:
shell>mysqlcheck --repair --databasesshell>db_name...mysqlcheck --repair --all-databases
You can copy the .frm,
.MYI, and .MYD files for
MyISAM tables between different architectures
that support the same floating-point format. (MySQL takes care of
any byte-swapping issues.) See
Section 13.5, “The MyISAM Storage Engine”.
In cases where you need to transfer databases between different architectures, you can use mysqldump to create a file containing SQL statements. You can then transfer the file to the other machine and feed it as input to the mysql client.
Use mysqldump --help to see what options are available.
The easiest (although not the fastest) way to move a database between two machines is to run the following commands on the machine on which the database is located:
shell>mysqladmin -h 'shell>other_hostname' createdb_namemysqldumpdb_name| mysql -h 'other_hostname'db_name
If you want to copy a database from a remote machine over a slow network, you can use these commands:
shell>mysqladmin createshell>db_namemysqldump -h 'other_hostname' --compressdb_name| mysqldb_name
You can also store the dump in a file, transfer the file to the target machine, and then load the file into the database there. For example, you can dump a database to a compressed file on the source machine like this:
shell> mysqldump --quick db_name | gzip > db_name.gz
Transfer the file containing the database contents to the target machine and run these commands there:
shell>mysqladmin createshell>db_namegunzip <db_name.gz | mysqldb_name
You can also use mysqldump and
mysqlimport to transfer the database. For large
tables, this is much faster than simply using
mysqldump. In the following commands,
DUMPDIR represents the full path name
of the directory you use to store the output from
mysqldump.
First, create the directory for the output files and dump the database:
shell>mkdirshell>DUMPDIRmysqldump --tab=DUMPDIRdb_name
Then transfer the files in the DUMPDIR
directory to some corresponding directory on the target machine
and load the files into MySQL there:
shell>mysqladmin createshell>db_name# create databasecatshell>DUMPDIR/*.sql | mysqldb_name# create tables in databasemysqlimportdb_nameDUMPDIR/*.txt # load data into tables
Do not forget to copy the mysql database
because that is where the grant tables are stored. You might have
to run commands as the MySQL root user on the
new machine until you have the mysql database
in place.
After you import the mysql database on the new
machine, execute mysqladmin flush-privileges so
that the server reloads the grant table information.
- 2.12.1.1. Linux Operating System Notes
- 2.12.1.2. Linux Binary Distribution Notes
- 2.12.1.3. Linux Source Distribution Notes
- 2.12.1.4. Linux Post-Installation Notes
- 2.12.1.5. Linux x86 Notes
- 2.12.1.6. Linux SPARC Notes
- 2.12.1.7. Linux Alpha Notes
- 2.12.1.8. Linux PowerPC Notes
- 2.12.1.9. Linux MIPS Notes
- 2.12.1.10. Linux IA-64 Notes
- 2.12.1.11. SELinux Notes
This section discusses issues that have been found to occur on Linux. The first few subsections describe general operating system-related issues, problems that can occur when using binary or source distributions, and post-installation issues. The remaining subsections discuss problems that occur with Linux on specific platforms.
Note that most of these problems occur on older versions of Linux. If you are running a recent version, you may see none of them.
MySQL needs at least Linux version 2.0.
Warning
We have seen some strange problems with Linux 2.2.14 and MySQL on SMP systems. We also have reports from some MySQL users that they have encountered serious stability problems using MySQL with kernel 2.2.14. If you are using this kernel, you should upgrade to 2.2.19 (or newer) or to a 2.4 kernel. If you have a multiple-CPU box, you should seriously consider using 2.4 because it gives you a significant speed boost. Your system should be more stable.
When using LinuxThreads, you should see a minimum of three mysqld processes running. These are in fact threads. There is one thread for the LinuxThreads manager, one thread to handle connections, and one thread to handle alarms and signals.
The Linux-Intel binary and RPM releases of MySQL are configured for the highest possible speed. We are always trying to use the fastest stable compiler available.
The binary release is linked with -static,
which means you do not normally need to worry about which
version of the system libraries you have. You need not install
LinuxThreads, either. A program linked with
-static is slightly larger than a dynamically
linked program, but also slightly faster (3% to 5%). However,
one problem with a statically linked program is that you can't
use user-defined functions (UDFs). If you are going to write
or use UDFs (this is something for C or C++ programmers only),
you must compile MySQL yourself using dynamic linking.
A known issue with binary distributions is that on older Linux
systems that use libc (such as Red Hat 4.x
or Slackware), you get some (nonfatal) issues with host name
resolution. If your system uses libc rather
than glibc2, you probably will encounter
some difficulties with host name resolution and
getpwnam(). This happens because
glibc (unfortunately) depends on some
external libraries to implement host name resolution and
getpwent(), even when compiled with
-static. These problems manifest themselves
in two ways:
You may see the following error message when you run mysql_install_db:
Sorry, the host '
xxxx' could not be looked upYou can deal with this by executing mysql_install_db --force, which does not execute the resolveip test in mysql_install_db. The downside is that you cannot use host names in the grant tables: except for
localhost, you must use IP numbers instead. If you are using an old version of MySQL that does not support--force, you must manually remove theresolveiptest in mysql_install_db using a text editor.You also may see the following error when you try to run mysqld with the
--useroption:getpwnam: No such file or directory
To work around this problem, start mysqld by using the
sucommand rather than by specifying the--useroption. This causes the system itself to change the user ID of the mysqld process so that mysqld need not do so.
Another solution, which solves both problems, is not to use a
binary distribution. Obtain a MySQL source distribution (in
RPM or tar.gz format) and install that
instead.
On some Linux 2.2 versions, you may get the error
Resource temporarily unavailable when
clients make a great many new connections to a
mysqld server over TCP/IP. The problem is
that Linux has a delay between the time that you close a
TCP/IP socket and the time that the system actually frees it.
There is room for only a finite number of TCP/IP slots, so you
encounter the resource-unavailable error if clients attempt
too many new TCP/IP connections over a short period of time.
For example, you may see the error when you run the MySQL
test-connect benchmark over TCP/IP.
We have inquired about this problem a few times on different Linux mailing lists but have never been able to find a suitable resolution. The only known “fix” is for clients to use persistent connections, or, if you are running the database server and clients on the same machine, to use Unix socket file connections rather than TCP/IP connections.
The following notes regarding glibc apply
only to the situation when you build MySQL yourself. If you
are running Linux on an x86 machine, in most cases it is much
better for you to use our binary. We link our binaries against
the best patched version of glibc we can
find and with the best compiler options, in an attempt to make
it suitable for a high-load server. For a typical user, even
for setups with a lot of concurrent connections or tables
exceeding the 2GB limit, our binary is the best choice in most
cases. After reading the following text, if you are in doubt
about what to do, try our binary first to determine whether it
meets your needs. If you discover that it is not good enough,
you may want to try your own build. In that case, we would
appreciate a note about it so that we can build a better
binary next time.
MySQL uses LinuxThreads on Linux. If you are using an old
Linux version that doesn't have glibc2, you
must install LinuxThreads before trying to compile MySQL. You
can obtain LinuxThreads from
http://dev.mysql.com/downloads/os-linux.html.
Note that glibc versions before and
including version 2.1.1 have a fatal bug in
pthread_mutex_timedwait() handling, which
is used when INSERT DELAYED
statements are issued. Do not use INSERT
DELAYED before upgrading glibc.
Note that Linux kernel and the LinuxThread library can by default handle a maximum of 1,024 threads. If you plan to have more than 1,000 concurrent connections, you need to make some changes to LinuxThreads, as follows:
Increase
PTHREAD_THREADS_MAXinsysdeps/unix/sysv/linux/bits/local_lim.hto 4096 and decreaseSTACK_SIZEinlinuxthreads/internals.hto 256KB. The paths are relative to the root ofglibc. (Note that MySQL is not stable with 600 to 1000 connections ifSTACK_SIZEis the default of 2MB.)Recompile LinuxThreads to produce a new
libpthread.alibrary, and relink MySQL against it.
There is another issue that greatly hurts MySQL performance,
especially on SMP systems. The mutex implementation in
LinuxThreads in glibc 2.1 is very poor for
programs with many threads that hold the mutex only for a
short time. This produces a paradoxical result: If you link
MySQL against an unmodified LinuxThreads, removing processors
from an SMP actually improves MySQL performance in many cases.
We have made a patch available for glibc
2.1.3 to correct this behavior
(http://dev.mysql.com/Downloads/Linux/linuxthreads-2.1-patch).
With glibc 2.2.2, MySQL uses the adaptive
mutex, which is much better than even the patched one in
glibc 2.1.3. Be warned, however, that under
some conditions, the current mutex code in
glibc 2.2.2 overspins, which hurts MySQL
performance. The likelihood that this condition occurs can be
reduced by re-nicing the mysqld process to
the highest priority. We have also been able to correct the
overspin behavior with a patch, available at
http://dev.mysql.com/Downloads/Linux/linuxthreads-2.2.2.patch.
It combines the correction of overspin, maximum number of
threads, and stack spacing all in one. You need to apply it in
the linuxthreads directory with
patch -p0
</tmp/linuxthreads-2.2.2.patch. We hope it is
included in some form in future releases of
glibc 2.2. In any case, if you link against
glibc 2.2.2, you still need to correct
STACK_SIZE and
PTHREAD_THREADS_MAX. We hope that the
defaults is corrected to some more acceptable values for
high-load MySQL setup in the future, so that the commands
needed to produce your own build can be reduced to
./configure; make; make install.
If you use these patches to build a special static version of
libpthread.a, use it only for statically
linking against MySQL. We know that these patches are safe for
MySQL and significantly improve its performance, but we cannot
say anything about their effects on other applications. If you
link other applications that require LinuxThreads against the
patched static version of the library, or build a patched
shared version and install it on your system, you do so at
your own risk.
If you experience any strange problems during the installation of MySQL, or with some common utilities hanging, it is very likely that they are either library or compiler related. If this is the case, using our binary resolves them.
If you link your own MySQL client programs, you may see the following error at runtime:
ld.so.1: fatal: libmysqlclient.so.#: open failed: No such file or directory
This problem can be avoided by one of the following methods:
If you are using the Fujitsu compiler
(fcc/FCC), you may have some problems
compiling MySQL because the Linux header files are very
gcc oriented. The following
configure line should work with
fcc/FCC:
CC=fcc CFLAGS="-O -K fast -K lib -K omitfp -Kpreex -D_GNU_SOURCE \
-DCONST=const -DNO_STRTOLL_PROTO" \
CXX=FCC CXXFLAGS="-O -K fast -K lib \
-K omitfp -K preex --no_exceptions --no_rtti -D_GNU_SOURCE \
-DCONST=const -Dalloca=__builtin_alloca -DNO_STRTOLL_PROTO \
'-D_EXTERN_INLINE=static __inline'" \
./configure \
--prefix=/usr/local/mysql --enable-assembler \
--with-mysqld-ldflags=-all-static --disable-shared \
--with-low-memory
mysql.server can be found in the
support-files directory under the MySQL
installation directory or in a MySQL source tree. You can
install it as /etc/init.d/mysql for
automatic MySQL startup and shutdown. See
Section 2.10.2.2, “Starting and Stopping MySQL Automatically”.
If MySQL cannot open enough files or connections, it may be that you have not configured Linux to handle enough files.
In Linux 2.2 and onward, you can check the number of allocated file handles as follows:
shell>cat /proc/sys/fs/file-maxshell>cat /proc/sys/fs/dquot-maxshell>cat /proc/sys/fs/super-max
If you have more than 16MB of memory, you should add something
like the following to your init scripts (for example,
/etc/init.d/boot.local on SuSE Linux):
echo 65536 > /proc/sys/fs/file-max echo 8192 > /proc/sys/fs/dquot-max echo 1024 > /proc/sys/fs/super-max
You can also run the echo commands from the
command line as root, but these settings
are lost the next time your computer restarts.
Alternatively, you can set these parameters on startup by
using the sysctl tool, which is used by
many Linux distributions (including SuSE Linux 8.0 and later).
Put the following values into a file named
/etc/sysctl.conf:
# Increase some values for MySQL fs.file-max = 65536 fs.dquot-max = 8192 fs.super-max = 1024
You should also add the following to
/etc/my.cnf:
[mysqld_safe] open-files-limit=8192
This should allow the server a limit of 8,192 for the combined number of connections and open files.
The STACK_SIZE constant in LinuxThreads
controls the spacing of thread stacks in the address space. It
needs to be large enough so that there is plenty of room for
each individual thread stack, but small enough to keep the
stack of some threads from running into the global
mysqld data. Unfortunately, as we have
experimentally discovered, the Linux implementation of
mmap() successfully unmaps a mapped region
if you ask it to map out an address currently in use, zeroing
out the data on the entire page instead of returning an error.
So, the safety of mysqld or any other
threaded application depends on the “gentlemanly”
behavior of the code that creates threads. The user must take
measures to make sure that the number of running threads at
any given time is sufficiently low for thread stacks to stay
away from the global heap. With mysqld, you
should enforce this behavior by setting a reasonable value for
the max_connections variable.
If you build MySQL yourself, you can patch LinuxThreads for
better stack use. See Section 2.12.1.3, “Linux Source Distribution Notes”. If
you do not want to patch LinuxThreads, you should set
max_connections to a value no
higher than 500. It should be even less if you have a large
key buffer, large heap tables, or some other things that make
mysqld allocate a lot of memory, or if you
are running a 2.2 kernel with a 2GB patch. If you are using
our binary or RPM version, you can safely set
max_connections at 1500,
assuming no large key buffer or heap tables with lots of data.
The more you reduce STACK_SIZE in
LinuxThreads the more threads you can safely create. Values
between 128KB and 256KB are recommended.
If you use a lot of concurrent connections, you may suffer from a “feature” in the 2.2 kernel that attempts to prevent fork bomb attacks by penalizing a process for forking or cloning a child. This causes MySQL not to scale well as you increase the number of concurrent clients. On single-CPU systems, we have seen this manifest as very slow thread creation; it may take a long time to connect to MySQL (as long as one minute), and it may take just as long to shut it down. On multiple-CPU systems, we have observed a gradual drop in query speed as the number of clients increases. In the process of trying to find a solution, we have received a kernel patch from one of our users who claimed it helped for his site. This patch is available at http://dev.mysql.com/Downloads/Patches/linux-fork.patch. We have done rather extensive testing of this patch on both development and production systems. It has significantly improved MySQL performance without causing any problems and is recommended for users who still run high-load servers on 2.2 kernels.
This issue has been fixed in the 2.4 kernel, so if you are not satisfied with the current performance of your system, rather than patching your 2.2 kernel, it might be easier to upgrade to 2.4. On SMP systems, upgrading also gives you a nice SMP boost in addition to fixing the fairness bug.
We have tested MySQL on the 2.4 kernel on a two-CPU machine and found MySQL scales much better. There was virtually no slowdown on query throughput all the way up to 1,000 clients, and the MySQL scaling factor (computed as the ratio of maximum throughput to the throughput for one client) was 180%. We have observed similar results on a four-CPU system: Virtually no slowdown as the number of clients was increased up to 1,000, and a 300% scaling factor. Based on these results, for a high-load SMP server using a 2.2 kernel, it is definitely recommended to upgrade to the 2.4 kernel at this point.
We have discovered that it is essential to run the
mysqld process with the highest possible
priority on the 2.4 kernel to achieve maximum performance.
This can be done by adding a renice -20 $$
command to mysqld_safe. In our testing on a
four-CPU machine, increasing the priority resulted in a 60%
throughput increase with 400 clients.
We are currently also trying to collect more information on
how well MySQL performs with a 2.4 kernel on four-way and
eight-way systems. If you have access such a system and have
done some benchmarks, please send an email message to
<benchmarks@mysql.com> with the results. We will
review them for inclusion in the manual.
If you see a dead mysqld server process with ps, this usually means that you have found a bug in MySQL or you have a corrupted table. See Section B.5.4.2, “What to Do If MySQL Keeps Crashing”.
To get a core dump on Linux if mysqld dies
with a SIGSEGV signal, you can start
mysqld with the
--core-file option. Note that
you also probably need to raise the core file size by adding
ulimit -c 1000000 to
mysqld_safe or starting
mysqld_safe with
--core-file-size=1000000.
See Section 4.3.2, “mysqld_safe — MySQL Server Startup Script”.
MySQL requires libc 5.4.12 or newer. It is
known to work with libc 5.4.46.
glibc 2.0.6 and later should also work.
There have been some problems with the
glibc RPMs from Red Hat, so if you have
problems, check whether there are any updates. The
glibc 2.0.7-19 and 2.0.7-29 RPMs are known
to work.
If you are using Red Hat 8.0 or a new glibc
2.2.x library, you may see mysqld die in
gethostbyaddr(). This happens because the
new glibc library requires a stack size
greater than 128KB for this call. To fix the problem, start
mysqld with the
--thread-stack=192K option.
This stack size is the default on MySQL 4.0.10 and above, so
you should not see the problem.
If you are using gcc 3.0 and above to
compile MySQL, you must install the
libstdc++v3 library before compiling MySQL;
if you do not do this, you get an error about a missing
__cxa_pure_virtual symbol during linking.
On some older Linux distributions, configure may produce an error like this:
Syntax error in sched.h. Change _P to __P in the /usr/include/sched.h file. See the Installation chapter in the Reference Manual.
Just do what the error message says. Add an extra underscore
to the _P macro name that has only one
underscore, and then try again.
You may get some warnings when compiling. Those shown here can be ignored:
mysqld.cc -o objs-thread/mysqld.o mysqld.cc: In function `void init_signals()': mysqld.cc:315: warning: assignment of negative value `-1' to `long unsigned int' mysqld.cc: In function `void * signal_hand(void *)': mysqld.cc:346: warning: assignment of negative value `-1' to `long unsigned int'
If mysqld always dumps core when it starts,
the problem may be that you have an old
/lib/libc.a. Try renaming it, and then
remove sql/mysqld and do a new
make install and try again. This problem
has been reported on some Slackware installations.
If you get the following error when linking
mysqld, it means that your
libg++.a is not installed correctly:
/usr/lib/libc.a(putc.o): In function `_IO_putc': putc.o(.text+0x0): multiple definition of `_IO_putc'
You can avoid using libg++.a by running
configure like this:
shell> CXX=gcc ./configure
In some implementations, readdir_r() is
broken. The symptom is that the SHOW
DATABASES statement always returns an empty set.
This can be fixed by removing
HAVE_READDIR_R from
config.h after configuring and before
compiling.
We have tested MySQL 6.0 on Alpha with our benchmarks and test suite, and it appears to work well.
We currently build the MySQL binary packages on SuSE Linux 7.0 for AXP, kernel 2.4.4-SMP, Compaq C compiler (V6.2-505) and Compaq C++ compiler (V6.3-006) on a Compaq DS20 machine with an Alpha EV6 processor.
You can find the preceding compilers at http://www.support.compaq.com/alpha-tools/. By using these compilers rather than gcc, we get about 9% to 14% better MySQL performance.
For MySQL on Alpha, we use the -arch generic
flag to our compile options, which ensures that the binary
runs on all Alpha processors. We also compile statically to
avoid library problems. The configure
command looks like this:
CC=ccc CFLAGS="-fast -arch generic" CXX=cxx \
CXXFLAGS="-fast -arch generic -noexceptions -nortti" \
./configure --prefix=/usr/local/mysql --disable-shared \
--with-extra-charsets=complex --enable-thread-safe-client \
--with-mysqld-ldflags=-non_shared --with-client-ldflags=-non_shared
Some known problems when running MySQL on Linux-Alpha:
Debugging threaded applications like MySQL does not work with
gdb 4.18. You should use gdb 5.1 instead.If you try linking mysqld statically when using gcc, the resulting image dumps core at startup time. In other words, do not use
--with-mysqld-ldflags=-all-staticwith gcc.
MySQL should work on MkLinux with the newest
glibc package (tested with
glibc 2.0.7).
To get MySQL to work on Qube2 (Linux Mips), you need the
newest glibc libraries.
glibc-2.0.7-29C2 is known to work. You must
also use gcc 2.95.2 or newer).
To get MySQL to compile on Linux IA-64, we use the following configure command for building with gcc 2.96:
CC=gcc \
CFLAGS="-O3 -fno-omit-frame-pointer" \
CXX=gcc \
CXXFLAGS="-O3 -fno-omit-frame-pointer -felide-constructors \
-fno-exceptions -fno-rtti" \
./configure --prefix=/usr/local/mysql \
"--with-comment=Official MySQL binary" \
--with-extra-charsets=complex
On IA-64, the MySQL client binaries use shared libraries. This
means that if you install our binary distribution at a
location other than /usr/local/mysql, you
need to add the path of the directory where you have
libmysqlclient.so installed either to the
/etc/ld.so.conf file or to the value of
your LD_LIBRARY_PATH environment variable.
See Section B.5.3.1, “Problems Linking to the MySQL Client Library”.
RHEL4 comes with SELinux, which supports tighter access
control for processes. If SELinux is enabled
(SELINUX in
/etc/selinux/config is set to
enforcing, SELINUXTYPE
is set to either targeted or
strict), you might encounter problems
installing Oracle Corporation RPM packages.
Red Hat has an update that solves this. It involves an update of the “security policy” specification to handle the install structure of the RPMs provided by Oracle Corporation. For further information, see https://bugzilla.redhat.com/bugzilla/show_bug.cgi?id=167551 and http://rhn.redhat.com/errata/RHBA-2006-0049.html.
The preceding discussion applies only to RHEL4. The patch is unnecessary for RHEL5.
On Mac OS X, tar cannot handle long file
names. If you need to unpack a .tar.gz
distribution, use gnutar instead.
MySQL should work without major problems on Mac OS X 10.x (Darwin).
Known issues:
If you have problems with performance under heavy load, try using the
--skip-thread-priorityoption to mysqld. This runs all threads with the same priority. On Mac OS X, this gives better performance, at least until Apple fixes its thread scheduler.The connection times (
wait_timeout,interactive_timeoutandnet_read_timeout) values are not honored.This is probably a signal handling problem in the thread library where the signal doesn't break a pending read and we hope that a future update to the thread libraries will fix this.
Our binary for Mac OS X is compiled on Darwin 6.3 with the following configure line:
CC=gcc CFLAGS="-O3 -fno-omit-frame-pointer" CXX=gcc \
CXXFLAGS="-O3 -fno-omit-frame-pointer -felide-constructors \
-fno-exceptions -fno-rtti" \
./configure --prefix=/usr/local/mysql \
--with-extra-charsets=complex --enable-thread-safe-client \
--enable-local-infile --disable-shared
For current versions of Mac OS X Server, no operating system changes are necessary before compiling MySQL. Compiling for the Server platform is the same as for the client version of Mac OS X.
For older versions (Mac OS X Server 1.2, a.k.a. Rhapsody), you must first install a pthread package before trying to configure MySQL.
For information about installing MySQL on Solaris using PKG distributions, see Section 2.6, “Installing MySQL on Solaris”.
On Solaris, you may run into trouble even before you get the MySQL distribution unpacked, as the Solaris tar cannot handle long file names. This means that you may see errors when you try to unpack MySQL.
If this occurs, you must use GNU tar (gtar) to unpack the distribution.
Sun native threads work only on Solaris 2.5 and higher. For Solaris 2.4 and earlier, MySQL automatically uses MIT-pthreads. See Section 2.9.5, “MIT-pthreads Notes”.
If you get the following error from configure, it means that you have something wrong with your compiler installation:
checking for restartable system calls... configure: error can not run test programs while cross compiling
In this case, you should upgrade your compiler to a newer
version. You may also be able to solve this problem by inserting
the following row into the config.cache
file:
ac_cv_sys_restartable_syscalls=${ac_cv_sys_restartable_syscalls='no'}
If you are using Solaris on a SPARC, the recommended compiler is gcc 2.95.2 or 3.2. You can find this at http://gcc.gnu.org/. Note that gcc 2.8.1 does not work reliably on SPARC.
The recommended configure line when using gcc 2.95.2 is:
CC=gcc CFLAGS="-O3" \
CXX=gcc CXXFLAGS="-O3 -felide-constructors -fno-exceptions -fno-rtti" \
./configure --prefix=/usr/local/mysql --with-low-memory \
--enable-assembler
If you have an UltraSPARC system, you can get 4% better
performance by adding -mcpu=v8
-Wa,-xarch=v8plusa to the CFLAGS and
CXXFLAGS environment variables.
If you have Sun's Forte 5.0 (or newer) compiler, you can run configure like this:
CC=cc CFLAGS="-Xa -fast -native -xstrconst -mt" \ CXX=CC CXXFLAGS="-noex -mt" \ ./configure --prefix=/usr/local/mysql --enable-assembler
To create a 64-bit binary with Sun's Forte compiler, use the following configuration options:
CC=cc CFLAGS="-Xa -fast -native -xstrconst -mt -xarch=v9" \ CXX=CC CXXFLAGS="-noex -mt -xarch=v9" ASFLAGS="-xarch=v9" \ ./configure --prefix=/usr/local/mysql --enable-assembler
To create a 64-bit Solaris binary using gcc,
add -m64 to CFLAGS and
CXXFLAGS and remove
--enable-assembler from the
configure line.
In the MySQL benchmarks, we obtained a 4% speed increase on
UltraSPARC when using Forte 5.0 in 32-bit mode, as compared to
using gcc 3.2 with the -mcpu
flag.
If you create a 64-bit mysqld binary, it is 4% slower than the 32-bit binary, but can handle more threads and memory.
When using Solaris 10 for x86_64, you should mount any file
systems on which you intend to store InnoDB
files with the forcedirectio option. (By
default mounting is done without this option.) Failing to do so
will cause a significant drop in performance when using the
InnoDB storage engine on this platform.
If you get a problem with fdatasync or
sched_yield, you can fix this by adding
LIBS=-lrt to the configure
line
For compilers older than WorkShop 5.3, you might have to edit the configure script. Change this line:
#if !defined(__STDC__) || __STDC__ != 1
To this:
#if !defined(__STDC__)
If you turn on __STDC__ with the
-Xc option, the Sun compiler can't compile with
the Solaris pthread.h header file. This is
a Sun bug (broken compiler or broken include file).
If mysqld issues the following error message
when you run it, you have tried to compile MySQL with the Sun
compiler without enabling the -mt multi-thread
option:
libc internal error: _rmutex_unlock: rmutex not held
Add -mt to CFLAGS and
CXXFLAGS and recompile.
If you are using the SFW version of gcc
(which comes with Solaris 8), you must add
/opt/sfw/lib to the environment variable
LD_LIBRARY_PATH before running
configure.
If you are using the gcc available from
sunfreeware.com, you may have many problems.
To avoid this, you should recompile gcc and
GNU binutils on the machine where you are
running them.
If you get the following error when compiling MySQL with gcc, it means that your gcc is not configured for your version of Solaris:
shell> gcc -O3 -g -O2 -DDBUG_OFF -o thr_alarm ...
./thr_alarm.c: In function `signal_hand':
./thr_alarm.c:556: too many arguments to function `sigwait'
The proper thing to do in this case is to get the newest version of gcc and compile it with your current gcc compiler. At least for Solaris 2.5, almost all binary versions of gcc have old, unusable include files that break all programs that use threads, and possibly other programs as well.
Solaris does not provide static versions of all system libraries
(libpthreads and libdl),
so you cannot compile MySQL with --static. If
you try to do so, you get one of the following errors:
ld: fatal: library -ldl: not found undefined reference to `dlopen' cannot find -lrt
If you link your own MySQL client programs, you may see the following error at runtime:
ld.so.1: fatal: libmysqlclient.so.#:
open failed: No such file or directory
This problem can be avoided by one of the following methods:
If you have problems with configure trying to
link with -lz when you do not have
zlib installed, you have two options:
If you want to be able to use the compressed communication protocol, you need to get and install
zlibfromftp.gnu.org.Run configure with the
--with-named-z-libs=nooption when building MySQL.
If you are using gcc and have problems with
loading user-defined functions (UDFs) into MySQL, try adding
-lgcc to the link line for the UDF.
If you would like MySQL to start automatically, you can copy
support-files/mysql.server to
/etc/init.d and create a symbolic link to
it named /etc/rc3.d/S99mysql.server.
If too many processes try to connect very rapidly to mysqld, you should see this error in the MySQL log:
Error in accept: Protocol error
You might try starting the server with the
--back_log=50 option as a
workaround for this. (Use -O back_log=50 before
MySQL 4.)
Solaris doesn't support core files for
setuid() applications, so you can't get a
core file from mysqld if you are using the
--user option.
Normally, you can use a Solaris 2.6 binary on Solaris 2.7 and 2.8. Most of the Solaris 2.6 issues also apply for Solaris 2.7 and 2.8.
MySQL should be able to detect new versions of Solaris automatically and enable workarounds for the following problems.
Solaris 2.7 / 2.8 has some bugs in the include files. You may see the following error when you use gcc:
/usr/include/widec.h:42: warning: `getwc' redefined /usr/include/wchar.h:326: warning: this is the location of the previous definition
If this occurs, you can fix the problem by copying
/usr/include/widec.h to
.../lib/gcc-lib/os/gcc-version/include and
changing line 41 from this:
#if !defined(lint) && !defined(__lint)
To this:
#if !defined(lint) && !defined(__lint) && !defined(getwc)
Alternatively, you can edit
/usr/include/widec.h directly. Either
way, after you make the fix, you should remove
config.cache and run
configure again.
If you get the following errors when you run
make, it is because
configure didn't detect the
curses.h file (probably because of the
error in /usr/include/widec.h):
In file included from mysql.cc:50: /usr/include/term.h:1060: syntax error before `,' /usr/include/term.h:1081: syntax error before `;'
The solution to this problem is to do one of the following:
Configure with
CFLAGS=-DHAVE_CURSES_H CXXFLAGS=-DHAVE_CURSES_H ./configure.Edit
/usr/include/widec.has indicated in the preceding discussion and re-run configure.Remove the
#define HAVE_TERMline from theconfig.hfile and run make again.
If your linker cannot find -lz when linking
client programs, the problem is probably that your
libz.so file is installed in
/usr/local/lib. You can fix this problem
by one of the following methods:
Add
/usr/local/libtoLD_LIBRARY_PATH.Add a link to
libz.sofrom/lib.If you are using Solaris 8, you can install the optional
zlibfrom your Solaris 8 CD distribution.Run configure with the
--with-named-z-libs=nooption when building MySQL.
On Solaris 8 on x86, mysqld dumps core if
you remove the debug symbols using strip.
If you are using gcc on Solaris x86 and you experience problems with core dumps under load, you should use the following configure command:
CC=gcc CFLAGS="-O3 -fomit-frame-pointer -DHAVE_CURSES_H" \
CXX=gcc \
CXXFLAGS="-O3 -fomit-frame-pointer -felide-constructors \
-fno-exceptions -fno-rtti -DHAVE_CURSES_H" \
./configure --prefix=/usr/local/mysql
This avoids problems with the libstdc++
library and with C++ exceptions.
If this doesn't help, you should compile a debug version and run it with a trace file or under gdb. See MySQL Internals: Porting.
This section provides information about using MySQL on variants of BSD Unix.
FreeBSD 4.x or newer is recommended for running MySQL, because
the thread package is much more integrated. To get a secure
and stable system, you should use only FreeBSD kernels that
are marked -RELEASE.
The easiest (and preferred) way to install MySQL is to use the
mysql-server and
mysql-client ports available at
http://www.freebsd.org/. Using these ports
gives you the following benefits:
A working MySQL with all optimizations enabled that are known to work on your version of FreeBSD.
Automatic configuration and build.
Startup scripts installed in
/usr/local/etc/rc.d.The ability to use
pkg_info -Lto see which files are installed.The ability to use
pkg_deleteto remove MySQL if you no longer want it on your machine.
It is recommended you use MIT-pthreads on FreeBSD 2.x, and native threads on FreeBSD 3 and up. It is possible to run with native threads on some late 2.2.x versions, but you may encounter problems shutting down mysqld.
Unfortunately, certain function calls on FreeBSD are not yet
fully thread-safe. Most notably, this includes the
gethostbyname() function, which is used by
MySQL to convert host names into IP addresses. Under certain
circumstances, the mysqld process suddenly
causes 100% CPU load and is unresponsive. If you encounter
this problem, try to start MySQL using the
--skip-name-resolve option.
Alternatively, you can link MySQL on FreeBSD 4.x against the LinuxThreads library, which avoids a few of the problems that the native FreeBSD thread implementation has. For a very good comparison of LinuxThreads versus native threads, see Jeremy Zawodny's article FreeBSD or Linux for your MySQL Server? at http://jeremy.zawodny.com/blog/archives/000697.html.
Known problem when using LinuxThreads on FreeBSD is:
The connection times (
wait_timeout,interactive_timeoutandnet_read_timeout) values are not honored. The symptom is that persistent connections can hang for a very long time without getting closed down and that a 'kill' for a thread will not take affect until the thread does it a new commandThis is probably a signal handling problem in the thread library where the signal doesn't break a pending read. This is supposed to be fixed in FreeBSD 5.0
The MySQL build process requires GNU make (gmake) to work. If GNU make is not available, you must install it first before compiling MySQL.
The recommended way to compile and install MySQL on FreeBSD with gcc (2.95.2 and up) is:
CC=gcc CFLAGS="-O2 -fno-strength-reduce" \
CXX=gcc CXXFLAGS="-O2 -fno-rtti -fno-exceptions \
-felide-constructors -fno-strength-reduce" \
./configure --prefix=/usr/local/mysql --enable-assembler
gmake
gmake install
cd /usr/local/mysql
bin/mysql_install_db --user=mysql
bin/mysqld_safe &
If you notice that configure uses MIT-pthreads, you should read the MIT-pthreads notes. See Section 2.9.5, “MIT-pthreads Notes”.
If you get an error from make install that
it can't find /usr/include/pthreads,
configure didn't detect that you need
MIT-pthreads. To fix this problem, remove
config.cache, and then re-run
configure with the
--with-mit-threads option.
Be sure that your name resolver setup is correct. Otherwise,
you may experience resolver delays or failures when connecting
to mysqld. Also make sure that the
localhost entry in the
/etc/hosts file is correct. The file
should start with a line similar to this:
127.0.0.1 localhost localhost.your.domain
FreeBSD is known to have a very low default file handle limit.
See Section B.5.2.18, “'File' Not Found and
Similar Errors”. Start the
server by using the
--open-files-limit option
for mysqld_safe, or raise the limits for
the mysqld user in
/etc/login.conf and rebuild it with
cap_mkdb /etc/login.conf. Also be sure that
you set the appropriate class for this user in the password
file if you are not using the default (use chpass
mysqld-user-name). See
Section 4.3.2, “mysqld_safe — MySQL Server Startup Script”.
FreeBSD limits the size of a process to 512MB, even if you have much more RAM available on the system. So you may get an error such as this:
Out of memory (Needed 16391 bytes)
In current versions of FreeBSD (at least 4.x and greater), you
may increase this limit by adding the following entries to the
/boot/loader.conf file and rebooting the
machine (these are not settings that can be changed at run
time with the sysctl command):
kern.maxdsiz="1073741824" # 1GB kern.dfldsiz="1073741824" # 1GB kern.maxssiz="134217728" # 128MB
For older versions of FreeBSD, you must recompile your kernel
to change the maximum data segment size for a process. In this
case, you should look at the MAXDSIZ option
in the LINT config file for more
information.
If you get problems with the current date in MySQL, setting
the TZ variable should help. See
Section 2.13, “Environment Variables”.
To compile on NetBSD, you need GNU make.
Otherwise, the build process fails when
make tries to run lint
on C++ files.
On OpenBSD 2.5, you can compile MySQL with native threads with the following options:
CFLAGS=-pthread CXXFLAGS=-pthread ./configure --with-mit-threads=no
If you get the following error when compiling MySQL, your ulimit value for virtual memory is too low:
item_func.h: In method `Item_func_ge::Item_func_ge(const Item_func_ge &)': item_func.h:28: virtual memory exhausted make[2]: *** [item_func.o] Error 1
Try using ulimit -v 80000 and run make again. If this doesn't work and you are using bash, try switching to csh or sh; some BSDI users have reported problems with bash and ulimit.
If you are using gcc, you may also use have
to use the --with-low-memory
flag for configure to be able to compile
sql_yacc.cc.
If you get problems with the current date in MySQL, setting
the TZ variable should help. See
Section 2.13, “Environment Variables”.
Upgrade to BSD/OS 3.1. If that is not possible, install BSDIpatch M300-038.
Use the following command when configuring MySQL:
env CXX=shlicc++ CC=shlicc2 \
./configure \
--prefix=/usr/local/mysql \
--localstatedir=/var/mysql \
--without-perl \
--with-unix-socket-path=/var/mysql/mysql.sock
The following is also known to work:
env CC=gcc CXX=gcc CXXFLAGS=-O3 \
./configure \
--prefix=/usr/local/mysql \
--with-unix-socket-path=/var/mysql/mysql.sock
You can change the directory locations if you wish, or just use the defaults by not specifying any locations.
If you have problems with performance under heavy load, try
using the
--skip-thread-priority option
to mysqld. This runs all threads with the
same priority. On BSDI 3.1, this gives better performance, at
least until BSDI fixes its thread scheduler.
If you get the error virtual memory
exhausted while compiling, you should try using
ulimit -v 80000 and running
make again. If this doesn't work and you
are using bash, try switching to
csh or sh; some BSDI
users have reported problems with bash and
ulimit.
BSDI 4.x has some thread-related bugs. If you want to use MySQL on this, you should install all thread-related patches. At least M400-023 should be installed.
On some BSDI 4.x systems, you may get problems with shared
libraries. The symptom is that you can't execute any client
programs, for example, mysqladmin. In this
case, you need to reconfigure not to use shared libraries with
the --disable-shared option to configure.
Some customers have had problems on BSDI 4.0.1 that the mysqld binary after a while can't open tables. This occurs because some library/system-related bug causes mysqld to change current directory without having asked for that to happen.
The fix is to either upgrade MySQL to at least version 3.23.34
or, after running configure, remove the
line #define HAVE_REALPATH from
config.h before running
make.
Note that this means that you can't symbolically link a database directories to another database directory or symbolic link a table to another database on BSDI. (Making a symbolic link to another disk is okay).
- 2.12.5.1. HP-UX Version 10.20 Notes
- 2.12.5.2. HP-UX Version 11.x Notes
- 2.12.5.3. IBM-AIX notes
- 2.12.5.4. SunOS 4 Notes
- 2.12.5.5. Alpha-DEC-UNIX Notes (Tru64)
- 2.12.5.6. Alpha-DEC-OSF/1 Notes
- 2.12.5.7. SGI Irix Notes
- 2.12.5.8. SCO UNIX and OpenServer 5.0.x Notes
- 2.12.5.9. SCO OpenServer 6.0.x Notes
- 2.12.5.10. SCO UnixWare 7.1.x and OpenUNIX 8.0.0 Notes
If you install MySQL using a binary tarball distribution on HP-UX, you may run into trouble even before you get the MySQL distribution unpacked, as the HP-UX tar cannot handle long file names. This means that you may see errors when you try to unpack MySQL.
If this occurs, you must use GNU tar (gtar) to unpack the distribution.
There are a couple of small problems when compiling MySQL on HP-UX. Use gcc instead of the HP-UX native compiler, because gcc produces better code.
Use gcc 2.95 on HP-UX. Do not use high
optimization flags (such as -O6) because they
may not be safe on HP-UX.
The following configure line should work with gcc 2.95:
CFLAGS="-I/opt/dce/include -fpic" \
CXXFLAGS="-I/opt/dce/include -felide-constructors -fno-exceptions \
-fno-rtti" \
CXX=gcc \
./configure --with-pthread \
--with-named-thread-libs='-ldce' \
--prefix=/usr/local/mysql --disable-shared
The following configure line should work with gcc 3.1:
CFLAGS="-DHPUX -I/opt/dce/include -O3 -fPIC" CXX=gcc \
CXXFLAGS="-DHPUX -I/opt/dce/include -felide-constructors \
-fno-exceptions -fno-rtti -O3 -fPIC" \
./configure --prefix=/usr/local/mysql \
--with-extra-charsets=complex --enable-thread-safe-client \
--enable-local-infile --with-pthread \
--with-named-thread-libs=-ldce --with-lib-ccflags=-fPIC
--disable-shared
If you install MySQL using a binary tarball distribution on HP-UX, you may run into trouble even before you get the MySQL distribution unpacked, as the HP-UX tar cannot handle long file names. This means that you may see errors when you try to unpack MySQL.
If this occurs, you must use GNU tar (gtar) to unpack the distribution.
Because of some critical bugs in the standard HP-UX libraries, you should install the following patches before trying to run MySQL on HP-UX 11.0:
PHKL_22840 Streams cumulative PHNE_22397 ARPA cumulative
This solves the problem of getting
EWOULDBLOCK from recv()
and EBADF from accept()
in threaded applications.
If you are using gcc 2.95.1 on an unpatched HP-UX 11.x system, you may get the following error:
In file included from /usr/include/unistd.h:11,
from ../include/global.h:125,
from mysql_priv.h:15,
from item.cc:19:
/usr/include/sys/unistd.h:184: declaration of C function ...
/usr/include/sys/pthread.h:440: previous declaration ...
In file included from item.h:306,
from mysql_priv.h:158,
from item.cc:19:
The problem is that HP-UX does not define
pthreads_atfork() consistently. It has
conflicting prototypes in
/usr/include/sys/unistd.h:184 and
/usr/include/sys/pthread.h:440.
One solution is to copy
/usr/include/sys/unistd.h into
mysql/include and edit
unistd.h and change it to match the
definition in pthread.h. Look for this
line:
extern int pthread_atfork(void (*prepare)(), void (*parent)(),
void (*child)());
Change it to look like this:
extern int pthread_atfork(void (*prepare)(void), void (*parent)(void),
void (*child)(void));
After making the change, the following configure line should work:
CFLAGS="-fomit-frame-pointer -O3 -fpic" CXX=gcc \ CXXFLAGS="-felide-constructors -fno-exceptions -fno-rtti -O3" \ ./configure --prefix=/usr/local/mysql --disable-shared
If you are using HP-UX compiler, you can use the following command (which has been tested with cc B.11.11.04):
CC=cc CXX=aCC CFLAGS=+DD64 CXXFLAGS=+DD64 ./configure \
--with-extra-character-set=complex
You can ignore any errors of the following type:
aCC: warning 901: unknown option: `-3': use +help for online documentation
If you get the following error from configure, verify that you do not have the path to the K&R compiler before the path to the HP-UX C and C++ compiler:
checking for cc option to accept ANSI C... no configure: error: MySQL requires an ANSI C compiler (and a C++ compiler). Try gcc. See the Installation chapter in the Reference Manual.
Another reason for not being able to compile is that you
didn't define the +DD64 flags as just
described.
Another possibility for HP-UX 11 is to use the MySQL binaries provided at http://dev.mysql.com/downloads/, which we have built and tested ourselves. We have also received reports that the HP-UX 10.20 binaries supplied by MySQL can be run successfully on HP-UX 11. If you encounter problems, you should be sure to check your HP-UX patch level.
Automatic detection of xlC is missing from
Autoconf, so a number of variables need to be set before
running configure. The following example
uses the IBM compiler:
export CC="xlc_r -ma -O3 -qstrict -qoptimize=3 -qmaxmem=8192 "
export CXX="xlC_r -ma -O3 -qstrict -qoptimize=3 -qmaxmem=8192"
export CFLAGS="-I /usr/local/include"
export LDFLAGS="-L /usr/local/lib"
export CPPFLAGS=$CFLAGS
export CXXFLAGS=$CFLAGS
./configure --prefix=/usr/local \
--localstatedir=/var/mysql \
--sbindir='/usr/local/bin' \
--libexecdir='/usr/local/bin' \
--enable-thread-safe-client \
--enable-large-files
The preceding options are used to compile the MySQL distribution that can be found at http://www-frec.bull.com/.
If you change the -O3 to -O2
in the preceding configure line, you must
also remove the -qstrict option. This is a
limitation in the IBM C compiler.
If you are using gcc to compile MySQL, you
must use the
-fno-exceptions flag, because the exception
handling in gcc is not thread-safe! There
are also some known problems with IBM's assembler that may
cause it to generate bad code when used with
gcc.
Use the following configure line with gcc 2.95 on AIX:
CC="gcc -pipe -mcpu=power -Wa,-many" \ CXX="gcc -pipe -mcpu=power -Wa,-many" \ CXXFLAGS="-felide-constructors -fno-exceptions -fno-rtti" \ ./configure --prefix=/usr/local/mysql --with-low-memory
The -Wa,-many option is necessary for the
compile to be successful. IBM is aware of this problem but is
in no hurry to fix it because of the workaround that is
available. We do not know if the
-fno-exceptions is required with
gcc 2.95, but because MySQL doesn't use
exceptions and the option generates faster code, you should
always use it with gcc.
If you get a problem with assembler code, try changing the
-mcpu= option
to match your CPU. Typically xxxpower2,
power, or powerpc may
need to be used. Alternatively, you might need to use
604 or 604e. We are not
positive but suspect that power would
likely be safe most of the time, even on a power2 machine.
If you do not know what your CPU is, execute a uname
-m command. It produces a string that looks like
000514676700, with a format of
xxyyyyyymmss where xx
and ss are always 00,
yyyyyy is a unique system ID and
mm is the ID of the CPU Planar. A chart of
these values can be found at
http://www16.boulder.ibm.com/pseries/en_US/cmds/aixcmds5/uname.htm.
This gives you a machine type and a machine model you can use to determine what type of CPU you have.
If you have problems with threads on AIX 5.3, you should upgrade AIX 5.3 to technology level 7 (5300-07).
If you have problems with signals (MySQL dies unexpectedly under high load), you may have found an OS bug with threads and signals. In this case, you can tell MySQL not to use signals by configuring as follows:
CFLAGS=-DDONT_USE_THR_ALARM CXX=gcc \
CXXFLAGS="-felide-constructors -fno-exceptions -fno-rtti \
-DDONT_USE_THR_ALARM" \
./configure --prefix=/usr/local/mysql --with-debug \
--with-low-memory
This doesn't affect the performance of MySQL, but has the side effect that you can't kill clients that are “sleeping” on a connection with mysqladmin kill or mysqladmin shutdown. Instead, the client dies when it issues its next command.
On some versions of AIX, linking with
libbind.a makes
getservbyname() dump core. This is an AIX
bug and should be reported to IBM.
For AIX 4.2.1 and gcc, you have to make the following changes.
After configuring, edit config.h and
include/my_config.h and change the line
that says this:
#define HAVE_SNPRINTF 1
to this:
#undef HAVE_SNPRINTF
And finally, in mysqld.cc, you need to
add a prototype for initgroups().
#ifdef _AIX41 extern "C" int initgroups(const char *,int); #endif
For 32-bit binaries, if you need to allocate a lot of memory to the mysqld process, it is not enough to just use ulimit -d unlimited. You may also have to modify mysqld_safe to add a line something like this:
export LDR_CNTRL='MAXDATA=0x80000000'
You can find more information about using a lot of memory at http://publib16.boulder.ibm.com/pseries/en_US/aixprggd/genprogc/lrg_prg_support.htm.
Users of AIX 4.3 should use gmake instead of the make utility included with AIX.
As of AIX 4.1, the C compiler has been unbundled from AIX as a separate product. gcc 3.3.2 can be obtained here: ftp://ftp.software.ibm.com/aix/freeSoftware/aixtoolbox/RPMS/ppc/gcc/
The steps for compiling MySQL on AIX with
gcc 3.3.2 are similar to those for using
gcc 2.95 (in particular, the need to edit
config.h and
my_config.h after running
configure). However, before running
configure, you should also patch the
curses.h file as follows:
/opt/freeware/lib/gcc-lib/powerpc-ibm-aix5.2.0.0/3.3.2/include/curses.h.ORIG
Mon Dec 26 02:17:28 2005
--- /opt/freeware/lib/gcc-lib/powerpc-ibm-aix5.2.0.0/3.3.2/include/curses.h
Mon Dec 26 02:40:13 2005
***************
*** 2023,2029 ****
#endif /* _AIX32_CURSES */
! #if defined(__USE_FIXED_PROTOTYPES__) || defined(__cplusplus) || defined
(__STRICT_ANSI__)
extern int delwin (WINDOW *);
extern int endwin (void);
extern int getcurx (WINDOW *);
--- 2023,2029 ----
#endif /* _AIX32_CURSES */
! #if 0 && (defined(__USE_FIXED_PROTOTYPES__) || defined(__cplusplus)
|| defined
(__STRICT_ANSI__))
extern int delwin (WINDOW *);
extern int endwin (void);
extern int getcurx (WINDOW *);
On SunOS 4, MIT-pthreads is needed to compile MySQL. This in turn means you need GNU make.
Some SunOS 4 systems have problems with dynamic libraries and libtool. You can use the following configure line to avoid this problem:
./configure --disable-shared --with-mysqld-ldflags=-all-static
When compiling readline, you may get
warnings about duplicate defines. These can be ignored.
When compiling mysqld, there are some
implicit declaration of function warnings.
These can be ignored.
If you are using egcs 1.1.2 on Digital Unix, you should upgrade to gcc 2.95.2, because egcs on DEC has some serious bugs!
When compiling threaded programs under Digital Unix, the
documentation recommends using the -pthread
option for cc and cxx
and the -lmach -lexc libraries (in addition
to -lpthread). You should run
configure something like this:
CC="cc -pthread" CXX="cxx -pthread -O" \ ./configure --with-named-thread-libs="-lpthread -lmach -lexc -lc"
When compiling mysqld, you may see a couple of warnings like this:
mysqld.cc: In function void handle_connections()': mysqld.cc:626: passing long unsigned int *' as argument 3 of accept(int,sockadddr *, int *)'
You can safely ignore these warnings. They occur because configure can detect only errors, not warnings.
If you start the server directly from the command line, you
may have problems with it dying when you log out. (When you
log out, your outstanding processes receive a
SIGHUP signal.) If so, try starting the
server like this:
nohup mysqld [options] &
nohup causes the command following it to
ignore any SIGHUP signal sent from the
terminal. Alternatively, start the server by running
mysqld_safe, which invokes
mysqld using nohup for
you. See Section 4.3.2, “mysqld_safe — MySQL Server Startup Script”.
If you get a problem when compiling
mysys/get_opt.c, just remove the
#define _NO_PROTO line from the start of
that file.
If you are using Compaq's CC compiler, the following configure line should work:
CC="cc -pthread"
CFLAGS="-O4 -ansi_alias -ansi_args -fast -inline speed \
-speculate all -arch host"
CXX="cxx -pthread"
CXXFLAGS="-O4 -ansi_alias -ansi_args -fast -inline speed \
-speculate all -arch host -noexceptions -nortti"
export CC CFLAGS CXX CXXFLAGS
./configure \
--prefix=/usr/local/mysql \
--with-low-memory \
--enable-large-files \
--enable-shared=yes \
--with-named-thread-libs="-lpthread -lmach -lexc -lc"
gnumake
If you get a problem with libtool when compiling with shared libraries as just shown, when linking mysql, you should be able to get around this by issuing these commands:
cd mysql
/bin/sh ../libtool --mode=link cxx -pthread -O3 -DDBUG_OFF \
-O4 -ansi_alias -ansi_args -fast -inline speed \
-speculate all \ -arch host -DUNDEF_HAVE_GETHOSTBYNAME_R \
-o mysql mysql.o readline.o sql_string.o completion_hash.o \
../readline/libreadline.a -lcurses \
../libmysql/.libs/libmysqlclient.so -lm
cd ..
gnumake
gnumake install
scripts/mysql_install_db
If you have problems compiling and have DEC CC and gcc installed, try running configure like this:
CC=cc CFLAGS=-O CXX=gcc CXXFLAGS=-O3 \ ./configure --prefix=/usr/local/mysql
If you get problems with the c_asm.h
file, you can create and use a 'dummy'
c_asm.h file with:
touch include/c_asm.h CC=gcc CFLAGS=-I./include \ CXX=gcc CXXFLAGS=-O3 \ ./configure --prefix=/usr/local/mysql
Note that the following problems with the ld program can be fixed by downloading the latest DEC (Compaq) patch kit from: http://ftp.support.compaq.com/public/unix/.
On OSF/1 V4.0D and compiler "DEC C V5.6-071 on Digital Unix
V4.0 (Rev. 878)," the compiler had some strange behavior
(undefined asm symbols).
/bin/ld also appears to be broken (problems
with _exit undefined errors occurring while
linking mysqld). On this system, we have
managed to compile MySQL with the following
configure line, after replacing
/bin/ld with the version from OSF 4.0C:
CC=gcc CXX=gcc CXXFLAGS=-O3 ./configure --prefix=/usr/local/mysql
With the Digital compiler "C++ V6.1-029," the following should work:
CC=cc -pthread
CFLAGS=-O4 -ansi_alias -ansi_args -fast -inline speed \
-speculate all -arch host
CXX=cxx -pthread
CXXFLAGS=-O4 -ansi_alias -ansi_args -fast -inline speed \
-speculate all -arch host -noexceptions -nortti
export CC CFLAGS CXX CXXFLAGS
./configure --prefix=/usr/mysql/mysql \
--with-mysqld-ldflags=-all-static --disable-shared \
--with-named-thread-libs="-lmach -lexc -lc"
In some versions of OSF/1, the alloca()
function is broken. Fix this by removing the line in
config.h that defines
'HAVE_ALLOCA'.
The alloca() function also may have an
incorrect prototype in
/usr/include/alloca.h. This warning
resulting from this can be ignored.
configure uses the following thread
libraries automatically:
--with-named-thread-libs="-lpthread -lmach -lexc
-lc".
When using gcc, you can also try running configure like this:
CFLAGS=-D_PTHREAD_USE_D4 CXX=gcc CXXFLAGS=-O3 ./configure ...
If you have problems with signals (MySQL dies unexpectedly under high load), you may have found an OS bug with threads and signals. In this case, you can tell MySQL not to use signals by configuring with:
CFLAGS=-DDONT_USE_THR_ALARM \ CXXFLAGS=-DDONT_USE_THR_ALARM \ ./configure ...
This does not affect the performance of MySQL, but has the side effect that you can't kill clients that are “sleeping” on a connection with mysqladmin kill or mysqladmin shutdown. Instead, the client dies when it issues its next command.
With gcc 2.95.2, you may encounter the following compile error:
sql_acl.cc:1456: Internal compiler error in `scan_region', at except.c:2566 Please submit a full bug report.
To fix this, you should change to the sql
directory and do a cut-and-paste of the last
gcc line, but change -O3
to -O0 (or add -O0
immediately after gcc if you do not have
any -O option on your compile line). After
this is done, you can just change back to the top-level
directory and run make again.
As of MySQL 5.0, we do not provide binaries for Irix any more.
If you are using Irix 6.5.3 or newer,
mysqld is able to create threads only if
you run it as a user that has CAP_SCHED_MGT
privileges (such as root) or give the
mysqld server this privilege with the
following shell command:
chcap "CAP_SCHED_MGT+epi" /opt/mysql/libexec/mysqld
You may have to undefine some symbols in
config.h after running
configure and before compiling.
In some Irix implementations, the alloca()
function is broken. If the mysqld server
dies on some SELECT statements,
remove the lines from config.h that
define HAVE_ALLOC and
HAVE_ALLOCA_H. If mysqladmin
create doesn't work, remove the line from
config.h that defines
HAVE_READDIR_R. You may have to remove the
HAVE_TERM_H line as well.
SGI recommends that you install all the patches on this page as a set: http://support.sgi.com/surfzone/patches/patchset/6.2_indigo.rps.html
At the very minimum, you should install the latest kernel
rollup, the latest rld rollup, and the
latest libc rollup.
You definitely need all the POSIX patches on this page, for pthreads support:
http://support.sgi.com/surfzone/patches/patchset/6.2_posix.rps.html
If you get the something like the following error when
compiling mysql.cc:
"/usr/include/curses.h", line 82: error(1084): invalid combination of type
Type the following in the top-level directory of your MySQL source tree:
extra/replace bool curses_bool < /usr/include/curses.h > include/curses.h make
There have also been reports of scheduling problems. If only one thread is running, performance is slow. Avoid this by starting another client. This may lead to a two-to-tenfold increase in execution speed thereafter for the other thread. This is a poorly understood problem with Irix threads; you may have to improvise to find solutions until this can be fixed.
If you are compiling with gcc, you can use the following configure command:
CC=gcc CXX=gcc CXXFLAGS=-O3 \
./configure --prefix=/usr/local/mysql --enable-thread-safe-client \
--with-named-thread-libs=-lpthread
On Irix 6.5.11 with native Irix C and C++ compilers ver. 7.3.1.2, the following is reported to work
CC=cc CXX=CC CFLAGS='-O3 -n32 -TARG:platform=IP22 -I/usr/local/include \
-L/usr/local/lib' CXXFLAGS='-O3 -n32 -TARG:platform=IP22 \
-I/usr/local/include -L/usr/local/lib' \
./configure --prefix=/usr/local/mysql --with-innodb \
--with-libwrap=/usr/local \
--with-named-curses-libs=/usr/local/lib/libncurses.a
The current port is tested only on
sco3.2v5.0.5,
sco3.2v5.0.6, and
sco3.2v5.0.7 systems. There has also been
progress on a port to sco3.2v4.2. Open
Server 5.0.8 (Legend) has native threads and allows files
greater than 2GB. The current maximum file size is 2GB.
We have been able to compile MySQL with the following configure command on OpenServer with gcc 2.95.3.
CC=gcc CFLAGS="-D_FILE_OFFSET_BITS=64 -O3" \
CXX=gcc CXXFLAGS="-D_FILE_OFFSET_BITS=64 -O3" \
./configure --prefix=/usr/local/mysql \
--enable-thread-safe-client --with-innodb \
--with-openssl --with-vio --with-extra-charsets=complex
gcc is available at ftp://ftp.sco.com/pub/openserver5/opensrc/gnutools-5.0.7Kj.
This development system requires the OpenServer Execution
Environment Supplement oss646B on OpenServer 5.0.6 and oss656B
and the OpenSource libraries found in gwxlibs. All OpenSource
tools are in the opensrc directory. They
are available at
ftp://ftp.sco.com/pub/openserver5/opensrc/.
Use the latest production release of MySQL.
SCO provides operating system patches at ftp://ftp.sco.com/pub/openserver5 for OpenServer 5.0.[0-6] and ftp://ftp.sco.com/pub/openserverv5/507 for OpenServer 5.0.7.
SCO provides information about security fixes at ftp://ftp.sco.com/pub/security/OpenServer for OpenServer 5.0.x.
The maximum file size on an OpenServer 5.0.x system is 2GB.
The total memory which can be allocated for streams buffers, clists, and lock records cannot exceed 60MB on OpenServer 5.0.x.
Streams buffers are allocated in units of 4096 byte pages, clists are 70 bytes each, and lock records are 64 bytes each, so:
(NSTRPAGES * 4096) + (NCLIST * 70) + (MAX_FLCKREC * 64) <= 62914560
Follow this procedure to configure the Database Services option. If you are unsure whether an application requires this, see the documentation provided with the application.
Log in as
root.Enable the SUDS driver by editing the
/etc/conf/sdevice.d/sudsfile. Change theNin the second field to aY.Use mkdev aio or the Hardware/Kernel Manager to enable support for asynchronous I/O and relink the kernel. To allow users to lock down memory for use with this type of I/O, update the aiomemlock(F) file. This file should be updated to include the names of users that can use AIO and the maximum amounts of memory they can lock down.
Many applications use setuid binaries so that you need to specify only a single user. See the documentation provided with the application to determine whether this is the case for your application.
After you complete this process, reboot the system to create a new kernel incorporating these changes.
By default, the entries in
/etc/conf/cf.d/mtune are set as follows:
Value Default Min Max ----- ------- --- --- NBUF 0 24 450000 NHBUF 0 32 524288 NMPBUF 0 12 512 MAX_INODE 0 100 64000 MAX_FILE 0 100 64000 CTBUFSIZE 128 0 256 MAX_PROC 0 50 16000 MAX_REGION 0 500 160000 NCLIST 170 120 16640 MAXUP 100 15 16000 NOFILES 110 60 11000 NHINODE 128 64 8192 NAUTOUP 10 0 60 NGROUPS 8 0 128 BDFLUSHR 30 1 300 MAX_FLCKREC 0 50 16000 PUTBUFSZ 8000 2000 20000 MAXSLICE 100 25 100 ULIMIT 4194303 2048 4194303 * Streams Parameters NSTREAM 64 1 32768 NSTRPUSH 9 9 9 NMUXLINK 192 1 4096 STRMSGSZ 16384 4096 524288 STRCTLSZ 1024 1024 1024 STRMAXBLK 524288 4096 524288 NSTRPAGES 500 0 8000 STRSPLITFRAC 80 50 100 NLOG 3 3 3 NUMSP 64 1 256 NUMTIM 16 1 8192 NUMTRW 16 1 8192 * Semaphore Parameters SEMMAP 10 10 8192 SEMMNI 10 10 8192 SEMMNS 60 60 8192 SEMMNU 30 10 8192 SEMMSL 25 25 150 SEMOPM 10 10 1024 SEMUME 10 10 25 SEMVMX 32767 32767 32767 SEMAEM 16384 16384 16384 * Shared Memory Parameters SHMMAX 524288 131072 2147483647 SHMMIN 1 1 1 SHMMNI 100 100 2000 FILE 0 100 64000 NMOUNT 0 4 256 NPROC 0 50 16000 NREGION 0 500 160000
Set these values as follows:
NOFILESshould be 4096 or 2048.MAXUPshould be 2048.
To make changes to the kernel, use the idtune
name parameter command.
idtune modifies the
/etc/conf/cf.d/stune file for you. For
example, to change SEMMS to
200, execute this command as
root:
# /etc/conf/bin/idtune SEMMNS 200
Then rebuild and reboot the kernel by issuing this command:
# /etc/conf/bin/idbuild -B && init 6
To tune the system, the proper parameter values to use depend on the number of users accessing the application or database and size the of the database (that is, the used buffer pool). The following kernel parameters can be set with idtune:
SHMMAX(recommended setting: 128MB) andSHMSEG(recommended setting: 15). These parameters have an influence on the MySQL database engine to create user buffer pools.NOFILESandMAXUPshould be set to at least 2048.MAXPROCshould be set to at least 3000/4000 (depends on number of users) or more.The following formulas are recommended to calculate values for
SEMMSL,SEMMNS, andSEMMNU:SEMMSL = 13
13 is what has been found to be the best for both Progress and MySQL.
SEMMNS = SEMMSL *
number of db servers to be run on the systemSet
SEMMNSto the value ofSEMMSLmultiplied by the number of database servers (maximum) that you are running on the system at one time.SEMMNU = SEMMNS
Set the value of
SEMMNUto equal the value ofSEMMNS. You could probably set this to 75% ofSEMMNS, but this is a conservative estimate.
You need to at least install the SCO OpenServer Linker and Application Development Libraries or the OpenServer Development System to use gcc. You cannot use the GCC Dev system without installing one of these.
You should get the FSU Pthreads package and install it first. This can be found at http://moss.csc.ncsu.edu/~mueller/ftp/pub/PART/pthreads.tar.gz. You can also get a precompiled package from ftp://ftp.zenez.com/pub/zenez/prgms/FSU-threads-3.14.tar.gz.
FSU Pthreads can be compiled with SCO Unix 4.2 with tcpip, or
using OpenServer 3.0 or Open Desktop 3.0 (OS 3.0 ODT 3.0) with
the SCO Development System installed using a good port of GCC
2.5.x. For ODT or OS 3.0, you need a good port of GCC 2.5.x.
There are a lot of problems without a good port. The port for
this product requires the SCO Unix Development system. Without
it, you are missing the libraries and the linker that is
needed. You also need
SCO-3.2v4.2-includes.tar.gz. This file
contains the changes to the SCO Development include files that
are needed to get MySQL to build. You need to replace the
existing system include files with these modified header
files. They can be obtained from
ftp://ftp.zenez.com/pub/zenez/prgms/SCO-3.2v4.2-includes.tar.gz.
To build FSU Pthreads on your system, all you should need to
do is run GNU make. The
Makefile in FSU-threads-3.14.tar.gz is
set up to make FSU-threads.
You can run ./configure in the
threads/src directory and select the SCO
OpenServer option. This command copies
Makefile.SCO5 to
Makefile. Then run
make.
To install in the default /usr/include
directory, log in as root, and then
cd to the thread/src
directory and run make install.
Remember that you must use GNU make to build MySQL.
Note
If you do not start mysqld_safe as
root, you should get only the default 110
open files per process. mysqld writes a
note about this in the log file.
With SCO 3.2V4.2, you should use FSU Pthreads version 3.14 or newer. The following configure command should work:
CFLAGS="-D_XOPEN_XPG4" CXX=gcc CXXFLAGS="-D_XOPEN_XPG4" \
./configure \
--prefix=/usr/local/mysql \
--with-named-thread-libs="-lgthreads -lsocket -lgen -lgthreads" \
--with-named-curses-libs="-lcurses"
You may have problems with some include files. In this case, you can find new SCO-specific include files at ftp://ftp.zenez.com/pub/zenez/prgms/SCO-3.2v4.2-includes.tar.gz.
You should unpack this file in the
include directory of your MySQL source
tree.
SCO development notes:
MySQL should automatically detect FSU Pthreads and link mysqld with
-lgthreads -lsocket -lgthreads.The SCO development libraries are re-entrant in FSU Pthreads. SCO claims that its library functions are re-entrant, so they must be re-entrant with FSU Pthreads. FSU Pthreads on OpenServer tries to use the SCO scheme to make re-entrant libraries.
FSU Pthreads (at least the version at ftp://ftp.zenez.com) comes linked with GNU
malloc. If you encounter problems with memory usage, make sure thatgmalloc.ois included inlibgthreads.aandlibgthreads.so.In FSU Pthreads, the following system calls are pthreads-aware:
read(),write(),getmsg(),connect(),accept(),select(), andwait().The CSSA-2001-SCO.35.2 (the patch is listed in custom as erg711905-dscr_remap security patch (version 2.0.0)) breaks FSU threads and makes mysqld unstable. You have to remove this one if you want to run mysqld on an OpenServer 5.0.6 machine.
If you use SCO OpenServer 5, you may need to recompile FSU pthreads with
-DDRAFT7inCFLAGS. Otherwise,InnoDBmay hang at a mysqld startup.SCO provides operating system patches at ftp://ftp.sco.com/pub/openserver5 for OpenServer 5.0.x.
SCO provides security fixes and
libsocket.so.2at ftp://ftp.sco.com/pub/security/OpenServer and ftp://ftp.sco.com/pub/security/sse for OpenServer 5.0.x.Pre-OSR506 security fixes. Also, the
telnetdfix at ftp://stage.caldera.com/pub/security/openserver/ or ftp://stage.caldera.com/pub/security/openserver/CSSA-2001-SCO.10/ as bothlibsocket.so.2andlibresolv.so.1with instructions for installing on pre-OSR506 systems.It is probably a good idea to install these patches before trying to compile/use MySQL.
Beginning with Legend/OpenServer 6.0.0, there are native threads and no 2GB file size limit.
OpenServer 6 includes these key improvements:
Larger file support up to 1 TB
Multiprocessor support increased from 4 to 32 processors
Increased memory support up to 64GB
Extending the power of UnixWare into OpenServer 6
Dramatic performance improvement
OpenServer 6.0.0 commands are organized as follows:
/binis for commands that behave exactly the same as on OpenServer 5.0.x./u95/binis for commands that have better standards conformance, for example Large File System (LFS) support./udk/binis for commands that behave the same as on UnixWare 7.1.4. The default is for the LFS support.
The following is a guide to setting PATH on
OpenServer 6. If the user wants the traditional OpenServer
5.0.x then PATH should be
/bin first. If the user wants LFS
support, the path should be
/u95/bin:/bin. If the user wants UnixWare
7 support first, the path would be
/udk/bin:/u95/bin:/bin:.
Use the latest production release of MySQL. Should you choose to use an older release of MySQL on OpenServer 6.0.x, you must use a version of MySQL at least as recent as 3.22.13 to get fixes for some portability and OS problems.
MySQL distribution files with names of the following form are
tar archives of media are tar archives of
media images suitable for installation with the SCO Software
Manager (/etc/custom) on SCO OpenServer
6:
mysql-PRODUCT-6.0.14-sco-osr6-i686.VOLS.tar
A distribution where PRODUCT is
pro-cert is the Commercially licensed MySQL
Pro Certified server. A distribution where
PRODUCT is
pro-gpl-cert is the MySQL Pro Certified
server licensed under the terms of the General Public License
(GPL).
Select whichever distribution you wish to install and, after download, extract the tar archive into an empty directory. For example:
shell>mkdir /tmp/mysql-proshell>cd /tmp/mysql-proshell>tar xf /tmp/mysql-pro-cert-6.0.14-sco-osr6-i686.VOLS.tar
Prior to installation, back up your data in accordance with the procedures outlined in Section 2.11.1, “Upgrading MySQL”.
Remove any previously installed pkgadd version of MySQL:
shell> pkginfo mysql 2>&1 > /dev/null && pkgrm mysql
Install MySQL Pro from media images using the SCO Software Manager:
shell> /etc/custom -p SCO:MySQL -i -z /tmp/mysql-pro
Alternatively, the SCO Software Manager can be displayed
graphically by clicking on the Software
Manager icon on the desktop, selecting
Software -> Install New, selecting the
host, selecting Media Images for the Media
Device, and entering /tmp/mysql-pro as
the Image Directory.
After installation, run mkdev mysql as the
root user to configure your newly installed
MySQL Pro Certified server.
Note
The installation procedure for VOLS packages does not create
the mysql user and group that the package
uses by default. You should either create the
mysql user and group, or else select a
different user and group using an option in mkdev
mysql.
If you wish to configure your MySQL Pro server to interface with the Apache Web server via PHP, download and install the PHP update from SCO at ftp://ftp.sco.com/pub/updates/OpenServer/SCOSA-2006.17/.
We have been able to compile MySQL with the following configure command on OpenServer 6.0.x:
CC=cc CFLAGS="-D_FILE_OFFSET_BITS=64 -O3" \
CXX=CC CXXFLAGS="-D_FILE_OFFSET_BITS=64 -O3" \
./configure --prefix=/usr/local/mysql \
--enable-thread-safe-client \
--with-extra-charsets=complex \
--build=i686-unknown-sysv5SCO_SV6.0.0
If you use gcc, you must use gcc 2.95.3 or newer.
CC=gcc CXX=g++ ... ./configure ...
SCO provides OpenServer 6 operating system patches at ftp://ftp.sco.com/pub/openserver6.
SCO provides information about security fixes at ftp://ftp.sco.com/pub/security/OpenServer.
By default, the maximum file size on a OpenServer 6.0.0 system is 1TB. Some operating system utilities have a limitation of 2GB. The maximum possible file size on UnixWare 7 is 1TB with VXFS or HTFS.
OpenServer 6 can be configured for large file support (file sizes greater than 2GB) by tuning the UNIX kernel.
By default, the entries in
/etc/conf/cf.d/mtune are set as follows:
Value Default Min Max ----- ------- --- --- SVMMLIM 0x9000000 0x1000000 0x7FFFFFFF HVMMLIM 0x9000000 0x1000000 0x7FFFFFFF
To make changes to the kernel, use the idtune
name parameter command.
idtune modifies the
/etc/conf/cf.d/stune file for you. To set
the kernel values, execute the following commands as
root:
#/etc/conf/bin/idtune SDATLIM 0x7FFFFFFF#/etc/conf/bin/idtune HDATLIM 0x7FFFFFFF#/etc/conf/bin/idtune SVMMLIM 0x7FFFFFFF#/etc/conf/bin/idtune HVMMLIM 0x7FFFFFFF#/etc/conf/bin/idtune SFNOLIM 2048#/etc/conf/bin/idtune HFNOLIM 2048
Then rebuild and reboot the kernel by issuing this command:
# /etc/conf/bin/idbuild -B && init 6
To tune the system, the proper parameter values to use depend on the number of users accessing the application or database and size the of the database (that is, the used buffer pool). The following kernel parameters can be set with idtune:
SHMMAX(recommended setting: 128MB) andSHMSEG(recommended setting: 15). These parameters have an influence on the MySQL database engine to create user buffer pools.SFNOLIMandHFNOLIMshould be at maximum 2048.NPROCshould be set to at least 3000/4000 (depends on number of users).The following formulas are recommended to calculate values for
SEMMSL,SEMMNS, andSEMMNU:SEMMSL = 13
13 is what has been found to be the best for both Progress and MySQL.
SEMMNS = SEMMSL *
number of db servers to be run on the systemSet
SEMMNSto the value ofSEMMSLmultiplied by the number of database servers (maximum) that you are running on the system at one time.SEMMNU = SEMMNS
Set the value of
SEMMNUto equal the value ofSEMMNS. You could probably set this to 75% ofSEMMNS, but this is a conservative estimate.
Use the latest production release of MySQL. Should you choose to use an older release of MySQL on UnixWare 7.1.x, you must use a version of MySQL at least as recent as 3.22.13 to get fixes for some portability and OS problems.
We have been able to compile MySQL with the following configure command on UnixWare 7.1.x:
CC="cc" CFLAGS="-I/usr/local/include" \
CXX="CC" CXXFLAGS="-I/usr/local/include" \
./configure --prefix=/usr/local/mysql \
--enable-thread-safe-client \
--with-innodb --with-openssl --with-extra-charsets=complex
If you want to use gcc, you must use gcc 2.95.3 or newer.
CC=gcc CXX=g++ ... ./configure ...
SCO provides operating system patches at ftp://ftp.sco.com/pub/unixware7 for UnixWare 7.1.1, ftp://ftp.sco.com/pub/unixware7/713/ for UnixWare 7.1.3, ftp://ftp.sco.com/pub/unixware7/714/ for UnixWare 7.1.4, and ftp://ftp.sco.com/pub/openunix8 for OpenUNIX 8.0.0.
SCO provides information about security fixes at ftp://ftp.sco.com/pub/security/OpenUNIX for OpenUNIX and ftp://ftp.sco.com/pub/security/UnixWare for UnixWare.
The UnixWare 7 file size limit is 1 TB with VXFS. Some OS utilities have a limitation of 2GB.
On UnixWare 7.1.4 you do not need to do anything to get large file support, but to enable large file support on prior versions of UnixWare 7.1.x, run fsadm.
#fsadm -Fvxfs -o largefiles /#fsadm /* Note #ulimit unlimited#/etc/conf/bin/idtune SFSZLIM 0x7FFFFFFF** Note #/etc/conf/bin/idtune HFSZLIM 0x7FFFFFFF** Note #/etc/conf/bin/idbuild -B* This should report "largefiles". ** 0x7FFFFFFF represents infinity for these values.
Reboot the system using shutdown.
By default, the entries in
/etc/conf/cf.d/mtune are set as follows:
Value Default Min Max ----- ------- --- --- SVMMLIM 0x9000000 0x1000000 0x7FFFFFFF HVMMLIM 0x9000000 0x1000000 0x7FFFFFFF
To make changes to the kernel, use the idtune
name parameter command.
idtune modifies the
/etc/conf/cf.d/stune file for you. To set
the kernel values, execute the following commands as
root:
#/etc/conf/bin/idtune SDATLIM 0x7FFFFFFF#/etc/conf/bin/idtune HDATLIM 0x7FFFFFFF#/etc/conf/bin/idtune SVMMLIM 0x7FFFFFFF#/etc/conf/bin/idtune HVMMLIM 0x7FFFFFFF#/etc/conf/bin/idtune SFNOLIM 2048#/etc/conf/bin/idtune HFNOLIM 2048
Then rebuild and reboot the kernel by issuing this command:
# /etc/conf/bin/idbuild -B && init 6
To tune the system, the proper parameter values to use depend on the number of users accessing the application or database and size the of the database (that is, the used buffer pool). The following kernel parameters can be set with idtune:
SHMMAX(recommended setting: 128MB) andSHMSEG(recommended setting: 15). These parameters have an influence on the MySQL database engine to create user buffer pools.SFNOLIMandHFNOLIMshould be at maximum 2048.NPROCshould be set to at least 3000/4000 (depends on number of users).The following formulas are recommended to calculate values for
SEMMSL,SEMMNS, andSEMMNU:SEMMSL = 13
13 is what has been found to be the best for both Progress and MySQL.
SEMMNS = SEMMSL *
number of db servers to be run on the systemSet
SEMMNSto the value ofSEMMSLmultiplied by the number of database servers (maximum) that you are running on the system at one time.SEMMNU = SEMMNS
Set the value of
SEMMNUto equal the value ofSEMMNS. You could probably set this to 75% ofSEMMNS, but this is a conservative estimate.
This section lists all the environment variables that are used directly or indirectly by MySQL. Most of these can also be found in other places in this manual.
Note that any options on the command line take precedence over values specified in option files and environment variables, and values in option files take precedence over values in environment variables.
In many cases, it is preferable to use an option file instead of environment variables to modify the behavior of MySQL. See Section 4.2.3.3, “Using Option Files”.
| Variable | Description |
CXX | The name of your C++ compiler (for running configure). |
CC | The name of your C compiler (for running configure). |
CFLAGS | Flags for your C compiler (for running configure). |
CXXFLAGS | Flags for your C++ compiler (for running configure). |
DBI_USER | The default user name for Perl DBI. |
DBI_TRACE | Trace options for Perl DBI. |
HOME | The default path for the mysql history file is
$HOME/.mysql_history. |
LD_RUN_PATH | Used to specify the location of libmysqlclient.so. |
MYSQL_DEBUG | Debug trace options when debugging. |
MYSQL_GROUP_SUFFIX | Option group suffix value (like specifying
--defaults-group-suffix). |
MYSQL_HISTFILE | The path to the mysql history file. If this variable
is set, its value overrides the default for
$HOME/.mysql_history. |
MYSQL_HOME | The path to the directory in which the server-specific
my.cnf file resides (as of MySQL
5.0.3). |
MYSQL_HOST | The default host name used by the mysql command-line client. |
MYSQL_PS1 | The command prompt to use in the mysql command-line client. |
MYSQL_PWD | The default password when connecting to mysqld. Note that using this is insecure. See Section 5.3.2.2, “End-User Guidelines for Password Security”. |
MYSQL_TCP_PORT | The default TCP/IP port number. |
MYSQL_UNIX_PORT | The default Unix socket file name; used for connections to
localhost. |
PATH | Used by the shell to find MySQL programs. |
TMPDIR | The directory where temporary files are created. |
TZ | This should be set to your local time zone. See Section B.5.4.6, “Time Zone Problems”. |
UMASK | The user-file creation mode when creating files. See note following table. |
UMASK_DIR | The user-directory creation mode when creating directories. See note following table. |
USER | The default user name on Windows and NetWare used when connecting to mysqld. |
The UMASK and UMASK_DIR
variables, despite their names, are used as modes, not masks:
If
UMASKis set, mysqld uses($UMASK | 0600)as the mode for file creation, so that newly created files have a mode in the range from 0600 to 0666 (all values octal).If
UMASK_DIRis set, mysqld uses($UMASK_DIR | 0700)as the base mode for directory creation, which then is AND-ed with~(~$UMASK & 0666), so that newly created directories have a mode in the range from 0700 to 0777 (all values octal). The AND operation may remove read and write permissions from the directory mode, but not execute permissions.
MySQL assumes that the value for UMASK or
UMASK_DIR is in octal if it starts with a zero.
Perl support for MySQL is provided by means of the
DBI/DBD client interface.
The interface requires Perl 5.6.0, and 5.6.1 or later is
preferred. DBI does not work if you have an
older version of Perl.
If you want to use transactions with Perl DBI, you need to have
DBD::mysql 2.0900. If you are using the MySQL
4.1 or newer client library, you must use
DBD::mysql 2.9003 or newer. Support for
server-side prepared statements requires
DBD::mysql 3.0009 or newer.
Perl support is not included with MySQL distributions. You can obtain the necessary modules from http://search.cpan.org for Unix, or by using the ActiveState ppm program on Windows. The following sections describe how to do this.
Perl support for MySQL must be installed if you want to run the MySQL benchmark scripts; see Section 7.1.3, “The MySQL Benchmark Suite”.
MySQL Perl support requires that you have installed MySQL client programming support (libraries and header files). Most installation methods install the necessary files. However, if you installed MySQL from RPM files on Linux, be sure that you've installed the developer RPM. The client programs are in the client RPM, but client programming support is in the developer RPM.
If you want to install Perl support, the files you need can be obtained from the CPAN (Comprehensive Perl Archive Network) at http://search.cpan.org.
The easiest way to install Perl modules on Unix is to use the
CPAN module. For example:
shell> perl -MCPAN -e shell
cpan> install DBI
cpan> install DBD::mysql
The DBD::mysql installation runs a number of
tests. These tests attempt to connect to the local MySQL server
using the default user name and password. (The default user name
is your login name on Unix, and ODBC on
Windows. The default password is “no password.”) If
you cannot connect to the server with those values (for example,
if your account has a password), the tests fail. You can use
force install DBD::mysql to ignore the failed
tests.
DBI requires the
Data::Dumper module. It may be installed; if
not, you should install it before installing
DBI.
It is also possible to download the module distributions in the form of compressed tar archives and build the modules manually. For example, to unpack and build a DBI distribution, use a procedure such as this:
Unpack the distribution into the current directory:
shell>
gunzip < DBI-VERSION.tar.gz | tar xvf -This command creates a directory named
DBI-.VERSIONChange location into the top-level directory of the unpacked distribution:
shell>
cd DBI-VERSIONBuild the distribution and compile everything:
shell>
perl Makefile.PLshell>makeshell>make testshell>make install
The make test command is important because it
verifies that the module is working. Note that when you run that
command during the DBD::mysql installation to
exercise the interface code, the MySQL server must be running or
the test fails.
It is a good idea to rebuild and reinstall the
DBD::mysql distribution whenever you install
a new release of MySQL, particularly if you notice symptoms such
as that all your DBI scripts fail after you
upgrade MySQL.
If you do not have access rights to install Perl modules in the system directory or if you want to install local Perl modules, the following reference may be useful: http://servers.digitaldaze.com/extensions/perl/modules.html#modules
Look under the heading “Installing New Modules that Require Locally Installed Modules.”
On Windows, you should do the following to install the MySQL
DBD module with ActiveState Perl:
Get ActiveState Perl from http://www.activestate.com/Products/ActivePerl/ and install it.
Open a console window (a “DOS window”).
If necessary, set the
HTTP_proxyvariable. For example, you might try a setting like this:set HTTP_proxy=my.proxy.com:3128
Start the PPM program:
C:\>
C:\perl\bin\ppm.plIf you have not previously done so, install
DBI:ppm>
install DBIIf this succeeds, run the following command:
ppm>
install DBD-mysql
This procedure should work with ActiveState Perl 5.6 or newer.
If you cannot get the procedure to work, you should install the MyODBC driver instead and connect to the MySQL server through ODBC:
use DBI;
$dbh= DBI->connect("DBI:ODBC:$dsn",$user,$password) ||
die "Got error $DBI::errstr when connecting to $dsn\n";
If Perl reports that it cannot find the
../mysql/mysql.so module, the problem is
probably that Perl cannot locate the
libmysqlclient.so shared library. You
should be able to fix this problem by one of the following
methods:
Compile the
DBD::mysqldistribution withperl Makefile.PL -static -configrather thanperl Makefile.PL.Copy
libmysqlclient.soto the directory where your other shared libraries are located (probably/usr/libor/lib).Modify the
-Loptions used to compileDBD::mysqlto reflect the actual location oflibmysqlclient.so.On Linux, you can add the path name of the directory where
libmysqlclient.sois located to the/etc/ld.so.conffile.Add the path name of the directory where
libmysqlclient.sois located to theLD_RUN_PATHenvironment variable. Some systems useLD_LIBRARY_PATHinstead.
Note that you may also need to modify the -L
options if there are other libraries that the linker fails to
find. For example, if the linker cannot find
libc because it is in
/lib and the link command specifies
-L/usr/lib, change the -L
option to -L/lib or add -L/lib
to the existing link command.
If you get the following errors from
DBD::mysql, you are probably using
gcc (or using an old binary compiled with
gcc):
/usr/bin/perl: can't resolve symbol '__moddi3' /usr/bin/perl: can't resolve symbol '__divdi3'
Add -L/usr/lib/gcc-lib/... -lgcc to the link
command when the mysql.so library gets
built (check the output from make for
mysql.so when you compile the Perl client).
The -L option should specify the path name of
the directory where libgcc.a is located on
your system.
Another cause of this problem may be that Perl and MySQL are not both compiled with gcc. In this case, you can solve the mismatch by compiling both with gcc.
You may see the following error from
DBD::mysql when you run the tests:
t/00base............install_driver(mysql) failed: Can't load '../blib/arch/auto/DBD/mysql/mysql.so' for module DBD::mysql: ../blib/arch/auto/DBD/mysql/mysql.so: undefined symbol: uncompress at /usr/lib/perl5/5.00503/i586-linux/DynaLoader.pm line 169.
This means that you need to include the -lz
compression library on the link line. That can be done by
changing the following line in the file
lib/DBD/mysql/Install.pm:
$sysliblist .= " -lm";
Change that line to:
$sysliblist .= " -lm -lz";
After this, you must run make realclean and then proceed with the installation from the beginning.
If you want to install DBI on SCO, you have to edit the
Makefile in
DBI-xxx and each subdirectory. Note
that the following assumes gcc 2.95.2 or
newer:
OLD: NEW: CC = cc CC = gcc CCCDLFLAGS = -KPIC -W1,-Bexport CCCDLFLAGS = -fpic CCDLFLAGS = -wl,-Bexport CCDLFLAGS = LD = ld LD = gcc -G -fpic LDDLFLAGS = -G -L/usr/local/lib LDDLFLAGS = -L/usr/local/lib LDFLAGS = -belf -L/usr/local/lib LDFLAGS = -L/usr/local/lib LD = ld LD = gcc -G -fpic OPTIMISE = -Od OPTIMISE = -O1 OLD: CCCFLAGS = -belf -dy -w0 -U M_XENIX -DPERL_SCO5 -I/usr/local/include NEW: CCFLAGS = -U M_XENIX -DPERL_SCO5 -I/usr/local/include
These changes are necessary because the Perl dynaloader does not
load the DBI modules if they were compiled
with icc or cc.
If you want to use the Perl module on a system that does not
support dynamic linking (such as SCO), you can generate a static
version of Perl that includes DBI and
DBD::mysql. The way this works is that you
generate a version of Perl with the DBI code
linked in and install it on top of your current Perl. Then you
use that to build a version of Perl that additionally has the
DBD code linked in, and install that.
On SCO, you must have the following environment variables set:
LD_LIBRARY_PATH=/lib:/usr/lib:/usr/local/lib:/usr/progressive/lib
Or:
LD_LIBRARY_PATH=/usr/lib:/lib:/usr/local/lib:/usr/ccs/lib:\
/usr/progressive/lib:/usr/skunk/lib
LIBPATH=/usr/lib:/lib:/usr/local/lib:/usr/ccs/lib:\
/usr/progressive/lib:/usr/skunk/lib
MANPATH=scohelp:/usr/man:/usr/local1/man:/usr/local/man:\
/usr/skunk/man:
First, create a Perl that includes a statically linked
DBI module by running these commands in the
directory where your DBI distribution is
located:
shell>perl Makefile.PL -static -configshell>makeshell>make installshell>make perl
Then, you must install the new Perl. The output of make perl indicates the exact make command you need to execute to perform the installation. On SCO, this is make -f Makefile.aperl inst_perl MAP_TARGET=perl.
Next, use the just-created Perl to create another Perl that also
includes a statically linked DBD::mysql by
running these commands in the directory where your
DBD::mysql distribution is located:
shell>perl Makefile.PL -static -configshell>makeshell>make installshell>make perl
Finally, you should install this new Perl. Again, the output of make perl indicates the command to use.