| Oracle® VM User's Guide Release 3.0 for x86 Part Number E18549-03 |
|
|
PDF · Mobi · ePub |
| Oracle® VM User's Guide Release 3.0 for x86 Part Number E18549-03 |
|
|
PDF · Mobi · ePub |
To set up and configure the storage providers for your Oracle VM environment you need to be aware of the concepts and design ideas behind the entire storage architecture. That is precisely the information provided in the first topics of this chapter. Next, you will find the necessary instructions to prepare, configure and start using storage elements with Oracle VM.
The topics covered in this chapter are:
For information on managing and working with the contents of a storage repository, such as virtual machine templates, ISO files, assemblies, and so on, see Section 8.5, "Virtual Machine Resources".
The particular way in which Oracle VM approaches storage is through plug-ins: Oracle has made storage configuration and integration as flexible and modular as possible by creating a Storage Connect plug-in for each different category and type of storage. These plug-ins are discussed in further detail in Section 5.3, "Storage Connect Plug-ins".
Storage in Oracle VM refers to two different types of disk storage: the space available for environment resources such as templates and ISO files, and the logical or physical disks used by virtual machines.
Note:
In addition there is also disk space used for the pool file systems of clustered server pools, but that is not the focus of this section.For virtual machine disks Oracle VM offers you two choices:
Virtual disks: disk image files on a file system.
Raw physical disks: LUNs accessed directly by the virtual machine.
The design decision of virtual versus physical storage access depends on your server virtualization use cases as well as the existing storage hardware at your disposal. Virtual storage enables quick and easy on-the-fly configuration but introduces a higher level of abstraction. Physical storage access implies that virtual machine disk storage is mapped directly onto the LUNs configured in the physical storage hardware, which is exactly like the way physical servers access their storage. The advantage here is that existing procedures and storage management practices can be maintained.
Storage can be configured locally, specifically using an OCFS2 file system on a local disk of the Oracle VM Server. However, it is far more performant and reliable to use a separate location for a storage repository, so that it can be addressed by and attached to all Oracle VM Servers in the server pool. This is also essential for live migration and HA configurations. Storage is configured with any of the following technologies:
Local disks
Shared Network Attached Storage - NFS
Shared iSCSI SANs: abstracted LUNs or raw disks accessible over existing network infrastructure
Fibre Channel SANs connected to one or more host bus adapters (HBAs)
Note:
OCFS2 (Oracle Cluster File System) is used in all these storage configurations except for server pools with no clustering enabled.To enable HA or live migration, you must make sure all Oracle VM Servers have access to the same storage resources. Specifically for live migration the Oracle VM Servers also must be part of the same server pool. Also note that server pools require access to a shared file system where server pool information is stored and retrieved, for example in case of failure and subsequent server role changes. The server pool file system can either be on an NFS share or on a LUN of a storage array. For more information about setting up file servers and storage arrays, see Section 5.6, "Preparing and Configuring Storage".
Oracle VM was designed to allow you to use a wide variety of storage types so you can adapt your configuration to your needs. Whether you have a limited hardware setup or a full rack of servers, whether you perform an installation for testing and temporary internal use or design a production environment that requires high availability in every area, Oracle VM offers support for a suitable storage solution.
Making use of both generic and vendor-specific Storage Connect plug-ins, Oracle VM allows you to use the following types of storage:
Local storage consists of hard disks installed locally in your Oracle VM Server. In a default installation, Oracle VM Server will only use the first disk (/dev/sda), leaving other disks available for storage.
As long as no partition and data are present the device will be detected as a raw disk. The choice is yours to use the local disks either to provision logical storage volumes as disks for virtual machines or to install a storage repository. If you place a storage repository on the local disk, an OCFS2 file system is installed.
Note:
Local storage can never be used for a server pool file system.Local storage is fairly easy to set up because no special hardware for the disk subsystem is required. Since the virtualization overhead in this setup is limited, and disk access is internal within one physical server, local storage offers reasonably high performance.
However, the downsides are quickly revealed when you think about configurations with multiple Oracle VM Servers. Local storage by definition remains local and cannot be shared between different servers. Therefore, even if you set up a pool of multiple servers and use the advantages of clustering, virtual machines using local storage can never benefit from high availability: they cannot be migrated from one server to another.
Note:
In Oracle VM, sharing a local physical disk between VMs is possible but not recommended.Network Attached Storage – typically NFS – is a commonly used file-based storage system that is very suitable for the installation of Oracle VM storage repositories. Storage repositories contain various categories of resources such as templates, virtual disk images, DVD iso files and virtual machine configuration files, which are all stored as files in the directory structure on the remotely located, attached file system.
With Oracle VM you discover NFS storage via the server IP or host name and typically present storage to all the servers in a server pool to allow them to share the same resources. This, along with clustering, helps to enable high availability of your environment: virtual machines can be easily migrated between host servers for the purpose of load balancing or protecting important virtual machines from going offline due to hardware failure.
NFS storage is exposed to Oracle VM Servers in the form of shares on the NFS server which are mounted onto the Oracle VM Server's file system. Since mounting an NFS share can be done on any server in the network segment to which NFS is exposed, it is possible not only to share NFS storage between servers of the same pool but also across different server pools.
In terms of performance, NFS is slower for virtual disk I/O compared to a logical volume or a raw disk. This is due mostly to its file-based nature. For better disk performance you should consider using block-based storage, which is supported in Oracle VM in the form of iSCSI or Fibre Channel SANs.
With Internet SCSI, or iSCSI, you can connect storage entities to client machines, making the disks behave as if they are locally attached disks. iSCSI enables this connectivity by transferring SCSI commands over existing IP networks between what is called an initiator (the client) and a target (the storage provider).
To establish a link with iSCSI SANs, all Oracle VM Servers can use configured network interfaces as iSCSI initiators. It is the user's responsibility to:
configure the disk volumes (iSCSI LUNs) offered by the storage servers
discover the iSCSI storage through Oracle VM Manager
set up access groups, which are groups of iSCSI initiators, through Oracle VM Manager, in order to determine which LUNs are available to which Oracle VM Servers
Performance-wise an iSCSI SAN is better than file-based storage like NFS and it is often comparable to direct local disk access. Because iSCSI storage is attached from a remote server it is perfectly suited for a clustered server pool configuration where high availability of storage and the possibility to live migrate virtual machines are important factors.
Provisioning of iSCSI storage can be done through open source target creation software at no additional cost, with dedicated high-end hardware or with anything in between. The generic iSCSI Storage Connect plug-in allows Oracle VM to use virtually all iSCSI storage providers. In addition, vendor-specific Storage Connect plug-ins exist for certain types of dedicated iSCSI storage hardware, allowing Oracle VM Manager to access additional interactive functionality otherwise only available through the management software of the storage provider. Examples are creating and deleting LUNs, extending existing LUNs and so on. Check with your storage hardware supplier if a Storage Connect plug-in is available. For installation and usage instructions, consult your supplier's plug-in documentation.
Functionally, a fibre channel SAN is hardly different from an iSCSI SAN. Fibre channel is actually older technology and uses dedicated hardware instead: special controllers on the SAN hardware, host bus adapters or HBAs on the client machines, and special fibre channel cables and switches to interconnect the components.
Like iSCSI, the Fibre Channel Protocol (FCP) is used to transfer SCSI commands between initiators and targets and establishes a connectivity that is almost identical to direct disk access. The same concepts from the iSCSI SAN, as described above, apply equally to the Fibre Channel SAN. Again, generic and vendor-specific Storage Connect plug-ins exist. Your storage hardware supplier will provide proper documentation with the Storage Connect plug-in.
Oracle VM Manager communicates with all storage through a set of plug-ins named Storage Connect. These plug-ins are not actually run from the Oracle VM Manager but rather live on some or all of the Oracle VM Servers. You can see these plug-in files in the local file system of an Oracle VM Server in the /opt/storage-connect/ directory. In the user interface of Oracle VM Manager you select an available plug-in when creating and configuring storage elements for use in your environment.
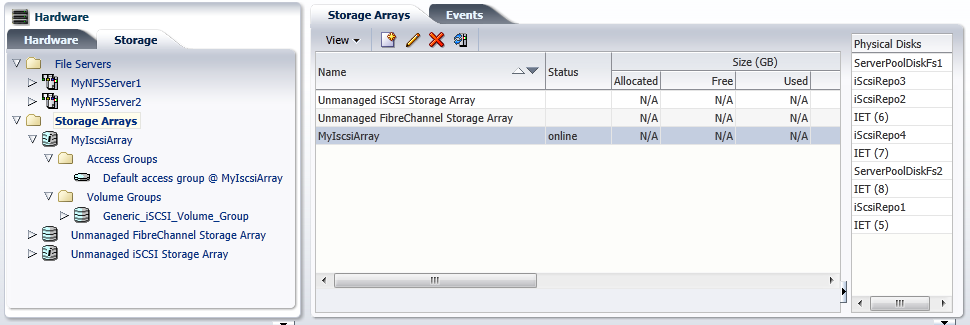
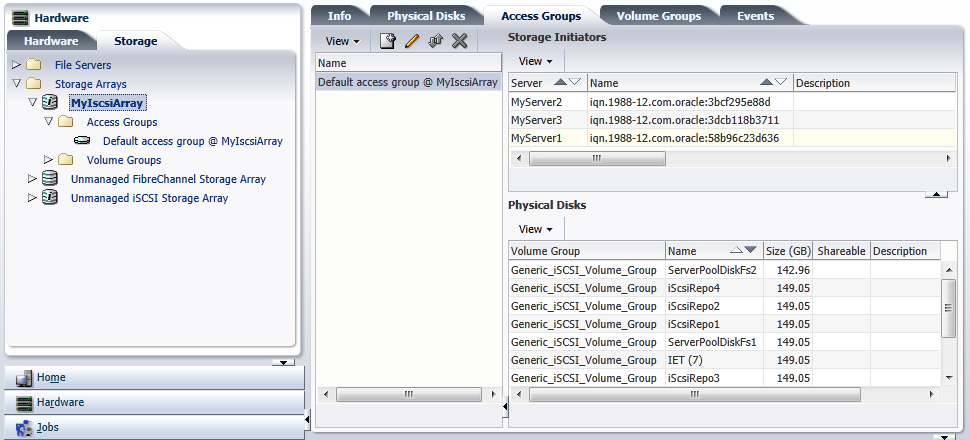
As you can see in the Storage tab of the Hardware view in Figure 5-1, storage elements are logically divided in File Servers and Storage Arrays. This distinction refers to the difference between file-based storage and block-based storage, or raw disks. Both types of storage are supported and Storage Connect plug-ins are available for each category described in Section 5.2, "Storage Types".
Furthermore, Storage Connect plug-ins are split up according to the functionality they offer: there are generic plug-ins and non-generic plug-ins, also referred to as vendor-specific plug-ins. Generic plug-ins offer a limited set of standard storage operations on virtually all storage hardware, such as discovering and operating on existing storage resources. We categorize these operations as 'passive' in the sense that they do not interact with the storage management but simply detect the available storage architecture and allow it to be used in the Oracle VM environment.
Vendor-specific plug-ins include a much larger set of operations, which also includes direct, active interventions on the storage hardware: snapshot, clone, create LUNs, resize, and so on. To execute generic storage plug-in operations, only an access host or fibre channel connectivity is required (for iSCSI: typically a host name or IP address with a port number). The non-generic plug-in operations require an additional admin host, with optional administrative user name and password, granting Oracle VM Manager direct access to the configuration of the storage hardware.
Vendor-specific (non-generic) storage connect plug-ins are available directly from your storage vendor.
Storage connect plug-ins are delivered as an RPM, usually a single RPM, but your storage vendor may provide multiple RPMs. When you have the storage connect plug-in RPM from your storage vendor, install the RPM on your Oracle VM Servers.
Note:
You must install the RPM on all the Oracle VM Servers that will use the particular storage.To install the storage plug-in RPM, on the command line of the Oracle VM Server, enter
# rpm -ivh filename.rpm
If you are upgrading an existing storage connect plug, use the RPM upgrade parameter:
# rpm -Uvh filename.rpm
Read the install and configuration documentation for the storage connect plug-in from your storage vendor before you install and use it. There may be extra configuration required that is not documented here.
For file-based storage abstraction, Oracle VM uses the concept of storage repositories. A storage repository is essentially logical disk space made available through a file system on top of physical storage hardware. If the storage repository is created on a file server, for example an NFS share, then a file system is already present; if the repository is created on a LUN, an OCFS2 file system is created first.
A storage repository defines where Oracle VM resources may reside. Resources include virtual machine configuration files, templates for virtual machine creation, virtual machine assemblies, ISO files (DVD image files), shared and unshared virtual disks, and so on.
Before you begin configuring a storage repository, make sure that these requirements are met:
NFS-based repository: At least one Oracle VM Server must be discovered. For the creation of the storage repository the Oracle VM Agent on the server will act as the worker component performing the instructions given through Oracle VM Manager.
LUN-based repository: By design, a storage repository on a LUN is linked to a clustered server pool, because of the nature of the OCFS2 file system it uses. Consequently, a server pool must exist with clustering enabled, and at least one server must be present in the clustered pool.
A repository on a local server storage also belongs in this category, since local disks are always discovered as LUNs. For more information about local storage and repositories, see Section 5.6.4, "Using Local Storage".
Note:
Only NFS storage repositories can be shared by multiple server pools.For detailed instructions about the configuration and management of storage repositories, see Section 5.8, "Preparing and Configuring Storage Repositories".
It is important to plan your storage configuration in advance of deploying virtual infrastructure. Here are some guidelines to keep in mind:
Take care when adding, removing, and resizing LUNs as it may require a physical server reboot. Do not resize LUNs that are used as part of Logical disks; instead, create a new LUN and add it to the disk group.
Test your configuration, especially failover, in a test environment before rolling into production. If your (SAN) array firmware is at a different release number than we have tested, confirm whether there are any differences. You may need to make changes to the multipath configuration files of Oracle VM Server.
Plan the size and type of storage that you are using by workload. For example:
Boot volumes can typically be on higher capacity drives as most operating systems have minimal I/O activity on the boot disk, but some of that I/O is memory paging, which is sensitive to response times.
Applications can be on larger, slower drives (e.g. RAID 5) unless they perform a lot of I/O. Write-intensive workloads should use RAID 10 on medium to fast drives. Ensure that log files are on different physical drives than the data they are protecting.
Infrastructure servers such as DNS tend to have low I/O needs. These servers can have larger, slower drives.
If using storage server features such as cloning and snapshots, use raw disks.
While it may be tempting to create a very large LUN when using logical disks, this can be detrimental to performance as each virtual machine queues I/Os to the same disks. Oracle recommend that storage repositories do not exceed 2TB.
Be sure to leave some disk space available to create smaller storage entities of, at least, 12GB each to use as server pool file systems. The server pool file system is used to hold the server pool and cluster data, and is also used for cluster heartbeating. You create space for server pool file systems the same way as you create storage entities for storage repositories. For more information about the use and management of clusters and server pools, see Chapter 7, "Managing Server Pools".
Place server pool file systems on a separate NFS server or use a small LUN, if possible. The OCFS2 heartbeating function can be disturbed by I/O-intensive operations on the same physical storage. For example: importing a template or cloning a VM in a storage repository on the same NFS server where the server pool file system resides may cause a time-out in the heartbeat communication, which in turn leads to server fencing and reboot. To avoid unwanted rebooting, it is recommended that you choose a server pool file system location with sufficient and stable I/O bandwidth.
As described in Section 5.1, "Storage Overview", Oracle VM Manager distinguishes between File Servers and Storage Arrays in the Storage tab of the Hardware view. Depending on your hardware and networking configuration, external storage may be detected during discovery of the Oracle VM Servers or a rescan of their physical disks. Local storage is always detected during this discovery operation.
An external storage element is created on storage hardware: a server configured for NAS offering NFS shares, generic iSCSI targets and LUNs, or SAN devices from your preferred storage vendors. The server or disk subsystem offering the storage simply needs to be reachable by the Oracle VM Servers in the Oracle VM environment through a Fibre Channel or Ethernet network. The external storage is offered as a mount point (NFS share) or LUN (iSCSI and fibre channel) which can be discovered through Oracle VM Manager as a potential location for a repository, or a raw disk for use with a VM.
The typical way to attach external storage to the Oracle VM environment is to create a new storage entity in Oracle VM Manager and point to the location of the external storage provider while selecting the appropriate Storage Connect plug-in.
Subsequently, you may choose to configure a storage repository on one or more of the discovered storage entities in order to make storage resources available to servers and server pools in the Oracle VM environment.
These preparation and configuration steps are covered in the following topics:
Storage repository configuration is covered in Section 5.8, "Preparing and Configuring Storage Repositories".
In Oracle VM, the term file server is used to indicated file-based storage made available to the environment from another physical server, as opposed to local storage. Describing the technology used to expose file systems, NFS shares and so on, is beyond the scope of this guide. The procedure below explains how you can bring the exposed file-based storage into Oracle VM, prepare it for the installation of a storage repository, and configure the file server and discovered file systems.
To register a file server:
Make sure that your storage server exposes a writable file system (through an NFS share or a Sun ZFS storage pool) to the storage network of your server pool.
In Oracle VM Manager open the Hardware view and open the Storage tab in the navigation pane.
In the navigation pane, select and right-click File Servers, then select Register File Server. The Register File Server dialog box is displayed, where you enter the information necessary for Oracle VM Manager to discover the external storage mount points.
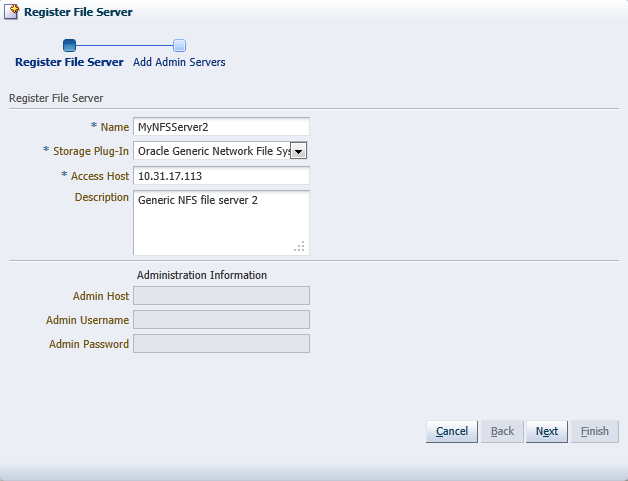
Always enter the following information:
Name: the name you wish to use to identify the file server
Storage Plug-in: the storage plug-in corresponding to the type of file server (generic NFS or vendor-specific)
Access Host: the host name or IP address of the server offering the file system
Description: optional information you would like to add about this file server
If you are adding a non-generic file server, for example a Sun ZFS Storage Appliance, also enter the additional plug-in options to enable Oracle VM Manager to access the file server's configuration management functions:
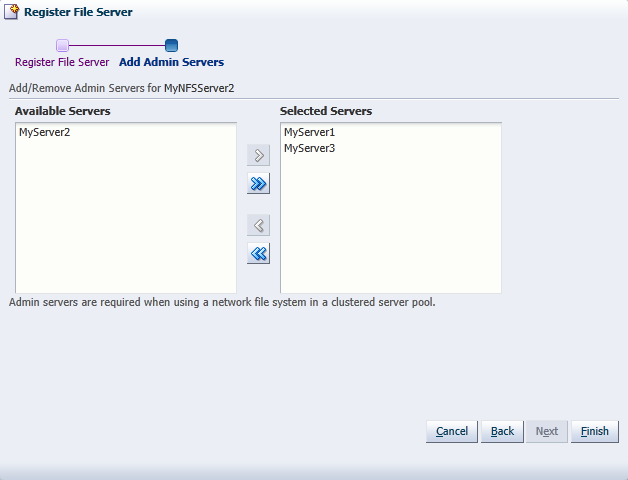
Click Next to proceed to the admin server selection screen. If you are working with a non-clustered server pool, you may skip this screen.
Use the arrow buttons to move the required Oracle VM Servers to the Selected Servers box. Click Finish to complete the file server registration.
The new file server appears in the navigation pane, under File Servers.
Note:
If you created shares to be used as server pool file systems, these are discovered in the same process. Since these file systems are relatively small, be sure to keep those available for the server pools and create storage repositories on the higher capacity file systems.At the end of the file server registration a discovery operation is triggered for the file systems available on the file server. When the operation is complete, the available file systems appear in the navigation pane, under the file server to which they belong. The file systems also show up to the right of the File Servers overview table when you select that particular file server.
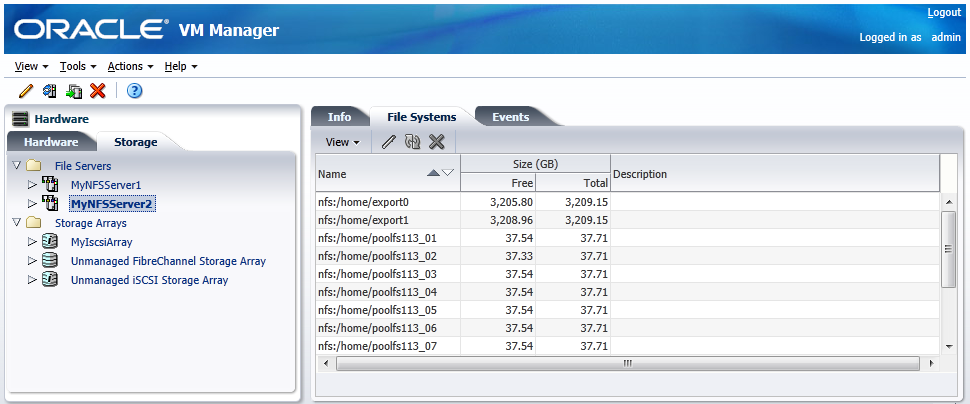
Your file server and file systems are now ready to be used either for storage repositories or as server pool file systems. A server pool file system is selected during the creation of the server pool; to create storage repositories on your file systems, see Section 5.8, "Preparing and Configuring Storage Repositories".
Of course, you can always make changes to the storage configuration you just registered. The steps and options to do so are described below.
To change the registered file server configuration:
If you need to modify a file server, select it in the tree structure in the navigation pane, right-click it and choose one of these options:
Edit File Server: change file server settings such as name, access host, description and plug-in options
Refresh File Server: request an update of the file server configuration in case changes have been made to the disks and file systems
Add/Remove Admin Server: determine which Oracle VM Servers are responsible for information exchange with this file server
Delete File Server: remove the selected file server from your Oracle VM environment
If you need to modify a file system, expand the file server it belongs to, select it in the tree structure in the navigation pane, right-click it and choose one of these options:
Edit File System: change the name and description of the file system
Refresh File System: request an update of the file system information to see if changes have been made to the size and contents
Delete File System: stop using the selected file system in your Oracle VM environment
The purpose of listing unmanaged storage arrays is that Oracle VM warns you when it detects storage in the environment for which no particular management mechanism is available or in case the appropriate management mechanism cannot be determined. In other words, the unmanaged storage arrays, for iSCSI and for fibre channel, are placeholders for physical disks of which the appropriate location in the storage management tree is unclear.
It should be noted that the unmanaged arrays behave differently for iSCSI and fibre channel. For iSCSI the use of the unmanaged array in practice is temporary, but for fibre channel the situation is different. Because generic fibre channel arrays are simply detected when they are connected to the storage network, there is no mechanism to place them under a separate storage array based on a specific access host. Consequently, generic fibre channel LUNs will remain in the unmanaged fibre channel storage array, which has no access group.
You may choose to delete the unmanaged storage elements from the Oracle VM environment in case you do not intend to use it. In the case of generic iSCSI storage arrays, it is preferable to register them in the correct way by following the procedures in Section 5.6.3, "Registering and Configuring Storage Arrays". To properly register the storage entries, you should remove them from the unmanaged array. After registration these entries are displayed under a managed storage array of the appropriate type.
Vendor-specific storage, which does not use a generic Storage Connect plug-in, must always be registered with its dedicated plug-in and appears under its own storage array entry in the storage management tree.
In Oracle VM, the term storage array is used to indicate block-based storage made available to the environment from another physical server or possibly as local storage. Describing the technology used to expose raw disk space in the form of iSCSI targets and LUNs or the configuration of a SAN (storage attached network), is beyond the scope of this guide. The procedure below explains how you can bring the exposed block-based storage into Oracle VM and configure the storage array and physical disks either for the installation of a storage repository or direct attachment as physical disk to a VM (virtual machine).
Note:
Oracle VM has a default Unmanaged Fibre Channel Storage Array. Since only a single generic fibre channel storage array can exist, no additional arrays of this type can be created. Consequently, the instructions below apply to storage arrays using the following types of Storage Connect plugins:generic iSCSI
vendor-specific iSCSI
vendor-specific fibre channel
The end-to-end procedure is broken down into three phases, discussed in the following sections:
This first phase covers purely the registration part, meaning how you discover the container of the storage elements you intend to use in your environment.
To register a storage array:
Make sure that your storage server exposes raw disks (Fibre Channel SAN volumes, iSCSI targets and LUNs) to the storage network of your server pool.
In Oracle VM Manager open the Hardware view and open the Storage tab in the navigation pane.
In the navigation pane, select and right-click Storage Arrays, then select Register Storage Array. The Register Storage Array dialog box is displayed, where you enter the information necessary for Oracle VM Manager to discover the external storage elements.
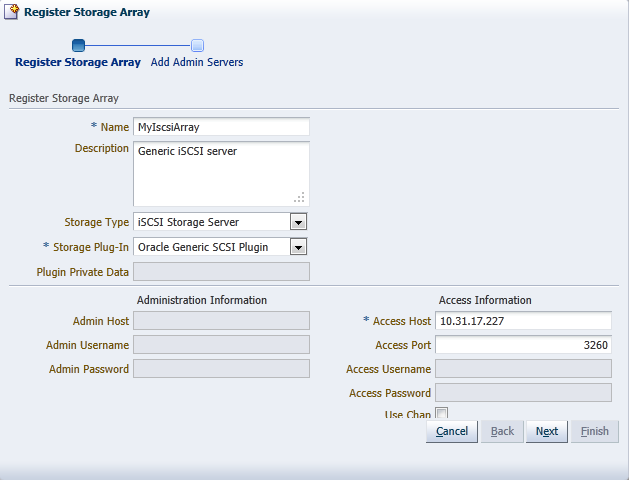
Enter the following information:
Name: the name you wish to use to identify the storage array
Description: optional information you would like to add about this storage array
Storage Type: the array is either a SAN or an iSCSI storage server
Storage Plug-in: the storage plug-in corresponding to the type of storage array, which is either generic iSCSI, or a vendor-specific iSCSI or fibre channel plug-in
Access Host: the host name or IP address of the server or SAN hardware offering the storage elements
Note:
This is not applicable to fibre channel storage arrays.Depending on the selected storage type and plug-in, you may be required to enter additional information when registering your storage array:
Table 5-1 Required Information for Registering Different Storage Types
| Information Field Required | generic iSCSI | vendor-specific iSCSI | generic Fibre Channel | vendor-specific Fibre Channel |
|---|---|---|---|---|
|
Access host and port |
yes |
yes |
no |
no |
|
Access credentials/Chap |
no |
optional |
no |
no |
|
Administration information |
no |
yes |
no |
yes |
|
Plug-in private data |
no |
optional |
no |
optional |
Note:
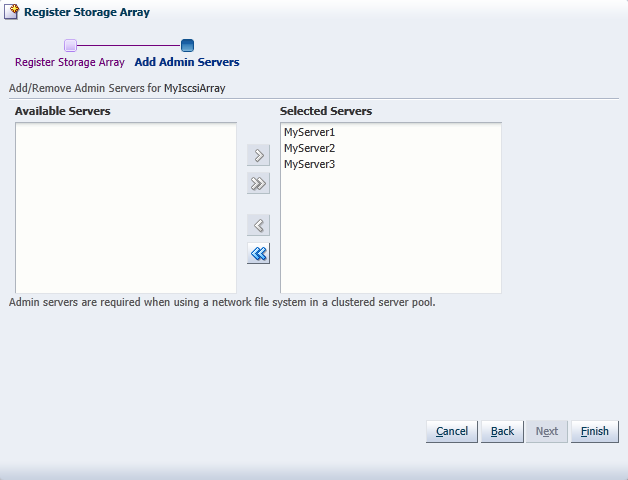
When registering a vendor-specific storage array, be sure to double-check the information you entered in the plug-in private data field. Once the storage array is registered, this field can no longer be modified. If you need to update the plug-in private data, you must unregister and re-register the storage array.Click Next to proceed to the admin server selection screen. If you are working with a non-clustered server pool, you may skip this screen.
Use the arrow buttons to move the required Oracle VM Servers to the Selected Servers box. Click Finish to complete the storage array registration.
The new storage array appears in the navigation pane, under Storage Arrays. At this point, the Storage Connect plug-in has established a link to the storage location. No new storage elements have been detected yet.
To discover the physical disks on the storage array, select it and click Refresh Storage Array. You can select the storage array either in the navigation pane or in the Storage Arrays management pane.
When the operation is complete, the available physical disks appear in the navigation pane, under the storage array and volume group to which they belong. The physical disks also show up to the right of the Storage Arrays overview table when you select that particular array.
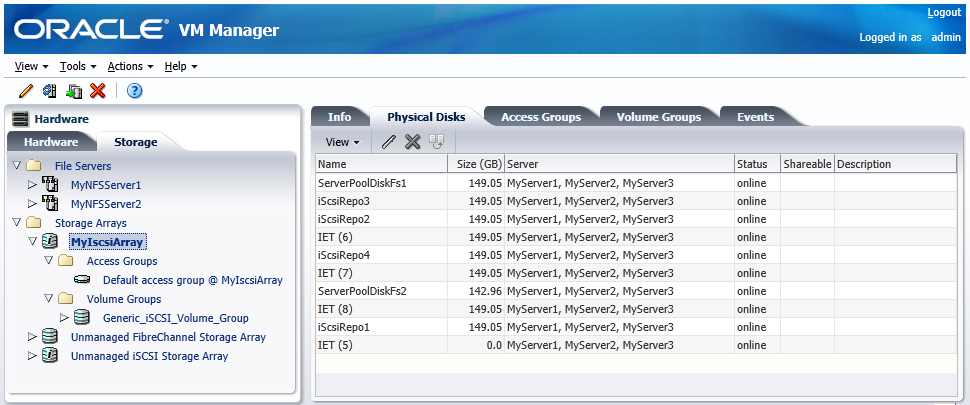
At this point the discovery phase of your storage array is complete: physical disks show up in the Storage tab of the Hardware view. However, the Oracle VM Servers have no access to this storage yet. You must first configure access to physical disks through access groups. The exception to this rule is again the unmanaged fibre channel storage array, which offers its LUNs to all Oracle VM Servers connected to the fibre channel storage network.
This section explains the second phase of storage array configuration, which is how you make the discovered storage usable by your Oracle VM Servers.
Except for generic storage arrays, it is possible to create multiple access groups in order to arrange and restrict physical disk access according to your requirements. The generic iSCSI storage arrays have a single access group available by default, where you can simply add or remove storage initiators from your Oracle VM Servers.
Note that generic fibre channel storage has no access groups and is always listed under the Unmanaged Fibre Channel Storage Array.
Select the appropriate procedure for your type of storage array.
To configure an access group for a non-generic iSCSI storage array:
In the navigation pane under the Storage tab, select your storage array and go to the Access Groups tab, or select Access Groups directly under the storage array in the tree structure.
Click the Create Access Group button in the toolbar. The Create Access Group dialog box appears. It contains the available storage initiators for this type of storage on the Oracle VM Servers in your environment.
Enter a name for your new access group and optionally provide a description.
Use the arrow buttons to move the required initiators to the Selected Storage Initiators box.
Click OK to create the new access group with the selected initiators. The new access group now appears in the Access Groups tab. When you select the access group, its initiators appear in the Storage Initiators table.
Select the access group and click Present/Unpresent Physical Disk. A dialog box appears with the available physical disks in the volume groups of the current storage array.
Use the arrow buttons to move the required disks to the Selected Physical Disks box. Click OK to present the selected disks to the current access group.
After configuring the access group it is advisable to refresh the storage array to make sure that the current storage layout and access rules are in effect.
The selected physical disks in your non-generic storage array are now available to the Oracle VM Servers in this access group. The access group configuration of a generic iSCSI storage array is much simpler, as you can see below.
To configure the access group for a generic iSCSI storage array:
In the navigation pane under the Storage tab, select your storage array and go to the Access Groups tab, or select Access Groups directly under the storage array in the tree structure.
The default access group for this storage array is already present, and all discovered physical disks in the generic storage array are listed.
Select the default access group and click the Edit Access Group button in the toolbar. The Edit Access Group dialog box appears. It contains the available storage initiators for this type of storage on the Oracle VM Servers in your environment.
You cannot modify the name of the default access group, but if required, provide a description for the access group.
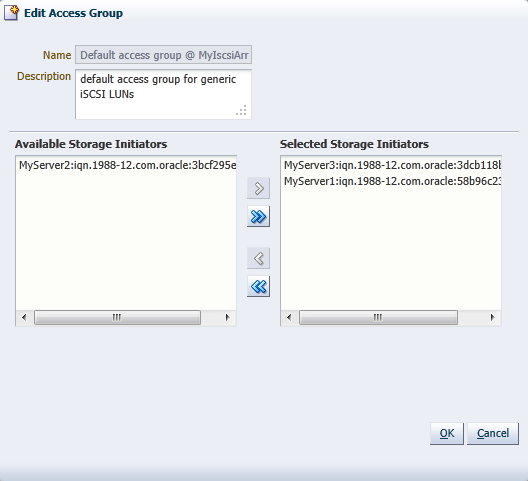
Use the arrow buttons to move the required initiators to the Selected Storage Initiators box.
Click OK to save your changes to the default access group. When you select the access group in the Access Groups tab, its initiators appear in the Storage Initiators table. The disks listed in the Physical Disks table are all automatically presented to the selected Oracle VM Servers.
After configuring the access group it is advisable to refresh the storage array to make sure that the current storage layout and access rules are in effect.
The Oracle VM Servers in this access group now have the necessary permissions to use the physical disks of the storage array; they can be deployed either as disks for virtual machines (VMs) or for storage repositories. To create storage repositories on your physical disks, see Section 5.8, "Preparing and Configuring Storage Repositories".
Of course, you can always make changes to the storage configuration you just registered. The steps and options to do so are described below.
Note:
In this section we consistently use the tree view in the navigation pane to access various storage elements at different levels. You can also reach these elements through the different tabs available to you when you select the storage array in the navigation pane.The third and final phase of this section discusses the update options available after a storage array has been registered through Oracle VM Manager.
To change the registered storage array configuration:
If you need to modify a storage array, select it in the tree structure in the navigation pane, right-click it and choose one of these options:
Edit Storage Array: change storage array settings such as name, description, access host and port.
Refresh Storage Array: request an update of the storage array configuration in case changes have been made to the available physical disk configuration
Delete Storage Array: remove the selected storage array from your Oracle VM environment
If you need to modify a physical disk on a storage array, expand the storage array and volume group, select the item in the tree structure in the navigation pane, right-click it and choose one of these options:
Edit Physical Disk: change the name and description of the physical disk or make it shareable
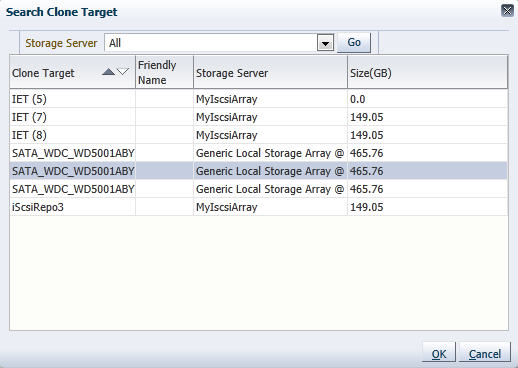
Clone Physical Disk: create a thin clone, sparse copy or non-sparse copy of the physical disk on the selected target. The options are explained in the table below:
| Clone Target | Thin Clone | Sparse Copy | Non-sparse Copy |
|---|---|---|---|
| Physical Disk | Yes | ||
| Storage Array | Yes | ||
| Storage Repository | Yes | Yes |
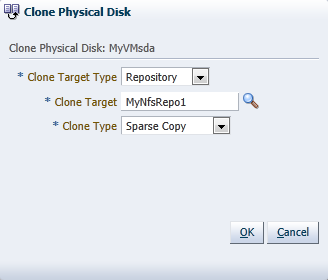
This applies specifically to a physical disk; for more information about VM cloning, see Section 8.8, "Cloning a Virtual Machine or Template".
For a definition of these clone target types, see Glossary.
Delete: stop using the selected physical disk in your Oracle VM environment
WARNING:
If you effectively delete a LUN from a registered storage array, make sure that you delete it in Oracle VM Manager first, before you physically delete it from the storage server. If you do not respect this order of operations, the system will go into an unknown state, which can only be resolved by rebooting the Oracle VM Servers the deleted LUN is connected to.
If you need to modify the way Oracle VM Servers access the physical disks in your storage array, expand the storage array and access groups, select the access group in the tree structure in the navigation pane, right-click it and choose one of these options:
Edit Access Group: change access group settings such as name, description, and selected storage initiators
Present/Unpresent Physical Disk: change the selection of physical disks to which this access group has access
Delete: remove the selected access group configuration
Note:
For generic iSCSI storage arrays, only the selected storage initiators can be modified. Other properties cannot be changed.If an Oracle VM Server has unused hard disks, they can be used as local storage for your environment. On condition that these spare disks are completely empty, meaning they have no partitions or file systems, they are included automatically in the local storage array of the Oracle VM Server.
Note that local storage arrays are not listed under the Storage tab of the Hardware view. You can, however, see the local storage entities in locations where you can use them; for example when you create a storage repository, select a physical disk for a VM, list the physical disks accessible to an Oracle VM Server, or select a physical clone target.
Local storage has the advantage that it is fast and easy to use, but users must be aware that there is no possibility to share this type of storage and that it cannot be used in a high-availability configuration. Consequently, if you need to store important data and run important VMs that require virtually uninterrupted uptime with a high degree of data loss prevention, it is recommended not to use local storage but to invest in attached storage with proper redundancy instead.
In addition, local storage lacks flexibility in a clustered setup with multiple Oracle VM Servers in a server pool. Resources and VM disks that live on local storage cannot be shared with other servers, even if they are within the same server pool. This means that you cannot use a template, ISO or VM disk stored on a local repository on another Oracle VM Server, and that live migration of VMs with locally stored disks is impossible. We strongly advise you to take this into account when designing your Oracle VM environment.
The configuration where local storage is most useful is where you have an unclustered server pool that contains only one Oracle VM Server. By configuring a storage repository (see Section 5.8, "Preparing and Configuring Storage Repositories") on local storage you can set up an Oracle VM virtualized environment quickly and easily on a single server: all your resources, VMs and their disks are stored locally. Since there is only one Oracle VM Server, access to resources is guaranteed.
Note:
Some properties of local storage elements may be edited through the Oracle VM Server management pane: go to the Hardware view, select the applicable server and open the Physical Disks tab in the management pane. Disks available to this server are displayed.Before you can remove a storage server, you should delete any storage repositories and server pool file systems on it.
If there is a storage repository on the storage server, all virtual machine resources such as virtual machine templates, virtual disks, assemblies and ISO files must be removed from the repository. If the storage repository is on a file server (NFS server), you should also release ownership of the storage repository before you delete the repository. Deleting an unowned storage repository only removes it from the Oracle VM Manager database; it does not delete any files in the repository. If the storage repository is on a storage array (physical disk), all of the contents of the storage repository must be deleted. Then the file system on which the storage repository resides must also be deleted.
If there is a server pool file system on the storage server, the server pool must be deleted to delete the server pool file system.
The storage server may now be shut down and decommissioned.
For more information on working with virtual machine resources, see Section 8.5, "Virtual Machine Resources". For more information on deleting a server pool, see Section 7.7.5, "Deleting a Server Pool". For more information on releasing ownership of a storage repository, see Section 5.8.3, "Editing a Storage Repository". For more information on deleting a storage repository, see Section 5.8.4, "Deleting a Storage Repository".
Multipathing is the technique of creating more than one physical path between the server CPU and its storage devices. It results in better fault tolerance and performance enhancement. Oracle VM supports multipath I/O out of the box. Oracle VM Servers are installed with multipathing enabled because it is a requirement for SAN disks to be discovered by Oracle VM Manager.
Note:
Any system disks (disks that contain / or /boot) are blacklisted by Oracle VM Manager and are not available for use in an Oracle VM environment.Multipath configuration information is stored in /etc/multipath.conf and contains specific settings for Oracle VM along with an extensive set of configuration details for commonly used SAN hardware. In most cases the user should not need to modify this file and is advised not to. Examining the contents of the file may be useful to better understand how it works in Oracle VM and what may need to be configured if your SAN is not using multipathing and your LUNs are not appearing.
In case user action is required to enable multipathing, this sections explains how to do so. The required steps depend on the storage hardware implemented. Consequently, the steps below are intended as a guideline and priority should be given to the SAN hardware documentation.
Note:
Not all steps apply to your environment. Consult the SAN hardware vendor's documentation for a complete list of steps, the order in which to execute them, and their relevance to your specific environment.General steps to configure multipathing:
Design and document the multipathing configuration you intend to apply to the SAN hardware used in your Oracle VM environment.
Ensure that the drivers for your Host Bus Adapters (HBAs) are present. If not, install the drivers.
Configure the appropriate zoning on the fibre channel switches.
Configure LUN masking on the storage arrays.
Configure path optimization features (ALUA or similar) on your disk subsystem, if so instructed by your vendor's documentation.
Check the fabric information on each Oracle VM Server that has access to the SAN hardware. Use multipath -ll and related commands.
Make the necessary changes to the file /etc/multipath.conf on the Oracle VM Servers.
Note:
You must make the exact same changes to the multipath configuration file on all Oracle VM Servers in your environment.Restart the multipath daemon (multipathd).
Check the fabric information again to verify the configuration.
If so instructed by the vendor's documentation, rebuild initrd.
Reboot the Oracle VM Servers to verify that the SAN and multipathing configuration come up properly after a restart.
For detailed information and instructions, consult the SAN hardware vendor's documentation.
Note:
Booting from a multipath SAN is currently not supported; booting from SAN is only possible in a single-path configuration.You use Oracle VM Manager to create and configure storage repositories, and to present one or more storage repositories to Oracle VM Servers in a server pool. This chapter discusses the flow of the operations you perform after the discovery of your physical storage hardware, LUNs, file systems and so on, in order to make a storage repository available to the Oracle VM Servers in your server pool. Once the storage repository is accessible, you can start adding storage resources and building VMs with those resources.
Depending on the configuration of Oracle VM Servers in your environment, restrictions may apply to the creation of storage repositories:
When using server pools without clustering functionality, two storage options are available: file servers (NFS) and local physical disks in a local storage array. Remember that local storage imposes severe restrictions, as described in Section 5.6.4, "Using Local Storage".
Local storage, or unused disks in your Oracle VM Servers, are discovered as LUNs in a local storage array. If you want to use a single-server setup with local storage, be sure to deactivate clustering in your server pool. This eliminates the need for a server pool file system, which cannot be on a local disk by definition.
Only a server pool with multiple servers, active clustering and attached storage (NFS, iSCSI, fibre channel) can offer high availability, load balancing and similar advanced functionality.
Oracle VM Manager allows you to perform a number of management operations on the storage repositories under its control. Table 5-2 describes the possible operations at the level of a storage repository. To access these functions in Oracle VM Manager, open the Home view, select Server Pools and go to the Repositories tab.
Note:
Storage repositories are presented to individual servers, meaning that not all repositories are necessarily available for example when you deploy a VM on a specific Oracle VM Server. To see which servers have access to a storage repository, select the repository in the table and verify the access status on the right-hand side.Table 5-2 Storage Repository Management Operations
| Operation | Description |
|---|---|
|
Create repository |
|
|
Present repository |
|
|
Edit repository |
|
|
Delete repository |
|
|
Refresh repository |
Select a repository in the table and click Refresh. Oracle VM Manager re-checks the disk contents of the selected repository. Any detected changes will be reflected in the various content tabs (Assemblies, ISO files, ...) of the storage repository. |
|
Discover existing repository |
If for any reason a storage repository exists on one of your storage providers, but is not visible in Oracle VM Manager – for example if the Oracle VM Manager host was reinstalled or the storage provider went down or moved to a different address – you can click Discover to detect pre-existing storage repository contents on the storage providers controlled by Oracle VM Manager. |
After you complete the preparation phase described above in Section 5.6.1, "Registering and Configuring File Servers" and Section 5.6.3, "Registering and Configuring Storage Arrays", Oracle VM Manager is fully aware of the underlying physical storage providers available for use as a storage repository.
To create a storage repository for your server pool:
In Oracle VM Manager, open the Home view and select Server Pools in the navigator.
In the management pane, open the Repositories tab.
Click Create to create a new storage repository.
In the Create Repository dialog box, enter the following information:
Name: the name you wish to use to identify the repository
Repository Location: either a network file server or a physical disk
If you selected Physical Disk as location, proceed to step 7. If you selected Network File Server as location, click the search icon to select a location in the Select Network File System dialog box:
Select a Network File Server from the list. The available file systems appear. Note that only a refreshed file system can be used.
Select the file system you wish to install the storage repository on. Click OK.
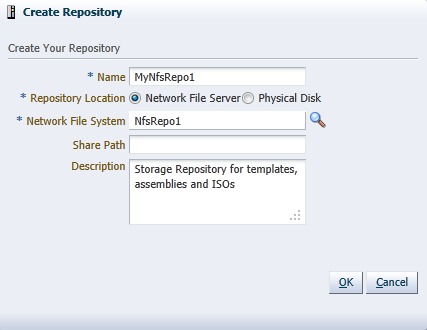
Optionally provide this additional information:
Share Path: path to a subdirectory on the selected file system
Description: information you would like to add about this storage repository
Proceed to step 9.
If you selected Physical Disk as the Repository Location, click the search icon to select a location in the Select Physical Disk dialog box:
Select a Storage Array and, if applicable, a Volume Group from the respective lists. The available disks appear.
Select the physical disk you wish to install the storage repository on. Click OK.
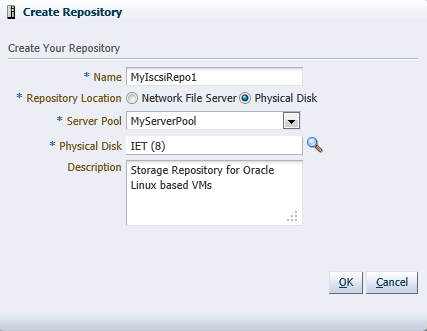
Select from the list to which Server Pool this storage repository should be provided. Optionally enter additional information about this storage repository in the Description field.
Note:
When you create a storage repository on a LUN, only clustered server pools can be selected.Click OK to create the new storage repository. The new storage repository is displayed in the Repositories table in the management pane.
At this point, the storage repository has been created and your Oracle VM Manager has taken ownership. However, to enable your Oracle VM Servers to use it to store virtual machines, ISO files, templates and so on, you must first present the repository to the Oracle VM Servers in your server pool. This is described in Section 5.8.2, "Presenting a Storage Repository".
When the storage repository is prepared and created, it still must be made available for use by your Oracle VM Servers before it can be populated. Typically you present the storage repository to all the Oracle VM Servers in the server pool. However, should you wish to set up storage differently, Oracle VM Manager allows you to present a repository to a selection of Oracle VM Servers instead of the entire server pool.
Presenting the storage repository to an Oracle VM Server is the equivalent of mounting a file system. Essentially, when you present the repository to the Oracle VM Servers in your server pool, the repository file system is mounted by the root user on each Oracle VM Server. This is an essential factor in the HA configuration of the Oracle VM setup.
To present a storage repository to your Oracle VM Servers:
Open the Home view and select Server Pools in the navigator.
In the management pane, open the Repositories tab.
Select the storage repository of your choice and click Present to present or expose the repository to one or more Oracle VM Servers.
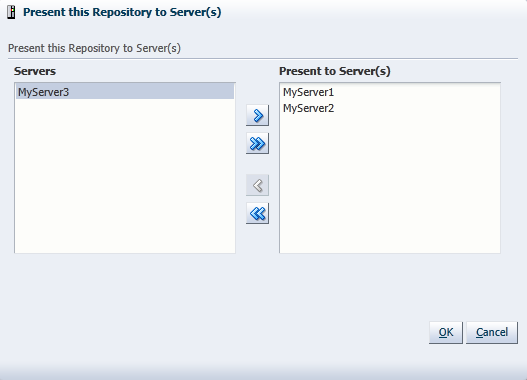
In the Present Repository dialog box, use the arrow buttons to move the required Oracle VM Servers from the left to the right pane.
Click OK to present the storage repository to the Oracle VM Servers.
Note:
NFS-based storage repositories can be shared by multiple server pools controlled by the same Oracle VM Manager. OCFS2-based storage repositories always belong to a single clustered server pool.Your external storage setup is now complete. The storage repository is available to your Oracle VM Servers. Create a server pool with your Oracle VM Servers and specify this storage repository, see Chapter 7, "Managing Server Pools". When the server pool is ready you can start creating virtual machines.
To edit a storage repository:
Select a repository in the table and click Edit.
In the Edit Repository dialog box you can make the following changes:
Name: edit the name of the selected repository.
Description: optionally enter a more elaborate description of the selected repository.
Release Ownership: select this check box to allow the repository to be used by another Oracle VM Manager.
Click OK to save the changes to the storage repository.
To delete a storage repository:
Make sure that all content has been removed from the storage repository you wish to delete.
Select the repository in the table and click Delete.
Confirm that you wish to delete this storage repository: click OK to continue.
Click OK to execute the delete operation.
When your server pool is fully configured with Oracle VM Servers, network and storage, you use Oracle VM Manager for all management and maintenance operations on the storage repository. The storage resources residing in the repository (ISO files, templates, and so on) are also managed through Oracle VM Manager. Management operations on the storage resources inside a storage repository are discussed in detail in a separate chapter: Section 8.5, "Virtual Machine Resources". Detailed instructions for the use of different types of storage entities with virtual machines are discussed in Chapter 8, "Managing Virtual Machines".
|
Copyright © 2011, Oracle and/or its affiliates. All rights reserved. Legal Notices |
|