 Understanding Payroll Data
This chapter provides an overview of payroll data and discusses how to:
Enter tax distribution information.
(USA) Enter U.S. employee tax data.
(CAN) Enter and maintain Canadian income tax data.
(USA) Process forms W-4 and W-5.
Set up employee general deductions.
Specify employee-level benefit deduction overrides.
Set up direct deposits.
Define additional pay earnings.
Maintain optional payroll data.
Maintain garnishments, savings bonds, and other payroll data.
Understanding Payroll Data
The Employee Pay Data menu contains the Payroll for North America pages that you use to maintain payroll-specific data, such as tax information, additional pay, general deductions, direct deposit, and garnishments information.
These pages work in conjunction with the information that you enter on the Workforce Administration pages and the benefit deduction data maintained in Benefits pages.
In addition to the payroll data information that is required for payroll processing, PeopleSoft also provides optional payroll data pages, where you can maintain and override information concerning check distribution and payroll deductions.
This diagram shows the types of payroll data information that you can maintain for employees, including tax information, general deductions, and other pay data:
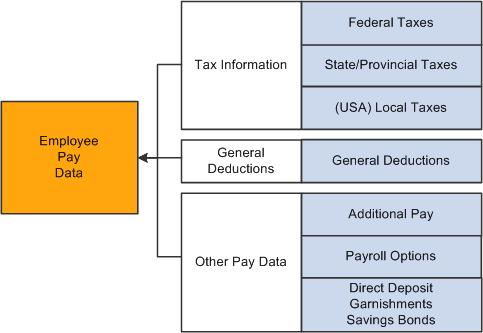
Maintaining employee payroll data including tax information, general deductions, and other pay data
The Employee Pay Data menu also offers the Search by National ID page, part of the Administer Workforce business process in PeopleSoft Human Resources. You can search for employees and their dependents/beneficiaries using their national ID.
(USA) Verifying Social Security Numbers
Payroll for North America provides the SSN Verification (social security number verification report) SQR Report process (TAX109) that you can use periodically to electronically submit employee name and SSN information to the Social Security Administration for verification.
Note. You must obtain a Requester Identification Code from the SSA before running the TAX109 process. It's a good idea to submit this file periodically throughout the year to identify and correct SSN errors before beginning year-end processing.
See Also
Entering Tax Distribution Information
This section provides an overview of tax distribution and discusses how to:
(USA) Enter U.S. tax distribution information.
(CAN) Enter Canadian tax distribution information.
 Understanding Tax Distribution
Every employee must have at least one Tax Distribution record. It represents the work location(s) for the employee. It is used to calculate the work taxes. The system automatically populates the State, Province, and Locality fields from the Tax Location Code field on the employee's Job Data record. The state and locality codes come from the Tax Location table.
Creating Employee Tax Distribution Data Automatically
If you select the Automatic Employee Tax Data option on the Installation table, Payroll for North America automatically sets up tax distribution records for the employee. It sets up federal, state (multiple, if necessary), provincial, and local (multiple, if necessary) records whenever an employee:
Is hired through PeopleSoft Human Resources Management (PeopleSoft HRMS) or the applicant tracking system.
Transfers to another company.
Has a job change that requires a new tax location to be entered on Job Data - Payroll page.
You can run the Default Tax Data Report (TAX016), (TAX016CN is the Canadian version) to verify automatically created tax data. This report lists which employees have such default data on their tax records. The report checks records within the date range that you specify.
Note. (USF) The employee's retirement code coverage helps determine which tax data is generated by the system.
Default Tax Information
If the Automatic Employee Tax Data check box is selected on the Installation Table component, the system:
References the employee's home address and tax location from human resources personal data and job data records.
Enters the data by default in the employee's federal, state, and local tax data.
Enters a marital status of Single.
Enters a withholding allowance of 0.
Changes to tax location in job data using Correction mode do not automatically export the new data to the employee's tax distribution record or employee tax data record. Only changes made in Update/Display mode cause these tables to be updated.
If the Use State Residence for Local check box is selected on the Installation Table component, then localities entered on the Tax Location table are indicated as resident locality in employee tax data.
This diagram illustrates how the system enters tax data from the Personal Data Record, Tax Location Table, Job Data Record, Employee Tax Data Record, and the Tax Distribution Record automatically and how that data is used on paysheets:
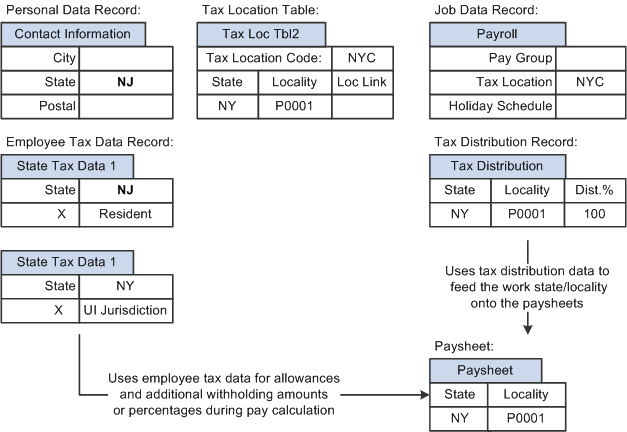
Illustration of how system pulls in information from various personal and tax data records automatically and uses that information on the paysheet
(USA) State Taxes for Multistate Employees
This is an example of how the system determines state taxes for multistate employees based on the distribution percents that you enter on the Tax Distribution pages.
Employee A is paid weekly and receives 1000 USD per week. The employee works 70 percent of the time in New York and 30 percent in Connecticut.
The system annualizes the pay period taxable earnings.
Employee A earns 1,000 USD for this pay period. Thus, the employee's annual taxable earnings are annualized by multiplying the week's earnings by 52 weeks: 1,000 USD × 52 = 52,000 USD.
The system calculates the annual tax for the taxable earnings for each state using the appropriate rate from the state's corresponding tax tables.
New York Annual Tax Calculation:
Because Employee A works 70 percent in New York, his annual taxable earnings is 52,000 USD x 70% = 36,400 USD. Assume that New York's tax rate from the tax table is 4.5%. Thus, the New York annual taxes are 4.5% x 36,400 USD = 1,638 USD.
Connecticut Annual Tax Calculation:
Because Employee A works 30 percent in Connecticut, his annual taxable earnings is 52,000 USD x 30% = 15,600 USD. Assume that Connecticut's tax rate from the tax table is 6%. Thus, the employee's Connecticut annual taxes are 6% x 15, 600 USD = 936 USD.
The system converts each state's annual tax amounts to weekly amounts and then applies these amounts to each state.
New York Weekly Tax Calculation:
1,638 USD ÷ 52 weeks = 31.50 USD per week
Connecticut Weekly Tax Calculation:
936 USD ÷ 52 weeks = 18 USD per week
Note. The Create Paysheet COBOL SQL process (PSPPYBLD) uses tax distribution information to set the state and locality by default on the paysheet and to distribute the employee's hours and/or earnings as specified. If this tax distribution data is changed after the paysheet is created, you must manually update the paysheet with the distribution changes.
Note. If you want the earnings in the Other Earnings section of the paysheet to be distributed according to the tax distribution, you must set up and add the earnings as additional pay (either manually or through an interface) before paysheet creation. If you add the earnings directly to the payline, the system does not apply tax distribution.
Pages Used to Enter Tax Distribution Information|
Page Name |
Definition Name |
Navigation |
Usage |
|
TAX_DISTRIBUTION |
|
Enter the employees work state or localities percentages for US employees. This information will be used in the Create Paysheet Process and create a payline for each state/locality combination. |
|
|
TAX_DIST_CAN |
Payroll for North America, Employee Pay Data CAN, Tax Information, Update Tax Distribution, Update Tax Distribution |
Enter tax distribution information for Canadian employees. |
|
|
RUNCTL_FRMTHRU_PAY |
|
Run TAX016 (TAX016CN for Canada) to print employee tax and other hire data automatically generated by the system. |
(USA) Entering U.S. Tax Distribution Information
Access the Update Tax Distribution page (Payroll for North America, Employee Pay Data USA, Tax Information, Update Tax Distribution, Update Tax Distribution; or Payroll for North America, Employee Pay Data USF, Tax Information, Update Tax Distribution, Update Tax Distribution).
Tax Distribution
|
Insert Pre-filled Tax Location |
When a tax location code contains multiple states, select this check box to have the system:
Create the appropriate number of tax distribution rows. |
States/Localities
|
Percent of Distribution |
Enter the percent of the employee's time or earnings that apply to the selected state/locality in the State and Locality fields. This tax distribution is for work location-based taxes only; this does not include resident-based taxes. If the employee works in one state or locality, the distribution percent should be 100 for that row. However, if an employee is hired or transferred into a tax location that represents more than one state or locality, you must distribute taxes among the different states or localities. All the percentages must total 100. You cannot save the page until the distribution percent values total 100. Note. You can distribute taxes for salaried and exempt hourly employees only. If you select the Use Total Wages for Multi-State Employee check box on the Federal Tax Data 2 page, the system uses 100 percent of the employee's wages to determine the tax rate. |
(CAN) Entering Canadian Tax Distribution Information
Access the Update Tax Distribution page (Payroll for North America, Employee Pay Data CAN, Tax Information, Update Tax Distribution, Update Tax Distribution).
Canada doesn't allow distribution to more than one province.
Note. All fields on this page have the same functionality as the fields on the U.S. version except for the following fields.
|
Province |
Enter the province in which the employee works. |
|
Distribution % (distribution percent) |
For Canadian payroll, the distribution percent must be 100 for a single row. The default value is 100. |
(USA) Entering U.S. Employee Tax Data
This section provides overviews of state tax considerations, split local tax distribution for Kentucky (KY), Alabama (AL), and Oregon (OR), and discusses how to:
Enter federal tax data.
Enter state tax data.
Enter local tax data.
Note. (USF) All pages in this section apply to both the generic Payroll for North America and U.S. federal government functionality, unless stated otherwise. The only difference between the two is their corresponding navigation.
Understanding State Tax Considerations
If the employee is a resident of a state other than the primary work state, you must create an additional State entry and select only one of the states as the state of residence.
Use the Non-Residency Statement Filed check box to record whether the employee has completed the necessary nonresidency certificate that some states require when an employee lives in one state and works in another.
For example, employees who reside in Wisconsin but work in Minnesota must file a certificate of nonresidence for Minnesota with their employer in order to avoid having both Minnesota and Wisconsin income taxes withheld from their wages. When employees do not file this certificate, their wages must be fully taxed in both Wisconsin and Minnesota. Employees who fail to file this certificate when required are supposed to be fully taxed in both resident and work states.
For employees who work in multiple states, most states have adopted a set of rules to determine a state of jurisdiction for unemployment and disability purposes. The employee's state of jurisdiction is indicated by the UI Jurisdiction check box.
The system performs the following edits to determine state of jurisdiction:
If an employee has only one state (the resident state), that state is the default state of jurisdiction.
If an employee has two states (one resident, the other nonresident), the nonresident state is the default state of jurisdiction.
If an employee has multiple nonresident states, and no state is indicated as the state of jurisdiction, the system issues a message requiring you to select the UI Jurisdiction check box on one record.
Other Factors Affecting State Tax Calculation
Enter the employee's SWT marital/tax status in the SWT Marital/Tax Status field for each state where the employee pays taxes. This is the marital status that is used for calculating SWT in each state for the employee. It indicates which tax rates the system should use for the SWT calculation. SWT marital status options are located on the SWT Marital Status table, which is maintained by PeopleSoft.
Note. For Guam (GU), Virgin Islands (VI), and American Samoa (AS): Employees in these territories are subject to territory withholding at the same rate as federal. You must enter the marital status and withholding allowances claimed on their withholding certificates on this page and on the Federal Tax Data page.
Understanding Split Local Tax Distribution for KY, AL, and OR
The interaction of the Tax Location table, the employee's Local Tax Data table and the employee's Tax Distribution table enables employees to be paid in any of the tax locations comprising a chain of linked localities. When an employee is paid in such a locality, the employee's earnings are included in the taxable grosses of all localities further down the chain. The Other Work Locality field on the following pages provides the links in the chain of localities.
Tax Location Table
The Tax Location table associates any number of states, localities and linked localities with a tax location code. The tax location code is used on the Job Data - Payroll page and automatically generates information on the employee's State Tax Data page and Local Tax Data page when the Automatic Employee Tax Data check box has been selected on the Installation table.
In the absence of (or to override) automatic employee tax data, state, locality and locality-link data may be set up directly on the employee's State Tax Data and Local Tax Data pages. The use of the Other Work Locality field described below is identical on both the Tax Location table and the Local Tax Data pages.
Local Tax Data
The Other Work Locality field on the Local Tax Data table is used where one or more taxes apply to a single location. A school district within a city within a county is such an example. In this case, there would be one chain with three rows. Row one would have the school district as the locality and the city as a link; row two would have the city as the locality and the county as a link; and row three would have the county as the locality only.
The Other Work Locality field on the Local Tax Data table may also be used where one or more taxes apply to multiple locations. Several cities within a county is such an example. In this case, there could be several chains. There would be a separate row for each city with the county as the link. The county, however, would appear only once in the Locality field of a row without a link.
Note. Linked localities may have either the same (congruent) or different (noncongruent) physical boundaries.
When linked localities have the same physical boundaries, there should be earnings in only one locality in a chain—namely, the locality at the beginning of the chain (the school district in the above example). Likewise, if the employee is a resident of any one locality, he/she should be a resident of all the localities. Unless the earnings are taxable to residents only, and the employee is not a resident, then all of the localities should have the same taxable earnings.
Note. We recommend that a chain of linked localities with the same physical boundaries start with a locality that taxes both residents and nonresidents.
When linked localities have different physical boundaries, there could be earnings in any locality in a chain. Likewise, an employee may be a resident of only some of the linked localities (and all of the localities down the chain). Unless the earnings are taxable to residents only, and the employee is not a resident, any earnings in locality with a link will be included in the taxable earnings of all localities further down the chain. They will not be included in the taxable earnings of localities further up the chain.
Important! A chain of linked localities with different physical boundaries should start with the smallest locality and progressively work up to the largest locality.
Employee Tax Distribution
The Employee Tax Distribution table allocates the work-location earnings of salaried and exempt hourly employees. Using this table, 100 percent of total earnings are allocated to states and localities during the Create Paysheet process.
When earnings are allocated to linked localities having the same physical boundaries, the allocation should be to the locality at the beginning of the chain. When earnings are allocated to linked localities having different physical boundaries, the allocation may be to any or all localities in the chain. As stated earlier, when earnings are allocated to linked localities, the earnings will be included in the taxable earnings of all localities further down the chain.
Example of Special City and County Withholding Tax Situations
In some states, such as Kentucky, both cities and counties can impose payroll withholding taxes on wages for work performed within their jurisdictions. If an employee works in a city that imposes a tax, and that city is located within a county which also imposes a tax, the employee is subject to payroll withholding for both the city and county taxes.
For example, the city of Covington, Kentucky is located within Kenton County, Kentucky. Both the city of Covington and Kenton County impose payroll taxes. In all three of the following situations, the employee is subject to the withholding taxes imposed by both the city of Covington and Kenton County:
A resident of Covington who also works in Covington.
A resident of Kenton County (outside of Covington) who works in Covington.
A resident of another county who works in Covington.
To ensure that both the city and the county local taxes are correctly calculated and withheld in these situations, you must set up the city as the first or primary work locality, and the county as the secondary/linked work locality on both the Tax Location table and in the employee local tax data setup.
See Also
(USA) Entering U.S. Tax Distribution Information
Associating Provinces, States, and Localities with the Tax Location Code
Pages Used to Enter U.S. Employee Tax Data|
Page Name |
Definition Name |
Navigation |
Usage |
|
TAX_DATA1 |
|
Enter and maintain the federal tax information that the system uses to calculate federal taxes for employees. |
|
|
TAX_DATA3 |
|
Enter and maintain state tax information that the system uses to calculate state taxes for employees. |
|
|
TAX_DATA5 |
|
Enter employee tax data for each locality in which an employee lives or works. |
|
|
RUNCTL_TAX019 |
|
Run Employee Tax Information Report (TAX019) to print employee tax withholding information. |
Entering Federal Tax Data
Access the Federal Tax Data page (Payroll for North America, Employee Pay Data USA, Tax Information, Update Employee Tax Data, Federal Tax Data; or Payroll for North America, Employee Pay Data USF, Tax Information, Update Employee Tax Data, Federal Tax Data).
Federal taxes include federal income tax, FICA, and FUT. If the employee works for multiple companies, the tax data is defined by company.
Note. Federal, state, and local taxes are implemented as a set of chained pages. To add a new effective-dated row for state or local tax data, you must insert a row on the first page in the chain, the Federal Tax Data page.
Note. For Guam (GU), Virgin Islands (VI), and American Samoa (AS): Although employees in these territories are not subject to federal withholding, they are subject to territory withholding at the same rate as federal. The system uses the tax marital status and withholding allowances information on the Federal Tax Data page to calculate the territory withholding required by each of these territories.
|
Date Last Updated |
This display-only field indicates whether the employee's federal tax data was last updated by an online system user or by a web user, using the PeopleSoft self-service web application. The date of the most recent update appears. |
Federal Withholding Elements
|
Specify the employee's special withholding tax status. The system calculates the withholding tax based on the value you select here and other factors. See Special Withholding Tax Status.
|
|
|
Tax Marital Status and Check here and select Single status if married but withholding at single rate |
Select the appropriate tax marital status for federal withholding taxes as indicated on the employee's completed Form W-4. If the employee has selected "Married but withhold at single rate" on the W-4 form, you must select both the Single option and the check box marked "Check here and select Single status if married but withholding at single rate." This setting results in the employee being reported with marital status W. Note. If you select the check box, the tax marital status automatically becomes Single when you save. |
|
Withholding Allowances |
Enter the number of allowances that the employee claims for FWT purposes. This number should match the number on the employee's W-4 form. |
|
Additional Amount and Additional Percentage |
Use these fields to indicate that additional FWT taxes are to be taken. You can specify both an amount and a percentage, if appropriate. When you enter an additional percentage, the additional withholding is calculated by taking a percentage of the taxable wages. The effect of this field depends on the option that you select in the Special Withholding Tax Status field. |
|
Earned Income Credit (EIC) is a payment from the government that is available to individuals who meet a number of qualifications related to family and income status. Select from these options:
Note. The payment amounts are determined by rates in the Federal/State Tax table under $E. |
|
|
Exempt from FUT |
Select this check box if the employee is exempt from FUT (Federal Unemployment tax). The default value comes from the FICA/Tax Details (Federal Insurance Contributions Act/tax details) page. You can override the default from the Company table for an employee. |
The system resets this indicator automatically when the employee's status is updated through the Determine W-4 Exempt Renewal Application Engine Process (PY_W4_EE) or the Reset W-4 Exempt List process (TAX103). You can also update this status manually.
See (USA) Processing Forms W-4 and W-5.
|
None |
Select this option if W-4 processing does not apply to the employee. This is the default value, which TAX103 resets automatically for those who fail to resubmit the W-4. |
|
Notification Sent |
Indicates that the employee has been notified to submit a new Form W-4. This option is set by PY_W4_EE or manually. |
|
New W-4 Received |
Indicates that a new Form W-4 has been received. This option is set manually or through the W-4 Tax Information self-service transaction in PeopleSoft Enterprise ePay. |
The system resets this indicator automatically when the employee's status is updated through the Determine W-5 Eligibility Application Engine process (PY_W5_EE) or the Reset W-5 Eligibility List process (TAX113). You can also update this status manually.
See (USA) Processing Forms W-4 and W-5.
Note. Advance EIC payments and W-5 processing are discontinued as of January 1, 2011. Pages, fields, and processes are available for use in supporting Advance EIC through tax year 2010.
|
None |
Select this option if W-5 processing does not apply to the employee. This is the default value, which TAX113 resets automatically for exempt employees who do not resubmit the W-5. |
|
Notification Sent |
Indicates that the employee has been notified to submit a new Form W-5. Set manually or by the PY_W5_EE process. |
|
New W-5 Received |
Select when you receive a new Form W-5. |
|
Letter Received |
Select this check box if a letter has been received from the Internal Revenue Service (IRS) specifying the allowances an employee is allowed to take. |
|
Limit on Allowances |
Enter the maximum number of allowances possible. The value that you enter in the Withholding Allowances field cannot exceed the value that you enter in this field. |
State Tax Options
|
Use Total Wage for Multi-State Taxation |
Select this check box to use taxable wages from all work states in the calculation of state taxes. For states, such as Arizona, that base their calculation on a percentage of federal withholding tax (FWT):
For states, such as Alabama, Iowa, Missouri, and Oregon, that include a credit for FWT in their SWT calculation:
|
|
Always create W2 for PA NQDC Reporting (always create W-2 for Pennsylvania nonqualified deferred compensation reporting) |
Select this check box if the employee has Pennsylvania W-2 reportable nonqualified deferred compensation amounts but does not have any Pennsylvania state taxable wages or state tax withheld for the tax year being reported. Selecting this check box ensures that the system reports the Pennsylvania nonqualified deferred compensation on the employee's W-2 even though the employee doesn't have any reportable Pennsylvania earnings. See Year End Processing: U.S., Puerto Rico, and the U.S. Territories Guide |
Tax Treaty/Non-Resident Data
Use these fields to enter information for nonresident alien employees. All nonresident alien employees (including those not governed by tax treaties) must be identified as nonresident alien employees on the Federal Tax Data record to invoke the nonresident alien withholding tax calculation.
|
Country |
Select a country from the list, or select one of the generic entries that are prefixed with $ that you may have established on the NR Alien Tax Treaty table (nonresident alien tax treaty table). Note. You must set up countries that do not have treaties with the U.S. on the NR Alien Tax Treaty table. See (E&G) Setting Up 1042 Processing for Non-resident Aliens. |
|
Treaty ID |
Select the appropriate treaty ID. If the employee is from a country with which the U.S. does not have a treaty, select NO TREATY. |
|
Form W9 Received and Form W9 Effective Date |
If the NRA employee is a resident for tax purposes and files a W9, select Yes and enter the appropriate date in the Form W9 Effective Date field. Employees who file a Form W9 that takes effect before the end of the current pay period are processed as if they did not have a treaty; their earnings are taxed as W-2 earnings instead of 1042 earnings. Select No if the employee is from a country with which the U.S. does not have a treaty. |
|
Taxpayer ID Number |
Enter the taxpayer ID number of the employee. If you enter a value here, the system uses this value instead of the social security number when producing the 1042 forms/magnetic media. |
|
NRA Withholding Rule |
Select from these options:
|
(E&G) Education and Government
The information in this group box enables the eligible employee to be subject to a reduced tax treaty rate. To claim benefits of a treaty, an employee must have a visa and be a resident of one of the treaty countries. An employee can claim benefits for only one treaty at any particular time. Employees who want to claim benefits under a tax treaty must submit a written statement to their employer, along with applicable forms.
Use the Form 8233 Received and Form W8 Received options to determine the employee's eligibility for reduced tax treaty rates. You must mark the correct form for the specified income code by the end of the current pay period. Otherwise, the affected earning will be taxed as W-2 earnings instead of 1042 earnings.
|
Treaty Expiration Date |
The treaty expiration date appears. The system calculates the date based on the date of entry and rules that are established on the Tax Treaty/NR Data table. |
|
Form 8233 Received |
If the NRA employee filed a Form 8223, select Yes and enter the appropriate dates in the Form 8233 Effective Date and From 8233 Expiration Date fields. Form 8223 is required for all income codes except 12 (royalties) and 15 (scholarships and fellowships). |
|
Form W8 Received |
If the NRA employee filed a Form W8 for scholarship and fellowship income or royalties, select Yes and enter the appropriate dates in the Form W8 Effective Date and Form W8 Expiration Date fields. |
(E&G) Allowable Earnings Codes
The system populates the Allowable Earnings Codes group box with information entered on the Treaty/NR Alien Table page according to the country and treaty ID that you specify.
|
Eligible Earnings Per Year |
The earnings caps that apply to each earnings type as per the tax treaties for nonresident aliens. |
|
Tax Rate After Form Received |
For nonresident aliens, whose forms (8223 or W8-BEN) have been completed and are in effect, this is the tax rate that is applied to their income until the income exceeds the maximum earnings specified. |
|
Tax Rate Before Form Received |
The tax rate that is applied to the nonresident alien employee's income if their forms (8223 or W8) have not been completed. |
See Also
(USA) Processing Forms W-4 and W-5
Entering State Tax Data
Access the State Tax Data page (Payroll for North America, Employee Pay Data USA, Tax Information, Update Employee Tax Data, State Tax Data; or Payroll for North America, Employee Pay Data USF, Tax Information, Update Employee Tax Data, State Tax Data).
If an employee works for multiple companies, tax data is defined by company. If the employee works in multiple states or lives in a state other than the state of employment, each state must be identified on these pages.
Note. For Guam (GU), Virgin Islands (VI), and American Samoa (AS): Although employees in these territories are not subject to federal withholding, they are subject to territory withholding at the same rate as federal. The system uses the marital status and withholding allowances information on the Federal Tax Data page to calculate the territory withholding required by each of these territories.
State Information
|
State |
Select the state. Certain state-specific page elements are shown or hidden depending on the state that you select. |
|
Resident |
Select this check box if the state selected in the State field is the state of residence. Note. The work state is derived from the employee's tax location on the Job Data table and is used by paysheets when calculating state tax deductions. This check box indicates whether the employee is a resident of the work state; the determination of resident state is made from the employee's home address. |
|
Non-Residency Statement Filed |
Select this check box if the employee has completed the necessary nonresidency certificate. |
|
UI Jurisdiction (unemployment insurance jurisdiction) |
Select this check box if the state selected in the State field is the state of jurisdiction for unemployment insurance tax. Note. State unemployment tax (SUT), and state disability insurance (SDI) if applicable, are usually calculated for the employee's primary work state. |
|
Exempt from SUT (exempt from state unemployment taxes) |
Select this check box if the employee's earnings are exempt from SUT. This field reflects the value entered in the Company Exempt from SUT (company exempt from state unemployment taxes) field on the Company table. |
|
SDI Status (state disability insurance status) |
This field reflects the value of the SDI deduction on the State Tax table and is derived from the employee's SDI status entered on the Company table. Select Exempt if the employee's earnings are exempt from SDI or Voluntary Disability Insurance tax. Select Not Applicable if the state does not have state disability or does not require employers to carry private disability plans. Select Subject if the employee's earnings are subject to SDI tax. Select Voluntary Disability Plan if the company has a voluntary disability plan that covers the employee. |
State Withholding Elements
Use these fields to enter state-specific withholding information.
|
Special Withholding Tax Status |
Specify the employee's special withholding tax status. The system calculates the withholding tax based on the value you select here and other factors. See Special Withholding Tax Status.
|
|
Tax Marital Status |
Select the appropriate tax marital status for SWT. The system displays the associated description. Note. Depending on the state that you selected in the State field, different field values for this field appear. |
|
Withholding Allowances |
Enter the number of allowances that the employee claims for SWT purposes. This number should match the number on the employee's state withholding allowance certificate. For states that have their own withholding allowances form, the system displays informational text explaining where this information appears on the state form. |
|
Additional Amount |
Enter an additional flat amount to withhold. The effect of this field depends on the option that you select in the Special Tax Status group box. |
|
Additional Percentage |
Enter an additional percentage to withhold. The additional withholding is calculated by taking a percentage of the taxable wages. |
|
Additional Allowances |
If applicable, enter any additional allowances that the employee claims for SWT purposes. For states that have their own withholding allowances form, the system displays informational text explaining where this information appears on the state form. |
Arizona-Specific Page Element
|
AZ Withholding Percent |
Enter the percentage of taxable gross that constitutes the Arizona state withholding. |
California-Specific Page Element
The California Wage Plan Code group box appears only when the state is CA.
The California Wage Plan Code is used only by employees of the California Public Employees Retirement System (PERS) to identify a wage continuation plan for employees in the public sector - such as schools and government - or religious organizations that are exempt from state unemployment or disability plans, or have voluntary plans instead.
|
Disability/Unemployment Plan |
Leave the value set at the default State/State (state disability plan and state unemployment) unless otherwise instructed by your organization's tax professionals. Values are: DI Exempt/State (disability unemployment exempt/state), None/None, None/State, State/Exempt, State/State, Voluntary/Exempt, and Voluntary/State. |
Connecticut-Specific Page Element
|
CT Only |
Indicate whether the withholding adjustment amount is an Increase or Decrease amount. The system increases or decreases the employee's CT withholding only on payments of regular wages. If regular and supplemental wages are paid concurrently, the system applies the increase or decrease to the regular earnings only, and not to the supplemental wages. |
Indiana-Specific Page Element
|
Earned Income Credit |
Select to trigger the processing of Indiana Advance EIC payments for Indiana employees who are eligible for Advance EIC payments and who have completed the Indiana Earned Income Credit Advance Payment Certificate (state WH-5 form). Note. Advance EIC payments are discontinued as of January 1, 2011. This field is available for use in supporting Advance EIC through tax year 2010. |
Louisiana-Specific Page Element
|
LA Only |
Indicate whether the withholding adjustment amount is an Increase or Decrease amount. The system increases or decreases the employee's Louisiana withholding only on payments of regular wages. If regular and supplemental wages are paid concurrently, the system applies the increase or decrease to the regular earnings only, and not to the supplemental wages. |
Mississippi-Specific Page Element
|
MS Annual Exemption Amount |
Enter an annual exemption amount for the employee from the employee's completed Mississippi withholding exemption certificate. This exemption amount reduces the employee's taxable gross before the SWT calculation for each pay period. |
New Jersey-Specific Page Element
|
FLI Status (family leave insurance status) |
Indicate the employee's status for the New Jersey Family Leave Insurance tax: Select Exempt if the employee's earnings are exempt from the FLI tax. Select Subject if the employee's earnings are subject to FLI tax. Select Voluntary Plan if the company has a voluntary family leave insurance plan that covers the employee. |
Puerto Rico-Specific Page Element
|
PR Retirement Plan |
(E&G) This check box is visible only if Education and Government is selected on the Installation table - Products page. Select to indicate that the employee is a participant in a government pension or retirement plan of the Commonwealth of Puerto Rico. The employee's government or retirement plan contribution is factored into the withholding calculations. |
Vermont-Specific Page Element
|
VT Health Coverage Indicator |
Select from the following values:
|
Wisconsin-Specific Page Element
|
WI WT-4A Filed |
This check box appears only if the state is WI and the Special Tax Status is Maintain Taxable Gross. Select this check box if you want the amount entered in the Additional Amount field to be treated as a flat withholding amount and used in reciprocity calculations. For example, if an employee lives in California and works in Wisconsin and files a WI WT-4A indicating that $100 be deducted as a Wisconsin additional amount, then selecting this check box ensures that employee's California withholding is reduced by $100 as required by the reciprocity rules. |
|
Earned Income Credit |
Select to trigger the processing of Wisconsin Advance EIC payments for Wisconsin employees who are eligible for Advance EIC payments and who have completed the Wisconsin Earned Income Credit Advance Payment Certificate (state WT-5 form). Note. Advance EIC payments are discontinued as of January 1, 2011. This field is available for use in supporting Advance EIC through tax year 2010. |
|
Letter Received |
Select this check box if a letter has been received from the state taxing authority that specifies the allowances an employee is allowed to take. |
|
Limit On Allowances |
Enter the maximum number of allowances possible. The value that you enter in Withholding Allowances field cannot exceed the value that you enter in this field. |
See Also
(E&G) Setting Up 1042 Processing for Non-resident Aliens
Entering Local Tax Data
Access the Local Tax Data page (Payroll for North America, Employee Pay Data USA, Tax Information, Update Employee Tax Data, Local Tax Data; or Payroll for North America, Employee Pay Data USF, Tax Information, Update Employee Tax Data, Local Tax Data).
Local Information
|
Locality |
Select the locality that the employee lives or works in. If the employee lives or works in multiple localities, enter a row for each different locality an employee pays taxes in. Define localities on the Company Local Tax Table page. |
|
Resident |
Select this check box if the locality selected in the Locality field is a resident locality. An employee can have more than one resident tax locality. You may need more than one resident locality entry in cases where two different taxes exist for the same locality, such as a municipality tax and a school district tax. Note. In Indiana, the employee's county of residence is the first determining factor for tax withholding. If the county in which an employee resides on January 1 of any year imposes a tax, you must withhold that tax. The employee is liable for the tax for the entire year, even if he or she moves to a nontaxing county. If the county of residence does not impose a tax, but the county in which the principal place of work is located does, you must withhold at the appropriate nonresident rate. For employees moving from out of state into a taxing Indiana locality, withholding does not begin until the next January 1, when residence determination is made. |
|
Other Work Locality |
Select another work locality if you have more than one work tax for a given locality. The entry in this field is used to link to another local work tax code. See Understanding Split Local Tax Distribution for KY, AL, and OR. |
Local Withholding Elements
|
Special Withholding Tax Status |
Specify the employee's special withholding tax status. The system calculates the withholding tax based on the value you select here and other factors. See Special Withholding Tax Status.
|
|
Tax Marital Status |
Enter the marital tax status for local withholding taxes. Depending on the locality that you selected, different field values appear. |
|
Withholding Allowances |
Enter the number of allowances that the employee claims for local withholding tax purposes. |
|
Additional Amount and Additional Percentage |
Use these fields to indicate that additional LWT taxes are to be taken. You can specify both an amount and a percentage, if appropriate. The effect of this field depends on the special tax status option that you select. |
See Also
Associating Provinces, States, and Localities with the Tax Location Code
(CAN) Entering and Maintaining Canadian Income Tax Data
This section lists common elements and discusses how to:
Specify federal income tax data.
Enter Quebec income tax (QIT) information.
Enter provincial income tax data.
See Also
(CAN) Canadian Tax Method Calculations
Common Elements Used in this Section|
Full indexation is in effect for federal, Quebec, and provincial taxes. Enter amounts not eligible for indexing such as pension income and tuition and education fees. The non-indexed amount is the component of the net claim amount that is not subject to indexing. For example, if the applicable taxing authority specifies an indexation factor of 3%, the new net claim amounts for all the affected employees would be recalculated as follows: Net claim amount + [ 0.03 (net claim amount – non-indexed amount)]. The Non-Indexed Amount field is not considered during the Pay Calculation COBOL SQL process (PSPPYRUN). However, it is required by the year-end Update Source Deductions SQR Report process (TAX103CN), which calculates and inserts new net claim amounts. This process applies a specified percentage and/or fixed amount increase or decrease as illustrated in the example noted above. |
|
|
Other Tax Credits |
Enter other authorized tax credits for the year as approved by the relative government agency. If other tax credits are entered mid-year, the amount must be prorated by the number of pay periods remaining in the year. |
|
Prescribed Area |
Enter an annual deduction from gross allowed for those employees who live in designated areas of Canada (such as the Northwest Territories, Nunavut, and the Yukon Territory). If an amount is entered mid-year, it must be prorated by the number of pay periods remaining in the year. |
|
Special Letters |
If the employee is eligible for annual deductions authorized by a taxation office, but not deducted at source from the employee's pay (such as childcare expenses), enter that amount here. Note that if a special letter is entered mid-year, the amount must be prorated by the number of pay periods remaining in the year. |
Pages Used to Enter and Maintain Canadian Income Tax Data|
Page Name |
Definition Name |
Navigation |
Usage |
|
TAX_DATA_CAN1 |
Payroll for North America, Employee Pay Data CAN, Tax Information, Update Employee Tax Data, Canadian Income Tax Data |
Specify special CIT withholding status, TD1 exemptions and adjustments, and other tax credits. |
|
|
TAX_DATA_CAN3 |
Payroll for North America, Employee Pay Data CAN, Tax Information, Update Employee Tax Data, Quebec Income Tax Data |
Enter QIT withholding status, exemption, and tax credit information for employees based in Quebec. |
|
|
TAX_DATA_CAN4 |
Payroll for North America, Employee Pay Data CAN, Tax Information, Update Employee Tax Data, Provincial Income Tax Data |
Enter provincial TD1 personal tax credit amounts. |
|
|
RUNCTL_TAX100CN |
Payroll for North America, Year-End Processing CAN, Year-End/New Year Preparation, Exemption Report, Exemption Report |
Generate the TAX100CN report that lists all employees whose Canadian or Quebec Tax Data records indicate that they are exempt from income tax withholding, exempt from unemployment insurance payments, exempt from Quebec Parental Insurance Plan (QPIP) contributions, or have fewer than 12 months subject to Canada Pension Plan (CPP) or Quebec Pension Plan (QPP) contributions. |
|
|
RUNCTL_TAX019 |
Payroll for North America, Employee Pay Data CAN, Tax Information, Employee Tax Information Rpt, Employee Tax Information Report |
Run TAX019 to print employee tax withholding information. |
Specifying Federal Income Tax Data
Access the Canadian Income Tax Data page (Payroll for North America, Employee Pay Data CAN, Tax Information, Update Employee Tax Data, Canadian Income Tax Data).
|
Special CIT Status (special Canadian income tax status) |
Select options in this field to indicate whether an employee's withholding tax status deviates from the norm: Exempt (Not Subject to CIT) (exempt [not subject to Canadian income tax]): Select if the employee is exempt from CIT. The taxable base for CIT, however, will still reflect the taxable pay the employee receives to ensure that proper employment income is reported on the year-end T4 slip. Maintain gross (maintain gross): Select to override the normal tax calculation with an amount or percentage indicated in the Additional Withholding group box. None: Select if no special status exists. If you select this option, the system calculates income tax based on the employee's net taxable gross (the norm). |
|
Net Claim Amount |
Enter the total sum of all federal income tax exemption amounts from the employee's federal TD1 form (including the non-indexed amount). The system uses this field during the Pay Calculation COBOL SQL process. |
|
Months Subject to CPP/QPP (months subject to Canada Pension Plan/Quebec Pension Plan) |
Enter the month that represents the last month, in which the employee is eligible for CPP/QPP contributions. Use the number that corresponds with the desired month of the calendar year (for example 1 for January). For example, if an employee was subject to CPP/QPP for nine months of the calendar year ending in September, and exempt for the remaining three months, enter 9. If the employee was exempt for the entire year, enter 0. Because employees are usually subject to CPP/QPP contributions for the entire year, the default is 12. CPP/QPP contributions will continue to be collected until the month defined in the Months Subject to CPP/QPP field has been met, or the prorated yearly maximum contribution amount has been reached, whichever comes first. Note. The system will not take CPP/QPP contributions if the employee is under the minimum age of 18 or over the maximum age of 70, as determined by the birthdate entered on the Personal Data - Eligibility/Identity page, unless you specify months subject to CPP/QPP on this page. Effective January 1, 1998, the maximum age exemption of 70 has been removed for QPP contribution calculations. |
|
CIT Y Factor (Canadian income tax Y Factor) |
The CIT Y Factor is used in the calculation of the provincial tax reduction for employees in the provinces of Manitoba and Ontario. You must enter a dollar amount for the CIT Y Factor and not the number of dependents. If you leave this field blank for employees who work in Manitoba, the provincial tax will be based on the net claim amount that you have entered from the employee's TD1 form. If you leave this field blank for employees who work in Ontario, no provincial tax reduction is calculated. |
|
LCF Amount (federal labour-sponsored funds tax credit) |
Enter the purchase amount of shares in Labour-Sponsored Venture Capital Corporations (LSVCC). This amount is used to calculate and apply the federal and provincial tax credits at source, for employees who purchase LSVCC shares. The PeopleSoft Canadian Tax tables maintain the maximum federal and provincial tax credit amounts and rates. |
|
Status Indian |
Select this check box to identify a Status Indian employee who is wholly tax-exempt. When this check box is selected, the Special CIT Status field on this page and the Special QIT Status (special Quebec income tax status) field on the Quebec Income Tax Data page become unavailable for entry and automatically set to an Exempt status. Payroll for North America provides system processing to support the year-end T4 and RL-1 reporting of employment income for Status Indian employees whose total remuneration received in the reporting year is based on Status Indian requirements. When the Status Indian check box is selected, the relevant tax form definition boxes of the T4 and RL-1 forms, will facilitate the reporting of Status Indian tax-exempt employment income for year-end slip reporting purposes. For further information, refer to the document titled Year-End Processing: Canada located on My Oracle Support. Note. If your company does not elect to provide CPP coverage to the Status Indian employees, update the Months Subject to CPP/QPP field to 0 (zero). |
|
CIT TH Factor (Canadian income tax TH Factor) |
Note. This field is no longer used, but is maintained for history data. The CIT TH Factor is the threshold amount used to calculate the provincial net income surtax for employees in the province of Manitoba. If you leave this field blank for an employee in Manitoba, the threshold amount is based on the net claim amount that you have entered from the employee's TD1 form. Note. You should review the CIT Y Factor and CIT TH Factor amounts when provincial tax legislation changes the values of these factors or when a change in the employee's number of dependents would affect these amounts. |
|
Payroll Tax Exempt |
Select this check box if the employee should not be subject to the Northwest Territories or Nunavut payroll tax. Effective July 1, 1993, the Northwest Territories imposed a one-percent payroll withholding tax on specified remuneration paid for work performed in the Northwest Territories. Effective April 1, 1999, part of the Northwest Territories split off to form the new territory of Nunavut. Only employees who earn more than 5,000 CAD in one calendar year in the Northwest Territories or Nunavut are subject to this tax. The tax is payable on the full amount of specified remuneration earned while working in the Northwest Territories or Nunavut in the year. If an employee's Northwest Territories or Nunavut earnings will not be more than 5,000 CAD for the calendar year, they are eligible for exemption from this tax. You can stop the tax withholding for this employee by selecting the Payroll Tax Exempt check box. The system continues to maintain the payroll tax gross for the employee, but the tax is not withheld. If you find later in the year that the employee should be subject to the tax, deselect the Payroll Tax Exempt check box. On the next system-generated paycheque for the employee, the system will retroactively deduct the tax not previously withheld on all year-to-date Northwest Territories or Nunavut wages. Note. Before running the final payroll for the calendar year, review the tax balance records of any employees whose Northwest Territories or Nunavut payroll tax status may be in doubt. Employees whose total Northwest Territories or Nunavut earnings will be more than 5,000 CAD for the year should not be identified as exempt from the tax. Employees whose total earnings will be 5,000 CAD or less for the year, but for whom tax has been withheld, should be designated as exempt from the tax, and the tax already withheld should be refunded. |
|
Cross Province |
An employee who resides in one province or territory and is employed in another, may be subject to excessive tax deductions. If the CRA approves a written request for tax relief in this instance, the employer is required to limit the employee's tax liability to the amount based upon that employee's province of residence. Payroll for North America refers to this type of situation as cross-province taxation as it applies only between provinces or territories. Select this check box to generate cross-province tax processing. If you select this check box, the Use Province of Residence check box becomes available for selection. |
|
Use Province of Residence |
Select this check box to use the employee's province of residence for calculating the employee's tax liability. The default for this check box is selected. If you deselect this check box, the Or Override field becomes available for selection. |
|
Or Override |
Use this field to override the employee's province of residence. Specify the applicable province to use for tax calculation if province of residence is not to be used. Note. When the province of employment for taxation purposes is Quebec (QC), the reduction in the tax liability is applied to the federal portion. |
Additional Withholding
|
Amount and Percentage |
Indicate additional CIT taxes that should be taken. The affect of this field depends on the option that you select in the Special CIT Status field: If you select None, you can specify only an amount for additional withholding. The system calculates taxes based on the information on the tax table and adds the additional withholding amount indicated. The amount you enter is always applied against CIT(T4). If you select Maintain gross you can specify an amount or a percentage, or both, for withholding income taxes. The system overrides the normal tax calculation and takes only the amount and/or percentage entered in the Amount and/or Percentage fields. The amount you enter applies against the associated taxable gross on the paycheque. If multiple taxable grosses are applicable, the system allocates/distributes taxes (amount and/or percentage) based on total taxable grosses. |
Note. If you do not want to take additional withholding from a particular cheque, deselect the Additional Taxes check box on the By Paysheet - One-Time Taxes page.
|
Income |
For individuals paid on a commission basis, enter the employee's annual estimated commission income. |
|
Expenses |
For individuals paid on a commission basis, enter the employee's annual expenses. |
|
RPP/RRSP Limit (Registered Pension Plan/Registered Retirement Savings Plan limit) |
Enter the RPP/RRSP limit. This limit overrides the legislated annual RPP/RRSP limit maintained by PeopleSoft on the Canadian Tax table. These fields are used during the commission tax method calculation to arrive at taxable gross. Note: In order to complete this information, the employee must complete the required government form (TD1x). |
|
Calculation Status |
The only options applicable as of January 1, 1997 are EI Rules (Employment Insurance rules) and EI Exempt (Employment Insurance exempt). The Pay Calculation process uses this field to determine whether to deduct EI premiums. Pre-January 1, 1997 the only options available were the UI Yearly (unemployment insurance yearly) and UI Period (unemployment insurance period) options. Select EI Rules if the employee is subject to EI premiums. This is the default premium calculation formula. Select El Exempt if the employee is exempt from paying EI premiums. |
|
Yearly Maximum |
When a calculate status of UI Yearly is selected, the system displays the current year's annual maximum insurable earnings amount in the Yearly Max field as listed in the Canadian Tax table. Note that you must review and update this value if the employee starts after the beginning of the year or terminates before the end of the year. |
Note. UI Yearly and UI Period cannot be selected on records dated later than January 1, 1997. The only valid calculate status selections effective after January 1, 1997 are EI Rules and El Exempt.
Balances from Previous Company
If the employee meets the guidelines set forth by the CRA for the continuation of CPP/QPP contributions and EI premiums as the result of a merger, acquisition, or company restructuring, use the fields in the Balances from Previous Company group box to enter the employee's year-to-date carryover amounts that were brought forward to the new company.
Enter the employee's year-to-date CPP and EI contribution amounts from the previously acquired/merged company into the appropriate fields.
|
Wage Loss Plan |
Select the appropriate wage loss plan code. This applies the correct employer EI premium rate as determined by the benefit coverage level of the wage loss replacement plan for short-term disability. You define valid wage loss replacement plan codes in the Canada Wage Loss Plan Table component (WAGELS_PLN_TBL) in Define Payroll Taxes. You must create these codes before you use them elsewhere in the system. Note. If the Multiple Jobs feature is enabled, you can enter multiple wage loss plans per employee. If the Multiple Jobs Allowed check box is deselected, you can enter only one wage loss plan per employee. If the Automatic Employee Tax Data check box on the Installation Table - Products Specific page is selected, the system automatically creates employee tax data records whenever you hire an employee or transfer an employee to a new company. The wage loss plan default that you specify on the Pay Group Table - Definition page becomes the default wage loss plan on the Canadian Income Tax Data page whenever the system automatically creates employee tax data records. |
Entering QIT Information
Access the Quebec Income Tax Data page (Payroll for North America, Employee Pay Data CAN, Tax Information, Update Employee Tax Data, Quebec Income Tax Data).
Tax Information
|
Special QIT Status (special Quebec income tax status) |
These options are similar to those on the Canadian Income Tax Data page. Your selection indicates whether the employee has any special tax status for QIT purposes. |
|
Net Claim Amount |
Enter the total sum of all Quebec income tax exemption amounts from the employee's Source Deductions Return (form TP-1015.3-V). |
|
Other Deductions |
Enter other authorized Revenu Quebec annual deductions—such as the deduction representing alimony or maintenance payments. |
|
QPIP Exempt (Quebec Parental Insurance Plan exempt) |
Select if the employee is exempt from QPIP premium deductions. |
Additional Withholding
|
Amount and Percentage |
Indicate additional QIT taxes that should be taken. The effect this field has depends on the option you select in the Special QIT Status field: If you select None, you can only specify an amount for additional withholding. The system calculates taxes based on the information on the tax table and adds the additional withholding amount indicated. If you select Maintain gross, you can specify an amount or a percentage, or both, for withholding Quebec income taxes. The system overrides the normal calculated tax and takes only the amount and/or percentage entered in the Amount and Percentage fields. |
Note. If you do not want to take additional withholding from a particular check, deselect the Additional Taxes check box on the By Paysheet - One-Time Taxes page.
|
Income |
For individuals paid on a commission basis, enter the employee's estimated annual commission income. |
|
Expenses |
|
Balances from Previous Company
For merged or acquired companies that have employees that worked in Quebec, enter the employee's year-to-date carryover amounts to the Quebec Pension Plan (QPP) and the Quebec Parental Insurance Plan (QPIP) in the appropriate fields in the Balances from Previous Company group box.
Note. Enter the federal portion of the year-to-date Employment Insurance premiums on the Canadian Income Tax Data page.
Entering Provincial Income Tax Data
Access the Provincial Income Tax Data page (Payroll for North America, Employee Pay Data CAN, Tax Information, Update Employee Tax Data, Provincial Income Tax Data).
|
Province |
Enter the employee's tax location province for calculating provincial income taxes. |
|
Prov Tax Credit Amount (TCP) (provincial tax credit amount) |
Enter the total net claim amount from the employee's or pensioner's provincial or territorial Form TD1. This is the sum of all of the individual personal tax credit amounts reported on the provincial Form TD1 contributing to the total claim amount. |
|
Labour Sponsored Shares Amount |
Enter the provincial or territorial labour-sponsored funds tax credit amount. Note. If a Provincial Income Tax Data record exists, the value that specified in the Labour Sponsored Shares Amount field (including zero) is used for the provincial income tax calculation and the LCF Amount field on the Canadian Income Tax Data page is used for the federal income tax calculation. If no Provincial Income Tax Data record exists, by default the system uses the federal labour-sponsored funds tax credit amount indicated in the LCF Amount field of the Canadian Income Tax Data page for both federal and provincial income tax calculations. Note. (Employers Paying Employees in the Province of Saskatchewan). Investment amounts in venture capital corporations that are registered federally only must be entered into the LCF Amount field of the employee's Canadian Income Tax Data page. Investment amounts in venture capital corporations that are registered in Saskatchewan must be entered into the Labour Sponsored Shares Amount field of the employee's Provincial Income Tax Data page. |
|
Dependant Claim Amount (Y) |
Where applicable, calculate and enter the total dependent claim amount (Y). This is the total sum of the calculated reduction factor Y amounts applicable to Manitoba and Ontario used in determining the provincial tax reduction (factor S). |
|
Other Provincial Credits (K3P) |
This field is currently not in use. Currently, although factor K3P is referenced in the TONI formulas, the details of the other provincial tax credits authorized by a tax services office or tax centre related to this factor have not yet been determined by the government. |
Important! For cross-province taxation to be calculated correctly, entries should be created on the Provincial Income Tax Data page for both the province of employment and the province of residence. If entries do not exist for one or both provinces, the provincial basic personal amounts from the Canadian Tax table will be applied.
(USA) Processing Forms W-4 and W-5
This section provides overviews of W-4 exemption processing and W-5 advance earned income credit (EIC) eligibility processing and discusses how to:
Identify and notify W-4 exempt employees.
Process employees who fail to resubmit Form W-4.
Identify and notify W-5 eligible employees.
Process employees who fail to resubmit Form W-5.
Note. Advance EIC payments and W-5 processing are discontinued as of January 1, 2011. Pages, fields, and processes are available for use in supporting Advance EIC only through tax year 2010.
Understanding W-4 Exemption Processing
Employees who claim exemption from federal withholding must submit a new Form W-4 each year by February 15 to maintain their exemption status. On February 15 of each tax year, the payroll administrator must reset the W-4 status of any employee who claimed exemption from federal withholding in the previous year and failed to file a new W-4 requesting the exemption for the current year.
Payroll for North America provides:
The PY_W4_EE workflow-enabled process that you can run at the end of each year to identify and notify employees who should complete a new Form W-4.
The TAX103 process to update the Federal Tax Data record of employees who were notified through workflow but did not update their W-4 data.
The TAX100 report to use for manual processing as an alternative to the workflow-enabled processing.
The TAX 107 and TAX108 reports for monitoring and printing W-4 data that employees submit through self-service transaction.
W-4 Workflow Processing Steps
This diagram illustrates how workflow processing is used by both the payroll administrator and employee to manage W-4 exemption processing:
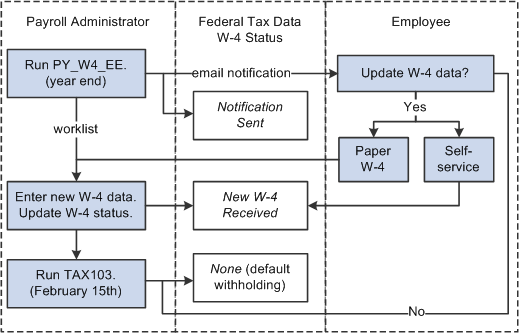
Workflow processing diagram showing how the payroll administrator and employee use the system to manage W-4 exemptions
To process W-4 exemptions using workflow processing, the payroll administrator:
Runs the Determine W-4 Exempt Renewal Application Engine process (PY_W4_EE) to identify and notify employees who must submit a new Form W-4.
Selects the New W-4 Received W-4 Processing Status option on the employee's Federal Tax Data page and updates the other special tax withholding information after receiving the updated Form W-4.
A workflow link on the worklist provides easy access to the Federal Tax Data page to enter the data.
Note. If a notified employee uses the W-4 Tax Information self-service transaction in PeopleSoft Enterprise ePay to update W-4 tax information, the system selects the New W-4 Received W-4 Processing Status option on the Federal Tax Data page and updates the other withholding information. The payroll administrator's worklist notification remains active so that the administrator can verify that the employee submitted a new current-year Form W-4 stating that the employee is still exempt.
Runs the Report/Update W-4 Exempt Employees SQR Report process (TAX103) to reset the withholding information to default values for employees who fail to resubmit.
Run the Determine W-4 Exempt Renewal process (PY_W4_EE) at year-end to:
Determine which employees must resubmit the Form W-4.
Notify these employees by email that they must resubmit.
Set the W-4 processing status to Notification Sent for employees identified.
Add a worklist instance to the payroll administrator's workflow role to process the new forms as they are received.
The process also produces a list of employees who must resubmit the Form W-4.
The Report/Update W-4 Exempt Employees process (TAX103) selects employees whose W-4 processing status is Notification Sent on Federal Tax Data rows dated on or after the due date specified in the process run parameters.
You can run the process in either Report Only mode or Update mode:
Report Only mode lists employees who failed to submit a new W-4.
Update mode resets the withholding information for employees who failed to submit a new W-4.
It inserts a new Federal Tax Data record to reset the employee federal withholding status, marital status, and withholding allowances to the default values. It sets the W-4 processing status to None.
It also updates future-dated records that currently specify exemption from withholding.
Payroll for North America provides these additional reports to track employees' W-4 information:
W-4 Exemptions SQR Report (TAX100).
Lists all employees in each company who are exempt from federal income tax withholding.
W-4 Audit SQR Report (TAX107).
Lists employees who either created or updated their W-4 information through the ePay self-service transaction.
W-4 Print Self-Service SQR Report (TAX108).
Prints employee W-4 information submitted electronically in PeopleSoft Enterprise ePay.
See Also
Understanding W-5 Advance EIC Eligibility Processing
Employees who receive advance EIC payments must complete a new Form W-5 each year to maintain their eligibility.
Note. Advance EIC payments and W-5 processing are discontinued as of January 1, 2011. Pages, fields, and processes are available for use in supporting Advance EIC only through tax year 2010.
Payroll for North America provides:
The PY_W5_EE workflow-enabled process that you can run at the end of each year to identify and notify employees who should complete a new Form W-5.
The TAX113 process to update the Federal Tax Data record of employees who were notified but did not update their W-5 data.
Use this report in list mode to manage W-5 data manually.
W-5 Workflow Processing Steps
This diagram illustrates how workflow processing is used by both the payroll administrator and employee to manage W-5 eligibility processing:
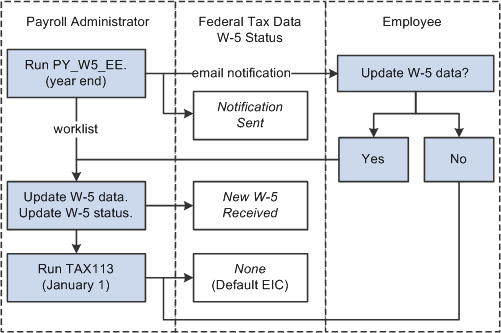
Workflow processing diagram showing how the payroll administrator and employee use the system to manage W-5 eligibility
To process W-5 eligibility using workflow processing, the payroll administrator:
Runs the Determine W-5 Eligibility Application Engine process (PY_W5_EE) to identify and notify employees who must submit a new Form W-5.
Selects the New W-5 Received W-5 Processing Status option on the employee's Federal Tax Data page and updates the other earned income credit information after receiving the updated Form W-5.
A workflow link on the worklist provides easy access to the Federal Tax Data page to enter the data.
Runs the Reset W-5 Eligibility List SQR Report process (TAX113) to reset the EIC information to default values for employees who fail to resubmit the W-5.
Run the Determine W-5 Eligibility process (PY_W5_EE) at year-end to:
Determine which employees must resubmit the Form W-5.
Notify these employees by email that they must resubmit.
Set the W-5 processing status to Notification Sent for employees identified.
Add a worklist instance to the payroll administrator's workflow role to process the new forms as they are received.
The process also produces a list of employees who must resubmit the Form W-5.
The Reset W-5 Eligibility List process (TAX113) selects employees whose W-5 processing status is Notification Sent on Federal Tax Data rows dated on or after the due date specified in the process run parameters.
You can run the process in either Report Only mode or Update mode:
Report Only mode lists employees who failed to submit a new W-5.
Update mode resets the EIC information for employees who failed to submit a new W-5.
It inserts a new Federal Tax Data record to reset the employee EIC status to Not Applicable and sets the W-5 processing status to None.
It also updates future-dated records that currently specify EIC eligibility.
See Also
Pages Used to Process W-4 Exemptions and W-5 Eligibility|
Page Name |
Definition Name |
Navigation |
Usage |
|
RUNCTL_PAY_W4W5 |
Payroll for North America, U.S. Annual Processing, Year-End/New Year Preparation, Determine W-4 Exempt Renewal, Determine W-4 Exempt Renewal |
Run the Determine W-4 Exempt Renewal process (PY_W4_EE) to identify and notify employees who need to file a new W-4. |
|
|
RUNCTL_TAX103 |
Payroll for North America, U.S. Annual Processing, Year-End/New Year Preparation, Reset W-4 Exempt List, Reset W-4 Exempt List |
Run the Reset W-4 Exempt List report process (TAX103) in update or report only mode. If run in update mode, the SQR inserts a new row into employee tax data with default values for employees who do not submit a new W-4 form. |
|
|
RUNCTL_TAX107 |
Payroll for North America, U.S. Annual Processing, Year-End/New Year Preparation, W-4 Audit Report, W-4 Audit Report |
Generate the W-4 Audit Report (TAX107) that lists all employees who either created or updated their W-4 information through the ePay self-service transaction. |
|
|
RUNCTL_TAX108 |
|
Run the W-4 Print Self-Service SQR Report (TAX108) to print Form W-4 information submitted by the employee in the ePay self-service transaction. |
|
|
RUNCTL_TAX100 |
Payroll for North America, U.S. Annual Processing, Year-End/New Year Preparation, W-4 Exemptions Report, W-4 Exemptions Report |
Generate the W-4 Exemptions Report (TAX100) that lists all employees in each company who have elected a federal special withholding tax status. |
|
|
RUNCTL_PAY_W4W5 |
Payroll for North America, U.S. Annual Processing, Year-End/New Year Preparation, Determine W-5 Eligibility, Determine W-5 Eligibility |
Run the Determine W-5 Eligibility process (PY_W5_EE) to identify and notify employees who need to file a new W-5. Note. Advance EIC payments and W-5 processing are discontinued as of January 1, 2011. Pages, fields, and processes are available for use in supporting Advance EIC only through tax year 2010. |
|
|
RUNCTL_TAX103 |
Payroll for North America, U.S. Annual Processing, Year-End/New Year Preparation, Reset W-5 Eligibility List, Reset W-5 Eligibility List |
Run the Reset W-5 Eligibility List report (TAX113) in update or report only mode. If run in update mode, the SQR inserts a new row into employee tax data with default values for employees who do not resubmit Form W-5. Note. Advance EIC payments and W-5 processing are discontinued as of January 1, 2011. Pages, fields, and processes are available for use in supporting Advance EIC only through tax year 2010. |
Identifying and Notifying W-4 Exempt Employees
Access the Determine W-4 Exempt Renewal page (Payroll for North America, U.S. Annual Processing, Year-End/New Year Preparation, Determine W-4 Exempt Renewal, Determine W-4 Exempt Renewal).
|
Company |
Select a company to run the process for all employees in that company only. To run the process for all employees in all companies, leave this field blank. |
Processing Employees Who Fail to Resubmit Form W-4
Access the Reset W-4 Exempt List page (Payroll for North America, U.S. Annual Processing, Year-End/New Year Preparation, Reset W-4 Exempt List, Reset W-4 Exempt List).
Note. Run the Reset W-4 Exempt List process on February 15 of each new tax year.
|
Due date for W-4 forms |
Enter the due date for the W-4 forms. The report uses this date to check for Federal Tax Data records with an effective date on or after the date specified. |
|
Date to be used for Effective date on inserted records |
Enter the effective date to enter on new Federal Tax Data records created by the process for employees who failed to refile. |
|
All Employees |
Select this option to include all employees in this process. |
|
By Company and Company |
Select this option to include specific companies, and enter the company name. |
|
Report Only |
Select this option to identify employees who, although notified by the Determine W-4 Exempt Renewal process, have not filed a new W-4 by February 15 to continue their exemption from withholding. The report also identifies future-dated records. |
|
Update |
Select this option to insert a new Tax record to reset the employee's federal special withholding tax status to None, tax marital status to Single, and withholding allowances to 0. |
Identifying and Notifying W-5 Eligible Employees
Access the Determine W-5 Eligibility page (Payroll for North America, U.S. Annual Processing, Year-End/New Year Preparation, Determine W-5 Eligibility, Determine W-5 Eligibility).
Note. Advance EIC payments and W-5 processing are discontinued as of January 1, 2011. Pages, fields, and processes are available for use in supporting Advance EIC only through tax year 2010.
|
Company |
Select a company to run the process for all employees in that company only. To run the process for all employees in all companies, leave this field blank. |
Processing Employees Who Fail to Resubmit Form W-5
Access the Reset W-5 Eligibility List page (Payroll for North America, U.S. Annual Processing, Year-End/New Year Preparation, Reset W-5 Eligibility List, Reset W-5 Eligibility List).
Note. Advance EIC payments and W-5 processing are discontinued as of January 1, 2011. Pages, fields, and processes are available for use in supporting Advance EIC only through tax year 2010.
Note. Run the Reset W-5 Eligibility List report on January 1 of each new tax year.
|
Due date for W-5 forms |
Enter the due date for the W-5 forms. The report uses this date to check for Federal Data Tax records with an effective date after the date specified. |
|
Date to be Used for Effective Date on Inserted Records |
Enter the effective date to be entered on new records created by the process for employees who failed to refile. |
|
All Employees |
Select this option to include all employees in this process. |
|
By Company and Company |
Select this option to include specific companies, and enter the company name. |
|
Report Only |
Select this option to identify employees who, although notified by the Determine W-5 Eligibility process, have not filed a new W-5 by January 1 to continue their advance payments of EIC. The report also identifies future-dated records. |
|
Update |
Select this option to insert a new Federal Tax Data record to reset the employee's EIC status to Not Applicable. |
Setting Up Employee General Deductions
This section provides an overview of deduction overrides and discusses how to:
Specify the calculation method for general deductions.
(USF) Specify the calculation method for general deductions.
(USF) Enter employee deduction distribution information.
Override general deduction code processing parameters for an employee.
Understanding Deduction Overrides
The system computes regular deductions based on deduction data at the company level and the employee level. You can make permanent or one-time changes to deduction data.
Permanent Deduction Overrides
To make a permanent change to deduction data:
Use the Deduction Table pages to change the basic attributes of a deduction, such as:
Processing priority.
Classification (before-tax, nontaxable benefit).
Effect on FICA gross and FUT gross.
Maximum yearly deduction.
Deduction frequency.
Pay periods in which the deduction is taken.
Use one of the Benefits Table pages (for benefit deductions) or the General Deduction Table page (for nonbenefit deductions) to change how the system calculates a deduction.
Use the Override General Deductions page (for nonbenefit deductions) or the Override Benefits Deductions page (for benefit deductions) to override processing parameters at the employee level that are normally controlled by the Deduction table:
Pay periods in which the deduction is taken.
Information on maximum arrears payback.
Use the Create General Deductions page to change employee-specific deduction data not governed by the Deduction table. This data includes:
The calculation option, with related dollar amounts, rates, or percentages.
Start and stop dates.
A goal amount and current goal balance.
One-Time Deduction Overrides
Enter one-time deduction overrides on the paysheet.
See Recording One-Time Deductions.
See Also
Understanding Deduction Override Processing
Pages Used to Set Up Employee General Deductions|
Page Name |
Definition Name |
Navigation |
Usage |
|
GENL_DED_DATA |
|
Assign general (nonbenefit-related) deductions to an employee and specify the calculation method for a general deduction. |
|
|
GVT_GENL_DED_DATA |
Payroll for North America, Employee Pay Data USF, Deductions, Create General Deductions, Create General Deductions |
Assign general (nonbenefit-related) deductions to an employee and specify the calculation method for a general deduction for a federal-specific general deduction. |
|
|
GVT_EMPE_DIST_SEC |
Click the Distribution Information link on the Create General Deductions page. |
Enter employee distribution information, such as payment method, electronic funds transfer info and check address. |
|
|
GENL_DED_OVERRIDE |
|
Override deduction code settings contained on the Deduction table for a particular employee. |
Specifying the Calculation Method for General Deductions
Access the Create General Deductions page (Payroll for North America, Employee Pay Data USA, Deductions, Create General Deductions, Create General Deductions; or Payroll for North America, Employee Pay Data CAN, Deductions, Create General Deductions, Create General Deductions).
General Deduction
|
Deduction Code |
Select the code for the general deduction that the system should take for this employee. The prompt table lists only those deductions defined for the employee's company on the Company General Deductions page. (CAN) For Canada Payroll Savings (CPS) programs, if both non-RRSP and RRSP options are offered, two deduction codes are necessary. Employees may elect to contribute to both types of accounts concurrently. In this event, two separate general deduction data records must be created; one for non-RRSP contributions and the other for RRSP contributions. |
Deduction Details
|
Effective Date |
Enter an effective date. (CAN) For CPS plans, this date is validated against the election period(s) specified on the Canada Payroll Savings Campaign table to ensure that changes to contribution information are entered for allowable periods. |
|
Take on all Paygroups |
This option applies only to employees who have jobs in more than one pay group. It instructs the system whether to take the deduction when the employee's pay group is not being processed. This field works in conjunction with the Single Check for Multiple Jobs (single check for multiple jobs) field on the Company - Default Settings page and the Priority Number field on the Pay Group Table - Definition page. If the Single Check for Multiple Jobs option is selected, and you select Take on all Paygroups, the system processes this deduction each time a check is issued for the employee, regardless of whether the employee's job in the primary pay group is being paid. If the Single Check for Multiple Jobs option is not selected, and you select Take on all Paygroups, the deduction is always taken when the job in the primary pay group is paid. If you have not defined a primary pay group for the employee, the system takes the deduction only if the job with the lowest priority number, as designated on the Pay Group Table - Definition page, is being paid. |
|
Calculation Routine |
The deduction calculation routine determines how a deduction is calculated for an employee. Values are: Default to Deduction Table: Select to use the deduction calculation routine that is specified on the Deduction table. If you select this option, the system takes the amount or percent from the Deduction table; thus, the Flat/Addl Amount (flat/additional amount) field and the Deduction Rate or % (deduction rate or percent) field on this page are not available for entry. To specify a different amount or percent, you must select an alternate deduction calculation routine and the appropriate amount or percent. Flat Amount: Select to establish the deduction as a flat amount. Enter the amount in the Flat/Addl Amount field, which is treated as an amount per pay period. (CAN) Select Flat Amount for Canada Payroll Savings programs. Percent of Federal Gross: Select to calculate the deduction as a percent of federal gross income. Enter the percent in the Deduction Rate or % field. Percent of Net Pay: Select to calculate the deduction as a percent of net pay. Enter the percent in the Deduction Rate or % field. Percent of Special Earnings: Select to calculate the deduction as a percent of a special accumulator, such as 401(k). Enter the percent in the Deduction Rate or % field. Special accumulator codes are defined on the General Deduction table. Percent of Total Gross: Select to calculate the deduction as a percent of total gross income. Enter the percent in the Deduction Rate or % field. Rate x Hours Worked: Select to calculate the deduction as rate multiplied by hours worked (hours with the Fair Labor Standards Act flag selected). Enter the rate in the Deduction Rate or % field. Rate x Special Hours: Select to calculate the deduction as a rate multiplied by hours that have a special accumulator associated with them. Enter the rate in the Deduction Rate or % field. The special accumulator code is defined on the General Deduction table. Rate x Total Hours: Select to calculate the deduction as a rate multiplied by total hours. Enter the rate in the Deduction Rate or % field. Special Deduction Calculation: Select to indicate that you have written a special calculation that you want to use. This option requires assistance from an IT person. |
|
Ded stopped by Self Serv User (deduction stopped by self-service user) |
If the employee stops a voluntary deduction using the Voluntary Deductions transaction in the ePay self-service application, the system will automatically select this check box. |
|
Distribution Information |
(USF) Click to access the Employee Distribution page. This link is visible only for U.S. Federal Government users. |
|
Deduction Rate or % (deduction rate or percent) |
Depending on the value that you select for the Deduction Calculation Routine field, you may need to enter a rate or percent in this field. This will determine how much to take out for the deduction. |
|
If this deduction is for payback for a low-interest loan, enter the interest rate here. If the loan interest percent specified here is less than the prescribed interest percent in the Canadian Company Tax table, the system calculates a low-interest loan taxable benefit for the employee. If the field is left empty, it is assumed that the interest rate is zero. |
|
|
Flat/Addl Amount (flat/additional amount) |
Depending on the value that you select for the Deduction Calculation Routine field, you may need to enter a flat or additional amount in this field. Note. The system maintains the maximum yearly deduction amount for the deduction in the Deduction table. The system checks this maximum before processing the deduction during the Pay Calculation process. |
|
Goal Amount |
Enter the limit for the total amount of the deduction. After this goal is met, the deduction ends. However, if there is a maximum yearly deduction, and the maximum has been reached, the system does not take the deduction, regardless of whether the goal amount has been reached. For example, if the maximum yearly deduction amount allowed for United Way is 80 USD, and an employee's goal amount for United Way is 100 USD, the system stops taking the deduction when 80 USD is reached. |
|
Current Goal Balance |
Displays the total amount taken to date from the employee's pay for this deduction. The system updates this amount after every payroll run, during the Pay Confirmation COBOL SQL process (PSPCNFRM). When the current goal balance equals the goal amount for this deduction, the system automatically stops taking the deduction. If you want the deduction to start again, you must increase the goal amount to the new total to be deducted. |
|
This data was last updated by and Data last updated on |
Each time the general deduction is updated, the system indicates whether an online user or a self-service web user made the update, and it displays the date of the most recent update. Online users can make updates online using the Create General Deductions page. The employee, also known as the web user, can update using the Voluntary Deductions transaction in the ePay self-service application. |
(USF) Specifying the Calculation Method for General Deductions
Access the Create General Deductions page (Payroll for North America, Employee Pay Data USF, Deductions, Create General Deductions, Create General Deductions).
Note. All fields on this page have the same functionality as the fields on the Create General Deductions page (commercial version), except for the following fields.
|
Deduction Code |
For military deposits, select the military deposit deduction reporting code that you defined in the Deduction table. |
|
Effective Date |
The effective date populated is the system date. You may need to change it. |
|
Distribution Cd (distribution code) |
If distribution has been set up for this deduction in the General Deduction Distribution table, the available distribution codes are visible. If the deduction does not have a distribution code, the field is unavailable for entry. |
|
Distribution Information |
Click this link to access the Employee Distribution page, which holds the details of the deduction distribution. |
|
Deduction End Date |
When a military deposit is closed or canceled, update the deduction end date to stop the deduction from being taken during payroll processing. |
|
Flat/Addl Amount (flat/additional amount) |
For military deposits, the pay period deduction amount that is defined on the Military Deposit Earning Information page. After an employee has been enrolled in military deposits and has chosen to use payroll deductions, the General Deduction Data table is automatically updated with the flat amount and goal amount. |
|
Goal Amount |
For military deposits, the total military deposit liability (the sum of all open deposit accounts, interest, and unscheduled payments). After an employee has been enrolled in military deposits and has chosen to use payroll deductions, the General Deduction Data table is automatically updated with the flat amount and goal amount. |
(USF) Entering Employee Deduction Distribution Information
Access the Employee Distribution page (click the Distribution Information link on the Create General Deductions page).
If a distribution code was selected on the Create General Deductions page, the information from the General Deduction Distribution page appears. If the deduction is an allotment, you must enter the distribution details. If the deduction has a unique distribution for the employee, you must enter the information here. If the deduction does not have a distribution, leave these fields blank.
Electronic Funds Transfer Info
If you select EFT (Electronic Funds Transfer) as the payment method, you must enter the following information:
|
Routing Number |
Enter the routing number (bank transit number). The number must be nine digits. If the account type is Checking or Savings, the system validates the bank transit number that you enter. |
|
Account Number |
Enter the account number. |
|
Account Type |
Enter the type of account: Checking, Expense, Issue Check, Liability, NA (not applicable), and Savings. |
Check Address Information
If you select Check as the payment method, you must enter the check address information.
Overriding General Deduction Code Processing Parameters for an Employee
Access the Override General Deductions page (Payroll for North America, Employee Pay Data USA, Deductions, Override General Deductions, Override General Deductions; or Payroll for North America, Employee Pay Data CAN, Deductions, Override General Deductions, Override General Deductions; or Payroll for North America, Employee Pay Data USF, Deductions, Override General Deductions, Override General Deductions).
If you've defined general deductions on the General Deduction table, you can also use this page to override general deductions. For most companies, you rarely use this page unless you have a policy that offers employees flexibility to take deductions out of a different pay period than the one specified on the Deduction table. Before you can set up employee deductions, you must establish the deductions on the General Deduction Table page and the Deduction Table pages before you can use them anywhere else in the system.
Note. If the multiple jobs feature is enabled, and you've selected the Single Check for Multiple Jobs option on the Company - Default Settings page, enter the override instructions for the employee's primary pay group.
|
Deduction Taken In |
The default pay periods are specified on the Deduction table. To use the default pay periods in the Deduction table, do not select any of these check boxes. To override the default pay periods in the Deduction table, select all of the appropriate check boxes for the pay periods in which this deduction should be taken. Select the corresponding period check box that you want the system to take the deduction in. |
Arrears Payback
|
Select this check box to specify a limit on how much the system deducts from the employee's pay each pay period to reduce an arrears balance. |
|
|
Maximum Amount |
Indicate a limit for how much the system takes when a deduction amount goes into arrears. The amount that you specify here becomes the maximum amount that can be deducted from the employee's pay each pay period to reduce an arrears balance. An arrears balance is created when an employee's net pay in a pay period is insufficient to cover a deduction. In the subsequent pay period, the system may attempt to recapture the arrears balance from the employee's pay during payroll processing; this depends on how you set up deduction payback rules on the Deduction table. There are several ways to use the maximum arrears payback fields:
Note. The system will always try to take any outstanding arrears on the employee's next check—even if the next check is a separate check or a final check. |
See Also
Understanding Deduction Override Processing
Specifying Employee-Level Benefit Deduction Overrides
This section provides an overview of benefit deduction overrides and discusses how to define employee-level benefit deduction overrides.
Understanding Benefit Deduction OverridesBenefit deduction processing override applies to benefit deductions only and overrides the benefit deductions taken value on the Pay Calendar table at the employee level. Multiple job employees can have multiple benefit records and each benefit record can have its own deduction override set up. These are reflected on separate paylines.
Page Used to Specify Employee-Level Benefit Deduction Overrides|
Page Name |
Definition Name |
Navigation |
Usage |
|
DED_SUBSET_BENF |
|
Specify overrides to benefit deductions at the employee level. |
Defining Employee-Level Benefit Deduction Overrides
Access the Override Benefits Deductions page (Payroll for North America, Employee Pay Data USA, Deductions, Override Benefits Deductions, Override Benefits Deductions; or Payroll for North America, Employee Pay Data CAN, Deductions, Override Benefits Deductions, Override Benefits Deductions; or Payroll for North America, Employee Pay Data USF, Deductions, Override Benefits Deductions, Override Benefits Deductions).
|
Deductions Taken |
Select a value to indicate how to take benefit deductions for this employee. The default value is No Override. Selections made on this page override the values that are entered for the pay run in the Benefit Deductions Taken field on the Pay Calendar table:
|
|
Deduction Subset ID |
You must specify the subset ID if you select Deduction Table Subset Governs in the Deductions Taken field. |
Setting Up Direct Deposits
This section provides an overview of direct deposits and discusses how to enter direct deposit information.
Understanding Direct Deposit Setup
In Payroll for North America, direct deposit distributions are performed during the Pay Confirmation process. Enter employee direct deposit distribution data on the Request Direct Deposit page.
Multiple Direct Deposit Distributions
Each direct deposit can be stated as either a percent of net pay or a dollar amount. For example, suppose that an employee wants 100 CAD deposited to a savings account, a 200 CAD check for pocket money, and 100 percent of the remaining net pay deposited to a checking account. To do this, you set up three rows of distribution data:
|
Objective |
Priority |
Account Type |
Amount |
|
100 CAD to Savings |
300 |
Savings |
100 CAD |
|
200 CAD Check |
350 |
Issue Check |
200 CAD |
|
Deposit remainder in Checking |
400 |
Checking |
100% Net Pay |
In this case, make sure that you assign the savings and separate check entries lower priority numbers than the checking account direct deposit; this ensures that they are taken out first. Otherwise, 100 percent of the employee's net pay goes into checking before the system checks the other direct deposit guidelines.
Designate one direct deposit account to receive the remaining funds after all of the other direct deposits are made. To designate an account to receive remaining funds, select Balance as the deposit type. If you do not do this, the remaining balance is issued through a check.
Changing or Discontinuing Direct Deposit
To change or discontinue direct deposits, set up the appropriate effective-dated rows on the Request Direct Deposit page.
Note. You can stop direct deposits for a single paycheck by selecting the Disable Direct Deposit check box on an employee's paysheet. This causes the system to produce an actual paycheck for the employee, rather than a direct deposit.
(USA) Understanding Prenotification
The prenote process is an optional, but strongly recommended, test run for direct deposits to verify that bank IDs and employee account numbers are valid.
Payroll for North America provides these reports that you can use to notify employees of new direct deposit requests so that they can verify the information:
|
Report Name |
Report ID |
Description |
|
Direct Deposit Prenotification |
DDP005 |
For each company and pay period, this reports lists employees that you have added to the direct deposit instructions since the last pay period. It includes Employee ID, priority of the types of deposits, account type, bank ID, and account number. |
|
Direct Deposit Prenote Memo |
DDP006 |
This report prints a memo on your company stationery or memo forms. The text of the memo informs the employee of the direct deposit and lists bank ID, account number, account type, and deposit instructions. |
If you're running the DDP Prenotification report (DDP005) and DDP Prenote Memo report (DDP006), you must run them prior to running the Create Direct Deposit Transmit SQR Report process (DDP001).
Prenote Wait Period
Here is how you manage the prenotification wait period to enable employees to verify new direct deposit information:
On the US Bank Additional Data page, define the number of days required for a prenotification wait period (one-time setup).
Specify the start date of the prenote wait period in the Prenote Date field when you run the Create Direct Deposit Transmit process (DDP001).
U.S. employees who request a new direct deposit continue to receive checks until the prenote period has passed. For example, if the prenote wait period is 10 days and you're running a weekly payroll, employees might receive two paychecks before direct deposit starts.
Prenotification Status and Prenote DateThis table describes prenotification data the system enters on the Request Direct Deposit page during creation and processing of new direct deposits:
|
Processing Step |
Prenotification Status |
Prenote Date |
|
Save new direct deposit record . |
Not Submtd (not submitted) |
Blank |
|
Run the Create Direct Deposit Transmit process (DDP001). |
Submitted |
The date entered in DDP001 process run parameters (blank if no date entered). |
|
Prenote wait period ends. |
Completed |
Remains the same as the value entered in DDP001 process run parameters. |
For example, on January 31 you confirm the payroll for period January 1 to January 31. You run DDP001 on the same day and enter a prenote date of January 31. Ten working days from that date (or whatever time interval you've specified on the Source Bank table), the system changes the prenotification status from Submitted to Completed and direct deposits go into effect.
Prenotification of Changed Direct Deposit Data
To change direct deposits, set up the appropriate effective-dated rows on the Request Direct Deposit page. When you insert a new data row, all values of the previous row are carried over to the new row as default values. You can update most values, but the availability of the Prenotification Reqd (prenotification required) check box depends upon the type of data updated. In addition, the Prenote Date and Prenotification Status values are always system-generated.
This table describes the results of updating and saving the direct deposit record when the Prenotification Reqd check box is selected on the employee's previous data row and the prenotification status of the previous row is Completed:
|
Description of Change |
Prenote Date |
Prenotification Status |
|
|
Changed bank ID or account information. |
Selected and unavailable for change upon saving. To update the check box, exit the page and re-enter in Correction mode. The check box is now selected and available for change. |
Blank |
Not Submitted |
|
Changed percent, amount, or priority with no change in bank ID or account information. |
Selected and unavailable for change. You cannot update this check box if the bank ID or account information has not changed. |
Same as the previous row |
Completed |
|
Changed account type to Issue Check and deleted bank ID and account information. |
Deselected upon saving. If you do not deselect the check box, the system deselects it when you save. |
Blank |
Not Submitted |
See Also
Generating a Direct Deposit File
Pages Used to Set Up Direct Deposits|
Page Name |
Definition Name |
Navigation |
Usage |
|
DIRECT_DEPOSIT |
|
Enter the information to enable the direct deposit of employee pay to checking or savings bank accounts. |
|
|
DIRECT_DEPOSIT_CAN |
Payroll for North America, Employee Pay Data CAN, Request Direct Deposit, Request Direct Deposit |
Enter the information to enable the direct deposit of employee pay to chequing or savings bank accounts. |
|
|
SRC_BANK_PY_SP |
Set Up HRMS, Common Definitions, Banking, Source Bank Accounts Click the Other Required Information link on the Source Bank Accounts page. |
(USA) Specify the number of days in the prenote wait period. |
|
|
RUNCTL_PAYINIT2 |
|
(USA) Run the Direct Deposit Prenotification report (DDP005). The report lists direct deposit information for employees who will have their pay deposited directly into their bank account for the first time. |
|
|
RUNCTL_PAYINIT2 |
|
(USA) Run the Direct Deposit Prenote Memo report (DDP006). The report produces a memo to each employee who has added a new direct deposit. The memo lists the direct deposit information for verification. |
Entering Direct Deposit Information
Access the Request Direct Deposit page (Payroll for North America, Employee Pay Data USA, Request Direct Deposit, Request Direct Deposit; or Payroll for North America, Employee Pay Data CAN, Request Direct Deposit, Request Direct Deposit; or Payroll for North America, Employee Pay Data USF, Request Direct Deposit, Request Direct Deposit).
|
Suppress DDP Advice Print (suppress direct deposit advice print) |
Select this check box to indicate that the employee has elected to receive their pay advice electronically, through the ePay self-service transaction, rather than in print. If part of an employee's check is direct deposited and part is issued in a live check, the live check would also show the direct deposit information. |
(USA) Your Bank Information
|
Country Code |
Enter the country of the bank where the direct deposit is to be sent. |
|
Bank ID |
Enter the identifier for the bank where the direct deposit is to be sent. When you select a bank, its name and address appear. |
|
Add New Bank |
If the employee's bank has not yet been set up in the system, click the Add New Bank button to add the bank to the bank table. |
|
International ACH Bank Account (international automated clearing house bank account) |
If the bank is in the United States, select this check box to indicate that funds are actually going to a non-US bank. This information is included in the direct deposit file that you create with the Direct Deposit Create File process (DDP001). If the bank is not in the United States, the system selects this check box and makes it read-only. |
|
Select this check box if prenotification is required. By default, the check box is deselected. You must select it if prenotification is required. Note. The Prenotification Required check box is available for entry when you make a change to the Bank ID or Account Number fields and only after you save the page and re-enter with Correct History selected. |
Distribution
|
Account Type |
Select the applicable value to indicate a direct deposit to a checking or savings account, or if the system will issue a check: Checking, Savings, and Issue Check. |
|
Deposit Type |
Select Amount if the employee wants a fixed dollar amount to be deposited in this account type. Select Balance if the balance of an employee's pay is to be deposited in this account type. Select Percent if the employee wants a specific percentage of his net pay to be deposited in this account type. |
|
Net Pay Percent and Net Pay Amount |
Enter a specific dollar amount if you selected Amount in the Deposit Type field. Enter a percent if you selected Percent in the Deposit Type field. |
|
(CAN) Bank ID and Branch ID |
Enter a bank ID and enter the five digit branch ID. Note. You must enter a bank ID and account number for each account type. |
|
Enter a priority number for this distribution. During direct deposit processing, distributions are made to accounts in order of their priority number―the lower the priority number, the higher the priority. Priority becomes important when an employee's net pay isn't enough to cover all direct deposits―in this case, only the higher priority deposits are made. |
|
|
Account Number (account number) |
Enter the employee's account number. The account number represents the employee's checking or savings account into which the money should be deposited. |
|
(USA) Prenote Date |
The system enters here the prenote date that you enter in the run parameters for the Create Direct Deposit Transmit process (DDP001). |
|
(USA) Prenote Status |
The system enters a value to indicate the status of the prenotification process:
Note. (CAN) The prenotification process does not apply to Canada. |
Last Updated Page Elements
|
This data was last updated by |
Each time direct deposit data is updated, the system indicates whether an online user or a self-service web user made the update, and it displays the date of the most recent update. Online users can make updates online using the Request Direct Deposit page. The employee, also known as the web user, can make updates using the Direct Deposit transaction in the ePay self-service application. |
Defining Additional Pay Earnings
This section provides an overview of additional pay earnings and discusses how to enter additional pay earnings information.
Understanding Additional Pay EarningsAdditional pay refers to earnings that an employee will be paid on a regular basis in addition to regular pay—a car allowance, for example.
If you want the earnings in the Other Earnings section of the paysheet to be distributed according to automatic tax distribution, you must set up and add the earnings as additional pay (either manually or through an interface) before paysheet creation. If you add the earnings directly to the payline, the system does not apply automatic tax distribution.
Note. Do not confuse additional pay with a one-time payment, such as overtime or an expense reimbursement, which you enter directly on the paysheet.
Page Used to Define Additional Pay Earnings|
Page Name |
Definition Name |
Navigation |
Usage |
|
ADDITIONAL_PAY1 |
|
Override the current job data for each additional pay earning, change default additional pay settings, and override the employee tax data for additional pay earnings. |
Entering Additional Pay Earnings Information
Access the Create Additional Pay page (Payroll for North America, Employee Pay Data USA, Create Additional Pay, Create Additional Pay; or Payroll for North America, Employee Pay Data CAN, Create Additional Pay, Create Additional Pay; or Payroll for North America, Employee Pay Data USF, Create Additional Pay, Create Additional Pay).
Note. (USF) This page can be populated automatically through the USF Hire - Data Control page in PeopleSoft Enterprise Administer Workforce. On the Hire pages, a PeopleSoft Human Resources user can designate compensation data to be pushed to this page. Awards and bonus processing also push earnings codes for additional pay to this page.
Changes that you make to an employee's Additional Pay record can initiate the Retro Pay function. Retro Pay is initiated by any additional pay change with an effective date that is earlier than or equal to the latest pay end date of a check that has already been paid to the employee.
|
Addl Seq Nbr (additional sequence number) |
Every additional pay entry that you set up requires an additional sequence number. The system uses this number to uniquely identify the additional pay and, if necessary, to distinguish it from other rows of data that you set up. For example, you may charge the additional pay to different departments. The additional sequence number you enter here is brought forward to the Paysheet pages. The additional sequence number should always be 1, unless there are multiple Additional Pay records for an earnings type. |
|
End Date |
Specify the date on which the additional pay should end. If the additional pay end date is equal to a pay period begin date, the system does not add the additional pay to the paysheet for that pay period. If the additional pay end date is not equal to a pay period begin date, the additional pay will apply for that pay period. For example, the employee is on a monthly pay frequency and will be working in the Controller's office for only six months, January 2 through June 30. The employee's pay period begin date is June 1 and the pay period end date is June 30. If you enter June 30 as the additional pay end date, it will be paid for the month of June. It will stop effective July 1. If you enter July 1 as the additional pay end date, it will not show up on the July paysheet. If you enter July 2 as the additional pay end date, it will continue to be paid for the month of July and will stop with the August payroll. |
|
Rate Code |
You can apply a compensation rate code to an Additional Earnings record by selecting a rate code. If you select a rate code for the additional earnings, the system uses the rate or percent defined for the rate code on the Compensation Rate Code table, Job Code table, or Employee Compensation table. Therefore, after you've selected your rate code, the system makes the Earnings and Hourly Rate fields unavailable on this page. |
|
Reason |
Indicate the reason the employee is receiving additional pay. Although this field is not used for payroll processing, the system generates a new Pay Earnings record for each additional pay earnings code where you have defined a different reason. You create your own reason codes according to your business needs. Payroll for North America delivers one reason code, BAS Credit. This reason code is populated by data from PeopleSoft Enterprise Benefits Administration. |
|
Earnings |
Enter a flat amount for the additional pay earnings. Each additional pay entry must either be a fixed or a variable amount, but not both. If the additional pay entry is a fixed amount, you must enter the fixed earnings amount in this field. |
|
Hours |
Enter the number of hours that are payable for the additional pay earnings. Each additional pay entry must either be a fixed or a variable amount, but not both. If the additional pay entry is variable, depending on the number of payable hours, then you must enter those hours in the field and the hourly rate in the Hourly Rate field. For example, assume there is a nurse that, aside from her normal routine, works eight hours in the Intensive Care Unit (ICU). Her regular rate of pay is 25 USD per hour. However, when she works in the ICU, she is paid an additional 10 USD per hour, thus, making 35 USD per hour. In this scenario, to account for this additional pay, enter 8 in the Hours field and enter 10 in the Hourly Rate field. |
|
Hourly Rate |
Enter the hourly rate. The hourly rate comes from the Job record if this field is blank. |
|
Goal Amount |
Enter a goal amount. This causes the system to stop the additional pay after the amount has been reached. |
|
Goal Balance |
The system updates the balance every time you run the Pay Confirmation process. |
|
Sep Check Nbr (separate check number) |
Enter a check number from 1 to 99 in this field, if you want the additional pay to be paid on a separate check. In one payroll run, the system can produce up to nine separate checks per employee, in addition to the regular paycheck. The additional pay is put on the check that you specify here. If you leave this field blank, the additional pay is included with regular pay in one paycheck. If the employee has multiple jobs, and you plan to select a deduction subset in the Tax Information group box, enter a check number in this field. Otherwise, the deduction subset is ignored and the standard deductions are taken. |
|
Disable Direct Deposit |
Select this check box if the additional pay will be paid by check versus direct deposit to the employee's bank account. In this case, a separate check is processed for the additional pay amount when a sequence number is entered in the Sep Chk Nbr field. |
|
Prorate Additional Pay |
Select this check box if you want the system to prorate the additional pay, based on the employee's Job record. If the employee has a mid-period, effective-dated change on their Job record, the system prorates the additional pay. The system does not prorate the additional pay based on the effective date of this Additional Pay record. Important! Always select this check box if the additional pay earnings code is based on another earnings code. |
|
OK to Pay |
Select this check box if the employee is to be paid automatically. In contrast, if the employee's additional pay must be approved before payment, do not select this check box. In this case, after approving the payment, the person manually selects the OK to Pay check box on the Paysheet page. If the employee is set up to receive more than one check, each check has its own OK to Pay check box on the Paysheet pages. |
Applies to Pay Periods
Select the pay periods in which this additional pay should be identified on the paysheets. For example, if an employee is paid twice a month, there are only two pay periods. Thus, you can select only the First or Second check box or both of those check boxes. If you selected both, the employee would receive the additional pay on each of his or her semimonthly checks.
When processing a payroll, the system checks the pay calendar and then the additional pay data to determine what applies to the pay period.
This group box displays the accounting information as entered on the employee's Job record. By default, additional pay is charged to the same department, job code, and general ledger account as the employee's regular pay. You can override this information in the Job Data Override group box.
The fields in this group box enable you to make adjustments to individual additional pay earnings. You also use this section of the page for other reasons. For example, you may have an employee who works a few hours a week in a department other than the one on that employee's Job record. To ensure that the department shown on the Job record is not charged for the time the employee spends in the other department, you could create an additional pay entry and enter the applicable information for the other department. If you enter information in any of these fields, the system creates a separate Pay Earnings record on the paysheet.
|
Position, Business Unit, Department, Job Code, Combination Code, and GL Pay Type (general ledger pay type) |
Select any of these fields to override the default value. |
|
Addl Shift (additional pay shift) |
Select 1 for the first shift. Select 2 for the second shift. Select 3 for the third shift. Select N/A (not applicable) for no shift. Select Use Job to use the shift specified on the employee's Job record. |
|
State |
Enter the state that the employee worked in, if different from the employee's regular pay. This field is validated against the employee's state and local tax data. |
|
Tax Periods |
Enter the number of pay periods over which to spread the tax for these earnings. The system uses this field in conjunction with the Tax Frequency field to determine how much tax to withhold each pay period. For example, if the employee's additional pay earnings were set up as biweekly, and you entered 3 in this field, the taxes are calculated as if they were earned over a six-week period. |
|
Locality |
Enter the locality the employee worked in, if different from the employee's regular pay. This field is validated against the employee's state and local tax data. |
|
Tax Method |
The tax method indicates the tax calculation method to be used for the additional pay. For example, for a U.S. employee receiving a monthly bonus payment in a state other than California, select Supplemental. In contrast, for a Canadian employee receiving the same bonus payment, select Bonus. Select one of these values: (USA) Aggregate: Select to tax the lump sum of the current payment with a previous payment. The system takes the last confirmed paycheck for that pay period and adds the current payment to it. Taxes are calculated on that lump sum amount, the taxes that were withheld on the confirmed check are subtracted, and the resulting tax difference is the tax for the current payment. Annualized: Select to annualize the earnings, calculate the tax on the annualized amount, and divide the tax by the number of pay periods in the year. The result is the withholding for the pay period. This is the most common tax method. (CAN) Bonus: Select to tax bonus payments. (CAN) Commission: Select to tax commission payments. Cumulative: Select to add together the year-to-date earnings and the earnings for this pay period, annualize the result, and calculate the annualized tax. The system deannualizes the tax by dividing it by the number of tax periods you specified on the paysheet. The result is compared to the year-to-date withholding; if it is greater than the year-to-date withholding, the difference becomes the withholding for the pay period. You generally use this for employees whose wages vary significantly from pay period to pay period, such as salespeople on commission. (CAN) Lump Sum: Select to tax lump sum payments. Paysheet: This is not a valid tax method for additional pay. If you select a tax method of Paysheet, the system generates an online error message. (USA) Supplemental: Select to calculate taxes as a straight percentage of earnings. This method is typically used for one-time pays, such as bonuses. For example, federal supplemental withholding is 25 percent of earnings. Some states vary the percentage based on annual income, while some states require PeopleSoft-maintained tax tables to calculate withholding. (USA) Special Supplemental: Select to calculate California state taxes on bonus and stock option payments. The California tax percentage is higher for these payment types than for other types of supplemental wage payments, such as commissions and overtime pay. |
|
Tax Frequency |
Select the frequency for calculating taxes for the additional pay if the tax frequency is different from the pay frequency set up in the Job record: Annual, Biweekly, Daily, Monthly, Quarterly, Semimonthly, Use Pay Group Frequency, Weekly. |
|
Benefit Deductions Taken |
Select a value to indicate how to take benefit deductions for this additional pay that is paid on a separate check. The default value is NoOverride. Selections made on this page override the values entered for the pay run in the Benefit Deductions Taken field on the Pay Calendar table and any employee-level overrides entered on the Benefit Deduction Processing Override page:
|
|
Benefit Ded Subset ID (benefit deductions subset ID) |
You must specify the subset ID if you select Subset in the Benefit Deductions Taken field. If the employee has multiple jobs, and you are entering more than one set of additional pay instructions with the same separate check number, select the same benefit deduction subset ID. If you select different subsets, the system applies the deduction subset associated with the lowest additional sequence number with the same separate check number. |
|
General Deductions Taken |
Select a value to indicate how to take general deductions for this additional pay that is paid on a separate check. The default value is NoOverride. Selections made on this page override the values entered for the pay run in the General Deductions Taken field on the Pay Calendar table and any employee-level overrides entered on the Payroll Options 2 page:
|
|
General Ded Subset ID (general deductions subset ID) |
You must specify the subset ID if you select Subset in the General Deductions Taken field. If the employee has multiple jobs, and you are entering more than one set of additional pay instructions with the same separate check number, select the same deduction subset ID. If you select different subsets, the system applies the deduction subset associated with the lowest additional sequence number with the same separate check number. |
See Also
Understanding Canadian Tax Methods
Maintaining Optional Payroll Data
This section discusses how to:
Enter optional employee payroll processing information.
Enter other optional employee payroll processing information.
Note. The following payroll data pages are not required for payroll processing, with the exception of multiple jobs processing when the single check option has been selected.
Pages Used to Maintain Optional Payroll Data|
Page Name |
Definition Name |
Navigation |
Usage |
|
PAYROLL_DATA1 |
|
Enter optional employee distribution mail options and address. |
|
|
PAYROLL_DATA2 |
|
Enter paycheck location options, deduction options and primary pay group data. |
Entering Optional Payroll Processing Information
Access the Payroll Options 1 page (Payroll for North America, Employee Pay Data USA, Update Payroll Options, Payroll Options 1; or Payroll for North America, Employee Pay Data CAN, Update Payroll Options, Payroll Options 1; or Payroll for North America, Employee Pay Data USF, Update Payroll Options, Payroll Options 1).
Paycheck Delivery Option
This field is used by the check print program to indicate what address it should print under the employee's name on the check stub.
|
Company Distribution |
Select to indicate that the check should be handed out as part of a regular company distribution. |
|
Postal Service |
Select to indicate that the check should be mailed using the Postal Service. |
Distribution Mail Option
|
Home Address |
Select this option to send checks to the employee's home address. The system automatically displays the home address from the employee's personal data in PeopleSoft Human Resources. |
|
Mailing Address |
Select this option to send checks to the employee's mailing address. The system automatically displays the mailing address from the employee's personal data in PeopleSoft Human Resources. |
|
Check Address |
Select this option to send checks to the employee's check address. The system automatically displays the check address from the employee's personal data in PeopleSoft Human Resources. |
|
Update Check Address |
Click to update the employee's check address here, rather than on the Personal Data component (PERSON). Note. Do not use this link to update addresses of payees or beneficiaries paid through PeopleSoft Enterprise Pension Administration. See Creating Payees. |
Entering Other Optional Payroll Processing Information
Access the Payroll Options 2 page (Payroll for North America, Employee Pay Data USA, Update Payroll Options, Payroll Options 2; or Payroll for North America, Employee Pay Data CAN, Update Payroll Options, Payroll Options 2; or Payroll for North America, Employee Pay Data USF, Update Payroll Options, Payroll Options 2).
Note. When a new PAYROLL_DATA record is created, for example when an employee transfers companies, the Payroll Options 2 page displays default values of Home Department Location selected as the paycheck location option and NoOverride selected as the Deductions Taken option. the Mail Drop ID and Paycheck Name fields are blank. You are responsible for verifying that all values on this page, including the primary pay group, are correct for each employee.
|
Identifies the pay group for which a consolidated paysheet will be created when an employee is being paid in different pay groups during the same pay run. The primary pay group also controls whether deductions or additional pay should be taken for the pay period. For employees with multiple jobs, PeopleSoft recommends that you select, as the primary pay group, the one in which the employee is paid most often. If you leave this field blank, the system uses the default pay group that is associated with the first job into which the employee was hired. |
These fields specify which location code is used as a sort option for printing paychecks for this pay group. These options are used only if:
The Company Distribution Order option is selected as the paycheck sequence option on the Pay Group Table - Check Distribution page.
The Select on Payroll Data Panel option is selected as the paycheck location option on the Pay Group Table - Check Distribution page.
The location is entered as a check print sequence on the Pay Group Table - Check Sequencing page.
Note. You must create location codes in the Location table before you can use them here or elsewhere in the system.
|
Home Department Location |
The location code (in the Department table) that is associated with the department ID on the employee's Job record is used as a sort option for printing checks. |
|
Job Location |
The location on the employee's Job record is used as a sort option for printing checks. |
|
Other Location |
Enter a different location code to use as a sort option for printing checks. In this case, the system uses the Designated Agent Address and transmits the check for office delivery. If you select the Other Location option, you also must select a setID and a location code. |
|
SetID |
Select the setID for the location code. |
|
Location CD (location code) |
Select a location code to indicate this location as a sort option for printing checks. Use this option only if the Select on Payroll Data Panel option is selected as the paycheck location option on the Pay Group Table - Check Distribution page. |
|
Mail Drop ID |
Enter the employee's mail drop ID. |
|
Paycheck Name |
Use this field to indicate a name, other than the employee name entered on the Personal Data record, to whom the paycheck should be made out. This field is not formatted, so enter the name exactly as you want it to appear on the paycheck. |
|
Deductions Taken |
Select a value to indicate how to take deductions for this employee. Selections made on this page override the values entered for the pay run in the General Deductions Taken field on the Pay Calendar table. Values include:
|
|
Deduction Subset ID |
You must specify the subset ID if you select Subset in the Deductions Taken field. |
Maintaining Garnishments, Savings Bonds, and Other Payroll Data
This section discusses how to:
Administer garnishment data.
Administer savings bond data.
(E&G) Administer employee contract data.
(CAN) Administer Canadian low interest loan payroll data.
(CAN) Administer Canada Payroll Savings plan data.
(USA) Administer employee tip allocation data.
(USF) Administer military deposit payroll data.
(USF) Administer employee Individual Retirement Record data.
(USF) Administer employee accrual enrollment.
(USF) Administer W-2 and W-2C information.
Administering Garnishment DataSee Administering Garnishments.
Administering Savings Bond DataSavings bonds are addressed separately for the U.S. and Canada.
See Also
Administering the Canada Savings Bond Program
Reviewing U.S. Savings Bonds Purchases
(E&G) Administering Employee Contract DataSee Adjusting Contract Employee Prepay Balances.
(CAN) Administering Canadian Low Interest Loan Payroll DataSee Administering Canadian Low-Interest Loans.
(CAN) Administering Canada Payroll Savings Program DataSee Administering Canada Payroll Savings Programs.
(USA) Administering Employee Tip Allocation DataSee Allocating Tips.
(USF) Administering Military Deposit Payroll DataSee Crediting Military Service to Civilian Retirement.
(USF) Administering Employee Individual Retirement Record DataSee (USF) Generating IRR and ROST Reports.
(USF) Administering Employee Accrual Enrollment(USF) Administering W-2 and W-2C InformationW-2 functionality is documented with year-end tax updates.
See Accessing Year-End Processing Instructions.