 Understanding Workgroups
This chapter provides an overview of using workgroups and discusses how to:
Set up workgroups.
Make workgroup transfers.
Make changes to a rule program for a workgroup.
Understanding Workgroups
A workgroup is a group of time reporters who share identical compensation requirements. For example, a workgroup may include all time reporters:
In the same business enterprise.
In the same pay group.
In the same union or union local.
At the same work location.
Each time reporter who reports time through Time and Labor must belong to a workgroup. In addition, the Time Administration process applies rules by workgroup. A workgroup must be created before any process that uses it.
When selecting a workgroup for an employee with multiple jobs, keep in mind that you need to enroll each job in the same workgroup, in order for each job to be considered for rules that combine data for processing in the same batch.
See Also
 Common Elements Used in This Chapter
|
Reporting Time Type |
You specify the time reporting type you want the system to process for a workgroup. The two Time Types are Exception Time Reporting and Positive Time Reporting. |
|
Compensation Controls |
The Compensation Controls allow the system to validate the compensation criteria that is specific to your Rule Program, TRC Program, or Holiday Schedule setup. |
|
Rounding |
You must select Rounding Options based on your company's time reporting requirements. Selecting an option will ensure that the time the time reporters enter is properly rounded. |
|
Day Breaker |
Enables you to define the point where one day crosses over to the next as the "day breaker." Although the day breaker is usually midnight—the moment when one calendar day becomes the next—you can set the day breaker to a different time to create virtual days that more closely mirror actual shifts worked. The system uses the day breaker to determine the exact "date under report" (DUR) of each punch or collection of punches that comprise the shift. |
|
Time Reporting Codes (TRCs) |
Enables you to define the level at which an organization actually needs to track employee time to support its administrative and compensation needs. For example, for payroll processing you establish an Earnings Code for Regular time (REG) and for time reporting you establish TRCs for all versions of regular time, such as tardy-paid, meeting-nonproductive, sick-paid, and so on. |
|
Date under report (DUR) |
The actual date of the time being reported for a shift as defined by the Day Breaker Options and Day Breaker Range. |
See Also
Understanding the Batch Process in Time Administration
Workgroup RequirementsTo meet the requirements for belonging to the same workgroup, a group of time reporters must:
Be associated with the same time reporting type: Exception Time Reporting or Positive Time Reporting.
Use the same holiday schedule if you're going to control the holiday schedule at the workgroup level.
Note. The system first checks for a holiday schedule on the JOB record. If one is not found there, it uses the pay group schedule, and if no schedule is associated with the pay group, it defaults to the workgroup schedule.
Use the same TRC Program (which is composed of Time Reporting Codes).
If the workgroup is for exception reporters, they must share work schedules for creating payable time if the default work schedule is selected for the time reporter.
Use the same compensation rules and the same time period to assist in determining the period of interest for Time Administration.
Use the same approval requirement.
Use the same day breaker—the time used to determine when one day becomes the next.
Use similar rounding rules for rounding punch and elapsed time.
They can share the same association to a Compensatory Time Off Plan.
Workgroups and Referential IntegrityWhen you make a change to one area of the application, Referential Integrity makes sure that these changes do not adversely affect another area of the application. It checks for retroactive changes to effective-dated setup data or employee related data that could invalidate related objects or values in the system.
The following tables describe Referential Integrity actions that occur when certain changes, inactivations, or deletions are made to workgroup data.
Prevent Inactivation or Deletion of Effective-Dated Rows
You cannot inactivate a workgroup or delete effective-dated rows in the following cases:
|
Feature |
Action |
|
Workgroup |
You cannot inactivate a workgroup if the workgroup is associated to a time reporter on the Create/Maintain Time Reporter Data pages. You cannot delete an effective-dated row if the deletion invalidates an association to a time reporter on the Create/Maintain Time Reporter Data pages. |
Execute Error Edit Checking
You cannot change the effective date of the target table to be greater than the effective date of the prompt table. This prevents an invalid association between the prompt value and the target table.
|
Target Table |
Prompt Table |
|
Workgroup |
Rule Program ID TRC Program ID Compensatory Time Off Plan Schedule ID Overtime Limit ID |
Nested Effective Dates
You cannot change the effective date of the source table to be greater than the effective date of the target table. This ensures the validity of a value that acts as a prompt on another page.
|
Source Table |
Target Table |
|
Workgroup |
Create/Maintain Time Reporter Data |
Setting Up Workgroups
To set up workgroups, use the Workgroup (TL_WKG_MAIN_PNLGRP) component. Use the TL_WKG_MAIN_PNLGRP component interface to load data into the tables for this component.
Here's how to define workgroups:
Enter basic parameters and approval requirements (if necessary).
Define the reporting time type.
Define the compensation controls.
Specify the workgroup defaults such as Schedule ID, Time Period ID, Comp Plan, and if and how the system generates and forecasts time based on schedules and holidays.
Set up rounding options.
Set up day breaker options.
Page Used to Define Workgroups|
Page Name |
Definition Name |
Navigation |
Usage |
|
TL_WRKGRP_DEF |
Set Up HRMS, Product Related, Time and Labor, Rules and Workgroups, Workgroup, Definition |
Define defaults, rounding options, and day breaker options for a workgroup. |
|
|
TL_WRKGRP_APPV |
Set Up HRMS, Product Related, Time and Labor, Rules and Workgroups, Workgroup, Approval |
Define approval options for a workgroup. |
|
|
TL_APP_GRPS_SEC |
Click the Approval Group link on the Workgroup - Approval page. |
Displays the correct approval groups and instructions to help with the setup for approval usage. |
Entering Basic Parameters, and Status
Access the Workgroup - Definition page (Set Up HRMS, Product Related, Time and Labor, Rules and Workgroups, Workgroup, Definition). Name every workgroup and define its basic parameters and status.
|
Status |
Valid values for Status are Active or Inactive. If you change the status of a workgroup to Inactive as of a particular effective date, the system will check if any time reporter is associated with the workgroup as of that effective date. If the association exists, the inactivation of the Workgroup will not be allowed. |
Note. The following fields on this page trigger Referential Integrity: Approve Payable Time, Rule Program ID, TRC Program ID, Holiday Schedule, Comp Plan, Schedule ID, Day Breaker, Day Breaker Options, Day Breaker Range, Rounding Options , Rounding Interval, and Rounding Marker. Additionally, if the Create Partial Work Hours for Partial Absence or the Exclude Holiday for Generating Timeoptions are changed for exception time reporting workgroups, Referential Integrity is triggered. For positive time reporting workgroups, modifying these options does not trigger Referential Integrity. For these fields, Referential Integrity ensures that if a time reporter's Earliest Change Date is less than the effective-dated change of the setup table, the Earliest Change Date will not be updated. If, however, the Earliest Change Date is null or greater than the effective date of the setup table change, the Earliest Change Date will be updated to the minimum effective date of Reported or Payable Time for the time reporter.
See Also
Understanding the Batch Process in Time Administration
Entering Approvals
Access the Workgroup - Approval page (Set Up HRMS, Product Related, Time and Labor, Rules and Workgroups, Workgroup, Approval). Name every workgroup and define its basic parameters, approvals and status.
Note. The Approve Payable Timefield on this page triggers Referential Integrity.
|
Approve Reported Time |
Select this check box if a manager's approval is required for reported time. Leave the check box clear if you do not want a manager to approve reported time. The Approve Reported Time feature is another option for approval of time. If selected, it requires that a manager approve the actual time that was reported versus payable time that has been processed by the Time Administration process. If you have Approve Reported Time selected, then when reported time is submitted, it will require approval before the Time Administration process selects the time, processes it, and generates payable time. If time is not approved, time will not be selected and run by the Time Administration process, and payable time will not be generated. |
|
Approve Payable Time |
Select this check box if a manager's approval is required before the time reporters in this workgroup can be paid. If this check box is selected and payable time is not approved by a manager, time reporters will either not be paid or their time will not be finalized. Leave the check box clear if you do not want a manager to approve the time in order to be paid. If you change the value of this check box after time has been reported, the Validation process checks for any affected reported time. Affected instances of time need to be rerun through Time Administration to generate and update the status of Payable Time to either Needs Approval or Estimated, depending on the change you made. If the time reporter is recognized as not using any payroll system (based on the Send to Payroll flag on the Create/Maintain Time Reporter page), the Needs Approval status needs to remain as the only method of closing the time. |
|
Approval Process ID |
Displays the Time and Labor process ID. The process ID identifies the approval transaction. |
|
Approval Definition ID |
Select the approval definition created for Time and Labor approvals. The definition ID also identifies the appropriate approval definition. |
|
Approval Group |
Click to display the TL Approval Groups page. This link is available when the selected Approval Definition ID requires a Time and Labor approval group. |
|
Adhoc Approval Group |
Select an adhoc approval group ID that is set up for approvals. You can insert adhoc approval group users into the approval process flow, along with the original approver. |
See Also
Selecting Approval Groups
The selected Approval Definition ID generates an approval routing based on the selected definition. For example, TLGroupMutlipleStageALL has two stages with one path, and one step within each stage. The request reaches final approval status when all of the Stage 1 approvers and then all Stage 2 approvers have approved the request. Based on the selected Approval Definition ID, the TL Approval Groups page displays the correct approval groups and instructions to help with the setup for approval usage.
Access the TL Approval Groups page (Click the Approval Group link on the Workgroup - Approval page).
|
Approval Group for Stage 1 - Path 1 |
Select the group of Stage 1 approvers. |
|
Approval Group for Stage 2 - Path 1 |
Select the group of Stage 2 approvers. Note. The Stage 2 approvers cannot approve a request until after the Stage 1 approvers have approved the request. |
Defining the Reporting Time Type Group Box
Access the Workgroup page (Set Up HRMS, Product Related, Time and Labor, Rules and Workgroups, Workgroup, Workgroup). Access the Time Type group box.
If you change the Time Type for the workgroup from Positive to Exception, the effect is the ability to automatically create time for a given population by turning default schedule information into Payable Time.
If you change from Exception to Positive, time cannot be created for time reporters based on schedules--all time needs to be positively reported.
When you make a change to the Time Type, the next time the system runs Time Administration, it will take into account the new time type.
Note. We recommend that you enter positive or exception time reporting into your description of each workgroup. This enables you to determine the workgroup to which you want to assign the time reporters from the Create Time Reporter Data page, or the Maintain Time Reporter Data page. It is important that you categorize your employees correctly, because Time Administration creates Payable Time differently for exception and positive time reporters.
Defining Compensation Controls
Access the Workgroup page (Set Up HRMS, Product Related, Time and Labor, Rules and Workgroups, Workgroup, Workgroup). Access the Compensation Controls group box.
|
Rule Program ID |
Enter a Rule Program ID. To set up a rule program, you must use the Rule Program page. Although this field is not required when you create a workgroup, the Rule Program ID is needed in order for the time reporters in this group to have rules applied during Time Administration rules processing. If you try to save the page without entering a value in this field, you will get a warning message. The message will not prevent you from saving the page. You can save the page and come back to assign a Rule Program ID after you have your rule programs defined. If a time reporter reports time with a valid TRC, Time Administration will create payable time even if their workgroup has no rule program: Time Administration will round, distribute tasks, and validate time without running rules. If the TRC is invalid, the system will generate an exception. For elapsed time reporters, exceptions will be created for all positively reported time that doesn't have a valid TRC. If you change the rule program attached to a workgroup, the Referential Integrity process will determine the Payable Time affected by this change, and trigger Time Administration to reprocess this time. |
|
TRC Program ID |
Select a TRC Program ID. TRC programs contain the list of TRCs that the system uses to create payable time for time reporters belonging to this workgroup. When workgroup members report time through the Elapsed Timesheet, only TRCs in this TRC program will appear in the TRC field. If you try to change the TRC program attached to this workgroup, the Referential Integrity process will trigger Time Validation to check any reported or payable time that might be affected by this change. If there is any such time, the system creates exceptions and you will have to adjust the TRC to address the exceptions. If time is reported through the TCD Interface or Rapid Entry process and contains invalid TRCs, the system will create exceptions for these instances of time. If the interface includes new TRCs that should be added, you can add the new TRCs to the appropriate TRC program. When you add the new TRCs, the system should delete the exceptions. |
|
Overtime Limit ID |
Select the Overtime Limit ID (if applicable), that applies to the members of the workgroup. |
See Also
Establishing Time Reporting Codes
Adding Rules to a Rule Program
Setting Up Rounding Options
Access the Workgroup page (Set Up HRMS, Product Related, Time and Labor, Rules and Workgroups, Workgroup, Workgroup). Access the Rounding Options group box.
There are three types of rounding in Time and Labor:
|
Round Punches Before Rules (pre-rules rounding) |
Pre-rules rounding applies only to punch time data. It does not apply to elapsed time. If you want to apply pre-rules rounding, select Round Punches Before Rules. If you select this option, the system rounds all reported punches before applying rules to the time in Time Administration. Even though you have selected Round Punches Before Rules, rules that require actual punch times continue to evaluate time as it was originally reported. For example, rules that track attendance (late punches, for instance) continue to evaluate the originally reported time. In addition, you can create custom rules that evaluate time as it was originally reported, as the original time remains available for use in rules even when Round Punches Before Rules is selected. |
|
Round Day Before Rules (Punch) |
Select this option for daily rounding of punch time before Time and Labor rules are processed, but after the Day Breaker is applied. Using this option, punch time is not changed, but the duration associated with the first punch (IN) for the day is adjusted. |
|
Round Duration After Rules (post-rules rounding) |
Post-rules rounding can be applied to punch time as well as elapsed time. Post-rules rounding is applied after rules have been processed, but before time is transferred to Payable Time. To enable post-rules rounding, select Round Duration After Rules and then choose one of the following rounding options: Segment: Select this option if you want the system to round each segment of reported time and then sum all like segments before transferring the data to Payable Time. Day: Select this option if you want the system to sum all like segments that belong to a single day and then apply rounding rules. |
Note. For punch time reporters, a segment is the duration between one punch and the next punch. For elapsed time reporters, a segment is one entry of time for a specific day. For example, if a time reporter reports 4 hours of REG and 4 hours of OT on one day, each entry of 4 hours would be considered a "segment." Two segments are considered "alike" if all the information in reported time (and all relevant fields in the TL_RPTD_TIME table) except TL_QUANTITY is the same.
Rounding in Time Administration
The units of time for Round Punches Before Rules is hours and minutes. Since this applies to punch time only, all pre-rules rounding is exact, because the rounding logic parameters are in minutes.
For post-rules rounding, the punch time is converted from standard hours and minutes to decimal time before the rules are processed to enable the punch time and elapsed time to be combined in the rules process.
For example, 8 hours and 30 minutes converts to 8.50 hours, and 8 hours and 29 minutes converts to 8.483333 hours.
When post-rules rounding is applied, the system performs the following conversions to the time units:
The punch time is converted from hours and minutes to decimal time.
When the post-rules rounding is applied, the time is converted into hours and minutes.
The time is then rounded and then converted back to decimal time.
The back-and-forth time conversion for post-rules rounding means that rounding differences occur even when the rounding rules are not applied.
The following table shows the differences that are encountered when minute values are converted to decimal time and then back to minutes:
|
Punch Time Minutes |
Conversion to Decimal Time in TL_QUANTITY |
TL_QUANTITY Rounded to Five Decimal Places |
TL_QUANTITY Converted Back to Minutes |
Difference Between Original Entry and Final Converted Time |
|
1 |
0.0166666667 |
0.016670 |
1.000200 |
Plus .0002 |
|
2 |
0.0333333333 |
0.033330 |
1.999800 |
Minus .0002 |
|
3 |
0.0500000000 |
0.050000 |
3.000000 |
No Difference |
|
4 |
0.0666666667 |
0.066670 |
4.000200 |
Plus .0002 |
|
5 |
0.0833333333 |
0.083330 |
4.999800 |
Minus .0002 |
|
6 |
0.1000000000 |
0.100000 |
6.000000 |
No Difference |
|
7 |
0.1166666667 |
0.116670 |
7.000200 |
Plus .0002 |
|
8 |
0.1333333333 |
0.133330 |
7.999800 |
Minus .0002 |
|
9 |
0.1500000000 |
0.150000 |
9.000000 |
No Difference |
Note. The values in the Difference column of this table repeat for every three minutes up through a value of 59 minutes in the Punch time Minutes column.
Intervals and Markers
After you have selected a rounding option, define your option by specifying a Rounding Interval and a Rounding Marker.
|
Rounding Interval (Mins) |
A rounding interval represents the number of minutes comprising a segment of an hour. For example, if you select 15 (minutes) in the Rounding Interval field, the following 4 intervals will be created for each hour: Interval 1: x:00 to x:15 Interval 2: x:15 to x:30 Interval 3: x:30 to x:45 Interval 4: x:45 to x:00 |
|
Rounding Marker (Mins) |
Rounding markers work in conjunction with rounding intervals (defined above) to define rounding rules: the rounding marker is a point in time in relation to which the system rounds either up or down within an interval. So if we return to the preceding example of four 15 minute rounding intervals, and select a rounding marker of 10 minutes, both the intervals and markers can be represented as follows: |
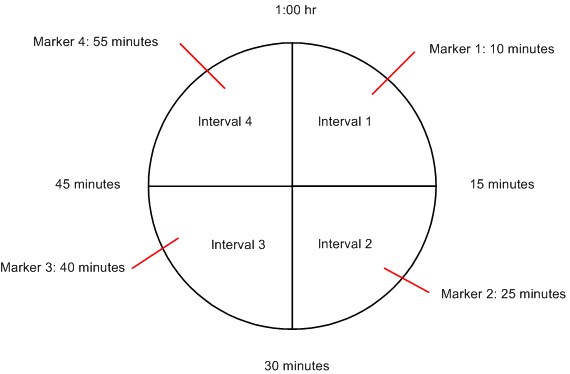
Intervals and Markers
As illustrated in this example, each interval contains a corresponding rounding marker. A rounding marker cannot exceed the number of minutes in an interval, and occurs as many minutes after the start of each interval as the value you enter in the Rounding Marker field. So, in this example, the rounding marker occurs 10 minutes into each interval.
The way rounding intervals and rounding markers are used depends on whether you are using pre-rules rounding or post-rules rounding:
Pre-Rules Rounding
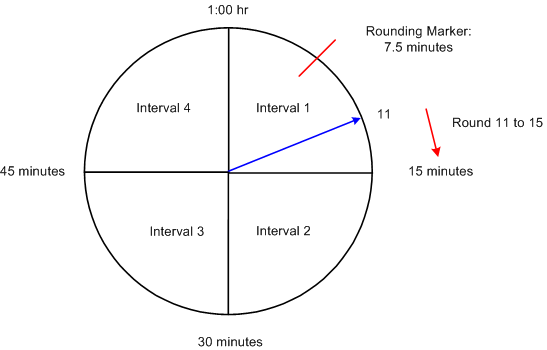
If you are rounding punches (pre-rules rounding), the system uses the rounding interval together with the rounding marker to round each punch to the closest start or end point of the interval in which the punch was made. The system then calculates the difference between each in and out punch and sends the resulting duration to Time Administration for rules processing. If a punch is made prior to the rounding marker, the system rounds down to the beginning of the interval. If a punch falls either directly on or after the rounding marker, the system rounds up to the end of the interval. A rounding marker always defaults to the midpoint of a rounding interval; the rounding marker can be modified.
The following example of pre-rules rounding illustrates how the system applies a rounding rule. Let's assume that you have selected the following rounding options, and that the punch to be rounded occurs 11 minutes into the first rounding interval:
|
Rounding Option |
= Round Punches Before Rules |
|
Rounding Interval |
= 15 Minutes |
|
Rounding Marker |
= 7.5 Minutes |
In this example, the system rounds the punch up to 15 minutes. This is because 11 minutes is greater than the rounding marker of 7.5 minutes.
Rounding a Punch
Post-Rules Rounding
Post-rules rounding affects both punch and elapsed time. In the case of punch time, the system calculates the difference between individual consecutive punches (for example, an IN and an OUT punch) to create a duration for each set of matched punches. These durations are then rounded. In the case of elapsed time, time is reported as a duration, so the system simply rounds the reported duration up or down within its corresponding interval.
The post-rules rounding process first determines the interval (as defined previously) within which the duration falls and then rounds within that interval. If a duration falling within an interval is less than the rounding marker (for that interval), the system rounds down to the beginning of the interval. If the duration falling within the interval is equal to or greater than the rounding marker, the system rounds up to the end of the interval.
The following examples illustrate how the system applies rounding rules to both punch and elapsed time:
Example 1: Segment Rounding of Punch Time
Let's assume that we have selected the following rounding options, that we are rounding punch time, and that the duration to be rounded is 1 hour, 18 minutes:
|
Round Duration After Rules |
= Segment |
|
Rounding Interval |
= 15 Minutes |
|
Rounding Marker |
= 10 Minutes |
Because our Rounding Interval is 15 minutes and our Rounding Marker is 10 minutes, the system rounds 1 hour, 18 minutes to 1 hour, 15 minutes. This is illustrated in the following diagram:
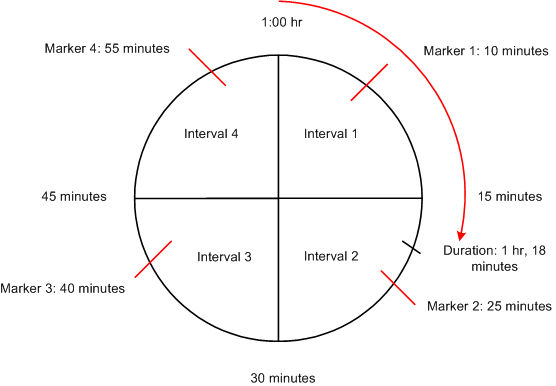
Rounding a Duration
In this example, the duration to be rounded (1 hour, 18 minutes) falls within Interval 2 (00:15 to 00:30). This means that the duration must be rounded up or down within that interval. Because 18 minutes is less than the Rounding Marker for Interval 2 (25 minutes), the duration is rounded down to 1 hour, 15 minutes.
Example 2: Segment Rounding of Elapsed Time
To illustrate how the rounding process works in the case of an elapsed time reporter, let's assume that we have selected the same rounding options used in the previous example, and that our time reporter is scheduled to work 8 hours on a given day, but positively reports 4.33 hours (4 hours and 20 minutes). In this case, the system would round the time to 4.25. This is because 4.33 hours equals 4 hours and 20 minutes, and 20 minutes falls within Interval 2. The duration of 20 minutes is less than the Rounding Marker (25 minutes), so the duration is rounded down to 15 minutes, which is .25 hours. Therefore, the final time is 4.25.
Note. If you change your rounding options, the rounding interval, or rounding marker, the Referential Integrity process will trigger Time Administration to reprocess any affected payable time from the effective-dated change forward. Affected instances of time need to be rerun through TA in order to recreate correct durations for payable time for the correct dates under report.
Example 3: Segment Rounding After Rules of Punch Time
Rounding Interval = 15 minutes
Rounding Marker = 7.5 minutes
|
Reported Time |
|||||
|
Punch Time |
Punch Type |
Segment |
Rounded |
Project |
Department |
|
8:10 a.m. |
IN |
1 hour, 50 minutes |
1.75 |
A |
|
|
10:00 a.m. |
BREAK |
20 minutes |
.25 |
Y |
|
|
10:20 p.m. |
IN |
2 hours, 40 minutes |
2.75 |
A |
|
|
1:00 p.m. |
MEAL |
1 hour, 5 minutes |
1.00 |
Y |
|
|
2:05 p.m. |
IN |
2 hours, 55 minutes |
3.00 |
B |
|
|
5:00 p.m. |
OUT |
||||
Note. All segments are rounded first, then like segments are summed.
|
Payable Time Results |
||
|
REG |
3 hours |
Project B |
|
REG |
4.5 hours |
Project A |
|
REG |
1.25 hours |
Department A |
Example 4: Day Rounding After Rules of Punch Time
Rounding Interval = 15 minutes
Rounding Marker = 7.5 minutes
|
Reported Time |
||||
|
Punch Time |
Punch Type |
Duration |
Project |
Department |
|
8:10 a.m. |
IN |
1 hour, 50 minutes |
A |
|
|
10:00 a.m. |
BREAK |
20 minutes |
Y |
|
|
10:20 p.m. |
IN |
2 hours, 40 minutes |
A |
|
|
1:00 p.m. |
MEAL |
1 hours, 5 minutes |
Y |
|
|
2:05 p.m. |
IN |
2 hours, 55 minutes |
B |
|
|
5:00 p.m. |
OUT |
|||
Total all like segments first, then round:
|
Project/Dept. |
Totalled Time by Task |
|
Project A |
4 hours, 30 minutes |
|
Project B |
2 hours, 55 minutes |
|
Department Y |
1 hour, 25 minutes |
|
Payable Time Results |
||
|
REG |
3 hours |
Project B |
|
REG |
4.5 hours |
Project A |
|
REG |
1.5 hours |
Department Y |
See Also
Step 12: Performing Rounding, Task Distribution and Estimated Gross
Specifying Workgroup DefaultsAccess the Workgroup page. Access the Workgroup Defaults group box.
See Also
Setting Up System Defaults and Loading Dates
Integrating with PeopleSoft Enterprise Time and Labor
Assigning and Viewing Compensatory Time Plans
Establishing Compensatory Time Plans
Setting Up Day Breaker Options
Access the Workgroup page (Set Up HRMS, Product Related, Time and Labor, Rules and Workgroups, Workgroup, Workgroup). Access the Day Breaker Options group box.
In Time and Labor we refer to the point where one day crosses over to the next as the "day breaker." Although the day breaker is usually midnight—the moment when one calendar day becomes the next—you can set the day breaker to a different time to create virtual days that more closely mirror actual shifts worked by your time reporters. The system will then use the day breaker to determine the exact date under report (DUR) of each punch or collection of punches that comprise the shift. Based on the Day Breaker and what we refer to as the Day Breaker Options, you can:
Assign all the time in a shift to a date based on when the first punch was logged.
Assign the time to a date based on when the last punch was logged.
Assign the time based on when the majority of the time in a shift was worked.
Split the time between different dates on either side of the day breaker.
Note. Although the normal day breaker is midnight, the optimum day breaker for your company depends on your company's work hours. We recommend you choose a time when there are no shifts or time reporters scheduled to work so that you won't have to split time on either side of the day breaker. For example, if your company has two shifts, a morning and an evening shift with hours from 08:00-17:00 and 18:00-02:00 consecutively, you may want to choose 04:00 as your day breaker.
Controlling the Date Under Report (DUR) of Reported Time
In Time and Labor, use the Day Breaker to define what we call a "Day Breaker Range" (a virtual 24 hour day), and then choose a Day Breaker Option to control the DUR (date under report) assigned to reported time.
Consider the following example:
If the day breaker is 12 midnight, the virtual Day Breaker Range is from 12 a.m. one day to 11:59 p.m. of the next day.
To define the DUR Assigned to Reported Time:
Select a Day Breaker to Define a Day Breaker Range
In Time and Labor, each punch in a shift is associated with a virtual 24 hour time reporting period called the Day Breaker Range. This period begins with (includes) the Day Breaker at the beginning of the period and ends with the following Day Breaker (it does not include the next day breaker). Although you can create Day Breaker Ranges that coincide with actual calendar days (days that begin at 12:00 midnight and continue for 24 hours), the Day Breaker Range can begin whenever you want it to (because it represents a "virtual" 24 hour day rather than an actual calendar day).
Once you have defined your Day Breaker Range, you will assign punches to this range in Step 2 (below).
Select a Day Breaker Option to Assign Punches to a Day Breaker Range
To assign punches to one of the "ranges" you defined in Step 1, you must specify a Day Breaker Option.
Your options are as follows:
|
Begin Time of Shift |
Select this option if you want the system to assign all the punches in a shift to the Day Breaker Range in which the shift began. |
|
End Time of Shift |
Select this option if you want the system to assign all the punches in a shift to the Day Breaker Range in which the shift ended. |
|
Majority of Shift |
Select this option if you want the system to assign all the punches in a shift to the Day Breaker Range in which the majority of the shift was worked. |
|
Split by Day Breaker |
Select this option if you want the system to split the shift between two Day Breaker Ranges on either side of the Day Breaker itself. |
Move the DUR for the Punches Assigned to a Day Breaker Range Backwards or Forward.
For any punch (or collection of punches) assigned to a Day Breaker Range in Step 2, you can move the date under report (DUR) in two directions: towards the Range Start Day or towards the Range End Day.
|
Range Start Day |
Select this option if you want to assign punches within a Day Breaker Range to the calendar (or actual) day intersected by the start of the range. |
|
Range End Day |
Select this option if you want to assign punches within a Day Breaker Range to the calendar (or actual) day intersected by the end of the range. |
Example: Shifting the DUR to the End of the Day Breaker Range
The following example illustrates how to use the Day Breaker and Day Breaker Options to define the date under report (DUR) of your employee's punch time. Assume the following:
We've set the Day Breaker to 4:00 AM.
We've chosen to assign all the punches in a shift to the Day Breaker Range on which the first punch was logged and our Day Breaker option is Begin Time of Shift.
Our Day Breaker Range is Range End Day.
Our shift begins at 9:00 AM on June 3 and ends at 6:00 AM on June 4. The shift therefore crosses the Day Breaker.
This scenario can be represented as follows:
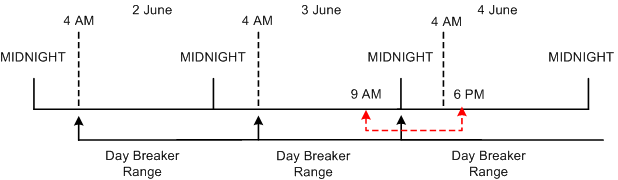
Establishing a DUR
Because the first punch occurs at 9 AM on June 3, the system includes the entire shift within the Day Breaker Range in which the first punch falls—the range that begins at 4:00 AM June 3 and ends at 3:59 AM on June 4. However, the system will set the DUR for the shift as a whole to June 4. The reason for this is that the Day Breaker Range is Range End Day, and the day (the actual calendar day) intersected by end of the range is June 4.
Note. If we had set the Day Breaker Range to Range Day Start in this example, the DUR would be June 3, because the start of the range falls on the 3rd of June.
Note. If you change your Day Breaker or Day Breaker Options, the Referential Integrity process will trigger Time Administration to reprocess any affected payable time from the effective-dated change forward. Affected instances of time must be rerun through Time Administration to recreate payable time.
Additional Day Breaker Option Examples
This section contains additional examples illustrating the effect on the DUR (date under report) of applying different Day Breaker and Day Breaker Range options to a time reporter's punch time.
In this example, assume that a time reporter reports time that crosses the day breaker, which is set to 12 midnight.
The time reporter enters the following punches:
Punch IN: 18:00, December 31, 2005
Punch OUT: 07:00, January 1, 2006
Using this data, the following diagram shows the dates and day breaker ranges:
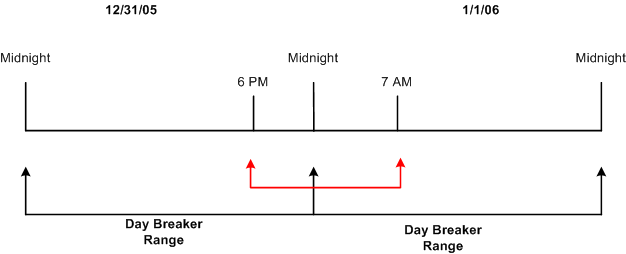
Dates and day breaker ranges (Example 1)
The results of applying different daybreaker options to the reported time are illustrated below:
|
Day Breaker Option |
Day Breaker Range |
Resulting DUR |
|
Begin Time of Shift |
Range Start of Day |
December 31, 2005 |
|
End Time of Shift |
Range Start of Day |
January 1, 2006 |
|
Majority of Shift |
Range Start of Day |
January 1, 2006 |
|
Split by Daybreaker |
Range Start of Day |
6 hours fall on December 31, 2005 and 7 hours fall on January 1, 2006. |
|
Begin Time of Shift |
Range End of Day |
December 31, 2005 |
|
End Time of Shift |
Range End of Day |
January 1, 2006 |
|
Majority of Shift |
Range End of Day |
January 1, 2006 |
|
Split by Day breaker |
Range End of Day |
6 hours fall on December 31, 2005 and 7 hours fall on January 1, 2006. |
Example 2
In this example, assume that the time reporter's time does not cross the day breaker. The day breaker is set to midnight.
The time reporter enters the following punches:
Punch IN: 13:00, 31 December 2005
Punch OUT: 21:00, 31 December 2005
The following diagram shows the dates and day breaker ranges, based on the data above:
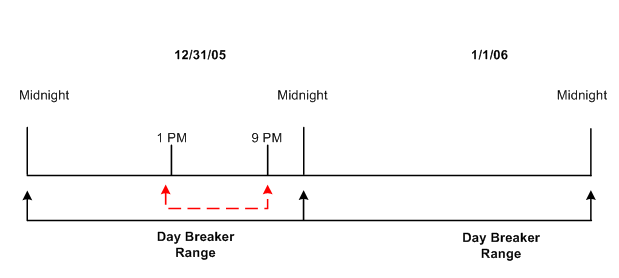
Dates and day breaker ranges (Example 2)
The results of applying different daybreaker options to the reported time are illustrated below:
|
Day Breaker Option |
Day Breaker Range |
Resulting DUR |
|
Begin Time of Shift |
Range Start of Day |
Because the begin time of the shift (1:00 p.m.) is on December 31, 2005 and the Range Start of Day falls on the day of December 31, 2005, the resulting DUR is December 31, 2005. |
|
End Time of Shift |
Range Start of Day |
Because the end time of the shift (9:00 p.m.) is on December 31, 2005 and the Range Start of Day falls on the day of December 31, 2005, the resulting DUR is December 31, 2005. |
|
Majority of Shift |
Range Start of Day |
December 31, 2005 |
|
Split by Daybreaker |
Range Start of Day |
December 31, 2005 |
|
Begin Time of Shift |
Range End of Day |
Since the begin time of shift (1:00 p.m.) is on December 31, 2005 and the Range End of Day falls on the day of December 31, 2005, the resulting DUR is December 31, 2005. |
|
End Time of Shift |
Range End of Day |
Since the end time of the shift (9:00 p.m.) is on December 31, 2005 and the Range End of Day falls on the day of December 31, 2005, the resulting DUR is December 31, 2005. |
|
Majority of Shift |
Range End of Day |
December 31, 2005 |
|
Split by Daybreaker |
Range End of Day |
December 31, 2005 |
Example 3
In this example, assume that the time reporter's time does not cross the day breaker. The day breaker is set to 04:00.
The time reporter enters the following punches:
Punch IN: 18:00, 31 December 2005
Punch OUT: 02:00, 1 January 2006
The following diagram shows the dates and day breaker ranges, based on the data above:
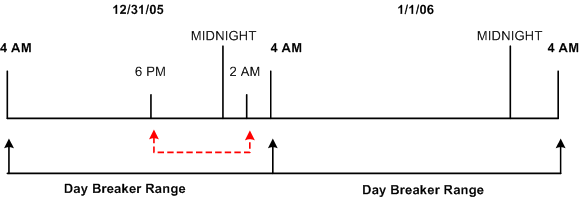
Dates and day breaker ranges (Example 3)
The results of applying different daybreaker options to the reported time are illustrated below:
|
Day Breaker Option |
Day Breaker Range |
Resulting DUR |
|
Begin Time of Shift |
Range Start of Day |
December 31, 2005 |
|
End Time of Shift |
Range Start of Day |
December 31, 2005 |
|
Majority of Shift |
Range Start of Day |
December 31, 2005 |
|
Split by Daybreaker |
Range Start of Day |
December 31, 2005 |
|
Begin Time of Shift |
Range End of Day |
January 1, 2006 |
|
End Time of Shift |
Range End of Day |
January 1, 2006 |
|
Majority of Shift |
Range End of Day |
January 1, 2006 |
|
Split by Daybreaker |
Range End of Day |
January 1, 2006 |
Example 4
In this example, assume that the time reporter reports time that crosses the day breaker, which is set to 4 AM.
The time reporter enters the following punches:
Punch IN: 18:00, December 31, 2005
Punch OUT: 07:00, January 1, 2006
The diagram below shows the dates and day breaker ranges based on the data above.
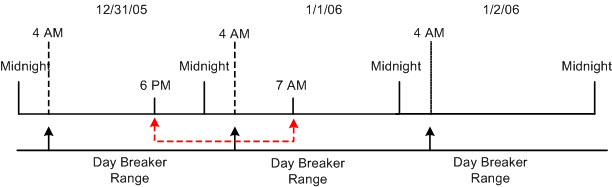
Dates and day breaker ranges (Example 4)
The results of applying different daybreaker options to the reported time are illustrated below:
|
Day Breaker Option |
Day Breaker Range |
Resulting DUR |
|
Begin Time of Shift |
Range Start of Day |
Because the begin time of the shift (6:00 p.m.) is on December 31, 2005 and the Range Start of Day falls on the day of December 31, 2005, the resulting DUR is December 31, 2005.. |
|
End Time of Shift |
Range Start of Day |
Because the end time of the shift (7:00 a.m.) is on January 1, 2006 and the Range Start of Day falls on the day of January 1, 2006, the resulting DUR is January 1, 2006. |
|
Majority of Shift |
Range Start of Day |
December 31, 2005 |
|
Split by Daybreaker |
Range Start of Day |
10 hours fall on December 31, 2005 and 3 hours fall on January 1, 2006. |
|
Begin Time of Shift |
Range End of Day |
Because the begin time of the shift (6:00 p.m.) is on December 31, 2005 and the Range End of Day falls on the day of January 1, 2006, the resulting DUR is on January 1, 2006. |
|
End Time of Shift |
Range Start of Day |
Because the end time of the shift (7:00 a.m.) is on January 1, 2006 and the Range Start of Day falls on the day of January 2, 2006, the resulting DUR is January 2, 2006. |
|
Majority of Shift |
Range End of Day |
January 1, 2006 |
|
Split by Daybreaker |
Range End of Day |
10 hours fall on January 1, 2006 and 3 hours fall on January 2, 2006. |
See Also
Making Workgroup Transfers
This section discusses the effect of workgroup transfers on the period of interest calculation in Time Administration as well as on rules processing. Because mid-period workgroup transfers can cause rules to be applied incorrectly, we strongly recommend that you schedule workgroup transfers to take place only at the beginning of a period.
Important! This section assumes that you have a thorough understanding of how Time Administration defines the period of interest for rules processing. If you are not familiar with the concept of the "period of interest," you should review the chapter on Batch Processing in Time Administration before reading the following section.
Transferring in the Current Period
If an employee transfers from one workgroup to another in the current period, Time Administration processes the employee in two separate batches—one for each workgroup. When Time Administration creates the rule map for each batch, it adjusts the start and end dates of the period of interest to reflect the effective date of the transfer according to the following rule: If the effective date of the new workgroup is greater than the initial period of interest begin date, the start date for the batch associated with the new workgroup will be set equal to the new workgroup effective date.
Example
In this example let's assume the following:
A time reporter changes workgroups on 9 June—in the middle of the current workgroup period (5 to 11 June).
The Time Period ID associated with each workgroup is weekly (the week begins on Monday and ends on Sunday).
Each workgroup has a rule program containing 3 rules with the same rule periods (a weekly rule, a monthly rule, and a daily rule). However, the rules are different for each workgroup.
Note. To determine the initial period of interest, Time Administration uses the Time Period ID on each time reporter's workgroup to determine the start date and the end date of the period intersected by the earliest change date. Any time reporter whose Earliest Change Date is less than or equal to the through date on the run control panel will be picked up when you run time administration—as long as his or her effective dates fall within the workgroup period, or their Max (maximum) TL_EMPL_DATA.EFFDT <= to the earliest change date. In addition, their TL_TR_STATUS.TA_STATUS must equal 'Y.'
![]()
Workgroup transfer example
In this example Time Administration sets the end date of the period of interest associated with the old workgroup to 8 June (the last day the employee is part of the old workgroup), and the start date of the period of interest associated with the new workgroup to 9 June. The rules associated with the old workgroup are used to process all dates before and including 8 June—going back to the final period of interest start date. The rules associated with the new workgroup are used to process all dates from 9 June to the final period of interest end date. However, because the transfer occurs in mid-week, the weekly and monthly rules (for both workgroups) will not have access to data for their entire rule periods and may be applied incorrectly. (Any rule crossing the transfer date could be applied incorrectly). For this reason, we recommend that you change workgroups at the beginning of a period whenever possible. If you absolutely must change workgroups in mid-period, you will have to override rules processing and manually enter the hours to be paid during the transfer period as follows:
To report time for the transfer period:
Enter the time manually through the time reporting pages
Enter time manually for the transfer period exactly as the time reporter should be paid (including overtime hours). This time will go directly to Payable Time (see step 2).
Enter dates for the transfer period on the Override Rules page
To tell Time Administration to accept time exactly as you enter it (untouched by rules), you must enter the dates for the transfer period on the Override Rules for Time Reporters page. Time Administration will extract records from TL_IPT1 into a working table—TL_TA_RUL_OVR—before applying rules to the data stored on TL_IPT1. Time Administration will apply rules to all records stored on TL_IPT1 and update Payable Time as usual. But, as a final step, it uses data stored in the TL_TA_RUL_OVR table (preserved, untouched by rules) to replace records found on the TL_PAYABLE_TIME table.
Note. Time Administration will not change hours entered as rule overrides. Rule overrides go directly to Payable Time.
Note. The same logic that governs workgroup transfers governs changes to Rule Program effective dates as well as TL_EMPL_DATA effective dates—effective dates associated with employee hires, inactivation, or job transfers. So, for example, if the rule program associated with a workgroup changes in mid-period, the start and end dates of the period of interest must be adjusted. Similarly, because a time reporter could have more than one row in TL_EMPL_DATA with different effective dates, multiple rows per time reporter can be pushed into the batch creation process. In this case, start dates and end dates must be adjusted for such things as the TL_EMPL_DATA.EFFDT falling within the period of interest. For example, if the EFFDT of a time reporter is greater than the START_DT of the period of interest, the START_DT will be set equal to the EFFDT.
A Note on Retroactive Transfers
Retroactive workgroup transfers can also prevent rules from being applied correctly—for the same reason that transfers in the current period affect rules processing. Thus, in the previous example, if we assume that the transfer occurs during a period that has already been processed, the weekly and monthly rules may again be applied incorrectly. As in the previous example, we recommend that you change workgroups at the beginning of a period whenever possible. If you absolutely must change workgroups mid-period, you will have to manually enter the hours to be paid during the transfer period as rule overrides.
Note. In the case of retroactive transfers there is an additional factor to consider: the period you are reprocessing with new rules has already been processed, which means that offsets to the original data will be created, new data will be generated, and both the new and old results will be passed to Payable Time.
See Also
Making Changes to a Rule Program of a WorkgroupThere may be times when you need to change the rules in the rule program associated with a workgroup. These rule changes could occur during the current processing period as well as retroactively. For example, you might need to go back in time to apply new rules to previously reported time. The time data as originally reported isn't different, but the way the data needs to be processed has changed. For this reason it is important to understand some of the implications of changing the rules in a rule program.
Understanding the Consequences of Rule Changes
The same logic that governs mid-period workgroup transfers applies to mid-period changes to rule program effective dates. For example, if the rule program changes in mid-period, the start and end dates of the period of interest must be adjusted and rules could be applied incorrectly. For this reason, we strongly recommend that you schedule rule program changes to occur at the beginning of a period whenever possible. If you absolutely must change your rule program in mid-period, you will have to override rules processing and manually enter the hours to be paid during the transfer period. Because the effect of mid-period changes to workgroup data is discussed in the section Making Workgroup Transfers, you should review the material in that section prior to modifying your rules. There are, however, some additional precautions you should observe when changing rules:
You should never make changes directly to rules themselves. This could result in incorrect results if you need to reprocess prior period time using the rule definitions that were valid in the prior periods. Also, rules are part of rule programs, which are used by workgroups, and reference TRC programs. So if you change a rule this change will have multiple impacts throughout the system.
Instead of modifying rules, you should do the following:
Create a new rule: modify the existing rule and save it as a new rule with a new rule ID, or create a new rule from scratch.
Insert a new effective-dated row in the Rule Program.
Remove the old rule from the new effective-dated rule program and insert the new rule.
If the effective date of the change is set to a prior period, data for prior periods will be reprocessed.
Note. You cannot reprocess dates for a time reporter in a workgroup prior to the effective date of the workgroup itself. In other words, if the workgroup effective date is 1/1/2006 you cannot reprocess dates prior to 1/1/2006. Similarly, you can not reprocess dates for a time reporter in a workgroup prior to the date that the time reporter was enrolled in the workgroup.
See Also
Adding Rules to a Rule Program