 Understanding Time and Labor Implementation
This chapter provides an overview of Time and Labor implementation and discusses how to:
Set up system defaults and load dates.
Establish payroll system options.
Establish time periods.
Set up planned overtime features.
Build and view time period calendars.
Set up manager time calendar view options.
Establish compensatory time plans.
Define exceptions.
Define PeopleSoft Application Engine sections.
Define validation criteria.
Define override reason codes.
Understanding Time and Labor ImplementationTo implement Time and Labor, you must set up the following tables, processes, and features:
Human Resource tables.
Benefits tables.
Time Zone Offsets table.
Concurrent online processing.
Time periods.
Periods and period instances.
Overtime limits.
Calendars.
Manager time calendar views.
Compensatory time plans.
Exceptions.
PeopleSoft Application Engine sections.
Validation criteria.
The following graphic shows the tables and pages required to implement Time and Labor.
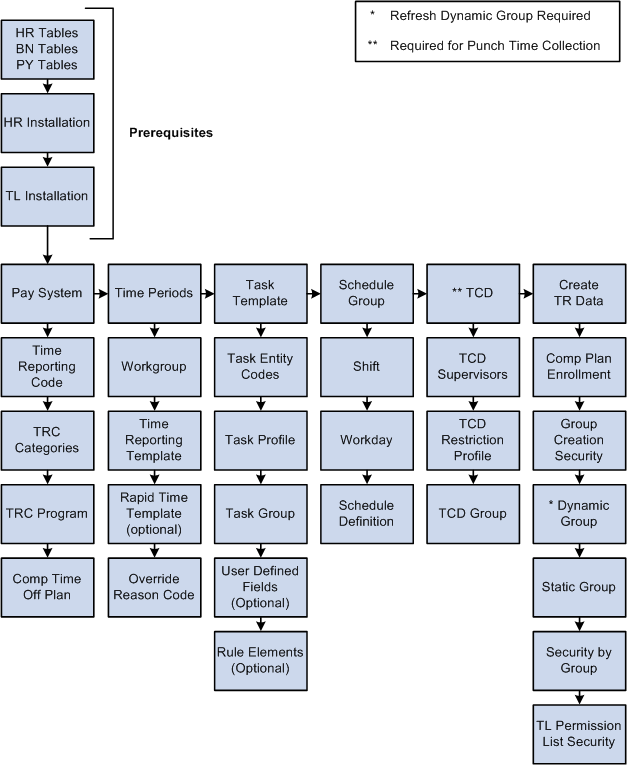
Time and Labor Implementation Flow
 Human Resource Tables
The Time and Labor system uses Human Resources Management (HR) tables to extract all the basic information about your company that will be used during Time and Labor processing. You must set up these tables before you establish any other tables in the system. HR tables and data used by Time and Labor include the Company, Location, Department, Compensation Rate, Job Code, and Pay Group tables.
The following table shows how Time and Labor uses data extracted from Human Resources.
|
Business Units |
Used for task reporting in Time and Labor and to resolve SetID for other fields. |
|
SetIDs |
Used to resolve values for reporting on job code, location, and department by using the business unit. |
|
Company |
Used for task reporting in Time and Labor. |
|
Location |
Used for task reporting in Time and Labor. |
|
Department |
Used for task reporting in Time and Labor. |
|
Job Code |
Used for task reporting in Time and Labor. |
|
Pay Group |
Used in distribution to define parameters for payment of payable time. |
|
Comp Rate Code Table |
Used for elapsed time reporting with time reporting codes (TRCs). |
|
Holiday Schedule |
Used for scheduling and rule processing. |
See Also
Setting Up Administer Compensation
Setting Up and Assigning Work and Holiday Schedules
Benefits TablesBenefits tables store leave plans and accrual balances. Time and Labor uses benefits tables for determining leave accrual balances. These tables include the Benefits Plan and Leave Plan tables. Set up these tables, in the following order, before setting up your Time and Labor tables.
Define all benefit plans by plan type, with vendor and group information.
Define the accrual rules for that plan on the Leave Plan table.
Leave Plan Table
To set up your leave plan, use the Leave Plan Table page. The Leave Plan table contains the service and accrual processing rules for a leave plan. The following steps must occur:
Selected Time and Labor on the Installation table.
If required by your organization, select the Allow Negative Balance check box on the Manual Accrual Processing section of the Leave Plan Table page.
The Max Negative Hours Allowed field becomes available.
Enter the number of negative hours you will allow for this plan in the Max Negative Hours Allowed field.
The Max Negative Hours Allowed field and the active association of time reporters to a leave plan is important for the Leave Validation processes within Time and Labor.
Note. Any changes you make to the Allow Negative Balance or the Max Negative Hours Allowed check boxes will trigger referential integrity processing to ensure that unpaid leave time is not invalidated. Similarly, any additions or changes you make to the plan type, coverage election, or benefit plan on the Leave Plan page will trigger referential integrity processing to ensure that unpaid leave time is not invalidated.
See Also
Check Leave and Comp Time Balances
Time Zone Offsets TablePeopleTools stores time/date information in only one time zone—the "Base Time Zone" you select at the time of installation. The base time zone may be set to the time zone of the company's headquarters, or perhaps to Greenwich Mean Time (GMT)—also known as UTC (Universal Coordinated Time).
When employees enter the hours they have worked in Time and Labor, they report time according to the local time zone and PeopleTools stores the information in the base time zone. The Time Administration process then converts the base time back to the local time for rules processing. To do this, it needs to know the time zone "offsets," or the differences between the local time and base time.
Two circumstances can occur when punch time is reported across a daylight saving boundary. These relate to either the transition to or from daylight saving. When transitioning to daylight saving, clocks are advanced by a fixed amount at a fixed time. Transitioning back from daylight saving clocks are put back by a fixed amount at a fixed time.
Let's look at an example:
For the transition from daylight saving at 2:00AM, the clocks will be put back one hour. This means that an employee starting work at 11:00PM the previous day and finishing at 7:00AM on the day that daylight saving occurred, will have really worked for an elapsed period of 9 hours, not the 8 hours indicated by the clock times.
For the transition to daylight saving at 2:00AM, the clocks will be put forward one hour. This means that an employee starting work at 11:00PM the previous day and finishing at 7:00AM on the day that daylight saving occurred, will have really worked for an elapsed period of 7 hours, not the 8 hours indicated by the clock times.
The following procedure explains how to select the base time zone and create time zone offsets.
To select the base time zone and create time zone offsets:
Select the base time zone on the PeopleTools Options page.
In the Base Time Zone field, select the time zone for storing all reported time.
Change the default settings on the Time Zone Data page and Daylight Savings page, if applicable.
The Time Zone Data page and Daylight Savings page display the default time zone settings delivered with PeopleTools. You can change the settings on these pages if you need to customize the information for your organization.
Create time zone offsets using the Time Zone Data page.
Click the Generate Query Offsets button on the Time Zone Data page to populate the time zone offsets table with values that represent the differences between the local and base time zones.
Concurrent Batch Processing
Using PeopleTools, you can control the number of batch application engine processes—such as the Time Administration batch process—that can run concurrently.
To increase the number of concurrent batch processes, use the Process Scheduler's Server Definition page to update the Max Concurrent field for Application Engine. (Navigation: PeopleTools, Process Scheduler, Servers.) You may also need to update the MAX API Aware field. The PeopleTools PeopleBook provides instructions for updating these fields.
See Also
Enterprise PeopleTools PeopleBook: PeopleSoft Process Scheduler
Concurrent Online Processing
In addition to the Time Administration process, which runs in batch mode, Time and Labor includes the following online processes that are invoked from PeopleCode with the Call AppEngine function:
|
Online Process |
Page and Button or Field That Invokes Application Engine Processing |
|
Apply Online Rules |
Timesheet page; Apply Rules button |
|
Submit Time |
Rapid Time page; Submit button |
|
Resolve Exceptions |
Manage Exceptions; Clean Up Exceptions button |
|
Load Dates |
Time and Labor Installation – Configurations page; Load Dates button |
|
Comp Plan Assignment Update |
Create Time Reporter Data; Workgroup field change Maintain Time Reporter Data; Workgroup field change Workgroup Page, Comp Time Plan change |
|
Forecast Payable Time |
Time and Labor Launch Pad; Forecast Payable Time button |
Multiple users can run online processes concurrently. The maximum number of concurrent processes depends on how many instances or images of the temporary tables are dedicated to online processing. Using the PeopleTools Options page (navigation: PeopleTools, Utilities, Administration, PeopleTools Options), you specify:
The total number of instances you want the system to create for each temporary table (default = 3)
The number of temporary table instances to create for online processes (default = 3)
Note. Application Engine programs are delivered to share temp tables; online processing requires dedicated temp tables.
When selecting the number of temporary table instances, keep in mind that a higher number increases the number of simultaneous users, but can also increase the consumption of disk space considerably.
Example
Assume that you use the default settings for the temporary tables, as previously described. According to these settings, three users can run online processes concurrently. So what happens if five users launch online processes simultaneously? The system runs the processes for the first three users, and as soon as temporary tables dedicated to online processing become available, runs the fourth, and then fifth processes.
See Also
Enterprise PeopleTools PeopleBook: Data Management
Enterprise PeopleTools PeopleBook: PeopleSoft Application Engine, Using Temporary Tables
Time Periods
You can define five types of periods in Time and Labor: daily, weekly, monthly, complex, and repeating. Although all period types are defined using the same set of pages, not all period types are used in the same way. For example, daily, weekly and monthly period types are used to create time reporting periods, but complex and repeating periods have no application to time reporting—their only purpose is to define periods for rules processing. This section discusses the different uses of periods in the system, and contains important information on when you can use each period type. Periods have the following uses in the Time and Labor system:
Time Reporting
Define periods for time reporting purposes; for example, employees in your company might report time for a day, a week, or a month at a time. Align these time periods to your pay period, billing cycle, or fiscal period. Although you can define as many as five different types of periods using the Time Period pages, only three types of periods are for time reporting purposes: daily, weekly, and monthly. Two additional periods' types—complex and repeating—are for rules creation. These time periods can be associated on the Maintain Time Reporter Data page, or the Workgroup page to derive the time period display on the Timesheet page.
Determining Periods to Process
Time and Labor uses time periods, identified by the time period ID on each time reporter's workgroup, to help determine the correct time periods to process (and pass to Payable Time) when you run the Time Administration process. To determine the correct weekly periods to process, Time and Labor looks to the period ID associated with the time reporter's workgroup.
Time periods determine the range of dates to which a rule applies. For example, for a rule program containing a daily, weekly, and monthly rule, build a calendar containing the periods to which each of these rules applies. For each rule period (daily, weekly, and monthly), define the corresponding calendar period containing the data needed to process the rule.
When defining calendar periods to correspond to rule periods, use the same period types used in time reporting (daily, weekly, monthly). In addition, define repeating and complex period types to use in connection with complex and repeating rule periods. For example, consider the following complex rule that looks at time reported on the last Sunday in April.
Example: If a time reporter works on the last Sunday in April, the employee will automatically receive four hours plus the time he or she actually reports for the day.
For this rule to work, identify the last Sunday in April by creating a complex period. Otherwise, the system will not know which day to look at.
Tracking Attendance
For attendance tracking in Time and Labor, specify the time periods for which to track absences, late punches, early departures, and so forth (for example, late punches in a day, absences per week). Use the three time-reporting period types for tracking attendance.
Determining Overtime Limits
For evaluating overtime balances, specify the time periods to track if time reporters are exceeding the amount of overtime that can be taken within a given period. Use the three time-reporting period types for tracking overtime balances.
Determining Current and Prior Period Time
Periods help the system distinguish between prior, current and future time (time entered for periods that have been processed as opposed to time for the current period). To determine whether time reporters are entering time for the current period or a prior one, the system looks at the current date for which time reporters report time and compares this date to the current period start and end dates on the time period calendar. The system first looks for a time period on the Maintain Time Reporter Data page for the time reporter and, if one is not defined there, uses the time period on the workgroup to distinguish current from prior period time.
See Also
Creating Rules in Time Administration
Understanding the Batch Process in Time Administration
Periods and Period Instances
All time period definitions include the period length (for example, you could define a weekly period to have a length of one week, two weeks, and so on) and the frequency of the time period. The definition of time and frequency is separate from the time period calendar to make reusing time periods easy and to provide maximum flexibility during setup.
To define a time period:
Define the different period types to use for time reporting, tracking attendance, or processing rules.
Note. Each time you create a time period using one of the
time period pages described in this section, the system generates a time period
ID. This ID uniquely identifies the time period.
Below are examples of potential time and frequency data:
|
Begin Date |
End Date |
Frequency |
|
1 July |
1 July |
Daily |
|
1 July |
7 July |
Weekly |
|
1 July |
30 July |
Monthly |
|
1 July |
15 July |
Semi-Monthly |
|
1 July |
31 September |
Quarterly |
Generate period instances.
Generate actual "instances" of period types on a calendar by running the Build Time Period Calendar Process. For example, a defined weekly period begins on Monday and ends on Sunday. This period doesn't exist in the system until instances of it are generated on a calendar. To create periods based on your period definition:
Define the start and end dates of your calendar. (for example, 1 February 2000 to 1 February 2001).
Specify the period types to include (daily, weekly, monthly, and so on).
Generate actual periods by running the Build Time Period Calendar process.
Define additional components.
|
Time Periods Used in the Definition of: |
Where Used: |
|
Workgroups |
If the period is a time reporting period, link the period, by its time period ID, to a workgroup on the Workgroup page. Or, enter a time reporting period for individual time reporters on the Maintain Time Reporter Data page. If you do so, this period ID overrides the reporting period associated with the time reporter's workgroup. |
|
Rules |
If the period is used to define a time segment for rules processing, link it, by its time period ID, to the rule on the Define Rule Header page. |
|
Attendance Tracking |
If the period is an attendance-tracking period, link it, by its time period ID, to the definition of the attendance program on the Attendance Program page. |
See Also
Building and Viewing Time Period Calendars
Planned Overtime FeaturesThe basic overtime functionality of Time and Labor requires no special setup—employees can enter requests for overtime and managers can accept or deny requests. The following optional features require setup:
Track overtime balances by period.
Establish overtime limits that trigger a warning, when exceeded, on the manager's approval page.
Base overtime limits on months of service.
Enable workflow so that employees and managers are automatically notified when overtime requests are submitted, approved, or denied.
You assign overtime limits to workgroups, consequently, the same overtime limits apply to all employees in the same workgroup.
Time Period Calendars
After defining time periods, launch the Build Time Period Calendar process to create instances of these periods for a week, a month, or years. The Build Time Period Calendar process:
Builds time period calendars using the specified start and end dates.
These dates do not have to correspond to pay period begin and end dates.
Enables you to select the time periods to be included in the calendar build process.
Provides the option to rebuild calendars to change or delete your time period definitions.
Enables you to update an existing calendar to expand (or contract) the calendar range (that is, to change the start and end dates of the calendar while preserving existing time period definitions).
Before running the calendar build process, define the start and end dates of the calendar that will include the periods defined earlier using the period definition pages. Specify the period types or period ID's to include in (or exclude from) the calendar build. For example, you could use all the defined period types or just one, specific period. To do this, use the Build Time Period Calendar page.
See Also
Building and Viewing Time Period Calendars
Manager Time Calendar View OptionsTime and Labor provides many options and combinations for viewing time management calendar information. The Calendar View Options page assists in determining what will be displayed on the time calendar pages. Use the Calendar View Options page to define the time reporting codes, using TRC Value lists, which will display on the manager time calendar views, as well as associate color coding to the TRC lists and other time related data.
Each TRC or time-related event defined on the Calendar View Options page appears on the time calendar pages when applicable. The time appears in the grid associated to the time reporter who reported the time, overlaying the color associated with the particular time event. The symbols are optional, both in defining them and also using them on the time calendar pages.
The Calendar View Options page is divided into two primary sections — the Reported/Payable Time section and the Scheduled Time and Exceptions section.
Compensatory Time Plans
Time and Labor enables you to define compensatory time plans. Compensatory time plans provide the ability to administer time off instead of pay. Unlike other leave accruals, where Time and Labor uses the employee's leave balance records maintained in Human Resources, Base Benefits to determine leave availability, compensatory time is administered entirely within Time and Labor. The system maintains each instance of a time reporter's earned compensatory time and the quantity and date earned. This gives you the ability to set expiration periods for individual instances of earned compensatory time.
For example, you may have one compensatory time plan for overtime and another compensatory time plan for meeting or exceeding a deadline. You can establish as many different plans as your organization requires and you can assign a time reporter to one or more compensatory time plans. When compensatory time is entered, the system adds to or deducts from a time reporter's compensatory time balance according to the established rules. If the time entered is within allowed limits, the balance is adjusted and maintained automatically. You do not have to manually change employee's compensatory time balances. The Time Administration process processes compensatory time plans during post-rules processing.
See Also
Understanding the Batch Process in Time Administration
ExceptionsExceptions are user- and system-defined warnings and errors to indicate a problem with a time reporter's time or a problem in the system. Exceptions are tied to the Time and Labor message sets in the message catalog. Defining exception conditions gives control over time reporting messages and warnings. You can keep an audit trail on resolved exceptions for problems, such as how many times an employee is tardy. If you choose to have the exception archived, you can run a query on resolved exceptions to track trends. By making exceptions allowable, you can track low-severity exceptions, and the system will create payable time without the need to make changes to reported time.
The system creates exceptions based on rules, which are defined in Time Administration, or errors that have been generated as a result of reporting time (specifically in the Time Validation process).
Almost all of the system-delivered exceptions have an exception severity of High and are defined as Not Allowable. These exceptions must be resolved before the Time Administration process creates payable time. You can change the severity and the allowable flag for system-delivered exceptions.
Exceptions that begin with TLX work with delivered attendance tracking and validations. The exceptions for attendance tracking are of a low severity, whereas the exceptions for validation are of high severity. These include validations for task reporting, time reporting codes, compensatory and leave time validations, and time reporter status validations.
The system-delivered validation sets are ST_SUBMIT, ST_TA and ST_ALL. If you don't want to have all the validations in this set run during processing, create a validation set and define which validation definitions to include. The ST_TA validation set represents all validations selected to run in Time Administration but not Submit Time. The ST_SUBMIT validation set represents all validations selected to run in Submit Time, but not in Time Administration. The ST_ALL validation set has all validations selected to run in both Submit Time and Time Administration. Each validation is configurable as to whether it is run in Submit Time, Time Administration, neither or both.
Establishing exceptions is the first part of setting up validation criteria so that the Time Validation process can generate exceptions correctly. You also need to set up PeopleSoft Application Engine sections and validation definitions in order for the system to generate exceptions through the Submit Time process. Validation definitions tie the SQL and exception information together to provide the system with a reference and a way to execute exceptions.
The following process flow illustrates the areas that need to be set up so that the system can generate exceptions and perform validations during processing.

Validation setup flow
To establish user-defined exceptions, set up Time and Labor messages in the message catalog using PeopleTools.
See Also
Enterprise PeopleTools PeopleBook: PeopleSoft Application Designer
PeopleSoft Application Engine SectionsAfter you've defined exceptions, you define your PeopleSoft Application Engine sections. Application Engine is a feature of PeopleTools that allows you to write software to perform SQL and PeopleCode processing against the data. An Application Engine program is composed of one or more Application Engine sections. Each Application Engine section typically does one discrete piece of work and is akin to a subroutine, paragraph, procedure of function in a more traditional programming language. Application Engine sections can include referential integrity or validation processing. For each Application Engine section you create, you'll specify which kind of processing should occur.
See Also
Enterprise PeopleTools PeopleBook: PeopleSoft Application Engine
Validation Criteria
For the validation process, the system determines the validations to be processed and retrieves the related PeopleSoft Application Engine section names. Each validation definition specifies the Application Engine section name that implements the validation. Control is returned to the Process Validations function upon completion and the system calls the next PeopleSoft Application Engine section.
See Also
Defining PeopleSoft Application Engine Sections
Setting Up System Defaults and Loading DatesTo set up system defaults and load dates, use the TL Installation (TL_INSTALL) component.
This section discusses:
Setting up general system defaults and activating specific features.
Loading dates.
Pages Used to Set Up System Defaults and Load Dates|
Page Name |
Definition Name |
Navigation |
Usage |
|
TL_INSTALLATION |
Set Up HRMS, Install, Product and Country Specific, Time and Labor Installation, Time and Labor Installation |
Set up general system defaults and to activate specific features for your Time and Labor application. |
|
|
TL_INSTL_PUNCH |
Set Up HRMS, Install, Product and Country Specific, Time and Labor Installation, Configurations |
Set up schedule total options, schedule resolution options, and punch pattern defaults for your Time and Labor application. Note. The navigation to Load Dates for GP and Absence Management Setup is HRMS, Product Related, Global Payroll and Absence Management, System Settings, Installation Settings. |
|
|
TL_DATE_LOAD |
Click the Load Dates link on the Configurations page. |
Load dates into your Time and Labor system when you implement the system and each time you approach the end of the load period. |
|
|
Manager Search Defaults |
TL_INSTL_MSS_DFLT |
Set Up HRMS, Install, Product and Country Specific, Time and Labor Installation, Manager Search Defaults |
Set up manager selection criteria fields and options that will be used for returning employee lists for all Time and Labor manager self-service pages. |
|
Email Notifications |
TL_INSTL_NOTIFY |
Set Up HRMS, Install, Product and Country Specific, Time and Labor Installation, Email Notifications |
Set up manager and employee email notifications. |
Setting Up System Defaults
Access the Time and Labor Installation page (Set Up HRMS, Install, Product and Country Specific, Time and Labor Installation, Time and Labor Installation).
System Options
|
Production Environment |
Select to indicate that the system is no longer in a testing environment. Use this check box to test the production functionality with the ability to change task templates and rules, and to understand exactly how the system responds in production. |
The following table describes how certain processes function when the Production Environment check box is selected or cleared.
|
Process
|
What Happens When the Production Environment Check Box Is Cleared or Selected |
|
Task Templates |
Cleared: You can change your task template elements to required, optional, or not used. These changes are allowed, but if you have live data already reported to a template, the resulting tasks may be invalidated, and there will be no validation to catch these errors. Selected: You can change the task template by adding optional task elements or changing required elements to optional. |
|
System Date/TL Security |
Cleared: You can select the system date so that it appears on the Row Security Permission List page. This option enables a testing environment in which various users access the same database and enter different system dates to test different time frames. Selected: The System Date field does not appear on the Row Security Permission List page. |
|
Rule Objects |
Cleared: All rule objects can be changed. Selected: No rule objects can be changed. |
|
Interface with PS/EPM |
Select this field if you will interface Time and Labor with PeopleSoft Enterprise Performance Management. |
|
Interface with PS/Projects |
Select this field if you will interface Time and Labor with Project Costing. |
|
Referential Integrity |
Cleared: No referential integrity processing for changes to effective-dated tables. Normally, this involves reevaluating reported and payable time, and creating exceptions for all affected time. Selected: Referential integrity processing occurs as necessary. Note. During nonproduction times, the system doesn't need to perform referential integrity checks because setup tables will change often, and the reported time is not real. The Referential Integrity Flag controls whether there are inserts in the RI_CNTRL_TBL, when a change occurs to an effective dated setup table. The rows in the RI_CNTRL_TBL are then read when the system runs the Time Administration process. This typically involves creation of exceptions for all reported time effected by the change. This flag has no dependency on the Production Environment Flag. |
|
Publish unmapped TRC as No Pay |
Two processes use this check box so set the payable time status to No Pay (NP):
If selected, this option will create Time and Labor NoPay Actuals rows in PS Projects. |
|
Calculate Estimated Gross |
Clear for the system to not calculate estimated gross for all instances of time. This check box is selected by default. If you clear this check box, all future instances of time lack the estimated gross calculated during the Time Administration process. If there is payable time with estimated gross attached that you don't want, rerun the Time Administration process. You can view the estimated gross by TRC for the time reporter by accessing the Payable Time pages. After a payroll is run, the system distributes the actual gross back to Time and Labor during the Labor Distribution process. For example, you may want to bill estimated costs before the pay cycle. Use the estimated grosses to book the estimated costs ahead of time. When the actual dollars from the Labor Distribution process are posted, you can reverse the estimates and replace them with the actual amounts. |
TL/NA Payroll Options
The setting in this group box affect integration between Time and Labor and Payroll for North America.
See Configuring Time and Labor for Use with Payroll for North America.
|
Number of Months to Process |
Enter the maximum number of months that the Load Time and Labor process will look back for prior adjustments. Enter the number of prior months of data to process during the loading. The number entered must not be negative, or else a error message would be generated. For example, if current date is 6/30/03 and the user entered 3 to the field, it will go back to 3/30/2003 on the Frozen Date field to load payable time to Payroll. |
|
Process Prior Paygroup Time with Current Paygroup |
This check box controls how Payable Time is loaded into paysheets when a Prior Period Adjustments (PPA) exists and the employee had a pay group change. For example, an employee transferred from pay group 1 to pay group 2 on September 1. When payroll is run on August 31, all Payable Time is loaded up to August 31 and the employee has one check in pay group 1. When payroll is run on September 30, all Payable Time in September is loaded and the employee has one check in pay group 2. Then, a prior period adjustment (PPA) occurs for the August pay period:
|
|
Concurrent Load Time and Labor Runs |
Select this check box if you run the Time and Labor Load processes concurrently (that is, multiple Load processes are run simultaneously). Clear this check box if the Time and Labor Load process is never run concurrently. |
|
Concurrent Load Time and Labor Cleanup |
Set this field using the following criteria:
|
|
Set Ignore Status for Not Ok to Pay |
This check box defines the payable time status code and reason codes that Time and Labor sets during the Distribution Dilution process when a no pay other earning or pay earning are processed:
The default setting for this option is selected. |
See Payable Time Status and Reason Codes.
Validation Options
|
Leave Balances |
Select On-line Only for the system to validate leave balances only when entered during online processing. Select Batch Only for the system to validate leave balances only during batch processing of rules or validating time. Select On-line and Batch for the system to validate leave balances during online and batch processing. Select None for the system not to validate leave balances. If you change the validation option, all time processed prior to the change may need to be reevaluated as leave balances have been processed and exceptions created. |
|
Compensatory Balances |
Select On-line Only for the system to validate compensatory balances only when entered during online processing. Select Batch Only for the system to validate compensatory balances only during batch processing of rules or when validating time. Select On-line and Batch for the system to validate compensatory balances during online and batch processing. Select None for the system not to validate compensatory balances. If you change these values, all time processed prior to the change may need to be reevaluated as compensatory time has already been processed, and exceptions will be created. |
|
Validation Set |
Select the validation ID to determine the validation definitions that will run during the Time Reporting validation process. This validation process is triggered by the Submit Time process and during the Referential Integrity process. The system delivered validation sets are ST_ALL, ST_TA and ST_SUBMIT. |
|
Chartfield Validation |
Select Table Validation for the system to validate Chartfields against the VALID_COMBO_TBL directly within HRMS. Select Sync Message for the system to validate Chartfields by messaging the FMS database. Select None for the system not to validate Chartfields. |
See PeopleSoft Enterprise Components for PeopleSoft Enterprise HRMS and Campus Solutions 9.1 PeopleBook
Time Administration Options
|
Automatic Time Admin Run |
Clear for the system not to automatically run the Time Administration process following the Submit Time process. The Submit Time process is initiated through the Mass Time, Rapid Time, and TCD Interface reporting processes. If this check box is selected, any time processed by Submit Time will also be automatically processed by Time Administration to create payable time. The only exception is Global Payroll absence entries, which automatically process from the Submit Time process through the Time Administration process. |
|
Max Employees in a Batch (maximum employees in rules run) |
Enter the number of employees for the system to process at a time when running rules (Time Administration process). The number controls system performance during batch processing. The default value is 100. Note. This value can be as high as needed. If the value is high, fewer batches are created during the Time Administration process. If the database can handle the higher volume per batch, it is better to have a higher number. Performance will improve due to a reduction in TL_TA000410 loops during the Time Administration process. |
|
Use of Identity Column |
Select this check box to signify a field type in DB2 UNIX and DB2 OS390 that supports the generation of sequence numbers. This process is more efficient in generating unique sequence numbers for each row rather than using the sequence numbers that use procedural logic. The Identity Column is a field type in the DB2 UNIX and DB2 OS390 databases that supports the generation of sequence numbers. This process is more efficient in generating unique sequence numbers for each row rather than using the sequence numbers that use procedural logic. The TL_TA_RESEQX record is being used as the identity column table. The field SEQ_NBR1 on this record should be defined as an Identity column. Note. This field appears on DB2 Unix and DB2 OS390 databases only. You need to create the Identity Column type table outside of the Application Designer. See Understanding the Identity Column below. |
|
Continue with Exceptions |
Select to enable the system to continue to run the process when exceptions are encountered. The system generates payable time for the employee, except for the days with high severity exceptions. This means that for a high severity exception, the system generates the exception and does not generate payable time for the impacted reported time. For any other exceptions, the system generates the exception and continues to generate payable time for the impacted reported time. Clear the field to indicate that when the system encounters any exception, no payable time is generated for the impacted reported time. |
|
Include All Jobs |
If selected, the system processes all Empl_Rcd numbers for the EmplID if the TA status and ECD are ready for processing, regardless of what Empl_Rcd numbers are defined on the Time Administration run control page. If the Empl_Rcd numbers are in different workgroups, they are processed in different batches. If not selected, the system processes all Empl_Rcd numbers listed on the Time Administration run control page or all Empl_Rcd numbers that are in the same workgroup as the Empl_Rcd numbers listed on the Time Administration run control page. Empl_Rcd numbers in the same workgroup are processed in the same batch. |
On-line Rules Options
|
Run On-line Rules |
Select to activate the online rules feature. This feature enables you to define online rules and launch an online process (from the Timesheet page) that immediately applies the rules to a time reporter's time. Note. On the Timesheet page, if the user clicks the Apply Rules button, the user is taken to the Payable Time Details page. If there is no payable time created, and if there are exceptions, the user is taken to the Exceptions page. |
|
Maximum On-line Rules |
To limit the number of online rules that the online process applies, complete the Maximum On-line Rules field. The number that you enter determines the maximum number of online rules that you can add to a rule program. (The default value is 5 when you select the Run On-line Rules check box.) |
TCD File Integration
|
Max Punches in a Batch |
Enter the maximum size of each batch of incoming messages from a TCD server for use with the PUNCHED_TIME_ADD service operation. The value in this field only affects the batch size of messages when you activate the PUNCH_ADD_DAEMON service operation handler. This field is only available after you have activated the PUNCH_ADD_DAEMON handler. See Incoming Service Operations from the TCD Server to the PeopleSoft Server. |
Comp Plan Assignment
|
Default Plan From Workgroup |
Select for the system to automatically populate the Comp Plan Enrollment page with the compensatory plan associated with the workgroup of a time reporter. If you select this check box, you can't:
The compensatory plan is controlled by the association of the workgroup to the time reporter. You can alter the compensatory plan association for the time reporter in two ways:
The system will automatically update the compensatory plan association accordingly. If you don't select this check box, you can enter any number of rows on the Comp Plan Enrollment page and inactivate any of the compensatory plans. You can't delete a row on the Maintain Time Reporter data page if it inactivates an association to a compensatory plan. Inactivate the association of the compensatory plan to the time reporter on the Comp Plan Enrollment page; then delete the row on the Maintain Time Reporter Data page. Important! You can only change this option once. The system doesn't enable changing this value back and forth because:
|
TCD File Integration
|
Outbound File Directory |
Enter the directory path for the TCD outbound flat files created by Integration Broker. These files are sent to your time collection device. Your path must end with a backslash (\). This directory is for flat file TCD integration only. |
|
Inbound File Archive Directory |
Enter the path for the TCD inbound flat file data to be archived after the inbound file process reads the data. Your path must end with a backslash (\) for successful creation of the flat file. This directory is for flat file TCD integration only. |
Time Reporting Options
|
Show TRC Category on Timesheet |
Select to display TRC categories in the Reported Hours Summary on the Timesheet page |
|
Show all Time Reporting Fields on MGR Timesheet |
Select to determine if all the time reporting fields appear on the Manager Timesheet, or only the fields that are selected on the Time Reporter's time reporting template. |
|
Decimal Positions |
Display the entered number of decimals for the Timesheet pages. |
|
Regenerate Reported Time for Absence Entry |
Note. The default setting for this option is cleared. If selected, when absence entries are reported or approved, the system regenerates reported time based on the employee's schedule (Reported Time source is SCH) so that the sum of reported absence and work time from other sources equals the number of scheduled hours for a day. This check box functions in conjunction with the Create Partial Work Hours check box on the Workgroup Defaults page in Time and Labor. If this check box is selected and the Create Partial Work Hours check box is cleared, the system uses full day absence logic when generating time. If the Create Partial Work Hours check box is selected and this check box is cleared, there is no impact on reported time. |
Note. The Learning Management field on the Products page (Set Up HRMS, Install, Installation Table), needs to be checked, in order for the user to view LM training data icons in Manage Schedules, Monthly Schedules and Calendars.
How to Determine the Correct Number of Temporary Table Instances for the TL_TA_RESEQX Record.
To determine the correct number of temporary table instances, you have two options:
You validate the Instance Count value on the TL_TIMEADMIN Application engine program, Properties folder and add that to the number of Temp Table instances (Online) defined on the PeopleTools Options page, or
Open the Application Designer and create the TL_TA_RESEQX table using the Build SQL Script option. This option creates the script to build the required number temporary table instances.
How to Create the Identity Column Table with Temporary Table Instances
If you are using the first option above of determining the number of temp table instances, then use the script below for building each temp table instance. For each temp table instance, replace the temp table number for "n" in the script. For PS_TMP_TS and PS_TMP_TSIDX, replace with your appropriate tablespace and index tablespace, respectively, for the table TL_TA_RESEQX.
This displays the Base table of the TL_TA_RESEQX record.
DROP TABLE PS_TL_TA_RESEQXn;
CREATE TABLE PS_TL_TA_RESEQXn (PROCESS_INSTANCE DECIMAL (10) NOT NULL,
   EMPLID CHAR (11) NOT NULL,
   EMPL_RCD SMALLINT NOT NULL,
   DUR DATE,
   SEQ_NBR DECIMAL (15) NOT NULL,
   SEQ_NBR1 DECIMAL (15) GENERATED ALWAYS
      AS IDENTITY
      (START WITH 1,
         INCREMENT BY 1,
         CACHE 72000,
         MINVALUE 1,
         MAXVALUE 10080000),
   TRC CHAR (5) NOT NULL,
   TL_QUANTITY DECIMAL (18, 6) NOT NULL) IN PS_TMP_TS INDEX IN PS_TMP_TSIDX
 NOT LOGGED INITIALLY;
COMMIT;
CREATE UNIQUE INDEX PS_TL_TA_RESEQXn ON PS_TL_TA_RESEQXn
 (PROCESS_INSTANCE,
   EMPLID,
   EMPL_RCD,
   DUR,
   SEQ_NBR,
   SEQ_NBR1);
COMMIT;
If you are using the second option above, Building SQL Script to create the table then you would alter the generated script as follows:
Replace SEQ_NBR1 references with:
SEQ_NBR1 DECIMAL (15) GENERATED ALWAYS
      AS IDENTITY
      (START WITH 1,
         INCREMENT BY 1,
         CACHE 72000,
         MINVALUE 1,
         MAXVALUE 10080000)
This change ensures the creation of the SEQ_NBR1 field as an Identity column for TL_TA_RESEQX.
See Also
Enterprise PeopleTools PeopleBook: PeopleSoft Application Designer, Administering Data, Creating Tables, Understanding the Create Table Process
Enterprise PeopleTools PeopleBook: PeopleSoft Application Engine, Using Temporary Tables
Adding Rules to a Rule Program
Configurations
Access the Configurations page (Set Up HRMS, Install, Product and Country Specific, Time and Labor Installation, Configurations).
Warning! Be careful to create a punch pattern that makes sense, without the same punch type in a row.
|
Load Dates |
When you click this link, the system accesses the Dates Table Load page, where you can determine the range of dates to use for time-reporting and scheduling purposes. When loading the number of years for processing prior, current or future time, keep the years in sync with the years loaded in the Time Zone Offset table. |
|
Schedule Total Options |
Use this option to configure whether meal and/or break times are included in Scheduled Hours totals on schedule definitions, and shift definition and Manage Schedules. Valid values are Exclude Meals and Breaks, Include Breaks, Include Breaks and Meals, Include Meals. The default is Exclude Meals and Breaks. |
|
Schedule Resolution Options |
This field specifies how to resolve schedule changes. If the Take Last Schedule Update field value is selected, whether the last schedule update is from a workforce scheduling third-party system, or an online override, the system will take the last update to resolve the employee's schedule. If the Take Online Override field value is selected, the system will look for an online schedule override for resolving the schedule for the day, if an override exists. The system will not look for any changes from a third-party workforce scheduling system. |
|
Default Punch Pattern |
For the Time Reporting and Scheduling pages, set up the punch pattern you require to be defaulted. A total of ten punches can be entered. A label can also be specified for each punch type row. The default punch pattern set here also defaults to the Time Reporting Template page. On the Time Reporting Template page, you can override the Installation Table settings and establish a different punch pattern for specific groups of punch time reporters, rather than for all punch time reporters. Important! Be sure not to create the same punch type successively, check the order of your punch types. |
|
Allow Override to OWS Schedule |
Select to enable a manager or administrator to override the schedule from Oracle Workforce Scheduling. Note. You must have Oracle Workforce Scheduling integration installed to view this field. |
Loading Dates
Access the Dates Table Load page (Set Up HRMS, Install, Product and Country Specific, Time and Labor Installation, Configurations, click the Load Dates link on the Configurations page).
|
Years |
Enter the number of years for the system to load into the database. The system will enter the dates for the number of years you entered, backward and forward. For example, if you entered 2, the system would load two years backward and two years forward. The maximum number of years to enter is 10. Important! Towards the end of the period you specify, be sure to load the next set of dates. |
|
Load Dates |
Click to load dates into the TL_DATES_TBL and create data in the TL_TA_OFFSET record. |
|
Return |
Click to return to the Configurations page. |
The Purpose of Load DatesThe Load Dates link populates years of dates into two tables.
The first table is TL_DATES_TBL, which populates years of dates for schedule resolution, and determines the date display while reporting time in the Time and Labor Timesheet. Global Payroll, Absence Management and Time and Labor uses the Schedule resolution process. Based on the number of years entered, the system populates that number of years prior to the current date, and after the current date.
The second table populated is TL_DSTOFFSET for Daylight Savings, which is used in Time Administration for Time and Labor. The system uses this table to calculate the duration of the transition times that occur at the beginning of daylight savings or at the ending of daylight savings per time zone.
Finally, the table, PSTZOFFSET is populated from the Time Zone Query Offsets function from the Time Zones page, and is also used in Time and Labor's Time Administration process, as well as the Scheduling process. The system uses PSTZOFFSET to convert the base time zone into the reported or scheduled time zone. (Refer to Tools page for Time Zone Query Offsets.)
All three tables, TL_DATES_TBL, TL_DSTOFFSET and PSTZOFFSET should be in sync with each other, with regards to the years loaded.
Manager Search Defaults
Access the Manager Search Defaults page (Set Up HRMS, Install, Product and Country Specific, Time and Labor Installation, Manager Search Defaults).
This page is used by managers and time administrators to set defaults that display on the Manager Search Options – Select Default Criteria and Options page. The Manager Search Options page is used for the various manager functions, to provide a consistent interface in which managers and administrators can easily identify, select and navigate through the pool of employees in whom they are interested.
You can establish preferred employee criteria and default values by configuring options on the Manager Search Defaults page. Employee lists can be pre-populated with a subset of a managers overall employee pool, criteria can be changed and data refreshed to expand or contract employee lists. When the employee pool is identified on pages that use the Manager Search page, the list persists throughout the application for easy navigation.
|
Include in Criteria |
Include this field in the Manager Selection Criteria. When the Manager Selection Criteria is displayed on the Manager Search Options page, this field can be used to filter employee lists. |
|
Include in List |
Include this field in the employee list that is returned on the Manager Search Options page. |
Auto Populate Option
|
AutoPopulate Results |
Auto populate the employee list when entering the page. |
|
Prompt for Results |
Do not automatically populate the employee list, allowing the manager or administrator to review or change criteria values. A button is then selected and the employee list displayed. |
Criteria Defaults
|
Collapse Criteria |
Collapse the Manager Search Criteria group box when entering the Manager Search Options page. |
|
Expand Criteria |
Expand the Manager Search Criteria group box when entering the Manager Search Options page. |
Email Notification
Access the Email Notifications page (Set Up HRMS, Install, Product and Country Specific, Time and Labor Installation, Email Notification).
This page is used to select whether email notifications will be used for managers.
|
Enable Email Notifications |
Select this field to enable the manager email notification fields to become selectable. |
Manager Notifications
|
Exception Generated |
Select this option to generate an email to a manager if exceptions are generated when :
|
|
Schedule Event Modified |
Select this option to generate an email to a manager if an external schedule event is updated or deleted. (This will be triggered with updates from Enterprise Learning Management, if the user is utilizing this application with Time and Labor.) |
Note. In order for a batch process to insert a URL in an
email notification to a manager, the following setup needs to be completed
for the database local node. This determines the portal and node used for
this process.
On the Portal page in the Nodes (IB_NODE) component, ensure that the Content
URI Text and the Portal URI Text fields
are populated as per the format displayed on the screen.
See Enterprise PeopleTools PeopleBook: PeopleTools Portal Technology, Configuring the Portal Environment
See Also
Enterprise PeopleTools PeopleBook: PeopleCode API Reference, Notification Classes
Enterprise PeopleTools PeopleBook: Workflow Technology, Using Notification Templates
Enterprise PeopleTools PeopleBook: Workflow Technology, Administering PeopleSoft Workflow, Setting Notification Options
Enterprise PeopleTools PeopleBook: Workflow Technology, Designing BlackBerry Email Responses, Activating the Send Notification Component
Enterprise PeopleTools PeopleBook: System and Server Administration , Setting Application Server Domain Parameters
Payroll System Options
To set up the payroll options, use the Pay System (TL_PAYSYS_PNLGRP) component.
This section discusses:
Establishing the type of payroll system to use with Time and Labor.
The delivered system contains both Global Payroll and Payroll for North America.
Choosing labor distribution for the costs retrieved from the payroll system
Choosing labor dilution.
Labor dilution is the breakout of costs to the original time entered.
Page Used to Establish Payroll System Options|
Page Name |
Definition Name |
Navigation |
Usage |
|
TL_PAYSYS_PNL |
Set Up HRMS, Product Related, Time and Labor, Time Reporting, Pay System, Pay System |
Establish the payroll system to use and to choose labor distribution and labor dilution. |
Establishing Payroll System Options
Access the Pay System page (Set Up HRMS, Product Related, Time and Labor, Time Reporting, Pay System, Pay System).
|
Labor Distribution Used |
Clear to disable Time and Labor's labor distribution. The check box is selected by default. When selected, payroll expense is distributed to all applicable Time and Labor earnings and task records. This updated time can then be extracted for additional processing by other applications. If you clear this check box after time has been processed, check for any time that may have currently been labor-distributed. |
|
Labor Dilution Used |
Clear to disable Time and Labor's labor dilution feature. The check box is selected by default. When selected, Time and Labor dilutes distribution to account for time that is paid at different rates, and dilutes labor distribution across all hours, regardless of whether an employee was paid for the time. If you clear this check box after time has been processed, check for any time that may have currently been labor diluted. This check box isn't available unless you select the Labor Distribution Used check box. Labor dilution is run within the Labor Distribution process. |
See Also
Integrating with Payroll Applications
Establishing Time PeriodsTo set up time periods, use the Daily Time Period (TL_FIXED_DAY_PNLGR), Weekly (TL_FIXED_WEEK_PNLG), Monthly (TL_FIXED_MNTH_PNLG), Complex (TL_COMPLEX_PNLGRP), and Repeating (TL_REPEAT_PNLGRP) components.
This section discusses how to set up the following time periods:
Daily
Weekly
Monthly
Complex
Repeating
Pages Used to Establish Time Periods|
Page Name |
Definition Name |
Navigation |
Usage |
|
TL_FIXED_DAY_PNL |
Set Up HRMS, Product Related, Time and Labor, Time Periods, Daily, Daily Time Period |
Establish a fixed day-type period when building time period calendars. |
|
|
TL_FIXED_WEEK_PNL |
Set Up HRMS, Product Related, Time and Labor, Time Periods, Weekly, Weekly Time Period |
Establish weekly periods of time when building time period calendars. |
|
|
TL_FIXED_MNTH_PNL |
Set Up HRMS, Product Related, Time and Labor, Time Periods, Monthly, Monthly Time Period |
Establish monthly periods of time when building a time period calendar. |
|
|
TL_COMPLEX_PNL |
Set Up HRMS, Product Related, Time and Labor, Time Periods, Complex, Complex Time Period |
Establish complex periods of time when building a time period calendar. Use this page for periods that cannot be defined by other period definitions. |
|
|
TL_REPEATING_PNL |
Set Up HRMS, Product Related, Time and Labor, Time Periods, Repeating, Repeating Time Period |
Establish repeating periods of time when building a time period calendar. |
Establishing a Daily Time Period
Access the Daily Time Period page (Set Up HRMS, Product Related, Time and Labor, Time Periods, Daily, Daily Time Period).
|
Days Offset from Period End |
Enter the number of offset days. Offset days are used to derive the start date of the next period instance with respect to the end date of previous instance. Offsets can be positive or negative. The default for offset days is 1. Note. The only day-type periods you can enter on the Workgroup and Maintain Time Reporter Data page are those with offset days = 1. |
Example: Positive Offset Days
If the offset is a positive number, the next period instance starts after that number of offset days, as the following table illustrates.
|
Offset Days Number |
Original End Date of the First Period |
New Instance Start Date for Next Period |
|
1 |
January 24, 2006 |
January 25, 2006 |
|
2 |
January 24, 2006 |
January 26, 2006 |
Example: Negative Offset Days
If the offset is a negative number, the system counts backwards from the end of the earlier period instance by the number of offset days to determine the start of the next period instance. Any two consecutive period instances will overlap if the offset is negative. The absolute value of offset days cannot be equal to or greater than the period length. In other words, when the offset days number is negative, the next period cannot start on or before the current period.
To avoid creating a period with an offset equal to or greater than the period length, observe the following rule: The maximum number of negative offset days cannot exceed the period length minus two. The following table illustrates the results of using this rule. Note that if the offset is −6, it exceeds the maximum number of offset days and the system creates a new period identical to the prior period.
|
Offset Days Number |
Begin and End Dates of the First Period |
Begin and End Dates of the Next Period |
|
−6 |
January 3 - January 9, 2006 |
January 3 - January 9, 2006 |
|
−5 |
January 3 - January 9, 2006 |
January 4 – January 10, 2006 |
|
−4 |
January 3 - January 9, 2006 |
January 5 – January 11, 2006 |
|
−3 |
January 3 - January 9, 2006 |
January 6 – January 12, 2006 |
Example: Creating a Rolling Period with Negative Offset Days
The following page illustrates how to define the offset to create a 90-day, rolling period.
To create a rolling period, the negative offset (the value of the Start Offset from Period End field) should be two less than the length of the rolling period, which in this example would be 90 − 2 (-88). If you attempt to use -89, the system will generate the following error message: "Invalid Value for Offset." The system starts the new period by counting backwards from the day before the end date of the first period. If your first period instance were January 1, 2006 to March 30, 2006, the system would subtract 89 days, beginning from March 29, which would start the next period on January 1. To be a rolling period, the next instance of time should begin one day after the first period instance.
Establishing a Weekly Time Period
Access the Weekly Time Period page (Set Up HRMS, Product Related, Time and Labor, Time Periods, Weekly, Weekly Time Period).
Enter the period length in weeks and select a start day for the week.
Establishing a Monthly Time Period
Access the Monthly Time Period page (Set Up HRMS, Product Related, Time and Labor, Time Periods, Monthly, Monthly Time Period).
|
Semi-month |
Select semi-month for the period length to be 15 days. |
|
Semi-year |
Select semi-year for your period length to be 6 months. |
|
User Defined |
If you select User Defined, the Period Length in Months field becomes available. Enter the length of the period in months. The maximum number of months you can enter is 999, and the minimum number is 1. |
Note. When you define a type other than a user-defined month period, the system displays the number of days contained within the period.
Establishing a Complex Time Period
Access the Complex Time Period page (Set Up HRMS, Product Related, Time and Labor, Time Periods, Complex, Complex Time Period).
Enter a start and end date for the time period.
Note. Complex periods are not created through the standard calendar build process; instead, they are created manually when you define the period on this page.
Establishing a Repeating Time Period
Access the Repeating Time Period page (Set Up HRMS, Product Related, Time and Labor, Time Periods, Repeating, Repeating Time Period).
|
Period starts on |
Repeating periods can be defined in any number of ways. To define a repeating period, follow these steps:
To ensure that you have the expected results, check the time period calendar by selecting the View Time Period Calendar page after building the period using the Build Time Period Calendar process. |
|
Period Length in Days |
Enter the number of days in your period. The maximum you can enter is 999. |
Setting Up Planned Overtime FeaturesTo set up planned overtime, use the Overtime Limit (TL_OT_SETUP) and the Workgroup (TL_WKG_MAIN_PNLGRP) components. Use the TL_WKG_MAIN_PNLGRP component interface to load data into the tables for this component.
This section discusses optional features of the overtime request transactions and explains how to:
Define overtime limits and track overtime balances.
View the TRCs in a Value List.
Assign overtime limits to workgroups.
Set up workflow.
See Also
Using Manager Self-Service Components for Time Management and Reporting
PrerequisitesTo establish overtime limits or maintain overtime balances by period, you create value lists to identify the sets of Time Reporting Codes (TRCs) to which the limits or balances apply. For example, to limit the combined number of overtime hours permitted for TRC1 and TRC2, you create a value list that includes these two TRCs.
Use the Value List page to create one or more value lists for your overtime TRCs.
Important! Because you assign overtime limits to workgroup, be sure that the TRCs in your value lists are also included in the workgroup's TRC program.
See Also
Pages Used to Set Up Overtime Features|
Page Name |
Definition Name |
Navigation |
Usage |
|
TL_OT_SETUP |
Set Up HRMS, Product Related, Time and Labor, Time Reporting, Overtime Limit, Overtime Limit |
Define overtime limits for a set of TRCs. Also identify the TRCs for which you want to track overtime balances. You must define the value list that includes the TRCs first. |
|
|
TL_OT_VAL_LIST_SEC |
Click All Test OT Values on the Overtime Limit page. |
Displays the Time Reports Codes (TRCs) that make up a selected value list. |
|
|
TL_WRKGRP_PNL |
Set Up HRMS, Product Related, Time and Labor, Rules and Workgroups, Workgroup, Workgroup |
Assign an overtime limit definition to a workgroup. |
Creating Overtime Limits
Access the Overtime Limit page (Set Up HRMS, Product Related, Time and Labor, Time Reporting, Overtime Limit, Overtime Limit).
|
Overtime Limit ID |
Displays the unique ID for the overtime limit definition. IDs can contain up to eight alphanumeric characters. |
Overtime Limit and Balance Attributes
Complete the following fields to designate the TRCs for which you want to set overtime limits and/or track overtime balances.
|
Status |
Select the status of the Overtime Limit ID: Active or Inactive. Note. You cannot inactivate an overtime limit definition that is associated with an active workgroup. To inactivate the limit definition, first remove it from the Workgroup page. (You can query the Workgroup table to find out which workgroups are associated with an overtime limit definition). |
|
Time Period |
Select the time period for managing overtime limits and balances. For example, if you select monthly, the system tracks the number of overtime hours for the month. If you also set a limit of 10 hours, this limit applies to each month. Repeating and complex time periods are not allowed. |
|
OT TRC List |
Select the value list that includes the overtime TRCs for which you are defining limits and/or tracking balances. |
|
View List |
Click to view the list of TRCs that are members of the value list selected in the OT TRC List field. |
Overtime Limits
Define the overtime limits in this group box. If you base overtime limits on months of service, add a row for each term of service that has a different overtime limit.
|
After Service Months |
To base overtime limits on an employee's number of months of service, enter the number of months here. Enter whole numbers only. If you do not want to link overtime limits to months of service, leave the default value of 0 (zero) in this field. Note. The system refers to the employee's Service Date on the Employment record to determine months of service. Because service dates can be defined for employees only, the system cannot calculate overtime balances or apply overtime limits for non-employees. |
|
Period Overtime Hours Limit |
Enter the maximum number of overtime hours that employees are allowed to work during the time period defined in the Time Period field. If you entered a non-zero value in the After Service Months field, the limit you enter here represents the number of overtime hours permitted for employees who have met the service requirement. If you entered zero in the After Service Months field, the limit you enter here applies to all employees. |
Example 1: Defining Overtime Limits without Service Dates
Assume that employees can work a maximum of 25 hours of overtime each month. The values you enter are as follows:
|
After Service Months |
Period Overtime Hours Limit |
|
0 |
25 |
Example 2: Defining Overtime Limits with Service Dates
Assume that employees must complete 12 months of service before working any overtime and after that can work a maximum of 20 hours of overtime each month. After 24 months of service, employees can work a maximum of 50 hours of overtime each month. In this case, the values that you enter are as follows:
|
After Service Months |
Period Overtime Hours Limit |
|
12 |
20 |
|
24 |
50 |
Viewing the TRCs in a Value List
Access the Overtime TRC Value List page (Set Up HRMS, Product Related, Time and Labor, Time Reporting, Overtime Limit, Overtime Limit, click All Test OT Values on the Overtime Limit page).
|
Value Group |
Displays the names of TRCs within the value list selected in the OT TRC List field on the Overtime Limit page. |
Assigning Overtime Limits to Workgroups
Access the Workgroup page for the workgroup that you want to assign overtime limits to.
In the Overtime Limit ID field (within the Compensation Controls group box), select the ID for the overtime limit definition that applies to the members of the workgroup.
Note. Overtime limit assignments are effective-dated. A workgroup can have more than one effective-dated row of overtime limits.
See Also
Enabling Workflow
Time and Labor uses workflow functions, such as approvals workflow. Approvals workflow takes a request entered by an employee and routes it to an approver to accept or deny. If the request is denied, the system notes that the request was denied. Employees and managers can view the approval status of some requests with self-service transactions.
Note. For Request Overtime, the employee's manager is the only person who is required to approve overtime requests.
To enable workflow:
Ensure that the appropriate roles are associated with user profiles.
Roles define what the user can and can't access in the system. Use the Roles page in the User Profiles component to review the roles and update as necessary. Manager profiles should include roles for Manager and Worklist User. Employee profiles should include an Employee role. Instructions for using the Roles page are provided in the Enterprise PeopleTools PeopleBook: Security Administration.
Specify which types of routings each role user can receive.
Use the Workflow page in the User Profiles component to specify where the system can deliver work items: to a worklist or an email mailbox. For Time and Labor, worklist, email, or both are appropriate for managers; email is appropriate for employees. Instructions for using the Workflow page are provided in the Enterprise PeopleTools PeopleBook: Security Administration.
Define the rules for workflow notifications by SetID.
Use the System Workflow Rules page to define how users are to receive notifications: email, worklist, both, no notification, or user-defined preference. The system can notify employees by email when a request is submitted, approved, or denied; it can notify managers by worklist, email, or both when requests are submitted for approval.
Procedures are provided in the PeopleSoft Enterprise HRMS Application Fundamentals PeopleBook and the Enterprise PeopleTools PeopleBook: Workflow Technology.
Activate workflow for the HRMS system, if not already activated.
Use the Worklist System Defaults page and the Workflow User Preferences page.
Procedures are provided in the PeopleSoft Enterprise HRMS Application Fundamentals PeopleBook.
See Also
Enterprise PeopleTools PeopleBook: Workflow Technology
Building and Viewing Time Period Calendars
To set up time and view period calendars, use the Build Time Period Calendar (TL_RCTRL_CAL_PG) and the View Time Period Calendar (TL_CALND_VW_PNLGRP) components.
This section discusses:
General rules for building periods and calendars.
Creating instances of a time and labor calendar.
Viewing the time period instances for each calendar.
Understanding General Rules for Building Periods and Calendars
This section contains important information on how to build calendars to insure that:
The system defines the correct period of interest for rules processing.
The data in Payable Time is what you expect it to be.
Important! To understand the information in this section, you must be familiar with the material in Understanding Batch Processing in Time Administration and Creating Rules in Time Administration.
Build calendars for the following time periods:
The entire period for which you intend to report time.
The entire span of time on which rules may be run.
In the Time Administration process, if gaps exist in time reporting periods or the calendar connected with a rule, the system may select a much greater period of interest than necessary, and the schedule resolve process may end up resolving a larger range of dates than necessary. This can significantly reduce performance time.
The Time Administration process determines the period of interest by looking at both the time reporting period—identified by the time period ID for the workgroup−and the time period ID associated with each rule. The time reporting period establishes the initial period of interest, while the rule period helps to determine how far into the past (or into the future) the Time Administration process may need to go to capture the data needed for rules processing.
Example: Building Calendars
Assume that there is a rule program containing a weekly rule and a biweekly rule with the following priority ranking:
|
Rules |
Rule Priority |
Periods |
|
Rule 1 |
Priority 1 |
Weekly |
|
Rule 2 |
Priority 2 |
Biweekly |
Assume that you have calendars for the following periods:
|
Calendar Builds for Each Period |
|
|
Weekly Period |
Biweekly Period |
|
2000 |
2000 |
|
2005 |
No Calendar Build for 2005 |
|
2006 |
2006 |
In this example, if you process rules for a period that ends on January 7, 2006 but starts December 15, 2005, you will extend the period of interest back to 2000, since no calendar exists for the biweekly rule in 2005, and both the weekly and biweekly rules must be run. Assuming that you are processing a group of exception reporters, the schedule resolve process would resolve time back to 2005 (time for exception reporters is based on time schedules unless there is an exception to the schedule).
If you have not built calendars for the periods used to determine the period of interest (the period ID connected with the workgroup and the rule), you may receive the following message when running the Time Administration process:
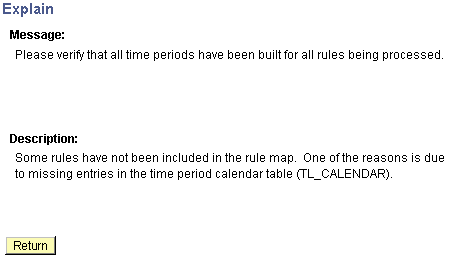
Missing entry in the time period calendar table message
In most cases when this message is reported, a period calendar has either not been built for a period ID or the calendar has not been built far enough into the past or future for all period IDs associated with the time reporters being processed through the Time Administration process.
Building a Complete Calendar
To avoid the problems described in this example, do the following:
Determine all of the period ID's associated with the time reporters to process through the Time Administration process. Period ID's are associated with:
Workgroups
Rules
Determine the maximum and minimum dates among the following:
The Process Date on the Process Time Admin Page.
The DUR (date under report) in TL_RPTD_ELPTIME.
The PUNCH_DTTM in TL_RPTD_PCHTIME.
Determine where the minimum date found in step two intersects the time reporting period for the workgroup to process.
Build the calendar at least as far into the past as the start of this period. And if this minimum date intersects a rule period belonging to a rule in the workgroup's rule program, and the rule requires time data from before the workgroup period, build the calendar as far into the past as the final period of interest start date.
Determine where the maximum date found in step two intersects the time reporting period for the workgroup to process.
Build the calendar at least as far forward into the future as the end of this period. And if this maximum date intersects a rule period belonging to a rule in the workgroup's rule program, and the rule requires time data from days following the workgroup period, build the calendar as far into the future as the end of the rule period.
If you rebuild your calendar with the override indicator set to OFF, and period instances already exist within the start and end dates of the calendar, the system will not alter the existing period instances within these dates. If you create new time periods, the system adds them to the existing ones.
Note. To change the definition of an existing period, you must set the override indicator to ON and rebuild the entire calendar using the new period definition.
To preserve your current period definitions, but change the start and end dates of the calendar, set the override indicator to OFF, change the begin and end dates, and rerun the Calendar Build process. The following criteria apply:
If the new start and end dates fall within or are equal to the old dates, the system builds new period instances.
If the new start date is less than the first calendar's start date, and the end date is the same as or less than the first calendar's start date, new period instances are built backwards in time, beginning with the old start date.
Example 1: Override Indicator Set to OFF
|
Original Calendar Dates: |
January 1, 2000 − December 31, 2000 |
|
New Calendar Dates: |
December 15, 1999 − December 31, 2000 |
The end dates are identical; however, the start dates are different. The new start date is December 15, 1999; the old start date is January 1, 2000. The system will create new period instances from December 31, 1999 to December 15, 1999. If the new end date is later than the old end date, and the new start date is the same as or greater than the old start date, the system builds new period instances going forward from the last end date.
Example 2: Override Indicator Set to OFF
|
Original Calendar Dates: |
January 1, 2000 − December 31, 2000 |
|
New Calendar Dates: |
January 1, 2000 − February 15, 2001 |
The start dates are identical; however, the end dates are different. The new end date is February 15, 2001; the old end date is December 31, 2000. The system builds new period instances going forward from the old end date. If both the new start and end dates are outside the range of the old start and end dates, the system builds new period instances. It will move backwards from the old start date until it reaches the new start date, and forward from the old end date until it reaches the new end date.
Example 3: Override Indicator Set to OFF
|
Original Calendar Dates: |
January 1, 2000 − December 31, 2000 |
|
New Calendar Dates: |
December 15, 1999 − February 15, 2001 |
The new calendar expands the date range of the old calendar in two directions. The system builds new periods backwards from December 31, 1999 to December 15, 1999, and forwards from January 1, 2001 to February 15, 2001.
Note. For daily, weekly and monthly period types, if the override indicator is set to OFF, the system does not alter existing records. But for repeating periods, records are always deleted, irrespective of the value of the override indicator.
Note. Because complex periods are not created through the standard calendar build process—they are created when you define the period on the Complex Time Period page—they must be extended or shortened to change the start and end dates of these periods.
Override Indicator Set to ON
If you rebuild a calendar with the override indicator set to ON, the system deletes all records from the new start date onwards and rebuilds the calendar as if no period instances existed for the new calendar period. No period instance for dates prior to the new start date are altered.
Note. For daily, weekly, and monthly period types, if the override indicator is set to ON, the system deletes all records from the new start date onwards. But for repeating periods, records are always deleted, irrespective of the value of the override indicator.
Note. Because complex periods are not created through the standard calendar build process—they are created manually when you define the period on the Complex Time Period page—they must be manually readjusted rather than "rebuilt" to change the start and end dates of these periods.
Important! If you are unfamiliar with the concept of payable time, review the chapter on Understanding Batch Processing in Time Administration before reading the following section.
Payable time is created through the interaction between the schedule calendar, time reporting periods, and rule periods. Compare the work schedule calendar to the workgroup and rule periods to ensure that the start and end dates of these periods are correctly aligned. If the periods are incorrect, you could end up creating Payable Time on different days than you expected. This is illustrated in the example below:
Example: Creating Payable Time
Assume the following:
You are processing a workgroup containing exception reporters.
The workgroup period should specify a begin date of Monday, June 5 and an end date of Sunday, June 11. By mistake, you defined a period ID for the workgroup that specifies a begin date of Tuesday, June 6 and end date of Monday, June 12.
There are two rules defined for the workgroup—a daily rule and a weekly rule. The period ID for the weekly rule specifies that the rule period begins on Monday, June 5 and ends Sunday, June 11. The rule period is consequently out of sync with the period ID on the workgroup.
The earliest change date is Tuesday, June 6.
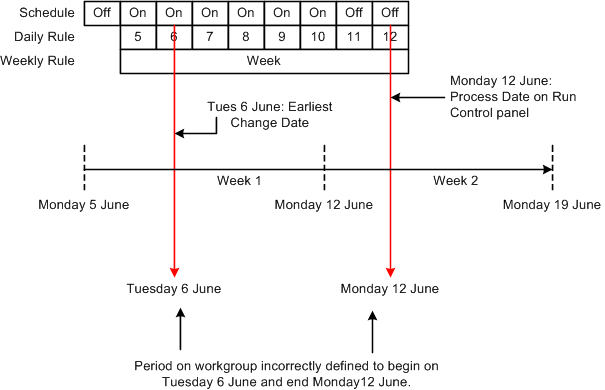
Defining the interaction of time reporting periods, rule periods and calendar
In this example the Time Administration process passes all the dates from June 6 to 12—the current workgroup period—to Payable Time. Assuming that the weekly rule in our example generates new time data for June 5—a date just outside the current workgroup period—we end up with a Payable Time date range of June 5 to 12. By contrast, the correct period ID for the workgroup would have produced a Payable Time date range of Monday June 5 to Sunday June 11 . Note that the calendar schedule for these date ranges results in different data being sent to Payable Time. Using the incorrect time reporting period, the schedule indicates two days off. Using the correct time reporting period, the schedule indicates only one day off. As you can see, it is important to understand the relation between time reporting periods, rule periods, and the schedule calendar, because they all work together to create Payable Time.
See Also
Understanding the Batch Process in Time Administration
Enterprise PeopleTools PeopleBook: PeopleSoft Process Scheduler
Pages Used to Build and View Time Period Calendars|
Page Name |
Definition Name |
Navigation |
Usage |
|
TL_RCTRL_CAL_PNL |
Set Up HRMS, Product Related, Time and Labor, Time Periods, Build Time Period Calendar, Build Time Period Calendar |
Create instances of a time and labor calendar that will include each of your period start and end dates. |
|
|
TL_CALENDAR_VW_PNL |
Set Up HRMS, Product Related, Time and Labor, Time Periods, View Time Period Calendar, View Time Period Calendar |
View the time period instances for each calendar. |
Creating Instances of a Time and Labor Time Period Calendar
Access the Build Time Period Calendar page (Set Up HRMS, Product Related, Time and Labor, Time Periods, Build Time Period Calendar, Build Time Period Calendar).
|
Delete and Rebuild Calendar |
Select to enable the system to override any existing calendar with a new one containing different or redefined periods. If this field is deselected, the system leaves any existing period instances built in place and allows you to insert new ones by modifying the calendar build scope. This enables you to update the calendar created by the system during the build process without recreating the entire calendar from scratch. Note. If you change the definition of an existing period--for example, you change the start date of a weekly period from Sunday to Monday--select the Delete and Rebuild Calendar check box and build a new calendar. Be aware that redefining a period used in rules processing will trigger Referential Integrity and cause payable time to be reevaluated. Therefore, if the time period you rebuild alters the period instances in a rule, any reported or payable time affected by the change is recalculated in Time Administration. If Payable Time that has been frozen is affected, the Time Administration process creates offsets for the changes. |
|
Start Before Start Date |
This applies only to weekly time periods and allows resetting the calendar start date when the start date bisects a period instance. For example, assume the calendar start date is January 1, 2000. You've defined a weekly period that begins on Monday. January 1 falls on a Saturday, which means that the week overlaps the start date. This is illustrated below: |
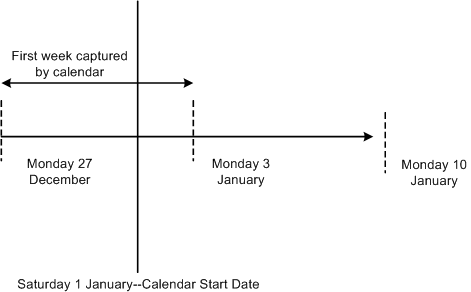
Using the prior week start day
In the diagram above, the first weekly period captured by the calendar begins Monday December 27 —4 days before the calendar start date. In this situation, specify whether the calendar should begin on the Monday before the specified calendar start date, or on the first Monday that falls within the calendar period. If you select Use Prior Week Start Day, the calendar begins before the initially specified start date (on December 27 in this example). If the Use Prior Week Start Day check box is cleared, then the calendar begins on the following Monday (January 3 in this example).
Note. You do not have to build the time period calendar at this time. Set up the rest of your time and labor system (workgroups and taskgroups), then build the time period calendar. The time period calendar must be built prior to reporting time, running the Time Administration process, or tracking attendance.
|
Time Period Selection |
Select a time period. The scope enables you to include or exclude specific periods or period types from the calendar build process. Valid values are: All Time Periods. Select to choose all time period types. The system uses all time periods entered. The time Period Type and Time Period ID are not available or displayed. Listed Period Definitions. Select to indicate which periods to use on an ad hoc basis. When this is selected, the Time Period ID becomes available. Add more periods by inserting additional rows in the Time Period ID region. Listed Period Types. When this field is selected, the Period Type field becomes available in the Time Periods region. You can choose from daily, weekly, monthly, or repeating period types. Note. Complex period types are never included in the Time Period Selection field because the calendar build process does not generate complex period instances. They are created when you define a complex period on the Complex Time Period Page. |
Viewing Time Period Instances for a Calendar
Access the View Time Period Calendar page (Set Up HRMS, Product Related, Time and Labor, Time Periods, View Time Period Calendar, View Time Period Calendar).
Use the scroll arrows to move up and down the list of the start and end dates on the Time and Labor View Page.
Setting Up Manager Time Calendar View Options
To set up manager time calendar views, use the Calendar View Options (TL_WV_OPTIONS) component.
This section provides an overview of manager calendar views and describes how to:
Set up calendar viewing options.
Preview the time calendar legend.
Understanding Manager Time Calendar Views
Manager calendar views provide assistance to managers in allocating workforce resources. The self-service manager calendar view pages enable the manager to view a group of employees and all their time-related information for a specific timeframe on one page. This calendar view offers up-to-the-minute information on group schedules and time related events. The information displayed on the manager calendar view depends on the selections made while setting up the calendar viewing options. The calendar viewing option setup applies to all calendar view pages. In designing your calendar views you decide what information managers can choose to display for work days and off days as well as training, absences, overtime and holidays. You also determine which TRCs will be associated with the calendar views.
Managers use the time calendars to determine how resources are currently allocated and how to adjust resources for maximum productivity and profitability. Managers can respond quickly to changing scheduling needs and employee requests. Managers can also view prior periods to assess past scheduling effectiveness and resource allocation.
Each calendar page displays the selected information on a grid. This information is viewable on a daily, weekly or monthly calendar schedule and provides drill down capability to view lower level details. The time calendar page displays the selected information using predetermined color codes to differentiate the data.
Prerequisites
Before setting up Time and Labor manager calendar viewing options, you must define time reporting codes and create TRC Value lists. Employee group definitions must also be defined to enable calendar viewing.
See Also
Establishing Time Reporting Codes
Pages Used to Set Up Calendar Viewing Options|
Page Name |
Definition Name |
Navigation |
Usage |
|
TL_WV_OPTIONS |
Set Up HRMS, Product Related, Time and Labor, Calendar View Options, Calendar View Options |
Define viewing options for calendars. |
|
|
TL_WV_LEGEND_SEC |
Click Preview Legend on the Calendar View Options page. |
View a sample of the legend that will appear at the bottom of the calendar viewing pages as defined by the current selected colors and symbols. |
|
|
TL_VALUE_LIST_SEC |
Click View List on the Calendar View Options page. |
View a list of the TRC value groups and descriptions contained in the selected TRC list. |
Defining Time Calendar View Options
Access the Calendar View Options page (Set Up HRMS, Product Related, Time and Labor, Calendar View Options, Calendar View Options).
|
Display Symbols |
Select the Display Symbols to assign symbols to TRCs and time events. If selected, the symbols overlay the color for the associated TRC or time event on the calendar. This option is selected by default. Clear the check box to deselect this option. Note. The time calendar pages allow the option of displaying symbols when this option is selected. If this box is not selected on the Calendar View Options setup page, users will not have this option on the time calendar viewing pages. |
|
Preview Legend |
Click to display an explanatory list of the colors and symbols that have been selected to display on the time calendar pages. While building the calendar viewing options, click this link to view the legend with the colors and symbols selected at the time. |
|
Maximum Time Reporters Shown |
Define the maximum number of time reporters to display on screen. Note. The maximum number of time reporters shown cannot exceed fifteen. |
|
Absence Default Workday Hours |
Define the number of hours to display for a requested or approved absence when:
The system displays this number if one or more of the reasons above are valid. The system displays half the number of the defined hours if the requested/approved absence is for a half day. |
Reported/Payable Time
|
TRC List |
Designate which TRCs will be displayed on the time calendar pages. TRC value lists are set up in Time and Labor and designated a unique ID. Click View List to see a list of the TRCs in the selected list. Note. A TRC can be included in more than one TRC List. If a TRC appears in two or more TRC lists, the list with the higher priority will display on the calendar. View the TRC lists before setting priority codes to avoid possible duplication of TRCs and minimize potential confusion while viewing calendar pages. TRC values are defined in the Time and Labor setup tables. Important! A maximum of five TRC lists can be specified. The system will not allow you to save the page with more than five TRC lists designated. |
|
Priority |
Enter a number from 1 to 99 in this field. Priority definitions enable the system to decide which information is the most important to show. The priorities assigned to the TRCs and time event options determine which color to display when more than one type of time related data is in effect for the same period. The color with the highest priority will be used to represent all of the time for the particular period. All assigned priorities need to be unique. |
|
Color |
The Calendar View Options page enables you to associate colors with TRCs and time events, such as holidays. Use the drop-down menu to view the list of sixteen color choices. This design provides easier viewing of the calendar pages. The colors and associated elements will appear on the legend at the bottom of each calendar page. |
|
Symbol |
Define symbols to designate different TRCs and time events. Use up to three characters for each symbol. If Display Symbols is selected, these symbols appear on the calendar along with the hours to show different types of reported time and are explained through the legend on the calendar viewing pages. |
|
View List |
Click to view the TRCs contained in the selected TRC list. |
|
Default Reported/Payable Time |
Designate the priority, color and symbol (if used) to either the payable time reported by a time reporter or the time that is defaulted from the schedule. |
Scheduled Time and Exceptions
In addition to TRCs and default reported time, select other time-related items for calendar viewing. For example, if requested overtime and exceptions are important, you can prioritize them so that they display on the calendar pages, when present.
Select the priority, color, and symbol that the system is to apply to the following types of calendar display options.
|
Workday |
A workday is any regularly scheduled day for which time events should be reported. When Show Schedules is selected on the Time Calendar pages, Workday and Off Day will be displayed. |
|
Off Day |
Days designated as non-workdays. Off days do not include requested/approved absences or holidays. |
|
Approved Training and Requested Training |
Time or days which have been either requested or approved for training. One option is to set the requested hours at a slightly lower priority than the approved hours. This option would allow the color associated to Requested Training to appear in the grid on the Calendar pages for that specific time. If approved, the color would change to what is associated with Approved Training. Note. This option requires implementation of the Human Resources Administer Training business process or PeopleSoft Enterprise Learning Management. |
|
Approved Absence and Requested Absence |
Time or days which have been requested or approved for absence. One option is to set the requested hours at a slightly lower priority than the approved hours. This option would allow the color associated to Requested Absence to appear in the grid on the Calendar pages for that specific time. If approved, the color would change to what is associated with Approved Absence. Note. This option requires implementation of Global Payroll or Absence Management. |
|
Approved Overtime and Requested Overtime |
Time or days which have been requested or approved for overtime. One option is to set the requested hours at a slightly lower priority than the approved hours. This option would allow the color associated to Requested Overtime to appear in the grid on the Calendar pages for that specific time. If approved, the color would change to what is associated with Approved Overtime. |
|
Holiday |
Days defined as holidays by the company or organization. |
|
Exceptions |
If employee time produces exceptions during the Time Administration process, this option will create a link on the calendar page to the Exceptions Information page for more detailed information about the exception. |
Previewing the Time Calendar Legend
Access the Preview Legend page (Set Up HRMS, Product Related, Time and Labor, Time Periods, View Time Period Calendar, View Time Period Calendar, click Preview Legend on the Calendar View Options page).
This page enables you to monitor the viewing option building process to assure the final design provides the necessary information in a readable format. You can see what symbols and colors have been designated for the various time events to be shown on the calendar. As you build your customized calendar views, check the legend periodically to review the symbols currently designated.
Establishing Compensatory Time Plans
To set up compensatory time plans, use the Compensatory Time Off Plan (COMP_TIME_PLAN) component.
This section discusses setting up compensatory time plans.
Page Used to Set Up Compensatory Time Plans|
Page Name |
Definition Name |
Navigation |
Usage |
|
TL_COMP_TIME_PLAN |
Set Up HRMS, Product Related, Time and Labor, Time Reporting, Compensatory Time Off Plan, Compensatory Time Off Plan |
Set up compensatory time plans for time reporters. |
Setting Up Compensatory Time Plans
Access the Compensatory Time Off Plan page (Set Up HRMS, Product Related, Time and Labor, Time Reporting, Compensatory Time Off Plan, Compensatory Time Off Plan).
Note. Adding, deleting, or updating a row in the Compensatory Time table triggers referential integrity processing. Referential integrity ensures that if changes to the compensatory time off plan have invalidated unpaid compensatory time, the time will be reevaluated and the balance updated accordingly.
|
Expiration Period |
Enter a unit of measure. Valid options are: Days, Months, Years, and Never. If you select Never, the Number field is unavailable. If you select any other value, enter a value in the Number field. |
|
Number |
Enter a the number of days, months, or years that the compensatory time is valid before expiry. This field defaults to a value of 9999. |
|
Limit Positive Comp Hours (limit positive compensatory hours) |
To limit the number of positive compensatory time hours that a time reporter can accrue, select this check box and fill in the Max Positive Hours Allowed field. If you do not select this check box, the Max Positive Hours Allowed field is unavailable. |
|
Max Positive Hours Allowed (maximum positive hours allowed) |
Enter the maximum number of compensatory time hours that a time reporter can accrue. |
|
Allow Negative Comp Hrs (allow negative compensation hours) |
To permit time reporters to have a negative compensatory time hours balance (use more compensatory time than they have accrued), select this check box and fill in the Max Negative Hours Allowed field. If you do not select this check box, the Max Negative Hours Allowed field will be unavailable. |
|
Max Negative Hours Allowed (maximum negative hours allowed) |
Enter the maximum negative hours of compensatory time that a time reporter can take. |
Valid Time Reporting Codes
Each compensatory time plan is linked to one or more TRCs. Add rows as necessary. If you assign more than one compensatory time plan to a time reporter and the compensatory time plans share one or more TRCs, the system creates an error. For example, a time reporter has plan A and you want to add plan B. Plan A contains TRCs REG and OVR. Plan B contains TRCs SPE and OVR. When you try to add plan B, the system creates an error. The uniqueness of the TRCs per compensatory time plan enables the system to recognize which plan's balance is affected when a time reporter has more than one plan.
|
Time Reporting Code |
Enter TRCs that are valid for this compensatory time plan. Some TRCs represent time compensatory time earned, other represent compensatory time taken. |
See Also
Establishing Time Reporting Codes
Defining ExceptionsTo define exceptions, use the Exception Definition (TL_EXCEPDEF_PNLGRP) component.
This section discusses defining exception criteria and assigning message numbers.
Page Used to Define Exceptions|
Page Name |
Definition Name |
Navigation |
Usage |
|
TL_EXCEPDEF_PNL |
Set Up HRMS, Product Related, Time and Labor, Validation Criteria, Exception Definition, Exception Definition |
Establish exception criteria and assign message numbers. |
Defining Exceptions and Assigning Message Numbers
Access the Exception Definition page (Set Up HRMS, Product Related, Time and Labor, Validation Criteria, Exception Definition, Exception Definition).
Exception Severity
Exception severity communicates the severity of the exception during the Manage Time process. It helps determine whether time for the day is processed by the Time Administration process to create payable time.
Note. If selecting an exception definition with a severity of "low" or "medium," the Allowable check box will automatically be selected. This is because all low and medium severity exceptions will automatically allow payable time to be created by Time Administration.
|
High |
Select to give the exception a high priority. This is the default for system-defined exceptions. The Time Administration process ignores all unresolved and disallowed high-severity exceptions when calculating payable time. The system will only create payable time for these exceptions after they have been resolved or allowed. |
|
Medium |
Select to give the exception a medium priority. The Time Administration process will create payable time for medium severity exceptions. |
|
Low |
Select to give the exception a low priority. The Time Administration process will create payable time for low-severity exceptions. |
Exception Controls
|
Allowable |
Select to allow payable time creation without resolving the exception during the Manage Time processes. If this is a system-defined exception, the check box is cleared by default. An allowable exception doesn't stop the Time Administration process. Leaving this check box cleared makes the exception disallowable, and requires the time manager to resolve the exception before it can become payable. This check box controls the exception display under Manage Exceptions. The Allow check box appears only if the exception is allowable. If selecting an exception definition with a severity of "low" or "medium", the Allowable check box will automatically be selected. This is because all low and medium severity exceptions will automatically allow payable time to be created by Time Administration. |
|
Archive Exception |
Select to archive exception. For example, you may want the system to store exceptions so that you can track how many times an employee is late. If this is a system-defined exception, the check box is cleared by default. Leave this check box cleared to prevent the exception from appearing on the Exceptions History page after it is resolved using the Manage Exceptions page. If you allow the exception using the Manage Exceptions page, the exception will also appear on the Exceptions History page. |
Message Data
|
Message Set Number |
Select a number to establish the message set associated with the exception. |
|
Message Number |
Select the number of the actual message to describe the exception generated by the Time Administration process. |
See Also
Defining PeopleSoft Application Engine SectionsTo define application engine section, use the AE Section Definition (TL_AE_SECTION_PNLG) component.
This section discusses specifying the purpose of a PeopleSoft Application Engine section.
Page Used to Define PeopleSoft Application Engine SectionsDefining a PeopleSoft Application Engine Section
Access the AE Section Definition page (Set Up HRMS, Product Related, Time and Labor, Validation Criteria, AE Section Definition, AE Section Definition).
|
Program Name |
Enter the name of the PeopleSoft Application Engine program in which this application engine section is included. |
|
Process Type |
Select the operation for the system to perform. Valid values are: Referential Integrity. Select for this PeopleSoft application engine section to perform referential integrity processing. Validation. Select for this PeopleSoft Application Engine section to perform validation processing. Rule (User Exit). Select to use a user exit. |
See Also
Using Validation CriteriaTo define validation criteria, use the Validation Definition (TL_VALID_DEFN_PNLG) and the Validation Set Definition (TL_VALID_SET_PNLG) components.
This section discusses:
Defining validation IDs.
Grouping validation IDs.
Pages Used to Define and Group Validation IDs|
Page Name |
Definition Name |
Navigation |
Usage |
|
TL_VALID_DEFN_PNL |
Set Up HRMS, Product Related, Time and Labor, Validation Criteria, Validation Definition, Validation Definition |
Define your validation IDs. |
|
|
TL_VALID_SET_PNL |
Set Up HRMS, Product Related, Time and Labor, Validation Criteria, Validation Set Definition, Validation Set Definition |
Group validation IDs. |
Defining Validation IDs
Access the Validation Definition page (Set Up HRMS, Product Related, Time and Labor, Validation Criteria, Validation Definition, Validation Definition).
|
Validation AE Section (validation application engine section) |
Select the validation AE section that should correspond to this validation. |
|
Exception ID |
Select the exception ID that should correspond to this validation. Generally, there will be a one-to-one correlation between exceptions and validations, but several validations could trigger the same exception. There will never be more than one exception per validation. |
See Also
Defining PeopleSoft Application Engine Sections
Grouping Validation IDs
Access the Validation Set Definition page (Set Up HRMS, Product Related, Time and Labor, Validation Criteria, Validation Set Definition, Validation Set Definition).
All Validation Definitions
A list of all validation IDs and descriptions is displayed in the grid. Two ways exist to select which validations to include in a validation set: Click Select All and the system will select the entire column of check boxes. Or, to select particular validations that should appear in the list, select check boxes next to those validations. Use the Clear button to clear the entire column of check boxes. Click the >> button to transfer the selected validations to the new validation set.
Validations Sets are configured to determine if the validation is run in Submit Time, Time Administration, both batch processes or neither.
Note. Validation TLX0010, Invalid Leave Time Taken, cannot be enabled for the Submit Time process.
Validation Definitions for <Validation Set Name>
This grid (displayed on the right side of the Validation Set Definition page) represents the validations included in the validation set. Use the check boxes to remove validations from the validation set. After selecting the check boxes for the validations to remove from the validation set, click the Delete button to remove selected items.
Note. If validations are not enabled which check against key reporting time tables, such as TRCs, the time will not be processed and no exceptions will be generated.
See Exceptions and Validations.
Defining Override Reason CodesTo define override reason codes, use the Override Reason Code (TL_OVRD_RSN_PNLGP) component.
This section discusses establishing codes for the reasons for reporting time or for changing reported time.
Page Used to Define Override Reason Codes|
Page Name |
Definition Name |
Navigation |
Usage |
|
TL_OVRD_RSN_PNL |
Set Up HRMS, Product Related, Time and Labor, Time Reporting, Override Reason Code, Override Reason Code |
Define codes for the reasons for reporting or for changing reported time. |
Defining Override Reason Codes
Access the Override Reason Code page (Set Up HRMS, Product Related, Time and Labor, Time Reporting, Override Reason Code, Override Reason Code).
Enter comments and instances of reported time. When you enter comments, enter a reason code so that it will be easy to categorize the comments for reporting purposes. Use override reason codes for the Rapid Time and Time Reporting templates, and with the Timesheet page.