| Skip Navigation Links | |
| Exit Print View | |

|
Oracle Identity Synchronization for Windows 6.0 Installation and Configuration Guide |
| Skip Navigation Links | |
| Exit Print View | |

|
Oracle Identity Synchronization for Windows 6.0 Installation and Configuration Guide |
Part I Installing Identity Synchronization for Windows
6. Synchronizing Existing Users and User Groups
9. Understanding Audit and Error Files
Local Windows NT Subcomponent Logs
Viewing Directory Source Status
To View the Status of your Directory Sources
Viewing Installation and Configuration Status
To View the Remaining Steps of the Installation and Configuration Process
Enabling Auditing on a Windows NT Machine
To Enable Audit Logging on Your Windows NT Machine
Part II Identity Synchronization for Windows Appendixes
A. Using the Identity Synchronization for Windows Command Line Utilities
B. Identity Synchronization for Windows LinkUsers XML Document Sample
C. Running Identity Synchronization for Windows Services as Non-Root on Solaris
D. Defining and Configuring Synchronization User Lists for Identity Synchronization for Windows
E. Identity Synchronization for Windows Installation Notes for Replicated Environments

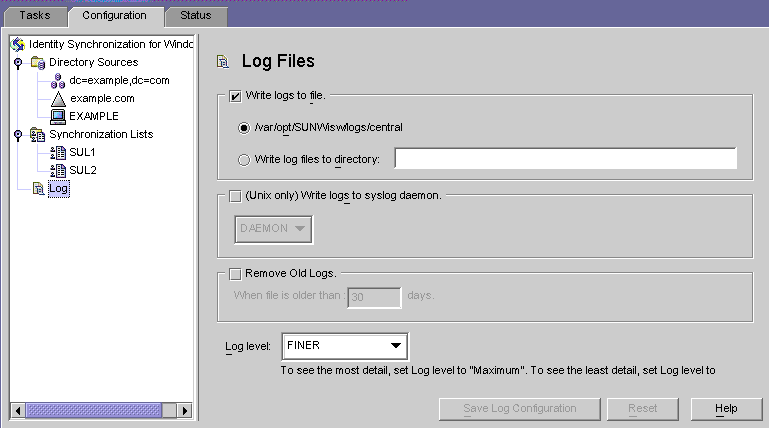
Write logs to file. Enable this option to write logs to a file on the Core host.
After selecting this option you can:
Enable the default log directory and file (for example, /var/opt/SUNWisw/logs/central ).
Enable the Write log files to directory option, and then specify a path and file name for the log file.
Note - The Console does not verify whether a specified log file location actually exists. The central logger will try to create the log directory if it does not exist. Consequently, there is no indication that you specified and saved a nonexistent log location until you try to view the logs. After several attempts to view the logs, a message displays to report the Console’s inability to find logs at the specified location.
On Solaris Only — Write logs to syslog daemon: Enable this option if Identity Synchronization for Windows resides on a Solaris platform. Use the drop-down list to select a category for writing the log. (Default is DAEMON)
Note - When you select this option, Identity Synchronization for Windows logs everything to the syslog; however, the syslog is configured by default to log WARNING and SEVERE messages only.
To configure syslog to log INFO messages, edit /etc/syslog.conf and change the following line:
*.err;kern.debug;daemon.notice;mail.crit /var/adm/messages
to
*.err;kern.debug;daemon.notice;daemon.info;mail.crit /var/adm/messages
After making this change, you must restart the syslog daemon as follows:
/etc/init.d/syslog stop ; /etc/init.d/syslog start
To enable FINE, FINER, and FINEST logging, include daemon.debug in the semicolon separated list.
Remove Old Logs: The number of log files will continue to grow (one per day) indefinitely. To avoid running out of disk space, enable this option and specify when the program can delete old logs from the central log file.
For example, if you specify 30 days, Identity Synchronization for Windows will delete all files when they become 31 days old.
Log Level. Use the drop-down list to select the level of detail you want to see in your system logs. (Review Reading the Logs)