| Skip Navigation Links | |
| Exit Print View | |

|
Sun Server X2-8 (formerly Sun Fire X4800 M2) Installation Guide Sun Server X2-8 (formerly Sun Fire X4800 M2) Documentation Library |
| Skip Navigation Links | |
| Exit Print View | |

|
Sun Server X2-8 (formerly Sun Fire X4800 M2) Installation Guide Sun Server X2-8 (formerly Sun Fire X4800 M2) Documentation Library |
Front and Back Features and Components
Unpacking the Server and Identifying the Rack Mounting Hardware
How to Identify Your Rack Mounting Kit
Installing the Server In the Rack Using the Standard Rack Mounting Kit
Contents of the Standard Rack Mounting Kit
Location of the Rack Mounting Kit and the Shipping Bracket Kit
Installing the Server In a Rack Using the Standard Rack Mounting Kit
Removing and Installing the Standard Rack Mounting Kit Shipping Brackets
Installing the Server in the Rack Using the Universal Rack Mounting Kit
Contents of the Universal Rack Mounting Kit
Installing the Server in a Rack Using the Universal Rack Mounting Kit
How to Remove Components to Reduce Weight
How to Replace the Components in the Server
How to Install the Universal Rack Mounting Hardware in a Square-Hole Rack
How to Install the Universal Rack Mounting Hardware in a Round-Hole Rack
How to Insert the Server Into the Rack
Installing and Removing the Universal Shipping Brackets
How to Remove the Universal Shipping Brackets
Removing the Server from the Rack
How to Remove the Server from the Rack
How to Remove the Rackmounting Hardware from the Rack
Attaching Administration (SP) Cables
Powering the Server On and Off
Getting Service for Your Server
How to Find the Server's Serial Number
Determining Your Server Management Strategy
Oracle Integrated Lights Out Manager
Oracle Hardware Management Pack
Oracle Hardware Installation Assistant
Configuring the Preinstalled Solaris Operating System
Configuring the Preinstalled Oracle Solaris OS
How to Connect to the Server Using the Server's IP Address
(Optional) How to Redirect the Console Output to the Video Port
How to Connect to the Server Using a Serial Capture Program
Oracle Solaris OS Information Products and Training
Configuring the Preinstalled Oracle Linux Operating System
Oracle Linux Configuration Worksheet
Configure the Preinstalled Oracle Linux OS
Register and Update Your Oracle Linux OS
Configuring the Preinstalled Oracle VM Software
Getting Started With Oracle VM
Communicating With Oracle ILOM and the System Console
About Oracle ILOM SP IP Addresses and the Oracle ILOM Interfaces
Connecting to the System Console
I/O and Interrupt Resource Allocation
Option ROM and I/O Space Allocation
Allocating MSI Interrupt Space (Oracle Solaris OS Only)
How to Identify and Fix Interrupt Resource Shortages
Sun Server X2-8 Specifications
Physical Specifications for the Sun Server X2-8
Power Specifications for the Sun Server X2-8
How to Request Physical Media Online
This procedure describes how to install brackets into a system equipped with the universal rack mounting kit.
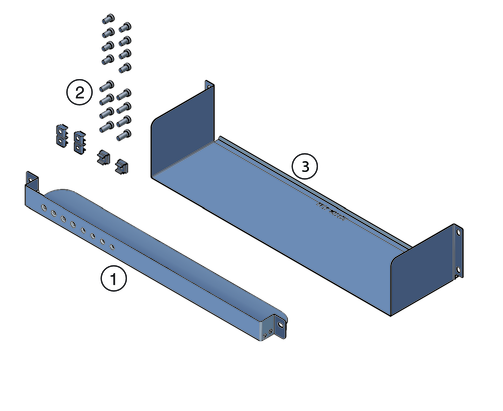
The following picture shows the shipping bracket kit.

| ||||||||
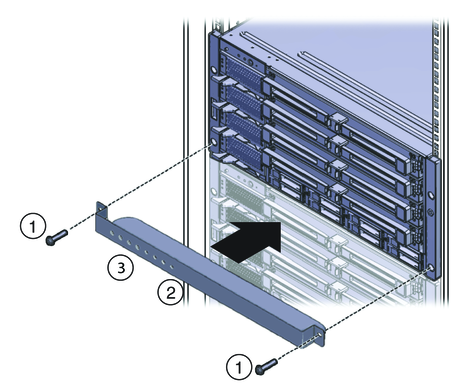
See the following figure.
Note - The front shipping bracket includes eight threaded holes (3) used for storing unused screws. When the shipping brackets are not installed, the bracket holds the long screws used to install them. When the shipping brackets are installed, it stores the short screws that were used before the shipping brackets were installed.

They will be stored there to be used when you remove the shipping bracket.
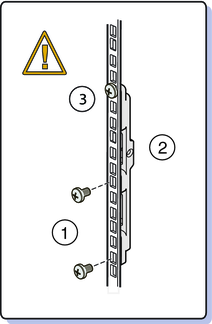
 | Caution - Do not remove the bottom screws unless you are certain that the upper screw (3) is in place. Otherwise, the server could fall. |

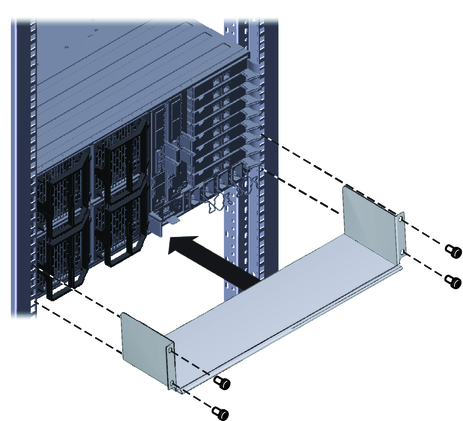
Use four screws (2) to fasten it to the rack. Do not finish tightening these screws. They should be tight enough to hold the bracket in place, but you should still be able to move the bracket slightly.
For square-hole racks, use the two screws that you removed in Step 5.
For round-hole racks, use either 10-32 x 10 or M6 x 12.

The bracket should be fastened to the posts, but loose enough to move slightly.
If necessary, loosen the screws enough so that you can move the bracket, and then tighten them after pushing it against the bottom of the server.
 | Caution - To prevent damage to the server during shipping, the bottom shipping bracket must rest firmly against the bottom of the server. |