Implementing a User Activity
This section provides an overview of how to configure the user activity and other
components required to implement a user activity. Each step below is described in
detail in the following sections. Perform the following steps to create a Business
Process containing a user activity.
-
Creating the Worklist Manager Database
-
Configuring Security
-
Creating a Web Service Definition
-
Creating the Business Processes
-
Defining Task Assignment Conditions
-
Configuring the WorkList Manager
Creating the Worklist Manager Database
The Worklist Manager database stores task assignment data, such as the type, priority,
and status of the task, as well as who a task is currently
assigned to. Before beginning this task, be sure you have database instance created
where you can install the Worklist Manager tables.
To Create the Worklist Manager Database
- In the NetBeans Projects window, expand CAPS Components Library, expand Business Process Manager,
and then expand WorkListViewer.
Note there is a second WorkListViewer node under WorkListViewer.
- Right-click the second instance of WorklistViewer, point to Version Control, and then click Check
Out.
- On the dialog box, click Check Out.
- Expand the second instance of WorkListViewer.
- Right-click Database Scripts, and then click Properties.
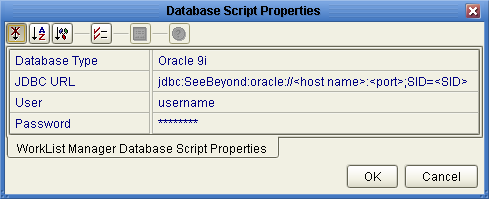
The Database Script Properties dialog box appears.
Figure 1 Worklist Manager Database Properties
- Configure the database properties to connect to your database, and then click OK.
See Figure 1 for more information about the values for these properties.
Note - The user whose login information you enter must have DBA privileges to create
the new Worklist Manager user.
- For Oracle databases only:
- Under Database Scripts, right-click Oracle Install Script, and then click Open.
- Modify the location of the tablespace datafile to the location where you want
the file to reside.
- In the NetBeans toolbar, click Save.
- In the Projects window, right-click the install script file appropriate for your database,
and then click Run.
|
|
|---|
|
The database vendor and version you are using. |
|
The
URL to connect with the database. Enter one of the following:
For Oracle: jdbc:SeeBeyond:oracle://host:port;SID=SID For Sybase: jdbc:SeeBeyond:sybase://host:port For SQL Server: jdbc:SeeBeyond:sqlserver://host:port;DatabaseName= dbname For DB2: jdbc:SeeBeyond:db2://host:port;DatabaseName=SID;collectionId=JDBCPKG;packageName=JDBCPKG;embedded=true;createDefaultPackage=FALSE where <host> is the machine on which the database resides, <port> is the port number on which the database is listening, and <SID> and <dbname> are the name of the database.
|
|
The login
ID of a database administrator. This user must be able to create users
and assign permissions, as well as create and drop tables. |
|
The password for the
administrator user. |
|
Configuring Security
The Worklist Manager and task assignment window both require a connection to an
LDAP directory for user information and authentication. You can optionally configure SSL on
the LDAP server to encrypt information.
Configuring the LDAP Server
If you are already using an LDAP server, you can use your existing
directory structure. The primary requirement for the Worklist Manager is a mechanism that
clearly defines a user hierarchy so managers and supervisors can view the tasks
of their subordinates and users can escalate tasks to their supervisors.
Oracle Internet Directory
The Worklist Manager can adapt to your existing Oracle Internet Directory structure. You need
to define the reporting structure if this has not been done already. Worklist
Manager uses two attributes, typically manager and directReports, that define the reporting hierarchy.
You can create custom attributes that indicate a user’s supervisors and subordinates. You
can create groups and roles to which Worklist Manager users belong, but this
is not required. You need to create an administrator user that the Worklist Manager
will use as the security principal.
For more information about configuring the Worklist Manager for Oracle Internet Directory, see
Configuring an Oracle Internet Directory Connection.
OpenLDAP
The Worklist Manager can adapt to your existing OpenLDAP directory structure. You may
need to assign each user an attribute that defines their reporting structure, if
this has not been done already. You can use the default attribute, Manager, or
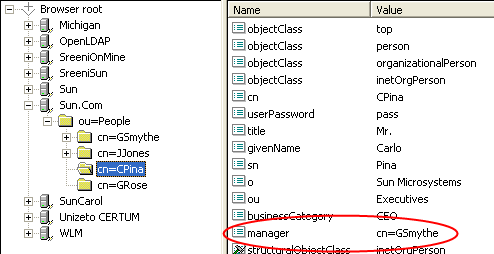
you can create a new manager attribute. Each user should have an entry
similar to Manager: cn=GSmythe, as shown in the sample directory structure in the following
figure.
Figure 2 Sample OpenLDAP Directory Structure
Worklist Manager login credentials for each user are defined by the value of
the Naming Attribute used in the distinguished name for each user (typically the cn
attribute) and the value of the userpassword attribute. For OpenLDAP, the Worklist
Manager uses an anonymous bind to access the directory server.
You can create custom groups and roles to which Worklist Manager users belong,
but this is not required. For information about configuring the Worklist Manager for
OpenLDAP, see Configuring an OpenLDAP Connection.
Oracle Directory Server Enterprise Edition
The Worklist Manager can adapt to your existing Oracle Directory Server Enterprise Edition (previously
Sun Java System Directory Server) structure. You need to define the reporting structure
if this has not been done already. There are a variety of ways
to define the reporting structure. The server provides a default attribute, manager, that you
can use to define the upward reporting structure, but you must also use
an attribute that defines subordinates. You can also create custom attributes that indicate
a user’s managers and subordinates, or define hierarchies in the entrydn attribute of the
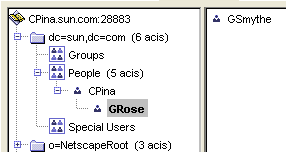
user. For example, if user “gsmythe” reports to “grose” who in turn reports
to “cpina”, the entrydn attribute for “gsmythe” would be similar to:
uid=gsmythe,uid=grose,uid=cpina,ou=people,dc=sun,dc=com
Using the above entrydn, the directory structure would look similar to the following
figure.
Figure 3 Sample Oracle Directory Server Enterprise Edition Structure
You can create custom groups and roles to which Worklist Manager users belong,
but this is not required.
Note - To enable task escalation and re-assignment on the Worklist Manager, you need to
use the manager attribute to define a user’s supervisor and you need to
define the reporting structure in each user’s entrydn attribute as described above. In
the manager attribute, be sure to enter the full entrydn value for the
supervisor.
When you define the LDAP directory structure, note the Naming Attribute used in the
distinguished name for each user. This is typically the uid attribute or
the cn attribute. This value is specified in the Worklist Manager External System
properties in the Environment. Worklist Manager login credentials for each user are defined by
the value of the Naming Attribute and the value of the userpassword attribute.
You need to create an administrator user that the Worklist Manager will use
as the security principal.
For more information about configuring the Worklist Manager for the Oracle Directory Server
Enterprise Edition, see Configuring an Oracle Directory Server Enterprise Edition Connection.
Microsoft Active Directory
The Worklist Manager can adapt to your existing Active Directory structure. You need to
define the reporting structure if this has not been done already. Active Directory
provides two default attributes, manager and directReports, that define the reporting hierarchy.
You can also create custom attributes that indicate a user’s supervisors and subordinates. You
can create groups and roles to which Worklist Manager users belong, but this
is not required.
In Active Directory, a user’s login ID is defined by the sAMAccountName attribute. This
attribute is specified in the Worklist Manager External System properties in the Environment.
Worklist Manager login credentials for each user are defined by the value of
the sAMAccountName attribute and the value of the userPassword attribute. You need to create
an administrator user that the Worklist Manager will use as the security principal.
For more information about configuring the Worklist Manager for Microsoft Active Directory, see
Configuring a Microsoft Active Directory Connection.
Configuring Secure Sockets Layer
By default, communications between the Repository and the LDAP server are unencrypted. You
can configure the LDAP server and Worklist Manager to use Secure Sockets Layer
(SSL).
To Encrypt Communications Between the Repository and the LDAP Server
For more information about using SSL with the Repository, see Configuring Oracle Java CAPS for SSL Support.
- Configure SSL on the LDAP server.
Ensure that the LDAP server is configured to use the Secure Sockets Layer
(SSL). For detailed instructions, see the documentation provided with the LDAP server.
- Export the LDAP server certificate to a file.
- Import the LDAP server certificate to the Repository’s list of trusted certificates.
The following steps use the keytool program. This program is included with the
Repository (as well as the Java SDK).
- From a command prompt, navigate to SDK_Home\bin, where SDK_Home is the location of
the Java EE Software Development Kit (SDK).
- Run the following command:
keytool -import -trustcacerts -alias alias -file certificate_filename -keystore cacerts_filename
-
For the -alias option, assign any value.
-
For the -file option, specify the fully qualified name of the LDAP server certificate. For example:
C:\ldap\mycertificate.cer
-
For the -keystore option, specify the fully qualified name of the cacerts file, JavaCAPS_Home\appserver\domains\Domain_Name\config\cacerts.jks. For example:
- When prompted, enter the keystore password. The default password is changeit.
- When prompted whether to trust this certificate, enter yes.
The following message appears:
Certificate was added to keystore
- In the Realm element of the server.xml file, modify the URL of the
LDAP server as follows:
- Set the protocol to ldaps.
- Set the port number to the port number that the LDAP server listens
on for SSL requests. Typically, this number is 636.
For example:
<Realm className="org.apache.catalina.realm.JNDIRealm" connectionURL="ldaps://myldapserver:636">
LDAP and UNIX Java CAPS Environments
If the application server to which Java CAPS application are deployed is running
on a UNIX system, you must configure the LDAP Provider URL to connect
to the LDAP server. The following is common for a Java CAPS environment.
In this environment, the LDAP provider URL in the Worklist Manager properties must
be set to an exact URL.
To Set an LDAP Provider URL
- On the NetBeans Services window right-click the Worklist Manager External System under the
CAPS environment, and then click Properties.
- In the Configuration list, expand WLMConnector External System Configuration, and then, depending on
the LDAP server you are using, click Open Ldap Parameters or Sun Java
System Directory Server/ADS/OID.
- In the LDAP Provider URL property, enter the exact URL to the LDAP
server.
The URL for the LDAP server is ldap://host:port
where hostis the name of the machine on which the LDAP server resides,
and port is the port number on which the LDAP directory is listening.
You can access the port number through the LDAP directory browser or administration tool
you are using.
- Click OK to save the changes.
Creating a Web Service Definition
Web Service Definitions, embodied as Web Service Definition Language (WSDL) files, can be
used to invoke and operate web services on the internet and to access
and invoke remote applications and databases. WSDL files are used when you are
building a web service, and expose the business process as a web service.
Creating the Business Processes
Once you have created the Worklist Manager database and have the LDAP directory
structure in place, you can create the main business process that contains the
user activity and the sub-process that defines the user activity logic.
Creating the Sub-Process
The sub-process defines the flow of data through the user activity, and defines
the access point for users to enter the required information.
To Create the Sub-Process
- Create the Visual Page Designer page flows that define the user activity.
- Create a business process, and add the modeling elements including the Visual Page
Designer page flows.
- Link the modeling elements together.
- Create the business rules for the links to define the mapping of data.
- When you are done configuring the modeling elements, click Save on the NetBeans
toolbar.
Creating a Partner
When creating a business process that will be used as a sub-process,
you need to create a partner to associate with the receive and reply
activities.
To Create a New Partner
- In the Projects window, right-click the sub-process, and then click Properties.
- On the Business Process Properties window, click the Partners tab.
- Click New, and enter a name for the partner.
- Click OK.
Associating the Partner with Activities
Once you create a partner for the sub-process, you need to associate it
with the implement or receive activity and the reply activity of the sub-process.
This allows you to connect the components in the Connectivity Map.
To Associate the Partner With Activities
- In the business process, select the receive or implement activity.
- On the Business Process Designer toolbar, click the Show Property Sheet icon.
- In the Partner property, select the partner you created above.
- Repeat for the reply activity.
Creating the Main Business Process
The main business process includes the user activity, and invokes the sub-process created
in the previous step.
To Create the Main Business Process
- Create a business process, and add the modeling elements including a user activity.
- Link the modeling elements together.
- In the Projects window, expand the sub-process, and then drag the operation of
the sub-process onto the user activity in the business process.
This node is named Operation by default, but you can customize the name
in the WSD object.
- Create the business rules for the links to define the mapping of data.
- Define task assignment for the user activity, as described in Defining Task Assignment.
- When you are done configuring the modeling elements, click Save on the NetBeans
toolbar.
Configuring User Activities Inside While Loops
When creating a business process that includes a user activity inside a while
loop, you must take a few extra steps. The following procedure provides the
steps for configuring a user activity inside a while loop.
To Configure a User Activity Inside a While Loop
- Create and configure a user activity as usual.
- Add a business rule to the link leaving the user activity.
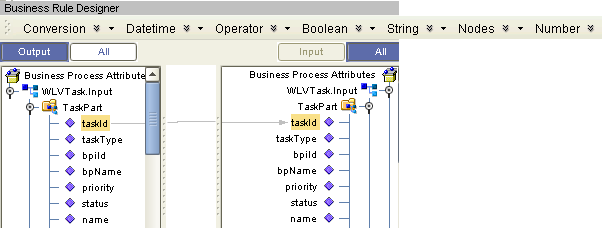
- Open the Business Rule Designer and expand the WLVTask.Input node.
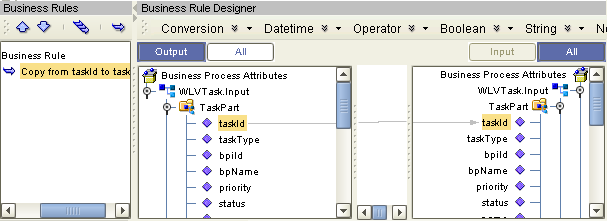
- Copy a business process attribute from the Output panel to the All panel,
as shown in Figure 4.
This creates an output container.
Figure 4 Copy Business Process Attribute
- Open the Business Rules panel and click Show Single Mapping, as shown in
Figure 5.
Figure 5 Business Rules Editor
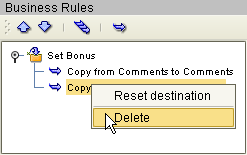
- Right-click the Copy rule and click Reset Destination, as shown in Figure 6.
Figure 6 Reset Destination
- On the NetBeans toolbar, click Save.
Defining Task Assignment
After the business processes are created and configured, you need to connect to
the LDAP server and configure the user activity. To configure a user activity,
you create expressions that define which users are assigned to a task under
specific conditions. You can optionally define automatic task escalation and email notifications for user
activities. The task assignment panel also provides a Visual Page Designer page mapper
so you can expose values generated by the user activity to the page
flow.
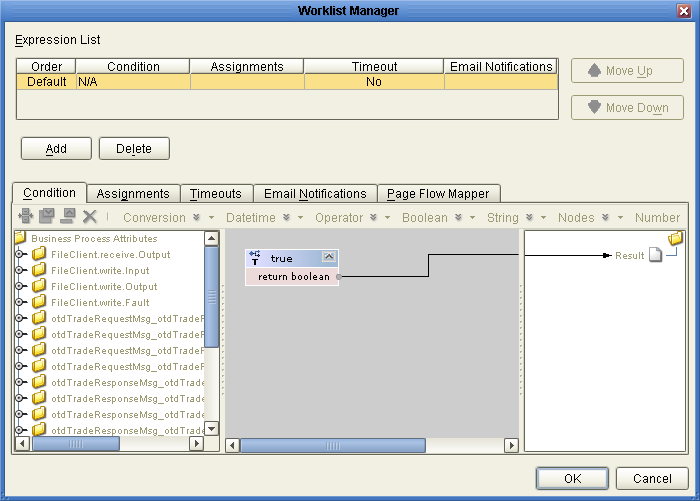
Note - One default expression is defined in the expression list, which cannot be deleted.
This expression is used when no conditions defined for any other expression evaluate
to true. At a minimum, you must configure the default expression by assigning
a user to the expression; otherwise, business process validation will find a fatal
error and you will be unable to deploy.
Creating a Task Assignment Expression
The flow of a specific task is defined by an expression. You can
define multiple expressions for each user activity, each defining the conditions under which
a task is assigned, the users to whom it is assigned, and what
happens once the task is assigned.
To Create a Task Assignment Expression
- In the main business process, right-click the user activity to which you want
to assign LDAP users, and then click Edit Task Assignment Panel.
The Worklist Manager window appears, as shown in Figure 7.
Figure 7 Worklist Manager Window: Expression List
- In the upper section of the window, click Add.
A new expression appears in the expressions list.
- If necessary, use the Move Up and Move Down buttons to place the
expression in the correct order.
- Configure the expression as described in the following sections.
Defining Task Assignment Conditions
Conditions define how an activity is evaluated for user completion. The Conditions tab
of the Worklist Manager window includes a Method Palette, similar to that of the
Business Rule Designer. This step is required for all but the default expression.
To Define Task Assignment Conditions
- On the Worklist Manager window, click the Condition tab.
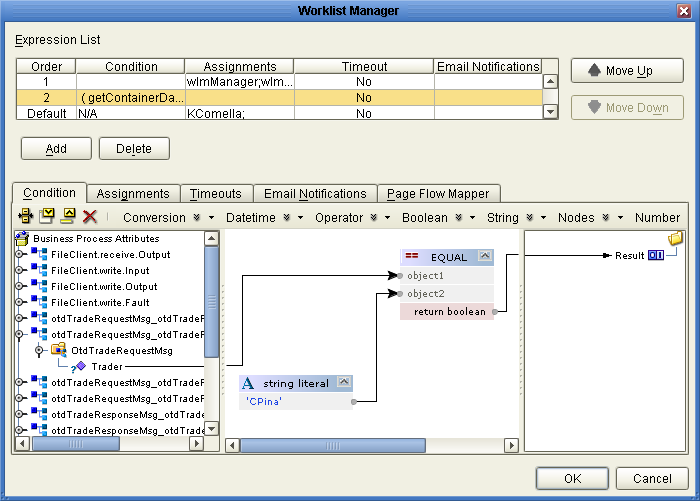
The Condition page appears, as shown in Figure 8.
- Define the conditions under which a task will be assigned.
Figure 8 illustrates an example of using methods on the Condition page.
Figure 8 Worklist Manager Window: Condition Tab
- Once the conditions are defined, continue to Assigning Users to the Activity.
Assigning Users to the Activity
In this step, you can create either static or dynamic assignments for
the user activity. With static assignments, you specify the users to whom tasks
will be assigned when the conditions you defined on the Condition page have
been met. To do this, you must connect to a running LDAP server.
With dynamic assignments, you specify a field in the incoming data that contains the
name of the user to whom that task is assigned. You do
not need to connect to the LDAP server to create this assignment. This
step is required for all expressions. If a user activity includes an expression with
no users assigned, the business process will fail validation.
To assign users to an activity
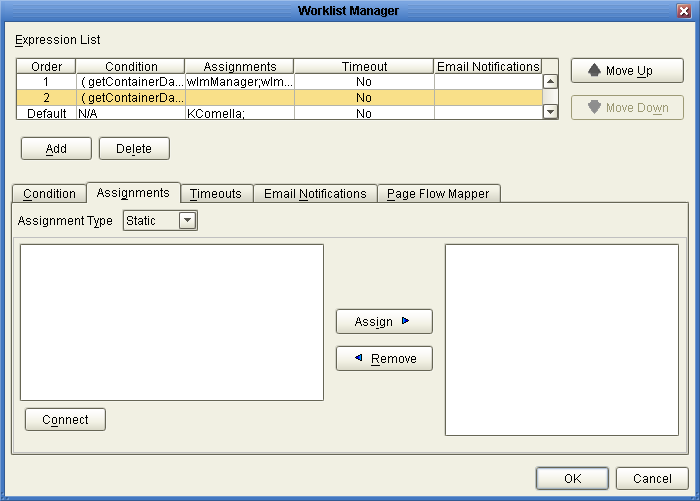
- On the Worklist Manager window, click the Assignments tab.
The Assignments page appears, as shown in Figure 9.
Figure 9 Worklist Manager Window: Static Assignments
- To create static assignments, do the following:
- On the Assignments page, make sure the Assignment Type is Static, and then
click Connect.
The LDAP connection properties dialog box appears.
Figure 10 LDAP connection properties Dialog Box
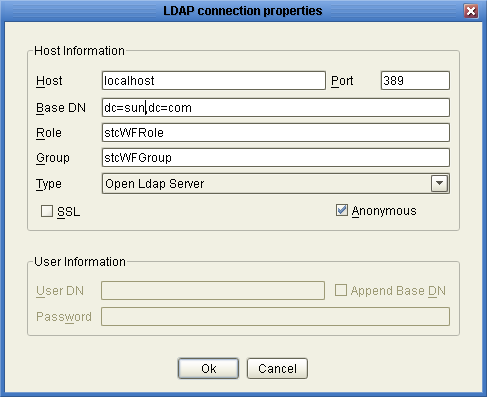
- Enter the values described in the table following these instructions, and then click
OK.
The left panel of the Assignments page is populated with the roles, groups,
and users defined in your LDAP directory.
- From the list in the left panel, select the roles, groups, or users
you want to include for this task assignment, and then click Assign.
- To create dynamic assignments, do the following:
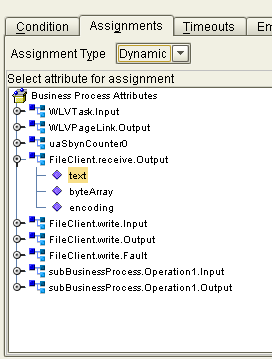
- In the Assignment Type field, select Dynamic.
The Assignments page changes to display attributes, as shown in Figure 11.
Figure 11 Worklist Manager Window: Dynamic Assignments
- In the attributes list, expand the list and select the field that will
contain the name of the user to whom a task will be assigned.
- Continue to Defining Task Escalation, or click OK if you are done defining the
expression.
|
|
|---|
|
The name of the computer on which the LDAP server resides. |
|
The port
number on which the LDAP server listens for requests. |
|
The root Distinguished Name
of the users directory; for example, dc=oracle,dc=com. |
|
The name of the object class
to filter for Worklist Manager users. This is in the form (objectclass=*), where *
is the name of the class. |
|
The name of the role
to which Worklist Manager users are assigned, if any. If you are specifying
a filter (for Oracle Internet Directory or Oracle Virtual Directory), this is in
the format of a filter, as described above. This field is not required. |
|
The name of the group to which Worklist Manager users are
assigned, if any. If you are specifying a filter (for Oracle Internet Directory or
Oracle Virtual Directory), this is in the format of a filter, as described
above. This field is not required. |
|
The type of LDAP server you are
using. |
|
An indicator of whether to encrypt data shared between the LDAP server and
the Repository. Select this option if SSL is configured. |
|
An indicator of whether
to create an anonymous bind to the LDAP server or to use specific
login credentials. If you deselect this check box, the fields below become enabled. |
|
The
distinguished name of the user to use to connect to the directory server. |
|
An indicator of whether to append the value of Base DN to the
User DN for authentication. |
|
The password associated with the User DN above. |
|
Defining Task Escalation
The Worklist Manager provides the ability to automatically escalate tasks based on either
a duration of time or a deadline. When escalation is based on duration,
the task can be escalated repeatedly. When it is based on a deadline,
the task is only escalated once.
For duration-based escalation, the timer starts when a task is added and when
a user checks in, reassigns, or escalates a task. If the specified duration
passes without the timer stopping, the task is escalated to all unique managers
of the assignee. The timer stops when a task is checked out or
completed and when the task has been escalated as high as it can
go.
For deadline-based escalation, the timer starts when a task is inserted. The task
is only escalated if the timer does not stop prior to the deadline.
The timer stops when a task is checked out, completed, or manually escalated.
The timer also stops when the deadline is reached and the task is
escalated.
Defining task escalation is optional.
Note - You can use a dialog box to format the deadline and duration for
you. For information purposes only, the following formats are used:
-
Deadlines: YYYY-MM-DDTHHmmSS-GMT_diff, where GMT_diff represents the difference from Greenwich Mean Time. For example, 2011-03-31T12:00:00-8:0 indicates March 31, 2011 at noon Pacific Standard Time.
-
Durations: PxYxMxDTxHxMxS, where x represents the number of units, Y is years, the first M is months, D is days, H is hours, the second M is minutes, and S is seconds. For example, P0Y0M0DT1H30M0S indicates and hour and one-half duration.
To Define Task Escalation
- On the Worklist Manager window, click the Timeouts tab.
The Timeouts page appears, as shown in Figure 12.
Figure 12 Worklist Manager Window: Timeouts Tab
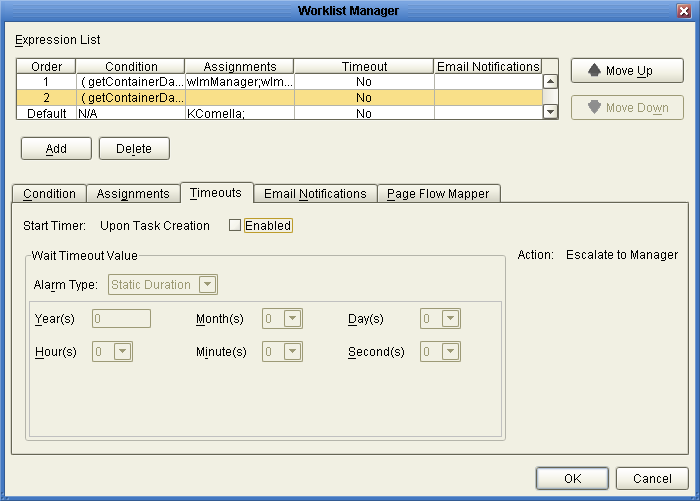
- Click the Enabled checkbox.
- To set a duration for escalation, do the following:
- In the Alarm Type field, select Static Duration.
- Enter the duration in the fields provided.
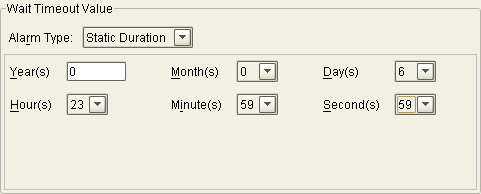
Figure 13. specifies that the task must be completed in just under one week
before it is escalated.
Figure 13 Static Duration Fields
- To set a deadline for the escalation, do the following:
- In the Alarm Type field, select Static Deadline.
- Enter the deadline in the fields provided.
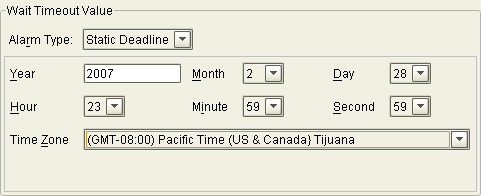
Figure 14 specifies that the task must be completed before midnight on the last
day of February, 2007.
Figure 14 Static Deadline Fields
- Continue to Exposing User Activity Values to Visual Page Designer Pages, or click OK if you are done defining the expression.
Exposing User Activity Values to Visual Page Designer Pages
Using the Page Flow Mapper, you can expose values generated by the user
activity to the associated Visual Page Designer pages. For example, if you map
the assignedTo field, pages can be built that display the name of the
task assignee.
The mapper has a Method Palette from which you can select methods to
manipulate the data in the mapping. Exposing user activities to Visual Page Designer
pages is optional.
To Expose User Activity Values to Visual Page Designer Pages
- On the Worklist Manager window, click the Page Flow Mapper tab.
The Page Flow Mapper page appears, as shown in Figure 15.
Figure 15 Worklist Manager Window: Page Flow Mapper
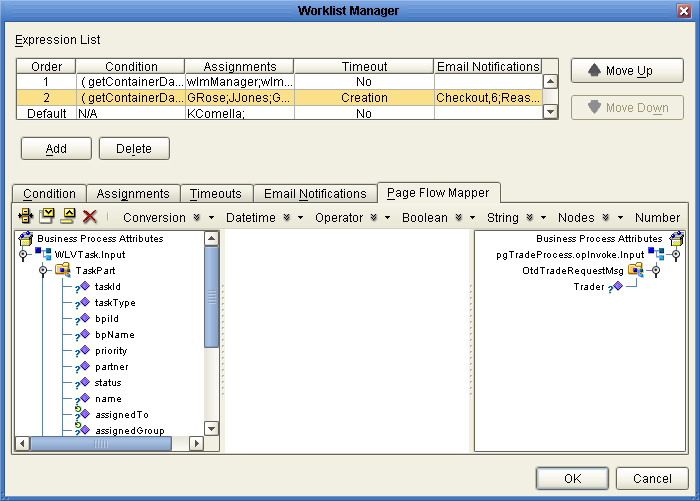
- In the mapper, map any user activity fields in the left panel to
nodes in the right panel.
- Continue to Define Email Notifications for Tasks, or click OK if you are done defining the
expression.
Define Email Notifications for Tasks
You can specify that certain users receive email notifications during different stages of task
completion. For example, you might want to notify both the assignee and their
managers when they are assigned a task. You can define email notifications for
all types of task activities, including assignment, reassignment, escalation, check-ins, checkouts, and completion. This
task is optional.
To define email notifications, complete the following tasks:
-
Make sure that the LDAP entry for each user assigned to user activity tasks includes an attribute that defines their email address.
-
Define email notification for tasks as described below (under Define Email Notifications for Tasks).
-
Configure the Worklist Manager External System in the Environment:
To Define email Notification for Tasks
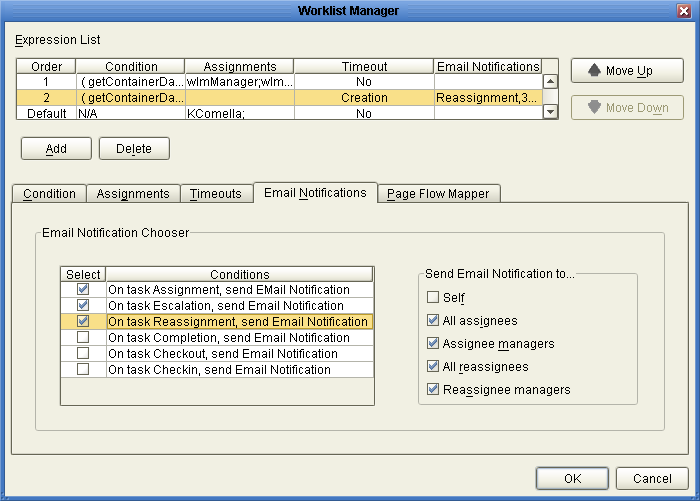
- On the Worklist Manager window, click the Email Notifications tab.
The Email Notifications page appears, as shown in Figure 15.
Figure 16 Worklist Manager Window: Email Notifications Tab
- For each action for which you want to generate email notifications, do the
following:
- In the Conditions list, select the checkbox next to the action.
- In the Send Email Notifications To list, select the users to whom the
notifications should be sent.
- Click OK.
- In the NetBeans Services window, configure the Worklist Manager External System properties by
doing the following:
- Specify the email server connection properties, as described in Defining email Notification Properties.
- In the properties for the LDAP server, enter the name of the LDAP
user attribute that contains the email address (for example, “mail”).
For more information about this property, see the topics under Configuring the WorkList Manager appropriate for
the type of LDAP directory you are using.
Configuring the WorkList Manager
When you create the Environment for a user activity business process, you need
to create and configure a Worklist Manager External System. The properties you configure
for the external system define the Worklist Manager database connectivity, LDAP server and
directory information, and custom labels for flex attributes. Perform the following steps to configure
the Worklist Manager.
In addition, you must perform one of the following tasks:
Creating the Worklist Manager External System
The Worklist Manager External System is created in a Java CAPS Environment from
the Services window in NetBeans.
To Create the Worklist Manager External System
- In the NetBeans Services window, expand CAPS Environments.
- If necessary, right-click the user activity Environment and use Version Control to check
it out.
- Right-click the Environment for the user activity Project, point to New, and then
click Work List Manager.
- Enter a name for the Worklist Manager External System, and then click OK.
- Right-click the new external system in the Environment tree, and then click Properties.
The Properties window appears.
- Configure the Worklist Manager, as described in the following sections.
Defining WLM Configuration Properties
The configuration properties of the Worklist Manager define information about the Worklist Manager database
and application.
To Define Configuration Properties
- On the Worklist Manager Properties window, click WLMConnector External System Configuration (shown in
Figure 17).
Figure 17 Worklist Manager External System Configuration
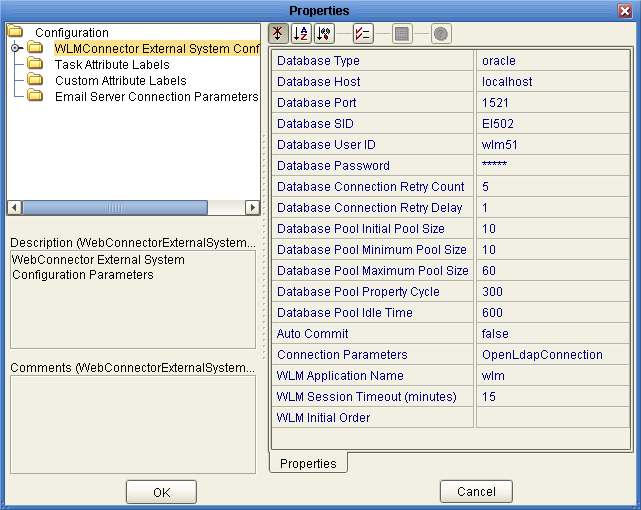
- Enter values for the properties described in the following table and click OK.
|
|
|---|
|
The
type of database you are using. Select from oracle, sybase, sqlserver, or
db2. |
|
The name of the database server. |
|
The port number on which the database
is listening. |
|
The SID name of the database. |
|
The login ID of
the WLM user for the database. This should be the same user as
was created by the WLM database installation scripts. |
|
The password for the
WLM user. |
Database Connection Retry Count |
The number of times the driver will try
to connect to the database after an unsuccessful attempt. |
Database Connection Retry Delay |
The number
of seconds the driver waits before retrying to connect to the database server. |
Database
Initial Pool Size |
The number of physical connections with which the database will be
initialized. |
Database Pool Minimum Pool Size |
The minimum number of physical connections in the
database pool. |
Database Pool Maximum Pool Size |
The maximum number of physical connections in
the database pool. |
Database Pool Property Cycle |
The frequency in seconds that the database
pool manager should check the pool. |
|
The length of time a
physical connection can be inactive. |
|
An indicator of whether to enable the auto-commit
feature of the database. |
|
The type of LDAP directory you are using. Select
from Oracle Internet Directory, Sun Java System Directory Server (for Oracle Directory Server Enterprise
Edition), ActiveDirectoryConnection, or OpenLdapConnection. |
|
The name of the Worklist Manager application that
is generated when you deploy the Project. This name is part of the
URL used to log into the Worklist Manager and should be unique for
each user activity business process. You can deploy multiple business process with user activities
to the same Environment, but each WLM application must have a unique name.
In that case, the Environment must include multiple Worklist Manager External Systems. |
WLM Session
Timeout (minutes) |
The number of minutes the Worklist Manager can remain idle before timing
out. |
|
The order of the fields on the Worklist Manager. When
you click the ellipses next to this property, the Ordering Sequence dialog box appears,
where you can select the fields to display on the Worklist Manager, and
the order in which they appear. |
|
Customizing Flex Attribute Labels
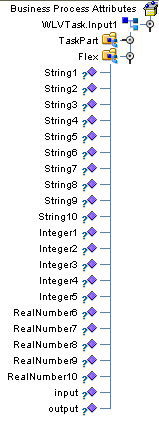
Flex attributes are customizable attributes that aid in task assignment. The attributes appear
in the Business Rule Designer (as shown in Figure 18) as well as in columns
of the Worklist Manager.
You can map values to these attributes in the Business Rule Designer so
the values appear in the Worklist Manager. You can also label the attributes
to make them easy to identify in the Worklist Manager.
Figure 18 Flex Attributes in the Business Rule Designer
To Customize Flex Attribute Labels
- From the NetBeans Services window, right-click the Worklist Manager External System.
- Click Properties.
The Properties dialog box appears.
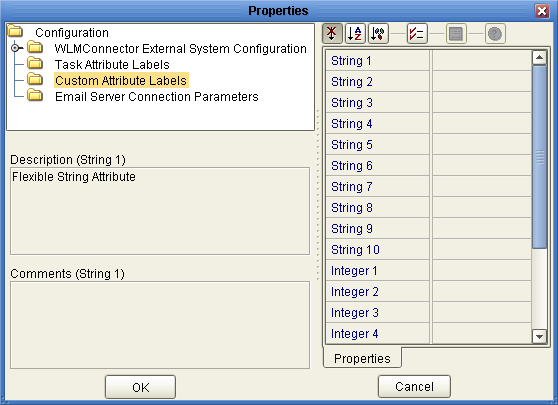
- Click Custom Attribute Labels, as shown in Figure 19.
Figure 19 Flex Attributes
- Define labels for as many attributes as necessary.
- Click OK.
Defining email Notification Properties
If you defined email notifications on the Worklist Manager window for a user
activity (see Define Email Notifications for Tasks), you need to define the connection properties for the email
server in the Worklist Manager External System properties. You also need to modify the
LDAP properties for the directory server you are using by specifying the name
of the attribute that contains the users’ email addresses.
To Define email Notification Properties
- On the Worklist Manager Properties window, click Email Server Connection Parameters (shown in
Figure 17).
Figure 20 Email Server Connection Properties
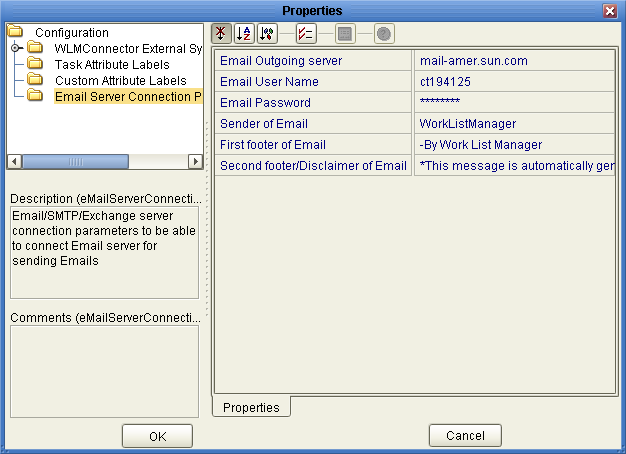
- Enter values for the properties described in the following table.
- Click OK.
|
|
|---|
|
The name of the email server on which the Worklist
Manager email notifications are sent. |
|
The login ID for the email account used
by the Worklist Manager. |
|
The password for the email account. |
|
The name that
should appear in the email as the sender. This property is used to
create a URL, so it cannot contain any spaces. |
|
A footer
for the email notifications. |
Second footer/Disclaimer of Email |
A second footer or disclaimer for
the email notifications. |
|
Configuring an OpenLDAP Connection
To use OpenLDAP with the Worklist Manager, you must specify certain information about
the LDAP directory structure so the Worklist Manager knows where to find the user
information defined in the directory. You can use your existing directory structure as
long as there is a mechanism for defining a user reporting hierarchy.
The Worklist Manager uses an anonymous bind with OpenLDAP, so you do not
need to specify credentials for the security principal.
To Configure an OpenLDAP Connection
- From the NetBeans Services window, expand CAPS Environments and expand the Environment for
the WLM Project.
- Right-click the Worklist Manager External System, and then click Properties.
- On the Properties window, verify that the Connection Parameters property is set to
OpenLdapConnection.
- Expand WLMConnector External System Configuration, and then click Open Ldap Parameters.
The OpenLDAP properties appear, as shown in Figure 21.
Figure 21 OpenLDAP Configuration Properties
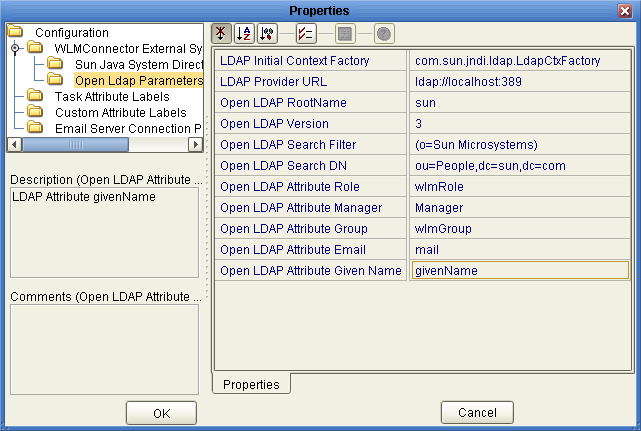
- Enter values for the properties in the following table.
Note - Modify these values to suit your existing directory structure and attributes.
- Click OK.
|
|
|---|
LDAP Initial Context Factory |
The fully qualified name of the factory class
that creates the initial context. The initial context is the starting point for
JNDI naming operations. |
|
The URL of the LDAP server. The format of
the URL is ldap://host:port, where host is the name of the computer
hosting the LDAP server, and port is the port number on which the LDAP
server is listening for requests. |
|
The name of the root node in
the LDAP directory. For example, if the root node is dc=oracle,dc=com, the value for
this property would be oracle. |
|
The version of OpenLDAP you are running. |
|
A search filter used by the Worklist Manager to search for
users. The Worklist Manager will only find those users described by the filter. For
example, to use an organization name as the search filter where all Worklist
Managers are assigned to the oracle organization, the value for this property
would be (o=oracle). |
|
The DN of the root entry of the
portion of the LDAP directory where the Worklist Manager will start the search
for users. For example, if users are all defined in an organizational unit named
People, the value for this property would be similar to ou=People,dc=oracle,dc=com. |
|
The
name of the role attribute in the LDAP directory to which Worklist Manager
users belong. Only enter a value for this property if you have defined
a role to which all Worklist Manager users are assigned. |
Open LDAP Attribute Manager |
The
name of the attribute that specifies reporting hierarchy in the LDAP directory. This
is the attribute assigned to a user that specifies who they report to.
You can use Manager, the predefine attribute for OpenLDAP, or you can create
a custom attribute. The Worklist Manager uses this entry to create the list
of users to whom a supervisor can reassign tasks, and to specify the
supervisor when a task is escalated. |
|
The name of the group attribute in
the LDAP directory to which Worklist Manager users belong. Only enter a value
for this property if you have defined a group to which all Worklist
Manager users are assigned. |
|
The name of the attribute that contains a user’s
email addresses. This is used in email notification. |
Open LDAP Attribute Given Name |
The name
of the attribute that contains a user’s first name. This is used in
email notification. |
|
Configuring an Oracle Internet Directory Connection
To use the Oracle Internet Directory with the Worklist Manager, you must specify
certain information about the LDAP directory structure so the Worklist Manager knows where to
find the user information defined in the directory. You can use your existing
directory structure as long as there is a mechanism for defining a user
reporting hierarchy.
To Configure an Oracle Internet Directory Connection
- From the NetBeans Services window, expand CAPS Environments and expand the Environment for
the WLM Project.
- Right-click the Worklist Manager External System, and then click Properties.
- On the Properties window, verify that the Connection Parameters property is set to
Oracle Internet Directory.
- Expand WLMConnector External System Configuration, and then click Sun Java System Directory Server/ADS/OID.
The LDAP properties appear, as shown in Figure 21.
Figure 22 Oracle Internet Directory Configuration Properties
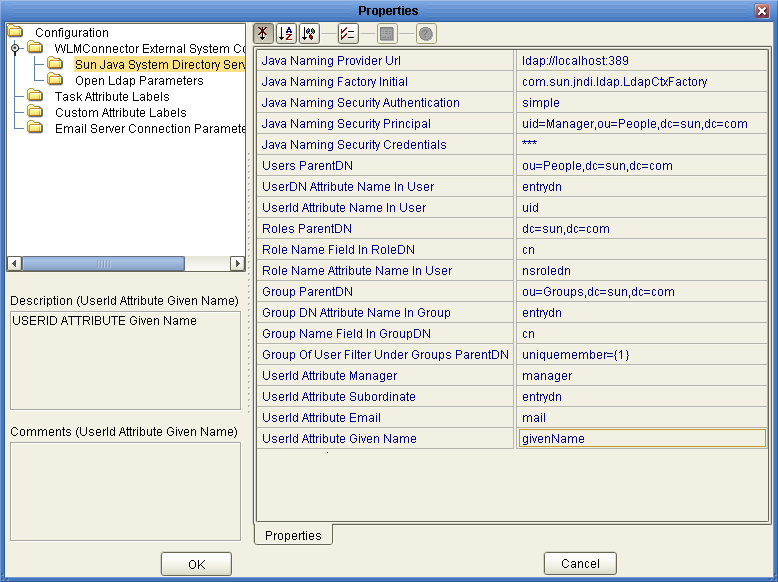
- Enter the property values for the properties described in the table at the
end of this procedure.
Note - Depending on how your LDAP directory is set up, not all of these
fields are required. The default configuration is not necessarily illustrative of an actual
implementation.
- Click OK.
|
|
|---|
|
The URL of the LDAP server. The format of
the URL is ldap://host:port, where host is the name of the computer
hosting the LDAP server, and port is the port number on which the LDAP
server is listening for requests. |
Java Naming Factory Initial |
The fully qualified name of
the factory class that creates the initial context. The initial context is the
starting point for JNDI naming operations. |
Java Naming Security Authentication |
The security level to use
in JNDI naming operations. Enter one of the following values:
|
Java Naming Security Principal |
The
DN of the security principal used for connecting to the LDAP server. |
Java Naming
Security Credentials |
The password of the naming security principal. |
|
The parent DN of the
user entries. This property specifies the root entry of the Users portion of
the LDAP directory; for example, cn=People,dc=oracle,dc=com. |
UserDN Attribute Name In User |
The name of
the attribute in a user entry where the user’s DN is defined. |
UserId
Attribute Name In User |
The name of the naming attribute in each user
entry. |
|
The parent DN of the role entries. This property specifies
the root entry of the Roles portion of the LDAP directory; for example,
dc=oracle,dc=com. |
Role Name Field In RoleDN |
The name of the attribute in a role
entry that specifies the name of the role. |
Role Name Attribute Name In
User |
The name of the attribute in a user entry that specifies the DNs
of the roles to which a user is assigned. |
|
The parent DN
of the group entries. This property specifies the root entry of the Groups
portion of the LDAP directory; for example cn=Groups,dc=oracle,dc=com. |
Group DN Attribute Name In
Group |
The name of the attribute in a group entry that specifies the distinguished
name of the group. |
Group Name Field In Group DN |
The name of
the attribute in a group entry that specifies the name of the group.
|
Group Of User Filter Under Groups ParentDN |
The LDAP search filter used to
retrieve all of a user’s groups. This property follows the syntax supported by
the java.text.MessageFormat class with {1} marking where the user’s DN should be inserted.
For example, uniquemember={1}. |
|
The name of the attribute in a user entry
that specifies the person the user reports to. The default value is manager.
You can also use the entrydn for this purpose, or you can create
custom attributes to define an upward reporting structure.
Note - To enable task escalation and re-assignment,
this value must be manager and each user entry in the LDAP directory must
include a manager attribute that specifies the supervisor by their entry DN.
|
UserId Attribute
Subordinate |
The name of the attribute in a user entry that specifies the people
who report to the user. The default value is directReports. You can use a
default attribute for this purpose or you can create custom attributes to define
the downward reporting structure.
Note - To enable task escalation and re-assignment, this value must
be entrydn and the reporting structure for each user must be defined in
their entrydn attribute in the LDAP directory.
|
|
The name of the attribute
in a user entry that specifies an email address. The default value is
mail. This is used for email notifications (as defined in the Worklist Manager
window for a user activity in the business process). |
UserId Attribute Given Name |
The name
of the attribute in a user entry that specifies a user’s first name.
The default value is givenName. This is used during email notification. |
|
Configuring an Oracle Directory Server Enterprise Edition Connection
To use the Oracle Directory Server Enterprise Edition (previously Sun Java System Directory
Server) with the Worklist Manager, you must specify certain information about the LDAP directory
structure so the Worklist Manager knows where to find the user information defined
in the directory. You can use your existing directory structure as long as
there is a mechanism for defining a user reporting hierarchy.
To Configure an Oracle Directory Server Connection
- From the NetBeans Services window, expand CAPS Environments and expand the Environment for
the WLM Project.
- Right-click the Worklist Manager External System, and then click Properties.
- On the Properties window, verify that the Connection Parameters property is set to
Sun Java System Directory Server.
- Expand WLMConnector External System Configuration, and then click Sun Java System Directory Server/ADS/OID.
The LDAP properties appear, as shown in Figure 21.
Figure 23 Oracle Directory Server Enterprise Edition Configuration Properties

- Enter the property values for the properties described in the table at the
end of this procedure.
Note - Depending on how your LDAP directory is set up, not all of these
fields are required. The default configuration is not necessarily illustrative of an actual
implementation.
- Click OK.
|
|
|---|
|
The URL of the LDAP server. The format of
the URL is ldap://host:port, where host is the name of the computer
hosting the LDAP server, and port is the port number on which the LDAP
server is listening for requests. |
Java Naming Factory Initial |
The fully qualified name of
the factory class that creates the initial context. The initial context is the
starting point for JNDI naming operations. |
Java Naming Security Authentication |
The security level to use
in JNDI naming operations. Enter one of the following values:
|
Java Naming Security Principal |
The
DN of the security principal used for connecting to the LDAP server. |
Java Naming
Security Credentials |
The password of the naming security principal. |
|
The parent DN of the
user entries. This property specifies the root entry of the Users portion of
the LDAP directory; for example, ou=People,dc=oracle,dc=com. |
UserDN Attribute Name In User |
The name of
the attribute in a user entry where the user’s DN is defined. The
default value is entrydn, which is the default name for the Oracle Directory
Server Enterprise Edition attribute. |
UserId Attribute Name In User |
The name of the naming attribute
in each user entry. The default name for this attribute in the Oracle
Directory Server Enterprise Edition is uid, but can also be cn. |
|
The parent
DN of the role entries. This property specifies the root entry of the
Roles portion of the LDAP directory; for example, dc=oracle,dc=com. |
Role Name Field In
RoleDN |
The name of the attribute in a role entry that specifies the name
of the role. The default name for this attribute in the Oracle Directory
Server Enterprise Edition is cn. |
Role Name Attribute Name In User |
The name of
the attribute in a user entry that specifies the DNs of the roles
to which a user is assigned. The default value is nsroledn, which is
the default attribute name in the Oracle Directory Server Enterprise Edition. |
|
The parent DN
of the group entries. This property specifies the root entry of the Groups
portion of the LDAP directory; for example ou=Groups,dc=oracle,dc=com. |
Group DN Attribute Name In
Group |
The name of the attribute in a group entry that specifies the name
of the group. The default value is entrydn, which is the default name
for the Oracle Directory Server Enterprise Edition attribute. |
Group Name Field In Group DN |
The
name of the attribute in a group entry that specifies the name of
the group. The default name for this attribute in the Oracle Directory Server
Enterprise Edition is cn. |
Group Of User Filter Under Groups ParentDN |
The LDAP search
filter used to retrieve all of a user’s groups. This property follows the
syntax supported by the java.text.MessageFormat class with {1} marking where the user’s DN
should be inserted. For example, uniquemember={1}. |
|
The name of the attribute in
a user entry that specifies the person the user reports to. The default
value is manager, which is the attribute the Oracle Directory Server Enterprise Edition provides
for this purpose. You can also use the entrydn for this purpose, or
you can create custom attributes to define an upward reporting structure.
Note - To enable task
escalation and re-assignment, this value must be manager and each user entry in
the LDAP directory must include a manager attribute that specifies the supervisor by their
entrydn.
|
UserId Attribute Subordinate |
The name of the attribute in a user entry that specifies
the people who report to the user. The default value is directReports, which
is not used in the Oracle Directory Server Enterprise Edition. You can use
a default attribute, such as secretary or entrydn, or you can create custom attributes
to define the downward reporting structure.
Note - To enable task escalation and re-assignment, this
value must be entrydn and the reporting structure for each user must be defined
in their entrydn attribute in the LDAP directory.
|
|
The name of the
attribute in a user entry that specifies an email address. The default value
is mail, which is the attribute the Oracle Directory Server Enterprise Edition provides for
this purpose. This is used for email notifications (as defined in the Worklist
Manager window for a user activity in the business process). |
UserId Attribute Given Name |
The
name of the attribute in a user entry that specifies a user’s first
name. The default value is givenName, which is the attribute the Oracle Directory
Server Enterprise Edition provides for this purpose. This is used during email notification. |
|
Configuring a Microsoft Active Directory Connection
To use Microsoft Active Directory with the Worklist Manager, you must specify certain
information about the LDAP directory structure so the Worklist Manager knows where to find
the user information defined in the directory. You can use your existing directory
structure as long as there is a mechanism for defining a user reporting
hierarchy.
To Configure a Microsoft Active Directory Connection
- From the NetBeans Services window, expand CAPS Environments and expand the Environment for
the WLM Project.
- Right-click the Worklist Manager External System, and then click Properties.
- On the Properties window, verify that the Connection Parameters property is set to
ActiveDirectoryConnection.
- Expand WLMConnector External System Configuration, and then click Sun Java System Directory Server/ADS/OID.
The LDAP properties appear, as shown in Figure 21.
Figure 24 Microsoft Active Directory Configuration Properties

- Enter the property values for the properties described in the table following this
procedure.
Note - Depending on how your LDAP directory is set up, not all of these
fields are required. The default configuration is not necessarily illustrative of an actual
implementation.
- Click OK to close the Properties dialog box.
|
|
|---|
|
The URL of
the LDAP server. The format of the URL is ldap://host:port, where host
is the name of the computer hosting the LDAP server, and port is
the port number on which the LDAP server is listening for requests. |
Java Naming
Factory Initial |
The fully qualified name of the factory class that creates the initial
context. The initial context is the starting point for JNDI naming operations. |
Java Naming
Security Authentication |
The security level to use in JNDI naming operations. Enter one of
the following values:
|
Java Naming Security Principal |
The DN of the security principal used
for connecting to the LDAP server. |
Java Naming Security Credentials |
The password of the naming
security principal. |
|
The parent DN of the user entries. This property specifies the root
entry of the Users portion of the LDAP directory; for example, cn=Users,dc=oracle,dc=com. |
UserDN
Attribute Name In User |
The name of the attribute in a user entry where
the user’s DN is defined. If you are using the default schema for
Active Directory, enter distinguishedName for this property. |
UserId Attribute Name In User |
The name of
the attribute in a user entry that defines the user’s login ID. The
default name for this attribute in Active Directory is sAMAccountName. |
|
The parent DN of
the role entries. This property specifies the root entry of the Roles portion
of the LDAP directory; for example, ou=orclRoles, dc=oracle,dc=com. |
Role Name Field In RoleDN |
The name
of the attribute in a role entry that specifies the name of the
role. The default name for this attribute in Active Directory is cn. |
Role Name
Attribute Name In User |
The name of the attribute in a user entry that
specifies the roles to which a user is assigned. The default value, nsroledn, does
not apply to Active Directory. The default attribute used by Active Directory is memberOf. |
|
The
parent DN of the group entries. This property specifies the root entry of
the Groups portion of the LDAP directory; for example ou=orclGroup,dc=oracle,dc=com. |
Group DN Attribute
Name In Group |
The name of the attribute in a group entry that specifies
the DN of the group. If you are using the default schema for
Active Directory, enter distinguishedName for this property. |
Group Name Field In Group DN |
The
name of the attribute in a group entry that specifies the name of
the group. The default name for this attribute in Active Directory is cn. |
Group
Of User Filter Under Groups ParentDN |
The LDAP search filter used to retrieve
all of a user’s groups. This property follows the syntax supported by the
java.text.MessageFormat class with {1} marking where the user’s DN should be inserted. For
example (for Active Directory only), (&(member={1})(objectclass=group)). |
|
The name of the attribute in a
user entry that specifies the person a user reports to. The default value
is manager, which is the attribute that Active Directory provides for this purpose.
You can also create custom attributes to define a reporting structure. |
UserId Attribute Subordinate |
The
name of the attribute in a user entry that specifies the people who
report to the user. The default value is directReports, which is the attribute that
Active Directory provides for this purpose. In Active Directory, directReports is linked
referentially to manager, above. |
|
The name of the user attribute that specifies an
email address. The default value is mail, which is the attribute that Active Directory
provides for this purpose. This is used for email notifications (as defined in
the Worklist Manager window for a user activity in the business process). |
UserId Attribute
Given Name |
The name of the user attribute that specifies a user’s first name.
The default value is givenName, which is the attribute that Active Directory
provides for this purpose. This is used during email notification. |
|


