JavaScript is required to for searching.
Skip Navigation Links
Exit Print View
Oracle Java CAPS Data Integrator User's Guide     Java CAPS Documentation
search filter icon
search icon

Document Information

Designing Data Integrator Projects

About Data Integrator

Extracting, Transforming, Loading: ETL

Oracle Java CAPS Data Integrator Overview

Extracting, Transforming, and Loading: ETL

Oracle Java CAPS Data Integrator Methodology

Oracle Java CAPS Data Integrator Features

Oracle Java CAPS Data Integrator Architecture

Oracle Java CAPS Data Integrator Design-Time Components

Data Integrator Editor

Oracle Java CAPS Data Integrator Project System

Data Integrator Service Engine

ETL Engine

ETL Service Engine

Data Integrator Monitor

Data Integrator Recovery

Creating Oracle Java CAPS Data Integrator Projects

Connecting to Source and Target Databases

Connecting to a JDBC-Compliant Database

Creating and Connecting to Data Mashup Services

Virtual Database Table Metadata Options

Virtual Database Column Properties

Creating a New Data Integrator Project

To Create a New Project

Creating an ETL Collaboration Using the Wizard

Creating a Basic ETL Collaboration

To Create a Basic ETL Collaboration

Creating an Advanced ETL Collaboration

To Create an Advanced ETL Collaboration

Creating an ETL Collaboration for a Master Index Staging Database

To Create an ETL Collaboration for a Master Index Staging Database

Creating a Bulk Loader ETL Collaboration

To Create a Bulk Loader ETL Collaboration

ETL Collaboration Overview

Execution Strategies

Direct/Simple Execution Strategy

One Pass Execution Strategy

Staging Execution Strategy

Pipeline Execution Strategy

Whitespace Considerations

Explicit and Implicit Joins

Runtime Properties

Data Validation Conditions

About the ETL Collaboration Editor

Configuring ETL Collaborations

Joining Source Tables

To Join Source Tables

To Join Source Tables During Mapping

Modifying an Existing Join

To Join Source Tables

Defining Extraction Conditions and Validations

To Define Extraction Conditions and Validation.

Adding Tables to an Existing Collaboration

To Add Tables to a Collaboration

Forcing Execution Strategies for Collaborations

To Force Execution Strategies for Collaborations

Changing the Database URL for Design Time

To Change the Database URL for Design Time

Configuring Source Table Properties

To Configure Source Table Properties

Configuring Target Table Properties

To Configure Target Table Properties

Using Pre-Created Temporary Staging Tables

Using Temporary Staging Tables

Viewing Table or Join Data

To View Table or Join Data

Viewing the SQL Code

To View SQL Code

Viewing Runtime Output Arguments

To View Runtime Output Arguments

Fine-Tuning the ETL Process

Filtering Source Data Using Runtime Inputs

To Filter Source Data Using Runtime Inputs

Setting the Batch Size for Joined Tables

To Set the Batch Size for Joined Tables

Using Table Aliases with Multiple Source Table Views

Grouping Input Data

To Group Input Data

Viewing and Modifying Table Data

To View and Modify Table Data

Creating Oracle Java CAPS Data Integrator Projects

The following tasks describe how to create and add components to a Oracle Java CAPS Data Integrator project using the Data Integrator Wizard.

Connecting to Source and Target Databases

Before you can select databases and database tables to extract data from and load data to, you need to create and connect to the databases to use. Oracle Java CAPS Data Integrator supports JDBC-compliant databases, flat files, and data mashup services. You only need to define the connections for relational databases. If you are using flat files as your source, you do not need to create or connect to a database. The wizard provides the ability to connect to multiple source files.

Connecting to a JDBC-Compliant Database

This step requires that the database drivers for the database platforms you are working with are installed. Some database drivers are already installed by default, but you might need to add the database driver depending on which database platform you are using. For example, if you are using Oracle or Microsoft SQL Server, you need to copy the driver to the application server and add it to the Services window.

To Connect to a JDBC-Compliant Database

Before You Begin

Make sure the database you are connecting to has already been created and is running. If the database drivers for the platforms you are using have not been installed to app_server/lib, copy the drivers to that location.
  1. In the NetBeans Services window, expand Databases.
  2. If you do not see the driver for the database you are using, copy the driver from your database installation to AppServer_Home/lib and then do the following:
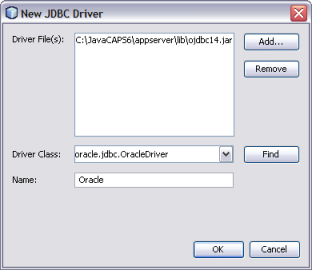
    1. Right-click Drivers, and select New Driver.
    2. On the New JDBC Driver dialog box, click Add.
    3. Browse to and open the JAR or ZIP file you copied to the application server libdirectory.
    4. Accept the default driver class or type in a new one. If no driver is entered, click Find to have the wizard search for an appropriate class.
    5. Enter a name for the driver.
      image:Figure shows the New JDBC Drivers dialog box.
    6. Click OK.

    The new database driver appears under Drivers in the Services window.

  3. Right-click the new driver, and select Connect Using.
  4. In the New Database Connection dialog box, do the following:
    1. Enter the database connection URL.

      Note - Different database platforms use different connection URLs. Refer to your database documentation for the format to use.
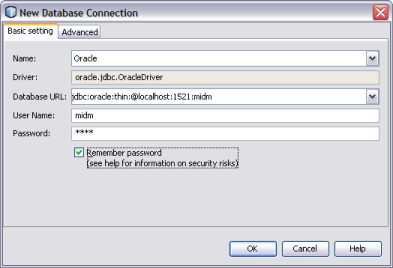

    2. Enter the user name and password to use to log on to the database.
    3. Select Remember Password.
      image:Figure shows the New Database Connection dialog box.
    4. To select a specific schema in the database, click the Advanced tab and then click Get Schemas.

      A list of available schemas appears for you to choose from.

    5. Click OK.

    A new database connection appears under Databases.

  5. Right-click the new database, and select Connect.

Creating and Connecting to Data Mashup Services

If you want to use more than one data source for the data integration process, you can create a Data Mashup Service. Data mashup allows you to select multiple data sources of varying types and combine them into one target database. Source data can reside in files on your network or on the web in HTML, RSS, or Web Row Set format.


Note - New in Java CAPS Release 6 Update 1, you can specify multiple data sources using the Data Integrator Wizard. If you are using multiple source files, you can either create the mashup here or you can use the Data Integrator Wizard to specify the sources directly.


To Create a Mashup Database for Source Data

  1. In the NetBeans main menu, select Tools, point to Virtual Database, and then select Create Virtual Database.
  2. On the New Virtual Database wizard, enter a name for the database and then click Finish.
  3. Click OK on the confirmation dialog box that appears.
  4. In the NetBeans main menu, select Tools, point to Virtual Database, and then select Add External Tables.

    The Add External Tables Wizard appears.

  5. Select the database you just created and then click Next.

    The Choose Data Source window appears.

  6. To add data sources, do any of the following:
    1. If the data source is on the web (such as HTML or Web Row Set), enter a URL for the data source and click Add.
    2. If the data source is a file on your network, brows to and select the input file. Click Add.
    3. Repeat the above steps for each data source.

      Tip - If you add a data source in error, highlight it in the table and then click Remove.
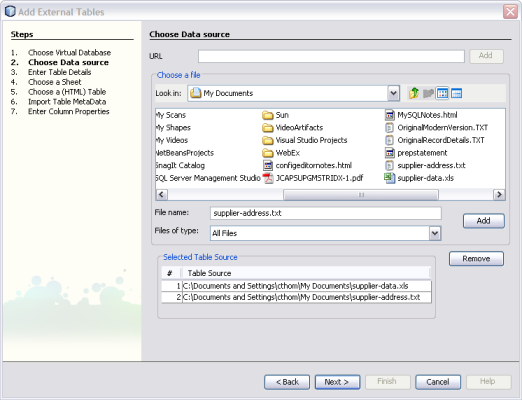


      image:Figure shows the Choose Data Source window of the Add External Tables wizard.
    4. Click Next.

      The Enter Tables Details window appears.
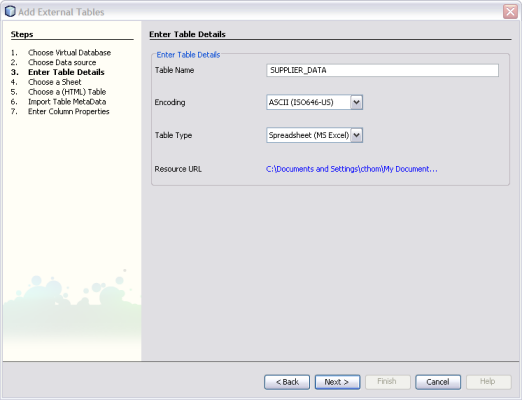
  7. Enter table information for the table specified in the Table Name field, and then click Next.
    image:Figure shows the Enter Table Details window of the Add External Tables Wizard.

    Depending on the type of file you selected, the Choose a Sheet, Choose a (HTML) Table, or Import Table MetaData window appears.
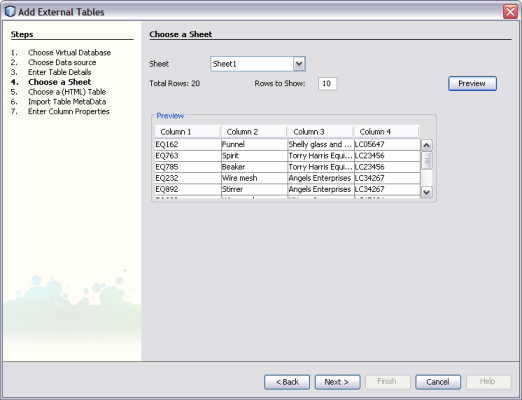
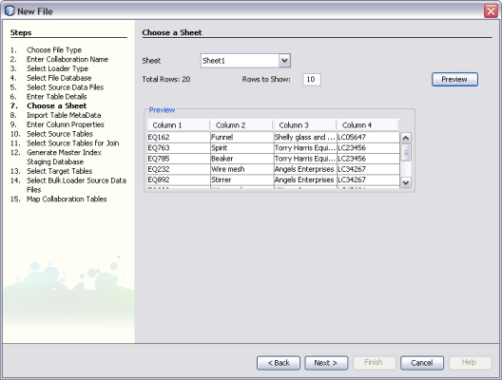
  8. If the Choose a Sheet or Choose a (HTML) Table window appears, do the following:
    • Select the name of the sheet that contains the data to use.
    • To view the data, click Preview.
      image:Figure shows the Choose a Sheet window of the Add External Tables Wizard.
    • Click Next.

      The Import Table MetaData window appears.

  9. If necessary, modify the information required to parse the data source.

    The available options on this window vary depending on the type of data source. For more information about the properties you can modify, see Virtual Database Table Metadata Options.
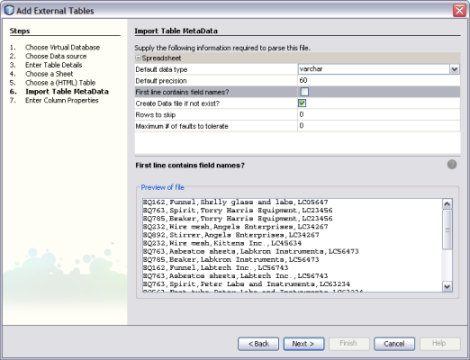

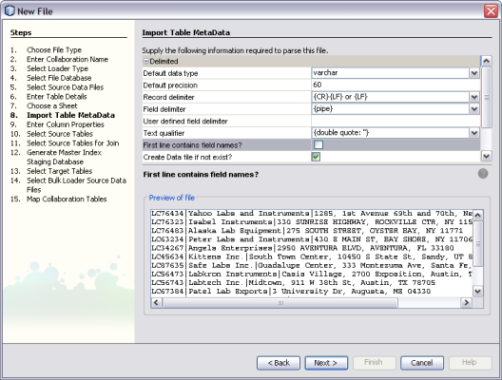
    image:Figure shows the Import Table Metadata window of the Add External Tables Wizard.
  10. Click Next.

    The Enter Column Properties window appears.

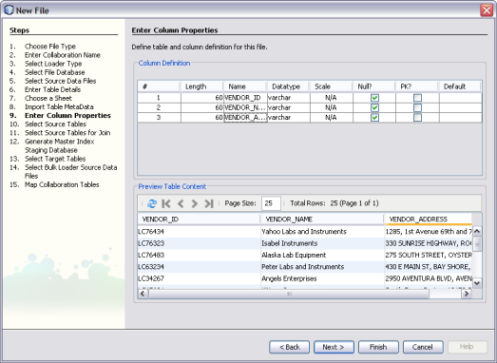
  11. Modify the properties for the database columns in the upper portion of the window.

    Tip - For more information about column properties, see Virtual Database Column Properties. If your data source does not contain field names, you should customize the column names for clarity.
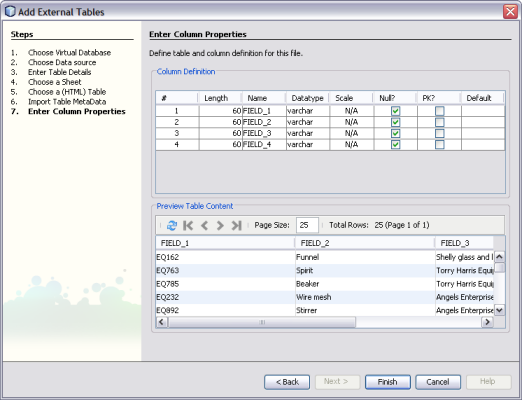


    image:Figure shows the Enter Column Properties window of the Add External Tables Wizard.
  12. Preview the source data in the lower portion of the window.
  13. Do one of the following:
    1. If there are additional data sources to configure, click Next. The wizard automatically returns to the Enter Table Details window so you can repeat the above steps for each data source to add.
    2. If there are no more data sources to configure, click Finish.
  14. Right–click the new database and select Connect.

Virtual Database Table Metadata Options

When you add external tables to a virtual database, you can configure the metadata for each data source. All metadata properties are listed below, but some might not be available depending on the type of data source you are adding.

Property
Description
Values
Default Data Type (or WIZARDDEFAULT SQLTYPE)
The default data type used for all fields in the data source (you can change the default in subsequent steps).
varchar

numeric

time

timestamp

Record Length (or WIZARDDEFAULT PRECISION)
The maximum length of a record in number of characters. This option must be appropriate for the selected data type and must be the same for all fields.
Any integer greater than or equal to 0.
Field Count
The number of fields per record.
Any integer greater than 1.
Default Precision
The length of the database columns for each field. You can modify this value for each field at a later time.
For numeric data types, enter <= 38.

For time/timestamp data types, enter the length of the format.

Type of XML File
An indicator of whether the XML file is read/write or read only.
READWRITE

READONLY

ROWNAME
Record Delimiter
The character that separates each record.
newline (LF)

carriage return (CR)

CR LF

CR LF or LF

semicolon (;)

comma (,)

tab

pipe (|)

Field Delimiter
The character that separates each field in a record. Select User Defined if the character does not match any of the other options in the menu.
comma

tab

semicolon

pipe

User Defined

User-defined Field Delimiter
The custom character that separates each field in a record. Use this field to specify a delimiter that is not a comma, tab, semicolon, or pipe. Unless you select User Defined for the Field Delimiter, this field is ignored.
Text Qualifier
A qualifier used to indicate text.
none

double quote: “

single quote: ”

First line contains field names?
An indicator of whether the names specified in the header row are used as field names or whether Data Integrator should assign default field names.
Select the check box to use column header names from the file. Deselect the check box if the file does not contain a header row.
Create data file if not exist?
Header Offset
The number of bytes to skip before reaching the start of the first record. This value is ignored if the First line contains field names? check box is deselected.
Any integer greater than or equal to 0.
Rows to Skip (or Records to Skip)
The number of rows or records to skip before the starting row or record for the data set. Specify 0 (zero) to include all rows or records from the source.
Any integer greater than or equal to 0.
Maximum # of Faults to Tolerate
The number of faults that can occur before Data Integrator generates an error message.
Any integer greater than or equal to 0.
Trim Whitespace
An indicator of whether to strip white space and tabs from the beginning and end of a string.
Select the check box to trim white space. Deselect the check box to leave white space in the string.

Virtual Database Column Properties

When you add external tables to a virtual database, you can configure the column attributes for each data source. All column properties are listed below.

Property
Description
Values
#
The number of each column (this value cannot be modified).
Length
The length for each column in the virtual database.
Any integer greater than 0. This value must be appropriate for the data type.
Name
The name of each column.
An unlimited number of characters.
Datatype
The type of data stored in each field.
varchar

time

numeric

timestamp

Scale
The number of digits to the right of the decimal point in a number field; for example, 9876.543 has a scale of 3.
An integer greater than 0.
Null
An indicator of whether the field can be null.
Select the check box if the field can be null or deselect it if the field cannot be null.
PK
An indicator of whether the column is a primary key.
Select the check box if the column is a primary key or deselect it if the column is not a primary key.
Default
Any default data to add to a column.

Creating a New Data Integrator Project

Before you can begin to define and configure the components and ETL processes to use for your data integration you need to create a new project of the type Data Integrator Module.

To Create a New Project

  1. Right-click in the NetBeans Projects window, and select New Project.

    The New Project Wizard appears.

  2. Under Categories, select SOA.
  3. Under Projects, select Data Integrator Module.
  4. Click Next.
  5. Enter a unique name and a location for the project.
  6. If this is not a main project, deselect Set as Main Project.
  7. Click Finish.

    The new project appears in the Projects window.

Next Steps

Create an ETL Collaboration following the instructions provided under Creating an ETL Collaboration Using the Wizard. You can also create an ETL Collaboration from scratch, but the wizard provides a quick and easy way to generate most of the collaboration code.

Creating an ETL Collaboration Using the Wizard


Note - The Data Integrator Wizard was enhanced in Java CAPS 6 Update 1. The instructions in this topic might differ from what is available in Release 6.


You can use the Data Integrator Wizard to create as much or as little of the ETL collaboration as you want. You can exit the wizard at any time once the basic framework is defined. After you complete the wizard, you can open the collaboration for further configuration.

The wizard provides three options for the collaboration:

Creating a Basic ETL Collaboration


Note - The Data Integrator Wizard was enhanced in Java CAPS 6 Update 1. The instructions in this topic might differ from what is available in Release 6.


A basic collaboration allows you to transfer data from a single data source to a data target. If you have multiple sources, you can create a virtual database before creating the basic collaboration. See Creating and Connecting to Data Mashup Services for more information. You could also use the Advanced option of the wizard instead.

You can click Finish at any time during the wizard to generate a collaboration with the information you specified to that point. Then you can complete the configuration using the ETL Collaboration Editor.

To Create a Basic ETL Collaboration

Before You Begin

Complete the following tasks:

  1. On the NetBeans Projects window, expand the new Data Integrator project and right-click Collaborations.
  2. Point to New, and then select ETL.

    The New File Wizard appears with the Name and Location window displayed.
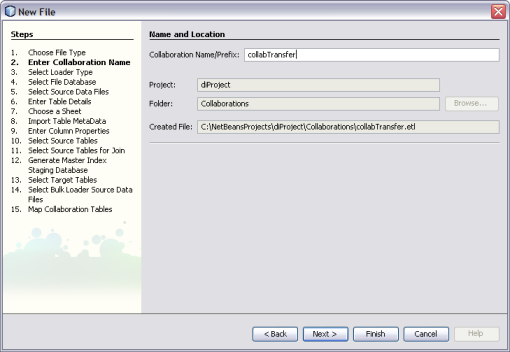
  3. Enter name for the collaboration.
    image:Figure shows the Name and Location window of the Data Integrator Wizard.
  4. Click Next.
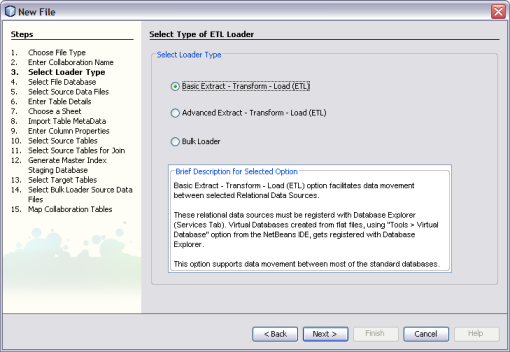
  5. On the Select Type of ETL Loader window on the New File Wizard, select Basic Extract – Transform – Load (ETL).
    image:Figure shows the Select Type of ETL Loader window of the Data Integrator Wizard.
  6. Click Next.

    The Select Source Tables window appears.

  7. To select the source data, do the following:
    1. Under Available Connections, select the database that contains the data to be extracted.
    2. Under Schemas, select the name of the database schema that contains the data to be extracted.

      Data Integrator automatically selects a schema based on the login information. You only need to change this field if you are using a different schema.

    3. Under Schemas, select the tables containing the source data and then click Select.

      Tip - You can use the Shift and Control keys to select multiple tables at once. If you add a table in error, select the table in the lower portion of the window and click Remove.


      image:Figure shows the Select Source Tables window of the Data Integrator Wizard.
    4. Click Next.

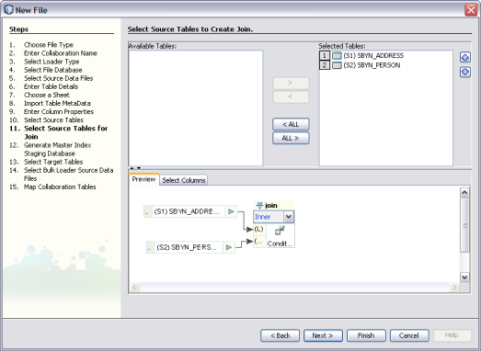
      The Select Source Tables for Join window appears.

  8. To define join conditions, do the following. If there are no join conditions, click Next.
    1. Under Available Tables, select the tables to join, and then click the right arrow to add them to the Selected Tables list.
    2. In the Preview panel, click the drop-down menu at the top of the join box and select the type of join to use from one of the following options:
      • Inner – Use this if all tables to be joined contain the same column.

      • Left Outer – Use this if the results should always include the records from the left table in the join clause.

      • Right Outer – Use this if the results should always include the records from the right table in the join clause.

      • Full Outer – Use this if the results should always include the records from both the right and left tables in the join clause. Full outer joins are only supported for tables from the same relational database. Flat files and the Axion database do not support full outer joins.


      image:Figure shows the Select Source Tables for Join window of the Data Integrator Wizard.
    3. To specify columns to exclude from each joined table, click the Select Column tab in the Preview panel, expand the table list, and deselect any columns to exclude.
      image:Figure shows the Select Columns to join panel.
    4. Click Next.

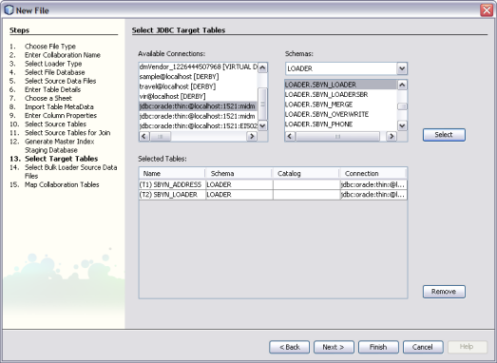
      The Select Target Tables window appears.

  9. To choose the target tables to load the extracted data into, do the following:
    1. Under Available Connections, select the database that contains the schema to load the data into.
    2. Under Schemas, select the schema that contains the tables to load the data into.
    3. Under Schemas, select the tables that will contain the target data and then click Select.

      Tip - You can use the Shift and Control keys to select multiple tables at once. If you add a table in error, select the table in the lower portion of the window and click Remove.


      image:Figure shows the Select Target Tables window of the Data Integrator Wizard.
    4. Click Finish.

    The new ETL collaboration appears in the Projects window, and the Collaboration Editor opens with the source tables displayed on the left and target tables displayed on the right.

Next Steps

You can further configure the ETL collaboration using the ETL Collaboration Editor. For more information, see Configuring ETL Collaborations.

Creating an Advanced ETL Collaboration


Note - The Data Integrator Wizard was enhanced in Java CAPS 6 Update 1. The instructions in this topic might differ from what is available in Release 6.


An advanced collaboration allows you to transfer data from multiple types of data sources to a data target. This procedure describes how to create an advanced collaboration using the automated wizard. Depending on the type of data source and the options you use, the wizard skips certain unnecessary steps. This option might product multiple ETL collaborations depending on the number of target tables.

You can click Finish at any time during the wizard to generate a collaboration with the information you specified to that point. Then you can complete the configuration using the ETL Collaboration Editor.

To Create an Advanced ETL Collaboration

Before You Begin

Complete the following tasks:

  1. On the NetBeans Projects window, expand the new Data Integrator project and right-click Collaborations.
  2. Point to New, and then select ETL.

    The New File Wizard appears with the Name and Location window displayed.
  3. Enter name for the collaboration.
    image:Figure shows the Name and Location window of the Data Integrator Wizard.
  4. Click Next.
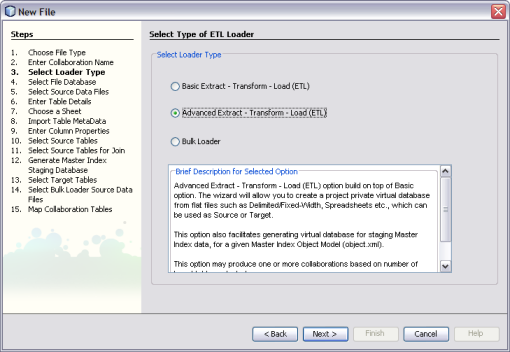
  5. On the Select Type of ETL Loader window on the New File Wizard, select Advanced Extract – Transform – Load (ETL).
    image:Figure shows the Select Type of ETL Loader window of the Data Integrator Wizard.
  6. Click Next.

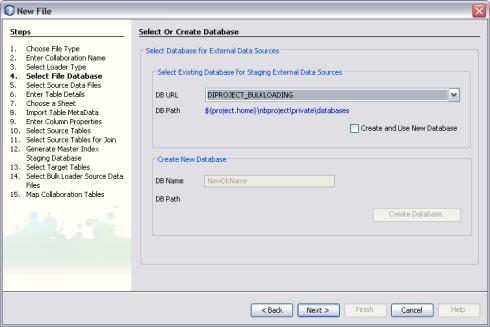
    The Select or Create Database window appears.

  7. To specify a staging database to use for external data sources (for this project only), do one of the following:
    1. Select an existing database to use from the DB URL field.
    2. Select Create and Use New Database, enter a name for a new database in the DB Name field, and then click Create Database. Select the new database in the DB URL field.

      Note - This database is required and is used for internal processing only.


    image:Figure shows the Select or Create Database window of the Data Integrator Wizard.
  8. Click Next.

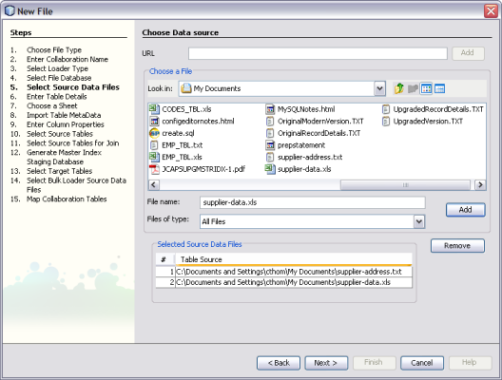
    The Choose Data Source window appears.

  9. Do one of the following:
    • If you do not have any file data sources, click Next and skip to step 15 (choosing JDBC data sources).
    • To specify a file data source using a URL, enter the URL and click Add.
    • To specify a file data source that is stored on your network, browse for and select a file containing source data in the Choose a File box, and then click Add.
    • Repeat the above two steps until all file data sources are selected.

    image:Figure shows the Choose Data Source window of the Data Integrator Wizard.
  10. Click Next.

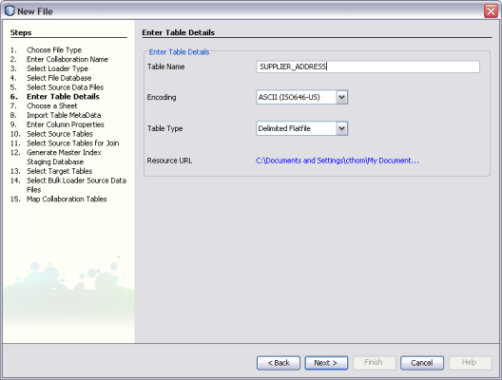
    The Enter Table Details window appears, with the information for the first data file displayed.

  11. If necessary, modify the table name, the type of data encoding, and the type of document that contains the source data.

    Data Integrator automatically fills in these fields based on the information from the previous window, so the existing values should be correct.


    image:Figure shows the Enter Table Details window of the Data Integrator Wizard.
  12. Click Next.

    If the data file is a spreadsheet, the Choose a Sheet window appears; otherwise, the Import Table MetaData window appears.

  13. If the Choose a Sheet window appears, select the name of the sheet in the spreadsheet that contains the source data, and then click Next.

    Tip - To view the contents of a sheet, click the Preview button.


    image:Figure shows the Choose a Sheet window of the Data Integrator Wizard.
  14. When the Import Table Metadata window appears, modify the information about the data file as needed.

    Data Integrator automatically fills in this information, but you might need to customize it. For more information about the properties you can configure, see Virtual Database Table Metadata Options.


    image:Figure shows the Import Table Metadata window of the Data Integrator Wizard.
  15. Preview the information in the bottom portion of the window, and then click Next.

    The Enter Column Properties window appears.

  16. In the upper portion of the window, customize any of the column properties.

    For more information about these properties, see Virtual Database Column Properties.


    image:Figure shows the Enter Column Properties window of the Data Integrator Wizard.
  17. Preview the information in the lower portion of the window, and then click Next.
  18. Do one of the following:
    1. If you selected multiple file data sources, the wizard returns to the Enter Table Details window with the attributes for a different file displayed. Repeat the above steps beginning with step 7.
    2. If all the files you specified are configured, a dialog box appears confirming the database table creation. Click OK on the dialog box and continue to the next step.

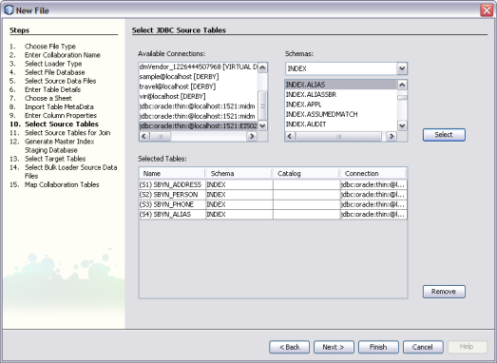
      The Select JDBC Source Tables window appears.

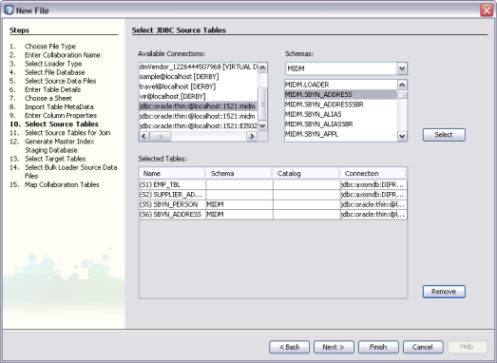
  19. If you specified file data sources, they are already listed under Selected Tables here. Click Next if you have no JDBC data sources to specify, or do the following to specify a JDBC data source:
    image:Figure shows the Select Source Tables window of the Data Integrator Wizard.
    1. Under Available Connections, select the database that contains the source data.
    2. If there are multiple schemas in the database, select the schema to use.
    3. Under Schemas, select the tables that contain the source data and then click Select.
    4. Click Next.

      If there are tables to join, the Select Source Tables for Join window appears; otherwise, the Generate Target Database window appears.

  20. To define join conditions, do the following. If there are no join conditions, click Next and skip to step 17.
    1. Under Available Tables, select the tables to join, and then click the right arrow to add them to the Selected Tables list.
    2. In the Preview panel, click the drop-down menu at the top of the join box and select the type of join to use from one of the following options:
      • Inner – Use this if all tables to be joined contain the same column.

      • Left Outer – Use this if the results should always include the records from the left table in the join clause.

      • Right Outer – Use this if the results should always include the records from the right table in the join clause.

      • Full Outer – Use this if the results should always include the records from both the right and left tables in the join clause. Full outer joins are only supported for tables from the same relational database. Flat files and the Axion database do not support full outer joins.


      image:Figure shows the Select Source Tables for Join window of the Data Integrator Wizard.
    3. To specify columns to exclude from each joined table, click the Select Column tab in the Preview pane and deselect any columns to exclude.
    4. Click Next.

      The Generate Target Database Master Index Model window appears. Using this page is described in a separate topic, Creating an ETL Collaboration for a Master Index Staging Database.

  21. Click Next.

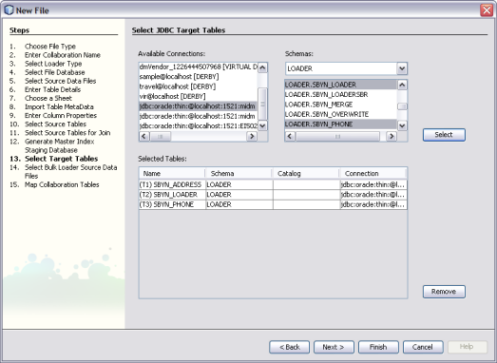
    The Select JDBC Target Tables window appears.

  22. To choose the target tables to load the extracted data into, do the following:
    1. Under Available Connections, select the database that contains the schema to load the data into.
    2. Under Schemas, select the schema that contains the tables to load the data into.
    3. Under Schema, select the tables that will contain the target data and then click Select.

      Tip - You can use the Shift and Control keys to select multiple tables at once. If you add a table in error, select the table in the lower portion of the window and click Remove.
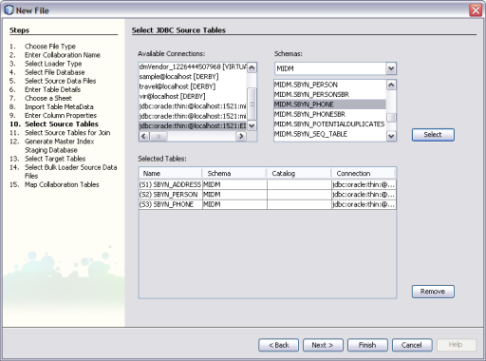


    image:Figure shows the Select Target Tables window of the Data Integrator Wizard.
  23. Click Next.

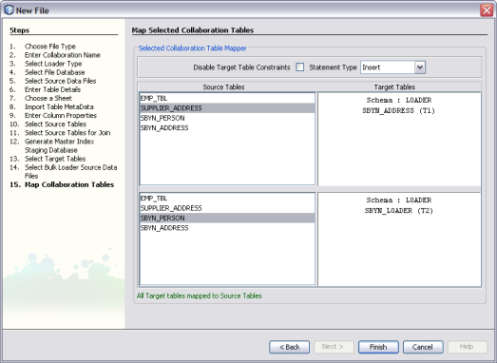
    The Map Selected Collaboration Tables window appears.

  24. To map source and target data, do the following:
    1. To disable constraints on the target tables, select Disable Target Table Constraints.
    2. Select the SQL statement type to use for the transfer. You can select insert, update, or both.
    3. For each target table listed on the right, select one or more source tables from the list directly to the left of the target table. These are the source tables that will be mapped to the target in the collaboration.

      Note - If you do not specify a mapping here, the source tables do not appear in the ETL collaboration. You can add the source tables directly to the collaboration using the Select Source and Target Tables function. To select multiple source tables for one target, hold down the Control key while you select the required source tables. If you select multiple source tables for one target, the source tables are automatically joined.


    image:Figure shows the Map Selected Collaboration Tables window of the Data Integrator Wizard.
  25. Click Finish.

    The new ETL collaboration appears in the Projects window. If multiple collaboration are created, they are given the name you specified for the collaboration with a target table name appended.

Next Steps

You can further configure the ETL collaboration using the ETL Collaboration Editor. For more information, see Configuring ETL Collaborations.

Creating an ETL Collaboration for a Master Index Staging Database


Note - The Data Integrator Wizard was enhanced in Java CAPS 6 Update 1. The instructions in this topic might differ from what is available in Release 6.


The Data Integrator Wizard helps you create and populate a staging database that stores the legacy data to be loaded into a master index database so you can cleanse and load the data in bulk. Data Integrator generates the staging database based on the object structure defined for the master index, so the data is automatically presented in a format that the Data Cleanser, Data Profiler, and Bulk Matcher can read. This procedure describes how to create the staging database using the automated wizard. Depending on the type of data source and the options you use, the wizard skips certain unnecessary steps.

You can click Finish at any time during the wizard to generate a collaboration with the information you specified to that point. Then you can complete the configuration using the ETL Collaboration Editor.

To Create an ETL Collaboration for a Master Index Staging Database

Before You Begin

Complete the following tasks:

  1. On the NetBeans Projects window, expand the new Data Integrator project and right-click Collaborations.
  2. Point to New, and then select ETL.

    The New File Wizard appears with the Name and Location window displayed.

  3. Enter name for the collaboration.
    image:Figure shows the Name and Location window of the Data Integrator Wizard.
  4. Click Next.
  5. On the Select Type of ETL Loader window on the New File Wizard, select Advanced Extract – Transform – Load (ETL).
    image:Figure shows the Select Type of ETL Loader window of the Data Integrator Wizard.
  6. Click Next.

    The Select or Create Database window appears.

  7. To specify a staging database to use for external data sources (for this project only), do one of the following:
    1. Select an existing database to use from the DB URL field.
    2. Select Create and Use New Database, enter a name for a new database in the DB Name field, and then click Create Database. Select the new database in the DB URL field.

      Note - This database is required and is used for internal processing only.


    image:Figure shows the Select or Create Database window of the Data Integrator Wizard.
  8. Click Next.

    The Choose Data Source window appears.

  9. Do one of the following:
    • If you do not have any file data sources, click Next and skip to step 15 (choosing JDBC data sources).
    • To specify a file data source using a URL, enter the URL and click Add.
    • To specify a file data source that is stored on your network, browse for and select a file containing source data in the Choose a File box, and then click Add.
    • Repeat the above two steps until all file data sources are selected.

    image:Figure shows the Choose Data Source window of the Data Integrator Wizard.
  10. Click Next.

    The Enter Table Details window appears, with the information for the first data file displayed.

  11. If necessary, modify the table name, the type of data encoding, and the type of document that contains the source data.

    Data Integrator automatically fills in these fields based on the information from the previous window, so the existing values should be correct.


    image:Figure shows the Enter Table Details window of the Data Integrator Wizard.
  12. Click Next.

    If the data file is a spreadsheet, the Choose a Sheet window appears; otherwise, the Import Table MetaData window appears.

  13. If the Choose a Sheet window appears, select the name of the sheet in the spreadsheet that contains the source data, and then click Next.

    Tip - To view the data in a sheet, click the Preview button.


    image:Figure shows the Choose a Sheet window of the Data Integrator Wizard.
  14. When the Import Table Metadata window appears, modify the information about the data file as needed.

    Data Integrator automatically fills in this information, but you might need to customize it. For more information about the properties you can configure, see Virtual Database Table Metadata Options.


    image:Figure shows the Import Table Metadata window of the Data Integrator Wizard.
  15. Preview the information in the bottom portion of the window, and then click Next.

    The Enter Column Properties window appears.

  16. In the upper portion of the window, customize any of the column properties.

    For more information about these properties, see Virtual Database Column Properties.


    image:Figure shows the Enter Column Properties window of the Data Integrator Wizard.
  17. Preview the information in the lower portion of the window, and then click Next.
  18. Do one of the following:
    1. If you selected multiple file data sources, the wizard returns to the Enter Table Details window with the attributes for a different file displayed. Repeat the above steps beginning with step 7.
    2. If all the files you specified are configured, a dialog box appears confirming the database table creation. Click OK on the dialog box and continue to the next step.

      The Select Source Tables window appears.

  19. If you specified file data sources, they are already listed under Selected Tables. Click Next if you have no JDBC data sources to specify, or do the following to specify a JDBC data source:
    image:Figure shows the Select Source Tables window of the Data Integrator Wizard.
    1. Under Available Connections, select the database that contains the source data.
    2. If there are multiple schemas in the database, select the schema to use.
    3. Under Schemas, select the tables that contain the source data and then click Select.
    4. Click Next.

      If there are tables to join, the Select Source Tables for Join window appears; otherwise, the Generate Target Database window appears.

  20. To define join conditions, do the following. If there are no join conditions, click Next and skip to step 17.
    1. Under Available Tables, select the tables to join, and then click the right arrow to add them to the Selected Tables list.
    2. In the Preview panel, click the drop-down menu at the top of the join box and select the type of join to use from one of the following options:
      • Inner – Use this if all tables to be joined contain the same column.

      • Left Outer – Use this if the results should always include the records from the left table in the join clause.

      • Right Outer – Use this if the results should always include the records from the right table in the join clause.

      • Full Outer – Use this if the results should always include the records from both the right and left tables in the join clause. Full outer joins are only supported for tables from the same relational database. Flat files and the Axion database do not support full outer joins.
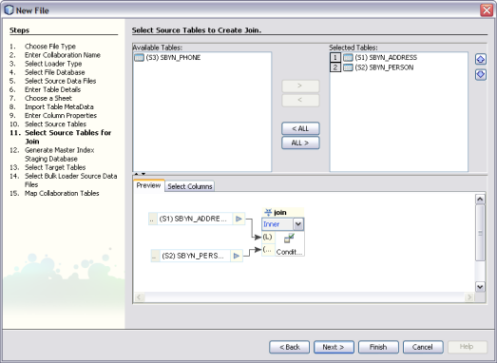
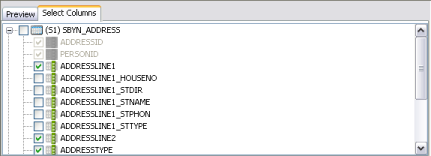
      image:Figure shows the Select Source Tables for Join window of the Data Integrator Wizard.
    3. To specify columns to exclude from each joined table, click the Select Column tab in the Preview pane and deselect any columns to exclude.
    4. Click Next.

      The Generate Target Database Master Index Model window appears.

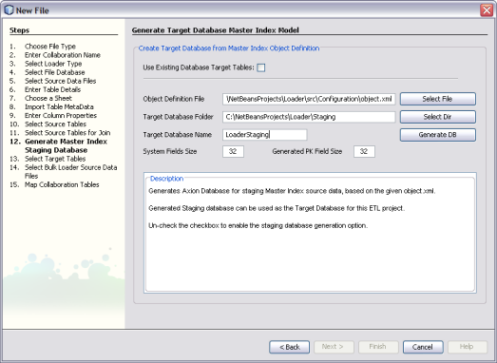
  21. To create the staging database, do the following:
    1. Deselect the check box for Use Existing Database Target Tables.
    2. In the Object Definition File field, browse to and select the object.xml file generated for the Master Index project.

      Note - This file is located in NetBeansProjects_Home/Project_Name/src/Configuration.


    3. In the Target Database Folder field, select or enter the path where you want to store the database.
    4. In the Target Database Name field, enter a name for the database.
    5. Click Generate Database.

    image:Figure shows the Generate Target Database Master Index Model window of the Data Integrator Wizard.
  22. Click Next.

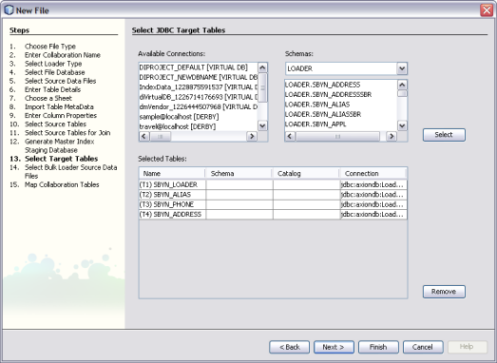
    The Select JDBC Target Tables window appears. The target tables to load the extracted data into are already listed under Available Connections. It is not recommended you change these.


    image:Figure shows the Select Target Tables window of the Data Integrator Wizard.
  23. Click Next.

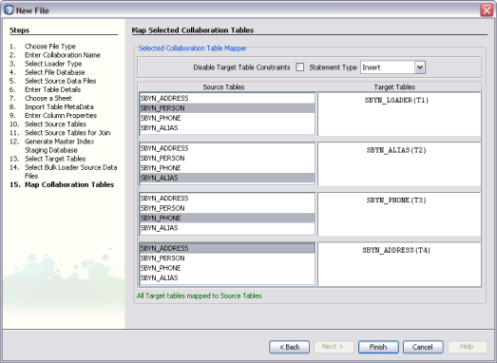
    The Map Selected Collaboration Tables window appears.

  24. To map source and target data, do the following:
    1. To disable constraints on the target tables, select Disable Target Table Constraints.
    2. Select the SQL statement type to use for the transfer. You can select insert, update, or both.
    3. For each target table listed on the right, select one or more source tables from the list directly to the left of the target table. These are the source tables that will be mapped to the target in the collaboration.

      Note - If you do not specify a mapping here, the source tables do not appear in the ETL collaboration. You can add the source tables directly to the collaboration using the Select Source and Target Tables function. To select multiple source tables for one target, hold down the Control key while you select the required source tables. If you select multiple source tables for one target, the source tables are automatically joined.


    image:Figure shows the Map Selected Collaboration Tables window of the Data Integrator Wizard.
  25. Click Finish.

    The new ETL collaboration appears in the Projects window. If multiple collaboration are created, they are given the name you specified for the collaboration with a target table name appended. To load the data into the staging database, run each of the collaborations. Make sure you are connected to both databases first.

Next Steps

You can further configure the ETL collaboration using the ETL Collaboration Editor. For more information, see Configuring ETL Collaborations.

Creating a Bulk Loader ETL Collaboration


Note - The Data Integrator Wizard was enhanced in Java CAPS 6 Update 1. The instructions in this topic might differ from what is available in Release 6.


You can use the Data Integrator Wizard to generate the Bulk Loader for a master index application. The Bulk Loader loads data that has already been cleansed, standardized, and matched into a master index database. The source files for the Bulk Loader are those generated by the Bulk Matcher.

To Create a Bulk Loader ETL Collaboration

Before You Begin

  1. On the NetBeans Projects window, expand the new Data Integrator project and right-click Collaborations.
  2. Point to New, and then select ETL.

    The New File Wizard appears with the Name and Location window displayed.

  3. Enter name for the collaboration.
    image:Figure shows the Name and Location window of the Data Integrator Wizard.
  4. Click Next.
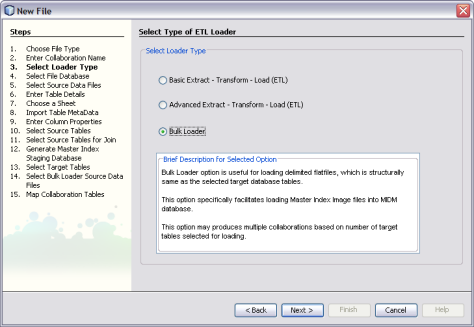
  5. On the Select Type of ETL Loader window on the New File Wizard, select Bulk Loader.
    image:Figure shows the Select Type of ETL Loader window of the Data Integrator Wizard.
  6. Click Next.

    The Select or Create Database window appears.

  7. To specify a staging database to use for external data sources (for this project only), do one of the following:
    1. Select an existing database to use from the DB URL field.
    2. Select Create and Use New Database, enter a name for a new database in the DB Name field, and then click Create Database. Select the new database in the DB URL field.

      Note - This database is required and is used for internal processing only.
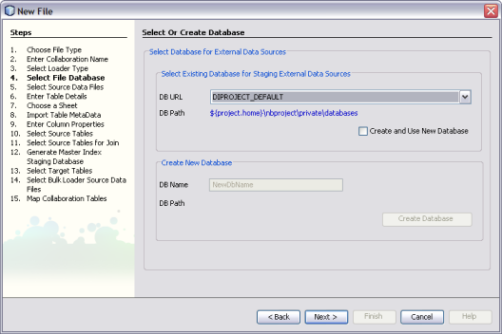


    image:Figure shows the Select or Create Database window of the Data Integrator Wizard.
  8. Click Next.

    The Select JDBC Target Tables window appears.

  9. To choose the target tables to load the extracted data into, do the following:
    1. Under Available Connections, select the master index database.
    2. Under Schemas, select the schema that contains the tables to load the data into.
    3. Under Schemas, select only the tables that correspond to the data files produced by the Bulk Matcher, and then click Select.

      Tip - You can use the Shift and Control keys to select multiple tables at once. If you select target tables that do not correspond to the Bulk Matcher files, collaborations without source table are generated and the project fails to build.
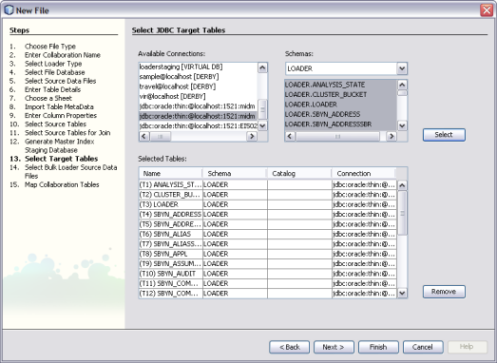


    image:Figure shows the Select Target Tables window of the Data Integrator Wizard.
  10. Click Next.

    The Choose Bulk Loader Data Source window appears.

  11. To specify the source data for the Bulk Loader, do the following:
    1. In the upper portion of the window, browse to the location of the of the output files from the Bulk Matcher.

      Note - These files are located in NetBeansProjects_Home/Project_Name/loader-generated/loader/work/masterindex, where work is the location you specified for the working directory in loader-config.xml.
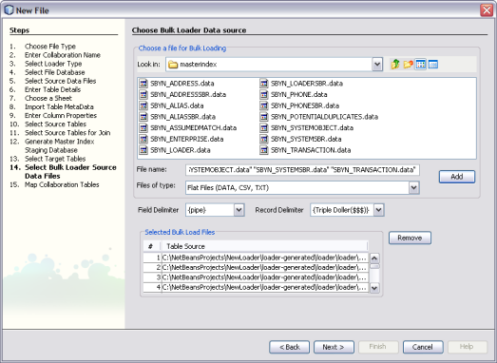

    2. Select all of the data files in the masterindex directory, and then click Add.

    image:Figure shows the Choose Bulk Loader Data Source window of the Data Integrator Wizard.
  12. Click Next.

    The Map Selected Collaboration Tables window appears.

  13. To map source and target data, do the following:
    1. To disable constraints on the target tables, select Disable Target Table Constraints.
    2. Select the SQL statement type to use for the transfer. You can select insert, update, or both.
    3. The wizard automatically maps the source and target tables for you. Review the mapping to verify its accuracy.

      Note - Not every table on the left will be mapped. For example, system tables such as SBYN_COMMON_HEADER, SBYN_COMMON_DETAIL, SBYN_APPL, and SBYN_SYSTEMS do not need to be mapped.
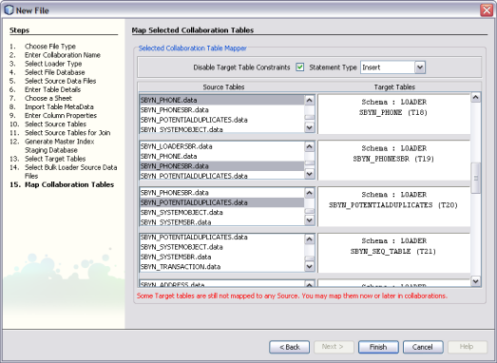


    image:Figure shows the Map Selected Collaboration Tables window of the Data Integrator Wizard.
  14. Click Finish.

    An ETL collaboration is created for each target table. This might take a few minutes to generate.

Next Steps

You can further configure the ETL collaboration in the ETL Collaboration Editor. For more information, see Configuring ETL Collaborations.

To load the data into the master index database, you can either run each collaboration individually, or you can generate a batch file that will run all collaborations for you. For more information, see Loading the Initial Data Set for a Master Index.