JavaScript is required to for searching.
Skip Navigation Links
Exit Print View
Oracle Java CAPS COBOL Copybook Encoder User's Guide     Java CAPS Documentation
search filter icon
search icon

Document Information

Working With the COBOL Copybook Encoder

COBOL Copybook Encoder Overview

About COBOL Copybooks

About the COBOL Copybook Encoder

Handling Content Beyond Column 72

Creating the Project Files

Creating the COBOL Copybook Document

To Create a New Document

To Import an Existing Document

Generating the XML Schema Definition (XSD)

To Generate the XSD File

Creating a WSDL Document to Use COBOL Copybook Encoding

To Create a WSDL Document for the File Binding Component

Applying COBOL Copybook Encoding to an Existing XSD

To Apply COBOL Copybook Encoding to an XSD

Validating and Testing the COBOL Copybook Encoder

Testing the COBOL Copybook Encoder

Creating the Project Files

To implement COBOL copybook encoding in your JBI projects, you need to import or create the copybook file, create an XSD file (where the encoding is configured), and add the encoding type to the WSDL document. The following topics provide instructions for each of these steps.

Creating the COBOL Copybook Document

You can add a COBOL copybook document to a project two ways. One is by creating a new empty file and adding the content; the second is by importing an existing copybook document into the project.

Follow the appropriate procedure below to add a COBOL copybook document to your project:

To Create a New Document

  1. In your NetBeans project, right-click the folder where you want to add the document (typically the Process Files folder).
  2. Point to New and then select Other.

    The New File wizard appears.

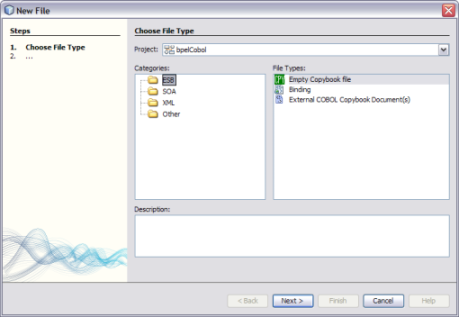
  3. Under Categories, select ESB; under File Types, select Empty Copybook file.
    image:Image of the New File Wizard with Empty Copybook File selected
  4. Click Next.

    The Name and Location window appears.

  5. Enter a name for the new copybook file and update the folder if needed.
  6. Click Finish.

    The empty copybook file is added to the project tree and is opened in a NetBeans editor.

  7. Fill in the contents of the copybook file.

    Tip - You can use the copy and paste features of the editor to copy content from another file.


  8. Save and close the file.

To Import an Existing Document

The COBOL Copybook Encoder supports the following file extensions: CPY, COBOL, COB, CBL, CCC, and CCP. If you have an external copybook document file with an extension other than those listed, rename the file by changing the extension to a supported extension.

  1. In your NetBeans project, right-click the folder where you want to add the document (typically the Process Files folder).
  2. Point to New and then select Other.

    The New File wizard appears.

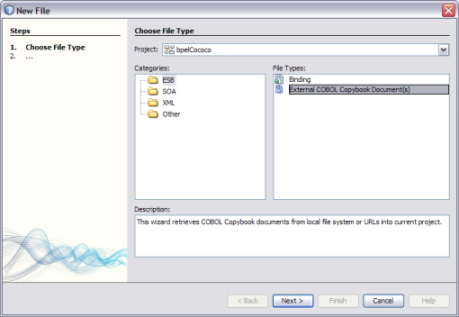
  3. Under Categories, select ESB; under File Types, select External COBOL Copybook Document(s).
    image:Image of the New File Wizard with External COBOL Copybook Document(s) selected
  4. Click Next.

    The Specify Resource Location window appears.
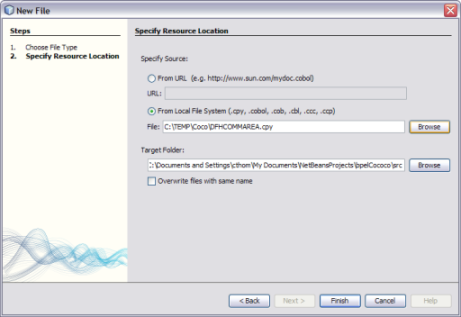

    image:Image of the Specify Resource Location page of the New File Wizard
  5. Under Specify Source, do one of the following:
    • To access the copybook file from a URL, select From URL and then enter the URL in the URL field.
    • To access the copybook file from your local file system, select From Local File System and then either enter the fully qualified path and file name or click Browse to navigate to and select the file.
  6. Accept or modify the default target folder.

    The default location is the src directory in your NetBeans project.

  7. To overwrite existing files, select the check box next to Overwrite Files With Same Name.
  8. Click Finish.

    The imported file appears in the project tree, and the content of the file appears in the editor.
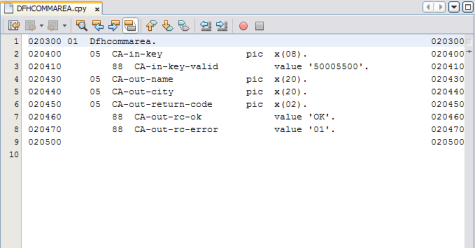

    image:Image of an imported COBOL copybook file

Generating the XML Schema Definition (XSD)

This step creates the annotated XSD file with information specific to the COBOL Copybook Encoder.

To Generate the XSD File

  1. In your NetBeans project, right-click the copybook file for which you want to generate the XSD file.
  2. Select Generate Encoder Definition XSD.

    The Generate Encoder Definition XSD Wizard appears.
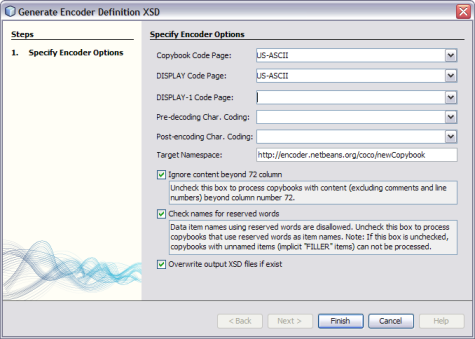

    image:Image of the Generate Encoder Definition XSD dialog box
  3. Enter the following information for the encoder definition:
    • Copybook Code Page: The character encoding of the data in the copybook file.

    • DISPLAY Code Page: The character encoding to use for data when the USAGE clause is DISPLAY.

    • DISPLAY-1 Code Page: The character encoding to use for data when the USAGE clause is DISPLAY-1.

    • Pre-decoding Char. Coding: The character encoding of the input data that needs to be converted to data that can be subsequently decoded by the COBOL Copybook Encoder.

    • Post-encoding Char. Coding: The character encoding of the output data that is converted from the data used by the COBOL Copybook Encoder.

    • Target Namespace: The target namespace for the XSD file.

  4. To process copybooks with content beyond column number 72 (excluding comments and line numbers), deselect the check box next to Ignore Content Beyond 72 Column; otherwise leave this check box selected.
  5. To process copybooks that use reserved words as item names, deselect the check box next to Check names for Reserved Words; otherwise leave this check box selected.

    If this check box is not selected, copybooks with unnamed items (implicit FILLER items) cannot be processed.

  6. To make sure that no existing files of the same name are overwritten, deselect the check box next to Overwrite Output XSD Files if Exist; otherwise leave this check box selected.
  7. Click Finish.

    The new XSD file is added to the project tree and the contents appears in the NetBeans editor.

Creating a WSDL Document to Use COBOL Copybook Encoding

When you create a concrete WSDL document for your project, you can specify COBOL copybook encoding for the data. Note that is only supported with a subset of binding components. The following procedure describes the process for the File Binding Component using a poll and write scenario. This illustrates using the encoder for both input and output files.

To Create a WSDL Document for the File Binding Component

  1. In your NetBeans project, right-click the folder where you want to add the document (typically the Process Files folder).
  2. Point to New and then select WSDL Document.

    The New WSDL Document wizard appears.

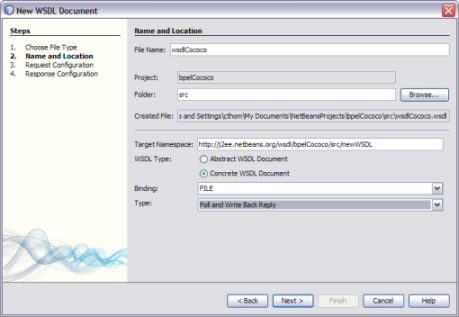
  3. Enter a file name for the WSDL document, and accept the default folder location or specify a new one.
  4. Under WSDL Type, select Concrete WSDL.

    The Binding and Type fields appear.

  5. Select the File binding, and then select the Poll and Write Back Reply type.
    image:Image of the Name and Location page of the New WSDL Document Wizard
  6. Click Next.

    The Request Configuration window appears.
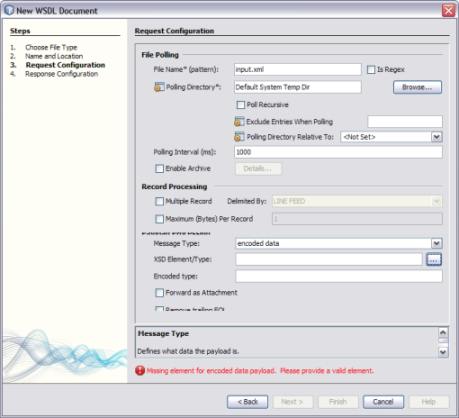

    image:Image of the Request Configuration page of the New WSDL Document Wizard
  7. Fill in the properties for the File Polling and Record Processing sections (see Oracle Java CAPS File Binding Component User’s Guide).
  8. In the Payload Processing section, do the following:
    1. For the Message Type, select encoded data.

      The options beneath message type change.

    2. Click the ellipsis next to XSD Element/Type.

      The Select Element or Type dialog box appears.
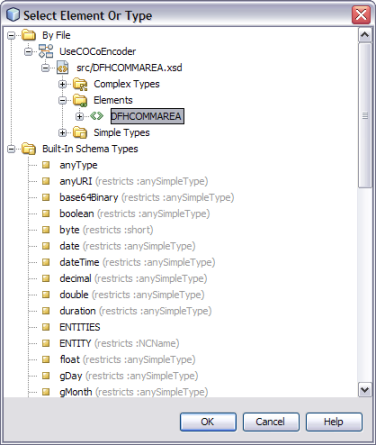

      image:Image of the Select Element Or Type dialog box
    3. Expand the By File node in the tree, and expand the copybook XSD file you created until you see the element to choose.
    4. Click the Element and then click OK.
    5. In the Encoded Type field on the Request Configuration page, enter cocoencoder-1.0.

      The Payload Processing section should be similar to the image below.


      image:Image of the Payload Processing section of the Request Configuration page
  9. Click Next.

    The Response Configuration window appears.
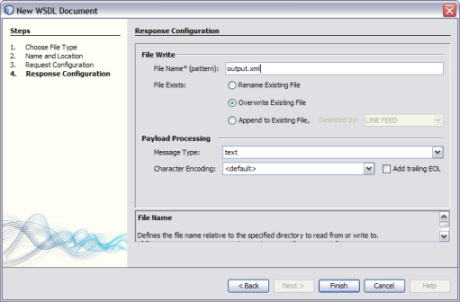

    image:Image of the Response Configuration of the New WSDL Document Wizard
  10. Fill in the File Write fields, and then do the following for the Payload Processing section:
    1. In the Message Type field, select encoded data.

      The options under Message Type change.

    2. Click the Ellipses next to the XSD Element/Type field.

      The Select Element or Type dialog box appears.

    3. Expand the By File node in the tree, and expand the copybook XSD file you created until you see the element to choose.
    4. Click the Element and then click OK.
    5. In the Encoded Type field on the Request Configuration page, enter cocoencoder-1.0.

      The Payload Processing section should be similar to the image below.


      image:Image of the Payload Processing section of the Request Configuration page
  11. Click Finish.

    The WSDL document appears in the project tree and its contents appears in the NetBeans WSDL Editor.