| Skip Navigation Links | |
| Exit Print View | |

|
Oracle Java CAPS Adapter for SQL Server Tutorials Java CAPS Documentation |
| Skip Navigation Links | |
| Exit Print View | |

|
Oracle Java CAPS Adapter for SQL Server Tutorials Java CAPS Documentation |
Java CAPS Adapter for SQL Server Tutorials
About the Adapter for SQL Server Sample Projects
Sample Input Trigger Files and Output Files
Operations Used in the SQL Server Sample Projects
About the Java CAPS Business Process Manager Project
Associating Business Process Manager Operators
Deploying JCD- Based Operations in the Business Process Manager
About the Java Collaboration Definition Sample Project
Creating the Java Collaboration Definition Project for the Java CAPS Adapter for SQL Server
Creating the Collaboration Definitions (Java)
Create the jcdDelete Collaboration Definition
Using the Java Collaboration Editor to Create Business Rules
Creating the Business Rules for the jcdDelete Collaboration
Create the jcdDelete Collaboration Business Rules
jcdDelete Collaboration Java Code
Creating the Business Rules for the jcdInsert Collaboration
Create the jcdInsert Collaboration Business Rules
jcdInsert Collaboration Java Code
Creating the Business Rules for the jcdPsSelect Collaboration
Using the Collaboration Editor's Java Source Editor
Create the jcdPsSelect Collaboration Business Rules
Creating the Business Rules for the jcdTableSelect Collaboration
Create the jcdTableSelect Collaboration Business Rules
jcdTableSelect Collaboration Java Code
Creating the Business Rules for the jcdUpdate Collaboration
Create the jcdUpdate Collaboration Business Rules
jcdUpdate Collaboration Java Code
Creating the Connectivity Maps
Adding Connectivity Maps to a Project
Add the Connectivity Maps to the Project
Populating and Binding the Connectivity Maps Using the Connectivity Map Generator
Populate the Connectivity Maps Using the Connectivity Map Generator.
Configuring the Adapter Properties
Configuring the Connectivity Map Properties
Configure the Connectivity Map Properties
File1 Inbound Adapter Properties
File2 Outbound Adapter Properties
SQL1 Outbound Adapter Properties
Configuring the Environment Properties
Configure the Environment Properties
File Adapter Environment Properties
SQL Server Adapter Environment Properties
Creating the Deployment Profile
Building and Deploying the Project
Deploying the Project from NetBeans
Creating the BPEL-Based Project for the Adapter for SQL Server
Creating the Business Processes
Create the bpDelete Business Process
Create the bpInsert Business Process
Create the bpPsSelect Business Process
Create the bpTableSelect Business Process
Create the bpUpdate Business Process
Using Business Process Designer to Create Business Rules
Creating the bpDelete Business Rules
Create the bpDelete Business Rules
Creating the bpInsert Business Rules
Create the bpInsert Business Rules
Creating the bpPsSelect Business Rules
Create the bpPsSelect Business Rules
Creating the bpTableSelect Business Rules
Create the bpTableSelect Business Rules
The Database OTD Wizard generates Object Type Definitions (OTDs) by connecting to external data sources and creating corresponding OTDs. The sample project requires three OTDs to interact with the SQL Server Adapter.
These OTDs are:
otdSQLServer: SQL Server Database OTD
OTDInputDTD_DBemployees: Inbound DTD OTD
OTDOutputDTD_DBemployees: Outbound DTD OTD
The sample project ZIP file includes DTDs used to create the inbound and outbound DTD OTDs.
The New Object Type Definition Wizard appears.
The connection information fields are:
Host name
Port
Database
User name
Password
For this example, select the following:
Tables/Views/Aliases
Prepared Statements
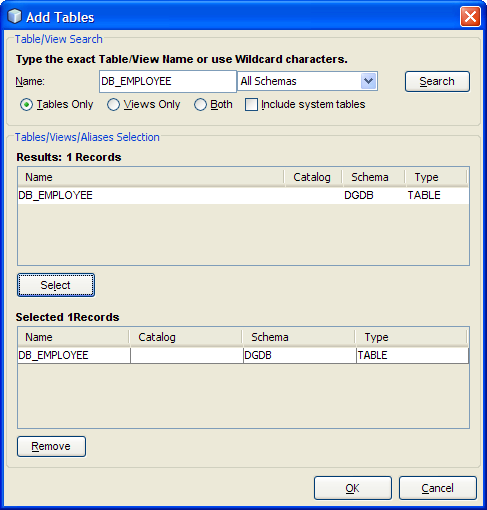
The Add Tables dialog box appears.
For this example, use the db_employee table.

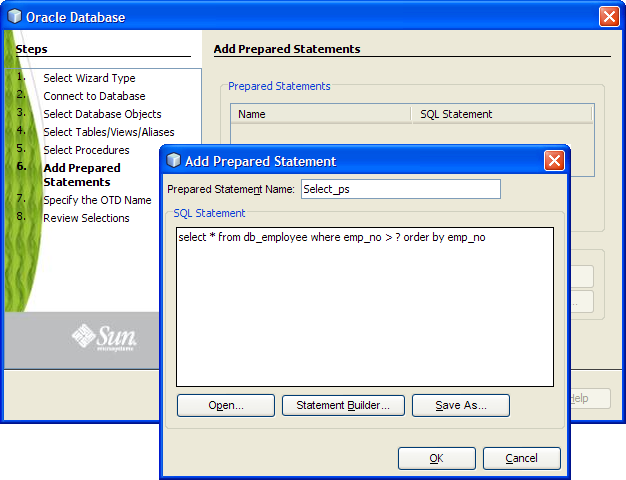
The Add Prepared Statements window appears.
The Add Prepared Statement dialog box appears.
select * from db_employee where emp_no > ? order by emp_no

Note - In this example, the SQL statement includes the ? placeholder for input. This placeholder represents the Where Clause.
The New Object Type Definition Wizard appears.
The new OTD, otdInputDTD_DBemployees, now appears under the project's otdALL node, in the Projects window.
When you are finished, the project's otdALL folder now contains three OTDs: otdSQLServer, otdInputDTD_DBemployees, and otdOutputDTD_DBemployees.
Next Steps
For your next step, see:
Creating the Collaboration Definitions (Java) if you are creating the prjSQLServer_JCD Project.
Creating the Business Processes if you are creating the prjSQLServer_BPEL Project.