| Skip Navigation Links | |
| Exit Print View | |

|
SPARC SuperCluster T4-4 Zones With Oracle Database on Database Domains Configuration Guide |
| Skip Navigation Links | |
| Exit Print View | |

|
SPARC SuperCluster T4-4 Zones With Oracle Database on Database Domains Configuration Guide |
Planning to Set Up Zones on Database Domains
Understanding Domain Configurations
Determining the Cores Available for Domains and Zones
Cores Available for Domains and Zones
Zones and Cluster Planning for Database Domains
Guidelines for Planning the Number of Zones and Clusters
Guidelines for Planning the Storage Server Disk Group Layout
Planning the Exadata Storage Server Disk Group Layout
Understanding an Example Scenario
Recording Your Existing and Planned Configuration Information
Recording Your Existing Configuration
Recording Your Zone Configuration Information
Recording Your Cluster Configuration Information
Recording Your Exadata Storage Server Disk Group Layout
Understanding Network Considerations
Understanding the Networking Setup Before Zone Creation
Host Management Network Before Zone Creation
Client Access Network Before Zone Creation
InfiniBand Network Before Zone Creation
Understanding the Networking Setup After Zone Creation
Host Management Network After Zone Creation
Client Access Network After Zone Creation
InfiniBand Network After Zone Creation
Understanding the Network Setup for Clusters
Preparing to Configure Zones on Database Domains
Determine the Repository Location
Install or Update Packages From the Remote Repository
Install or Update Files From the Local Repository
Verify Configuration Tool Installation
Creating Configuration Files Using OEDA
Verify Exadata Storage Server Disk Space for Additional Zones
Creating Configuration Files Using OEDA: Manual Procedures
Oracle Exadata Deployment Assistant Overview
Complete the Customer Details Page
Complete the Hardware Selection Page
Complete the Define Customer Networks Page
Complete the Administration Network Page
Complete the Identify Compute Node OS and Enable Capacity-on-Demand Configuration Page
Review the Information in the Management and Private Networks Page
Complete the Define Clusters Page
Set Zone Default Configurations
Complete the Cluster Review and Edit SCAN, Client, VIP and Optional Backup Networks Page
Verify Remaining Configuration Information
Generate the Configuration Files
Creating Configuration Files Using OEDA: Automated Procedures
Locate the Necessary Files to Set Up Zones
Import the Most Recent OEDA Configuration File
Review Existing Configuration Information
Review the Information in the Identify Compute Node Operating System Page
Review the Information in the Management and Private Networks Page
Complete the Define Clusters Page
Set Zone Default Configurations
Complete the Cluster Review and Edit SCAN, Client, VIP and Optional Backup Networks Page
Verify Remaining Configuration Information
Generate the Configuration Files
Creating the Template Zone on Each Database Domain
Create a Template Zone on a Database Domain
Delete a Template Zone From a Database Domain
Determining if Additional VNETs Are Needed for a Database Domain
Determine if Additional VNETs Are Needed (CPU-to-Database Domain Mapping)
Determine if Additional VNETs Are Needed (Software Commands)
Set Up Public Key Authentication for ZFS Storage Controllers
Creating Additional Links on the IB Storage Network for Zones
Create Additional Links on the IB Storage Network for Zones

|
The Client Network Format Masks page is displayed.

The Client Access Details area will be populated with a name that was automatically generated, based on the Database Machine Name prefix that you entered earlier. However, this automatically-generated name does not provide necessary zone-specific information, so you should change the name in this field to reflect information on this cluster.
For example, if you entered ssc01r1 for the Database Machine prefix in the Customer Details page, you should see this entry in the Name field in the Client Access Details area:
ssc01r1client%%
The name that you enter in this field will be used as the host name for the client access network for zones that are part of this cluster. You should use the same naming convention for this field as you did for the administration network page. The following is an example format for this field:
cluster-namez#db#cn%-z#-client
For example:
ssc01r1z1db1cn%-client
Note - There is a valid configuration where you would have a cluster where the zones reside on different Database Domains on the SPARC T4-4 servers (for example, a two-node cluster where the first zone resides on the first Database Domain on the first SPARC T4-4 server, and the second zone resides on the second Database Domain on the second SPARC T4-4 server). In this case, enter the Database Domain number for the first zone in this field for now - you will make manual modifications for the zone on the second Database Domain later on in this process.
Note that the Name field in the VIP Details area automatically populates with the changes that you made in the Client Access Name field in the Client Access Details area. Because this name applies to each zone within this particular cluster, this automatically-generated information should be correct as-is.
Do not modify the information in the SCAN Details section. This will generate a single SCAN name and three SCAN IP addresses for the cluster or the single-instance database, which is correct.
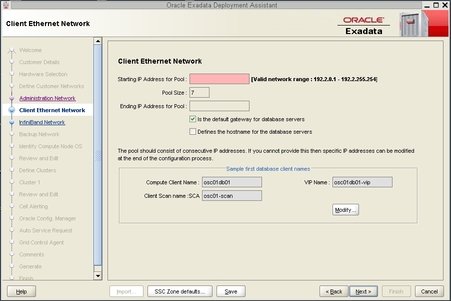
The main Client Access Network page is displayed, showing the results of the changes you made in the Client Network Format Masks page.
The IB Network page is displayed. Go to Complete the IB Network Page.