A User Interface
This section contains information about the interface used with Oracle Imaging and Process Management (Oracle I/PM).
The following pages are shown in this section:
-
Section A.36, "Input Identify and Parse File Parameters Page"
-
Section A.41, "Content Server Connection Basic Information Page"
-
Section A.42, "Content Server Connection Content Server Settings Page"
-
Section A.44, "Content Server Connection Review Settings Page"
A.1 Icons
The following icons are used throughout the Oracle I/PM interface without explicit identification. In some cases, as in the pencil icon, the exact use is determined by the context it is in. You can place your cursor over an icon to view identifying text about it.
| Name | Icon | Description |
|---|---|---|
| Collapse or Restore Pane | Click to expose or hide a pane. | |
| Show or Hide this Panel | Click to expose or hide a panel. | |
| Create | Click to create a new item. Items may be searches, application, or other. | |
| Close Current | Click to close a current tab or window. | |
| More Options | Click to expand a hidden menu. | |
| Expand Horizontally | Click to expand an item horizontally. | |
| Edit, Modify, or Update | Click to edit, update, or modify a value or document. |
A.2 Navigator Pane
The navigator pane displays the top-level navigation panels used to access the main features of Oracle I/PM.
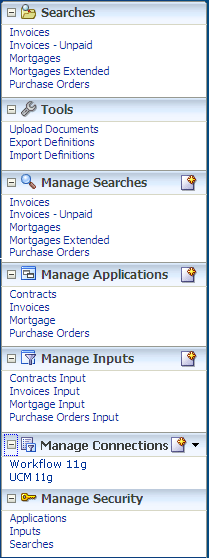
The following table describes the options available on the page.
| Panel | Description |
|---|---|
| Searches | Lists all searches to which you have rights. Clicking on a search name displays the search form in the content region. The search form is used to enter criteria to find documents in Oracle I/PM. |
| Tools | Contains the following options:
|
| Manage Searches | Lists all searches to which you have at least Modify or Grant Access rights. Click the expand icon to view the Create New Search icon. Click this icon to open the Search Properties Page to create a new search. |
| Manage Applications | Lists all created applications to which you have at least Modify or Grant Access rights. Click the expand icon to view the Create Application icon. Click this icon to open the Application General Properties Page to create a new application. |
| Manage Inputs | Lists all created inputs to which you have at least Modify or Grant Access rights. Click the expand icon to view the Create Input icon. Click this icon to open the Input Basic Information Page to create a new input. |
| Manage Connections | Lists all created connection to which you have at least Modify or Grant Access rights. Click the expand icon to view the Create New Connection menu icon. Click this icon to open a menu and select Create Content Server Connection to display the Content Server Connection Basic Information Page or select Create Workflow Connection to display the Workflow Connection Basic Information Page. |
| Manage Security | Used to grant security rights to applications, inputs, connections, and searches. |
A.3 Navigation Train
The Navigation Train is displayed on all pages in Oracle I/PM that are used within a procedure such as creating searches, applications, inputs, and connections. The current step of the procedure is in Bold and has a double box icon above the step name. Click Next when the required information has been entered to proceed to the next page. Click Back to visit a previous page or access steps directly by clicking the step name or icon in the navigation train. Steps displayed in gray have not yet been completed in a sequential process, such as creating an application, and cannot be navigated to until each preceding step is completed. Once all steps have been completed, all steps in the navigation train are enabled and can be used to jump from one step to another non-sequentially.
A.4 Upload Document Page
Access the Upload Document page by clicking Upload Document in the Tools panel in the Navigator Pane.
Note:
When uploading a document, be aware of the file size. File size limitations are primarily a factor when retrieving a document for viewing. System architecture, hardware limitations, network load and other factors can influence document retrieval times and cause the viewer to time out. Oracle I/PM has been optimized to store tiff image files of sizes to 200KB. If the documents you need to upload and view are larger than to 200KB, test the performance of those files in the specific network architecture you are planning to use while simulating peak network load.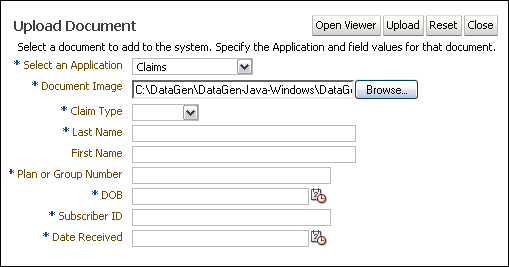
The following table describes the elements available on the page.
| Element | Description |
|---|---|
| Open Viewer | Displays the Viewer in the Advanced mode next to the Upload Document page, replacing the Document Image field and Browse button. Use the Viewer to navigate to a document and to review and annotate a document before uploading. This is useful when you need to view the document to see the associated metadata to be entered, such as an invoice number or title, if you need to see the document to determine what application should be used, or if you want to annotate a document when uploading. Note that you must select an application and enter the associated metadata values before completing the upload. |
| Upload | Submits the document and metadata to Oracle I/PM based on the selected application. When the document has been successfully uploaded, you will see a confirmation message. Clicking the confirmation message opens the uploaded document in the viewer. |
| Reset | Resets the page and allows for another document to be uploaded. Click this to clear inaccurate information before submitting the document or to clear the information and confirmation of a successfully submitted document so you can upload another one. |
| Close | Closes the Upload Document page and returns to the Welcome page or an open search tab if one or more searches have been run. |
| Select An Application | Select an application in which to upload the document. This is a required field. Once an application is selected, metadata fields specific to the application are displayed. Application-specific metadata fields are determined when the application is defined and will likely be different for each application. |
| Document Image field and Browse button | Enter the path to the image being uploaded, or click Browse to select the file. This is a required field. This field is replaced with the Viewer if Open Viewer is clicked, and the viewer is used to navigate and select the file to upload.
Note that if using your keyboard rather than your mouse to select the Browse button, use the Space bar to execute the Browse button function and open the dialog box. The Enter key does not execute the Browse button function. |
A.5 Update Document Page
Use the Update Document function to update or add a new version of an existing document. You can create a new version of the document or update one or more application fields of the existing document.
From within a search results list, select a document and click Update in the Search Results toolbar. The Update Document window opens and displays the Original File Name, Document ID, and its application. To add a new version of the existing document, enter the path and name of the file, or click Browse to select it, and click Update. To update specific fields in the existing document, make your changes to the fields displayed and click Update. Upon successful update, you will see a confirmation message.
It is recommended that you lock a document prior to updating it in order to prevent others from updating the document at the same time. You can easily lock a document from a search results listing using the contextual menu or search results toolbar. If a document is locked before being updated, the Keep Lock check box is displayed at the bottom of the Update document page. Select to keep the document locked after it is updated. If you did not have it locked before clicking Update, the Lock Document check box will appear. Select to lock the document after it is updated.
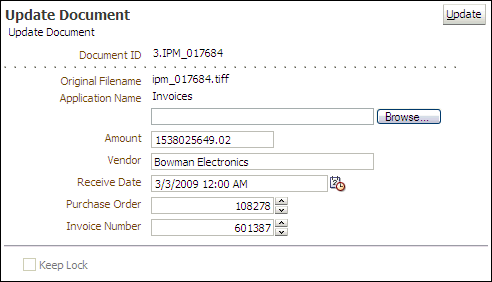
The following table describes the elements available on the page.
| Element | Description |
|---|---|
| Update | Submits the document and metadata to Oracle I/PM based on the selected application. When the document has been successfully updated, you will see a confirmation message. If you receive a system error message, review the log files to determine its cause. |
| File name field and Browse button | Type the name of the new file or click Browse to select it.
Note that if using your keyboard rather than your mouse to select the Browse button, use the Space bar to execute the Browse button function and open the dialog box. The Enter key does not execute the Browse button function. |
| Application fields | Information fields vary by application. Change the information in an existing document by updating one or more of the application fields. |
| Keep Lock or Lock Document | If document is locked, select Keep Lock to remain locked after being updated. If document is not locked, select Lock Document to lock document after being updated. |
A.6 Export Definitions: Export Comments Page
Application, input, and search definitions can be exported to a transportable file format (XML) for import and use in other systems. Enter a short description and other pertinent information in the Export Comments field about the export file.
Access the Export Definitions Comments page by clicking Export Definitions in the Tools panel in the navigator pane.
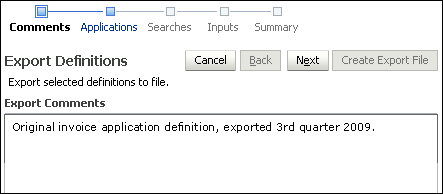
The following table describes the elements available on the page.
| Element | Description |
|---|---|
| Cancel | Cancels the export procedure and returns to Oracle I/PM welcome page. |
| Next | Continues to next step. |
| Export Comments field | Type the description or other pertinent information for the definitions file being created. |
A.7 Export Definitions: Applications Page
Select the applications to be included in the export definitions file by enabling the check box in the Export column next to the application name.
Access the Export Applications page by clicking Next on the Export Comments page.
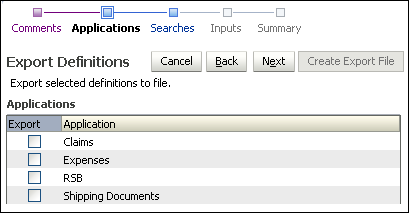
The following table describes the elements available on the page.
| Element | Description |
|---|---|
| Export | Select to export the application on that line. |
| Application | Name of the application to include in the Export Definitions file. |
A.8 Export Definitions: Searches Page
Select the searches you want to export by selecting the field in the Export column next to the search name.
Access the Export Definitions Searches page by clicking Next on the Export Definitions Applications page or by clicking searches in the Navigation Train.
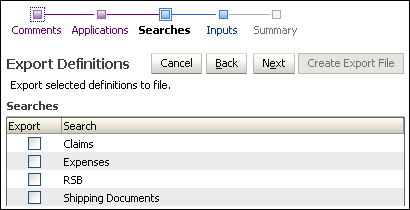
The following table describes the elements available on the page.
| Element | Description |
|---|---|
| Export | Select to export the search on that line. |
| Search | Name of the search to include in the Export Definitions file. |
A.9 Export Definitions: Inputs Page
Choose the input definitions to export by selecting the field in the Export column next to the input name.
Access the Export Definitions Inputs Page by clicking Next on the Export Definitions Searches page or by clicking on Inputs in the Navigation Train.
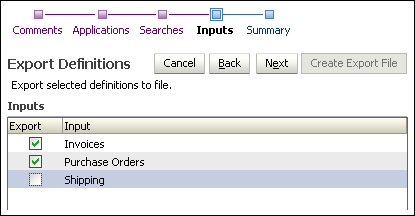
The following table describes the elements available on the page.
| Element | Description |
|---|---|
| Export | Select to export the input on that line. |
| Input | Name of the input to include in the Export Definitions file. |
A.10 Export Definitions: Summary Page
Review your selected definitions and make any necessary changes. Then click Create Export File. A File Download window displays where you indicate whether you want to open, save or cancel the new Export Definitions File.
Access the Export Definitions Summary Page by clicking Next on the Export Definitions Inputs page or by clicking Summary in the Navigation Train.
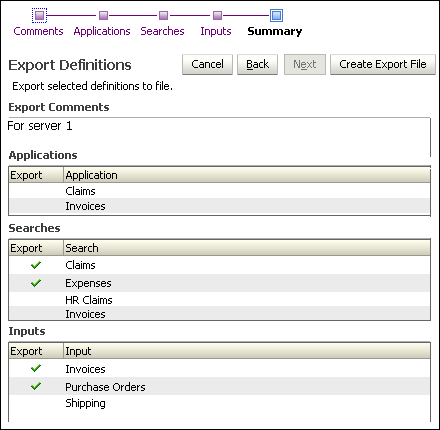
The following table describes the elements available on the page.
| Element | Description |
|---|---|
| Summary sections | Displays a summary of the selections made in each of the Export Definitions pages. |
A.11 Import Definitions: File Location Page
Access the Import Definitions Select File page by clicking Import Definitions on the Tools panel in the Navigator Pane.
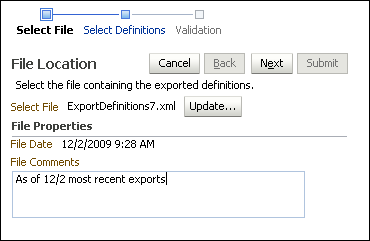
The following table describes the elements available on the page.
| Element | Description |
|---|---|
| Select File field | Click Browse to locate and select the file that contains the definitions to import or type the file name in the field.
Note that if using your keyboard rather than your mouse to select the Browse button, use the Space bar to execute the Browse button function and open the dialog box. The Enter key does not execute the Browse button function. |
| File Properties section | After a file is selected, displays the date of file creation and associated comments. |
A.12 Import Definitions: Select Imports Page
Choose the applications, inputs, and searches to be imported by selecting the field in the Import column next to the application, input or search name.
Access the Import Definitions Select Definitions page by clicking Next on the Import Definitions: File Location Page.
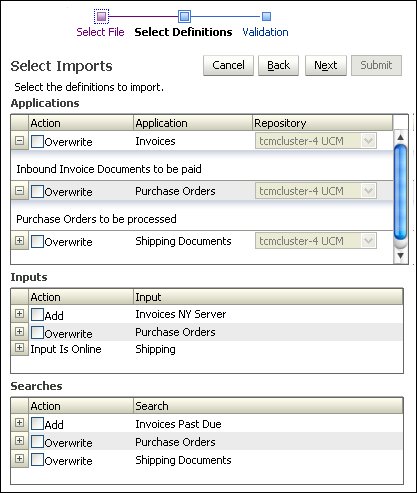
The following table describes the elements available on the page.
| Element | Description |
|---|---|
| Action | Select the specific definitions to import for applications, inputs, and searches by selecting the field under the Action heading. Options are:
Note that you must take existing input definitions offline before you can import a definition to overwrite the existing input. You take an input definition offline and online by clicking Toggle Online on the Input Summary page, accessed by clicking the input name in the Manage Inputs panel. |
| Applications, Inputs, Searches Sections | Each application, input, or search is listed under the appropriate heading. |
| Repository | When importing an application definition into a system where the application is not currently defined, for example from a test environment to a production environment, use the Repository picklist to select the repository to be used by the application. |
A.13 Import Definitions: Validate Imports Page
After all selections are made on this page, click Submit. The definitions being imported reference multiple system-specific items, such as security groups, storage devices, and repository connections. All of these items are referenced by name. As long as items are named correctly between the two systems, importing definitions will be successful with no additional adjustment. By the time the Validate Imports page is displayed, Oracle I/PM has validated each of these system-specific items to determine if the definitions can be imported as provided. If the definitions are valid, the Successful Validation icon (a check mark) will display in the Status column. If not valid, the Validation Failed icon will display. If a failure occurs, click the expand button to see details. Change options or verify that users and groups exist on the target system and click Submit again. If you receive a system error message, review log files to determine the problem.
Access the Import Definitions Select File page by clicking Next on the Import Definitions: Select Imports Page.
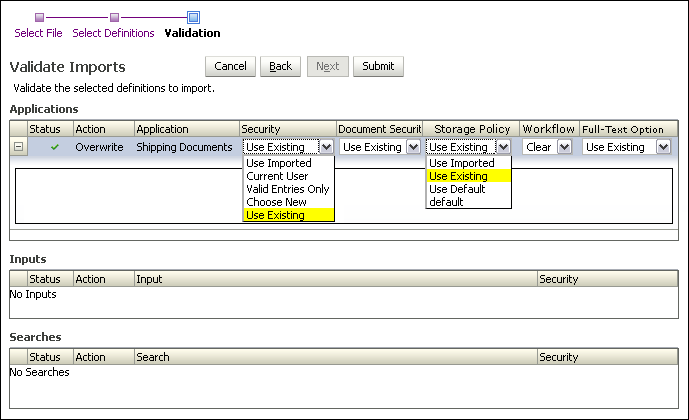
The following table describes the elements available on the page.
| Element | Description |
|---|---|
| Submit | Click Submit to import the selected application, input, and search definitions. |
| Status | A Successful Validation icon or Failed Validation icon is displayed indicating whether or not to proceed with importing the definition or definitions. |
| Action | Specifies the action being taken with the import. Options are:
|
| Application | Name of application from which definitions are being imported. |
| Security | Select from the following security options:
|
| Document Security | Select from the following options:
|
| Storage Policy | Select from the following options:
|
| Workflow | Select from one of the following options:
|
| Full-Text Option | Use Existing: Select this option to use the existing Full-Text configuration, ignoring the configuration in the imported definition. This option is available only for definitions that already exist on the system.
Use Imported: Select this option to use the Full-Text options defined in the export file. None: Select if full-text is not configured. |
A.14 Import Definitions: Summary Page
Review your selected definitions and make any necessary changes. Then click Submit. Access the Import Definitions Summary Page by clicking Next on the Import Definitions: Validate Imports Page page or by clicking Summary in the Navigation Train.
The following table describes the elements available on the page.
| Element | Description |
|---|---|
| Summary sections | Displays a summary of the selections made in each of the Import Definitions pages. |
A.15 Search Properties Page
Use the Create Search Properties page to start creating a search that will be used more than once. If the Accounting department often searches for all Invoices during a specific year, create a search that specifies Invoices between the desired dates, such as January 1, 2008 and December 31, 2008.
Access this page by clicking the Create New Search icon on the Manage Searches panel in the Navigator Pane. Expand the Manage Searches panel to view the Create New Search icon.
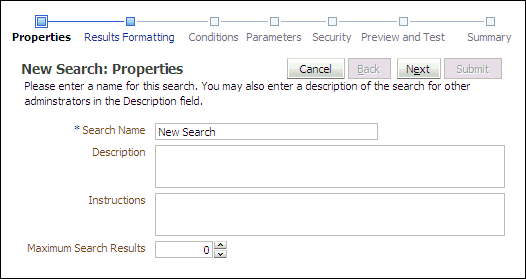
The following table describes the elements available on the page.
| Element | Description |
|---|---|
| Search Name | Enter a descriptive name for the search. This search name will be displayed to users under the searches panel of the navigator pane and must be unique to Oracle I/PM. |
| Description | Enter a description of the new search. The description is displayed when the cursor hovers over the search name in the navigator pane. The field contains a maximum of 1000 characters. |
| Instructions | Enter helpful information about what criteria is being searched for and how a user should use the search. These instructions are available on the search form and also appear on the Search Tab display. If no instructions are defined, the Instructions section is not displayed on the search form. The field contains a maximum of 1000 characters. |
| Maximum Search Results | Select the maximum number of rows per application a search will return before stopping. The search can span multiple applications, which are selected on the Search Results Formatting Page. The default is zero which means that the search will use the maximum results value set on the server. |
A.16 Search Results Formatting Page
The Create Search Results Formatting page is used to format how search results are displayed. Searches can be limited to one application or span multiple applications. For example, you can create a single search that returns purchase orders from a Purchase Order application and invoices from an Invoice application.
Access the Create Search Results Formatting page by clicking Next on the Create Search Properties page or by clicking Results Formatting on the Navigation Train.
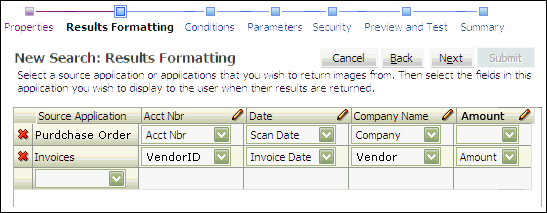
The following table describes the elements available on the page.
| Element | Description |
|---|---|
| Source Application | Specifies the application to be searched. The application selected determines the criteria fields available. Only applications to which you have View security rights are listed. |
| Field Columns | The second and subsequent columns represent the columns of metadata and system fields from the searched applications that appear in the search results. Metadata fields are created in the application when the application is created or modified. System fields are created by the system, including Document Id, Document Creation Date, Document Created By, and Document Batch Id.
Selecting a search field populates the column header with the name and enables the next column. Clicking the pencil icon allows you to modify the column name to something more descriptive. For example, if fields with different names from multiple applications are aligned in the same column, such as Vendor Name and Company Name, you can change the column title to account for both. If searching multiple applications, aligning like field types in one column can facilitate sorting search results. For example, a purchase order application may have a field named Account Number that corresponds with a field in an invoicing application called VendorID. Aligning the fields in the results allows you to click on the header to sort the results so that invoices and purchase orders from the same company are grouped. Note that when aligning fields from multiple applications, be careful to align only fields of the same field type, for example, date fields with date fields and text fields with text fields. Failing to align fields of like types can cause errors when sorting search results. |
| Column Options Icon | Clicking the Column Options icon in the column header displays the following options:
|
| Remove Application Icon | Clicking the Remove Application Icon next to the Source Application displays a dialog window asking for confirmation to remove the application from the search. |
A.17 Search Conditions Page
Specify the conditions to be applied to each document in the searched applications to determine if they should be shown in the search results. Each condition contains three parts: the application's metadata field, the operator used for the comparison and the data value to be used. These conditions for each application can be grouped using parentheses and combined using the conjunction operators (and/or) to form complex conditions.
Access the Create Search Conditions page by clicking Next on the Create Search Results Formatting page or by clicking Conditions in the Navigation Train.
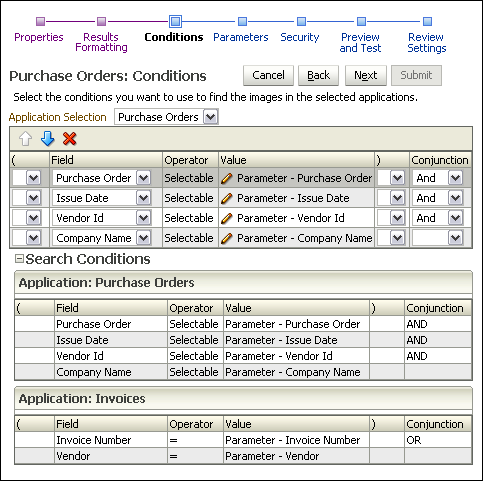
The following table describes the elements available on the page.
| Element | Description |
|---|---|
| Application Selection | Select the application to add or modify search conditions for that application. |
| Moves the selected condition up one row. | |
| Moves the selected condition down one row. | |
| Displays a dialog window requesting confirmation to remove the selected condition. | |
| ( | Opening parenthesis for beginning conditional grouping. |
| Field | Selects the application field to be used in the condition. |
| Operator | Selects the operator used for the search. Available operators depend on the data type of the application selected. |
| Value | A search condition value is the value that the selected Field is being compared to. This value can be one of the following:
|
| Modify Value Icon | Displays a dialog window with options for modifying value types. |
| ) | Closing parenthesis for ending conditional grouping. |
| Conjunction | Logical operator for grouping together the smaller condition elements.
|
A.18 Search Parameters Page
Specify the parameters for conditions used in a search. Values can be set as default or to read only, and picklists can be used to define parameter choices. The Create Search Parameters page is accessed by clicking Next on the Search Conditions Page or by clicking Parameters on the Navigation Train.
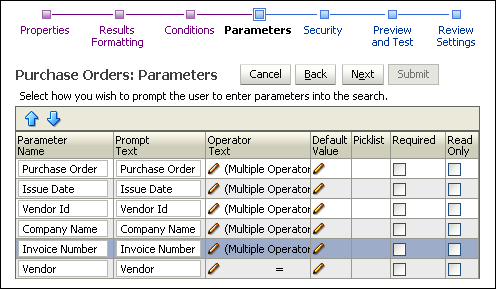
The following table describes the elements available on the page.
| Element | Description |
|---|---|
| Move the parameter up in the list. The ordering in this list corresponds to the presentation the user will see on the Search Form page. | |
| Move the parameter down in the list. The ordering in this list corresponds to the presentation the user will see on the Search Form page. | |
| Parameter Name | Specifies the parameter name. |
| Prompt Text | Specifies what is listed on the Search Form page to prompt the user. This information can be edited to provide more descriptive text to the user. |
| Modify Operator Properties Icon | Clicking displays the Operator Properties Dialog Box for making additional operator options available to a user when searching. |
| Modify Default Value Icon | Displays a dialog window for specifying a default value for the parameter. The value you enter is of the same data type as the parameter. Defaults for date data type will have two choices: Static Value and Relative Date. Defaults for text data type will have two choices: Static Value and Logged in UserID. Picklists can also be used to choose a default value if a picklist was defined for the application and the picklist is enabled in the Picklist column.
|
| Picklist | Enable to allow users to choose from defined parameter values or to use the picklist to define a default value. Defined values for a picklist are created when the application is created. |
| Required | Enable to require users to enter a parameter when using this search. |
| Read Only | Enable to prevent a user from modifying a parameter. This is similar to the static value on the Search Conditions Page but allows the user to see the value being used. If the parameter is set to Read Only, but has no default value specified, the condition is effectively deleted from the search because the user has no way to specify a value. |
A.18.1 Operator Properties Dialog Box
The Operator Properties dialog box allows two things:
-
If Allow user to choose operator is disabled, you can change the displayed text for the operator prompt. For example, you can change the < symbol to the text Less Than. Changing the prompt text does not change the behavior of the operator. For example, changing the = sign to the text Not Equals still returns results equal to the specified value.
-
If Allow user to choose operator is enabled, you can allow users to select from multiple operators.
The Operator Properties Dialog Box is accessed by clicking the Modify Operator Properties icon in the Operator Text column on the Search Parameters Page.
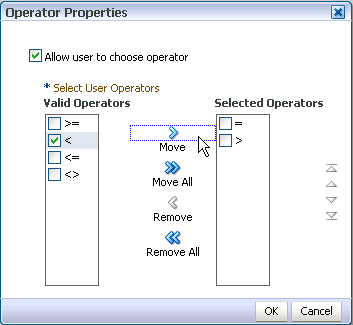
The following table describes the elements available on the page.
| Element | Description |
|---|---|
| Allow user to choose operator | Enable to make additional operators available to users. |
| Valid Operators | Displays a list of available operators. Valid operators are dependent on the type of field the condition is mapped to. To select an operator, enable it in the valid operators list and click Move to make the operator available to the user. Click OK once the desired operators are selected and moved. |
| Selected Operators | Displays a list of operators that are available to the user. |
| Move | Enable a valid operator and click Move to send it to the selected operator list. |
| Move All | Moves all valid operators to the selected operator list. Using Move All does not require you to enable an operator in the valid operators list first. |
| Remove | Removes enabled operators from the selected operators list. |
| Remove All | Removes all selected operators from the selected operator list. Using Remove All does not require you to enable an operator in the selected operators list first. |
A.19 Search Security Page
Use the Security page to define who has rights to view, modify, delete and grant access to the search being created.
The Search Security page is accessed by clicking Next on the Search Parameters Page or by clicking Security on the Navigation Train.
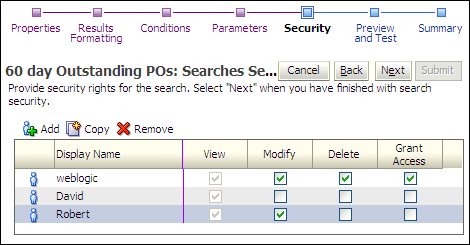
The following table describes the elements available on the page.
| Element | Description |
|---|---|
| Add | Displays the Add Security Member Page from which you can search for and select users or predefined security groups. |
| Copy | Selecting a user or group from the existing list and clicking Copy displays the Add Security Member Page and copies the permissions of the selected user or group to the next user or group added. |
| Remove | Removes the selected user or group from the list. |
| User/Group Icon | Displays a single person for a user and multiple persons for a group. |
| Display Name | The name of the user or group. |
| View | Enabled by default. Grants the user or group the right to view and execute this search. |
| Modify | Enable to grant the user or group the right to modify all aspects of this search except for granting security rights. |
| Delete | Enable to grant the user or group the right to delete this search. |
| Grant Access | Enable to grant a user or group the right to grant security rights to others for this search. If this is the only security level granted, the user can modify only the security information for this search. |
A.20 Add Security Member Page
Use the Add Security Member page to manage definition security and to add users and groups to an application, search, connection, or input. Access this page by clicking Add on the Definition Management Security pages, Content Server Connection Security Page, Workflow Connection Security Page, Search Security Page, Application Security Page, Application Document Security Page, or Input Security Page.
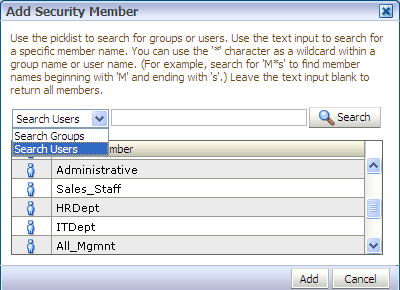
The following table describes the elements available on the page.
| Element | Description |
|---|---|
| Search Menu | Select Search Users to search for users by their login identifier; select Search Groups to search for groups by group name. Note that for document security, only Search Groups are available. |
| Search Field | Enter the name of a user or group to find. Criteria is not case-sensitive. The asterisk (*) can be used as a wildcard. For example, you can enter *group to find UserGroup and AdminGroup, but would need to enter *group* to find AdminGroups. Click Search without entering any criteria to return the entire listing of either users or groups. |
| Search | Click Search to submit search criteria. |
| Results Listing | Displays the returned results. Select multiple adjacent results using Shift + Click or multiple non-adjacent results using Ctl + Click. |
| Add | Click Add to close the dialog and return the selected user(s) or group(s) to originating security configuration page. |
| Cancel | Cancels the procedure and closes the Add Security Member page. |
A.21 Search Preview and Test Page
From this page, you can test the search you just created to ensure it is working and displaying properly before deploying it.
Access the Create Search Preview and Test page by clicking Next on the Search Security Page.
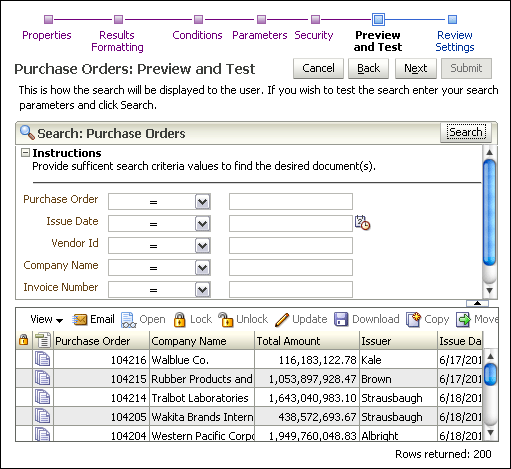
The following table describes the elements available on the page.
| Element | Description |
|---|---|
| Search | Runs the test search. Once run, the results are displayed in the lower section as they will display on a search results page. Go back to any previous page to alter any elements of the search that are not producing the desired results. Navigate backwards by clicking the back button, or skipping directly to it using the Navigation Train. |
| Search Result Toolbar | The Search Results Toolbar is displayed above the search results area and provides options for manipulating returned documents. Functionality is documented in the User's Guide for Oracle IPM and in the help system on a search results page. |
A.22 Search Review Settings Page
Review the details of the search you just created on the Search Review Settings page. Go back to previous pages to make changes by clicking the Back button or by clicking the name of the page on the Navigation Train.
Access this page by clicking Next on the Search Preview and Test Page.
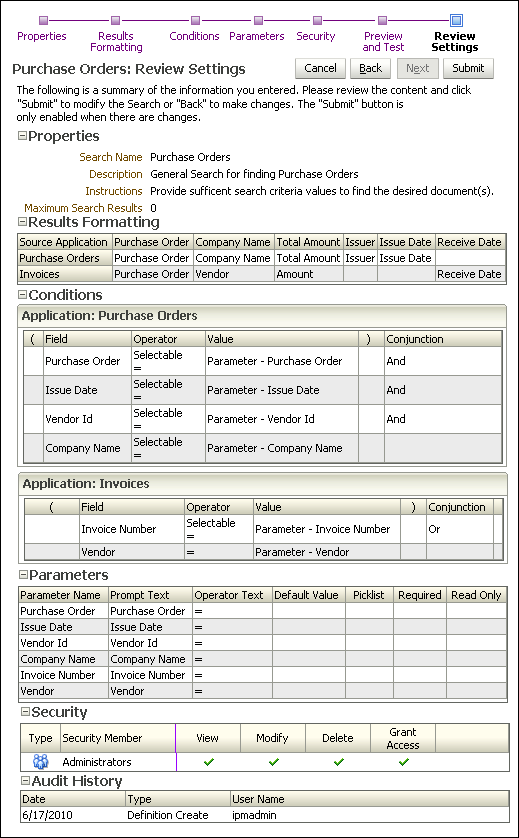
The following table describes the elements available on the page.
| Element | Description |
|---|---|
| Properties Section | Lists the search name and other criteria defined on the Search Properties Page. |
| Results Formatting Section | Displays the information defined on the Search Results Formatting Page. |
| Conditions Section | Displays information defined on the Search Conditions Page. |
| Parameters Section | Displays information defined on the Search Parameters Page. |
| Security Section | Displays information defined on the Search Security Page. |
| Audit History Section | Once a search is created, the audit history section displays a list of all actions performed on a search. It is blank on the summary page of a search being created. |
A.23 Search Summary Page
The Search Summary page is displayed when clicking an existing search in the Manage Searches panel of the Navigator Pane. It summarizes the search settings and allows for deleting or initiating changes to a search.
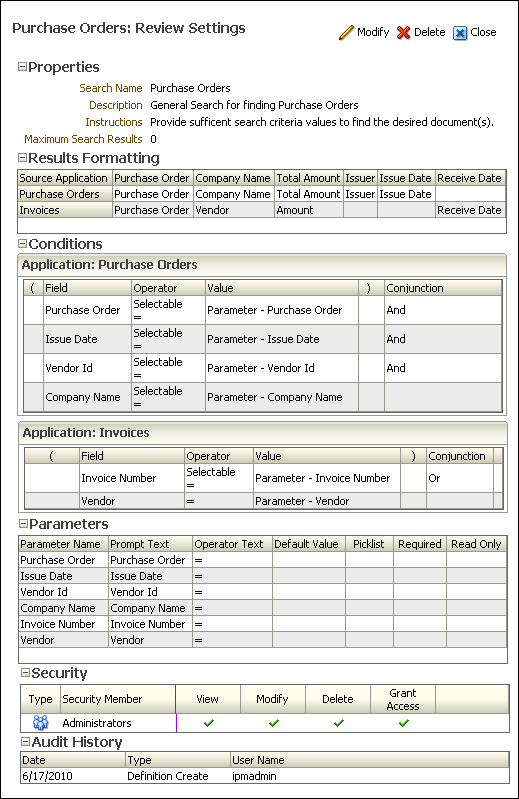
The following table describes the elements available on the page.
| Element | Description |
|---|---|
| Modify | Click to display the Search Properties Page to begin modifying the search. |
| Delete | Click to delete the search. |
| Close | Click to close the search. |
| Properties Section | Lists the search name and other criteria defined on the Search Properties Page. |
| Results Formatting Section | Displays the information defined on the Search Results Formatting Page. |
| Conditions Section | Displays information defined on the Search Conditions Page. |
| Parameters Section | Displays information defined on the Search Parameters Page. |
| Security Section | Displays information defined on the Search Security Page. |
| Audit History Section | Once a search is created, the audit history section displays a list of all actions performed on a search. It is blank on the summary page of a search being created. |
A.24 Application General Properties Page
Note:
The user creating an application must also have View permission to the repository connection being used.Applications define a set of common metadata and access to a group of documents. On this page, provide general properties information about the application being created.
Access the Create Application General Properties page by clicking the Create Application icon on the Application panel in the navigator pane.
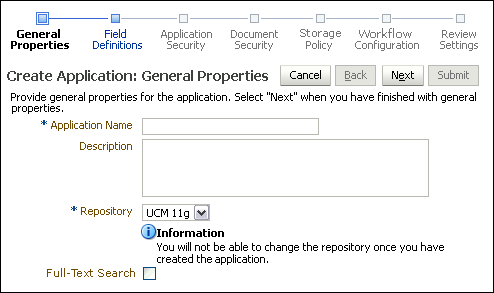
The following table describes the elements available on the page.
A.25 Application Field Definitions Page
Specify the fields and their definitions that will appear in the new application.
Access the Create Application Field Definitions page by clicking Next on the Application General Properties Page or by clicking Field Definitions in the Navigation Train.
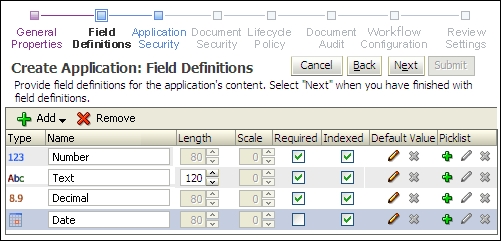
The following table describes the elements available on the page.
A.26 Application Security Page
Specify the users and groups that will be able to view, modify, or delete the application or grant access to others.
Access the Create Application: Application Security page by clicking Next on the Application Field Definitions Page or by clicking on Application Security in the Navigation Train.
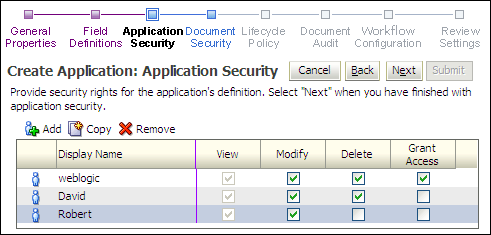
The following table describes the elements available on the page.
| Element | Description |
|---|---|
| Add | Displays the Add Security Member Page from which you can search for and select users or predefined security groups. |
| Copy | Selecting a user or group from the existing list and clicking Copy displays the Add Security Member Page and copies the permissions of the selected user or group to the next user or group added. |
| Remove | Removes the selected user or group from the list. |
| User/Group Icon | Displays a single person for a user and multiple persons for a group. |
| Display Name | The name of the user or group. |
| View | Enabled by default. Grants the user or group the right to view and upload into this application. |
| Modify | Enable to grant the user or group the right to modify all aspects of this application except for granting security rights. |
| Delete | Enable to grant the user or group the right to delete this application. |
| Grant Access | Enable to grant a user or group the right to grant security rights to others for this application. If this is the only security level granted, the user can modify only the security information for this application. |
A.27 Application Document Security Page
Application Document Security applies to groups but not users. Select the field in the appropriate column to grant a group that aspect of document security.
Access the Create Application Document Security page by clicking Next on the Application Security Page or by clicking Document Security in the Navigation Train.
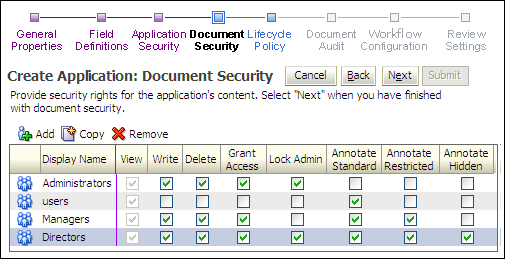
The following table describes the elements available on the page.
| Element | Description |
|---|---|
| Add | Displays the Add Security Member Page from which you can search for and select predefined security groups. |
| Copy | Selecting a group from the existing list and clicking Copy displays the Add Security Member Page and copies the permissions of the selected group to the next group added. |
| Remove | Removes the selected group from the list. |
| User/Group Icon | Displays multiple persons for a group. |
| Display Name | The name of the group. |
| View | Enabled by default. Grants the group the right to view documents in this application. |
| Write | Grants a group rights to upload, update, and copy documents and document metadata within a specific application. Until a group has Write security rights to documents in at least one application, the Upload tool is not visible to group members in the Tools panel of the Navigator Pane. |
| Grant Access | Grants a group rights to assign document rights to other groups. Note that groups with Grant Access rights are automatically assigned Delete and Write security rights. |
| Delete | Enable to grant a group the right to delete documents in this application. |
| Lock Admin | Grants the selected group the right to unlock documents locked by users other than themselves within this application. |
| Annotate Standard | Grants a group the right to create and manipulate annotations classified as standard by the annotator |
| Annotate Restricted | Grants a group the right to create and manipulate annotations classified as restricted by the annotator. |
| Annotate Hidden | Grants a group the right to create and manipulate annotations classified as hidden by the annotator. |
A.28 Application Storage Policy Page
On this page, specify the location of storage for the documents in this application.
WARNING:
Changing the Storage Policy in an existing application affects future documents only. Existing documents maintain the Storage Policy that was in place at the time they were uploaded.
Access the Create Application Storage Policy page by clicking Next on the Application Document Security Page or by clicking Storage Policy in the Navigation Train.
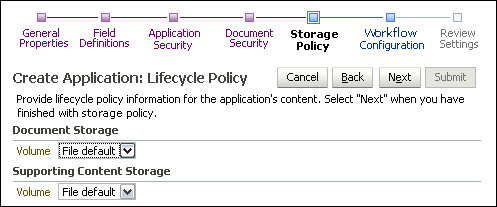
The following table describes the elements available on the page.
| Element | Description |
|---|---|
| Document Storage Volume | Specify where documents will be stored. This may be a file system or a database, depending on how the Oracle Content Server repository is configured. |
| Supporting Content Storage Volume | Specify where annotations and supporting content will be stored. This may be a file system or a database, depending on how the Oracle Content Server repository is configured. |
A.29 Application Workflow Configuration Page
Workflow enables your organization to automate its business processes by orchestrating services within the process flow. Click Add to create a workflow process to define an integration to an existing workflow process. A new instance of this process will be created each time a document is created within this application.
Access the Create Application Workflow Configuration General Properties page by clicking Next on the Application Storage Policy Page.
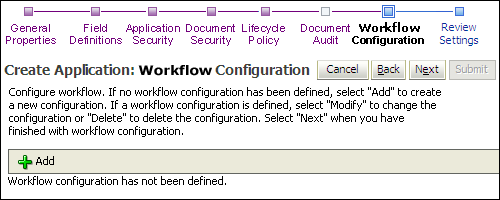
The following table describes the elements available on the page.
| Element | Description |
|---|---|
| Add | Click to add a new workflow configuration. |
| Modify | Click to modify an existing workflow configuration. |
| Remove | Remove the configuration from the application. |
A.30 Workflow Server Properties Page
On this page select the workflow connection to the workflow server hosting the desired process. Connection, User name, and Password are required values.
Access this page by clicking Add or Modify on the Application Workflow Configuration Page. Access the Create Application Workflow Server Properties page by clicking Next on the Application Workflow Configuration Page or clicking Modify on an existing Application Workflow Configuration Server Properties page.

The following table describes the elements available on the page.
| Element | Description |
|---|---|
| Connection | Select the workflow connection to the workflow server hosting the desired process. This is a required value. |
A.31 Workflow Component Properties Page
Select from the Composite, Service, and Operation fields to identify the workflow process you want to initiate.
Access the Create Application Workflow Component Properties page by clicking Next on the Application Workflow Configuration Page or clicking Modify on an existing Application Workflow Configuration Component Properties page.
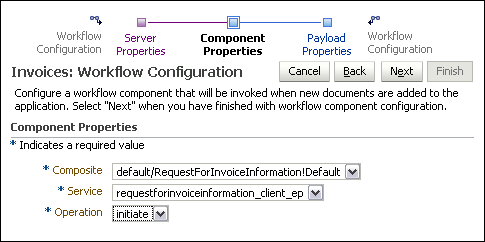
The following table describes the elements available on the page.
| Element | Description |
|---|---|
| Composite | Select the name and version of a deployed workflow composite. This is a required value. Deployed composites are listed by their version number. A composite listed as Default in the selection list always uses the default version of the composite as specified on the workflow server. For example, selecting Payment!1.0 causes the workflow to use the 1.0 version of the Payment composite, even if a 2.0 version has been deployed and specified as the default. Selecting Payment!Default causes the workflow to use the specified default composite version. Selecting the Default option may be preferred if changes made to the composite will not impact the way Oracle I/PM and the workflow server have been configured to work together. |
| Service | Select the name of a service associated with the selected composite. This is a required value. |
| Operation | Select the name of an operation associated with the selected service. This is a required value. |
A.32 Workflow Payload Properties Page
The Workflow Payload Properties page defines which application field values will be transferred to the new process instance when it is created. Access the Create Application Workflow Payload Properties page by clicking Next on the Create Application Component Properties page or clicking Modify on an existing Application Workflow Configuration Payload Properties page. When you have completed the changes, click Finish.
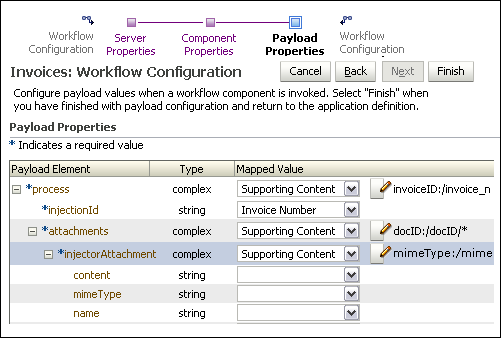
The following table describes the elements available on the page.
| Element | Description |
|---|---|
| Payload Element | Select the application field to provide a value for the workflow field. |
| Type | This column lists the data type for the workflow process field. This data type is used to limit the list of possible application fields to compatible data types. |
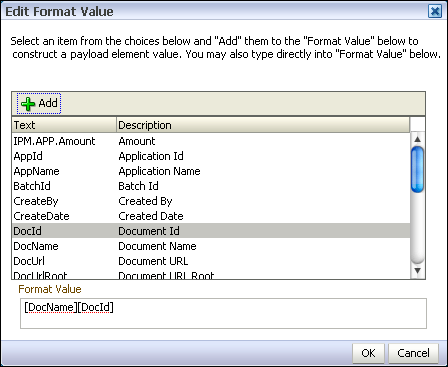
| Mapped Value, Function | Select the application field to provide a value for the workflow field. Available fields are dependent on the application. The Format Value option allows a user to define a string expression. This expression can include a constant value (1.23) or a function (AppId) or a combination of both. Selecting the Format Value option displays an icon to launch the Edit Format Value Page to facilitate creating custom URLs or concatenation of values.
Selecting the Supporting Content option from the Mapped Value column displays an icon which when clicked launches the Edit Supporting Content Value Page that enables you to identify what portion of a supporting XML document is included in a workflow payload. |
A.32.1 Edit Format Value Page
This page is accessed from the Workflow Payload Properties Page. Selecting the Format Value option from the Mapped Value column displays an icon which when clicked launches the Edit Format Value page. This page enables you to construct a value from parts of text and application fields. For example, you would use this page to construct custom URLs or to concatenate multiple values together into a single value.
A.32.2 Edit Supporting Content Value Page
This page is accessed from the Workflow Payload Properties Page. Selecting the Supporting Content option from the Mapped Value column displays an icon which when clicked launches the Edit Supporting Content Value page. This page enables you to identify what portion of a supporting XML document is included in a workflow payload.
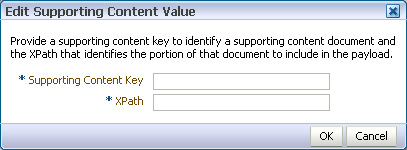
| Element | Description |
|---|---|
| Supporting Content Key | Provide the content key to identify a supporting document. This field is required. Maximum length cannot exceed 30 characters. |
| XPath | Specify the XPath that identifies the portion of the supporting document to include in the payload. This field uses standard XPath syntax. For example, to get the root element of a supporting document without specifying the name of the element, the XPath would be:
/* To get all elements directly below a root element of a supporting document, the XPath would be: /root/* Maximum length cannot exceed 224 characters. This field is required. |
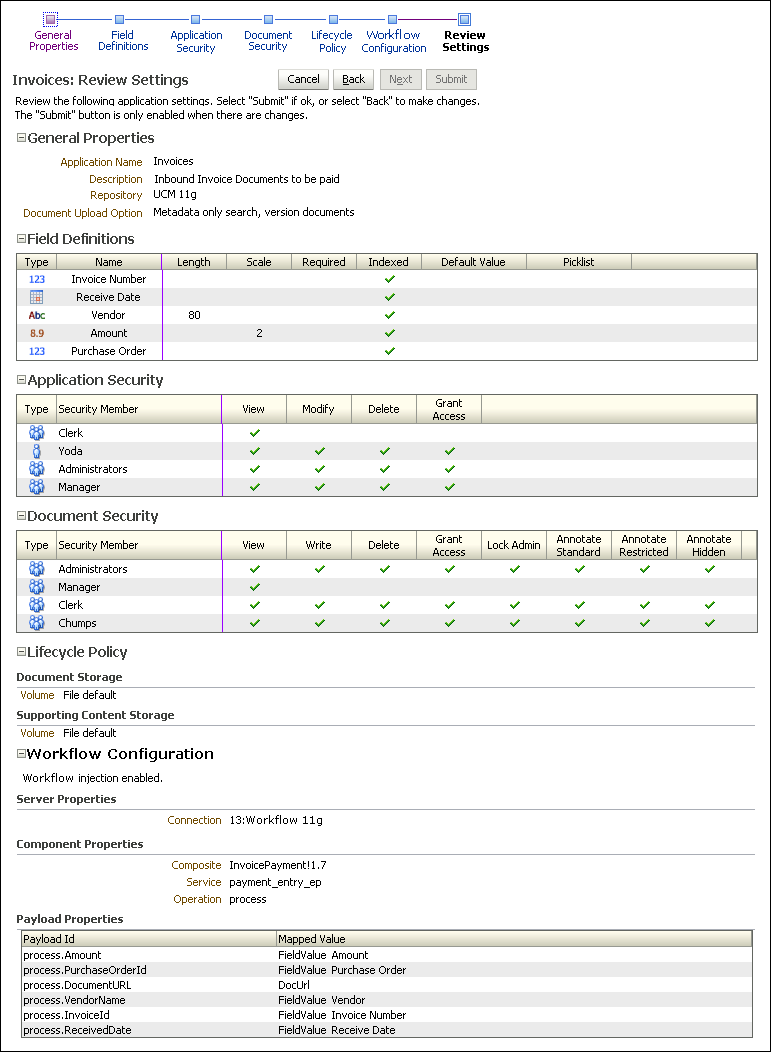
A.33 Application Review Settings Page
The Create Application Review Settings page allows you to check the settings defined in the application prior to creating the application. Access the Create Application Review Settings page by clicking Next on the Create Application Workflow Payload Properties page. To make any changes to the settings prior to submitting them, click Back or the appropriate link in the navigation train to return to the necessary page. When you are satisfied with the Application settings, click Submit.
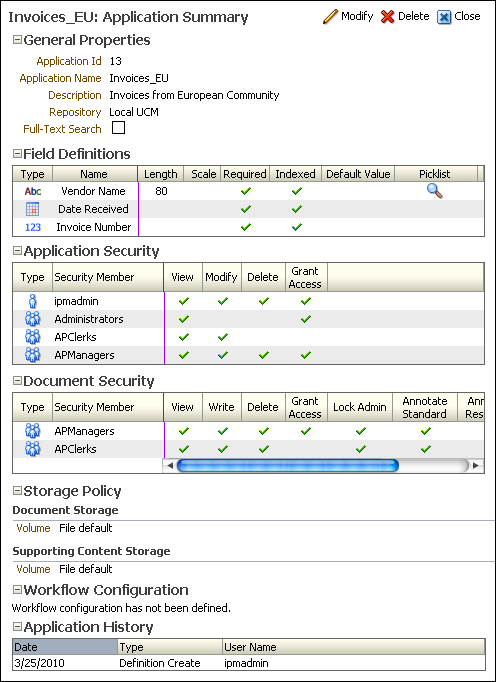
A.34 Application Summary Page
Review the details of the application you just created. Click Modify to go to the Application General Properties Page to change settings if necessary. Click the magnifying glass icon in the Picklist column to review the values of a picklist.
Access this page by clicking Submit on the Application Review Settings Page.
A.35 Input Basic Information Page
An input is a configuration that maps an input file to an application for doing bulk uploads to Oracle I/PM. Access the Create Input Basic Information page by clicking the Create Input icon on the Manage Inputs panel of the navigation pane.
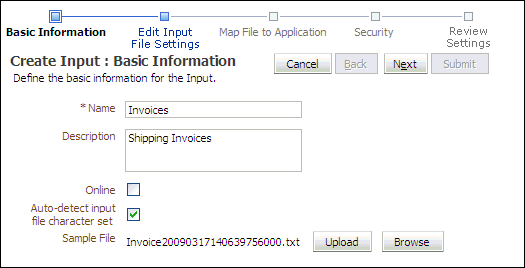
The following table describes the elements available on the page.
| Element | Description |
|---|---|
| Name | The name of the input. |
| Description | A brief description of the input. |
| Online | Select this field when you want the input agent to start its search for work. You can leave this field unselected until after you test the file. |
| Auto-detect input file character set | When enabled, the input file character set of the application is automatically detected. When this field is not selected, you can manually specify the input file character set and override the default character set of the application used in the input. |
| Sample File | A path to a sample text file that illustrates the content of an input for this input definition. Input Identify and Parse File Parameters Page and will be used when mapping columns in the file to application fields. |
| Upload | Click to upload a sample file on a local or shared drive to the samples directory on the server. |
| Browse | Click to select from a list of sample files in the samples directory of the server. |
A.36 Input Identify and Parse File Parameters Page
Specify the input mask, delimiter used to separate data, and the application to which the input file is being mapped. The contents of the sample input file is displayed in the Sample Data section of the page for reference.
The input mask supports regular expressions in addition to the * or ? characters for masks. For example, specifying an input mask of abc*|*.def pulls all files starting with abc or ending in .def. Specifying an input mask of [abc]try.lst pulls files atry.lst, btry.lst, and ctry.lst, but not dtry.lst.
WARNING:
Each input's mask should resolve to a unique set of input files that do not overlap the masks of other inputs. Input Agent only processes an input file for one input and will not restage a file to be processed again for a different input definition. The order in which inputs are processed is random so it is unknown as to which input will pick up a shared input file.
Access the Create Input Review Sample File page by clicking Next on the Input Basic Information Page.
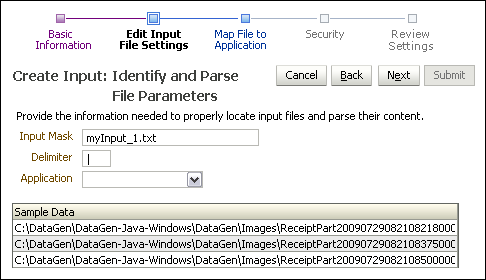
The following table describes the elements available on the page.
| Element | Description |
|---|---|
| Input Mask | This is the filter that the input agent uses to locate files for the input. |
| Delimiter | Specify the character that indicates the boundary between independent regions of data. |
| Application | Select the application to be mapped to the input file. |
| Sample Data | Displays contents of uploaded sample file. |
A.37 Input Field Mapping Page
This page facilitates mapping of the columns of data from input files into the correct fields of the target application. Access the Create Input Field Mapping page by clicking Next on the Input Identify and Parse File Parameters Page.
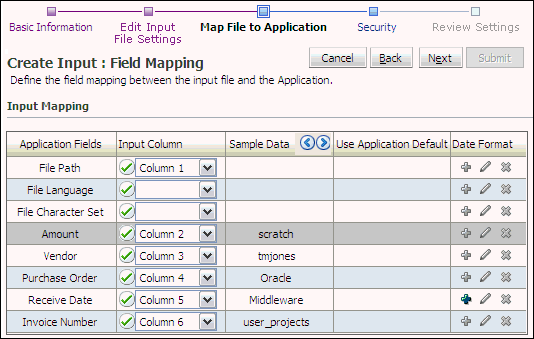
The following table describes the elements available on the page.
| Element | Description |
|---|---|
| Application Fields column | List of field names that are specific to the selected application. |
| Input Column | A green check mark in the radio button indicates that the mapping is good. A red X indicates that the mapping will not work and you must specify a different column. The picklist lets you choose the column in the input file that will be mapped to the specified data in the application. |
| Sample Data | After you select a column, the corresponding data from the sample input file will be displayed in the Sample Data column. Click the Show Previous Line or Show Next Line icon to see more data from the sample file. |
| Use Application Default | Enable to use the default value specified in the application if this value is blank in the input file. The check box is only displayed if the application defines a default value. |
| Date Format | Click the Add or Edit icons to access the date mask editing dialog. This dialog allows you to create a custom date mask for deciphering nonstandard date values in the input file. Click the Delete icon to remove the custom date mask. |
A.37.1 Define Date Format Page
The Define Date Format Page is displayed when clicking the Add a Date Format or Edit a Date Format icon in the Date Format column of the Input Field Mapping Page. Use the Define Date Format page to specify how the date is displayed. If no date format is specified, the default is to the format of the input agent server locale.
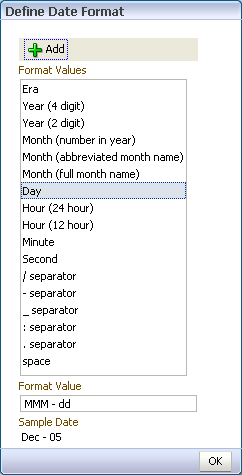
The following table describes the elements available on the page.
| Element | Description |
|---|---|
| Add | Click to add the selected format value to the to the Format Value field. Once added, an example is displayed in the Sample Date section. |
| Format Values | Select format values to add to the Format Value field to determine how a date will be displayed. Only one value can be selected at a time. Values are displayed in the order they are added to the Format Value field. Format value options are:
For example, if the Format Value field were populated with yyMMMdd - HH:mm:ss, the Sample Date would display 10Jan01 - 15:16:59 for a date and time of January 1st, 2010 at 5:16 and 59 seconds PM, based on the following Format Values being added in the following order:
|
A.38 Input Security Page
The Create Input: Security page is accessed by clicking Next on the Input Field Mapping Page.
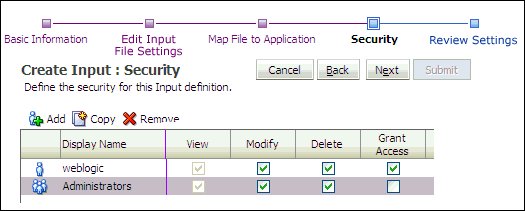
The following table describes the elements available on the page.
| Element | Description |
|---|---|
| Add | Displays the Add Security Member Page from which you can search for and select users or predefined security groups. |
| Copy | Selecting a user or group from the existing list and clicking Copy displays the Add Security Member Page and copies the permissions of the selected user or group to the next user or group added. |
| Remove | Removes the selected user or group from the list. |
A.39 Input Review Settings Page
The Input Review Settings page allows you to check the settings defined in the input wizard prior to creating the input. To make any changes to the settings prior to submitting them, click Back or the appropriate link in the navigation train to return to the desired page. When you are satisfied with the input settings, click Submit. The Input Summary Page is displayed.
The Input Review Settings page is accessed by clicking Next on the Input Security Page.
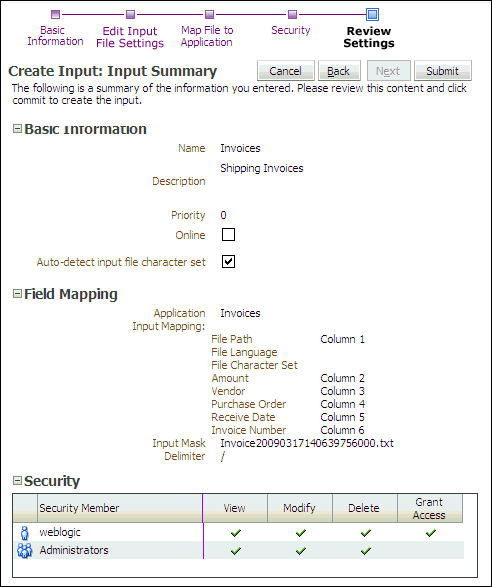
A.40 Input Summary Page
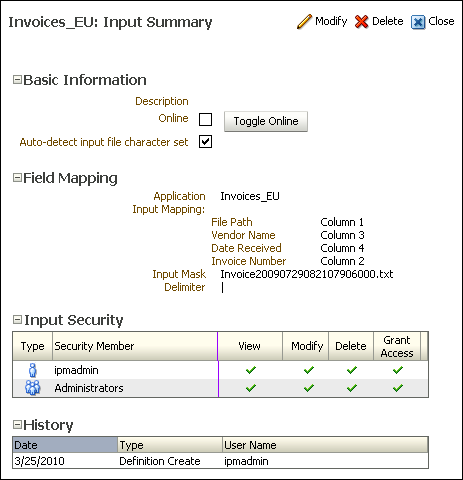
Review the details of the created input. Click Modify to go to the Input Basic Information Page to change settings if necessary. Click Toggle Online to tell the Input Agent to start polling the definition files of this input.
Access this page by clicking Submit on the Input Review Settings Page.
A.41 Content Server Connection Basic Information Page
Create and modify connections to an Oracle Content Server repository server by expanding the Manage Connections panel in the Navigator Pane. Click the Create New Connection icon or click an existing connection and click Modify to display the Connection Basic Information page.
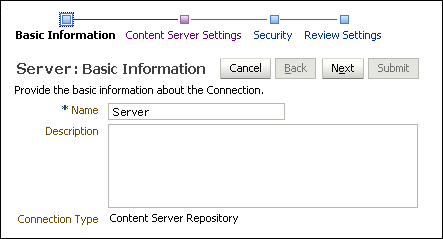
The following table describes the elements available on the page.
| Element | Description |
|---|---|
| Name | A name for the repository to which you are connecting. |
| Description | A brief description of the connection. |
| Connection Type | Identifies the type of connection. The type of connection cannot be changed once it is defined. |
A.42 Content Server Connection Content Server Settings Page
Specify the details of the Oracle Content Server repository to connect to on the Content Server Settings page. It is accessed by clicking Next on the Content Server Connection Basic Information Page when creating a new connection, or directly using the navigation train on any repository connection page for an existing connection.
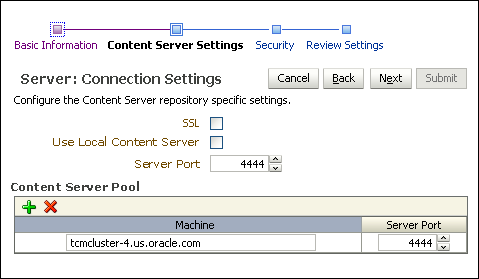
The following table describes the elements available on the page.
| Element | Description |
|---|---|
| SSL | Enable connection using Secure Socket Layer (SSL). Additional steps must be taken to configure SSL on Oracle Content Server and ensure proper credentials. For detailed information, see the full Oracle Fusion Middleware Administrator's Guide for Oracle Imaging and Process Management. |
| Use Local Content Server | Enable to specify localhost as the machine name and connect Oracle I/PM to the Oracle Content Server sharing the computer. Local communication offers the fastest connection option. If enabled, localhost is used exclusively unless a communication failure occurs. If there is a communication failure to localhost and a pool of Oracle Content Servers is defined, messages are sent to the machines named in the Oracle Content Server pool until communication to localhost resumes.
If Use Local Content Server is not enabled, then a pool of Oracle Content Servers must be defined and messages are sent to multiple Oracle Content Servers. This option is for load balancing in a clustered environment. |
| Server Port | Specifies the Oracle Content Server's remote API (RIDC) connection port. If the SSL option is checked, then the port provided must be the SSL listening port for the server. |
| Content Server Pool | Specify the machine names and connection ports for all Oracle Content Servers used remotely. Oracle Content Servers can be added to the pool for load balancing. |
| Machine Name | Specifies the host name or names used for the connection. It is the name or IP address of the server. |
A.43 Content Server Connection Security Page
Specify the connection definition security on Connection security page. It is accessed by clicking Next on the Content Server Connection Content Server Settings Page when creating a new connection, or directly using the navigation train on any connection page for an existing connection.
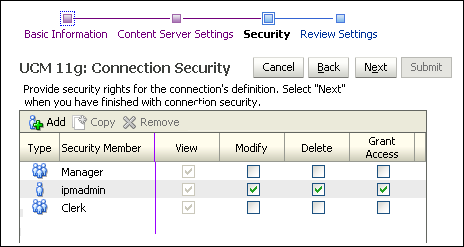
The following table describes the elements available on the page.
| Element | Description |
|---|---|
| Add | Displays the Add Security Member Page from which you can search for and select users or predefined security groups. |
| Copy | Selecting a user or group from the existing list and clicking Copy displays the Add Security Member Page and copies the permissions of the selected user or group to the next user or group added. |
| Remove | Removes the selected user or group from the list. |
| User/Group Icon | Displays a single person for a user and multiple persons for a group. |
| Display Name | The name of the user or group. |
| View | Enabled by default. Grants the user or group the right to view this connection. |
| Modify | Enable to grant the user or group the right to modify all aspects of this connection except for granting security rights. |
| Delete | Enable to grant the user or group the right to delete this connection. |
| Grant Access | Enable to grant a user or group the right to grant security rights to others for this connection. If this is the only security level granted, the user can modify only the security information for this connection. |
A.44 Content Server Connection Review Settings Page
Review connection settings prior to submitting the connection on the Review Settings page. Access the Review Settings by clicking Next on the Content Server Connection Security Page when creating a new connection, or directly in the navigation train on any connection page when modifying an existing connection.
If settings need to be changed, navigate to the connection page to make the changes either by clicking Back or by clicking the needed page in the navigation page. Once you are satisfied with your settings, click Submit. The Content Server Connection Summary Page is displayed.
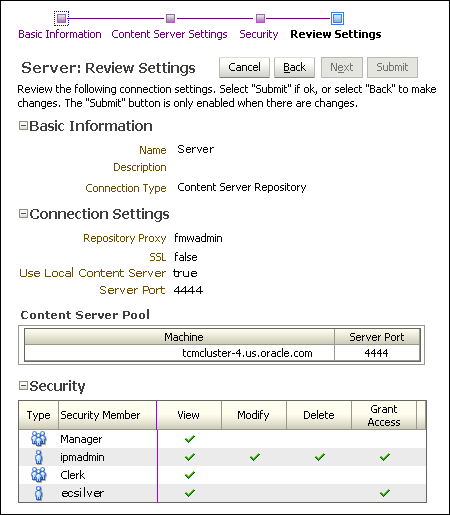
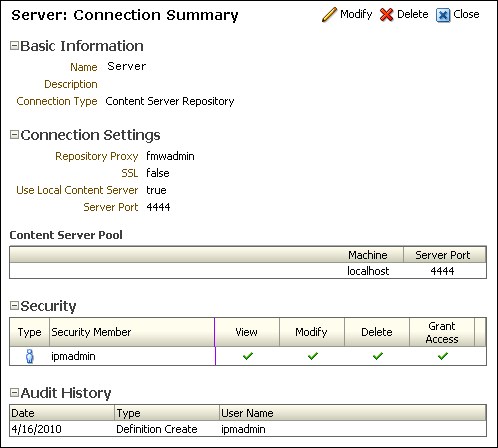
A.45 Content Server Connection Summary Page
The Connection Summary page is accessed by clicking Submit on the Content Server Connection Review Settings Page. Review the details of the created connection. Click Modify to go to the Content Server Connection Basic Information Page to change settings if necessary.
A.46 Workflow Connection Basic Information Page
Create and modify connections to a workflow server by expanding the Manage Connections panel in the Navigator Pane. Click the Create New Connection icon or click an existing connection and click Modify to display the Workflow Connection Basic Information page.
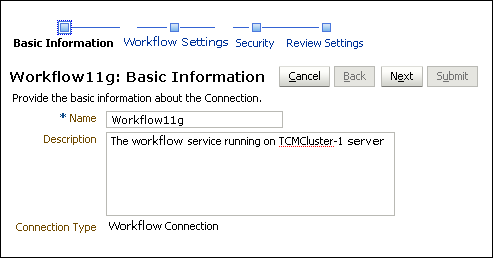
The following table describes the elements available on the page.
| Element | Description |
|---|---|
| Name | Provide a unique name for this connection. |
| Description | A brief description of the connection. |
| Connection Type | Identifies the type of connection. |
A.47 Workflow Connection Settings Page
Specify the details of the workflow server to connect to on the Workflow Connection Settings page. It is accessed by clicking Next on the Workflow Connection Basic Information Page when creating a new connection, or directly using the navigation train on any Content Server connection page for an existing workflow connection.
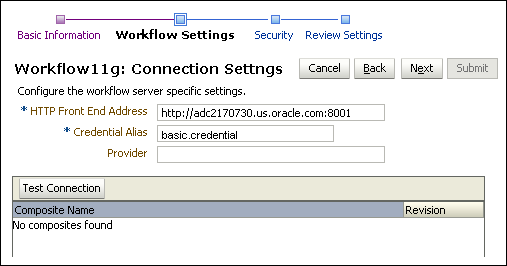
The following table describes the elements available on the page.
| Element | Description |
|---|---|
| HTTP Front End Address | The URL address of the workflow server, including the listening port if it is not the default port for the protocol defined in the URL. |
| Credential Alias | Provides the alias for username and password credentials encrypted in the credential store. These credentials are used when making the remote connection to the workflow server and must reference a username and password with appropriate permissions in the workflow system, not Oracle I/PM.
This credential must be created in the credential store before the workflow connection configuration can be completed. A credential can be created in the credential store in one of two ways: through Fusion Middleware Control or through WLST. |
| Provider | Specifies the host name or names used for the connection. If the workflow server is a single instance, it is the name or IP of the workflow machine. If the workflow server is operating within a cluster, this parameter value can be a comma-separated list of machine names or IP addresses of servers in the cluster, or it can be the cluster name for the cluster.
When a cluster name is used, the name must be defined in DNS to resolve to the multiple machines within the cluster. Neither Oracle I/PM nor SOA defines this behavior. Rather, it is defined by the Oracle WebLogic Server support for JNDI in a cluster. |
| Test Connection | Click to test if connection settings are configured correctly. A dialog box is displayed indicating whether or not the connection test was successful. If successful, the available composites deployed on the workflow server are also displayed in a list at the bottom. |
A.48 Workflow Connection Security Page
Specify the connection definition security on Connection security page. It is accessed by clicking Next on the Workflow Connection Settings Page when creating a new connection, or directly using the navigation train on any connection page for an existing connection.
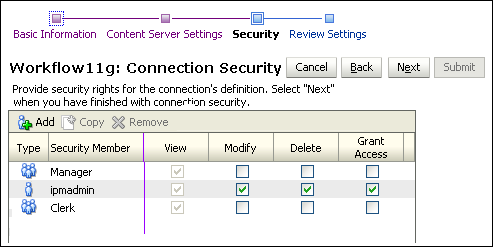
The following table describes the elements available on the page.
| Element | Description |
|---|---|
| Add | Displays the Add Security Member Page from which you can search for and select users or predefined security groups. |
| Copy | Selecting a user or group from the existing list and clicking Copy displays the Add Security Member Page and copies the permissions of the selected user or group to the next user or group added. |
| Remove | Removes the selected user or group from the list. |
| User/Group Icon | Displays a single person for a user and multiple persons for a group. |
| Display Name | The name of the user or group. |
| View | Enabled by default. Grants the user or group the right to view this connection. |
| Modify | Enable to grant the user or group the right to modify all aspects of this connection except for granting security rights. |
| Delete | Enable to grant the user or group the right to delete this connection. |
| Grant Access | Enable to grant a user or group the right to grant security rights to others for this connection. If this is the only security level granted, the user can modify only the security information for this connection. |
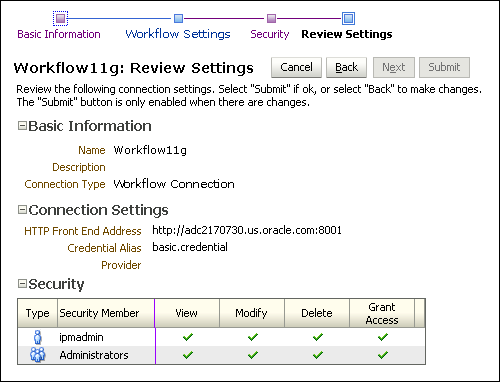
A.49 Workflow Connection Review Settings Page
Review connection settings prior to submitting the connection on the Review Settings page. Access the Review Settings by clicking Next on the Workflow Connection Security Page when creating a new connection, or directly in the navigation train on any workflow connection page when modifying an existing connection.
If settings need to be changed, navigate to the connection page to make the changes either by clicking Back or by clicking the needed page in the navigation page. Once you are satisfied with your settings, click Submit. The Workflow Connection Summary Page is displayed.
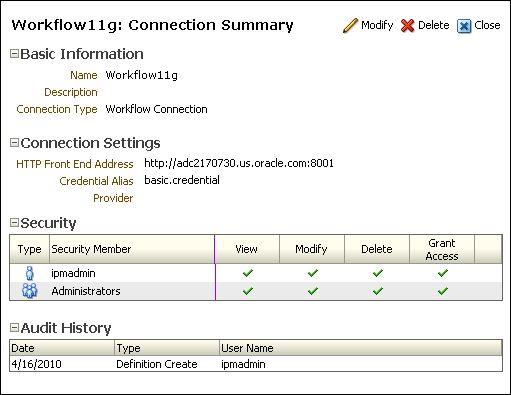
A.50 Workflow Connection Summary Page
The Workflow Summary page is accessed by clicking Submit on the Workflow Connection Review Settings Page. Review the details of the created connection. Click Modify to go to the Workflow Connection Basic Information Page to change settings if necessary.
A.51 Definition Management Security
Create and modify the top level security settings for applications, inputs, searches, and connections by selecting the appropriate category in the Manage Security panel in the navigator pane.
Access the Manage Security pages by clicking the expand icon on the Manage Security panel in the navigator pane.
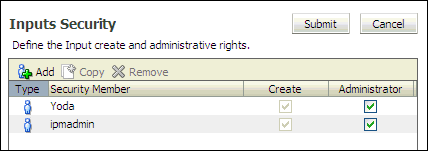
The following table describes the elements available on the page.
| Element | Description |
|---|---|
| Create | Select to assign Create permission to a user which allows the user to create an application, input, search, or connection. |
| Administrator | Select to assign a user permission to view, create, modify, and delete an application, input, search, or connection. |