| Oracle® Shared Shell User's Guide Release 4.3.2 Part Number E22458-01 |
|
|
PDF · Mobi · ePub |
| Oracle® Shared Shell User's Guide Release 4.3.2 Part Number E22458-01 |
|
|
PDF · Mobi · ePub |
This procedure covers logging in for Oracle Shared Shell clients who do not require a proxy to reach the Internet. In this procedure, you are the initiator of the session. A likely scenario is that you contacted Oracle for technical support and a technical support engineer is on the phone. The technical support engineer asks you to launch an Oracle Shared Shell session.
To login, perform the following steps:
From a web browser, go to: http://oracle.com/123
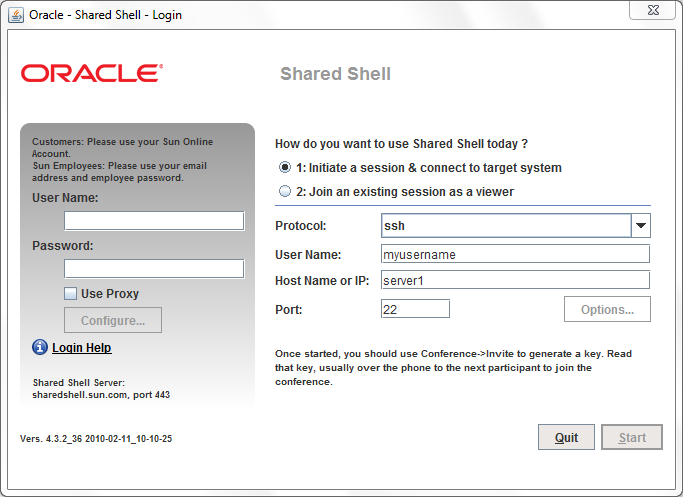
Click the orange Launch button. The Shared Shell Login screen appears:

Do one of the following:
If you are not an Oracle employee, type your Sun Online Account user name and password.
Note:
If you do not have a Sun Online Account, go to https://reg.sun.com. If you forget your password or need help with your account, go to https://reg.sun.com/accounthelp.If you are an Oracle employee, enter your Oracle Single Sign On login information.
Make sure the Use Proxy box is deselected.
Note:
If you receive error messages such as "Unable to resolve Shared Shell server ..." or "Failure communicating with Shared Shell Server ...", you may be on a network that requires a proxy server. See "Initiating a Conference With a Proxy" for more information.Answer the question "How do you want to use Shared Shell today?" by selecting option 1: Initiate a session & connect to target system.
Choose Telnet or SSH in the Protocol field, depending on how you plan to connect to the target system.
If you are making an SSH connection, type into the User Name field the user name you plan to use to log in to the target system.
Do one of the following:
If you are initiating this session from the target system, type localhost in the Host Name or IP Address field.
If the initiator system and the target system are different, type the IP address or the host name of the target machine.
If your target system runs Telnet (port 23) or SSH (port 22) on a standard port, leave the Port field blank or accept the default. If it uses a nonstandard port (typical of terminal servers or serial console concentrators), type the appropriate port.
Click Start or press 'Enter' button.
If you are making a Telnet connection, the Terminal pane appears. Type your login and password as you would for any other Telnet connection.
If you are making an SSH connection, you might be prompted with the target server key fingerprint and you might be prompted for the password to use for SSH authentication in a dialog box. If so, type your password.
This procedure covers logging in for Oracle Shared Shell clients who require a proxy to reach the internet. In this procedure, you are the initiator of the session. A likely scenario is that you contacted Oracle for technical support and a technical support engineer is on the phone. The support engineer asks you to launch a Shared Shell session.
To log in, perform the following steps:
From a web browser, go to: http://oracle.com/123
Click the orange Launch button. The Shared Shell Login screen appears (see sample login screen above).
Do one of the following:
If you are not an Oracle employee, type your Sun Online Account user name and password.
Note:
If you do not have a Sun Online Account, go to https://reg.sun.com. If you forget your password or need help with your account, go to https://reg.sun.com/accounthelp.If you are an Oracle employee, enter your Oracle Single Sign On login information.
Make sure the Use Proxy box is selected.
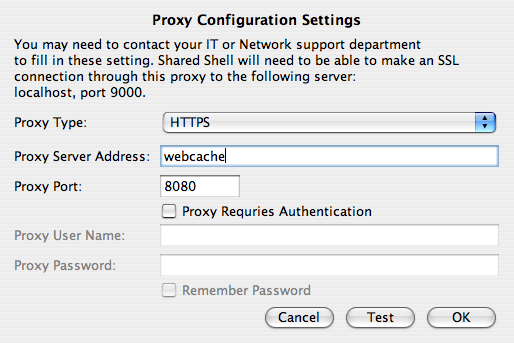
Click the Configure button to supply the proxy information. The Proxy Configuration dialog opens:

Make sure that you have gathered the proxy information, as explained in "Information to Gather Before Using Shared Shell".
Choose HTTPS or SOCK5 in the Proxy Type field.
Type the proxy server address into the Proxy Server Address field.
Type the port number into the Proxy Port field.
If your proxy requires authentication, select the Proxy Requires Authentication check box, and complete the following two steps:
Type the proxy user name in the Proxy User Name field.
Type the password in the Proxy Password field.
You can optionally choose to have the system remember the proxy user name and password for future sessions by selecting the Remember Password check box.
If you want to test your proxy entries before initiating the session, click Test or if you want to return to the login screen without testing your proxy entries, click OK.
Answer the question "How do you want to use Shared Shell today?" by selecting option 1: Initiate a session & connect to target system.
Choose Telnet or SSH in the Protocol field, depending on how you plan to connect to the target system.
If you are making an SSH connection, type into the User Name field the user name you plan to use to log in to the target system.
Do one of the following:
If you are initiating this session from the target system, type localhost in the Host Name or IP Address field.
If the initiator system and the target system are different, type the IP address or the host name of the target machine.
If your target system runs Telnet (port 23) or SSH (port 22) on a standard port, leave the Port field blank or accept the default. If it uses a nonstandard port (typical of terminal servers or serial console concentrators), type the appropriate port.
Click Start or press 'Enter' button.
If you are making a Telnet connection, the Terminal pane appears. Type your login and password as you would for any other Telnet connection.
If you are making an SSH connection, you might be prompted with the target server key fingerprint and you might be prompted for the password to use for SSH authentication in a dialog box. If so, type your password.
This procedure covers joining a conference as a participant.
Login to Oracle Shared Shell
Answer the question "How do you want to use Shared Shell today?" by selecting 2, Join an existing session as a viewer.
Enter the invitation key provided by the conference initiator.
Click Start or press 'Enter' button.
If your connection is successful, a grayed-out Terminal pane and a status message about waiting for approval appears.
When the initiator approves your joining, you will see the Initiator information dialog. You can verify that is the intended customer and decide to continue with the session or end it.
If you continue, your Terminal pane becomes active and you see the list of other conference participants in the Participants pane.If you enter an invalid invitation key or if the initiator does not approve your joining, the Login/Splash screen reappears, and you should try joining again.
To invite an Oracle Support Services engineer or a coworker from your company, to join the conference:
Select Conference -> Invite.
The Invite Participant window appears.
Contact an Oracle Support Services engineer outside of Oracle Shared Shell, such as by telephone or email, and provide the key displayed in the Invitation Key field.
The Oracle Support Services engineer types the invitation key into the Oracle Shared Shell application.
When the Oracle Support Services engineer's name appears in the Waiting to Join box, click Allow.
You can use the same invitation key to invite additional participants. When a participant requests to join the session, the Invite Participant window will appear and you can Allow or Deny the request.
Note that the invitation key will expire after 2 hours.
Oracle Shared Shell will return different types of messages depending on the task you are trying to accomplish. Common system and error messages are explained below.
This message means that the target system is refusing your Telnet or SSH connection. If you chose Telnet, try switching to SSH, or vice versa. Oracle Shared Shell needs to make a direct connection from the initiator system to the target system using SSH or Telnet.
This message indicates that you are being shown the SSH key fingerprint of the target system in order to verify the authenticity and security of the connection. This is a feature of the SSH protocol designed to protect against spoofing by showing you a fingerprint of the unique server key that you can match and verify. If verified, this ensures your username and password are not transmitted to a hostile server. The next dialog will prompt whether you want to create a known_hosts file in your Shared Shell directory so that you are only prompted for this key/fingerprint verification once per host.
This message generally displays when you have an old version of Java 1.4.2 installed on your system, possibly alongside a newer version of Java. Oracle Shared Shell uses a production Oracle/Verisign certificate, but this root certificate and chain is only supported in Java 1.4.2_06 and newer. Note that this may be true even if you check our "Verify your Java installation" link and it shows an up-to-date version of Java. This is because the Java installer allows multiple versions of the SDK and Java Runtime to be installed at the same time.
You should remove older/unused versions of Java:
On Windows, use Start -> Control Panel -> Add/Remove Programs and remove all but the most recent version of Java. On other platforms, this is typically configured through your PATH or environment settings.
On Solaris, make sure your /usr/java symbolic link points to the most recent version of Java you have installed.
This error message means Java Web Start was unable to connect to the Shared Shell server to download the application. The exact error message can usually be found by clicking Details and checking the Wrapped Exception tab. Error messages like "java.net.UnknkownHostException: sharedshell.sun.com" or "java.net.ConnectionException: Connection timed out: connect" usually indicate you need to set up a Proxy Server configuration for Java. By default Java Web Start will try to use your browser proxy settings, but in some cases you will need to configure it manually, depending on your platform:
Microsoft Windows: Use Start -> Control Panel -> Java -> Network Settings. Then check Use a Proxy Server and enter your proxy server name and proxy port number, such as "webcache" and "8080." Click OK, then OK again to close the preferences application.
Solaris, Linux, or other UNIX: run javaws. Use Edit -> Preferences -> Network Settings. Then check Use a Proxy Server and enter your proxy server name and proxy port number, such as "webcache" and "8080." Click OK, then OK again to close the preferences application.
Apple MacOS X: will use the proxy settings from your Network panel in System Preferences. Select your currently-active interface, such as "AirPort" or "Built-in Ethernet," click Configure, then Proxies. Then check the boxes for at least "Web Proxy (HTTP)" and "Secure Web Proxy (HTTPS)" and enter the proxy server name and port for each of those, like "webcache" and "8080."