4 Extending the Functionality of the Salesforce Connector

You can extend the functionality of the connector to address your specific business requirements.

This chapter discusses the following topics:

Note:

From Oracle Identity Manager Release 11.1.2 onward, lookup queries are not supported. See Managing Lookups in Oracle Fusion Middleware Administering Oracle Identity Manager for information about managing lookups by using the Form Designer in the Oracle Identity System Administration.

4.1 Adding New User or Group Attributes for Reconciliation

The connector provides a default set of attribute mappings for reconciliation between Oracle Identity Manager and the target system. If required, you can add new user or group attributes for reconciliation.

4.1.1 Adding New Attributes on the Process Form

You add a new attribute on the process form in the Form Designer section of Oracle Identity Manager Design Console.

  1. Log in to the Oracle Identity Manager Design Console.
  2. Add the new attribute on the process form as follows:
    1. Expand Development Tools, and then double-click Form Designer.
    2. Search for and open one of the following process forms:
      • For Users: UD_SF_USR

      • For Groups: UD_SF_GRP

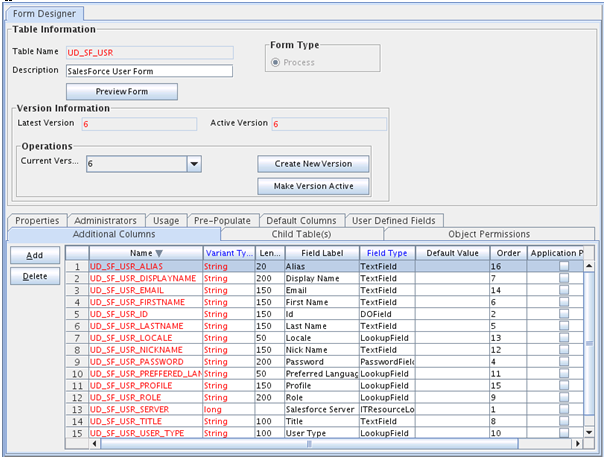
    3. Click Create New Version, and then click Add.
    4. Enter the details of the field.
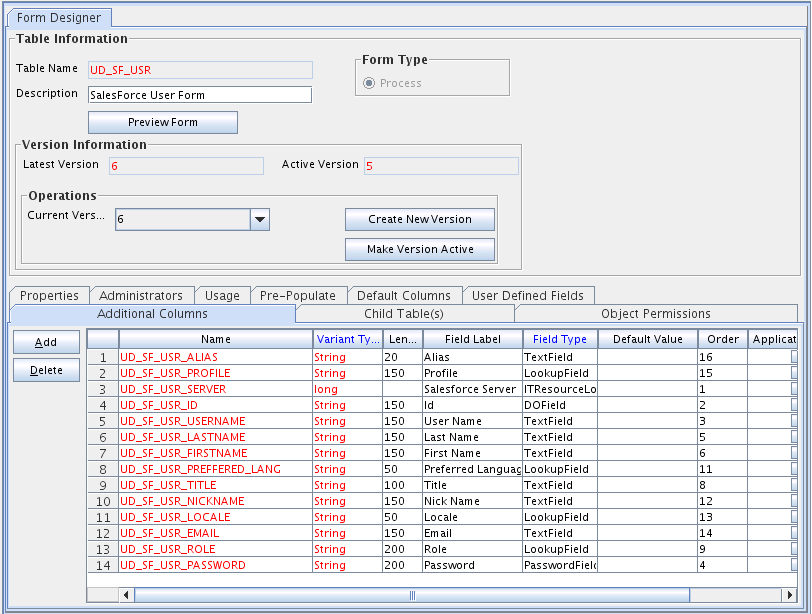
      For example, if you are adding the ALIAS field, enter UD_SF_USR_ALIAS in the Name field and then enter other details such as Variable Type, Length, Field Label, and Field Type.
    5. Click the Save icon, and then click Make Version Active. The following screenshot shows the new field added to the process form.

4.1.2 Adding Attributes to Reconciliation Fields

You can add the new attribute to the resource object's list of reconciliation fields in the Resource Objects section of Oracle Identity Manager Design Console.

  1. Expand Resource Management, and double-click Resource Objects.
  2. Search for and open one of the following resource objects:
    • For Users: Salesforce User
    • For Groups: Salesforce Groups
  3. On the Object Reconciliation tab, click Add Field.
  4. Enter the details of the field.
    For example, enter ALIAS in the Field Name field and select String from the Field Type list.
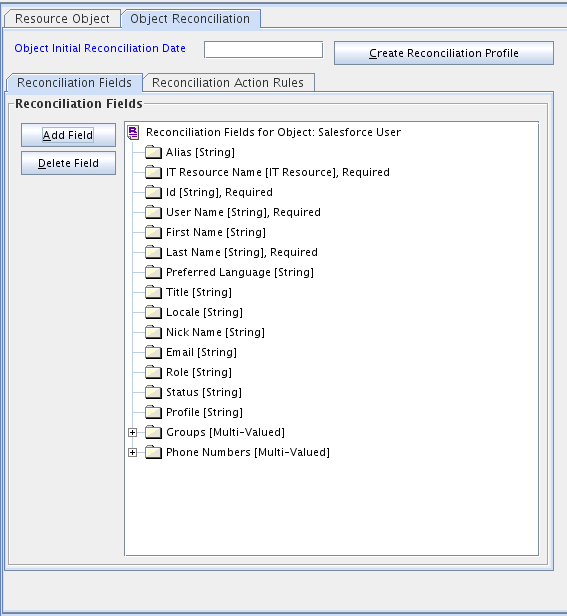
  5. Click the Save icon. The following screenshot shows the new reconciliation field added to the resource object:

    Figure 4-2 Object Reconciliation Tab

    Description of Figure 4-2 follows
    Description of "Figure 4-2 Object Reconciliation Tab"

4.1.3 Creating Reconciliation Field Mapping

You create a reconciliation field mapping for the new attribute in the Process Definition section of Oracle Identity Manager Design Console.

  1. Expand Process Management, and double-click Process Definition.
  2. Search for and open one of the following process definitions:
    • For Users: Salesforce Users
    • For Groups: Salesforce Groups
  3. On the Reconciliation Field Mappings tab of the Salesforce User process definition, click Add Field Map.
  4. From the Field Name list, select the field that you want to map.
  5. Double-click the Process Data Field field, and then select the column for the attribute. For example, select UD_SF_USR_ALIAS.
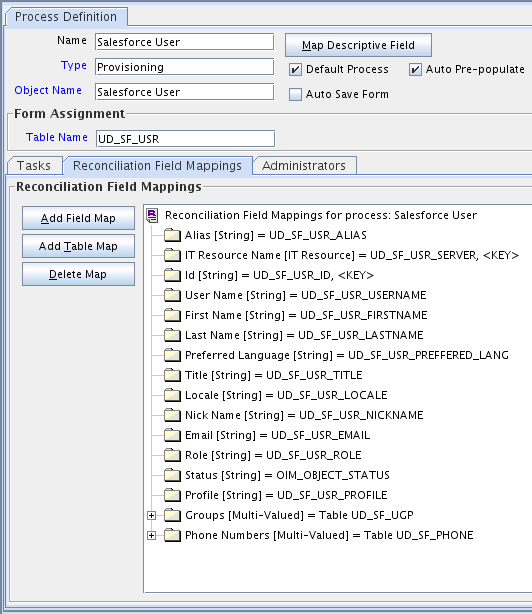
  6. Click the Save icon. The following screenshot shows the new reconciliation field mapped to a process data field in the process definition:

    Figure 4-3 Process Definition Tab

    Description of Figure 4-3 follows
    Description of "Figure 4-3 Process Definition Tab"

4.1.4 Creating Entries in Lookup Definitions

You create an entry for the newly added attribute in the lookup definition that holds attribute mappings for reconciliation.

  1. Expand Administration.
  2. Double-click Lookup Definition.
  3. Search for and open one of the following lookup definitions:
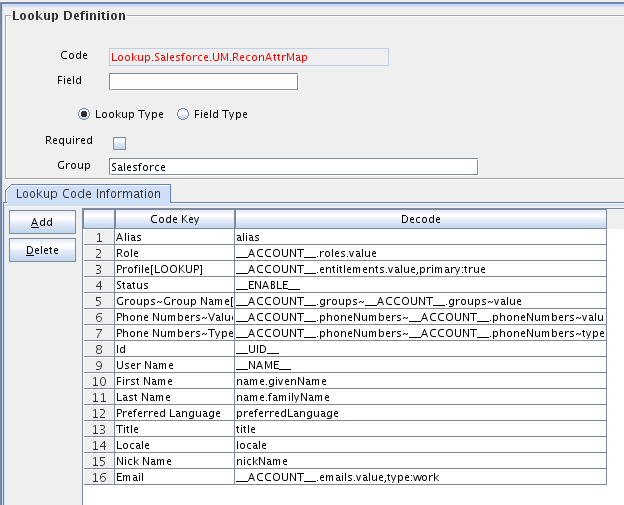
    • For Users: Lookup.Salesforce.UM.ReconAttrMap

    • For Groups: Lookup.Salesforce.GM.Recon.AttrMap

  4. Click Add and enter the Code Key and Decode values for the field. The Code Key value must be the name of the field in the resource object.
  5. Click the Save icon. The following screenshot shows the entry added to the lookup definition:

    Figure 4-4 Lookup Definition Page

    Description of Figure 4-4 follows
    Description of "Figure 4-4 Lookup Definition Page"

4.1.5 Performing Changes in a New UI Form

You must replicate all changes made to the Form Designer of the Design Console in a new UI form.

  1. Log in to Oracle Identity System Administration.
  2. Create and activate a sandbox. See  Creating a Sandbox and Activating a Sandbox in Oracle Fusion Middleware Developing and Customizing Applications for Oracle Identity Manager.
  3. Create a new UI form to view the newly added field along with the rest of the fields. See Creating Forms by Using the Form Designer in Oracle Fusion Middleware Administering Oracle Identity Manager.
  4. Associate the newly created UI form with the application instance of your target system. To do so, open the existing application instance for your resource, from the Form field, select the form, and then save the application instance.
  5. Publish the sandbox. See Publishing a Sandbox in Oracle Fusion Middleware Developing and Customizing Applications for Oracle Identity Manager.

4.2 Adding New User or Group Attributes for Provisioning

The connector provides a default set of attribute mappings for provisioning between Oracle Identity Manager and the target system. If required, you can add new user or group attributes for provisioning.

The default attribute mappings for provisioning are listed in Table 1-13 and  Table 1-17.

The following topics discuss the procedure to add new user or group attributes for provisioning:

4.2.1 Adding New Attributes for Provisioning

You add a new attribute on the process form in the Form Designer section of Oracle Identity Manager Design Console.

Note:

If you have already added an attribute for reconciliation, then you need not repeat steps performed as part of that procedure.
  1. Log in to the Oracle Identity Manager Design Console.
  2. Expand Development Tools, and double-click Form Designer.
  3. Search for and open one of the following the process forms:
    • For Users: UD_SF_USR
    • For Groups: UD_SF_GRP
  4. Click Create New Version, and then click Add.
  5. Enter the details of the attribute.
    For example, if you are adding the ALIAS field, enter UD_SF_USR_ALIAS in the Name field, and then enter the rest of the details of this field.
  6. Click the Save icon, and then click Make Version Active.
    The following screenshot shows the new field added to the process form

    Figure 4-5 New Field Added to the Process Form

    Description of Figure 4-5 follows
    Description of "Figure 4-5 New Field Added to the Process Form"

4.2.2 Creating Entries in Lookup Definitions for Provisioning

You create an entry for the newly added attribute in the lookup definition that holds attribute mappings for provisioning.

  1. Expand Administration.
  2. Double-click Lookup Definition.
  3. Search for and open one of the following lookup definitions:
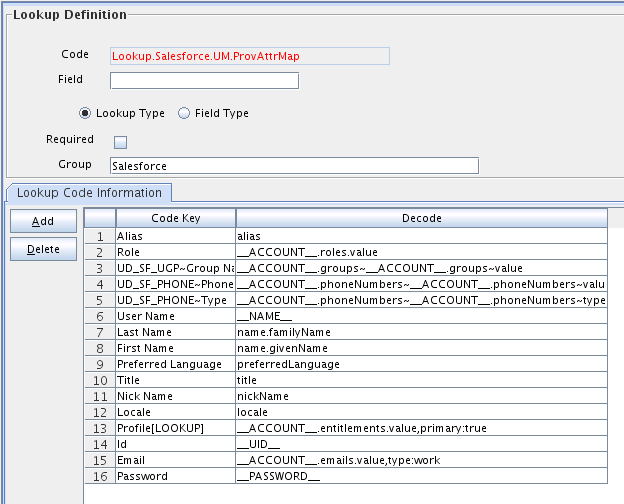
    • For Users: Lookup.Salesforce.UM.ProvAttrMap
    • For Groups: Lookup.Salesforce.GM.ProvAttrMap
  4. Click Add and then enter the Code Key and Decode values for the attribute.
    For example, enter Alias in the Code Key column and then enter alias in the Decode column. The following screenshot shows the entry added to the lookup definition:

    Figure 4-6 Entry Added to the Lookup Definition

    Description of Figure 4-6 follows
    Description of "Figure 4-6 Entry Added to the Lookup Definition"

4.2.3 Creating a Task to Enable Update Operations

Create a task to enable updates on the new user or group attribute during provisioning operations.

If you do not perform this procedure, then you will not be able to modify the value of the attribute after you set a value for it during the Create User provisioning operation.
To enable the update of the attribute during provisioning operations, add a process task for updating the new user or group attribute as follows:
  1. Expand Process Management, and double-click Process Definition.
  2. Search for and open one of the following process definitions:
    • For Users: Salesforce User
    • For Groups: Salesforce Group
  3. Click Add.
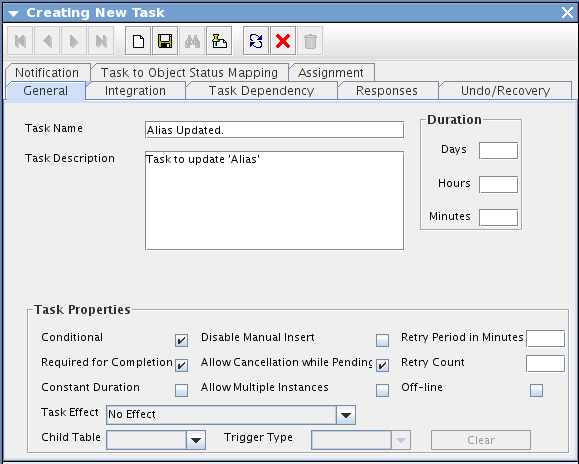
  4. On the General tab of the Creating New Task dialog box, enter a name and description for the task and then select the following:
    • Conditional
    • Required for Completion
    • Allow Cancellation while Pending
    • Allow Multiple Instances
  5. Click the Save icon.
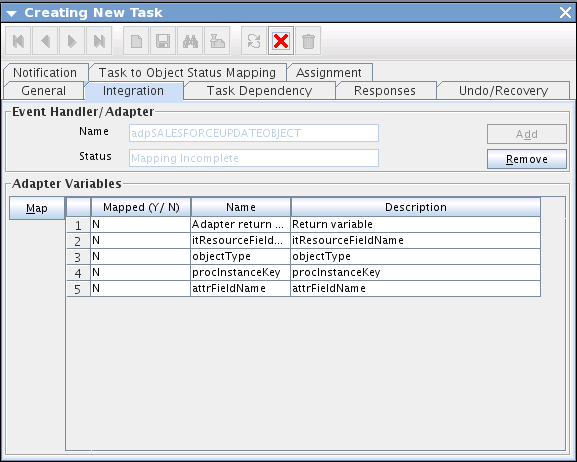
    The following screenshot shows the new task added to the process definition:

    Figure 4-7 New Task Added to the Process Definition

    Description of Figure 4-7 follows
    Description of "Figure 4-7 New Task Added to the Process Definition"
  6. In the provisioning process, select the adapter name in the Handler Type section as follows:
    1. On the Integration tab of the Creating New Task dialog box, click Add.
    2. In the Handler Selection dialog box, select Adapter, click adpSALESFORCEUPDATEOBJECT, and then click the Save icon.
      The list of adapter variables is displayed on the Integration tab. The following screenshot shows the list of adapter variables:

      Figure 4-8 List of Adapter Variables

      Description of Figure 4-8 follows
      Description of "Figure 4-8 List of Adapter Variables"
  7. In the Adapter Variables region, click the ParentFormProcessInstanceKey variable.
  8. In the dialog box that is displayed, create the following mapping:
    • Variable Name: ParentFormProcessInstanceKey

    • Map To: Process Data

    • Qualifier:Process Instance

  9. Click Save and close the dialog box.
  10. If you are enabling update provisioning operations for a User attribute, then repeat Steps 7 through 9 for the remaining variables listed in the Adapter Variables region. 
    The following table lists values that you must select from the Map To, Qualifier, and Literal Value lists for each variable:
    Variable Map To Qualifier Literal Value

    Adapter Return Value

    Response Code

    NA

    NA

    Object Type

    Literal

    String

    User

    itResourceFieldName

    Literal

    String

    UD_SF_USR_SERVER

    attributeFieldName

    Literal

    String

    Alias

  11. If you are enabling update provisioning operations for a Group attribute, then repeat Steps 7 through 9 for the remaining variables listed in the Adapter Variables region.
    The following table lists values that you must select from the Map To, Qualifier, and Literal Value lists for each variable:
    Variable Map To Qualifier Literal Value

    ParentFormProcessInstanceKey

    Process Data

    Process Instance

    NA

    Adapter Return Value

    Response Code

    NA

    NA

    Object Type

    Literal

    String

    Group

    itResourceFieldName

    Literal

    String

    UD_SF_GRP_SERVER

    attributeFieldName

    Literal

    String

    NAME_OF_THE_NEW_GROUP_ATTRIBUTE

  12. On the Responses tab, click Add to add at least the SUCCESS response code, with Status C. This ensures that if the task is successfully run, then the status of the task is displayed as Completed.
  13. Click the Save icon and close the dialog box, and then save the process definition.

4.2.4 Replicating Form Designer Changes to a New UI Form

You must replicate all changes made to the Form Designer of the Design Console in a new UI form.

  1. Log in to Oracle Identity System Administration.
  2. Create and activate a sandbox. See Creating a Sandbox and Activating a Sandbox in Oracle Fusion Middleware Developing and Customizing Applications for Oracle Identity Manager.
  3. Create a new UI form to view the newly added field along with the rest of the fields. See Creating Forms by Using the Form Designer in Oracle Fusion Middleware Administering Oracle Identity Manager.
  4. Associate the newly created UI form with the application instance of your target system. To do so, open the existing application instance for your resource, from the Form field, select the form, and then save the application instance.
  5. Publish the sandbox. See Publishing a Sandbox in Oracle Fusion Middleware Developing and Customizing Applications for Oracle Identity Manager.

4.3 Configuring Validation of Data During Reconciliation and Provisioning

You can configure validation of reconciled and provisioned single-valued data according to your requirements.

You can configure validation of reconciled and provisioned single-valued data according to your requirements. For example, you can validate data fetched from the User Name attribute to ensure that it does not contain the number sign (#). In addition, you can validate data entered in the User Name field on the process form so that the number sign (#) is not sent to the target system during provisioning operations.
For data that fails the validation check, the following message appears or recorded in the log file:
Validation failed for attribute ATTRIBUTE_NAME.

Note:

This feature cannot be applied to the Locked/Unlocked status attribute of the target system.
To configure validation of data:
  1. Write code that implements the required validation logic in a Java class.
    The validation class must implement validate method with the following method signature:
    boolean validate(HashMap hmUserDetails, HashMap 
    hmEntitlementDetails, String field)

    The following sample validation class checks if the value in the User Name attribute contains the number sign (#):

    public boolean validate(HashMap hmUserDetails,
        HashMap hmEntitlementDetails, String 
       field) { /*
        *   You must write code to validate attributes. Parent
        *   data values can be fetched by using hmUserDetails.get(field)
        *   For child data values, loop through the
        *   ArrayList/Vector fetched by hmEntitlementDetails.get("Child Table")
        *   Depending on the outcome of the validation operation,
        *   the code must return true or false.
           */
           /*
           *        In this sample code, the value "false" is returned if the 
           field
           *        contains the number sign (#). Otherwise, the value "true" 
           is
           *        returned.
            */
               boolean valid=true;
               String sUserName=(String) hmUserDetails.get(field); for(int 
       i=0;i<sUserName.length();i++){
         if (sUserName.charAt(i) == '#'){
             valid=false;
             break;
                    }
                    }
              return valid;
                }    
  2. Create a JAR file to hold the Java class.
  3. Copy the JAR file to Oracle Identity Manager database.
    Run the Oracle Identity Manager Upload JARs utility to post the JAR file to the Oracle Identity Manager database. This utility is copied into the following location when you install Oracle Identity Manager:

    Note:

    Before you use this utility, verify that the WL_HOME environment variable is set to the directory in which Oracle WebLogic Server is installed.
    • For Microsoft Windows: OIM_HOME/server/bin/UploadJars.bat

    • For UNIX: OIM_HOME/server/bin/UploadJars.sh

    When you run the utility, you are prompted to enter the login credentials of the Oracle Identity Manager administrator, URL of the Oracle Identity Manager host computer, context factory value, type of JAR file being uploaded, and the location from which the JAR file is to be uploaded. Specify 1 as the value of the JAR type.
  4. If you created the Java class for validating a process form field for reconciliation, then:
    1. Log in to the Design Console.
    2. Create a lookup definition named Lookup.Salesforce.UM.ReconValidation.
    3. Save the changes to the lookup definition.
    4. Search for and open the Lookup.Salesforce.UM.Configuration lookup definition.
    5. Save the changes to the lookup definition.
  5. If you created the Java class for validating a process form field for provisioning, then:
    1. Log in to the Design Console.
    2. Create a lookup definition named Lookup.Salesforce.UM.ProvValidation.
    3. In the Code Key column, enter the process form field name. For example, User Name. In the Decode column, enter the class name. For example, org.identityconnectors.Salesforce.extension.
    4. Save the changes to the lookup definition.
    5. Search for and open the Lookup.Salesforce.UM.Configuration lookup definition.
    6. Save the changes to the lookup definition.

4.4 Configuring Transformation of Data During User Reconciliation

You can configure transformation of reconciled single-valued account data according to your requirements.

For example, you can use User Name and Last Name values to create a value for the Full Name field in Oracle Identity Manager.

Note:

This feature cannot be applied to the Locked/Unlocked status attribute of the target system.
To configure transformation of single-valued account data fetched during reconciliation:
  1. Write code that implements the required transformation logic in a Java class.
    The transformation class must implement the transform method with the following method signature:
    Object transform(HashMap hmUserDetails, HashMap hmEntitlementDetails, String sField)
    The following sample transformation class creates a value for the Full Name attribute by using values fetched from the User Name and Last Name attributes of the target system:
       package oracle.iam.connectors.common.transform;
       import java.util.HashMap;
       public class TransformAttribute {
           /*
           Description:Abstract method for transforming the attributes
           param hmUserDetails<String,Object>
           HashMap containing parent data details
           param hmEntitlementDetails<String,Object>
           HashMap containing child data details
           */
                public Object transform(HashMap hmUserDetails, HashMap 
           hmEntitlementDetails,String sField) {
       /*
       *    You must write code to transform the attributes. 
       Parent data attribute values can be fetched by using 
       hmUserDetails.get("Field Name").
       *To fetch child data values, loop through the
     *      ArrayList/Vector fetched by hmEntitlementDetails.get("Child Table")
     *      Return the transformed attribute.
       */
          String sUserName= (String)hmUserDetails.get("User Name"); 
          String sLastName= (String)hmUserDetails.get("Last Name"); 
          String sFullName=sUserName+"."+sLastName;
          return sFullName;
          }
       } 
    
  2. Create a JAR file to hold the Java class.
  3. Copy the JAR file to Oracle Identity Manager database.
    Run the Oracle Identity Manager Upload JARs utility to post the JAR file to the Oracle Identity Manager database. This utility is copied into the following location when you install Oracle Identity Manager:

    Note:

    Before you use this utility, verify that the WL_HOME environment variable is set to the directory in which Oracle WebLogic Server is installed.
    For Microsoft Windows: OIM_HOME/server/bin/UploadJars.bat
    For UNIX: OIM_HOME/server/bin/UploadJars.sh
    When you run the utility, you are prompted to enter the login credentials of the Oracle Identity Manager administrator, URL of the Oracle Identity Manager host computer from which the JAR file is to be uploaded. Specify 1 as the value of the JAR type.
  4. If you created the Java class for transforming a process form field for reconciliation, then:
    1. Log in to the Design Console.
    2. Create a lookup definition named Lookup.Salesforce.UM.ReconTransformation.
    3. In the Code Key column, enter the resource object field name on which you want to apply transformation. For example, User Name. In the Decode column, enter the name of the class that implements the transformation logic. For example, oracle.iam.connectors.common.transform.TransformAttribute.
    4. Save the changes to the lookup definition.
  5. Add an entry in the Lookup.Salesforce.UM.Configuration lookup definition to enable transformation as follows:
    1. Expand Administration, and then double-click Lookup Definition.
    2. Search for and open the Lookup.Salesforce.UM.Configuration lookup definition.
    3. In the Code Key column, enter Recon Transformation Lookup. In the Decode column, enter Lookup.Salesforce.UM.ReconTransformation.
    4. Save the changes to the lookup definition.

4.5 Configuring the Connector for Multiple Installations of the Target System

You might want to configure the connector for multiple installations of the target system.

The following example illustrates this requirement:

The London and New York offices of Example Multinational Inc. have their own installations of the target system. The company has recently installed Oracle Identity Manager, and they want to configure Oracle Identity Manager to link all the installations of the target system.

To meet the requirement posed by such a scenario, you must create copies of the connector. See Cloning Connectors in Oracle Fusion Middleware Administering Oracle Identity Manager.
4.6 Defining the Connector

By using the Identity System Administration, you can define a customized or reconfigured connector. Defining a connector is equivalent to registering the connector with Oracle Identity Manager.

A connector is automatically defined when you install it using the Install Connectors feature or when you upgrade it using the Upgrade Connectors feature. You must manually define a connector if:
  • You import the connector by using the Deployment Manager.

  • You customize or reconfigure the connector.

  • You upgrade Oracle Identity Manager.

The following events take place when you define a connector:
  • A record representing the connector is created in the Oracle Identity Manager database. If this record already exists, then it is updated:

  • The status of the newly defined connector is set to Active. In addition, the status of a previously installed release of the same connector automatically is set to Inactive.

See Defining Connectors in Oracle Fusion Middleware Administering Oracle Identity Manager.