Creating Maps
Application Builder includes built-in wizards for generating Flash maps. How you create a flash map depends upon whether you are adding the map to an existing page, or adding a map on a new page.
About Flash Map Support
Flash map support in Oracle Application Express is based on the AnyChart AnyMap Interactive Maps Component. AnyMap is a flexible Macromedia Flash-based solution that enables developers to visualize geographical related data. Flash maps are rendered by a browser and require Flash Player 9 or later. For more information about AnyChart, go to
http://www.anychart.com
AnyChart stores map data in files with a *.amap extension, and supports 300 map files for the United States of America, Europe, Asia, Europe, Africa, Oceania, North America, and South America. To render a desired map, you select the map source in the wizard (for example, Germany) and the map XML automatically references the desired map source .amap file, germany.amap. To browse through the available maps, see "Map Reference" in AnyChart User's Guide:
http://anychart.com/products/anychart/docs/users-guide/
Adding a Flash Map to an Existing Page
To add a flash map to an existing page.
-
Navigate to the Page Definition. See "Accessing the Page Definition".
-
On the Page Definition, create a new region:
-
Tree view- Under Page Rendering, right-click Regions and select Create.
-
Component view - Under Region, click the Create icon.
-
-
Select Map and click Next.
-
For Map Type, select a map type (for example, Europe), and click Next.
-
For Map Source, a Tree lists the map source files for the selected Map Type. Click the Map Source you wish to use (for example, Denmark).
-
For Display Attributes:
-
Specify the following:
-
Title
-
Region Template
-
Parent Region
-
Display Point
-
Sequence
-
Column
-
-
Click Next.
-
-
For Display Attributes, select the appropriate map attributes and click Next.
To learn more about a specific attribute, click the item label. See "About Field-Level Help".
-
For Source:
-
Specify a query by either:
-
Entering a SQL query in the field provided. See "About Creating SQL Queries for Maps".
-
Clicking the Build Query button. When the Build Chart Query Wizard appears, follow the on-screen instructions.
-
-
Specify relevant attributes. To view map reference information associated with your selected Map Source, expand the Map Region Information region at the bottom of the page.
To associate data with geographical locations, you must incorporate information from the Region Name or Region ID columns into the Map query. See "About Creating SQL Queries for Maps".
-
-
Click Create Region.
Adding Flash Maps to a New Page
To create an flash chart on a new page:
-
On the Workspace home page, click the Application Builder icon.
-
Select an application.
-
Click Create Page.
-
Select Map and click Next.
-
For Map Type, select a map type (for example, Europe), and click Next.
-
For Map Source, a Tree lists the map source files for the selected Map Type. Click the Map Source you wish to use (for example, Denmark).
-
For Page Attributes:
-
Specify the following:
-
Page Number
-
Page Name
-
Region Template
-
Region Name
-
Breadcrumb
To learn more, click the item label. When Help is available, the item label changes to red when you pass your cursor over it and the cursor changes to an arrow and question mark. See "About Field-Level Help".
-
-
Click Next.
-
-
Specify whether to include tabs and click Next.
-
For Map Attributes, select the appropriate attributes and click Next.
To learn more about a specific attribute, click the item label. See "About Field-Level Help".
-
For Query:
-
Specify a query by either:
-
Entering a SQL query in the field provided. See "About Creating SQL Queries for Maps".
-
Clicking the Build Query button. When the Build Chart Query Wizard appears, follow the on-screen instructions.
-
-
Specify relevant attributes. To view map reference information associated with your selected Map Source, expand the Map Reference Information region at the bottom of the page.
To associate data with geographical locations, you must incorporate information from the Region Name or Region ID columns into the Map query. See "About Creating SQL Queries for Maps".
-
Click Next.
-
-
Click Finish.
About Creating SQL Queries for Maps
You define a map in Application Builder using a wizard. For most chart wizards, you select a map type, map source, and provide a SQL query using the following syntax:
SELECT link, label, value
FROM   ...
Where:
-
linkis a URL. -
labelis the text that identifies the point on the map that you wish to associate data with. The Region ID or Region Name of the map should be used as the label. -
valueis the numeric column that defines the data to be associated with a point on the map.
Consider the following example when creating a new page:
-
On the Workspace home page, click the Application Builder icon.
-
Select an application.
-
Click Create Page.
-
Select Map and click Next.
-
For Map Type, select United States of America and click Next.
-
For Map Source, expand Country Maps and select States.
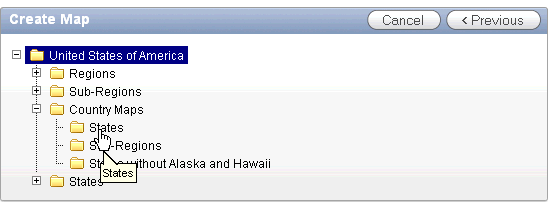
Description of the illustration maps_source1.gif
-
For Page Attributes specify the appropriate attributes and click Next.
-
Specify whether to include tabs and click Next.
-
For Map Attributes, select the appropriate attributes and click Next.
The Query page appears.
-
Expand and review the Map Reference Information region at the bottom of the page.
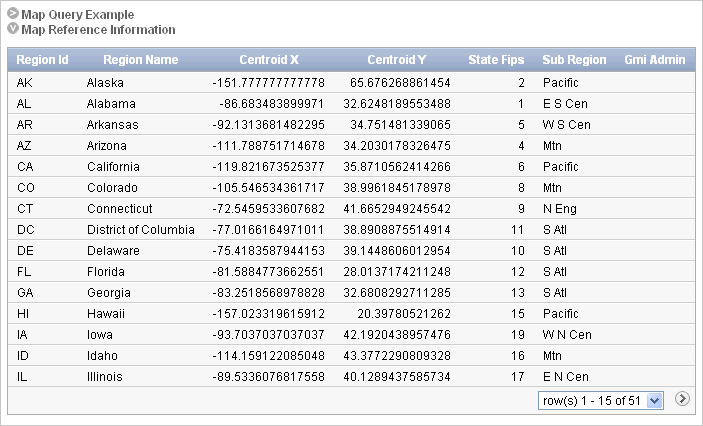
Description of the illustration maps_source2.gif
-
For Query,
-
Specify a query by either:
-
Entering a SQL query in the field provided. See "About Creating SQL Queries for Maps".
-
Clicking the Build Query button. When the Build Chart Query Wizard appears, follow the on-screen instructions.
-
-
When you create your query, you must incorporate the region name information. The following example includes information for Florida and Alaska:
SELECT null link, region label, value Populations
FROM (
SELECT 'Florida' region, 18328340 value FROM dual
UNION ALL
SELECT 'Alaska' region, 686293 value FROM dual)
Note:
If you are referencing geographical information stored in a database table, the information must correspond with the Region information associated with the map source. For more information, see AnyChart User's Guide:http://anychart.com/products/anymap/docs/
-
Click Next.
-
-
Click Finish.
Editing Flash Map Attributes
Once you create a map, you can alter its display by editing map attributes on the Map Attributes page.
To access the Map Attributes page:
-
Navigate to the Page Definition. See "Accessing the Page Definition".
-
Access the Chart Attributes page:
-
Tree view- Under Page Rendering, double-click the region name.
-
Component view - Under Region, select the region name.
The Region Definition appears.
-
-
Click Map Attributes.
-
Edit the appropriate attributes.
To learn more about a specific item on a page, click the item label.
When Help is available, the item label changes to red when you pass your cursor over it and the cursor changes to an arrow and question mark. See "About Field-Level Help".
-
Click Apply Changes.
About Navigation Alternatives
The Map Attributes page is divided into sections. You can access these sections by scrolling down the page, or by clicking a navigation button at the top of the page. When you select a button at the top of the page, the selected section appears and all other sections are temporarily hidden. To view all sections of the page, click Show All.
Using Custom XML with Flash Maps
There are additional map settings that cannot be controlled using the standard attributes on the Map Attributes page. To further control the look and feel of a chart, you can use custom XML.
To use custom XML:
-
Navigate to the Page Definition. See "Accessing the Page Definition".
-
Access the Map Attributes page:
-
Tree view- Under Page Rendering, double-click the region name.
-
Component view - Under Region, select the region name.
The Region Definition appears.
-
-
Click Map Attributes.
-
Scroll down to Map XML.
-
From Use Custom XML, select Yes.
Note that when you select to use custom XML, regions with attributes that no longer appear are hidden. To display these regions again, select No for Use Custom XML.
-
Edit the XML.
-
Click Apply Changes.
Tip:
For more information on supported XML format for maps, see the Online Map XML Reference at:http://www.anychart.com/
Enabling Asynchronous Updates
You can create Flash maps that monitor information by enabling the Asynchronous Update attribute on the Map Attributes page. Enabling this attribute updates the map to reflect changes in the underlying data within a specified time interval.
To enable asynchronous updates:
-
Create a Flash map. See "About Flash Map Support" and "About Flash Map Support".
-
Navigate to the Page Definition. See "Accessing the Page Definition".
-
Access the Map Attributes page:
-
Tree view- Under Page Rendering, double-click the region name.
-
Component view - Under Region, select the region name.
The Region Definition appears.
-
-
Click Map Attributes.
-
Scroll down to Refresh.
-
From Asynchronous Update, select Yes.
-
In Update Interval (Seconds), enter the interval in seconds between map updates. For optimal performance, select an interval that is greater than 2 seconds.
-
Click Apply Changes.