Creating Calendars
Application Builder includes a built-in wizard for generating a calendar with monthly, weekly, and daily views. Once you specify the table on which the calendar is based, you can create drill-down links to information stored in specific columns and enable drag and drop capability.
Note:
Oracle Application Express supports the creation of only one calendar per page.-
Editing an Existing Calendar to Include Add and Edit Functionality
-
Enabling the Dragging and Dropping of Data In an Existing Calendar
About Creating Calendars
Application Builder supports two calendar types:
-
Easy Calendar creates a calendar based on the schema, table, and columns you specify. The wizard prompts you to select a date column and display column. See "Creating an Easy Calendar".
-
SQL Calendar creates a calendar based on a SQL query you provide. This SQL
SELECTstatement must include at least two columns: a date column and display column. See "Creating as SQL Calendar".
How you create a calendar depends on if you are adding a calendar to an existing page or adding a calendar on a new page. When creating calendars, remember:
-
You can only create one calendar for each page. The calendar may include daily, weekly, and monthly views.
-
The date column determines the days on the calendar which will contain entries.
-
The display column defines a specific row which will display the calendar.
See Also:
"Calendar Display" andAbout Adding Drag and Drop Capability
If you choose to enable drag and drop capability in an Easy Calendar, the calendar generation process automatically creates a On Demand process to implement this functionality for you. However, when you create a SQL Calendar on a new page, the Enable Drag and Drop option does not appear. To enable this functionality, create a SQL Calendar page and then edit to page to enable drag and drop. To learn more, see "Enabling the Dragging and Dropping of Data In an Existing Calendar".
Supported Calendar Substitution Strings
Application Builder supports many date format substitution strings. You can view a complete list of supported substitution strings on the Calendar Templates page.
To view a list of supported substitution strings for calendars:
-
Navigate to the appropriate calendar template.
-
View the Substitution Stings list on the right side of the page.
See Also:
"Managing Themes and Templates"Viewing a Sample Calendar
The Product Portal sample application includes a sample calendar.
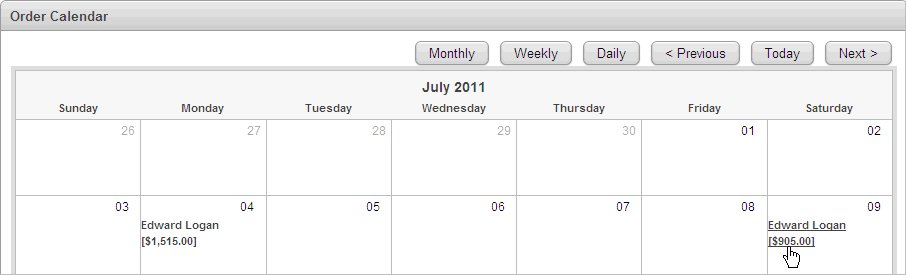
Description of the illustration calendar_example.gif
Clicking on a calendar entry links you to the Order Details page where you can update the order information. Additionally, you can move a calendar entry to another date by simply dragging and dropping it. To learn more about installing this sample application in your workspace, see "Reviewing Sample Applications".
Creating an Easy Calendar
An Easy Calendar creates a calendar based on schema, table, and columns you specify. The wizard prompts you to select a date column and display column.
Adding an Easy Calendar to an Existing Page
To add an Easy Calendar to an existing page:
-
Create a Calendar region:
-
Navigate to the Page Definition. See "Accessing the Page Definition".
-
On the Page Definition, create a new Calendar region:
-
Tree view- Under Page Rendering, right-click Regions and select Create.
-
Component view - Under Region, click the Create icon.
-
-
For Region, select Calendar and click Next.
-
-
For Implementation, select Easy Calendar and click Next.
-
For Region Attributes:
-
Title - Enter a title for the region. This title displays if the region template you select displays the region title.
-
Region Template - Choose a template to control the appearance of the region.
-
Parent Region - Defines the parent region to which the new region belongs to.
-
Display Point - Identify a display point for this region. Two types of display points exist: page template positions and page body positions. To learn more, see online Help.
-
Sequence - Specify the sequence for this component. The sequence determines the order of evaluation.
-
Column - Indicate the column in which this region displays. A page can have multiple regions, these regions can be displayed in different columns. Note that this attribute only applies to regions that are displayed in a Page Template Body position.
-
Display Type - Determines the behavior of the calendar. Options include
-
Standard - Submits the page along with the associated request.
-
Partial Page Refresh - Only refreshes the Calendar region
Tip:
Once the calendar is created, the display type cannot be changed. To change the display type, you must delete the calendar and then re-create it. -
-
Click Next.
-
-
For Source:
-
Owner - Select the database schema that owns the table from which you are creating a calendar.
-
Table/View Name - Specify the table to be used in the calendar.
-
Click Next.
-
-
For Calendar Attributes:
-
Date Column - Specify which column is used as the date to place an entry on to the calendar.
-
Display Column - Specify the column to be displayed on the calendar.
-
Date Format - Specify how you wish to represent dates on your calendar. Options include:
-
Date Only - Results in a monthly calendar.
-
Date and Time - Results in s monthly, weekly and daily calendar.
-
-
Custom Date Range - Identify whether to include custom start and end dates. Use this options to enable more than one month to be represented on a monthly calendar.
-
Enable Drag and Drop - Select Yes or No. Enables drag and drop of calendar data to other dates and times on the calendar.
-
Click Next.
Next, define Link Details for calendar entries. The Link Target determines where users are redirected to if they select a calendar entry. Note that the selected Link Target determines what attributes display.
-
-
On Link Details, select a Link Target:
-
Create a new edit page - Creates a new form page to add, edit, or delete calendar entries.
-
Allowed Operations - Specify which data manipulation language (DML) operations are allowed. Options include: Insert, Update, and Delete.
Tip:
To enable drag and drop on the calendar data, you must select Update. -
Page Number - Enter a unique page number for the page being created.
-
Page Name - Enter a title for the page being created.
-
Region Template - Select a region template for the new calendar region.
-
Region Name - Enter a name for the region to contain the calendar.
-
Select Columns - Select the column(s) to be included in the form. You must include date and primary key columns to the form for expected functionality.
-
Open Link To - Specify the location where the URL or Page should be opened.
-
-
Page in this application - Enables you to select an existing form page to add, edit, or delete calendar entries.
-
Page - Identify the target page number for the calendar entry link.
-
Date Item on Target Page - Identify the page item on the target page to be used to pass the date value when adding data.
-
Primary Key Item on Target Page - Identify the page item on the target page to be used to pass the primary key value when editing data.
-
Open Link In - Specify the location where the URL or page should be opened.
-
-
URL - Enables you specify an internal or external URL which is opened by clicking on the data column link.
-
URL Target - Identify a URL to serve as a destination for the calendar link.
-
Open Link In - Specify the location where the URL or page should be opened.
-
-
Exclude Link Target - Results in no link on the data column. Select this option if you do not want to support the editing of link details.
-
Click Next.
-
-
For Drag and Drop Process:
-
Process Type - Select the type of page process to execute when calendar data is dragged and dropped. Options include:
-
Create New Process - Automatically creates a new process for drag and drop.
-
Select Existing Process - Enables you to select a page level process to execute when data is dragged and dropped.
-
-
Authorization Scheme - Optionally select an authorization scheme. This authorization scheme must evaluate to true in order for this component to be rendered or otherwise processed.
-
Select Next.
-
-
For Process Options:
-
Cancel Button Label - Enter the label for the Cancel button.
-
Show Create Button - Indicate whether users should have insert capability using the form.
-
Show Save Button - Indicate whether users should have update capability using the form.
-
Show Delete Button - Indicate whether users should have delete capability using the form.
-
Select Next.
-
-
Confirm your selections and click Finish.
Adding an Easy Calendar to a New Page
To create an Easy Calendar on a new page:
-
Create a Calendar page:
-
Navigate to the Workspace home page.
-
Click the Application Builder icon.
-
Select an application.
-
Click Create Page.
-
Select Calendar and click Next.
-
-
For Implementation, select Easy Calendar and click Next.
-
For Region Attributes:
-
Title - Enter a title for the region. This title displays if the region template you select displays the region title.
-
Region Template - Choose a template to control the appearance of the region.
-
Parent Region - Defines the parent region to which the new region belongs to.
-
Display Point - Identify a display point for this region. Two types of display points exist: page template positions and page body positions. To learn more, see online Help.
-
Sequence - Specify the sequence for this component. The sequence determines the order of evaluation.
-
Column - Indicate the column in which this region displays. A page can have multiple regions, these regions can be displayed in different columns. Note that this attribute only applies to regions that are displayed in a Page Template Body position.
-
Display Type - Determines the behavior of the calendar. Options include
-
Standard - Submits the page along with the associated request.
-
Partial Page Refresh - Only refreshes the Calendar region
Tip:
Once the calendar is created, the display type cannot be changed. To change the display type, you must delete the calendar and then re-create it. -
-
Click Next.
-
-
On Tab Options, specify a tab implementation and click Next.
-
For Source:
-
Owner - Select the database schema that owns the table from which you are creating a calendar.
-
Table/View Name - Specify the table to be used in the calendar.
-
Click Next.
-
-
For Calendar Attributes:
-
Date Column - Specify which column is used as the date to place an entry on to the calendar.
-
Display Column - Specify the column to be displayed on the calendar.
-
Date Format - Specify how you wish to represent dates on your calendar. Options include:
-
Date Only - Results in a monthly calendar.
-
Date and Time - Results in s monthly, weekly and daily calendar.
-
-
Custom Date Range - Identify whether to include custom start and end dates. Use this options to enable more than one month to be represented on a monthly calendar.
-
Enable Drag and Drop - Select Yes or No. Enables drag and drop of calendar data to other dates and times on the calendar.
Tip:
If you select Yes for Enable Drag and Drop, the wizard automatically creates an On Demand process. -
Click Next.
Next, define Link Details for calendar entries. The Link Target determines where users are redirected to if they select a calendar entry. Note that the selected Link Target determines what attributes display.
-
-
On Link Details, select a Link Target:
-
Create a new edit page - Creates a new form page to add, edit, or delete calendar entries.
-
Allowed Operations - Specify which data manipulation language (DML) operations are allowed. Options include: Insert, Update, and Delete.
Tip:
To enable drag and drop on the calendar data, you must select Update. -
Page Number - Enter a unique page number for the page being created.
-
Page Name - Enter a title for the page being created.
-
Region Template - Select a region template for the new calendar region.
-
Region Name - Enter a name for the region to contain the calendar.
-
Select Columns - Select the column(s) to be included in the form. You must include date and primary key columns to the form for expected functionality.
-
Open Link To - Specify the location where the URL or Page should be opened.
-
-
Page in this application - Enables you to select an existing form page to add, edit, or delete calendar entries.
-
Page - Identify the target page number for the calendar entry link.
-
Date Item on Target Page - Identify the page item on the target page to be used to pass the date value when adding data.
-
Primary Key Item on Target Page - Identify the page item on the target page to be used to pass the primary key value when editing data.
-
Open Link In - Specify the location where the URL or page should be opened.
-
-
URL - Enables you specify an internal or external URL which is opened by clicking on the data column link.
-
URL Target - Identify a URL to serve as a destination for the calendar link.
-
Open Link In - Specify the location where the URL or page should be opened.
-
-
Exclude Link Target - Results in no link on the data column. Select this option if you do not want to support the editing of link details.
-
Click Next.
-
-
For Process Options:
-
Cancel Button Label - Enter the label for the Cancel button.
-
Show Create Button - Indicate whether users should have insert capability using the form.
-
Show Save Button - Indicate whether users should have update capability using the form.
-
Show Delete Button - Indicate whether users should have delete capability using the form.
-
Select Next.
-
-
Confirm your selections and click Finish.
See Also:
"Editing Calendar Attributes"Creating as SQL Calendar
A SQL Calendar creates a calendar based on a SQL query you provide. When creating a SQL Calendar, you must specify the table name and select the date column and primary key which need to be used while creating the form. Also since you are using SQL source, you need to explicitly specify the primary key.
Tip:
When creating a SQL Calendar, you must manually create an On Demand page process to enable drag and drop functionality. See "Enabling the Dragging and Dropping of Data In an Existing Calendar".Adding a SQL Calendar to an Existing Page
To add a SQL Calendar to an existing page:
-
Create a Calendar region:
-
Navigate to the Page Definition. See "Accessing the Page Definition".
-
On the Page Definition, create a new Calendar region:
-
Tree view- Under Page Rendering, right-click Regions and select Create.
-
Component view - Under Region, click the Create icon.
-
-
For Region, select Calendar and click Next.
-
-
For Implementation, select SQL Calendar and click Next.
-
For Region Attributes:
-
Title - Enter a title for the region. This title displays if the region template you select displays the region title.
-
Region Template - Choose a template to control the appearance of the region.
-
Parent Region - Defines the parent region to which the new region belongs to.
-
Display Point - Identify a display point for this region. Two types of display points exist: page template positions and page body positions. To learn more, see online Help.
-
Sequence - Specify the sequence for this component. The sequence determines the order of evaluation.
-
Column - Indicate the column in which this region displays. A page can have multiple regions, these regions can be displayed in different columns. Note that this attribute only applies to regions that are displayed in a Page Template Body position.
-
Display Type - Determines the behavior of the calendar. Options include
-
Standard - Submits the page along with the associated request.
-
Partial Page Refresh - Only refreshes the Calendar region
Tip:
Once the calendar is created, the display type cannot be changed. To change the display type, you must delete the calendar and then re-create it. -
-
Click Next.
-
-
For Source:
-
Enter SQL Query - Enter the select statement to be used by the calendar.
Use the syntax:
SELECT id, name, date
FROM ...
Remember the following:
-
You include at least two columns, one of which must be a
DATEcolumn.The first column should identify the primary key column to be used for managing data manipulation language (DML) operation. -
Review the examples at the bottom of the page.
-
-
Click Next.
-
-
For Calendar Attributes:
-
Date Column - Specify which column is used as the date to place an entry on to the calendar.
-
Display Column - Specify the column to be displayed on the calendar.
-
Date Format - Specify how you wish to represent dates on your calendar. Options include:
-
Date Only - Results in a monthly calendar.
-
Date and Time - Results in s monthly, weekly and daily calendar.
-
-
Primary Key Column - Select the name of the first column that uniquely identifies a row in the table, or select
ROWID.ROWIDis a built in globally unique identifier for the row. -
Custom Date Range - Identify whether to include custom start and end dates. Use this options to enable more than one month to be represented on a monthly calendar.
-
Enable Drag and Drop - Select Yes or No. Use this option to enable drag and drop of calendar data to other dates and times on the calendar.
Tip:
When creating a SQL Calendar, you must manually create an On Demand page process to enable this functionality. See "Enabling the Dragging and Dropping of Data In an Existing Calendar". -
Click Next.
Next, define Link Details for calendar entries. The Link Target determines where users are redirected to if they select a calendar entry. Note that the selected Link Target determines what attributes display.
-
-
On Link Details, select a Link Target:
-
Create a new edit page - Creates a new form page to add, edit, or delete calendar entries.
-
Allowed Operations - Specify which data manipulation language (DML) operations are allowed. Options include: Insert, Update, and Delete.
Tip:
To enable drag and drop on the calendar data, you must select Update. -
Page Number - Enter a unique page number for the page being created.
-
Page Name - Enter a title for the page being created.
-
Region Template - Select a region template for the new calendar region.
-
Region Name - Enter a name for the region to contain the calendar.
-
Owner - Identifies the schema that owns the table.
-
Table/View Name - Select the database object (table or view) on which this calendar is based.
-
Date Column - Specify the date column to be placed on the calendar.
-
Primary Key Column - Select the name of the first column that uniquely identifies a row in the table, or select
ROWID.ROWIDis a built in globally unique identifier for the row. -
Primary Key Type - Options include:
Managed by Database (ROWID) - The form uses the
ROWIDpseudo column to identify rows to update and delete.Select Primary Key Column(s) - The form uses the source table's primary key column(s).
-
Select Columns - Select the column(s) to be included in the form. You must include date and primary key columns to the form for expected functionality.
-
Open Link In - Specify the location where the URL or page should be opened.
-
-
Page in this application - Enables you to select an existing form page to add, edit, or delete calendar entries.
-
Page - Identify the target page number for the calendar entry link.
-
Date Item on Target Page - Identify the page item on the target page to be used to pass the date value when adding data.
-
Primary Key Item on Target Page - Identify the page item on the target page to be used to pass the primary key value when editing data.
-
Open Link In - Specify the location where the URL or page should be opened.
-
-
URL - Enables you specify an internal or external URL which is opened by clicking on the data column link.
-
URL Target - Identify a URL to serve as a destination for the calendar link.
-
Open Link In - Specify the location where the URL or page should be opened.
-
-
Exclude Link Target - Results in no link on the data column. Select this option if you do not want to support the editing of link details.
-
Click Next.
-
-
For Drag and Drop Process:
-
On Demand Process - Select a custom page process to be executed when Calendar data is dragged and dropped. See "Enabling the Dragging and Dropping of Data In an Existing Calendar".
-
Authorization Scheme - Optionally select an authorization scheme. This authorization scheme must evaluate to true in order for this component to be rendered or otherwise processed.
-
Select Next.
-
-
For Process Options:
-
Cancel Button Label - Enter the label for the Cancel button.
-
Show Create Button - Indicate whether users should have insert capability using the form.
-
Show Save Button - Indicate whether users should have update capability using the form.
-
Show Delete Button - Indicate whether users should have delete capability using the form.
-
Select Next.
-
-
Confirm your selections and click Finish.
Adding a SQL Calendar to a New Page
To create an Easy Calendar on a new page:
-
Create a Calendar page:
-
Navigate to the Workspace home page.
-
Click the Application Builder icon.
-
Select an application.
-
Click Create Page.
-
Select Calendar and click Next.
-
-
For Page, select SQL Calendar and click Next.
-
For Region Attributes:
-
Title - Enter a title for the region. This title displays if the region template you select displays the region title.
-
Region Template - Choose a template to control the appearance of the region.
-
Parent Region - Defines the parent region to which the new region belongs to.
-
Display Point - Identify a display point for this region. Two types of display points exist: page template positions and page body positions. To learn more, see online Help.
-
Sequence - Specify the sequence for this component. The sequence determines the order of evaluation.
-
Column - Indicate the column in which this region displays. A page can have multiple regions, these regions can be displayed in different columns. Note that this attribute only applies to regions that are displayed in a Page Template Body position.
-
Display Type - Determines the behavior of the calendar. Options include
-
Standard - Submits the page along with the associated request.
-
Partial Page Refresh - Only refreshes the Calendar region
Tip:
Once the calendar is created, the display type cannot be changed. To change the display type, you must delete the calendar and then re-create it. -
-
Click Next.
-
-
On Tab Options, specify a tab implementation and click Next.
-
For Source:
-
Enter SQL Query - Enter the select statement to be used by the calendar.
Use the syntax:
SELECT id, name, date
FROM ...
Remember the following:
-
You include at least two columns, one of which must be a
DATEcolumn.The first column should identify the primary key column to be used for managing data manipulation language (DML) operation. -
Review the examples at the bottom of the page.
-
-
Click Next.
-
-
For Calendar Attributes:
-
Date Column - Specify which column is used as the date to place an entry on to the calendar.
-
Display Column - Specify the column to be displayed on the calendar.
-
Date Format - Specify how you wish to represent dates on your calendar. Options include:
-
Date Only - Results in a monthly calendar.
-
Date and Time - Results in s monthly, weekly and daily calendar.
-
-
Primary Key Column - Select the name of the first column that uniquely identifies a row in the table, or select
ROWID.ROWIDis a built in globally unique identifier for the row. -
Custom Date Range - Identify whether to include custom start and end dates. Use this options to enable more than one month to be represented on a monthly calendar.
-
Click Next.
Next, define Link Details for calendar entries. The Link Target determines where users are redirected to if they select a calendar entry. Note that the selected Link Target determines what attributes display.
-
-
On Link Details, select a Link Target:
-
Create a new edit page - Creates a new form page to add, edit, or delete calendar entries.
-
Allowed Operations - Specify which data manipulation language (DML) operations are allowed. Options include: Insert, Update, and Delete.
Tip:
To enable drag and drop on the calendar data, you must select Update. -
Page Number - Enter a unique page number for the page being created.
-
Page Name - Enter a title for the page being created.
-
Region Template - Select a region template for the new calendar region.
-
Region Name - Enter a name for the region to contain the calendar.
-
Owner - Identifies the schema that owns the table.
-
Table/View Name - Select the database object (table or view) on which this calendar is based.
-
Date Column - Specify the date column to be placed on the calendar.
-
Primary Key Column - Select the name of the first column that uniquely identifies a row in the table, or select
ROWID.ROWIDis a built in globally unique identifier for the row. -
Primary Key Type - Options include:
Managed by Database (ROWID) - The form uses the
ROWIDpseudo column to identify rows to update and delete.Select Primary Key Column(s) - The form uses the source table's primary key column(s).
-
Select Columns - Select the column(s) to be included in the form. You must include date and primary key columns to the form for expected functionality.
-
Open Link In - Specify the location where the URL or page should be opened.
-
-
Page in this application - Enables you to select an existing form page to add, edit, or delete calendar entries.
-
Page - Identify the target page number for the calendar entry link.
-
Date Item on Target Page - Identify the page item on the target page to be used to pass the date value when adding data.
-
Primary Key Item on Target Page - Identify the page item on the target page to be used to pass the primary key value when editing data.
-
Open Link In - Specify the location where the URL or page should be opened.
-
-
URL - Enables you specify an internal or external URL which is opened by clicking on the data column link.
-
URL Target - Identify a URL to serve as a destination for the calendar link.
-
Open Link In - Specify the location where the URL or page should be opened.
-
-
Exclude Link Target - Results in no link on the data column. Select this option if you do not want to support the editing of link details.
-
Click Next.
-
-
For Drag and Drop Process:
-
On Demand Process - Select a custom page process to be executed when Calendar data is dragged and dropped.
Tip:
When creating a SQL Calendar, you must manually create an On Demand page process to enable this functionality. See "Enabling the Dragging and Dropping of Data In an Existing Calendar". -
Authorization Scheme - Optionally select an authorization scheme. This authorization scheme must evaluate to true in order for this component to be rendered or otherwise processed.
-
Select Next.
-
-
For Process Options:
-
Cancel Button Label - Enter the label for the Cancel button.
-
Show Create Button - Indicate whether users should have insert capability using the form.
-
Show Save Button - Indicate whether users should have update capability using the form.
-
Show Delete Button - Indicate whether users should have delete capability using the form.
-
Select Next.
-
-
Confirm your selections and click Finish.
See Also:
"Editing Calendar Attributes"Editing Calendar Attributes
Once you create a calendar, you can alter the display by editing attributes on the Calendar Attributes page.
Note that to disable a view of a calendar, you must delete the Monthly, Weekly, or Daily buttons on the calendar page.
Accessing the Calendar Attributes Page
To access the Calendar Attributes page:
-
Navigate to the appropriate Page Definition. See "Accessing the Page Definition".
-
Access the Calendar Attributes page:
-
Tree view- Under Page Rendering, double-click the region name.
-
Component view - Under Region, select the region name.
The Region Definition appears.
-
-
Click Calendar Attributes.
-
Edit the appropriate attributes. To learn more about a specific item on a page, click the item label.
When Help is available, the item label changes to red when you pass your cursor over it and the cursor changes to an arrow and question mark.
-
Click Apply Changes.
About Navigation Alternatives
The Calendar Attribute page is divided into sections.
You can access these sections by scrolling down the page, or by clicking a navigation button at the top of the page. When you select a button at the top of the page, the selected section appears and all other sections are temporarily hidden. To view all sections of the page, click Show All.
About the Calendar Attributes Page
The topics that follow describe specific sections of the Calendar Attributes page. You can use these attribute to specify general calendar formatting, define the dates included in the calendar, or create a link on the column or a day in the calendar.
Calendar Display
Use Calendar Display to specify a calendar template, date columns, and general calendar formatting. Table 10-2 describes Calendar Display attributes.
Table 10-2 Calendar Display Attributes
| Attribute | Description |
|---|---|
|
Calendar Template |
Determines what template is used when the Application Express engine renders a calendar. |
|
Easy SQL Table Owner |
Indicates the database owner of the table on which the calendar is based. |
|
Easy SQL Table |
Indicates the database table on which the calendar is based. |
|
Date Column |
Defines the column from the table or query containing the dates to be placed on the calendar. |
|
Date Item |
Defines the item which holds the date on which the calendar is based |
|
Date Format |
Specifies how you wish to represent dates on your calendar. Options include:
|
|
Date Item |
The item which holds the date on which the calendar is based. |
|
End Date Item |
Specifies the item which holds the end date on which the calendar of type Custom is based. |
|
Calendar Type Item |
Specifies the item which holds the calendar type. |
|
Display Type |
Defines the display type. Options include:
If the Display Type is Column, use the Display Column attribute to select the column to display in the day cell of the monthly calendar. If the Display Type is Custom, in Column Format enter a custom column format using HTML expressions and supported substitution strings. |
|
Display Column |
When the Display Type is set to Column, select the column to display in the day cell of the monthly calendar. To display more then one column, change the display type. |
|
Primary Key Column |
The primary key column value which is passed when editing data through Calendar. This value will be passed to the target page only if the Column link item values has |
|
Column Format |
Enter HTML expressions to be shown in this column. Use #EMPLOYEE_NAME# This following example demonstrates how to display images in a column. <img src="#IMAGE_NAME#"> |
Display Attributes
Use Display Attributes to define the dates that are included in the calendar. Table 10-3 describes Display attributes.
| Attribute | Description |
|---|---|
|
Begin at Start of Interval |
Determines when the calendar should start. Selecting this option creates a calendar that spans an entire interval (such as a month). For example:
|
|
Start of Week for Monthly Calendar |
Determines the day on which the calendar starts for the monthly view. |
|
Start Day for Weekly Calendar |
Select the start day for a weekly calendar. |
|
End Day for Weekly Calendar |
Select the end day for a weekly calendar. Time Format determines if the time displays in a 12-hour or 24-hour format. Start Time and End Time determine the start and end times to display in the weekly and daily calendar views. |
|
Time Format |
Select the time format. Determines if the time displays in a 12 hour or 24 hour format. |
|
Start Time |
Enter the Start time from which the weekly and daily Calendar should be displayed. |
|
End Time |
Enter the end time until which the weekly and daily Calendar should be displayed. |
|
Data Background Color |
Specify a background color for this data displayed in the calendar. |
|
Data Text Color |
Specify a text color for data displayed on the calendar. |
Column Link
Use Column link to create a link on the entries displayed on the calendar.
To set session state with these values:
-
Navigate to the appropriate Calendar Attributes page. See "Accessing the Calendar Attributes Page".
-
Scroll down to Column Link.
-
From Target is a, select Page in this Application.
-
From Open Link in, select the location where the URL or page should open. Options include:
-
Same Window
-
Popup Window
-
-
In Page, specify the target page number. To reset the pagination for this page, select reset pagination for this page.
-
In Request, specify the request to be used.
-
In Clear Cache, specify the pages (that is, the page numbers) on which to clear cache. Specify multiple pages by listing the page numbers in a comma-delimited list.
You can set session state (that is, give a listed item a value) using the next two attributes: the Set these items attribute and the With these values attribute.
-
To set session state with these values:
-
Set these items - Enter a comma-delimited list of item names for which you would like to set session state.
-
With these values - Enter a comma-delimited list of values for the items specified in the previous step.
You can specify static values or substitution syntax (for example,
&APP_ITEM_NAME.). Note that item values passed tof?p=in the URL cannot contain a colon (:). Additionally, item values cannot contain commas unless you enclose the entire value in backslashes (for example,\1234,56\).
-
-
Click Apply Changes.
To create a column link to a URL:
-
Navigate to the appropriate Calendar Attributes page.
-
Scroll down to Column Link.
-
From Target is a, select URL.
-
In URL, enter the appropriate address.
You can use a column link to a URL to:
-
Link to a URL defined by your query, for example:
#URL#
Where
URLis a column alias from your query that defines the proper URL. -
Pass values from your query to the page you want to call, for example:
f?p=&FLOW_ID.:3:&SESSION.::&DEBUG.:3:P3_EVENT_ID,P3_PREV_PAGE:#EVENT_ID#,1
Where
EVENT_IDis the alias of a column from your query.
-
-
Click Apply Changes.
Day Link
Use Day link to create a link on a day in the calendar. This attribute creates a link on an actual number (or day) on the calendar.
To create a day link to another page:
-
Navigate to the appropriate Calendar Attributes page. See "Accessing the Calendar Attributes Page".
-
Scroll down to Day Link.
-
From Target is a, select Page in this Application.
-
In Page, specify the target page number.
To reset the pagination for this page, select reset pagination for this page.
-
In Request, specify the request to be used.
-
In Clear Cache, specify the pages (that is, the page numbers) on which to clear cache. Specify multiple pages by listing the page numbers in a comma-delimited list.
You can set session state (that is, give a listed item a value) using the next two attributes: Set these items and With these values.
-
To set session state:
-
Set these items - Enter a comma-delimited list of item names for which you would like to set session state.
-
With these values - Enter a comma-delimited list of values for the items specified in the previous step.
You can specify static values or substitution syntax (for example,
&APP_ITEM_NAME.). Note that item values passed tof?p=in the URL cannot contain a colon (:). Additionally, item values cannot contain commas unless you enclose the entire value in backslashes (for example,\1234,56\).
-
-
Click Apply Changes.
To create a day link to a URL:
-
Navigate to the appropriate Calendar Attributes page.
-
Scroll down to Day Link.
-
From Target is a, select URL.
-
In URL, enter the appropriate address.
-
Click Apply Changes.
Editing an Existing Calendar to Include Add and Edit Functionality
To edit an existing calendar to include add and edit functionality:
-
Navigate to the appropriate Calendar Attributes page. See "Accessing the Calendar Attributes Page".
-
Scroll down to Column Link. Under Column Link:
-
Target is a - Select Page in this Application.
-
Open Link in - Select the location where the URL or page should open. Options include:
-
Same Window
-
Popup Window
-
-
Page - Specify the form page number.
-
Set these items - Select the primary key and date column from the target form page.
Tip:
The selected date column must have a format mask ofRRRRMMDDHH24MISSsince the calendar will pass the date in the that format.If you do not want to change the format mask of date item, you need to create a hidden item (this hidden item should be selected as Date Item which will accept the date value) in the form page with the above format mask.
-
With these values - Enter the substitution strings
#PRIMARY_KEY_VALUE#for primary key value and#DATE_VALUE#, for example:#PRIMARY_KEY_VALUE#,#DATE_VALUE#
-
-
Scroll up to Calendar Display.
From Primary Key Column, select the value to be passed when editing calendar data. This value will be substituted for the
#PRIMARY_KEY_VALUE#specified in the previous step. -
Click Apply Changes.
About the Date Column Format Mask
Because the calendar passes the date in specific format, the selected date column must have a format mask of RRRRMMDDHH24MISS. If you do not want to change the format mask of date item, you must create a hidden item (this hidden item should be selected as Date Item which will accept the date value) in the form page with the above format mask. The default value of the date column should be changed to:
return to_char(to_date(<hidden item created>,'RRRRMMDDHH24MISS'),<Date item format mask>);
Consider the following example:
return to_char(to_date(:P130_HIREDATE_TMP,'RRRRMMDDHH24MISS'),:APP_DATE_TIME_FORMAT);
The source type for default should be PL/SQL Function returning value.
Enabling the Dragging and Dropping of Data In an Existing Calendar
If you choose to enable drag and drop capability in an Easy Calendar, the calendar generation process automatically creates a On Demand process to implement this functionality. When creating an Easy Calendar on new page, the process is created automatically. When creating an Easy Calendar on an existing page, the wizard prompts you to create the new page process. To learn more, see "Creating an Easy Calendar". These are the only wizards that automatically facilitate the creation of this On Demand process.
In contrast, when you create a SQL Calendar on a new page, the Enable Drag and Drop option does not appear. To enable this functionality, you must create the On Demand process, create a SQL Calendar page, and then edit to page to enable drag and drop. As a best practice, Oracle recommends creating this process prior to creating the calendar.
To enable support for dragging and dropping of calendar data:
-
Create an On Demand application process. See "Understanding Page Processes".
This page process should execute when the calendar data is dragged and dropped. It should have code similar to the following example:
declare l_date_value varchar2(32767) := apex_application.g_x01; l_primary_key_value varchar2(32767) := apex_application.g_x02; begin update EMP set HIREDATE = to_date(l_date_value,'YYYYMMDD HH24MISS') where ROWID = l_primary_key_value; end; -
Navigate to the Calendar Attributes page. See "Accessing the Calendar Attributes Page".
-
Scroll down to Drag and Drop.
-
From Process, select the custom page process you created in step 1.
-
Click Apply Changes.
Editing a Calendar Title
The title that appears at the top of calendar corresponds to the region title.
To alter the region title:
-
Navigate to the Page Definition. See "Accessing the Page Definition".
-
Access the Region Definition:
-
Tree view- Under Page Rendering, double-click the region name.
-
Component view - Under Region, select the region name.
The Region Definition appears.
-
-
Under Identification, edit the Title attribute.
-
Click Apply Changes.
Upgrading a Calendar Created in a Previous Releases
By default, calendars you create in Oracle Application Express 3.0 include daily, weekly, and monthly views. To update calendars created in a previous release to include these views, you can either:
-
Create a calendar:
-
Create a calendar page and integrate the SQL query from your previous calendar.
-
Replace the previous calendar page with the new one in your application.
-
-
Upgrade the theme:
-
Change the identification number of the existing theme. See "Changing a Theme Identification Number".
-
Re-create the theme. See "Creating a Theme".
-
Apply the new theme to your application. See "Switching the Active Theme".
-
Converting an Easy Calendar to a SQL Calendar
Creating an Easy Calendar is the simplest way to create a calendar. However, if you find the resulting calendar does not meet your needs, you can quickly convert it to a SQL Calendar.
To convert an Easy Calendar to a SQL Calendar:
-
Navigate to the Page Definition. See "Accessing the Page Definition".
-
Under Regions, click Calendar next to the region name.
The Calendar Attributes page appears.
-
On the Tasks list, click Convert to SQL Based calendar.
Converting an Easy Calendar to a SQL Calendar adds a Region Source section to the Region Definition. The Region Source contains the original SQL query that creates the calendar. By accessing the Region Source, you can edit the query to meet your needs.