16 Working with Resource Catalogs
Oracle WebCenter Portal: Spaces provides rich Resource Catalogs, also known as Business Dictionaries, which expose components and connections that Spaces users can add to their pages. You can use a Resource Catalog to populate resources such as page templates, navigation models, pages, and task flows. Spaces applications are preconfigured with three Resource Catalogs out-of-the-box. If these catalogs do not meet your business requirements, you can modify them or create new ones.
This chapter provides information about the default, out-of-the-box Resource Catalogs included in Spaces, and also describes how to create and manage custom Resource Catalogs. It includes the following sections:
-
Section 16.1, "What You Should Know About Resource Catalogs"
-
Section 16.9, "Using JDeveloper to Build Your Resource Catalog"
-
Section 16.10, "Configuring Resource Catalogs in Your Application"
For generic information about adding and editing different types of resources, see Chapter 10, "Working with the Resources that Compose a Portal or Community."
This chapter is intended for users who want to provide and manage Resource Catalogs in their Spaces application. Portal designers with the application permission Application-Resource Catalogs-Create Edit Delete can manage application-level Resource Catalogs. Space moderators with the permission Space-Resources-Create Edit Delete (simple permission model) or Space-Resource Catalogs-Create Edit Delete (detailed permission model) can manage space-level Resource Catalogs. For information about roles and permissions, see Chapter 20, "Understanding Security."
16.1 What You Should Know About Resource Catalogs
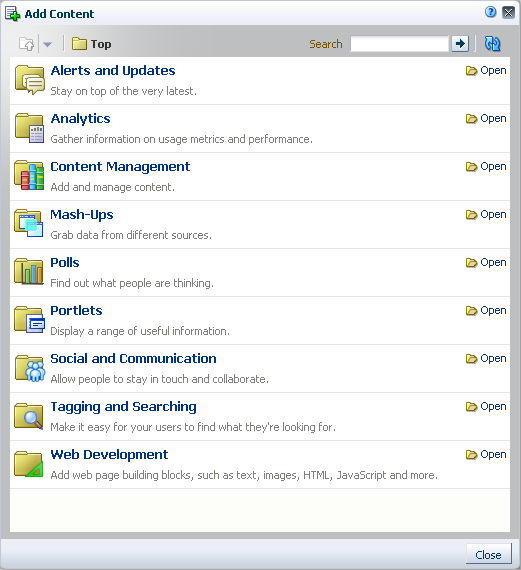
The Resource Catalog is displayed when you edit a page or page template in Composer and click Add Content. You can add resources from the catalog on your page or page template.
As a Spaces user, you can use a Resource Catalog to populate pages in Composer.
As an administrator or delegate, you can also use a Resource Catalog to populate the following artifacts in the Resources Manager:
-
Page templates
-
Task flows
This section provides an overview of Resource Catalogs and explains how to manage them at runtime. It includes the following subsections:
-
Section 16.1.1, "Understanding the Out-of-the-Box Resource Catalogs"
-
Section 16.1.2, "Introducing the Resource Catalog Management Page"
16.1.1 Understanding the Out-of-the-Box Resource Catalogs
WebCenter Portal: Spaces provides the following out-of-the-box Resource Catalogs:
-
Default Home Space Catalog - The application-level Resource Catalog. You see this catalog when you edit a page or task flow in your Home space.
-
Default Space Catalog - The space-level Resource Catalog. You see this catalog when you populate a page or task flow within a space.
-
Default Page Template Catalog - The catalog used for page template creation in both your Home space and other spaces. You see this catalog when you edit a page template.
This section describes these catalogs. It includes the following subsections:
16.1.1.1 Default Home Space Catalog
This catalog is displayed when designing pages and task flows in your application. The Default Home Space Catalog (Figure 16-1) contains items that users may typically want to add to a task flow or a business role page, such as page layout components, portlets, and WebCenter Portal services task flows.
Figure 16-1 Resource Catalog Used to Populate Pages
Description of "Figure 16-1 Resource Catalog Used to Populate Pages"
Table 16-1 provides a description of each folder in the default Resource Catalog.
Table 16-1 Resources in the Default Resource Catalog
| Folder Name | Description |
|---|---|
|
Alerts and Updates |
Includes task flows from the following WebCenter Portal services to track alerts and notifications:
|
|
Analytics |
Includes the Analytics service task flows. These task flows help to track and display different metrics, such as response times and usage behavior, for the Spaces application. For more information, see Chapter 55, "Analyzing Usage and Performance Metrics." |
|
Content Management |
Includes the documents task flows, which can be used to access, add, and manage folders and files, or display content in a predefined template. For more information, see Part X, "Working with Content". |
|
Mash-Ups |
Includes the following resources that enable you to create business mashups:
|
|
Polls and Surveys |
Includes the Polls service task flows that can be used to create, edit, and take online polls on your application pages. Polls let you survey your audience, check whether they can recall important information, and gather feedback on the efficacy of presentations. For more information, see Chapter 67, "Working with the Polls Service." |
|
Portlets |
Includes the following resources:
For more information, see Chapter 25, "Understanding Portlet Basics." |
|
Social and Communication |
Includes the following resources to enable social networking and communication among users:
|
|
Tagging and Searching |
Includes the following WebCenter Portal services task flows to enable effective search of Oracle WebCenter Portal and other sources:
|
|
Web Development |
Includes the following components that you can use to design your pages:
|
Note:
WebCenter Portal service task flows added from the Resource Catalog do not have a fixed height; they take the height of the content in the task flow.
With the default Spaces configuration, this Resource Catalog is displayed when you create pages at the application level.
When creating pages in a space, the Default Space Catalog is displayed. This catalog is similar to the Default Home Space Catalog, except that its resources display content specific to the space, where applicable.
16.1.1.2 Default Space Catalog
The Default Space Catalog is the same as the Default Home Space Catalog, except for a few resources that display data relevant to the current space, for example, the Personal Documents folder, which displays documents associated with the current space. Table 16-2 describes the resources that are exclusive to the Default Space Catalog.
Table 16-2 Resources that Are Exclusive to the Default Space Catalog
| Resource or Folder Name | Description |
|---|---|
|
Similar Spaces |
This resource in the Social and Communication folder displays all spaces that are similar to the one you are currently viewing. For more information, see Section 58.2.3, "Working with the Similar Spaces Task Flow." |
|
Lists folder |
This resource in the Social and Communication folder enables you to add lists to pages in your space. Lists are useful for many space activities, such as tracking issues, capturing project milestones, publishing project assignments, and much more. However, the Lists service is not available to the Home space. For more information, see Chapter 64, "Working with the Lists Service." |
|
Members |
This resource in the Social and Communication folder lists all members in the space. For more information, see Section 52.4, "Working with the Members Task Flow." |
|
Spaces documents |
This resource from the Content Management folder exposes a list of folders and files associated with the current space. For more information, see Section 39.2, "What You Should Know About Content Management Selections in the Resource Catalog." |
16.1.1.3 Default Page Template Catalog
This catalog is displayed when designing page templates. A page template defines the layout of your portal. It defines the location of content on the page and contains artifacts that display on each page of the portal; for example, a navigation pane to the left of the page, a header or banner with the company logo at the top, and a copyright notice at the bottom of the page. When you build a page template, you should be able to add all such components to it. To address this requirement, Spaces provides the Default Page Template Catalog to be used for page template creation. For more information about page templates, see Chapter 12, "Working with Page Templates."
In addition to all the folders available in the Default Home Space Catalog (Table 16-1), the Default Page Template Catalog also includes the Template Development folder. This folder includes a Navigations folder and all the resources that are typically used in page templates only, for example logos, navigation components, navigation models, layout components, and copyright statements.
The Navigations subfolder includes three navigation task flows. You can add these task flows, described as follows, to page templates to quickly visualize your portal navigation model:
-
Navigation Breadcrumb, to display a series of horizontal or vertical links that show users their current position in the navigation hierarchy.
-
Navigation Menu, to display navigational links as a series of tabs, menus, bars, buttons, choices, or as a list.
-
Navigation Tree, to display navigational links in a hierarchical structure.
For information about navigation structures, see Chapter 11, "Working with Navigation."
For information about the other resources in the Template Development folder, see Chapter 13, "Adding Spaces Components to Your Templates."
16.1.2 Introducing the Resource Catalog Management Page
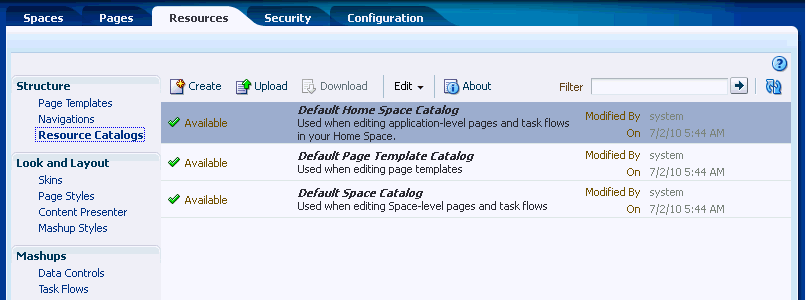
If the default catalogs provided in Spaces do not meet your company's requirements, you can create custom Resource Catalogs and offer those to users. The Resource Manager, shown in Figure 16-2, provides options to create and manage custom Resource Catalogs.
Only users with permissions to create, edit, and delete Resource Catalogs can access the Resource Manager.
Figure 16-2 Resource Catalogs Page in the Resource Manager
Description of "Figure 16-2 Resource Catalogs Page in the Resource Manager"
On this page, you can create, copy, publish, edit, preview, and delete Resource Catalogs. When you publish a custom Resource Catalog, it is available for selection on the application's Configuration page or a space's administration settings.
16.1.3 Understanding the Resource Registry
The Resource Registry is a central repository of all the resources available to the Spaces application. It contains all resources that you can add to Resource Catalogs in the application. In addition to the out-of-the-box resources, it is also updated dynamically to include new resources, such as task flows, data controls, and navigations, as and when they are created in the Resource Manager or deployed as shared libraries from JDeveloper. As a result, a resource that is created and published in the Resource Manager is available for consumption right away.
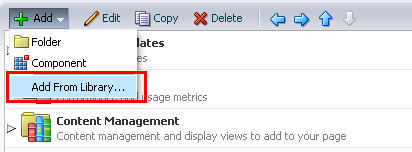
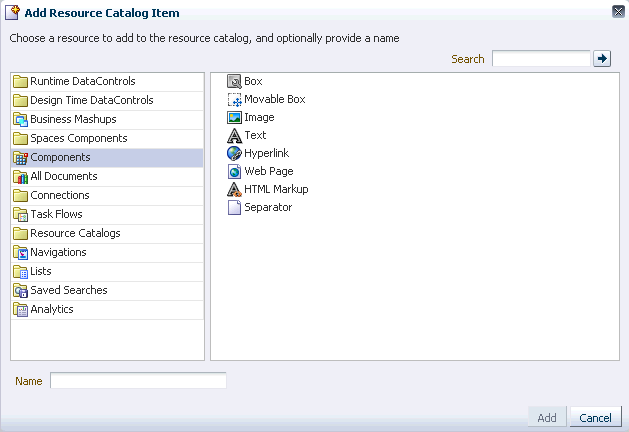
The Resource Registry (Figure 16-4) is displayed when you click the Add From Library option (Figure 16-3) in the Edit dialog for a Resource Catalog.
Figure 16-3 Add From Library Option to Access the Resource Registry
Description of "Figure 16-3 Add From Library Option to Access the Resource Registry"
Figure 16-4 Add Resource Catalog Item Dialog (Resource Registry)
Description of "Figure 16-4 Add Resource Catalog Item Dialog (Resource Registry)"
Table 16-3 describes the folders in the Resource Registry.
Table 16-3 Folders in the Resource Registry
| Resource Folder | Description |
|---|---|
|
Runtime DataControls |
Lists all data controls created at runtime. When you add these data controls in a Resource Catalog, you enable users to consume them in pages or task flows using different visualizations such as tables, graphs, buttons, and so on. For more information, see Section 26.2, "Creating and Managing Data Controls." This folder is empty if there are no runtime data controls in your Spaces instance. |
|
Design Time DataControls |
Lists all data controls deployed from JDeveloper. At a minimum, it displays the WebCenter Portal services data controls that are available out-of-the-box. In addition, it also displays data controls that an application developer may have created in JDeveloper and deployed to Spaces. For information about the data controls available for a WebCenter Portal service, refer to the chapter describing that service. |
|
Business Mashups |
Lists the task flows created at runtime in the Resources Manager. For more information, see Section 26.3, "Creating and Managing Task Flows." This folder is empty if there are no runtime task flows in your Spaces instance. |
|
Spaces Components |
Lists components, such as menus, links, copyright message, and so on, that are typically used in page templates. These resources are available out-of-the-box in the Default Page Template Catalog, in a folder named Template Development. For more information, see Chapter 13, "Adding Spaces Components to Your Templates." |
|
Components |
Lists a selection of layout components that you can use to design pages, templates, and task flows. For more information, see Chapter 18, "Adding and Configuring Page Layout Components." |
|
All Documents |
Lists all documents that you have access to. For more information, see Part X, "Working with Content". |
|
Portlet Producers |
Lists all registered portlet producers. For more information, see Chapter 25, "Understanding Portlet Basics." |
|
Connections |
Lists all available repository connections. Many resources, such as portlets, external applications, and some WebCenter Portal services, require a connection to a database schema where relevant information is stored. The chapters describing the various resources and services provide information about whether a connection is required for that resource or service. |
|
Task Flows |
Lists all task flows deployed from JDeveloper. At a minimum, it displays the WebCenter Portal services task flows that are available out-of-the-box. In addition, it also displays task flows that an application developer may have created in JDeveloper and deployed to Spaces. For information about the task flows available for a resource or WebCenter Portal service, refer to the chapter describing that service or resource. |
|
Resource Catalogs |
Lists all available Resource Catalogs. You can embed multiple Resource Catalogs inside a catalog. |
|
Navigations |
Lists all available navigations. These resources are available out-of-the-box in the Default Page Template Catalog. For more information, see Chapter 11, "Working with Navigation." |
|
Lists |
Displays all the lists created using the Lists service. For more information, see Chapter 64, "Working with the Lists Service." |
|
Saved Searches |
Displays all saved searches. For more information, see Chapter 56, "Working with the Search Service." |
|
Analytics |
Displays all the Analytics service task flows. These task flows help to track and display different metrics, such as response times and usage behavior, for the Spaces application. For more information, see Chapter 55, "Analyzing Usage and Performance Metrics." |
16.2 Creating Resource Catalogs
You can build a custom Resource Catalog either from scratch or by extending an existing Resource Catalog. Creating a Resource Catalog follows the same procedure as any other resource. For information about creating a Resource Catalog, see Section 10.2, "Creating Resources." For information about copying an existing Resource Catalog, see Section 10.4.1, "Copying a Resource."
The new Resource Catalog is listed on the Resources - Resource Catalogs page. However, the catalog is hidden by default. To make the new Resource Catalog available to the application or space, you must do the following:
-
Publish it in the Resource Manager. For more information, see Section 16.4, "Showing and Hiding a Resource Catalog."
-
Configure the application or space to use the new catalog as the default one. For more information, see Section 16.10, "Configuring Resource Catalogs in Your Application."
16.3 Editing a Resource Catalog
When you edit a Resource Catalog in the Resource Manager, you are basically managing its resources. The Resource Manager provides the following two options for editing Resource Catalogs:
-
Managing resources in the Edit dialog.
-
Editing the source code of the Resource Catalog definition file in a text editor.
This section explains both options. It includes the following sections:
Note:
To perform certain advanced editing tasks, you may want to download the Resource Catalog to JDeveloper, edit it, and upload it back to your Spaces instance. For more information, see Section 16.9, "Using JDeveloper to Build Your Resource Catalog."
16.3.1 Managing Resources in the Edit Dialog
The Edit option in the Resource Manager opens an Edit dialog (Figure 16-5), which provides various options to manage resources in the selected Resource Catalog.
Note:
You cannot edit out-of-the-box catalogs. The Edit option on these catalogs is grayed out.
Figure 16-5 Edit Dialog Used to Edit a Resource Catalog
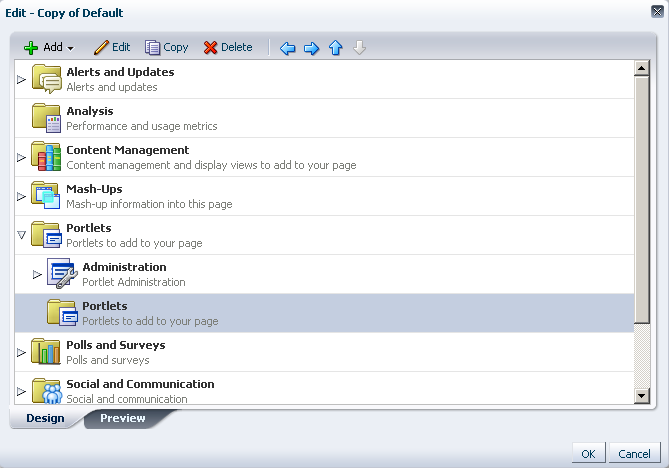
Description of "Figure 16-5 Edit Dialog Used to Edit a Resource Catalog"
You can edit a Resource Catalog to:
-
Create folders
-
Create custom components by providing the XML code
-
Add resources from the Resource Registry
-
Edit resource properties
-
Copy resources
-
Delete resources
-
Rearrange resources
-
Preview the catalog
This section describes the steps to perform these tasks. It includes the following subsections:
16.3.1.1 Creating a Folder
To organize your catalog better, you can group similar resources together; for example, group all layout components or all resources from a particular service.
To add a folder to a catalog:
-
Select the catalog in the Resource Manager and from the Edit menu, select Edit.
-
In the Edit dialog, from the Add menu, select Folder.
The Edit Resource Catalog Item dialog displays with two tabs, Target and Options. The Target tab is selected by default.
-
On the Target tab, specify a name and description for the folder, and leave the Visible option checked to ensure that the folder is displayed in the catalog.
-
Optionally, use the Options tab to define display options for the folder. For more information, see Section 16.3.1.5, "Setting Properties on a Resource."
-
Click OK.
You can now add resources inside this folder, or move resources inside it by dragging and dropping them from the top level folder.
16.3.1.2 Adding Resources
This section describes how to populate your catalog using the Resource Registry. For more information, see Section 16.1.3, "Understanding the Resource Registry."
To add a resource:
-
Select the Resource Catalog in the Resource Manager and from the Edit menu, select Edit.
-
If you have created folders (see Section 16.3.1.1, "Creating a Folder") and want to add resources inside a particular folder, then select the folder in the Edit dialog.
-
From the Add menu, select Add From Library.
-
In the Add Resource Catalog Item dialog (Figure 16-4), select a folder name in the left pane to display its contents in the right pane, or search for a resource by specifying its name in the Search field.
For a description of the available resources, see Section 16.1.3, "Understanding the Resource Registry."
-
Select a resource.
Tip:
You can select multiple resources using the standard shortcut keys for selection.
-
Optionally, in the Name field, specify a different name for the resource, if required. You can skip this step to retain the default resource name.
Note:
If you selected multiple resources at a time, you cannot rename them at this point. However, you can edit them after adding them to the catalog. For more information, see Section 16.3.1.5, "Setting Properties on a Resource."
-
Click Add.
Notes:
-
The Runtime DataControls folder lists the available data controls. You can expand a data control node to display its accessors and methods. However, you can only add the data control as a whole. Adding its accessors, methods, or attributes separately is not supported. You may see catalog errors if you try to add these objects.
-
Avoid adding a data control more than once in a catalog. The data control is added to the catalog as many times, but when you use the catalog to populate a page or task flow, you will not be able to add accessors, methods, or attributes from such data control instances.
-
The Design-Time DataControls folder lists all the WebCenter Portal services data controls. However, adding the ConnectionsNetworkDC and KudosServiceDC data controls at runtime is not supported. Avoid adding these data controls to your page or task flow.
-
-
Repeat the previous four steps to add more resources from the available folders.
-
Click OK in the Edit dialog.
16.3.1.3 Creating Custom Components
The Resource Registry in Spaces provides a large repository of resources that you can add to a catalog. However, if this is not sufficient and your business requires you to add other resources, such as ADF Faces components, custom JSPX, or raw HTML, you can create a custom component and specify the XML code for the component. Using a custom component is the only way to make such components available to a page in Composer.
You may want to create a custom component for the following purposes:
-
Create seeded layouts that can be added to a page. You can add a layout component and include a combination of design and container components inside it. The container components provide empty content areas that can be filled later.
-
Add external content by including the raw HTML code.
-
Define seeded layouts in which to consume data controls. You can then bind the data control to the layout.
To create a custom component:
-
Select the catalog in the Resource Manager and from the Edit menu, select Edit.
-
If you have created folders and want to add resources inside a particular folder, select the folder in the Edit dialog.
-
From the Add menu, select Component.
-
In the Edit Resource Catalog Item dialog, on the Target tab, specify a name and description for the new resource, and leave the Visible option checked to ensure that the resource is displayed in the catalog.
-
In the XML text area, enter the XML code for the component.
The following are a few examples of custom components:
-
Output Textcomponent:<af:outputText xmlns:af="http://xmlns.oracle.com/adf/faces/rich" value="Weather Foercast for the Day" id="#"/> -
Custom navigation:
<af:forEach xmlns:af="http://xmlns.oracle.com/adf/faces/rich"
            var="level_1_menu"
             items="#{SiteStructureContext.defaultSiteStructure.listModel['startNode=/, includeStartNode=false']}">
<af:outputText id="#"
               xmlns:af="http://xmlns.oracle.com/adf/faces/rich"
               value="#{level_1_menu.title}"/>
</af:forEach>
-
External HTML content:
<f:verbatim xmlns:f="http://java.sun.com/jsf/core">
  <![CDATA[
    <object width="640" height="385">
      <param name="movie" value="http://www.youtube.com/v/KO2ti-B00gw&hl=en_US&fs=1">
      </param>
      <param name="allowFullScreen" value="true">
      </param>
      <param name="allowscriptaccess" value="always">
      </param>
      <embed src="http://www.youtube.com/v/KO2ti-B00gw&hl=en_US&fs=1"
             type="application/x-shockwave-flash" allowscriptaccess="always"
             allowfullscreen="true" width="640" height="385">
      </embed>
    </object>]]>
</f:verbatim>
An alternative to this is to create a new task flow in the Resource Manager and add an HTML Markup component inside it.
-
-
Optionally, use the Options tab to define display options for the folder. For more information, see Section 16.3.1.5, "Setting Properties on a Resource."
-
Click OK.
16.3.1.4 Rearranging Resources
To move a resource within a folder, select the resource and click the Move Up or Move Down icon, shown in Figure 16-6, as many times as necessary until the resource is in the desired location.
Tip:
You can also reorder resources in a folder by dragging and dropping them at a different position.
To indent one resource (child item) under a folder (parent item), move the child item so that it is immediately below the parent item, select the child item and click the Indent icon. The Indent button is grayed out if there is no folder above the selected resource.
To move an indented resource so that it is no longer indented below a folder, select the resource and click the Outdent icon.
16.3.1.5 Setting Properties on a Resource
You can edit properties on a resource to set the resource name and description, the icon to be associated with the resource, and to add new properties.
To edit resource properties:
-
Select the catalog in the Resource Manager and from the Edit menu, select Edit.
-
If the resource you want to edit is inside a folder in the catalog, expand the folder and select the resource.
-
Click Edit.
-
In the Edit Resource Catalog Item dialog, on the Target tab (Figure 16-7), define the following attributes:
Note:
Each type of resource has different properties associated with it. The Name, Description, and Visible properties are common to all resources in a catalog. However, you may see all or some of the other attributes depending on the type of resource you are editing.
Figure 16-7 Target Tab on the Edit Resource Catalog Item Dialog
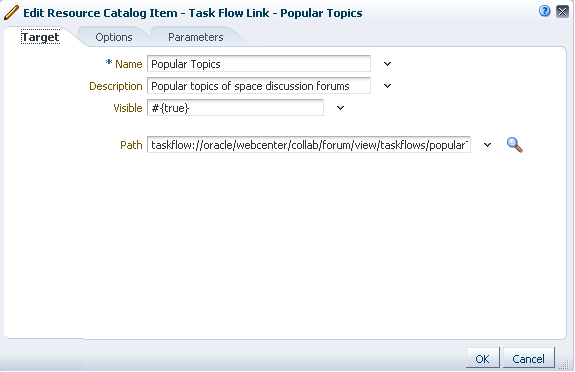
Description of "Figure 16-7 Target Tab on the Edit Resource Catalog Item Dialog"
-
Name: Name used for the resource in the catalog.
-
Description: A short description that appears below the resource name in the catalog.
-
Visible: Whether the resource must be rendered in the catalog. This field takes
trueorfalsevalues, or an EL value that can be specified using the Expression Builder option on the dropdown menu. -
Path: The URL to access the resource. This field is displayed only for resources of type Link. The URL format is different for the different link types. Table 16-4 describes the supported URL formats.
-
Repository: The name of the connection used to lookup the resource. This field is displayed only for resources that require a repository connection, for example, portlets.
-
Include Catalog: Select the catalog that you want to nest within the catalog. Contents from the catalog you select here are included directly under the catalog.
This field is displayed only when you select a nested catalog.
-
Hide Top-Level Folder: Select to include contents from the selected folder directly under the parent folder; for example, if you select this option for the Data Controls folder, then any data controls created at runtime are displayed directly under Mash-Ups. The Data Controls folder is not displayed. You can preview the catalog to see this change.
This field is displayed only for custom folders that are populated dynamically at runtime.
-
Factory Class: The factory class used to create the folder. This field is displayed only for custom folders that are populated dynamically at runtime.
The factory classes for the folders available in the default catalog are as follows:
-
Task flow:
oracle.webcenter.portalframework.sitestructure.rc.TaskFlowResourceFactory -
Portlet:
oracle.webcenter.portalframework.sitestructure.rc.PortletResourceFactory -
Content:
oracle.webcenter.content.model.rc.ContentUrlResourceFactory -
Data control:
oracle.webcenter.datacomposer.internal.adapter.datacontrol.DataControlContextFactory
-
-
-
Click the Options tab, shown in Figure 16-8, to define display options for the resource.
You can use this tab to assign attributes to the resource. You can assign any arbitrary attribute to a resource. The tab displays standard attributes such as icon and subject and keywords. In addition to these, you can add you own attributes, which can then be used by the drop handlers registered with Composer in Oracle WebCenter Portal. For example, you can add
attr.*andparameter.*attributes for task flows because their drop handler recognizes them.Figure 16-8 Options Tab on the Edit Resource Catalog Item Dialog
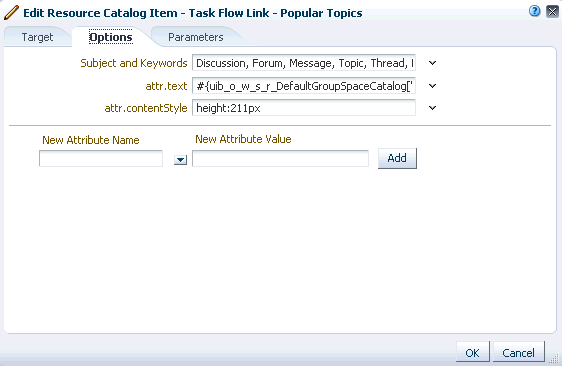
Description of "Figure 16-8 Options Tab on the Edit Resource Catalog Item Dialog"
The fields on the Options tab can be described as follows:
-
Subject and Keywords: Keywords to facilitate keyword searching of the Resource Catalog.
-
attr.ATTRIBUTE_NAME: These are attributes that were explicitly defined on the resource at design time. This field is displayed only for portlets and task flows, which display a chrome around them when consumed in a page. This field is used to set an initial value for an attribute on the task flow or portlet. When the task flow or portlet is consumed in a page, this attribute is exposed along with the enclosing chrome's attributes; for example,
attr.textdefines the default title for the task flow or portlet andattr.contentStyledefines the CSS style to be applied. This attribute is not exposed on the chrome if you do not set an initial value for it. -
parameter.PARAMETER_NAME: These are parameters that were explicitly defined on the resource at design time. This field is displayed only for task flows, which are wrapped in a
Show Detail FrameorMovable Boxcomponent when consumed in a page. This field is used to set an initial value for a task flow parameter. When the task flow is consumed in a page, this parameter is exposed along with the enclosingShow Detail FrameorMovable Boxcomponent's properties. This parameter is not exposed on the chrome if you do not set an initial value for it. -
New Attribute Name: Select one of the following attributes from the dropdown menu:
Tool Tip: Use to specify the tool tip to be displayed when you move the mouse over this resource name in the catalog.
Large Icon URI: Use to specify the path to the icon to be used for the resource.
-
New Attribute Value: Specify a value for the selected attribute.
The new attribute is displayed on the Options tab along with the existing properties.
-
-
Click the Parameters tab to define parameter values for resources that support wiring, for example, portlets and task flows. For details about supported parameters for a resource, refer to the documentation for that resource.
16.3.1.6 Copying a Resource
You can create a copy of an existing resource and modify it.
To copy a resource, select it in the catalog and click Copy. A copy of the resource is placed just below it in the resource hierarchy. You can select the copy and alter its attributes and parameters.
16.3.1.7 Deleting a Resource
You can delete resources from any custom Resource Catalog.
To delete a resource:
-
Select a resource and click Delete.
-
In the Delete dialog, click Delete to confirm deletion.
16.3.1.8 Previewing the Resource Catalog
Click the Preview tab in the Edit dialog to see how the Resource Catalog appears to users. The preview shows the order in which the resources will be displayed. It also shows how dynamic folders are executed.
16.3.2 Editing the Source Code for a Resource Catalog
The Resource Manager provides the Edit Source option for editing the source code of the catalog definition file. You may want to edit a Resource Catalog's source file to make advanced edits to its code without having to download the file, edit it in JDeveloper, and upload it back into Spaces:
To edit a Resource Catalog's source files:
-
Select the Resource Catalog in the Resource Manager and from the Edit menu, select Edit Source.
A simple Edit Source dialog displays the catalog definition.
-
Edit the catalog definition source code as required.
The format of the code is validated and an error message is displayed if you miss any tags or add them incorrectly. For information about the correct format for catalog definition elements, see "Resource Catalog Properties and Files" in Oracle Fusion Middleware Developer's Guide for Oracle WebCenter Portal.
-
Click OK.
16.4 Showing and Hiding a Resource Catalog
When you create a Resource Catalog, by default it is hidden. A hidden Resource Catalog is not available for use in the application, the Home space, or any other space. To publish a Resource Catalog, it must be marked as shown. Further, for a Resource Catalog created at the application level, you can control whether it is available to any, all, or selected spaces in the application.
For generic information about hiding and showing resources, see Section 10.4.3, "Showing and Hiding Resources."
For generic information about resource availability in spaces, see Section 10.4.2, "Setting Properties on a Resource."
16.5 Setting Properties on a Resource Catalog
You can control a Resource Catalog's display attributes and availability by setting the catalog's properties in the Edit Properties dialog. Setting Resource Catalog properties follows the same procedure as any other resource. For more information, see Section 10.4.2, "Setting Properties on a Resource."
16.6 Setting Security on a Resource Catalog
You can control whether all users or only specific users or groups can access the custom Resource Catalogs that you created in the application. Setting access to a Resource Catalog follows the same procedure as any other resource. For more information, see Section 10.4.4, "Setting Security for a Resource."
16.7 Copying a Resource Catalog
You can make a copy of a Resource Catalog by selecting it and choosing Copy from the Edit menu on the Resources - Resource Catalogs page. Copying a Resource Catalog follows the same procedure as any other resource. For the generic procedure, see Section 10.4.1, "Copying a Resource."
16.8 Deleting a Resource Catalog
You can delete custom Resource Catalogs created at runtime and those that you imported into your application. Deleting a Resource Catalog follows the same procedure as any other resource. For the generic procedure, see Section 10.4.5, "Deleting a Resource."
16.9 Using JDeveloper to Build Your Resource Catalog
You may want to create a Resource Catalog that is beyond the editing capabilites of WebCenter Portal: Spaces, or you may prefer working in JDeveloper. To do this, you have several options:
-
Use the Edit Source option to edit the source code of the catalog definition file. You can edit the source code directly in the Edit Source dialog or you can copy the contents of the dialog to JDeveloper for editing and then copy the edited code back into the dialog. For more information, see Section 16.3.2, "Editing the Source Code for a Resource Catalog."
-
Download an existing Spaces Resource Catalog, import it into JDeveloper, for editing, and then upload it back to Spaces.
-
Create a completely new Resource Catalog in JDeveloper and upload it to Spaces.
The steps to upload and download a Resource Catalog from Spaces are described in Section 10.5.2, "Downloading a Resource"and Section 10.5.3, "Uploading a Resource."
Oracle provides a special JDeveloper workspace (DesignWebCenterSpaces.jws) for developing Spaces resources, including Resource Catalogs. The workspace offers a design environment in which to create and edit your catalogs, and also enables you to upload them to Spaces for testing. For more information and to download the JDeveloper workspace, see "Developing Spaces Resources" in Oracle Fusion Middleware Developer's Guide for Oracle WebCenter Portal.
Note:
When editing a catalog in JDeveloper, if you add a custom resource such as a task flow, you must also deploy the resource to Spaces as a shared library. For more information, see "Deploying Your Own Custom Code and Task Flows in Shared Libraries" in the Oracle Fusion Middleware Developer's Guide for Oracle WebCenter Portal.
For information about editing a catalog in design time, see the chapter titled "Creating and Managing Resource Catalogs" in Oracle Fusion Middleware Developer's Guide for Oracle WebCenter Portal.
16.10 Configuring Resource Catalogs in Your Application
Out of the box, your Spaces application is configured with catalogs to be used at the application level. Resource Catalogs are configured for page and page template creation, and for business role page creation. If you want to use custom catalogs in place of the default ones, perform the steps in Section 16.10.1, "Configuring the Application-Level Resource Catalog."
Resource Catalogs are not configured by default at the space level. You can configure the catalogs to be used for page creation and page template creation within a space by performing the steps in Section 16.10.2, "Configuring the Space-Level Resource Catalog."
16.10.1 Configuring the Application-Level Resource Catalog
From your Home space, click the Administration link at the top of the page, then click the Configurations tab. The Resources section on the Configuration page, shown in Figure 16-9, displays information about the default catalogs used at different levels in the application. Select a catalog of your choice in each field.
Out-of-the-box, Spaces is configured to use the following catalogs:
-
Default Home Space Catalog for Home space pages and Business Role pages.
-
Default Page Template Catalog for page templates in your Home space and other spaces.
-
Default Space Catalog for pages in a space.
Figure 16-9 Default Resource Catalog Configurations at Different Levels in the Application

Description of "Figure 16-9 Default Resource Catalog Configurations at Different Levels in the Application"
16.10.2 Configuring the Space-Level Resource Catalog
By default, the Resource Catalogs for pages and the page templates in a space are inherited from the application-level settings. You can change the Resource Catalogs for a space in the space administration settings. For more information, see Section 51.4.11, "Changing the Resource Catalogs for Pages and the Page Template for a Space."