 Understanding Data Administration and the Build Process
This chapter provides an overview of PeopleSoft Application Designer data administration and the Build process and discusses how to:
Run the Build process.
Create tables.
Create indexes.
Alter tables.
Create triggers.
Create views.
Administer Data Definition Language (DDL).
Understanding Data Administration and the Build Process
Using PeopleSoft Application Designer, you create several kinds of definitions that represent database components. For instance, field definitions represent table columns, and record definitions represent tables and views. From these field and record definitions, you can create tables, views, and indexes. The important concept to remember is that the definitions are just the blueprints for the actual, physical database components with which they are associated. In the context of the entire application development cycle, use the Build process to create SQL tables, views, triggers, and indexes after you define new fields and create the record definitions. After you build the SQL tables, you begin creating page definitions.
After you create and define your field and record definitions, you must create or build the underlying SQL tables that house the application data that your users enter online in your production environment. The Build process is the centerpiece of the data administration features in PeopleSoft Application Designer. The Build process uses DDL to construct a physical database component that is based on the associated record and field definitions that you created. Using the Build feature, you can create:
Tables.
Indexes.
Views.
Triggers.
You can also use the Build feature to alter existing tables if you change the record definition after the table already exists. Altering a table is useful, because it enables you to make changes without losing the application data that is already housed in the table. In general, the results of the build operation are written to a script file that a database administrator can run later. On some database platforms, you can run the SQL online, if you prefer, so that your changes are immediately reflected in the physical database. However, if you run the SQL immediately, you cannot review it to make sure that the table that was built truly meets all of your requirements.
Before you begin using the data administration tools and running a build process, make sure you:
Review what DDL means for PeopleSoft applications.
Grant build authority.
DDL is the part of SQL that pertains to the creation of tables, indexes, views, triggers, and tablespaces. DDL is also the part of SQL that differs most between the various relational database platforms. Each database vendor provides different syntax and configuration options for creating and organizing tables and for optimizing performance. Because PeopleTools supports multiple database platforms, PeopleSoft developers designed a flexible way of specifying DDL that enables you to take advantage of each vendor’s features. The basic components of the PeopleSoft DDL support include the following:
DDL model definition: A complete set of the supported DDL statements for each database platform.
Statements include Create Table, Create Tablespace, and Create Index. Each DDL model statement has substitution parameters that can be specified at the database level or overridden for individual records.
Record DDL: Specify the DDL model substitution parameters for an individual record.
Index DDL: Specify the DDL model substitution parameters for an index.
Sizing sets: A way to maintain multiple versions of your DDL model statements for a database platform.
For example, you can use one sizing set during a development phase, when tables have only test data, and another during production, when tables have more data.
PeopleSoft Security enables you to specify which users can build scripts, run scripts (Execute SQL now), maintain DDL, and so on. Access Security from the PeopleTools link in the menu.
See Also
Setting PeopleTools Permissions
Running the Build ProcessThis section provides an overview of the Build menu and discusses how to:
Select the build scope.
Select build options and run the Build process.
 Understanding the Build Menu
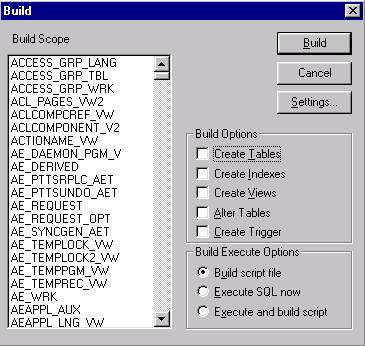
Access all of the commands and options that are associated with building tables, views, indexes, triggers, and altering tables from the Build menu. When you choose to build an item from the Build menu, the tasks for creating or running SQL scripts that define the underlying database components are included in the Build dialog box.
Build dialog box
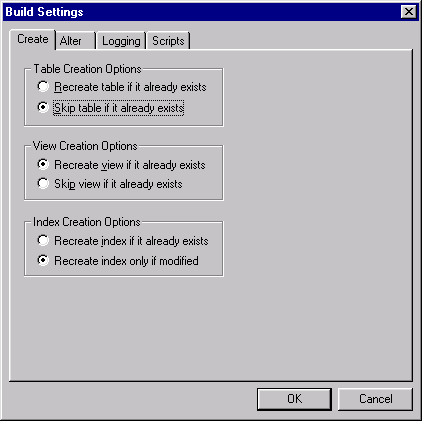
The settings for the Build process in the Build Settings dialog box enable you to configure various aspects of the process. Depending on which build option you are running, your settings vary. The Build Settings that you select are stored on your workstation so that they can be reused during future PeopleSoft Application Designer sessions. Access the Build settings by selecting Settings from the Build menu in PeopleSoft Application Designer or click theSettings button in the Build dialog box.
Build Settings dialog box
When you select the Create Tables, Create Indexes, or Create Views options in the Build dialog box, specify the appropriate options on the Create tab of the Build Settings dialog box. For example, you might need to specify whether an existing table, view, or index is skipped or dropped and then recreated.
If you modify your record definitions, the tables in your production database should reflect those changes to maintain your data integrity. When you alter a table, select the appropriate options, such as the options in the Drop Column Options area on the Alter tab of the Build Settings dialog box.
You can monitor the Build process by reviewing the log files that it automatically generates. Keep in mind that the log file is entirely separate from the script file. The amount of information that the log file contains is up to you. You can set up logging so that all statuses (both good and bad) appear in the log, or you can specify that only errors or warnings appear in the log. Control the settings for the Build log file (such as the logging level and the location for the output log file) on the Logging tab of the Build Settings dialog box.
If you build a script file, then the Build process generates a script file that contains all of the CREATE and ALTER SQL statements so that you can review them before running the SQL through another SQL command processor. If the generated script file meets your requirements, a database administrator (DBA) can run the script later. The Build process can produce multiple scripts during a single run—one for each build option—depending on the script settings that you specify at runtime. For example, you can specify that the Build process generate a separate script for your tables, views, indexes, triggers, and alters, or you can have all of the SQL for each action contained in one script. Use the Scripts tab of the Build Settings dialog box to specify where the SQL script is written, whether you want multiple scripts generated for each definition type, and whether you want previous scripts overwritten.
Selecting the Build Scope
The Build feature includes three different scopes that determine the size of your build project. Depending on what you actually want to build—one record or an entire project—you can determine the scope by selecting one of the scopes described in the following topics.
Select Current Definition from the Build menu to build or alter the active record definition. Active definition means the definition that is currently active in the definition workspace.
Select Project from the Build menu to build or alter all of the records, indexes, triggers, and views in the current project—that is, all of the records that appear in the project workspace. You typically find numerous record definitions in the Build Scope list box.
To build all definitions in a database, create a new project and insert all of the appropriate records. For example, insert records of a particular type, such as views. If you create another record after the all records project is built, you must manually add the new record to the project.
You may also build a project using the command line and specific parameters. The prerequisites for using the command line to build a project are:
The project exists with all objects.
The build settings need to be set in the Windows registry.
Note. The Build Project process accesses every single record that is in the project, including work records, even if they are marked to be deleted.
Select Definitions Into Project
In some situations, you might want to build a subset of the records in the project that is currently open. If you do not want to build an entire project or even the current project, you can build only the definitions that you select in the project workspace by pressing the ctrl key and selecting multiple records in the project workspace. After you select the appropriate records, right-click and select Build from the pop-up menu. Only the definitions that are selected in the project workspace appear in the Build Scope list box.
Note. You must invoke the Build process from the pop-up menu; you cannot build selected definitions from an open project using the Build menu.
Selecting Build Options and Running the Build Process
Access the Build dialog box.
|
This list box displays all of the definitions that are included in the current Build process. The records that appear in this list box cannot be selected or deselected. If you must narrow the scope of your build, do so before accessing the Build dialog box. |
|
|
Build |
Click this button to start the Build process. While the Build process is running, the Build Progress dialog box appears, showing the current record being processed, the record number being processed in the series, and the total number of records that comprise the build. To stop a running Build process, click the Cancel button. When the Build process completes, the Cancel button is unavailable, and the Close button is the only valid button. |
|
Click this button to open the Build Settings dialog box, where you can view or change your options. |
Note. After the Build process begins, no runtime prompts appear until the process is complete. All events are written to the Build log.
The Build Options group box enables you to specify what action you want to occur: Create Tables, Create Indexes, Create Views, Alter Tables, or Create Trigger. If you select Create Tables or Alter Tables, Create Indexes is automatically selected by default. Also, if you select Alter Tables, Create Indexes and Create Trigger are automatically selected by default.
Note. You can select both Alter Tables and Create Tables to run concurrently if the Skip table if it already exists option is enabled on the Create tab in the Build Settings dialog box. Otherwise, the system cannot determine whether you want to alter or recreate a table that already exists.
Build Execute Options
|
Select this option to review and update the SQL before running the script. This method is the safest. |
|
|
Select this option if you do not want to invoke another program to run the SQL; the SQL runs as part of the Build process. The disadvantage of running the SQL immediately is that you have no opportunity to review the SQL before it is committed to the database. |
|
|
Execute and build script |
Select this option to review the SQL that the Build process just ran. |
To run the SQL script file that the Build process generates, you must use a third-party SQL interpreter, such as Oracle SQL*Plus or Microsoft ISQL/W. Most database vendors include a native command processor that you can run on the client or the server.
Note. The Execute SQL now option is unavailable if you use the Alter Tables Build option. However, you can use the Execute and build script option when using Alter Tables. Selecting this option builds a script with the entire altered SQL. This script may help if errors are encountered during the alter process. However, if an alter process has multiple tables and an error occurs, the errors are reported to a log file and the process continues to the next table.
Using Command Line Syntax to Build a Project
Use the same command line syntax as identified previously to build a project.
See Understanding PeopleSoft Application Designer Command Line Parameters.
Use the command line statement for the project build to:
Connect the project to the source database.
Use the build settings from the Windows registry to generate the SQL script for the create or alter processes.
Before running the build command line, verify that:
The system components of the project are created and loaded.
The build options are set in the Windows registry.
This table lists all of the available parameters for the project build statement:
|
Parameter |
Description |
|
|
Use to hide the PeopleSoft Application Designer interface. Always use this parameter when performing a command line Copy process. |
Required for all project command line processes. |
|
|
–CT |
Database type. Enter the type of the database to which you are connecting (MICROSFT, ORACLE, SYBASE, and so on). |
Required. If you omit this parameter, the last database type is taken from the registry. If it fails, the process stops and error messages are written to the log file. |
|
–CS |
Server name. Enter the name of the source database server for the database to which you are connecting. |
Required for some database types. If you omit this parameter, the process stops and error messages are written to the log file. |
|
–CD |
Database name. Enter the name of the source database to which you are connecting as you would enter it into the PeopleSoft Signon dialog box. |
Required. If you omit this parameter, the process stops and error messages are written to the log file. |
|
–CO |
User ID. Enter the PeopleSoft user ID that is needed to sign in to the source database. |
Required. If you omit this parameter, the last database type is taken from the registry. If it fails, the process stops and error messages are written to the log file. |
|
User password. Enter the password for the specified user ID for the source database. |
Required. If you omit this parameter, a PeopleSoft Signon dialog box appears for the user to enter a valid user password. If the password fails, the process stops and error messages are written to the log file. |
|
|
–PJB |
Project name. Enter the name of the project to be built. This project should be available in the database before starting the command line project build. |
Required. The system uses this main parameter internally to decide whether the user can build a project. If you omit this parameter and if you supply all of the source database login parameters, the program only starts the application. |
Example
For this example, assume that the:
Project name is CJR1.
Database type is Microsoft.
Database name is CJR810G.
User ID is PTDMO.
Password is PTDMO.
Path name of the SQL script file is c:\temp\psbuild.sql.
Path name of the log file is c:\temp\psbuild.log in the Windows registry.
For this example, you would enter the following at the command line:
PSIDE.EXE −CT MICROSFT −CD CJR810G −CO PTDMO −CP PTDMO −PJB CJR_PRJ
Creating TablesThis section provides an overview of the Create Table process and discusses how to:
Create a table.
Specify Create options.
Specify Logging options.
Specify Script options.
Confirm a table build.
Understanding the Create Table ProcessThe Build process generates the appropriate SQL Create statements to build tables based on both your record definition and your platform. It prefaces each new application SQL table with PS_ to identify it as an application that was built using PeopleTools. For example:
PS_ABSENCE_HIST
Note. PeopleTools does not preface table names with PS_ if you specified a custom name in the Non-Standard SQL Table Name edit box located on the Type tab of the Record Properties dialog box.
The Build process also creates the appropriate indexes. Because long-character fields operate more efficiently in some database environments when they are located at the end of a table, the Build process automatically positions long-character fields at the end of the table for each database environment.
The Create Table process creates a new application table based on parameters defined in the record definition. When a new table is created, the database management system updates the system catalog tables to reflect the attributes of the new table.
The Create Table process is illustrated by the following diagram:
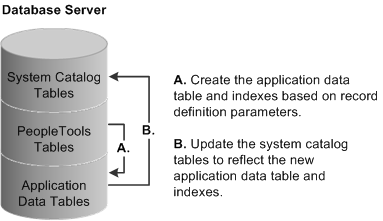
Create Table process
After you create an updated SQL build script and run it, the PeopleTools tables and the system catalog tables are synchronized; and the record definition and the application data table are synchronized. The following table lists the steps of the Create Table process and the associated record definition parameters:
|
Create Table Process |
Record Definition Parameter |
Usage |
|
Drop the table if it already exists. |
NA |
NA |
|
Create the application data table. |
Record definition name. Field names. Field type. Field length. |
Table name (add PS_ prefix). Column names. Column type. Column length. |
|
Create indexes. |
Key fields. Alternate search key fields. Custom indexes. |
Unique index: (_) Alternate index: 10 (0–9) per table. Custom index: (A–M) per table. |
The following procedure covers all of the high-level steps that you need to successfully complete for the Create Table build process. Steps that involve a variety of options include links to the area where those options appear in PeopleBooks.
Note. You can have a maximum of 500 columns per table.
Creating a Table
To create a table:
Open the project for which you want to build SQL tables.
Select Build, Project.
From the Build menu, select the appropriate scope of your build.
See Selecting the Build Scope.
The Build dialog box appears.
Select the Create Tables in the Build Options group box.
PeopleSoft Application Designer automatically activates the Create Indexes option. If you are rebuild or recreate tables, then the indexes that the system uses to extract information from those tables must also be updated. Definitions to be built appear in the Build Scope list box, which does not allow you to edit, remove, or add definitions.
Select one of the Build Execute options.
The default option builds an SQL script file containing the commands to run the selected build options.
Click the Settings button in the Build dialog box to set user-defined defaults.
The Create tab in the Build Settings dialog box appears.
Select the appropriate settings on the Create tab.
See Specifying Create Options.
Recreating a table removes all data contained in the table as well as views or grants referencing that table.
Select the Logging tab.
Set the Logging Levels and associated options.
Select the Scripts tab.
Specify the script file options.
If you selected Execute SQL Now as your build option in the Build dialog box, you can skip the Scripts tab because you will run the SQL online. Settings on the Scripts tab are relevant only if you are building a SQL script to run later.
Click OK to close the Build Settings dialog box.
In the Build dialog box, click the Build button to run your build option.
The length of a Build process depends on the number of definitions that require building. Watch the Build Progress dialog box to monitor the Build process. When the process completes, check any errors listed in the log file.
Specifying Create Options
Access the Build Settings dialog box and select the Create tab.
Table Creation Options
These options determine when a table should and should not be created.
|
Recreate table if it already exists |
Select to drop and recreate a table if it already exists. Select this option with extreme care because if data already resides in the table, it is also dropped. If you select this option, the Build process prompts you to confirm your intention before performing any destructive action. If you do not care about losing the data that resides in the table, then this option is faster than the Alter Tables option. |
|
Skip table if it already exists |
Select to create only newly defined tables. If you want to preserve the data that already resides in existing tables or if you are only interested in creating the tables that do not already exist, select this option. |
Similar settings are available for creating views that you use for creating tables.
|
Recreate view if it already exists |
Because views are only logical views of data, you can safely select this option; you do not run the risk of losing physical data. Using this option ensures that all views in the project are rebuilt, whether they need to be or not. |
|
Skip view if it already exists |
If you are concerned only with creating views that do not already exist in the database, select this option. This option is useful if you want to run Build Project on a large project and only a subset of the views in the project must be created. This option consumes less time than recreating all of the views in the project. |
These options determine when an index should be recreated.
|
Recreate index if it already exists |
Select to recreate the index for your tables, even if you already have one in place. This option recreates the index no matter what the situation. |
|
Recreate index only if modified |
Select to recreate the index only if the data in the indexes is being modified. |
Specifying Logging Options
Access the Build Settings dialog box and select the Logging tab.
Specify the level of detail of information that you want in your Build log output.
|
Fatal errors only |
Select this option if you want to see only the operations that failed. |
|
Select this option to add warnings to the fatal errors. |
|
|
Fatal errors, warnings and informational messages |
Select this option to see all the definitions that processed successfully and all of the errors and warnings. |
Note. These options are personal preferences and do not affect the actual build of your SQL tables, but they might help you track down potential failures. For example, if you are processing a large number of definitions, you will want to see only the operations that failed. Whereas, if you are processing a small number of definitions, you will want to see all of the successful operations, too.
Specify where and in what form you want to view your log output.
|
Select to write the same information that appears in the log file to the PeopleSoft Application Designer output window. Always be aware of the level that you select. If you expect a lot of detail (high logging level plus many records to process), you may want to copy the logging information to a file and print it later. |
|
|
Log to file |
Select to write the log to a file. If you select this check box, you can specify a location and name for your log file in the Log file name edit box. To search for a name, click the Browse button. Select a .LOG type file from the Build File Selection dialog box. If you do not select this check box, the edit box is unavailable for entry. |
|
Log settings |
Select to write all of the runtime options to the log. If you select this check box, you do not need to rerun a test when you have a problem. If you must report a problem with the Build process or troubleshoot, you need to know the settings that were active. |
Note. You should select the Log to file check box and the Log to output window check box with a minimum logging level of fatal errors and warnings. In case you run into a problem, you already have the information you need to research the problem. Otherwise, you must run the process again with a higher logging level.
The following are samples of the type of information that you can expect to see in your log output that corresponds to the selections that you make on the Logging tab:
Fatal errors:
SQL Build process began on 7/30/2003 at 8:46:46 PM for database
OM51U20
Error: BI_BILL_BY_F_VW - Unable to retrieve current DDL space name.
 Alter processed failed.  (76,47)
Error: BI_CHARGE_VW - Unable to retrieve current DDL space name.
Alter processed failed.  (76,47)
Error: PS_BI_CYCLE_VW - alter failed due to an unknown column type
(UNDEFINED) found for field BILL_CYCLE_ID.  (76,22)
Error: PS_BI_IVCLAYOUT_VW - alter failed due to an unknown column
type (UNDEFINED) found for field INVOICE_LAYOUT_ID.  (76,22)
Error: CARINA - alter failed because SQL table does not exist.  (76,7)
SQL Build process ended on 7/30/2003 at 8:54:34 PM.
2487 records processed, 11 errors, 0 warnings
SQL Build script for all processes written to file C:\TEMP\step38.SQL.
SQL Build log file written to C:\TEMP\step38.LOG
Warnings:
SQL Build process began on 8/27/2003 at 4:00:32 PM for database DXD7L
Warning: ABSENCE_HIST2 - data would be truncated by altering
REASON.  Record processed.  (76,24)
Fatal errors, warnings, and informational messages:
SQL Build process began on 8/27/2003 at 3:58:58 PM for database DXD7L
Warning: ABSENCE_HIST2 - data would be truncated by altering
REASON.  Record processed.  (76,24)
Error: ABSENCE_HIST2 - field PAID_UNPAID to be deleted has data
present.  Record skipped.  (76,23)
Informational: ACCOMPLISHMT_VW - view created and scripted
successfully.  (76,18)
Informational: ACCT_AD2_INV_VW - view created and scripted
successfully.  (76,18)
Informational: ACCT_ADJ_INV_VW - view created and scripted
successfully.  (76,18)
Informational: ACCT_ISS_INV_VW - view created and scripted
successfully.  (76,18)
Informational: ACCT_STK_INV_VW - view created and scripted
successfully.  (76,18)
Informational: ACCT_TYPE_VW - view created and scripted
successfully.  (76,18)
Informational: ACTION_SP_VW - view created and scripted
successfully.  (76,18)
Informational: ACTION_XLAT_VW - view created and scripted
successfully.  (76,18)
Informational: ADJUST_INV2_VW - view created and scripted
successfully.  (76,18)
Informational: ADJUST_INV_VW - view created and scripted
successfully.  (76,18)
11 records processed, 1 errors, 1 warnings
SQL Build script for all processes written to file
C:\TEMP\PSBUILD.SQL.
SQL executed online.
SQL Build log file written to C:\TEMP\PSBLD.log
Log settings:
**** Begin Build Settings for this Run
Create Tables = No
Create Indexes = Yes
Create Views = No
Create Triggers = Yes
Alter Tables = Yes
Log to File = Yes
Log to Window = Yes
Write comments to script = No
Always overwrite files = Yes
Execute SQL Now = No
Write SQL to script file = Yes
Logging level = Log fatal errors, warnings and informational messages
Table creation option = Skip table if it exists
View creation option = Drop and recreate view if it exists
IndexCreationOption = Drop and recreate index always
Alter Adds = Yes
Alter Changes = Yes
Alter Renames = Yes
Alter Deletes = Yes
Alter even if no changes = No
Alter Table Option = Alter by Table Rename
Write script output to: Single file
Log filename = c:\temp\PSBUILD.LOG
Single script filename = c:\temp\PSBUILD.SQL
Alter drop column option = skip record if data present
Alter truncate column option = skip record if data would be truncated
Target database platform = MICROSFT
Target sizing set = 0
Working With the Output Window
You can navigate from error messages in the PeopleSoft Application Designer output window to the corresponding record definition by selecting the appropriate line in the Build log and double-clicking anywhere on that line. PeopleSoft Application Designer opens the corresponding record in the definition workspace.
Also, you can double-click any line in the output window that corresponds to a file, not just a record. PeopleSoft Application Designer opens that file with whatever application that you defined to open files with a particular extension. For example, if you associated SQL files with your native SQL command utility, then your SQL utility opens and loads your PSBUILD.SQL script when you double-click the line that reads:
Single script file name = C:\TEMP\PSBUILD.SQL
Note. PeopleSoft Application Designer uses the standard Microsoft Windows method for defining which programs are associated with particular file types. To modify the file associations, open My Computer, select Tools, Folder Options, and then select the File Types tab.
Specifying Script Options
Access the Build Settings dialog box and select the Scripts tab.
The Write Alter comments to script check box enables you to either include or suppress alter comments. The following example displays the types of comments that you see in your PSALTER.SQL script if you enable this option:
-- Alters for record PS_AE_RUN_CONTROL ;
--           AE_THREAD - change ;
--               OPRID - change ;

-- Start the Transaction ;


-- Data Conversion ;


-- Drop Old Indexes ;

DROP INDEX SYSADM.PS_AE_RUN_CONTROL
/

-- Add Columns ;

ALTER TABLE PS_AE_RUN_CONTROL ADD Z_TMP_ALTER_1 DECIMAL(12,4)
/
ALTER TABLE PS_AE_RUN_CONTROL ADD Z_TMP_ALTER_2 CHAR(12)
/
UPDATE PS_AE_RUN_CONTROL SET
    Z_TMP_ALTER_1 = AE_THREAD,
    Z_TMP_ALTER_2 = OPRID
/
If you do not view the alter comments, the script containing the same commands as the previous script looks like this:
DROP INDEX SYSADM.PS_AE_RUN_CONTROL
/
ALTER TABLE PS_AE_RUN_CONTROL ADD Z_TMP_ALTER_1 DECIMAL(12,4)
/
ALTER TABLE PS_AE_RUN_CONTROL ADD Z_TMP_ALTER_2 CHAR(12)
/
UPDATE PS_AE_RUN_CONTROL SET
    Z_TMP_ALTER_1 = AE_THREAD,
    Z_TMP_ALTER_2 = OPRID
/
The default for the Save as Unicode check box is based on the UNICODE/ANSI database. This check box is available only when using MSSQLServer, Oracle, DB2/UDB for Linux, UNIX, and Windows, Sybase and DB2 UDB for OS/390 and z/OS databases. Only on Informix , the check box is permanently unavailable because the script files are always ANSI.
The following table lists the default settings for the Save as Unicode check box:
|
Database Type |
Default for Save as Unicode Check Box |
|
Unicode |
Selected |
|
ANSI |
Unavailable |
The script file option, Save as Unicode, is stored in the registry with the other build settings. Therefore, the previous setting is always the default every time that the dialog box is opened.
The type of script file that is generated during the Build process is based on the Save as Unicode check box setting for the UNICODE/ANSI build and UNICODE/ANSI database. This table lists details:
|
Database Platform |
Unicode |
ANSI |
|
MSSQL Server |
UCS2 |
ANSI |
|
Sybase |
UTF8 |
ANSI |
|
Oracle |
UTF8 |
ANSI |
|
DB2/UDB for Linux, UNIX, and Windows |
UTF8 |
ANSI |
|
DB2 UDB for OS/390 and z/OS |
UTF8 |
ANSI |
If you want all of your CREATE TABLE statements to be written to one SQL script file and your CREATE INDEX statements to another, then select the Output to separate files option. If you prefer to have all of your statements, CREATE, ALTER, and so on, contained in a single file, then select the Output to single file option.
Note. Script files can be quite large. To reduce the size of files so that they are easier to manage, select the Output to separate files option. Also, the system never appends script files; it overwrites them or you can terminate the process if you elected to be prompted before a build script file is overwritten.
Depending on which output option you select, the options in the Script File Names group box change to suit one file or multiple files.
These options indicate whether you want to overwrite automatically or be prompted before script files are overwritten. Your personal preference determines which technique you employ.
|
Always overwrite |
Select to overwrite your previous build scripts. |
|
Prompt for each overwrite |
Select to be alerted when a script is about to be overwritten. To avoid the possibility of overwriting files altogether, you can use a naming convention that, in itself, prevents any overwrites. For example, you could specify a unique name for each build script, as shown:
|
The options available to select in this group box depend on your selection in the Script File Options group box.
|
Output to single file |
When you select this option, an edit box appears in the Script File Names group box: All Output File Name. The default name for the generated script is PSBUILD.SQL. Note. Script files can be quite large. To reduce the size of files so that they are easier to manage, select the Output to separate files option. Also, the system never appends script files; it overwrites them or you can terminate the process if you elected to be prompted before a build script file is overwritten. |
|
Output to separate files |
If you select this option, the following edit boxes appear, one for each build option:
|
Confirming a Table Build
If you are running SQL online, complete Steps 1 and 3; Step 2 is not required.
To confirm a table build:
Review the SQL script that was generated by the Build process.
Use your native SQL command processor to open the SQL script. The script is located where you specified on the Scripts tab of the Build Settings dialog box.
Run the script against your database.
Confirm that the tables now exist.
Use your query tool and SQL Select statements to confirm that the Create Table process created an application table that corresponds to your record definition and updated the system catalog tables. The SQL statement that you use to confirm depends on the table that you just created.
Creating Indexes
This section provides an overview of indexes and discusses how to:
Configure indexes.
Add a custom index.
Edit the DDL.
Understanding Indexes
Indexes are an important part of your physical database because they affect the efficiency and speed with which your application can store and retrieve data. PeopleSoft application indexes are defined in two ways.
Some indexes are defined for you automatically, based on the key, search key, list box items, and alternate search keys that you specified in your record definition. The application processor uses these indexes for quick access when you use the online system.
However, sometimes you need to define additional indexes to improve the performance of demanding queries, reports, or batch programs. You define and modify these additional indexes using the data administration tools in PeopleSoft Application Designer.
Note. You can only create indexes for record definition types that are SQL or temporary tables. You would not create indexes on views, such as a SQL view, because views are never physically created. The Indexes option in the Tools, Data Administration menu is disabled when a view is open.
When you use SQL Create or SQL Alter for a table, the system automatically builds database indexes to the SQL table that are based on the keys and list items that you specify in the record definition. Your database uses indexes to find definitions in the database the same way that you use indexes to find specific information in a book. If an index entry exists for a specific field in a table, the database can search and quickly find what it needs to complete your request; otherwise, it must search the contents of the entire table.
Indexes enhance system performance by generating key lists that the application processor uses to extract the data that it uses to populate pages and search records. The system automatically creates:
Standard indexes (key or duplicate order key indexes) if at least one field in the table is a key or duplicate order key.
The index contains all key and duplicate order key fields. The system automatically names this index with a prefix of PS_.
Alternate search key indexes for each alternate search key.
The system automatically names this index with a prefix of PSn, in which n is a number between 0 and 9.
Custom indexes, which you can define using the Edit Index, Edit DLL, and Add Index dialog box in the PeopleSoft Application Designer administration tools.
The system automatically names this index with a prefix of Psa, in which a can be any letter between A and M. The system does not create custom indexes automatically.
For most database tables (those with unique keys), the key index defines unique keys for a table, but the system also uses it to access high-level keys and orders by all keys. Alternate search key indexes support the search record and field prompts. The purpose of these different indexes is to enable the system to respond to all system prompts through index-only SQL access, minimizing direct database table access.
Note. If you use Create Table or Alter, the Create
Index option is automatically selected. With the Create
Table or Alter options, you cannot
deselect the Create Index option.
The alter process takes care of indexes regardless of the Alter Table
Options you select on the Alter tab of the Build Settings dialog box. In the
case of the Alter by Table Rename option, the
indexes are dropped automatically when the temporary table is dropped. For
the Alter in Place option, the index creation
process goes through the Recreate index only if modified option
on the Create tab.
When creating indexes with the Alter method, before altering the table,
drop the statistics using "DROP STATISTICS" that were created explicitly in
columns using "CREATE STATISTICS."
The following record definition modifications require you to create new indexes:
Add, delete, or modify keys, duplicate order keys, alternate search keys, or descending keys in the Record Field Properties dialog box.
Change the order of keys (ascending, as opposed to descending) in the Change Record Indexes dialog box.
Change the Unique settings in the Edit Index dialog box.
Most database platforms support indexes with an unlimited number of keys. However, Microsoft SQL Server 2000; DB2/UDB for Linux, UNIX, and Windows (DB2/UDB LUW); and Informix support only indexes that have a maximum of 16 keys. PeopleSoft Application Designer supports indexes for these databases by creating functional indexes. If a record definition has more than 16 keys, the Build process automatically alters the table to support functional indexes. The system adds a warning message to the log file indicating this. You can find sample code for functional indexes for each of these platforms in Appendix A of this PeopleBook.
See Understanding Functional Indexes.
The following list offers more details about functional indexes by database platform:
Functional indexes for Microsoft SQL Server 2000.
If an index has more than 16 keys, the key fields are concatenated to a functional key. This key field is then added to the table as the last column, called MSSCONCATCOL. A unique index is created for MSSXCONCATCOL as well as an additional index called PSW<record name>, which is used as a search index.
Functional indexes for DB2/UDB LUW.
Similar to the concatenation that occurs with SQL Server, DB2/UDB LUW also concatenates the key fields to a functional key. The key is then added to the table as the last column, called DBXCONCATCOL. A unique index is created for DBXCONCATCOL as well as an additional index called PSW<record name>, which is used as a search index.
Functional indexes for Informix.
If an index has more than 16 keys, a function is created for every 16 keys. The name for this set of 16 keys is PS_<record name>_SP<the incremented number for each function>. The functions are used to create a unique index. An additional index, called PSW<record name>, is also created.
Configuring Indexes
For performance tuning, you might want to change the order of your index keys. PeopleSoft Application Designer provides direct control over all of the indexes created by PeopleTools. You can inspect, add, or change all defined indexes or delete custom indexes for any record in the system through the Change Record Indexes dialog box.
Standard indexes are based on the key, duplicate order key, or alternate search key only. However, with the Change Record Indexes dialog box, you can modify those indexes and create additional indexes, which might be required if you do custom processing. Any of the indexes that you entered can be maintained for all database platforms or for a list of specific platforms. All indexes and keys created by PeopleTools are stored in PeopleSoft system tables.
To edit the index key order:
Open the record definition for which you want to make the custom index.
Select Tools, Data Administration, Indexes to access the Change Record Indexes dialog box.
The Custom Order column indicates whether the index keys were configured. The default selection is N, indicating that no index keys were configured.
Double-click N or Y in the Custom Order column for the index that you want to alter, or click Edit Index.
Select the Custom Key Order check box.
Click OK.
The Custom Order entry changes from N to Y.
Drag and drop the field that you want to move into the appropriate order.
After configuring the key order, to reset the key order of the index to the original order as defined in the record definition, deselect the Custom Order entry (Y to N), and click OK. The order of the key fields reset to the original position in the Change Record Indexes dialog box.
Check the key order in the Use Display mode of your record definition.
The Num (number) column represents the original order of the keys in your record, and the Ordr (order) column reflects the key order in the index.
Create the indexes:
Select Build, Current Project.
Select Create Indexes in the Build Options group box.
Make sure that you select the appropriate build settings.
Run the Build process to either generate a script or run the SQL online.
Confirm the construction of the new index with your native SQL command processor.
Note. Users might also configure indexes for parent records that contain one or more subrecords without key fields, such as the ADDRESS_SBR subrecord . However, if the subrecords contain key fields, then index key order changes are restricted. The Custom Key Order option is deactivated and cannot be changed from N to Y. Change the index key order for the parent before inserting the subrecord.
Adding a Custom Index
To add a custom index:
Open a record.
Select Tools, Data Administration, Indexes to access the Change Record Indexes dialog box.
Click Add Index.
The Add Index dialog box enables you to determine for which database platforms you want to define the index if you selected the Some option for Platform. The system selects the Custom Key Order check box to ensure that the underlying record definition is not adversely affected by the change to your index.
For all user-defined indexes, you must enter a description of the index in the Comments section. You should know the purpose of the index, the transactions and processes that use this index, and other relevant information. This information assists you when you want to remove unused indexes. An error message appears if you do not remove unused indexes.
Note. You cannot add more than 22 user indexes (A–V). The system disables the Add Index button if the record already contains 22 user indexes.
Indicate the database platforms for which you want to create an index.
Click the OK button to add a row to the Change Record Indexes dialog box and to enable the arrow buttons.
Move the field under the new index row:
In the Record Fields list box, select the field that you want indexed.
Click the arrow button or double-click the field.
Repeat this step for each field that you want to add.
Click OK.
Save the record definition.
Select Build, Current Project.
Select Create Indexes under Build Options.
Make sure that you select the appropriate build settings.
Run the Build process to either generate a script or run SQL online.
Run the generated SQL script if you opted to generate one.
Confirm the construction of the new index with your native SQL command processor.
Editing the DDLIn the Change Record Indexes dialog box, you can view the DDL for the index and override DDL parameters that are defined in the DDL model for this index.
To edit the DDL:
In the Change Record Indexes dialog box, select the index that you want to edit.
Click the Edit DDL button to access the Maintain Index DDL dialog box.
The upper list box in this dialog box lists the platform and DDL parameter, and the lower list box shows the DDL templates for the various platforms. Your database might have fewer platforms enabled. The sizing set enables different collections of tables to have different model statements and parameters.
Select the platform and sizing set.
Click View DDL.
The dialog box that appears shows the index DDL for the platform and sizing set that you selected. Review this DDL statement.
Click the Close button when you are finished.
Select the parameter that you want to edit in the upper list box.
The default value is set in the DDL Model Defaults dialog box. You can change this setting by selecting Go, PeopleTools, Utilities, Use, DDL Model Defaults in PeopleSoft Application Designer, or by selecting PeopleTools, Utilities, Use, DDL Model Defaults in the browser.
Click the Edit Parm (edit parameter) button to access the Edit Override Parm Value (edit override parameter value) dialog box.
Enter the override value for the parameter that you selected.
Select OK for both open dialog boxes.
Altering Tables
This chapter provides an overview of the Alter process and discusses how to:
Determine tables to be altered after a field change.
Alter a table.
Specify alter options.
Confirm your table alter.
Understanding the Alter Process
The Alter process enables you to make changes to your record definitions at any time without losing the application data that is already housed in the table. To ensure that the Alter process produces the appropriate results, be aware of when to alter an existing table and what types of conversions PeopleSoft Application Designer supports. To preserve data that is stored in tables and also reflect a recent change in the table definition, use the alter tables function to make the appropriate changes.
The alter function simplifies the process of modifying database tables when new data fields are added or when existing data fields are modified. It effectively eliminates the need to write SQL statements to perform the same function.
The alter process was specifically designed to automate the task of writing alter scripts and to protect the integrity of your database. In essence, it protects your interests by ensuring that you always control data loss. The alter function performs tests that verify whether data will be lost during the conversion of each column to be altered. Data loss normally occurs when reducing the character width of a column, dropping a column that contains data, or converting a number field to a character field that is too small.
The generated statements for this method are sent to a SQL script file, the alter script. After the script has completed, you are responsible for reapplying any SQL table DDL that you applied outside of PeopleTools. Typically, this SQL table DDL consists of GRANT and REVOKE statements that control security.
Note. In Oracle databases, procedural language/SQL (PL/SQL) is required to use the PeopleSoft Application Designer Build process.
The Alter tab in the Build Settings dialog box handles the most common types of data conversions, including:
Increasing the length of character fields.
Changing a character (CHAR) field to a long character (LONG VARCHAR) field.
Increasing the size of number or character fields.
Reducing the decimal positions in number fields.
If any column of the table has data that will be lost when truncating, the system action is determined by the Change Column Length options.
Changing integer-only number fields to character fields, where the character field is formatted with leading zeros.
If any column of the table has a number that does not fit in the new character field, the system action is determined by the Change Column Length options to prevent data from being lost.
Adding columns to SQL tables.
Dropping columns from SQL tables.
Renaming columns in SQL tables.
Renaming SQL tables.
Moving tables to a new tablespace.
The following sections describe the types of alter conversions that you can expect to occur during the Build process.
When altering tables with existing field data, PeopleSoft Application Designer handles conversions as outlined in the following table. A No value indicates that conversion cannot take place. A number in the cell following a Yes value indicates that restrictions are involved with the conversion. Refer to the corresponding numbered note following the table for additional information:
|
PeopleSoft Previous Field Type Format |
PeopleSoft New Field Type Format |
||||||||||
|
— |
Char |
Oracle - Long Char with Length < 2000 |
Long Char |
Image |
Long Char - Raw Binary |
Number/Signed Number where n = length and d = decimal |
Date |
Time |
DateTime |
||
|
SmallInt *(small integer) |
Integer ** |
Decimal *** |
|||||||||
|
Char |
Yes (1) |
Yes (1) |
Yes (9) |
No |
No |
No |
No |
No |
No |
No |
No |
|
Oracle - Long Char with Length < 2000 |
Yes (1) |
Yes (1) |
Yes |
No |
No |
No |
No |
No |
No |
No |
No |
|
LongChar |
Yes (2)(9) |
Yes (2) |
Yes (8) |
No |
No |
No |
No |
No |
No |
No |
No |
|
Image |
No |
No |
No |
Yes (8) |
Yes (8) |
No |
No |
No |
No |
No |
No |
|
Long Char - RawBinary |
No |
No |
No |
Yes (8) |
Yes (8) |
No |
No |
No |
No |
No |
No |
|
SmallInt * |
Yes (5) |
Yes (5) |
No |
No |
No |
No Action |
Yes (4) |
Yes (4) |
No |
No |
No |
|
Integer ** |
Yes (5) |
Yes (5) |
No |
No |
No |
Yes (4) |
No Action |
Yes (4) |
No |
No |
No |
|
Decimal *** |
Yes (7) |
Yes (7) |
No |
No |
No |
Yes (3) |
Yes (3) |
Yes (3) |
No |
No |
No |
|
Date |
No |
No |
No |
No |
No |
No |
No |
No |
No Action |
No |
No |
|
Time |
No |
No |
No |
No |
No |
No |
No |
No |
No |
No Action |
No |
|
DateTime |
No |
No |
No |
No |
No |
No |
No |
No |
Yes (6) |
Yes (6) |
No Action |
|
Notes: |
|||||||||||
|
* n < 4, d = 0, n = 5, d = 0 RawBinary |
** n > 4, d = 0, (or) n = 10, d = 0 RawBinary |
*** n > 9, d > 0 |
|||||||||
|
1 |
If data fits or data truncation is allowed. |
||||||||||
|
2 |
Not allowed in Oracle. |
||||||||||
|
3 |
If data fits or data truncation is allowed (for decimal portion only). |
||||||||||
|
4 |
If data fits. No data truncation can occur, even with the option to allow data truncation. |
||||||||||
|
5 |
If data fits, except for Informix. |
||||||||||
|
6 |
If data truncation is allowed by selecting theTruncate data if field too short option on the Alter tab of the Build Settings dialog box. |
||||||||||
|
7 |
If data fits, except if data has decimal values or is for Informix. |
||||||||||
|
8 |
If image or long character change from Null to Not Null or Not Null to Null, otherwise, no action. |
||||||||||
|
9 |
Allowed on all platforms except Informix (due to an Informix limitation). |
||||||||||
As you create and run alter scripts, keep the following information in mind.
Temporary tables during alter:
When you run the Alter process, the script might create a temporary table. Temporary tables are named PSY%tablename%, and they are created in the tablespace of the altered table, that is, the tablespace currently defined in the record definition.
Alter process on tables containing logs on Oracle:
Oracle does not allow an INSERT or SELECT FROM command if a table contains a LONG VARCHAR or LONG RAW data type. Therefore, in Oracle databases, PeopleSoft Application Designer uses an Oracle PL/SQL script to perform alters on tables that contain any type of LONG data type.
Alter process on Oracle on records with CHAR fields greater than 1333 bytes but less than 2000 bytes:
For Oracle, records with CHAR fields of length greater than 1333 characters and less than 2000 characters will appear in the alter SQL script as needing to be altered, even if the information has not changed. In Oracle Unicode databases, PeopleSoft applications triple the length of a field while creating a table with a VARCHAR2 column in the database to store all three bytes of the Unicode character. In Oracle databases, VARCHAR2 can store up to 4000 bytes, which means a restriction exists to store only 1333 characters (with three bytes each).
For example, if a LONG CHAR field is designed with a length of 1999 characters, then PeopleSoft applications interpret the field as a VARCHAR2 and create the column with a size of 1333 characters. The field length of that LONG CHAR field will be stored as 1999 in the PSRECFIELD table, but in the database it will be created with a size of 1333. So, each time a record with a LONG CHAR field of 1999 (or any value > 1333), the alter process detects the difference between the 1999 character length in PSRECFIELD and the 1333 character length in the database and generates the alter script. In addition, PeopleSoft applications also create a constraint on the VARCHAR2.
PeopleSoft Application Designer does not keep track of view dependencies. When the structure of a table changes, you should recreate all views. Many database environments track this information, so you might be able to determine view dependencies by issuing a query directly against the system catalog. However, if you are not the DBA, you might not have the authority to run such a query successfully.
Also, renaming or dropping a table, view, or column might invalidate view text, dynamic view text, and possibly other stored queries.
This table describes what happens to views by database platform:
|
Database Platform |
What Happens to the Dependent Views When a Table Is Dropped? |
Do the Inoperative Views Become Operative When the Table is Recreated? |
Comments |
|
Becomes inoperative. |
Yes |
The dependency reported by sp_depends is incorrect until you recreate the view. |
|
|
Becomes inoperative. |
Yes |
The dependency reported by sp_depends is incorrect until you recreate the view. |
|
|
Becomes inoperative. |
Yes, but only after the first use of the dependent view. |
The VIEW object that became invalid remains invalid until its first use. The Oracle catalog table for objects marks the view as valid again. |
|
|
Is dropped when the table is dropped. |
Not applicable (NA). |
Views need to be created because the system drops them along with the table drop. |
|
|
Becomes inoperative. |
No |
Views need to be recreated to make them operative. |
|
|
DB2 UDB for OS/390 and z/OS |
Is dropped when the table is dropped. |
NA |
Views need to be recreated because the system drops them along with the table drop. |
Alter script:
After you invoke the Alter process, the system uses the default value that is defined in the record definition to populate the column in the altered table. The alter script that is generated contains detailed comments indicated by the (--) to assist you if you must modify the script manually.
The following record definition changes affect synchronization with the application table and require an alter process:
Add or delete a field in the record.
Modify the length of a field.
Change the required status of a date, time, DateTime, or long field.
Rename a field.
Rename a record.
The Alter Table process is similar to the Create Table process except that it does not drop existing application data tables and the data that they contain.
Note. The Build process automatically alters records with more than 16 keys to support functional indexes. A warning message indicating this is included in the log file for Microsoft SQL Server and DB2/UDB for Linux, UNIX, and Windows. For Informix, the warning message reads: "The record %s has more than 16 keys. Indexes will be re-created to support functional indexes."
Working With Alters on DB2 for z/OS
You must be aware of a variety of considerations and maintenance tasks when performing alters on DB2 UDB for z/OS. For example, you must consider:
Tablespace versioning.
Advisory Reorg Pending status.
Rebuild Pending status.
Avoiding SQL Code -4702.
These topics are discussed in detail in the PeopleTools 8.51 PeopleBook: Data Management.
See Working with Alters on DB2 z/OS.
Determining Tables To Be Altered After a Field Change
To determine tables to be altered after a field change:
Create a new project.
Open the altered field.
Select Edit, Find Definition References.
The referenced definitions appear in the output window.
Select all of the rows that appear in the output window.
Right-click the selected rows and select Insert Into Project from the pop-up menu.
Altering a Table
To alter a table:
Open the project for which you must perform an alter.
From the Build menu, select the appropriate scope of your build.
The Build dialog box appears.
Select the Alter Tables option in the Build Options group box.
Selecting the Alter Tables option automatically selects and disables the Create Indexes and Create Trigger (only if triggers are needed) option. In the Build Execute Options group box, only the Build script file option is enabled.
Click the Settings button in the Build dialog box to set user-defined defaults.
Select the appropriate alter, logging, and scripts settings.
Note. The alter process takes care of the indexes, regardless of the Alter Table Options you select on the Alter tab of the Build Settings dialog box. In the case of the Alter by Table Rename option, the indexes are dropped automatically when the temporary table is dropped. For the Alter in Place option, the index creation process goes through the Recreate index only if modified option on the Create tab.
In the Build dialog box, click Build to run the Alter Tables process.
The length of a build process depends on the number of definitions that require building. Watch the Build Progress dialog box to monitor the Build process. When the process completes, check any errors listed in the log file.
Specifying Alter Options
Access the Build Settings dialog box and select the Alter tab.
These options are referenced whenever a field is deleted from a PeopleTools record definition in which data exists in the database for that column.
|
Drop column if data present |
Select to drop the column and data, and write a warning to the build log. |
|
Skip record if data present |
Select to end the alter for that record and write an error message to the log. Processing continues with the next record. |
Note. Whenever you select the Drop column if data present option, you run the risk of losing data, and you are prompted at runtime to confirm your selection of this option.
Change Column Length Options
Use these options whenever the length of a character column is reduced in PeopleTools and an alter could result in data truncation.
|
Truncate data if field too short |
Select to alter the record and write a warning message to the build log. Note that the system does not truncate data for numeric fields because of possible data loss. |
|
Skip record if field too short |
End the alter for that record and write an error message to the build log. Processing continues with the next record. |
Note. Whenever you select the Truncate data if field too short option, you run the risk of losing data, and you are prompted at runtime to confirm your selection of this option. Also, numeric fields are not truncated to avoid any loss of data.
PeopleTools assumes that you want to perform alters for any modifications made to tables, so, by default, all of the check boxes in the Alter Any group box are selected. The Alter Any group box enables you to customize alter processing for adds, changes, renames, and deletes. For example, you have the flexibility to add, change, and rename fields but not to delete any removed columns. When you complete any other custom external conversion processes, you can then enable the delete processing to drop columns that are no longer defined.
Normally, you select all of these options, but during upgrades or operations requiring data conversion steps you might select a subset of actions. For example:
Perform alter with Adds and Changes selected.
Perform data conversion routines to populate the new and changed columns (perhaps from columns that are ultimately to be dropped).
Perform alter with Rename and Delete selected.
Select this check box to force an alter, even if no changes were made to the tables. This check box is deselected by default. If selected, the Alter by Table Rename option in the Alter Table Options group box is automatically selected and the Alter in Place option is disabled.
When altering tables, the alter process takes care of the indexes, regardless of the Alter Table Options you select on the Alter tab of the Build Settings dialog box. In the case of Alter by Table Rename, the indexes are dropped automatically when the temporary table is dropped. For the Alter in Place option, the index creation process goes through the Recreated index only if modified option on the Create tab.
Alter in Place
Selected by default. For database platforms in which Alter in Place is not supported, alter is automatically done by Alter by Table Rename (even if that option is not selected).
Database platforms vary in the capabilities for Alter in Place table operations. This table displays the limitations for each operation by platform:
|
Database Platform |
Add Column |
Change Column (data type, size, precision, scale, and null/not null property change) |
Rename Table |
Delete Column |
|
Yes * |
Yes * |
Yes * |
Yes * |
|
|
Yes * |
No |
Yes |
Yes * |
|
|
Yes * |
Yes * |
Yes * |
No |
|
|
DB2/UDB for Linux, UNIX, and Windows |
Yes * |
No |
No |
No |
|
No |
No |
Yes |
No |
|
|
Yes |
Yes |
Yes |
Yes |
|
|
* Certain restrictions might apply to this operation. Refer to the documentation for your specific database platform for more information. |
||||
Select to create a temporary table (with changes made to the original table or its fields); the data from the original table is imported into the temporary table. The original table is then dropped and the temporary table is renamed to the original table.
If a table is renamed from the old name to a new name, the indexes that were created for the old table are moved to the new table, but the index names remain in the name of the old table. With Alter by Table Rename selected, the indexes of the old table are dropped before being renamed to the new table name, and the indexes are recreated after the table is renamed to the new name. This way, the index is created in the name of the new table.
See Working with Alters on DB2 z/OS.
Confirming Your Table Alter
To confirm your table alter:
Review the SQL script that was generated by the Alter process.
Use your native SQL command processor to open the SQL script. The script is located where you specified on the Scripts tab of the Build Settings dialog box.
Run the script against your database.
Use your query tool and SQL Select statements to confirm that the Alter Tables process created an application table that corresponds to your record definition and updated the system catalog tables.
Creating Triggers
A database trigger is a type of stored procedure that runs automatically when a user makes a specific data-modification statement (INSERT, UPDATE, or DELETE) on a specified table. Within PeopleTools, you create triggers in tables related to synchronization for mobile applications and for optimization servers. Do not create triggers for all records; create them only for records that have specific properties set.
For example, in a mobile component record, set the required properties for that record so that triggers are created during the Build process. Using the Build dialog box, create the trigger by selecting the Create Trigger check box in Build Options. Using the Build Execute options, you can either generate the SQL or run the build online. Usage and implementation restrictions exist.
Important! PeopleSoft Mobile Agent is a deprecated product. These features exist for backward compatibility only.
See Also
Creating and Building Optimization Records
Creating Views
This section provides an overview of online views and discusses how to:
Create views.
Use joins in views.
Use cross-platform meta-SQL for dynamic views.
Understanding Online Views
Views in PeopleSoft applications are comparable to views used in traditional relational database management system (RDBMS) technology. A view, in essence, is a virtual table. It is created from the results of a query run against one or more tables.
When you create views to use online, you must keep the views synchronized with the database. Like SQL tables, you must have a record definition for online views because the system checks the record definitions for online processing rules. You must build the view before you can use or reference it online.
If you use a view as the basis for a page, you select existing information to display on the page. Therefore, when you create the record definition for your view, you can clone an existing record definition, delete any fields that are not used in the view, and proceed to define the view. Query views are processed the same way as view text, which is defined as part of the record.
The order in which PeopleTools creates views is based on the build sequence number that you set on the Record Type tab while the record is open. The default build sequence number is 1. For the dependent views to be created first, the build sequence number should be 0. This way, all of the 0 views are created first, then the 1 views, and finally the views that are greater than 1. Although the views are sorted alphabetically in the project, they are created based on the build sequence number.
Creating Views
If you are already familiar with creating record definitions and writing SQL queries, creating online views is similar.
To create online views:
Clone a record definition:
Open an existing record definition.
Select File, Save As.
Specify the name of the view that you want to create.
Delete and add the appropriate fields.
All columns that are selected in your view should have a corresponding field in the record definition.
Set the record type to SQL View:
Select the Record Type tab for the record definition.
Select SQL View in the Record Type group box.
Click the Click to open SQL Editor button.
The order in which you list the columns in your SQL SELECT statement should match the order that you specified in the record definition. A SQL statement can be given for each platform.
Save the record definition.
Select Build, Current Definition to create the view in the database.
Select the Create Views check box under Build Options.
Click Build.
Using Joins in Views
If you plan to use a join regularly, you can save it as a SQL script or you can create a view—a single virtual table—using the join as the logical representation of the data. After you create a view, the users never need to know that the data they are viewing is stored in multiple tables. To users, the relative complexity of your view is transparent. For example:
SELECT A.EMPLID,
       A.NAME,
       B.CONTACT_NAME,
       B.RELATIONSHIP
FROM   PS_PERSONAL_DATA A,
       PS_EMERGENCY_CNTCT B
WHERE  A.EMPLID = B.EMPLID;
Using Cross-Platform Meta-SQL for Dynamic Views
PeopleTools includes functionality to produce meta-SQL constructs for dynamic views, which means that dynamic SQL views that are created using PeopleSoft Application Designer can be used on any platform that is supported by PeopleSoft. The PeopleSoft PeopleTools PeopleBook: PeopleCode Developer’s Guide contains a full list of the meta-SQL that is supported in the PeopleSoft Internet Architecture.
See Also
Meta-SQL Placement Considerations
Administering DDL
Select Data Administration from the Tools menu in PeopleSoft Application Designer to access critical dialog boxes that enable you to define the record location and structure and other guidelines for PeopleTools to extract information from your selected database.
This section discusses how to:
Use the record DDL.
Set the tablespace.
Use physical data storage.
Using the Record DDL
Use the record DDL to define parameters and default values for the tables in your database. PeopleSoft applications provide templates for each database platform that PeopleTools supports. The templates contain the typical parameters for each database platform. The mechanics of editing and viewing record, index, and unique index DDL are the same as for space DDL.
Access the Maintain Record DDL dialog box from Tools, Data Administration, Record DDL. The Data Administration menu option is only enabled if a record definition is open.
|
View DDL |
Select a Platform row in the Maintain Record DDL dialog box to enable the View DDL button. This button opens the DDL Statements dialog box, which displays the CREATE TABLE DDL for the current record on each of the database platforms. |
|
Edit Parm (edit parameter) |
Select a Parameter row in the Maintain Record DDL dialog box to enable the Edit Parm button. This button opens the Edit Override Parm Value dialog box, where you can enter a new value to override the Default Value listed in the table. The new value is stored in the PSRECDDLPARM override table. |
Setting the Tablespace
The Change Space dialog box is an editing tool with which you can select the space name and view the records attributed to the named space in the database.
Access this dialog box by selecting Tools, Data Administration, Set Tablespace. This dialog box also appears automatically when you attempt to save a new record definition. For each new record definition that is created in PeopleSoft Application Designer, you must allocate a tablespace name. For the Change Space dialog box to appear upon saving a new record definition, you must select the Platform Compatibility Mode check box under PeopleTools, Utilities, Administration, PeopleTools Options.
|
Record Name |
Displays the name of the current record definition. This field is display-only. |
|
Platform |
Select from the available database platforms to which you can assign the designated space name. |
|
Space Name.DB Name (tablespace name.database name) |
Displays the available space name that is assigned to the current record. This field is display-only. |
|
Available Space Name-DB Name (available tablespace name-database name) |
Select the space name and database name to assign to the record. |
|
Records Allocated to this Space |
Displays all of the records that are already allocated to the space that you selected from the Available Space Name-DB Name drop-down list box. This field is display-only. |
See Tablespace Utilities.
Using Physical Data Storage
You have control over the physical storage of your data. You can view and edit the DDL for creating tables, indexes, and tablespaces in the browser.
Access the DDL Model Defaults page.
To view or edit the DDL parameters for creating tables, indexes, and tablespaces:
From the home page of your application, select PeopleTools, Utilities, Administration, DDL Model Defaults to access the DDL Model Defaults search page.
Press the Enter key to view platform names.
Select a platform name.
The DDL Model Defaults page appears.
The Model SQL edit box shows the DDL template for the specified platform and sizing set. The items in square brackets are special parameters that are populated when instances of SQL are generated. For example, the preceding example shows an index model statement for ALLBASE. In this example:
[TBNAME] is the name of the table.
[TBCOLLIST] is replaced by the columns that are specified in the index definition.
The model statements also contain parameter names enclosed in pairs of asterisks. A parameter name is replaced by a value when instances of the SQL are generated. The preceding example has one parameter, **FILESET**. When DDL is generated using this model, the FILESET parameter is replaced by FILE unless it is overridden for the specific record or tablespace. The other text in the model statement is copied to the generated SQL.
See Also
Using Administration Utilities