 Using the Message Tool
After you finish recording a test, you will likely need to make some changes. You may have made an error entering a value or skipped a step. You may have recorded extra steps. You will probably need to manually add steps that cannot be recorded.
The topics in this chapter describe tools and techniques you can use to modify your tests after recording them.
This chapter discusses how to:
Use the Message Tool.
Use reserved words.
Use variables.
Use conditional logic.
Handle errors.
Interpret logs.
Incorporate scroll handling.
Call tests.
Using the Message Tool
This section discusses how to use the Message tool.
As you modify a test, you will often need to use the Message tool to capture details for a browser object. You can then use these details to modify a test step.
Select Help, Tools, Message to open the Message tool.
Click and drag the Object Properties icon and hover over a browser object to view details about that object in the Message window.
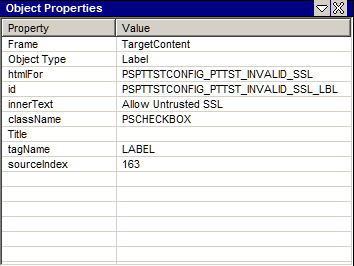
This example shows the Message tool ID values:
![]()
Message tool ID values
To copy and paste recognition information from the application browser to the PTF Test Editor, drag and drop the Object Properties icon onto a browser object. Object recognition details appear in the Message tool. Double-click the name in the Message tool to copy it to the clipboard. You can then paste the information into the Recognition field of a test step. To automatically copy each selection to the clipboard, select Menu, Auto Copy to Clipboard.
You can also use the Message tool to monitor test execution. The Message tool displays types, actions, IDs, and values for each step of a PeopleSoft Test Framework (PTF) test as the test executes.
HTML Browser
To view additional details about a browser object, access the Message tool and select Menu, HTML Browser, Show. This example shows the HTML Browser Object Properties window:
Example of the HTML Browser
The HTML Browser Object Properties window displays properties and values of HTML objects as you hover over them using the Object Properties icon. Double-click a line in the HTML Browser window to copy the text to the clipboard.
Using Reserved Words
This section discusses how to use reserved words.
Reserved words enable you to access data available from the PTF program when a test is executed.
Reserved words are useful when data is not known before the test is executed. For example, suppose you have the following manual test instruction:
12. Enter the current date into the Voucher Creation Date field.
If, when you record the step, you enter the current date, then you will put specific, or static, data into the test, similar to the following example, which shows the data created by a test recorded on June 30, 2010:
However, the test instruction calls for the current date, which may be different each time you run the test. Data that can change is called dynamic data. To make the test data dynamic, replace the recorded data with the #TODAY reserved word, which represents the date at the moment of test execution, as shown in this example:
Other reserved words enable you to define specific actions in the Value field of a step.
For example, suppose you are required to test two very similar test scenarios:
1. Create a new pension calculation using the following parameters.
2. Open the pension calculation created earlier and verify that the parameters
   entered into the application are the same as those specified in the
   previous scenario.
You can meet this requirement by using a single test step with two test cases. The first test case might be named CREATE and the second named VERIFY.
In the CREATE test case, a step that sets the Calculation Description field might look like this:
![]()
Example of a step that sets a value
The VERIFY test case uses the reserved word #CHECK# in the Value field. Using the same step, the #CHECK# reserved word causes the Set_Value action to behave like a Verify action, which satisfies the second test scenario. Rather than setting the value of the object, the same step now verifies it, as shown in this example:
![]()
Example of a step that verifies a value
See Also
Using Variables
This section discusses how to use variables.
Variables enable you to store a value in one step and access that data in a subsequent step. Variables are useful when your test requires a value that will not be known until the test is executed.
Variables are prefixed by an ampersand (&).
Store a value for a variable either by placing the ret=&varname parameter in the Recognition field in a step that supports return values, or by using a Variable.Set_Value step.
You can refer to the values stored in a variable in two ways:
Use the variable in the Recognition field of a Conditional.If_Then step or any step that takes a parameter.
Use the variable in the Value field of any step that sets or verifies the value of an object on the page.
For example, suppose you have the following test instructions for a test of the Maintain Proposal component:
1. From the Maintain Proposal page, make a note of the new proposal ID.
2. Click on the version ID link and verify that the same proposal ID appears
   on the Resource Estimate page.
The application generates a proposal ID when the test is executed, so it is not known ahead of time.
The following example shows one way to automate these steps using a variable. The first step gets the value of the Proposal ID field from the application and stores it to the &propID variable. The second step clicks the version ID link, which brings up the Resource Estimate page. The third step verifies the value of the Proposal ID field on the Resource Estimate page against the value saved in the &propID variable:

Example of using a variable
For additional examples of variable usage, see the “Test Language Reference” chapter, especially the Conditional.If_Then and Variable.Set_Value steps.
See Also
Using Conditional Logic
This section discusses how to use conditional logic.
Some test scenarios call for conditional logic—special handling based on information gathered from the application during the test. Conditional logic uses a Conditional.If_Then step with a Conditional.End_If step. The If_Then step evaluates a statement. If the statement is true, then PTF executes the subsequent steps until it encounters the End_If step. If the statement is false, then flow skips to the step following the End_If step.
What appears to be simple test instruction, such as the following, may require conditional logic to automate successfully:
12. In the Modify a Person page, click the Brazil flag if necessary to expand the
    Brazil region of the page.
When you record the click on the Brazil flag, PTF creates the following step, which looks deceptively simple:
![]()
Example of step that requires a conditional construct
The problem is that pages like the Modify a Person page typically use the same image to collapse and expand a section. The page may remember which regions are expanded and which are collapsed, so that the next time you run the test, the Brazil section might be expanded when you enter the page, in which case the Image.Click action in the previous example would collapse the Brazil section and potentially cause the test to fail.
The solution is to click the flag image only if the section is collapsed, which requires putting the click action within a conditional If-Then construct.
For example, suppose that you use the Message tool to determine that when the region is already collapsed, the alt property of the flag image is equal to “Expand section Brazil.” Alternatively, when the region is already expanded, the alt property of the same image is equal to “Collapse section Brazil.” You would construct your test such that the click would only occur if the alt property is equal to “Expand section Brazil.” You could do that with the following steps:

Example of using conditional logic
See Also
Handling Errors
This section discusses how to handle errors.
Use the Error/Message Definitions feature to specify how PTF will respond to messages, such as warning messages or error messages, issued by the application being tested.
For example, suppose you have the following manual test instructions:
12. Clear the Calculate all Plans checkbox. If you get the following
    warning, click OK:
      Warning - Remember all plans must be selected to ensure an accurate 415
      limit calculation (16000,494)
When you record the test, the step that triggers the message and the step that clicks OK might look like this:
![]()
Example of steps that trigger and dismiss a warning
If some test cases belonging to this test do not deselect the Calculate all Plans check box in the first step, then the step would not trigger the warning message and PTF would fail to find the OK button in the next step.
You could use conditional logic to evaluate whether the test case deselects the check box. Alternatively, you could use the Error Handling feature to indicate that PTF should click OK whenever that specific message appears in the application.
To create a message definition, access the Error/Message Definitions dialog box.
With a test open, select the Use Error Handling check box.
When the Use Error Handling check box is selected, the Error/Message Definitions link is enabled.
If the Use Error Handling check box is deselected, PTF will not check for message definitions.
Click the Error/Message Definitions link.
Enter the text of the message, or a portion of the text, in the Message field.
The following example uses the message catalog number rather than the full message text.
You can define message definitions at either the test or test case level. Message definitions defined at the test case level take precedence over message definitions defined at the test level.
Select which button the step should click.
Specify what action PTF should take after the button is clicked.
This example shows the Error/Message Definitions dialog box:
This table lists the names and definitions of the elements on the Error/Message Definitions dialog box:
|
Message |
Enter the message, or portion of the message, displayed by the error. For example, you might use the Message Catalog numbers. |
|
Button |
Enter the button that PTF should click when it encounters the message. Valid values are:
|
|
Action |
Select the action that PTF will take. Valid actions are:
|
Interpreting Logs
This section discusses how to interpret logs.
This table lists and describes common log messages:
|
Status |
Message |
Description |
|
Fail |
Access is denied. Please check browser settings. |
PTF is not able to read information from your browser. Check browser settings to make sure your browser is configured properly. |
|
Fail |
Object not found in the page, or access is denied to the Frame. |
If all of your steps that involve setting values, verifying values, or getting properties return a failure with this message in the log, then it is likely PTF is having trouble interacting with your browser in general. Check browser settings to make sure your browser is configured properly. See Configuring the Browser Security Settings. If this log message appears sporadically throughout your log, it could mean that objects within your application have been removed or renamed.
|
Incorporating Scroll Handling
This section discusses how to incorporate scroll handling in PTF tests.
Data on a PeopleSoft component is organized hierarchically using rowsets, or scrolls, and rows.
A scroll can be implemented as a scroll area or a grid. In scroll areas, the fields appear on the page in a freeform manner. In grids, fields appear as columns similar to those on a spreadsheet. Individual rows of data within a scroll or grid are uniquely identified by a set of one or more fields, or keys.
PTF references a field on a scroll by the field name and the row number. The PTF scroll handling feature enables a test to identify a row number at test execution time based on the keys for that row.
For example, suppose you have a test requirement that says:
12. Verify that the QEDMO user profile has the PTF Administrator role.
Here is an example of the Roles page for the QEDMO user profile:
When you record the test, PTF generates a step similar to the following example:
The step uses two elements in the Name= parameter in the Recognition column to reference the Role Name field: the name of the field (PSROLEUSER_VW_ROLENAME) and its row position index ($0). A row position index is composed of a dollar sign ($) and an integer. The integer count starts at zero, so indexes for a scroll containing 11 rows are $0 through $10.
This test will work as recorded until something changes the grid position of the row that contains PTF Administrator. For instance, if another row is inserted before PTF Administrator, the PTF Administrator row position index changes to $1, and the test fails. The same problem occurs if the grid is sorted differently, or if a test case tests a different user profile, such as QEMGR.
Using a Dynamic Position Index
You can use the Scroll.Key_Set action and a Scroll.Action step to locate a row by key and generate a dynamic position index variable. Then you can use the dynamic position index variable to reference a row or a field reliably and repeatably because the variable is regenerated each time the test is run.
For example, instead of looking at the first row, PTF looks for the row where the key equals “PTF Administrator”.
If the value exists in the scroll, the test finds it, takes the specified action, and returns the position index.
If it does not find the value in the first displayed set of rows, PTF clicks the Show Next Rows icon on the scroll and continues searching until it has searched all rows on all pages of the scroll.
Follow these steps to use a dynamic position index variable:
Create Key_Set steps.
Create an Action step
Use the index variable for other steps.
Specify the Scroll ID.
Creating Key_Set Steps
Create one Key_Set step for each field in the scroll key. If the key consists of three fields, create three Key_Set steps and specify key values for each of the three fields.
Key_Set requires two parameters in the Recognition column; Type= and Name=. You can get these values by recording a step with the PTF recorder and then manually modifying the recorded step or by copying the information from the application using the Message tool and pasting into a step.
Specify the field value in the Value column. You can use the PTF Recorder or Message tool to get the field value as well.
Here is an example of the Message tool with recognition data for the Role Name field:
Here is an example of a test step that references a row on a scroll. This step checks for the existence of PTF Administrator in the Role Name field:
This is one way to convert the step in the example to a Scroll.Key_Set step:
Change the Type to Scroll.
Change the Action to Key_Set.
Add Type=Text; to the Recognition column.
Leave the Name parameter in the Recognition column, but remove the row position index ($0).
This signals PTF that the actual row number for the key is not yet known.
Here is an example of a Scroll.Key_Set step that sets the key to PTF Administrator:
This step defines the key value, but PTF does not take an explicit action on the page based on the key until it executes an Action step.
Creating an Action Step
Create an Action step, based on what action you want to take on the row, such as update, insert, select, and so on. All of the available actions are detailed in the PTF Language Reference.
In this example, you want to select a row, so enter sel in the Value field.
The Action step attempts to locate a row defined by Key_Set. If a row is found, it returns the index of the row. Use the ret= parameter of the Action step to populate an index variable with the index value.
Here is an example of an Action step:
Using the Index Variable
Now that you have the row position stored in the index variable, you can use that value to reference other fields on that row.
For instance, suppose you want to verify the Dynamic checkbox. You can use the PTF Recorder or the Message tool to get its name and position and create a step similar this one:
This step has the problem that the positional reference is static, so it won’t work if the position changes. To fix that, replace the position index with the index variable.
This example shows a step that uses an index variable following the steps that locate the key and set the index variable:
Now whenever the test is run, the index variable is updated dynamically by the Key_Set and Action steps and the positional reference is accurate.
Specifying the Scroll ID
Assign a Scroll ID to group Scroll actions for each scroll. Use a different scroll ID and scroll variable for each different scroll area. You can assign any integer you like, as long as it is unique.
Scroll ID is a required field for Scroll actions.
If you are taking multiple actions in the same scroll, using the same scroll ID and scroll variable improves performance over using a new scroll ID.
In this example, the test defines two Action steps that both act on the same scroll. The first action verifies that the user profile does not contain the PTF Administrator role. The second action verifies that the user profile does contain the PTF User role. You would assign the same Scroll ID number to all four of the Scroll steps because they all act on the same scroll.
See the “PTF Language Reference” chapter for a complete description of Scroll actions and additional examples
See Also
Calling Tests
This section provides an overview of calling tests and discusses how to:
Use library tests.
Use shell tests.
Share test assets.
 Understanding Calling Tests
If a test uses a sequence of steps repeatedly, you may want to isolate the repetitive sequence of steps and move them to another, smaller test. Doing so enables you to call the steps repeatedly and also make them available to other tests that use the same sequence of steps.
Moving shared test steps to a distinct test (a called, or child, test) provides these benefits:
Reduces the amount of recording or development you need to do.
Reduces the amount of debugging you need to do.
Reduces the effects of development changes that require manual updates to existing tests.
You can use the Test.Exec action to call any other test, but you may be able to manage and identify the relationships between calling and called tests more easily on the PTF Explorer tree if you use library tests and shell tests.
Using Library Tests
A library test cannot be executed by itself. It must be called by another test.
To make a test a library test, select the Library Test check box in the Test Editor.
Complete these steps to create a library test from an existing test:
Open an existing test.
Identify repetitive steps within the test, copy them from the existing test, and paste them into a new test.
Select the Library Test check box on the new test.
Save the library test.
Remove the repetitive steps from the original test and replace them with a step that uses a Test.Exec action to call the new test.
Save the original test.
Using Shell Tests
To create a shell test, while in PTF Explorer select Create, Shell Test.
A shell test is a type of test that is meant to be used primarily to call other tests. For this reason, a shell test only supports these actions:
Test.Exec - calling other tests
DataMover.Exec - calling data mover scripts
Query.Exec - running queries
Variable.Set_Value - manipulating variables
Organizing component tests into shells enables you to identify large business-process oriented type tests (that is, the type that cross multiple components and online activities). The steps available in shell tests are intentionally limited in order to represent high-level business process flows through called test routines.
PTF variables are global, so you can set a variable in the shell test and use it in the called tests, or you can set a variable in a test and use it in the shell test or other called tests.
Sharing Test Assets
Often, test developers, application developers, testers, and others collaborate to develop tests. PTF enables you to send links to tests, test cases, and logs to other users, saving them from having to navigate through PTF Explorer to locate them.
To share the location of a test asset:
Copy the link to the clipboard.
In PTF Explorer, highlight the name of a test asset and select Edit, Copy Link to Clipboard.
In the Log Viewer, with a log open, select Log, Copy Link to Clipboard.
Send the text to another user.
The recipient copies the text and selects Window, Quick Open.
The Quick Open feature is available in PTF Explorer, Test Editor, and Log Viewer.
The system automatically copies the link for the asset to the Quick Open dialog box.
The recipient clicks OK to open the asset.
You can also use Copy Link to Clipboard with the Quick Open feature to locate a folder in PTF Explorer.