| StorageTek SL500 Systems Assurance Guide E21060-07 |
|


 Previous |
 Next |
The SL500 library supports up to eight partitions. Each partition can be accessed by one host or multiple hosts.
Partitioning is an optional feature. Activation is required to enable the feature. See "Hardware Activation Files". If the customer orders the partitioning feature, the service representative must enable the feature and work with the systems administrators who will be involved with assigning the partitions.
Clear communication and cooperation among system programmers, network administrators and service representatives are essential. Be sure to share this information with all members involved in the partitioning effort and correspond with other members of the service community when assistance is required.
|
Note: Before partitioning a library, ensure that all members of the team clearly understand the fundamentals of the partitioning feature. |
Partitioning has terms associated with it that you and your customer must understand to effectively use the feature. In certain cases, these terms redefine some concepts that are familiar with users of the traditional, non-partitioned library configuration.
”Partitioning” is defined as the process of dividing portions of a library into discrete sections. The partitioning feature offers great flexibility for users. A partition can be as small as a single storage slot, a single CAP slot, or one tape drive if desired. A library can also contain multiple partitions. Customers may set up partitions that are accessible by single or multiple hosts.
The key to understanding partitioning is knowing what partitions exist, their boundaries, and who has access to the specific partitions that are configured.
Setting up a partition requires some important considerations:
If one partition designates several tape drives solely to its partition, no other partitions can use these tape drives.
Partition users must also anticipate how much storage area is needed for their resident tape volumes and the amount of free slots required.
CAP assignments are also critical. CAP slots can be specifically assigned to certain partitions or left open for common use. This will be discussed in detail later.
Storage slots and drives that are not assigned a partition within a partitioned library cannot be accessed. A customer could leave an area of slots unassigned, for example, in preparation for a planned future partition.
The SCSI element numbering within partitioned libraries is continuous for each partition, even if slot locations for each partition are non-contiguous.
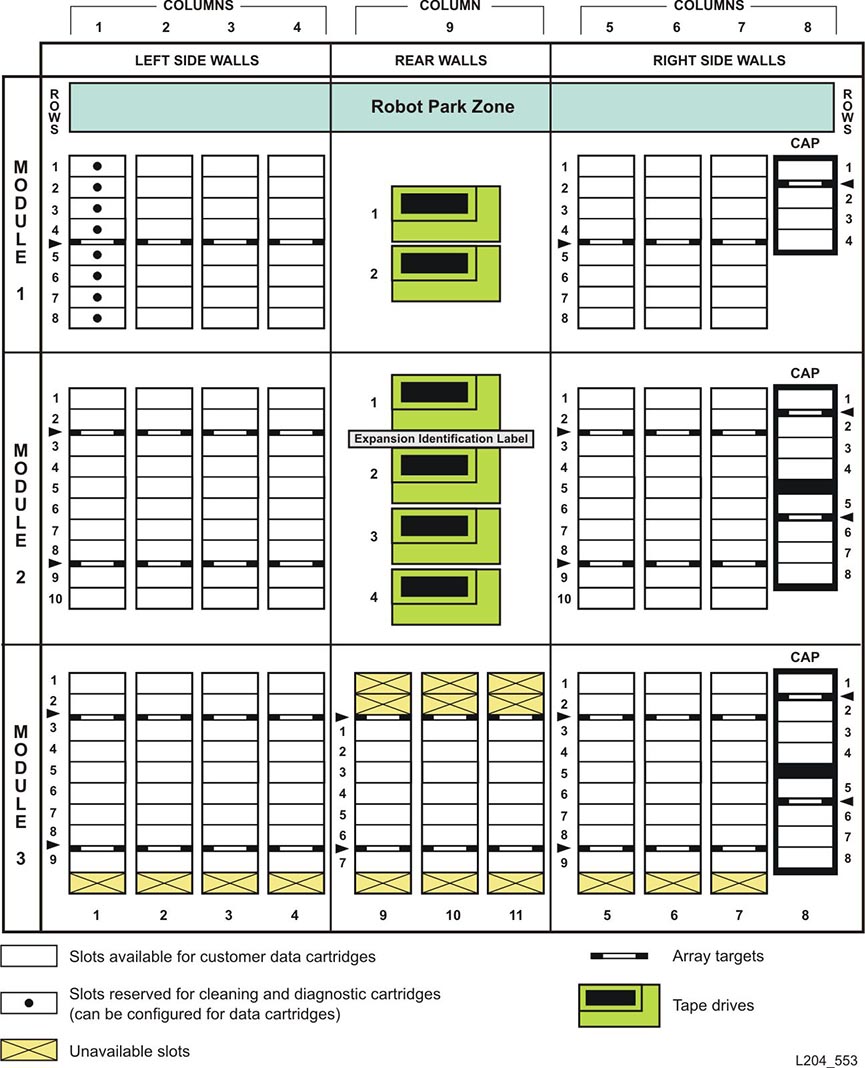
Figure 3-1 is used in all partitioning examples in this chapter. The examples split the library into two partitions. Refer to the specific example for how Partition 1 and Partition 2 are divided. The example library below consists of a base, DEM, and CEM.
Host definitions are assigned to specific partitions. Customers can assign multiple host definitions to a single partition. However, they cannot assign the same host definitions to multiple partitions. For example, Partition 1 could be set up for hosts 2, 3, and 4; Partition 2 could have hosts 1 and 5 for host definitions. They could not, however, assign host 1 or 5 to both Partitions 1 and 2.
The host definition consists of:
Host ID (WWN)
Port number
Logical unit number (LUN)
Location numbering is composed of four digits: Library number, Module number, Row number, and Column number.
In a non-partitioned library configuration, the location number for the library always begins with the number ”0.” For partitioned libraries, however, the library number will change to the partition number.
If Partition 1 was composed of the entire base module, locating a cartridge in module 1, row 8, column 1 in the base module would translate into the following: 1, 1, 8, 1.
If Partition 2 was composed of the entire drive expansion module, row 10, column 1 would translate into 2, 2, 10, 1.
Refer to Figure 3-1. Consider a library with the following partitions: Partition 1 owns the base module and Partition 2 owns the drive expansion module and cartridge expansion module. For Partition 1, SCSI element numbering begins at the first available slot in the base module and continues through to the end of the base. For Partition 2, the first slot in the drive expansion module will begin the element numbering for that partition and continue through the cartridge expansion module.
Configure CAPs (or CAP slots) for:
Assignment to a specific partition only (split assigned CAP)
Common use for those partitions that do not specifically assign slots (common CAP)
A combination of specific slots and common slots (mixed CAP)
Customers could conceivably partition two slots in an 8-slot CAP to a single partition and the remaining slots to a second partition, for example.
For partitioned libraries, these three configuration options for CAP assignments are explained below.
CAPs or CAP slots can be assigned to the sole use of a partition. When specific CAP slots are assigned to a specific partition, the split assigned CAP option is enabled
Careful planning for anticipated CAP usage is required when using this option. Only those CAP slots designated as split assigned can be used by the partition assigning them.
The library (see Figure 3-1) is composed of a base, drive and cartridge expansion modules. In this example, all cartridge slots, drives and CAP slots in the base module comprise Partition 1. All cartridge slots, drives and CAP slots in the drive expansion and cartridge expansion modules are assigned to Partition 2. Each partition has access to only the components configured for it.
If Partition 1 requests a CAP import operation, the procedure is:
The operator selects Partition 1's CAP through either the local operator panel or SLConsole.
The CAP button on the base module is pressed.
The top CAP door is opened. All remaining CAP doors remain closed.
The operator completes the operation.
If Partition 2 requests a CAP import operation, the procedure is:
The operator selects Partition 2's CAP through either the local operator panel or SLConsole.
The CAP button on the base module is pressed.
The top CAP door remains closed. All remaining CAP doors open.
The operator completes the operation.
Multiple split CAP assignments are available within a library. This is in contrast to common assigned CAPs (see below).
The common (or unassigned) CAP configuration is present when there are no specified CAP slots designated (split assigned) to a partition or partitions. Strictly speaking, one does not ”configure” or ”assign” a CAP as common—any CAP slots that are not split assigned are available for mutual use among the remaining, unassigned partitions. Keep in mind that common CAPs are a unit, shared among those partitions that have no split assigned CAPs.
Referring to Figure 3-1, in this example, Partition 1 is set up to contain all cartridge slots and drives in the base module for a single host. The remaining cartridge slots and drives are a second partition used only by a second host. However, no CAP slots are explicitly assigned for a partition—both partitions can use all CAP slots.
An example of an import operation sequence for a common CAP is:
The operator selects the CAP through either the local operator panel or SLConsole.
An operator presses the CAP button.
All CAP doors open.
A cartridge is placed in any CAP slot.
The CAP door is closed.
The cartridge is placed into a slot within the requesting host's partition.
In a second instance, assume that Partition 2 requests a CAP export operation of a cartridge. Since it is a common CAP, the operation is:
The operator selects the CAP through either the local operator panel or SLConsole.
The VOLSER of the cartridge to be exported is entered.
The cartridge is placed in any CAP slot.
All CAP doors open.
The operator completes the operation.
For common CAPs, slots may be used by all partitions who do not specifically assign them. However, only one partition can select a CAP for operation simultaneously. The operation must be completed before the CAP is released to someone else through either the operator panel or SLConsole.
A mixed CAP option is present when both split CAP and common CAP configurations are present within a library.
Referring again to Figure 3-1, in this example, Partition 1 contains only the cartridge in module 1, column 5, row 1, and drive number 1 and the single CAP slot 1 in the base module. The remaining storage slots and drives are divided among partitions 2, 3, and 4. The remaining CAP slots are left unassigned. These unassigned CAP slots are usable by partitions 2, 3, and 4, but CAP slot 1 in the base module can only be used by Partition 1.
If Partition 1 requests a CAP export operation, the procedure is:
The operator selects its CAP through either the local operator panel or SLConsole.
The VOLSER of the cartridge to be exported is entered.
The cartridge is placed into the top CAP slot of module 1's CAP.
The top CAP door is opened. All remaining CAP doors remain closed.
The operator completes the operation.
If Partitions 2 through 4 request an export operation, the procedure is:
The operator selects a CAP through either the local operator panel or SLConsole. For this example, assume that Partition 2 has selected the top CAP for placement of the cartridge.
The VOLSER of the cartridge to be exported is entered.
The cartridge is placed into any module 1 CAP slot except the top one.
All CAP doors open.
The operator closes all CAP doors.
Within mixed assigned CAP environments:
For common CAPs, one or more partitions can share those CAP slots not designated as split assigned.
For split assigned CAPs, several configurations are possible. For example, the 4-slot CAP in a base module could be split assigned to Partition 1; the top four slots in the drive expansion module's CAP could be split assigned to Partition 2; the bottom four slots in the drive expansion module's CAP could be split assigned to Partition 3, and so forth. To fulfill the mixed definition, however, there must also be common CAP slots available.
For a non-partitioned library, pressing the CAP button opens all CAPs that are configured as CAPs. In a partitioned library, each partition must first have its CAP selected, using the operator panel or Library Console. This will dedicate the CAP button to the use of those partitions that selected a CAP or CAPs for operation. After selection, pressing the CAP button will open only the CAP doors assigned to that partition.
If not selected by any partition, pressing the CAP button will open only those CAP slots that are split assigned (see the note under "Split Assigned CAPs - Example").
An important thing to remember is that if multiple partitions are assigned to the same CAP slots (that is, common slots)—and that CAP is selected for use by one partition—the CAP import/export operation must be completed and the new partition assignment made, before another member of that partition can gain access for CAP operations.