Monitoring Oracle E-Business Suite
Navigation and Overview
Once discovered, an Oracle E-Business Suite instance will appear in the Oracle E-Business Suite Instances section in the System Management page. You can click on the name of the instance to go to the home page of that instance.
Oracle E-Business Suite System
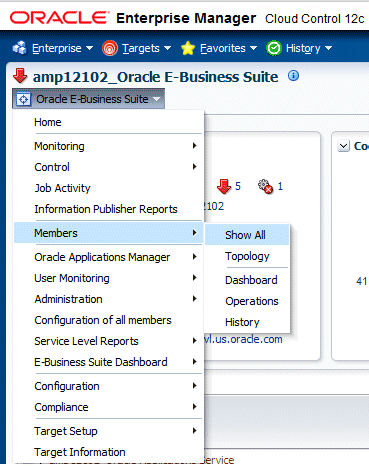
Oracle E-Business Suite is discovered as a system. The members of the system include all the nodes and the targets that run on each node. To see the members select Members/Show All from the target menu.
Topology of the Oracle E-Business Suite
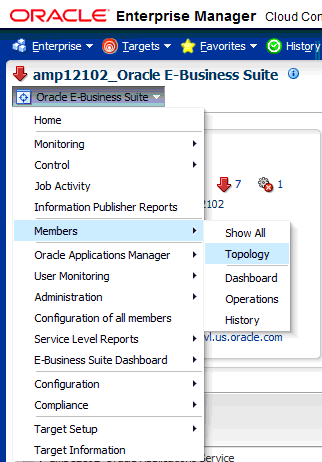
The Configuration Topology Viewer provides a visual layout of Oracle E-Business Suite with its child targets. To access the Configuration Topology Viewer, select Members/Topology from the target menu.
Upon service failure, the potential causes of failure, as identified by root cause analysis, are highlighted in the topology view. You can view dependent relationships between services and systems from the Topology tab.
Using the viewer, you can:
-
Determine the source of a target's health problems
-
Analyze the impact of a target on other targets
-
Determine the system's structure by viewing the members of a system and their interrelationships
Metrics
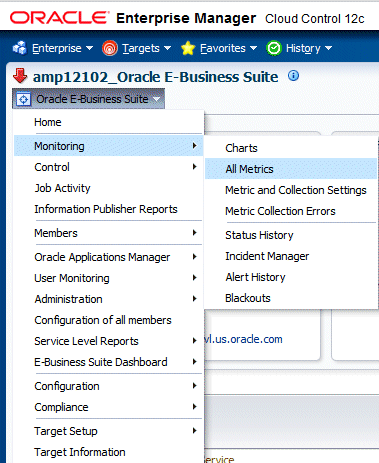
Once discovered, metrics are collected for Oracle E-Business Suite System as well as its individual members. To see the metrics collected for any target, select Monitoring > All Metrics from the Target menu.
Setting Thresholds for Metrics
Metrics collected can be compared to predefined values to check if they are exceeding a critical threshold or a warning threshold. Incidents are generated once the threshold is exceeded. To see the thresholds defined for metrics of any target, select Monitoring/Metric and Collection Settings from the Target menu. Here you can set the Critical/Warning thresholds used to generate incidents. You can also change the collection schedule of the metrics here.
For more information on incidents, see: Incidents for an Oracle E-Business Suite Target.

Home Page of the Oracle E-Business Suite System
General Section
The general section gives the following basic details of the Oracle E-Business Suite instance.
Status
The status of the Oracle E-Business Suite system, calculated based on the availability of its member targets that contribute to its availability computation. For more information, see: Changing the Availability Computation.
Configured Components
The count of member targets that fall into the status categories of Up, Down, or Other. You can drill down on a status category to view the targets that currently fall into that category.
System Name
The name of the Oracle E-Business Suite instance.
Version
The version of the Oracle E-Business Suite instance.
Products Installed
The number of products installed in the Oracle E-Business Suite system. You can drill down into Oracle Applications Manager to see the details.
New Internal System Alerts
The number of new System Alerts generated in the Oracle E-Business Suite instance. You can drill down on this number to view the details in Oracle Applications Manager. Note that these System Alerts originate from the alerting infrastructure of Oracle E-Business Suite. These are complementary to the Oracle Enterprise Manager incidents.
Patches Applied
The number of patches applied to the system in the last 24 hours. You can drill down to view the patches in Oracle Applications Manager.
Site Level Profile Options Changed
The number of site level profile options that have changed on the system in the last 24 hours. You can drill down to view the site level profile options in Oracle Applications Manager.
Context Files Edited
The number of AutoConfig context files that was changed on the system in the last 24 hours. You can drill down to view the context files in Oracle Applications Manager.
Monitoring Host
The host of the agent which is monitoring the Oracle E-Business Suite system. This will be the host where the database is running.
Note: The New Internal System Alerts, Patches Applied, Site Level Profile Options Changed, and Context Files Edited metrics are based on information periodically summarized in the Oracle E-Business Suite database by the Oracle Applications Manager Dashboard Collection concurrent program. This program is controlled through the Preferences global link in Oracle Applications Manager. If this program has been disabled in the Oracle E-Business Suite system for any reason, then these metrics will not be updated.
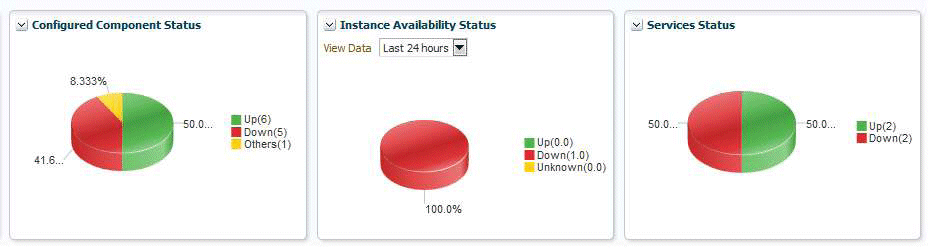
Availability Status Charts
This section has three charts:
-
Status of the Configured Components
-
Historic information about the status of the Oracle E-Business Suite instance. You can choose day, week, or month.
-
Status of the services.
Services
Oracle E-Business Suite and its member targets provide four major services to its customers. They are:
-
Concurrent processing
-
Forms
-
Self-service pages
-
Workflow
All these services are registered with Cloud Control once the successful discovery of the Oracle E-Business Suite target is completed . The services section in the home page of the Oracle E-Business Suite instance has the details of services. Each service has a set of critical components without which the service cannot be provided. The following table lists the critical component of each service.
| Service | Critical components |
|---|---|
| Concurrent Processing |
|
| Workflow Service |
|
| Forms Applications Service |
|
| Self Service Applications Service |
|
Performance of Services
The metrics collected from a service's critical components are used to evaluate the performance of each service. The following table lists the performance metrics for each service.
| Service | Metric | Description |
|---|---|---|
| Concurrent Processing Service | Concurrent Requests Success Rate | Successfully completed requests per hour |
| Concurrent Processing Service | Concurrent Requests Error Rate | Failed requests per hour |
| Forms Service | Forms Response Time | Average response time of forms in milliseconds |
| Forms Service | Forms Requests per Second | Average of number of requests processed by the Forms server per second |
| Forms Service | HTTP Server Request Throughput | Average of number of requests processed by the HTTP server per second |
| Workflow Service | Pending Agent Listener Events | Count of pending agent listener events |
| Workflow Service | Pending Mailer Notification Events | Count of pending mailer notification events |
| Workflow Service | Pending Mailer Notifications | Count of pending mailer notifications |
| Self Service Applications Service | OACore requests per second | Average of number of requests processed by the oacore server per second |
| Self Service Applications Service | HTTP Server Request Throughput | Average of number of requests processed by the HTTP server per second |
Usage by Services
The metrics collected from a service's critical components are used to evaluate the resources used by each service. The following table lists the the usage metrics for each service.
| Service | Metric | Description |
|---|---|---|
| Concurrent Processing Service | Running Requests per Hour | Number of requests running per hour |
| Concurrent Processing Service | Active Service Processes | Number of active services running per hour |
| Forms Service | Forms server CPU usage | Percentage of CPU used by the Forms server |
| Forms Service | HTTP server CPU usage | Percentage of CPU used by the HTTP server |
| Forms Service (Socket Mode) | Total Memory Utilization | Percentage of the total memory used by the Forms process |
| Forms Service (Socket Mode) | Total CPU Utilization | Percentage of CPU used by the Forms process |
| Forms Service (Socket Mode) | Number of Forms Processes | Total number of Forms processes that are running |
| Workflow Service | Background Engine Deferred Items | Number of items deferred by the background engine yet to be processed |
| Self Service Applications Service | OACore CPU usage | Percentage of CPU used by the oacore server |
| Self Service Applications Service | HTTP server CPU usage | Percentage of CPU used by the HTTP server |
Charts for services
You can see charts based on the above performance and usage metrics. Go to the home page of each service and click on the tab Charts.

Incidents for Services
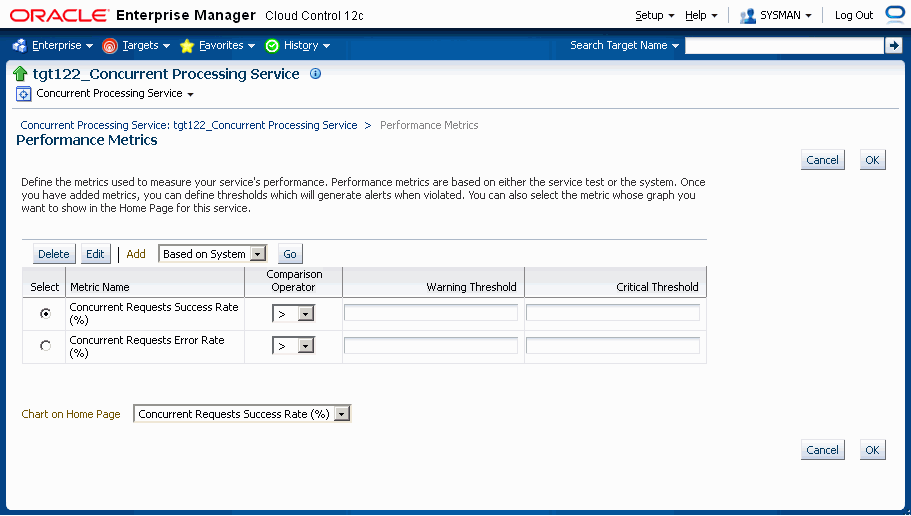
You can set thresholds for tracking the performance and usage of services. Incidents are generated once the metrics exceeds the threshold. To set the threshold, go to the home page of the service and click on the tab Monitoring Configuration. Click on the link Performance Metrics or Usage Metrics. You can set the warning and critical threshold for performance and usage metrics in the respective pages.
The services section in the Oracle E-Business Suite home page shows the details described in the following table:
| Status | Whether the status is up or down |
|---|---|
| System | The Oracle E-Business Suite system whose members are providing this service. |
| Performance Incidents | Number of performance incidents which are Critical or Warning. You can drill down from here to get the details of the incident. |
| Usage Incidents | Number of performance incidents which are Critical or Warning. You can drill down from here to get the details of the incident. |
| Key Components Status | The status of the key components. The service will be down if any of the key components is down. You can drill down from here. |
| Key Components Incidents | Incidents (Critical and Warning) raised against key components of the service. You can drill down from here. |
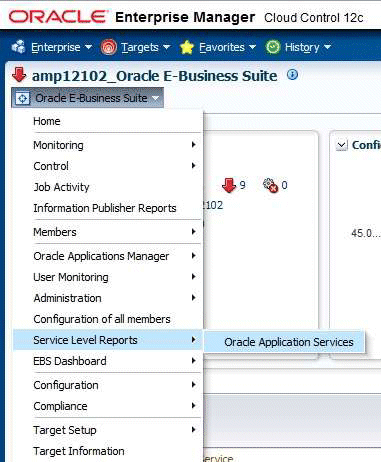
Services Dashboard
Extending the service dashboard feature provided by Cloud Control, Oracle E-Business Suite also has a service dashboard which provides a brief summary of all service-related information. You can access it by selecting Service Level Reports > Oracle Application Services from the target menu.
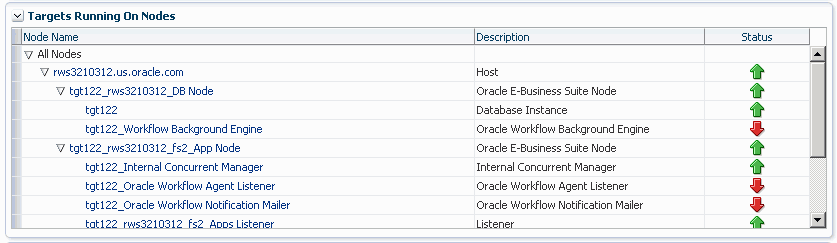
Targets Running on Nodes
This section shows the targets running on each node in which the Oracle E-Business Suite is deployed. The data is shown in a hierarchical way with the host as the topmost parent. The nodes running on that host appear as the immediate children. The individual targets running on each node will appear as the child of each node. If the Oracle E-Business Suite instance features Online Patching, only run edition targets will be shown.
Administration of Oracle E-Business Suite
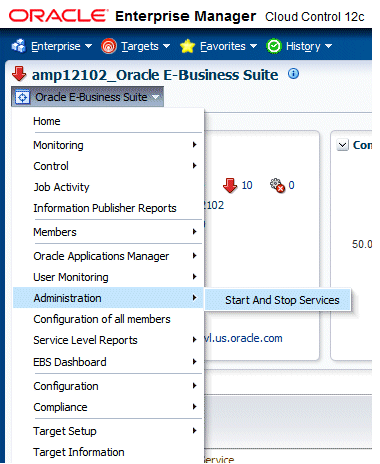
Starting and Stopping Services
You can start and stop the components running on each node using the Administration menu. Select Administration > Start and Stop Services from the target menu. All the application nodes will be shown with the targets running in them. You can select individual target or a node (which means you are selecting all targets running on that node) and start or stop it. ICM does not show up under a specific node because we can start and stop it from any node where it is enabled. If the Oracle E-Business Suite instance features Online Patching, only run editions targets will be shown.
Jobs will be submitted to start and stop services. The details and status of these jobs can be tracked through standard Enterprise Manager Job screens.
Privileges need to start and stop services
An administrator must have the EM_ALL_ADMINISTRATOR role to run the jobs to start and stop components. In addition, an administrator must have the "Start and Stop Services" privilege to start and stop services.
For more information on privileges and roles, see: link : Privileges and Roles for Managing Oracle E-Business Suite.
Credentials that must be set to start and stop services
-
The preferred credential must be set for Oracle E-Business Suite node for the credential set OS Credentials.
-
The preferred credential must be set for Oracle E-Business Suite for the credential set AppsDBCredsSet.
For more information on preferred credentials, see: Setting Oracle E-Business Suite Preferred Credentials.
Configuration of Oracle E-Business Suite
You can get the details of how the Oracle E-Business Suite instance is configured by looking at the configuration metrics collected for the Oracle E-Business Suite target. Select Configuration > Last Collected from the target menu.

Configuration of all members
To see the configuration of each member target of Oracle E-Business Suite you would have to go to the home page of each target and follow the navigation path mentioned above. As this would be inconvenient, the Configuration of all members page simplifies this task. You will get link to see configuration of all members in one place. Select Configuration of all members from the Oracle E-Business Suite target menu.
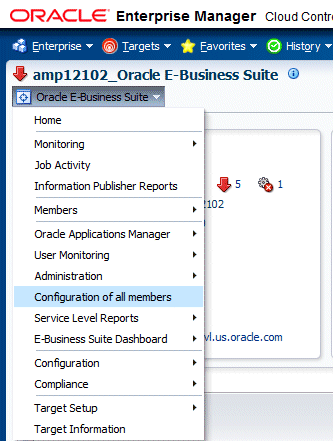
Here you can see the links to see the last collected configuration of all member targets grouped as nodes, host, services etc. You can search for any context variable by clicking the Search Context Variable button. You can also search for patches applied and patch set information.
Comparing Configurations
Comparing configurations is very important while managing Oracle E-Business Suite targets. Benefits include:
-
Find out why two Oracle E-Business Suite instances with the same configuration is exhibiting different behavior.
-
Same Oracle E-Business Suite instance showing different behavior in two different occasions.
-
You can use an Oracle E-Business Suite instance as golden copy to bench mark other instances.
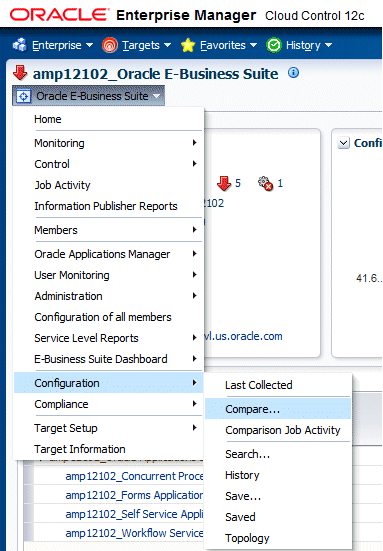
You can compare the configuration of one Oracle E-Business Suite instance with another or the configuration of the same Oracle E-Business Suite instance collected at different times. The same applies to any member target of Oracle E-Business Suite as well. To compare configurations select Configuration > Compare from the target menu.
Incidents for an Oracle E-Business Suite Target
Incidents will be raised if any member of the Oracle E-Business Suite system is down or if any metric exceeded its threshold. The incidents region in the Oracle E-Business Suite instance home page gives an overview of the incidents raised for that instance. You can get the number of incidents grouped by severity. In addition, you can filter incidents based on the type of the incident, such as availability, performance, security, and so on. You can drill down to the details of each incident by clicking on the summary column which takes you to the Incident Manager. Here you can see more details of the event. You can also track and mange the incident from here.
Compliance Standards for Oracle E-Business Suite
The Oracle Enterprise Manager Compliance Management solution provides the capability to define, customize, and manage Compliance Frameworks and Compliance Standards. It also provides tools to evaluate targets and systems for compliance with business best practices in terms of configuration, security, storage, and so on.
Compliance evaluation generates a score for a target which indicates how much the target is compliant with the standard. Violation of a standard can be classified as critical, warning or minor warning.
The management pack includes a set of compliance standards for Oracle E-Business Suite security which will be associated to every Oracle E-Business Suite instance once it is discovered. Evaluation will happen periodically which will ensure that the Oracle E-Business Suite is configured in a secure way.
The following table lists details of the compliance standards shipped along with the compliance rules associated with them.
| Compliance Standard | Rules mapped to the standard | Severity |
|---|---|---|
| Profile Settings | Check if all critical profiles are set correctly. | Critical |
| Profile Settings | Check if other profiles are set correctly. | Warning |
| Profile Settings | Check if no profile is missing. | Critical |
| Change Default Passwords | Checks if any database user with a default password exists. | Critical |
| Change Default Passwords | Checks if any application user with a default password exists. | Critical |
| Secure APPLSYSPUB | Checks if there is any unwanted privilege in the APPLSYSPUB account. | Warning |
| Use Secure Flag on DBC File | Checks if server security is on. | Warning |
| Migrate to Password Hash | Checks if the setting for hashed passwords are on. | Warning |
| Enable Application Tier Secure Socket Layer (SSL) | Checks if Oracle E-Business Suite is configured for HTTPS. | Warning |
| Turn on ModSecurity | Checks if mod security is on. | Warning |
| Encrypt Credit Card Data | Checks for the encryption of credit card data. | Warning |
| Encrypt Credit Card Data | Checks if supplemental credit card data is encrypted or not. | Warning |
| Encrypt Credit Card Data | Checks if enhanced hashing is on or not. | Warning |
The compliance standards region in the home page of the Oracle E-Business Suite instance has the details of the evaluations performed on that instance and how many violations are there. You can click on each standard which will give further details of evaluations per rule. Each standard comes with a recommendation on how to fix the violations for that standard.
Note: Compliance standards will not be set for Oracle E-Business Suite instances discovered using the previous releases of the management pack. You must rediscover an instance to attach compliance standards to it.
Monitoring Current Activity
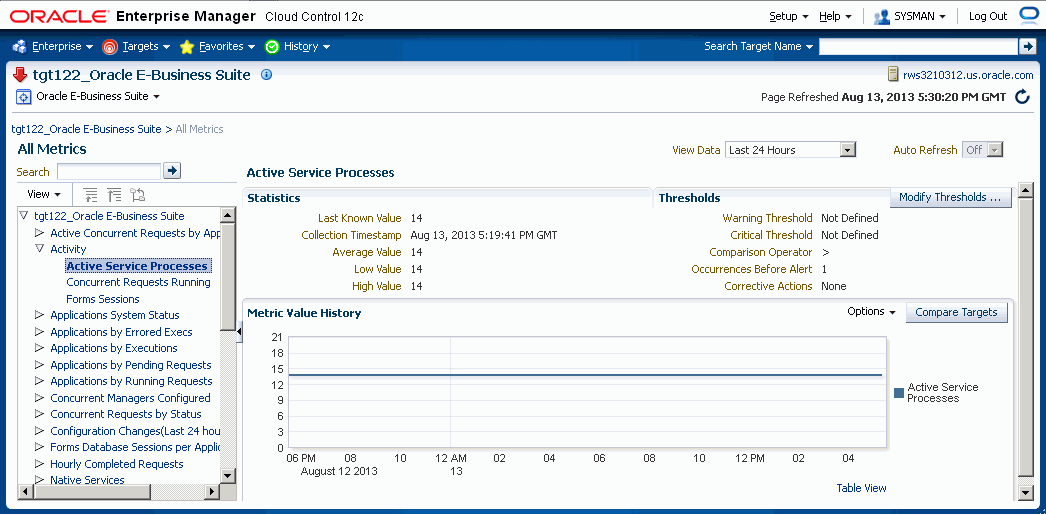
Activity metrics are collected for the Oracle E-Business Suite target. These metrics provide details of current activities going on the Oracle E-Business Suite instance. Select Monitoring/All Metrics from the target menu. Expand the metric named Activity. You can see the trends for service processes, concurrent processing, and Forms.
Monitoring User Sessions
When a user logs in to Oracle E-Business Suite, the system creates sessions in the database identified by a unique session ID, or SID. All of these user sessions are created using the APPS schema credential. Each database session is associated with an Oracle E-Business Suite application user. This feature enables linking the database session with the corresponding application user for monitoring and troubleshooting purposes. You will be able to pinpoint how the Oracle E-Business Suite user opened a database session and whether it is with a concurrent processing, Forms, or Self-Service application.
For information on diagnostic tests for this feature, see: Diagnostic Tests for User Monitoring.
Mandatory Settings
The following settings are mandatory:
Settings in the OMS
Set the preferred credentials of the "Oracle E-Business Suite" target type for the credential set AppsUserCredsSet. You must provide the Oracle E-Business Suite user login credentials.
For information on setting preferred credentials, see: Setting Oracle E-Business Suite Preferred Credentials.
Settings on the Oracle E-Business Suite
-
For the above Oracle E-Business Suite user, assign "LCM_EM_CLIENT" responsibility.
-
Form sessions can be monitored only when the site-level profile Sign-On:Audit Level is set to 'FORM'. The internal name for this profile is 'SIGNONAUDIT:LEVEL'.
Top Sessions
This page will show four bar charts of database sessions triggered by APPS database user.
-
Top waiting sessions: sessions waiting for a database event to trigger to proceed further.
-
Top running SQL statements.
-
Top CPU consuming sessions.
-
Top memory intense sessions.
The level of detail shown in the bar graphs is controlled by properties set in the Preferences page. See: Setting Preferences.
-
Sampling Interval for User Monitoring. By default it is 15 minutes and can be increased up to 60 minutes.
-
Number of Rows in tables of User Monitoring.
You can drill down from the legend to see the details of the session. If the Oracle E-Business Suite user information is available, the Oracle E-Business Suite session details is shown with further drilling down available to the database session details. If the Oracle E-Business Suite user information is not available (that is, the database sessions was triggered by a background process and not by a user), you can drill down to the database session details directly.
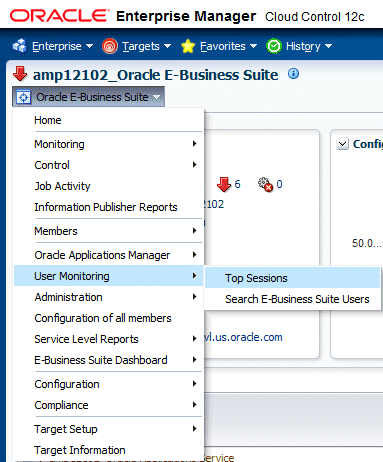
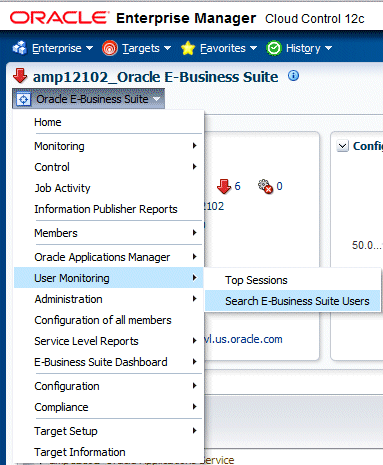
To navigate to the Top Sessions page, select User Monitoring > Top Sessions from the target menu of the Oracle E-Business Suite target.
Searching for User Sessions
You can search for Oracle E-Business Suite user sessions using
Database Session ID - Provide the database session ID and if a match is found with a concurrent program, form or Oracle Application Framework page, the details will be shown with a drilldown facility to the database session details.
Oracle E-Business Suite user name - This search shows all the active concurrent programs, Forms, and Oracle Application Framework pages accessed by the user. It will also show the associated database session ID with drilldown capability.
To navigate to user sessions search, select User Monitoring > Search E-Business Suite User from the target menu of the Oracle E-Business Suite target.
Monitoring JVM Usage
Note: This feature is not supported for Oracle E-Business Suite Release 12.2 in this release.
You can monitor JVM usage parameters which are specific for Oracle E-Business Suite. You can review the following parameters for each of the oacore J2EE containers in which a given Oracle E-Business Suite instance is deployed.
-
Application Module pool - Provides information about all active and leaked application modules.
-
Locked AOLJ Connections - Provides information about all locked and leaked AOL/J connections utilized by applications.
-
Cache Components - Provides information about the cache component utilization by Oracle Application Framework.
Setup Steps
For Release 12 systems, ensure that you have set up the monitoring configuration for each "oacore" OC4J target as follows:
-
In the section Targets Running on Nodes in the Oracle E-Business Suite instance home page, click on the "oacore" OC4J target. This will take you to the home page of the target.
-
On the home page of the oacore OC4J target, Select Target Setup > Monitoring Configuration in the target menu.
-
Enter the OC4J administrator username and password for the "oacore" OC4J in the "Username for Basic authorization" and the "Password for Basic authorization" fields, respectively.
Note: The OC4J administrator username by default is "oc4jadmin" and is specified in the system-jazn-data.xml file under the $INST_TOP/ora/10.1.3/j2ee/oacore/config directory. The oc4jadmin password by default is set to a randomized value during installation and will need to be reset as in the following example:
In the $INST_TOP/ora/10.1.3/j2ee/oacore/config/system-jazn-data.xml file, set the value of the "credentials" element for oc4jadmin user to your chosen password preceded by a ! character. For example:
<user>
<name>oc4jadmin</name>
<display-name>OC4J Administrator</display-name>
<description>OC4J Administrator</description>
<credentials>[new password]</credentials>
</user>
After saving system-jazn-data.xml, restart the oacore OC4J. This step encrypts the updated password in system-jazn-data.xml.
-
Click OK to save the information.
For both Release 11i and Release 12, ensure that the Application Server passwords are set as well, because Oracle Enterprise Manager expects these passwords to be set for metrics collection for the JVM targets.
Note: If you do not set up monitoring for JVM usage after discovery, then metric collection errors will be reported for the target type 'oracle_apps_jvm'. You should either set up monitoring as described above, or disable the metric collection if you do not want to monitor Applications JVM Usage.
To disable the metric collection, run the following commands:
emcli modify_collection_schedule -targetType="oracle_apps_jvm"
-targetNames="<targetName1>,<targetName2>" -collectionName="LockedAOLJConn"
-collectionStatus="Disabled" -preview=N
emcli modify_collection_schedule -targetType="oracle_apps_jvm"
-targetNames="<targetName1>,<targetName2>" -collectionName="AMPoolCount"
-collectionStatus="Disabled" -preview=N
emcli modify_collection_schedule -targetType="oracle_apps_jvm"
-targetNames="<targetName1>,<targetName2>" -collectionName="CachedObjects"
-collectionStatus="Disabled" -preview=N
To find out the oracle_apps_jvm target names associated with an Oracle E-Business Suite instance, go to the All Targets page and search for <ebs_instance_name>%oacore_jvm_1_apps
In case if you want to enable it back, run the following commands:
./emcli modify_collection_schedule -force -targetType="oracle_apps_jvm"
-targetNames="<targetName1>,<targetName2>" -collectionName="LockedAOLJConn"
-collectionStatus="Enabled" -preview=N -freqType="Minute" -freqValue="1"
./emcli modify_collection_schedule -force -targetType="oracle_apps_jvm"
-targetNames="<targetName1>,<targetName2>" -collectionName="AMPoolCount"
-collectionStatus="Enabled" -preview=N -freqType="Minute" -freqValue="1"
./emcli modify_collection_schedule -force -targetType="oracle_apps_jvm"
-targetNames="<targetName1>,<targetName2>" -collectionName="CachedObjects"
-collectionStatus="Enabled" -preview=N -freqType="Minute" -freqValue="1"
Configuring Monitoring of HTTPS/SSL Targets
To configure Cloud Control to monitor Oracle E-Business Suite middle tiers that are running in SSL, each Management Agent must be able to authenticate the middle tier's SSL certificate against its Certificate Authority (CA).
Assumed Prerequisites
The HTTP Server that ships with Oracle E-Business Suite is already configured and verified to be running in SSL mode.
Basic knowledge of SSL certificates and their configuration.
Obtaining the CA certificate(s)
-
In Microsoft Internet Explorer, connect to the HTTPS URL of the Web site you are attempting to monitor.
-
Double-click the lock icon at the bottom of the browser screen which indicates that you have connected to a secure Web site. The browser displays the Certificate dialog box, which describes the certificate used for this Web site. Other browsers offer a similar mechanism to view the certificate details of a Web site.
-
Click the Certificate Path tab and select the first entry in the list of certificates.
-
Click View Certificate to display a second Certificate dialog box.
-
Click the Details tab on the Certificate window.
-
Click Copy to File to display the Certificate Manager Export wizard.
-
In the Certificate Manager Export wizard, select Base64 encoded X.509 (.CER) as the format you want to export and save the certificate to a text file with an easily identifiable name, such as beacon_certificate.cer.
-
Open the certificate file using a text editor.
Add the Certificate to the Management Agent(s)
Each Management Agent that monitors an Oracle E-Business Suite middle-tier must have the CA certificate added to it as follows:
-
Locate the b64InternetCertificate.txt file in the following directory of Agent Home of the Beacon host: $AGENT_ORACLE_HOME/sysman/config (This file contains a list of Base64 Certificates).
-
Edit the b64InternetCertificate.txt file and add the contents of the certificate file you just exported to the end of the file, taking care to include all the Base64 text of the certificate including the BEGIN and END lines.
-
Repeat for each Management Agent.
Restart Each Management Agent
Each Management Agent should be restarted:
> $AGENT_ORACLE_HOME/bin/emctl stop agent
> $AGENT_ORACLE_HOME/bin/emctl start agent
Cloud Control may not immediately pick up the change. You may want to give it a few minutes for the agent to run a metrics collection and upload them to the Oracle Management Server (OMS). You can click on the Refresh icon in the upper right of the Oracle E-Business Suite home page (by the Page Refreshed time stamp) in the Cloud Control console to get updated information.
Importing an Oracle E-Business Suite SSL Certificate to the OMS
Oracle Application Management Pack for Oracle E-Business Suite invokes REST services deployed on Oracle E-Business Suite using java.net.HttpURLConnection. The User Monitoring and Diagnostics features use REST services. If the Oracle E-Business Suite instance is SSL-enabled, the SSL certificate must be exported from Oracle E-Business Suite and imported to the trust keystore of the Oracle WebLogic Server (WLS) that runs the OMS. Below are the steps to do this action:
-
Find out the trust keystore of WebLogic Server.
-
Open the WebLogic Server Administration Console by using the following steps.
-
Go to the All Targets page of Enterprise Manager Grid Control
-
Select the target type Oracle WebLogic Server.
-
Select the WebLogic Server instance that runs the OMS.
-
The target home page will contain the link to open the Administration Console.
-
-
From the Administration Console, select Servers.
-
Select the server that runs the OMS.
-
Click on the subtab Keystores under Configuration.
-
Look for the Java Standard Trust Keystore which points to the location of the keystore.
-
Run the command to import the certificate using the keytool utility. Use the JDK that comes with WebLogic Server.
JDK_HOME/bin/keytool -importcert -alias oracle_ebs_<ebs instance name> -trustcacerts -file <location of EBS SSL certificate> -keystore <location of key store>
Refer to the Java SE documentation on the command keytool for information on passwords.
-
Restart the OMS.
For more information on configuring identity and trust for WebLogic Server, see the Oracle Fusion Middleware manual Securing Oracle WebLogic Server.
A Note on Oracle Forms 6i
Even though your Oracle Forms configuration may be running in SSL, Cloud Control does not require any additional configuration to monitor Forms. The reason for this is that it uses a different method for determining the Forms Server status which does not require SSL communications with the server.
Re-Configuring SSL for Oracle E-Business Suite
If you have implemented SSL or deactivated SSL after the initial discovery of that Oracle E-Business Suite instance in Cloud Control, you will have to re-configure Cloud Control to monitor the new URL with the new protocol. There are two ways to do this:
-
The Easy Way: If you don't care about the metrics data that has been collected for the instance, you can simply remove the instance from Cloud Control and rediscover it.
-
The Hard Way: If metrics history is important, then each HTTP Server Target has to be re-configured to point to the new URL, port, and protocol.
Re-configuring Release 11i Apache Targets
-
Select the Release 11i instance in the Oracle Applications targets tab.
-
Under Applications Nodes Status, expand the Context link that corresponds with your SSL middle tier.
-
Select the Apache target (description: "HTTP Server for Oracle Applications 11i").
-
From the Target menu, select Target Setup, then select Monitoring Configuration.
-
Edit the Protocol and Port as appropriate.
-
Click OK.
Re-configuring Release 12 Application Servers
-
Select the Release 12 instance in the Oracle Applications targets tab.
-
Under Applications Nodes Status, expand the Context link that corresponds with your SSL middle tier.
-
Select the target described as "Oracle Application Server".
-
Navigate to the Target menu (labeled "Application Server"), and select Change Application URL.
-
Edit the "URL to measure application response" as appropriate.
-
Click OK.
References
-
My Oracle Support (formerly OracleMetaLink) Knowledge Document 123718.1 - A Guide to Understanding and Implementing SSL with Oracle Applications Release 11i
-
My Oracle Support Knowledge Document 376700.1 - Enabling SSL in Oracle Applications Release 12
-
My Oracle Support Knowledge Document 391652.1 - Problem: Accessing Web application gives sun.security.validator.ValidatorException: No trusted certificate
-
Oracle Enterprise Manager Cloud Control Administrator's Guide
Drilling Down to Oracle Applications Manager
You can drill down to the Oracle Application Manager of each Oracle E-Business Suite instance from Oracle E-Business Suite plug-in. Select Oracle Applications Manager from the target menu.
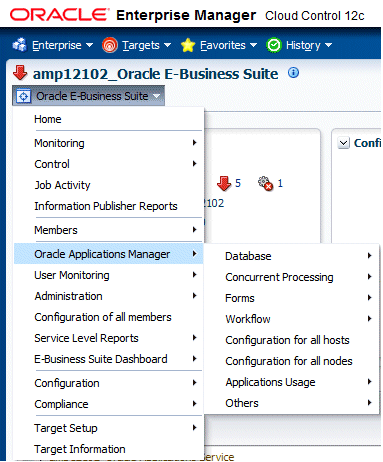
You can go to the following sections and its subsections in Oracle Applications Manager:
-
Database
-
Concurrent Processing
-
Forms
-
Workflow
-
Configurations of all hosts
-
Configurations of all nodes
-
Applications Usage
-
Others
Concurrent Processing Dashboard
The Concurrent Processing Dashboard provides you with details in concurrent processing in your Oracle E-Business Suite system. The dashboard gives you a complete picture of concurrent processing on your system, both current activities as well as usage statistics.
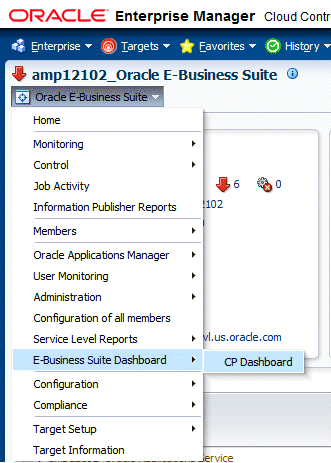
To navigate to the Concurrent Processing Dashboard, select E-Business Dashboard > CP Dashboard from the target menu of the Oracle E-Business Suite target.
You can add a user-defined concurrent program as a target to the Oracle E-Business Suite composite target. You can then monitor related activities of the registered individual concurrent programs for your own specified thresholds.
You can also add a user-defined concurrent manager as a target to the Oracle E-Business Suite composite target. You can then monitor related activities of the registered individual concurrent managers for your own specified thresholds.
Overview Tab

The General region lists the status of the Concurrent Processing Service
-
Status - The status is linked to the Concurrent Processing Service home page.
-
Active Service Processes - Number of active service processes.
-
User-defined Concurrent Program Targets - Defining these targets is described in a later section.
-
Configured Concurrent Managers - The number of configured concurrent managers.
The Hourly Completed Requests region shows a pie chart for requests by status (Successful, Warning, and Errored).
The Activity Summary graph illustrates active requests in the following statuses
-
Pending Normal
-
Pending Standby
-
Running
The Components region lists components of the Concurrent Processing service. The table shows the following for each component:
-
Name
-
Type
-
Status
-
Incidents
-
Host
The Incidents region lists any incidents that were triggered recently, with the following information for each:
-
Severity
-
Metric
-
Target Name
-
Target Type
-
Incident Triggered
-
Last Value
-
Last Checked
At the bottom of the dashboard are Related Links:
The first three links provide metrics on requests and processes:
-
Hourly Completed Requests
-
Processes and Requests per Concurrent Manager
-
Active Concurrent Requests by Application
The last three links take you to Oracle Applications Manager pages for the Oracle E-Business Suite instance:
-
Concurrent Request Runaways
-
Concurrent Processing Reports
-
Concurrent Processing Charts
Current Activity Tab
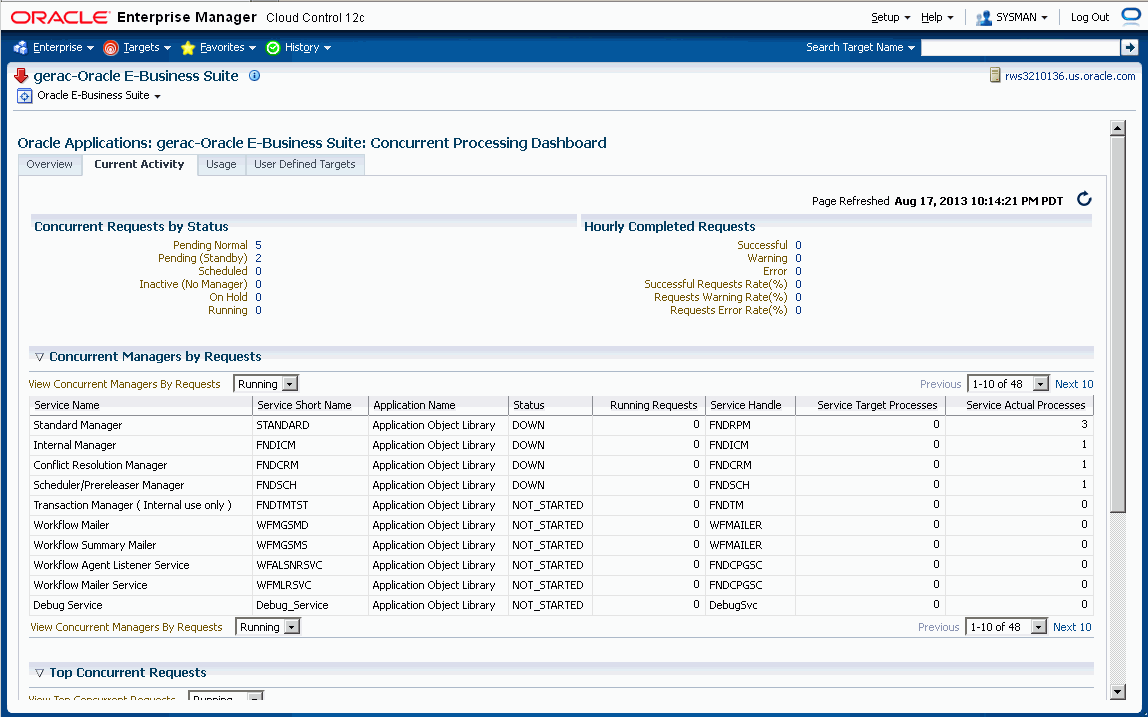
The Concurrent Requests by Status region lists the number of requests for each status:
-
Pending Normal
-
Pending (Standby)
-
Scheduled
-
Inactive (No Manager)
-
On Hold
-
Running
Click on the number for a status to find out more about the metric trend.
The Hourly Completed Requests region lists statistics for requests that have completed in the past hour, including:
-
Successful
-
Warning
-
Error
-
Successful Requests Rate (%)
-
Requests Warning Rate (%)
-
Requests Error Rate (%)
Click on the number for each statistic to find out more details.
The Concurrent Managers by Requests lists all concurrent managers, in order of the number of requests it has in the specified status, either Running or Pending.
With "Running" selected, the following is shown for each concurrent manager:
-
Service Name
-
Service Short Name
-
Application Name
-
Status
-
Running Requests
-
Service Handle
-
Service Target Processes
-
Service Actual Processes
With "Pending" selected, the following is shown for each concurrent manager:
-
Service Name
-
Service Short Name
-
Application Name
-
Status
-
Normal Pending Requests
-
Standby Pending Requests
-
Service Handle
-
Service Target Processes
-
Service Actual Processes
The Top Concurrent Requests region shows the top ten (10) requests for the specified status of Running, Pending, or Scheduled.
-
Running - These are sorted by running time in descending order.
-
Pending - These are sorted by running time in descending order.
-
Scheduled - These are sorted by their scheduled start time.
The Top Applications region lists the top ten (10) applications for running requests or pending requests, as specified.
The Top Users region lists the top ten (10) users by number of running or pending requests, as specified.
Usage Tab
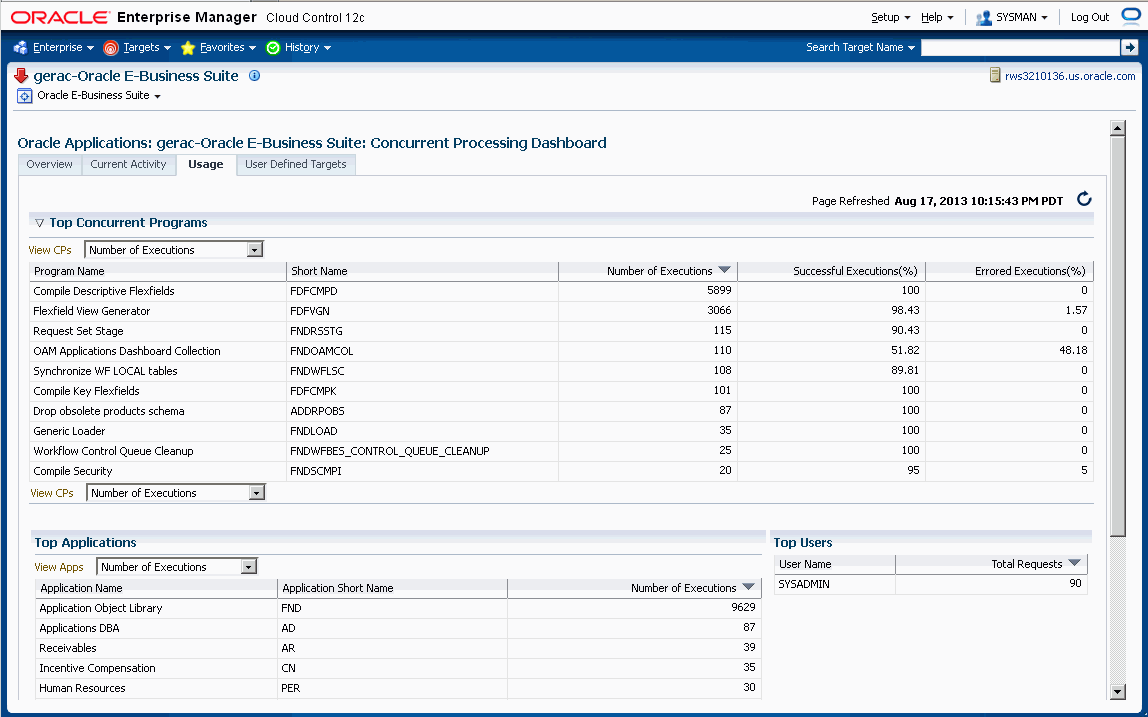
This tab provides a summary of how the concurrent programs and managers have been utilized over a period of time.
The top ten (10) concurrent requests for the following categories are listed:
-
Number of executions - For this category, the total number of executions, the percentage (%) of successful executions, and the percentage (%) of errored executions are shown.
-
Number of failed executions - The number of executions, percentage (%) of failed executions, and percentage (%) of errored executions are shown.
-
Average run time in minutes - The number of executions, average running time (minutes), and total running time (minutes) are shown.
-
Total run time in minutes - The top ten (10) programs with the highest maximum running time are shown. For each program listed, the number of executions, total running time (minutes) and percentage (%) of successful executions are shown.
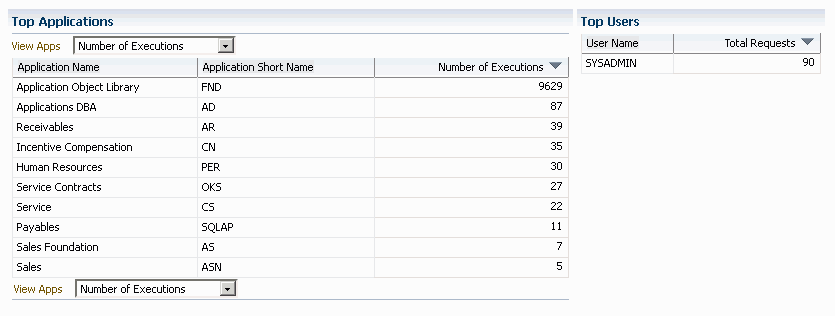
The top ten (10) applications for the following categories are listed:
-
Number of executions
-
Number of failed executions
The top ten (10) users by total number of requests are also listed, in descending order of number of requests.
User-Defined Targets Tab
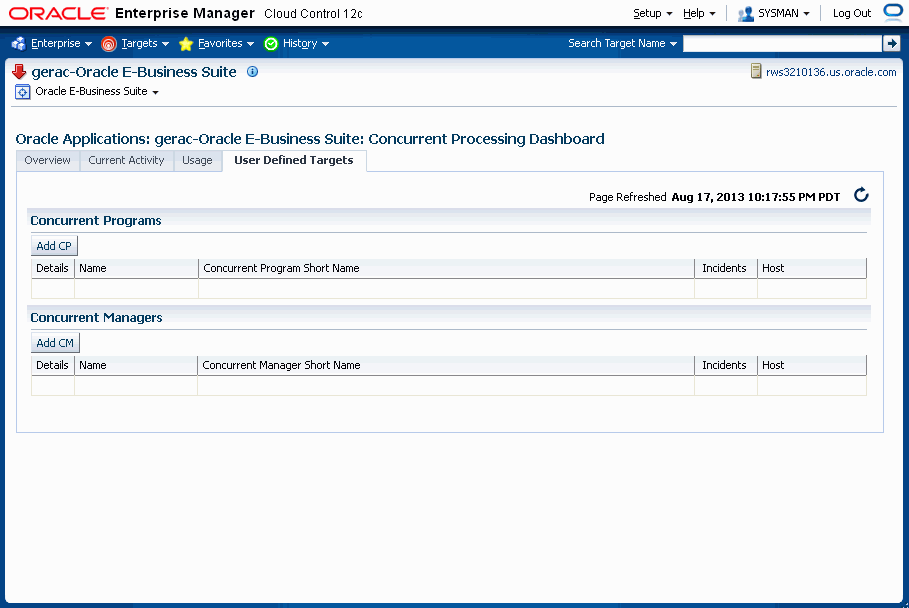
You can add concurrent managers and programs as targets to monitor. Use this tab to get details about these targets as well as add more custom targets.
Concurrent Programs
For custom concurrent program targets, the following columns are shown:
-
Name
-
Concurrent Program Short Name
-
Incidents
-
Host
Click on "Show" in the Details column to see the following metrics for the given concurrent program target. (More details can be seen from the Target home page > All Metrics):
-
Number of Concurrent Requests by Status
-
Number of Hourly Completed Requests
-
Requests Completed with Error
-
Long-Pending Requests
-
Long-Running Requests
Use the Add button under Concurrent Programs to add a new program target.
Concurrent Managers
For concurrent manager targets, the following columns are shown:
-
Name
-
Concurrent Manager Short Name
-
Incidents
-
Host
Click on "Show" in the Details column to see the following for the given concurrent manager target:
-
Active Processes
-
Running Requests
-
Pending Requests
Use the Add button under Concurrent Managers to add a new manager target.
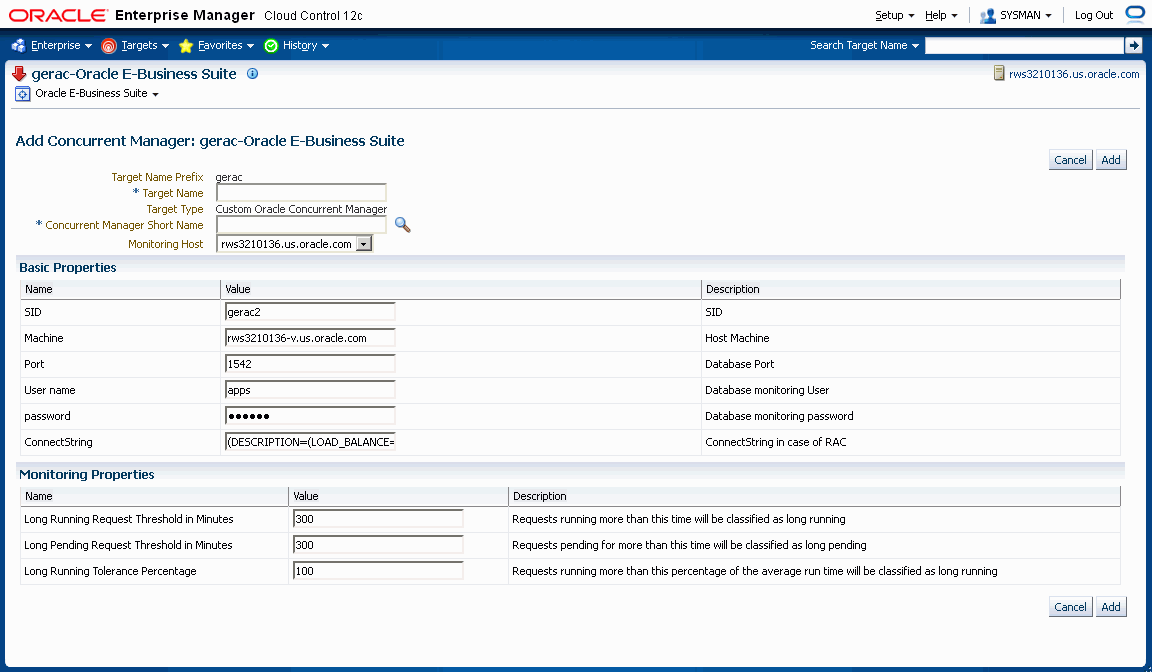
Adding a Concurrent Program Target
You can add a concurrent program custom target so that the system will collect metrics on activity and usage for the concurrent program.
Note: You cannot add a custom concurrent program target using Internet Explorer 8. Please use a different version, or different browser such as Mozilla Firefox.
-
To add a concurrent program custom target, navigate to the Concurrent Processing Dashboard, User Defined Targets tab, and click Add under Concurrent Programs.
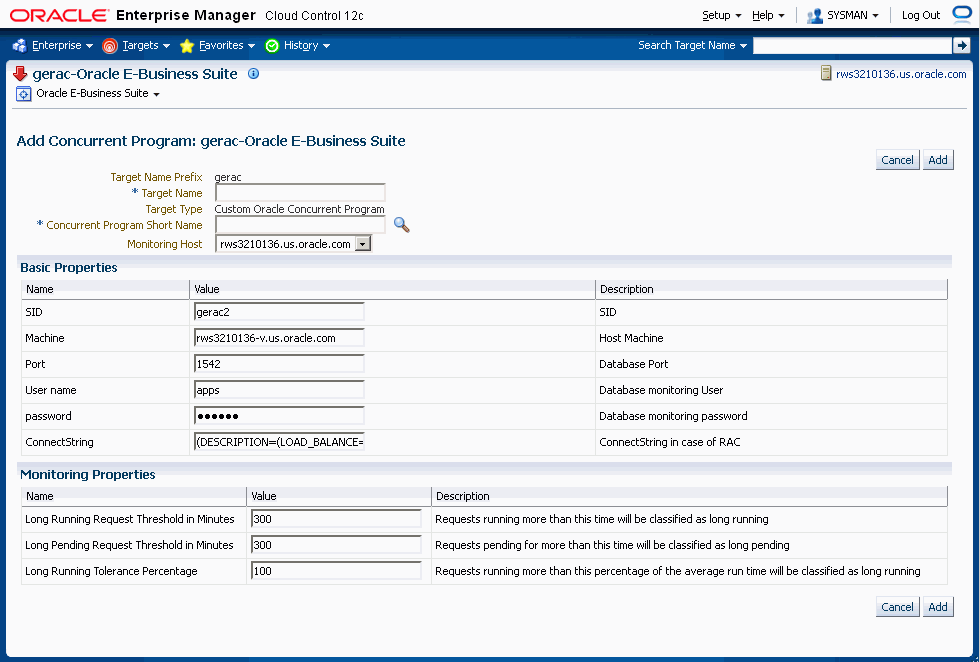
-
For your new target, define the following:
-
Target Name Prefix - This value is determined by the system based on the instance name and cannot be updated.
-
Target Name - Enter in a target name "suffix". The actual target name will be composed of the Target Name Prefix (above) and the value of this field.
-
Target Type - The system automatically provides the value "Custom Oracle Concurrent Program".
-
Concurrent Program Short Name - Use the LOV icon to search for and select the program short name. In searching for the program name you can search by concurrent program short name, concurrent program name, or application.
-
Monitoring Host
For the Basic Properties region, values for the following should default in. These values are used as credentials by the target for metrics collection:
-
SID
-
Machine
-
Port
-
(Database) User name
-
(Database) Password
-
ConnectString
-
-
For metrics collection, you need to define the thresholds for several metrics. Define instance parameters that will be used to categorize requests for the following:
A request will be termed Long Pending if it is in Pending status for longer than the "Long Pending Request Threshold In Minutes".
A request will be considered Long Running if it runs for longer than the "Long Running Request Threshold In Minutes" and (1+0.1*"Long Running Tolerance Percentage")*Average Running Time of the Concurrent Program.
-
When you are done, click Add to add the target.
Custom Concurrent Program Target Metrics
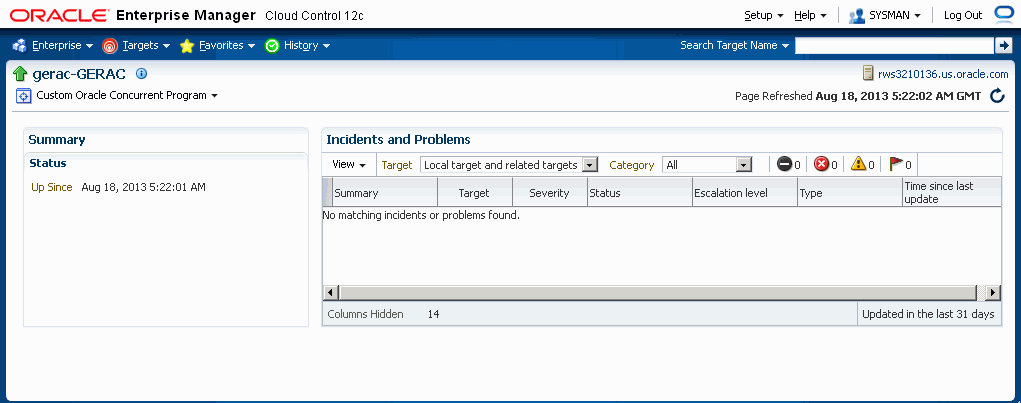
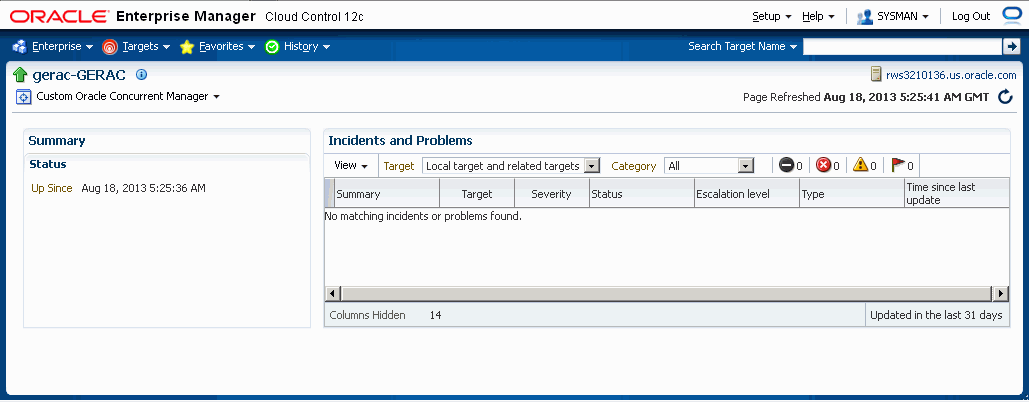
Once you have added a custom concurrent program target, you can monitor it. It should be listed on the User Defined Targets tab. Click on its name link to view details.
Click on the Show link under Details for links to drill down on the following:
-
Number of Concurrent Requests by Status
-
Number of Hourly Completed Requests
-
Requests Completed with Error
-
Long Pending Requests
-
Long Running Requests
From here, you can access the metrics collected for this target by navigating to Target menu > Monitoring > All Metrics. The collected metrics are listed below.
Metrics Collected
The following metrics are collected:
Basic Information
This page lists metrics for the following:
-
Requests Completed Successfully
-
Requests Completed with Warnings
-
Requests Completed with Errors
-
Minimum Run Time
-
Maximum Run Time
-
Average Run Time
Concurrent Requests by Status
The numbers for requests in each status below are listed.
-
Concurrent Requests Pending (Normal)
-
Concurrent Requests Pending (Standby)
-
Concurrent Requests Scheduled
-
Concurrent Requests Inactive (No Manager)
-
Concurrent Requests Inactive (On Hold)
-
Concurrent Requests Running
Hourly Completed Requests
-
Concurrent Requests Completed Successfully
-
Concurrent Requests Completed With Warning
-
Concurrent Requests With Error
-
Concurrent Requests Successful Requests Rate (%)
-
Concurrent Requests Warning Rate (%)
-
Concurrent Requests Error Rate (%)
Long Pending Requests
-
Request ID
-
Concurrent Program Short Name
-
Concurrent Program Name
-
Request Start Date
-
Username
-
Phase
-
Status
-
Pending Time
-
Concurrent Manager
Long Running Requests
-
Request ID
-
Concurrent Program Short Name
-
Concurrent Program Name
-
Request Start Date
-
Username
-
Phase
-
Status
-
Running Time
-
Concurrent Manager
Pending Requests
-
Request ID
-
Concurrent Program Short Name
-
Concurrent Program Name
-
Request Start Date
-
Username
-
Phase
-
Status
-
Pending Time
-
Concurrent Manager
Requests Completed with Error
-
Request ID
-
Concurrent Program Short Name
-
Concurrent Program Name
-
Request Start Date
-
Username
-
Phase
-
Status
-
Execution Time
Requests Completed with Warning
-
Request ID
-
Concurrent Program Short Name
-
Concurrent Program Name
-
Request Start Date
-
Username
-
Phase
-
Status
-
Execution Time
Running Requests
-
Request ID
-
Concurrent Program Short Name
-
Concurrent Program Name
-
Request Start Date
-
Username
-
Phase
-
Status
-
Running Time
-
Concurrent Manager
Adding a Concurrent Manager Target
You can add a concurrent manager custom target so that the system will collect metrics on activity and usage for requests run by the concurrent manager.
-
To add a concurrent manager custom target, navigate to the Concurrent Processing Dashboard > User Defined Targets tab, and click Add under Concurrent Manager.
-
For your new target, define the following:
-
Target Name Prefix - This value is determined by the system based on the instance name and cannot be updated.
-
Target Name - Enter in a target name "suffix". The actual target name will be composed of the Target Name Prefix (above) and the value of this field.
-
Target Type - The system automatically provides the value "Custom Oracle Concurrent Manager".
-
Concurrent Manager Short Name - Use the LOV icon to search for and select the concurrent manager short name. In searching for the manager name you can search by concurrent manager short name, concurrent manager name, or application.
-
Monitoring Host
For the Basic Properties region, values for the following should default in. These values are used as credentials by the target for metrics collection:
-
SID
-
Machine
-
Port
-
(Database) User name
-
(Database) Password
-
ConnectString
-
-
For metrics collection, you need to specify values for three Instance Properties that will be used to categorize requests for the following:
A request will be termed Long Pending if it is in Pending status for longer than the "Long Pending Request Threshold In Minutes".
A request will be considered Long Running if it runs for longer than the "Long Running Request Threshold In Minutes" and (1+0.1*"Long Running Tolerance Percentage")*Average Running Time of the Concurrent Program.
You can also change these properties by clicking the "Monitoring Configuration" link on the Target Home page.
-
When you are done, click Add to add the target.
Monitoring a Custom Concurrent Manager Target
Once you have added a custom concurrent manager target, you can monitor for it. It should be listed on the User Defined Targets tab. Click on its name link to view details.
From here, you can also monitor the metrics for this target by navigating to Target menu > Monitoring > All Metrics.
Active Processes
-
Target Node
-
OS Process ID
-
Session ID
-
Process Status
Pending Requests
-
Request ID
-
Concurrent Program Short Name
-
Concurrent Program Name
-
Request Start Date
-
Username
-
Phase
-
Status
-
Pending Time
Running Requests
-
Request ID
-
Concurrent Program Short Name
-
Concurrent Program Name
-
Request Start Date
-
Username
-
Phase
-
Status
-
Running Time
Concurrent Processing Metrics
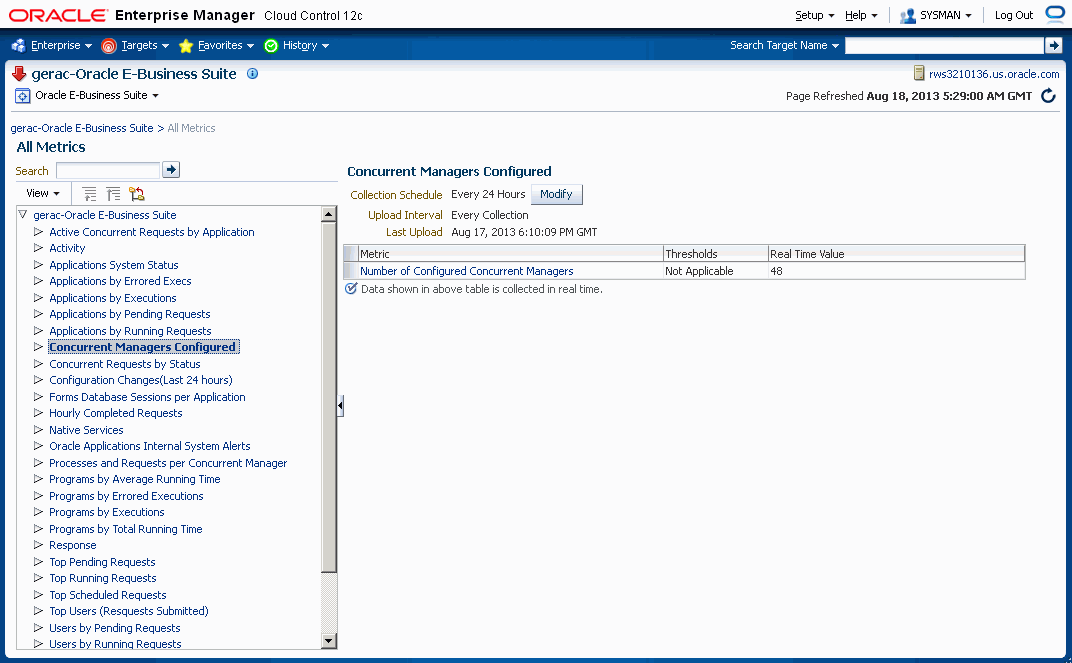
This section lists the concurrent processing metrics available from the All Metrics page. Navigate to the All Metrics page by selecting Target menu > Monitoring > All Metrics.
For each type of metric below, the details listed for each record are shown.
Active Concurrent Requests by Application
-
Application Short Name
-
Application Name
-
Non-Repeating Pending Requests (Normal and Standby)
-
Repeating Pending Requests (Normal and Standby)
-
Non-Repeating Running Requests
-
Repeating Running Requests
Applications by Errored Executions
-
Application Short Name
-
Application Name
-
Total Executions
-
Errored Executions
-
Errored Executions (%)
Applications by Executions
-
Application Short Name
-
Application Name
-
Total Executions
-
Successful Executions (%)
-
Errored Executions (%)
Applications by Pending Requests
-
Application Short Name
-
Application Name
-
Number of Pending Requests
Applications by Running Requests
-
Application Short Name
-
Application Name
-
Number of Running Requests
Programs by Average Running Time
-
Concurrent Program Name
-
User Concurrent Program Name
-
Total Executions
-
Average Running Time
-
Maximum Running Time
Programs by Errored Executions
-
Concurrent Program Name
-
User Concurrent Program Name
-
Total Executions
-
Total Executions (Errored)
-
Executions Errored (%)
Programs by Executions
-
Concurrent Program Name
-
User Concurrent Program Name
-
Total Executions
-
Successful Executions (%)
-
Errored Executions (%)
Programs by Total Running Time
-
Concurrent Program Name
-
User Concurrent Program Name
-
Total Executions
-
Total Running Time
-
Successful Executions (%)
Top Pending Requests
-
Request ID
-
Program Name
-
Program Short Name
-
Request Start Date
-
Pending Time
-
User Name
-
Manager Name
-
Phase
-
Status
Top Running Requests
-
Request ID
-
Program Name
-
Program Short Name
-
Request Start Date
-
Running Time
-
User Name
-
Manager Name
-
Phase
-
Status
Top Scheduled Requests
-
Request ID
-
Program Name
-
Program Short Name
-
Request Start Date
-
Scheduled to Run In (Minutes)
-
User Name
-
Manager Name
-
Phase
-
Status
Top Users (Requests Submitted)
-
User Name
-
Number of Requests
Users by Pending Requests
-
User Name
-
Number of Pending Requests
Users by Running Requests
-
User Name
-
Number of Running Requests
Setting Long Running and Long Pending Requests Parameters for Metrics and Incidents
Oracle Application Management Pack for Oracle E-Business Suite allows you to define parameters for long running and long pending requests. Follow the procedure below to do so.
-
From the Concurrent Processing Dashboard, add a custom concurrent program or concurrent manager target.
-
For the custom target, enter in values for these fields:
-
Long Pending Request Threshold in Minutes
-
Long Running Request Threshold in Minutes
-
Long Running Tolerance Percentage
The three parameters above are instance parameters for categorizing a request as long running or long pending.
A request will be considered long pending if it is pending for more than the "Long Pending Threshold in Minutes" value.
A request will be considered long running if it runs for more than the "Long Running Request Threshold in Minutes" value AND for longer than (1 + 0.01*[Long Running Tolerance Percentage]*[Average Running Time of the Concurrent Program]).
-
-
After you have set these parameters, you can go to the All Metrics page to see these categories listed. Navigate to the All Metrics page by navigating to the Target Menu, selecting Monitoring, then selecting All Metrics.
For Long Pending Requests, the following details are available through drilling down:
-
Request ID
-
Concurrent Program Short Name
-
Concurrent Program Name
-
Request Start Date
-
Username
-
Phase
-
Status
-
Pending Time
-
Concurrent Manager
For Long Running Requests, the following are available through drilling down:
-
Request ID
-
Concurrent Program Short Name
-
Concurrent Program Name
-
Request Start Date
-
Username
-
Phase
-
Status
-
Running Time
-
Concurrent Manager
For Long Running and Long Pending Requests, you can drill down to get a count for each.
-
-
On the same All Metrics page, click on Metric and Policy Settings to edit the incident threshold for long pending and long running requests. Choose to view "All Metrics" from the View dropdown list and set the incidents count for Long Pending Requests and Long Running Requests.